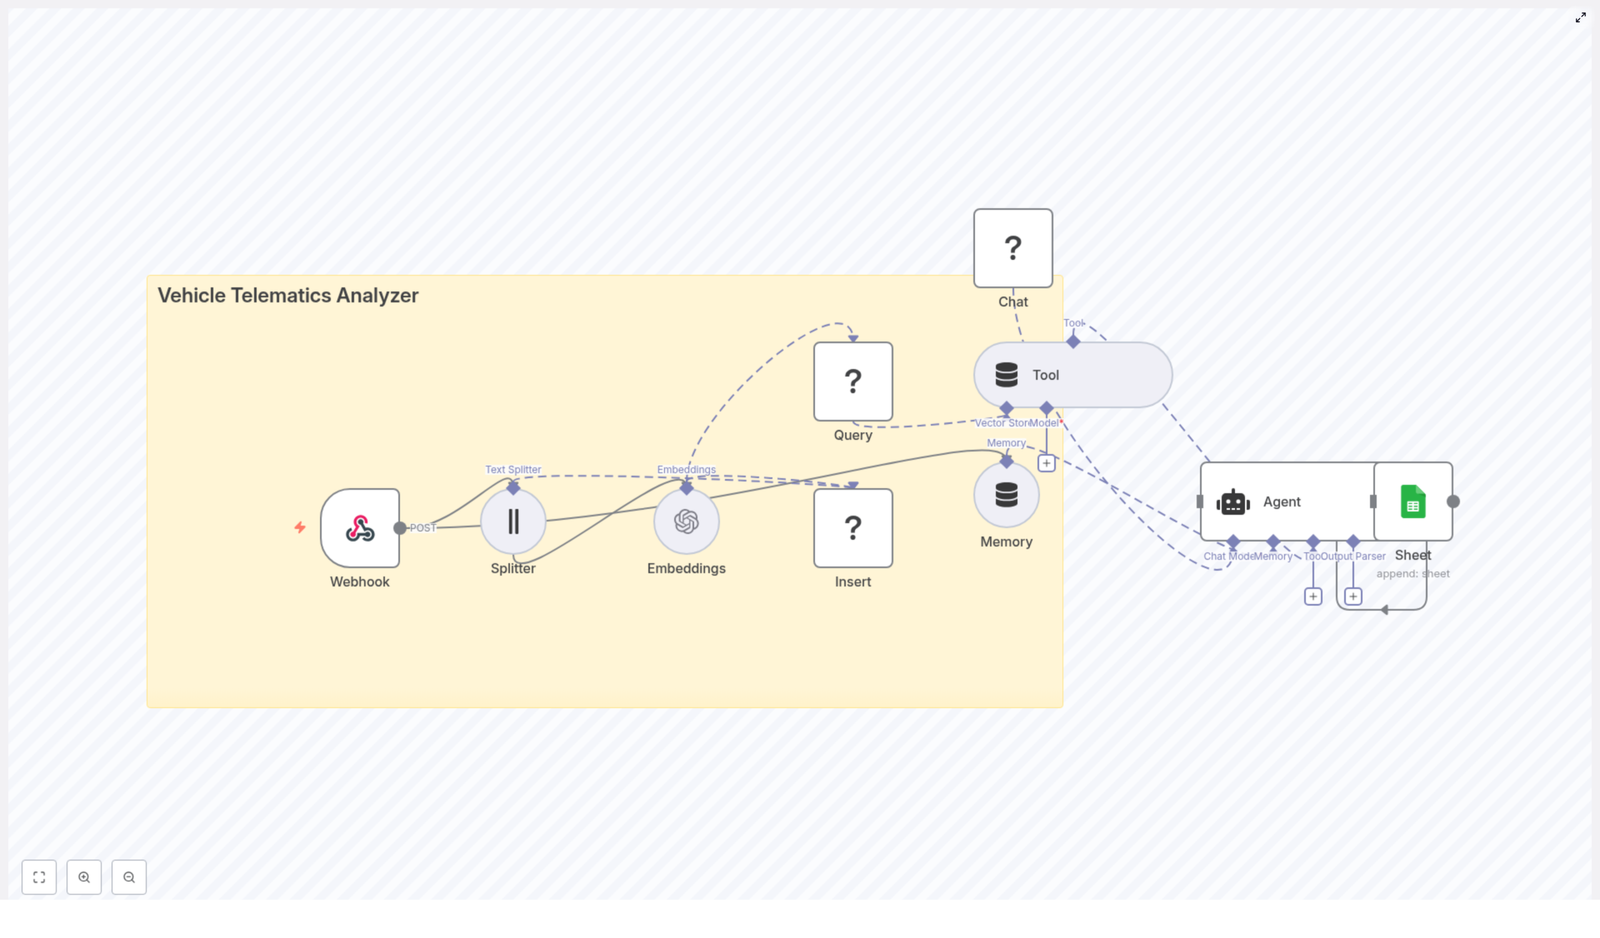
Build a Vehicle Telematics Analyzer with n8n
Imagine you are responsible for a fleet of vehicles and your telematics system is sending you an endless firehose of GPS data, engine codes, trip logs, and mysterious error messages that look like they were written by a very anxious robot. You copy, paste, search, scroll, repeat. Every. Single. Day.
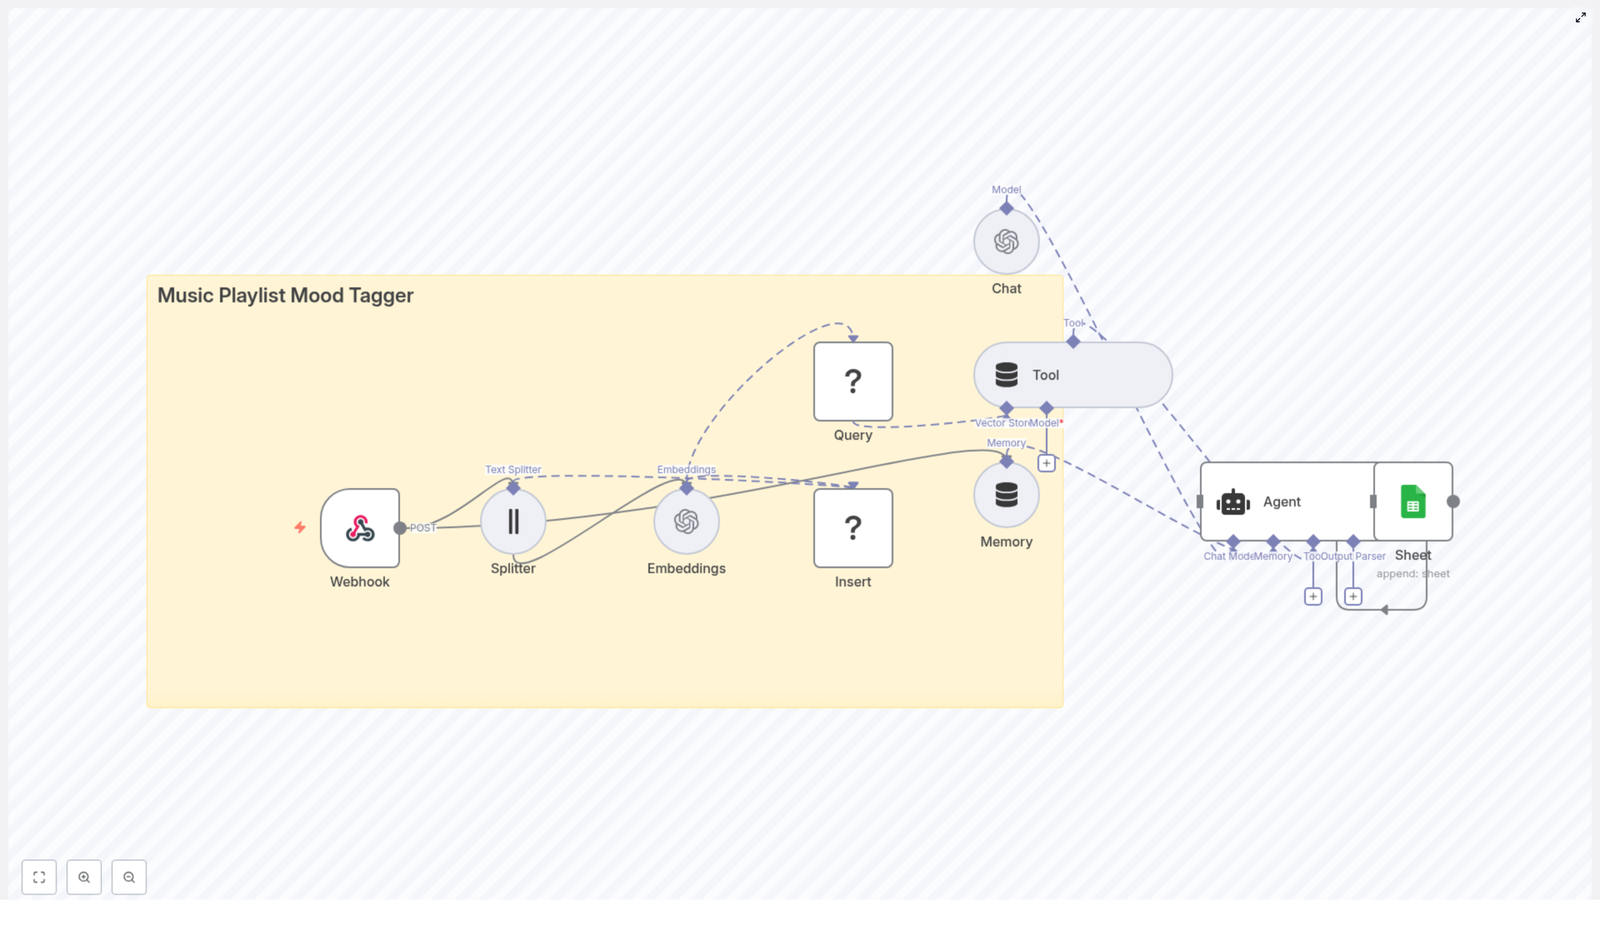
If that sounds familiar, this n8n workflow template is your new best friend. The “Vehicle Telematics Analyzer” workflow takes all that raw telemetry, slices it into useful pieces, stores it in a Redis vector database, and lets an AI agent make sense of it. It then logs the results neatly into Google Sheets so you can actually read what is going on without digging through a mountain of JSON.
In other words, you get to stop doing repetitive manual analysis and let automation handle the boring parts.
What this n8n Vehicle Telematics Analyzer actually does
This workflow is designed as an end-to-end telematics analysis pipeline. It:
- Accepts telemetry data via a webhook (perfect for event-driven IoT setups).
- Splits long logs into smaller text chunks for better semantic understanding.
- Creates OpenAI embeddings for each chunk so you can run semantic search later.
- Stores those vectors in a Redis vector index for fast similarity lookups.
- Gives an AI agent a “tool” to query that Redis vector store for historical context.
- Uses a Hugging Face chat model plus short-term memory to generate explanations, summaries, and recommended actions.
- Logs key outputs into Google Sheets so humans can easily review alerts and insights.
The result is a workflow that turns raw, noisy telemetry into searchable, contextualized knowledge that your team (or other automations) can use for fleet management, predictive maintenance, and reporting.
Why this architecture works so well for telematics
Vehicle telematics data does not arrive in polite, tiny sentences. It shows up as long diagnostic dumps, event logs, and verbose error messages. This workflow architecture is tuned for two very common needs:
- Fast ingestion of large telemetry batches via an HTTP webhook that accepts POST requests from your devices or broker.
- Semantic retrieval and analysis so an agent can ask questions like “show me similar incidents” instead of you manually searching logs.
Some key advantages of this setup:
- Webhook-based ingestion scales nicely as your devices or broker send JSON payloads with fields like
vehicle_id,timestamp, GPS data, OBD-II codes, and human-readable logs. - Text chunking makes long logs searchable by splitting them into smaller segments so embeddings capture local context, for example one specific fault code with its surrounding text.
- Redis vector store provides persistent, low-latency semantic search across historical data using an index such as
vehicle_telematics_analyzer. - Agent-driven analysis uses a Hugging Face chat model plus tools and memory to generate structured outputs, explanations, and alerts.
- Automated logging to Google Sheets gives you an easy audit trail and a quick way to review what the agent is doing over time.
How the workflow behaves from end to end
Here is the typical data journey, from “vehicle sends event” to “you have a neat row in a spreadsheet”:
- A telematics device sends a POST request with a JSON payload to the Webhook node.
- Any long text fields in that payload are split into overlapping chunks.
- Each chunk is converted into an embedding using OpenAI and then stored in Redis with metadata.
- Later, when an operator or rule needs context, the workflow runs a semantic query against Redis.
- The AI agent combines the retrieved chunks, its short-term memory, and the chat model to generate an explanation or suggested action.
- The final output is appended to a Google Sheet as a log entry or report.
Once this is in place, you can stop hunting through logs and start asking questions like “What has happened before when this engine code appeared?” and get meaningful answers.
Node-by-node tour of the Vehicle Telematics Analyzer
1. Webhook (POST) – the front door for your telemetry
The Webhook node is the workflow’s entry point. Configure it to accept POST requests from your telematics gateway, broker, or device fleet. The typical payload is a JSON object that can include:
vehicle_idtimestamp- GPS coordinates
- OBD-II diagnostic codes
- Human-readable logs or diagnostic text
Using a single webhook keeps things simple and fits nicely with event-driven IoT architectures where devices push events as they happen.
2. Splitter (Text Splitter) – turning walls of text into bites
Telematics logs and diagnostic dumps can be novel-length. The Text Splitter node breaks large text fields into smaller chunks so the embeddings can focus on local context instead of trying to understand everything at once.
In this template the settings are:
- chunkSize: 400
- chunkOverlap: 40
The overlap keeps some shared context between chunks, which helps when you later search for related incidents around a specific fault code or event.
3. Embeddings (OpenAI) – making your text machine-searchable
Each text chunk is passed to the Embeddings node, which uses the OpenAI embeddings integration. You will need to configure your OpenAI API key in n8n credentials.
The embeddings transform each chunk into a vector representation. These vectors allow semantic similarity search later, so you can find “things that mean roughly the same” instead of only matching exact keywords.
4. Insert (Redis Vector Store) – storing vectors with context
The next step is to persist those embeddings in Redis. The workflow uses a Redis vector index with a name such as vehicle_telematics_analyzer. Each vector is stored along with metadata like:
vehicle_idtimestamp- The original text chunk
Redis is used as a vector store so you can perform fast nearest-neighbor lookups based on semantic similarity, even as your dataset grows over time.
5. Query & Tool (Redis Vector Store Tool) – asking “what happened before?”
When the agent needs historical context, it uses the Redis Vector Store Tool. The Query node runs a semantic search against the Redis index, and the Tool node wraps this capability so the agent can call it as a tool.
For example, the agent might ask for “past incidents similar to this engine code” and receive the top-k most relevant chunks. It can then reason over these results together with its memory and the LLM’s understanding to produce a useful explanation or recommendation.
6. Memory (Buffer Window) – short-term brain for the agent
The Memory node uses a buffer window to store recent conversational or analysis history. This helps the agent keep track of follow-up questions and multi-step investigations.
If an operator asks “What caused this fault last time?” and then follows with “And how often has this happened in the last month?”, the memory buffer keeps the context so the agent does not forget what “this” refers to.
7. Chat (Hugging Face) – the language engine
The Chat node uses a Hugging Face conversational model that you configure with your Hugging Face API key. This model is responsible for generating human-readable outputs, such as:
- Natural language summaries of incidents
- Recommended actions or next steps
- Structured responses that can be turned into incident objects
You can swap this model for a different provider or a custom fine-tuned model depending on your latency, quality, and cost preferences.
8. Agent – the conductor of tools, memory, and LLM
The Agent node is the orchestrator. It receives:
- Results from the Redis vector store tool
- Context from the memory buffer
- Responses from the Chat LLM
Based on these, the agent decides what to do next, such as generating an incident report, summarizing likely causes, or preparing details that could feed into a maintenance ticket.
9. Sheet (Google Sheets) – your human-friendly logbook
Finally, the workflow sends relevant agent outputs to a Google Sheet using an append operation. This gives you:
- A simple audit trail of what the agent has analyzed
- A running log of alerts, suggested actions, and diagnostic summaries
- A convenient starting point for reporting or sharing insights with non-technical stakeholders
What you can use this template for
Once this is wired up, you can apply it to several telematics scenarios without rewriting everything from scratch.
- Driver behavior analysis: Correlate speed patterns, harsh braking, and driver-specific trends across trips using semantic search on historical logs.
- Predictive maintenance: Look up past records related to current fault codes and get summaries of probable causes and recommended checks.
- Compliance and audits: Maintain readable incident logs and summaries that are ready for regulatory or internal reporting.
- Dispatch assistance: Provide dispatchers with context-aware recommendations for prioritizing repairs or rerouting vehicles based on historical incidents.
Quick setup guide: from zero to automated insights
Here is a simplified checklist to get the Vehicle Telematics Analyzer running in your environment.
Step 1 – Prepare your n8n environment
- Install and secure your n8n instance, either self-hosted or using n8n cloud.
- Expose the webhook endpoint over HTTPS so your devices can safely send POST requests.
Step 2 – Configure required credentials
- OpenAI: Add your OpenAI API key for the Embeddings node.
- Redis: Configure your Redis connection, including support for vector operations (Redis Vector Similarity or equivalent module).
- Hugging Face: Set up your Hugging Face API key for the Chat node.
- Google Sheets: Configure OAuth2 credentials so n8n can append rows to your chosen spreadsheet.
Step 3 – Redis index and splitter tuning
- Create or confirm your Redis index name, for example
vehicle_telematics_analyzer. Depending on your setup, the Insert node may be able to create it automatically. - Adjust the Text Splitter settings:
- chunkSize: 400 is a solid default.
- chunkOverlap: 40 keeps enough context between chunks.
Tune these based on your typical log length and how detailed you want each chunk to be.
Step 4 – Pick models and watch costs
- Choose an OpenAI embedding model that fits your budget and performance needs.
- Decide which chat model to use for the Hugging Face node, especially if you want structured outputs.
- Monitor costs for both embeddings and chat calls. If you ingest a lot of telemetry, consider batching embedding operations instead of embedding tiny events one by one.
Step 5 – Security, PII, and reliability
- Strip or encrypt any personally identifiable information before storing data in Redis or logging to Google Sheets.
- Restrict access to your n8n instance, Redis, and Sheets to authorized users and systems only.
- Add monitoring and error handling nodes in n8n to retry failed steps and alert you when something breaks, so you are not debugging at 3 a.m.
Security, cost, and scaling: things to keep in mind
As useful as this pipeline is, it is not free or riskless. A few practical considerations:
- Cost: OpenAI embeddings and LLM calls scale with volume. Batch embedding where possible to reduce overhead.
- Scaling: Plan Redis capacity for both the size of your vector index and the expected query throughput. As your fleet grows, so do your vectors.
- Security: Encrypt sensitive fields, manage access control carefully, and ensure your n8n instance is not exposed without proper protection.
Ideas for extending the workflow
Once the core template is in place, you can gradually add more automation to reduce manual work even further.
- Connect to ticketing tools like Jira or Zendesk for automatic work order creation when certain conditions are met.
- Feed summarized incidents into BI tools such as Grafana or Metabase to visualize semantic clusters and trends.
- Swap the chat model for one that is optimized for structured outputs, for example automatically generating JSON incident objects.
- Introduce anomaly detection or time-series rules that proactively trigger queries and agent analysis when metrics look suspicious.
Wrapping up
The n8n “Vehicle Telematics Analyzer” template gives you a complete pipeline to turn noisy telemetry into organized, searchable, and actionable insights. With a webhook, text splitter, OpenAI embeddings, Redis vector store, an agent with memory, and Google Sheets logging, you get a flexible architecture that works well for fleet management, maintenance automation, and operational reporting.
If you are tired of manually digging through logs, this workflow lets you offload the repetitive work to automation so you can focus on decisions instead of copy-paste.
Call to action: Spin up this template in your n8n instance, plug in your OpenAI, Redis, Hugging Face, and Google Sheets credentials, and point your telematics gateway to the webhook. Start turning raw telemetry into real insights. If you want help tailoring it to your fleet or expanding it with new features, reach out to us or subscribe for more step-by-step templates and consulting.