Automate YouTube to Raindrop Bookmarks

Automate YouTube to Raindrop Bookmarks with n8n

This reference guide describes an n8n workflow template that automatically saves new videos from a YouTube playlist into Raindrop.io bookmarks. The workflow queries the YouTube Data API for playlist items, normalizes the response, filters only unseen videos using workflow static data, then creates structured bookmarks in Raindrop with consistent titles, links, and tags.

1. Overview

The workflow is designed for users who regularly track specific YouTube playlists and want a reliable way to archive or curate videos in Raindrop.io without manual intervention. It supports both manual execution and scheduled polling via a Cron trigger.

Primary capabilities

  • Polls the YouTube API for all items in a specific playlist.
  • Flattens the playlist item structure to expose key fields from the snippet object.
  • Maintains a persistent list of previously seen video IDs using n8n workflow static data.
  • Filters out already processed videos to avoid duplicate bookmarks.
  • Creates Raindrop bookmarks with a normalized URL, formatted title, and predefined tags.

Typical use cases

  • Content curation pipelines and research libraries.
  • Personal learning playlists and watch-later archives.
  • Team knowledge bases that rely on video resources.

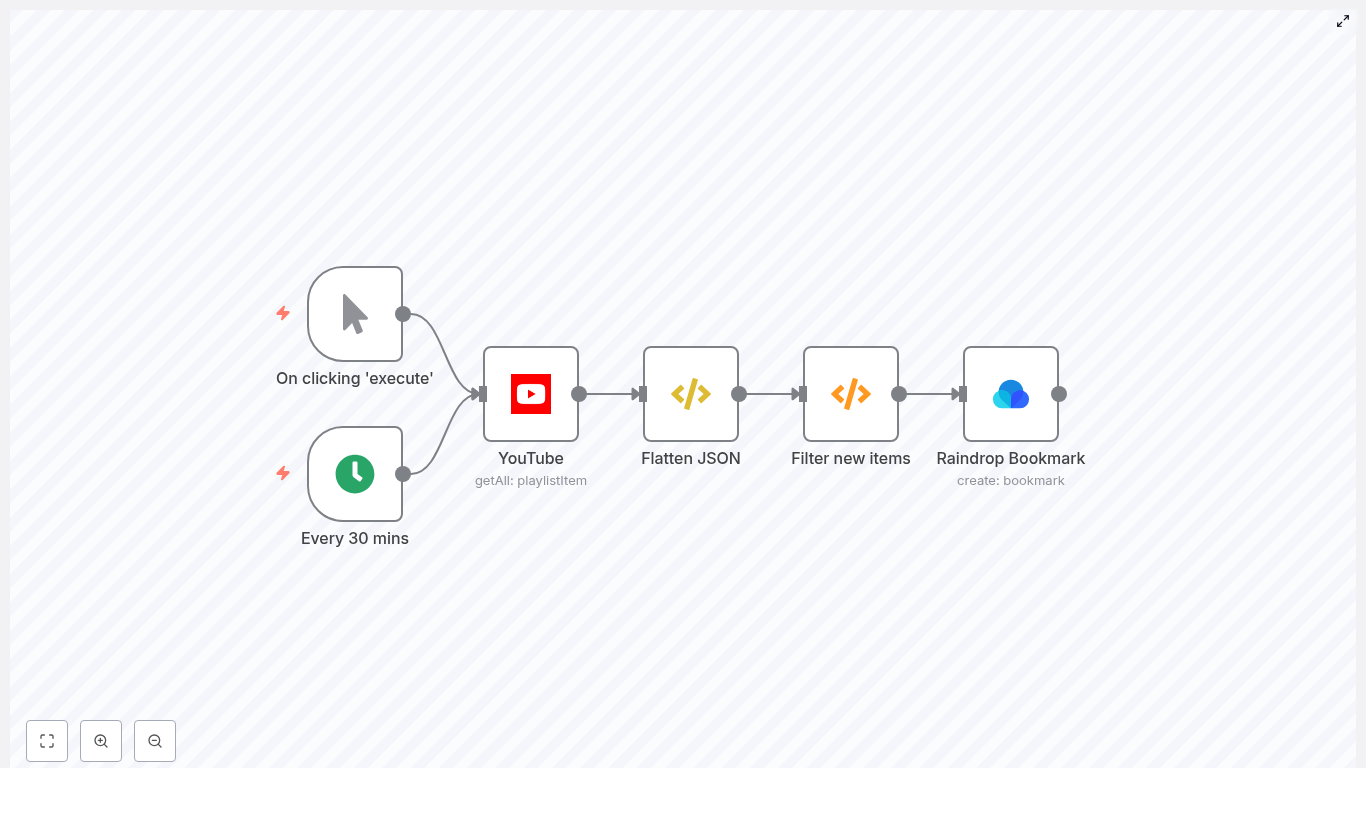
2. Workflow architecture

The template is built as a linear data flow with optional triggers and a small amount of custom logic. At a high level:

  1. Trigger – Start the workflow manually or on a schedule using Cron.
  2. YouTube node – Retrieve all items from the target playlist.
  3. FunctionItem node (Flatten JSON) – Replace the item payload with the snippet object for simpler downstream access.
  4. Function node (Filter new items) – Compare video IDs against stored static data to return only new videos.
  5. Raindrop Bookmark node – Create a bookmark in Raindrop for each new video.

State is stored using getWorkflowStaticData('global'), which persists across workflow executions on the same n8n instance. This is used solely to track previously seen videoId values.

3. Node-by-node breakdown

3.1 Triggers: Manual Trigger and Cron

  • Manual Trigger
    • Purpose: Run the workflow on demand, for example during initial setup or debugging.
    • Usage: Start the workflow from the n8n UI to test configuration or initialize static data.
  • Cron
    • Purpose: Schedule periodic checks of the YouTube playlist.
    • Typical configuration: Every 30 minutes (adjustable based on your needs and API quotas).
    • Behavior: Each Cron execution runs the full workflow, which then filters out already processed videos.

You can keep both triggers in the workflow and enable or disable them depending on whether you want scheduled polling, manual runs, or both.

3.2 YouTube node

This node communicates with the YouTube Data API to retrieve playlist items.

  • Resource: playlistItem
  • Operation: getAll
  • playlistId: CHANGE_ME
    • Replace CHANGE_ME with the ID of the playlist you want to monitor.
    • To obtain the playlist ID, open the playlist in YouTube and copy the value of the list= query parameter in the URL.
    • Example: in https://www.youtube.com/playlist?list=PLxxxx, the playlist ID is PLxxxx.
  • Credentials: Google (YouTube) OAuth2 credentials
    • Configure a Google OAuth2 credential in n8n with access to the YouTube Data API.
    • Attach this credential to the YouTube node.

The node returns playlist items that include a snippet object containing fields such as title, resourceId.videoId, and videoOwnerChannelTitle. These are used later to construct Raindrop bookmarks.

3.3 FunctionItem node: Flatten JSON

The FunctionItem node simplifies the structure of each item so that downstream nodes can reference fields directly on $json without deep nesting.

Code used in the template:

item = item["snippet"]
return item;

After this node:

  • The current item payload is the snippet object from the YouTube response.
  • Fields like $json["title"], $json["resourceId"]["videoId"], and $json["videoOwnerChannelTitle"] are available at the top level of the JSON for that item.

If the snippet field is missing from a playlist item (which is uncommon for standard playlist queries), this node would fail. In that case, verify your YouTube API configuration and playlist permissions.

3.4 Function node: Filter new items

This node implements deduplication logic using workflow static data. It ensures that only videos that have not been processed in previous executions are passed to the Raindrop node.

Code used in the template:

const staticData = getWorkflowStaticData('global');
const newIds = items.map(item => item.json["resourceId"]["videoId"]);
const oldIds = staticData.oldIds;  if (!oldIds) {  staticData.oldIds = newIds;  return items;
}

const actualNewIds = newIds.filter((id) => !oldIds.includes(id));
const actualNew = items.filter((data) => actualNewIds.includes(data.json["resourceId"]["videoId"]));
staticData.oldIds = [...actualNewIds, ...oldIds];

return actualNew;

Logic and behavior

  • Static data storage:
    • getWorkflowStaticData('global') returns an object that persists across executions.
    • The property staticData.oldIds is used to store an array of video IDs that have already been seen.
  • First execution:
    • If oldIds is not defined, this is treated as the first run.
    • All current playlist video IDs are stored into staticData.oldIds.
    • The node returns all current items. These are considered “seen” from this point onward.
  • Subsequent executions:
    • The node computes newIds from the current items.
    • It compares newIds to oldIds and identifies only those IDs that are not already stored.
    • It filters the items array to include only playlist items whose videoId is in actualNewIds.
    • staticData.oldIds is updated by prepending the newly discovered IDs to the existing array: [...actualNewIds, ...oldIds].

Edge cases and notes

  • If the playlist is empty, items will be an empty array and the function returns an empty array without modifying static data.
  • If the node returns an empty array on a non-initial run, it means no new video IDs were detected compared to staticData.oldIds.
  • If static data is reset (for example after a server reset or manual clearing), the workflow will treat the next run as a first run, which may result in previously processed videos being treated as new. In that case, you may see duplicate bookmarks unless you add an additional de-duplication mechanism on the Raindrop side.

3.5 Raindrop Bookmark node

This node creates a bookmark in Raindrop.io for each new YouTube video passed from the Filter node.

  • Link:
    =https://www.youtube.com/watch?v={{$json["resourceId"]["videoId"]}}

    Constructs a canonical YouTube watch URL using the videoId from the flattened snippet.

  • Title:
    = {{$json["videoOwnerChannelTitle"]}} | {{$json["title"]}}

    Formats the bookmark title as “Channel Name | Video Title” for better searchability and context inside Raindrop.

  • CollectionId:
    • Default value: 0, which typically refers to the default collection.
    • Replace with a specific collection ID if you want to route these bookmarks to a dedicated folder.
  • Tags:
    • Example: youtube.
    • You can add additional tags or change them to match your taxonomy.
  • Credentials:
    • Configure Raindrop OAuth credentials in n8n.
    • Attach these credentials to the Raindrop Bookmark node.

If the Raindrop node fails, check that the OAuth credential is correctly configured and that the link and title expressions resolve to valid values in the execution data.

4. Configuration notes

4.1 Required credentials

  1. Google / YouTube OAuth2
    • Configure an OAuth2 credential in n8n with access to the YouTube Data API.
    • Assign this credential to the YouTube node.
  2. Raindrop OAuth
    • Create a Raindrop credential in n8n using OAuth.
    • Assign it to the Raindrop Bookmark node.

4.2 Playlist ID selection

To monitor a specific playlist:

  • Open the playlist in your browser.
  • Locate the list= parameter in the URL.
  • Copy the value and paste it into the playlistId field of the YouTube node.

4.3 Trigger strategy

You can choose between or combine:

  • Manual Trigger for ad-hoc runs, testing, and first-time initialization of static data.
  • Cron for continuous polling, for example every 30 minutes. Adjust the interval if you are close to YouTube API quota limits or if the playlist updates infrequently.

4.4 Static data initialization

To avoid creating bookmarks for all existing videos when you first deploy the workflow:

  1. Import the workflow template into n8n.
  2. Configure credentials and set the correct playlistId, collectionId, and tags.
  3. Run the workflow manually once.
    • This will populate staticData.oldIds with the current playlist video IDs.
    • From then on, only newly added videos in the playlist will be treated as new items.

5. Step-by-step setup guide

  1. Import the template
    • Use the provided template link to import the workflow into your n8n instance.
  2. Configure Google / YouTube OAuth credentials
    • Create a Google OAuth2 credential in n8n.
    • Grant access to the YouTube Data API.
    • Attach the credential to the YouTube node.
  3. Configure Raindrop OAuth credentials
    • Create a Raindrop OAuth credential in n8n.
    • Attach it to the Raindrop Bookmark node.
  4. Set the playlist ID
    • Replace CHANGE_ME in the YouTube node playlistId field with your actual playlist ID.
  5. Adjust Raindrop target collection and tags
    • Set collectionId to your desired Raindrop collection (or leave as 0 for the default).
    • Customize tags (for example youtube, learning, research).
  6. Configure triggers
    • Decide whether to use Manual Trigger, Cron, or both.
    • If using Cron, set the interval, for example every 30 minutes.
  7. Run an initial manual execution
    • Execute the workflow once manually.
    • This initializes staticData.oldIds with the current playlist contents.
    • Subsequent runs will bookmark only newly added videos.

6. Troubleshooting and diagnostics

6.1 No bookmarks are created

If the workflow runs but you do not see new bookmarks in Raindrop, inspect each step:

  • Check YouTube node output
    • Open the execution log and inspect the YouTube node.
    • Confirm that the node returns playlist items and that the snippet field is present.
  • Verify Flatten JSON node
    • Ensure that after the FunctionItem node, $json["title"] and $json["resourceId"]["videoId"] are available.
  • Inspect Filter node output
    • If the Filter node returns an empty array on the very first run, static data may have already been initialized in a previous execution.
    • On subsequent runs, an empty result simply means no new videos were detected.
  • Check Raindrop node execution
    • Verify that the Raindrop node receives input items from the Filter node.
    • Check for authentication or rate-limit errors in the node logs.

6.2 Common issues and constraints

  • Private or unlisted playlists
    • You must have appropriate permissions on the YouTube account used for OAuth.
    • If the playlist is private or unlisted, ensure the authenticated account can access it.
  • YouTube API quota
    • YouTube enforces quotas on API usage.
    • If you encounter quota errors, reduce the Cron frequency or consolidate workflows where possible.
  • Duplicate bookmarks
      <

n8n: Auto-Save YouTube Playlist to Raindrop

n8n: Automatically Save YouTube Playlist Items to Raindrop.io

For teams and professionals who consume a high volume of video content, manually bookmarking YouTube links quickly becomes unmanageable. By combining n8n, the YouTube API, and Raindrop.io, you can implement a robust automation that continuously monitors a playlist and stores every new video as a structured bookmark.

This article walks through an optimized n8n workflow template that:

  • Polls a YouTube playlist on a fixed schedule
  • Normalizes and filters the API response
  • Tracks processed videos using workflow static data
  • Creates Raindrop.io bookmarks for newly discovered items

Why automate YouTube to Raindrop.io with n8n?

For automation professionals, the benefits go beyond convenience. A fully automated YouTube-to-Raindrop workflow provides:

  • Consistent capture – New videos are bookmarked as soon as they appear in the playlist, without manual intervention.
  • Centralized knowledge base – Raindrop.io becomes the single source of truth for your video resources, accessible across devices and platforms.
  • Structured enrichment – Tags, titles, and metadata can be standardized or dynamically generated, which improves searchability and downstream processing.

The result is a curated video library that is reliable, searchable, and integrated into your broader automation ecosystem.

Workflow architecture and core components

The workflow is designed around a simple polling pattern with idempotent processing. At a high level it:

  1. Starts on a schedule or manually for testing
  2. Fetches all items from a specified YouTube playlist
  3. Flattens the nested API response to simplify mapping
  4. Filters out videos that were already processed in previous runs
  5. Creates Raindrop.io bookmarks only for new videos

Key nodes used in the n8n workflow

  • Cron (Every 30 mins) – Triggers the workflow on a recurring schedule. Default interval is 30 minutes, configurable as needed.
  • Manual Trigger – Provides an on-demand entry point for initial testing and debugging.
  • YouTube (playlistItem.getAll) – Retrieves all items from the specified playlist using the YouTube Data API.
  • Flatten JSON (Function Item) – Extracts the snippet object from each playlist item to simplify downstream expressions.
  • Filter new items (Function) – Uses workflow static data to maintain a list of previously processed video IDs and outputs only new entries.
  • Raindrop Bookmark (create) – Creates a bookmark in Raindrop.io for each new video, including title, URL, and tags.

Configuration prerequisites

YouTube API access and credentials

Before configuring the nodes, ensure you have valid Google OAuth2 credentials in n8n with permission to read YouTube playlist items.

  • Create or reuse a Google Cloud project with YouTube Data API enabled.
  • Configure OAuth2 credentials in n8n with the appropriate scopes to access playlist items.
  • Confirm that the playlist you want to monitor is either public or owned by the authenticated account.

The YouTube node in this workflow uses the playlistItem.getAll operation, so the credentials must allow read access to that resource.

Raindrop.io credentials

For bookmark creation, configure Raindrop.io credentials in n8n:

  • Use an OAuth token or API token that includes permission to create bookmarks.
  • Identify the target collection ID in Raindrop.io. You can use 0 for the default collection or specify a dedicated collection ID.

Detailed workflow setup in n8n

1. Configure the YouTube node

After adding your Google OAuth2 credentials, configure the YouTube node as follows:

  • Resource: playlistItem
  • Operation: getAll
  • Playlist ID: Replace the placeholder CHANGE_ME with your actual playlist ID.

The playlist ID can be extracted from the playlist URL as the value after list=, for example:

https://www.youtube.com/playlist?list=PLw-VjHDlEOgs658sP9Q...

Use that token (for example PLw-VjHDlEOgs658sP9Q...) as the playlistId in the node configuration.

2. Normalize the YouTube response with a Function Item node

The YouTube API returns a nested JSON structure where most of the useful metadata is contained within the snippet object. To simplify expressions in later nodes, use a Function Item node to replace each item with its snippet:

item = item["snippet"]
return item;

After this step, each item passed downstream has the snippet fields at the root level of item.json, which makes it easier to access properties like title, videoOwnerChannelTitle, and resourceId.videoId.

3. Implement idempotency with workflow static data

To ensure that videos are bookmarked only once, the workflow relies on workflow static data. This provides persistent storage across executions within the same workflow and instance.

Use a Function node named for example Filter new items with the following code:

const staticData = getWorkflowStaticData('global');
const newIds = items.map(item => item.json["resourceId"]["videoId"]);
const oldIds = staticData.oldIds;  if (!oldIds) {  staticData.oldIds = newIds;  return items;
}

const actualNewIds = newIds.filter((id) => !oldIds.includes(id));
const actualNew = items.filter((data) => actualNewIds.includes(data.json["resourceId"]["videoId"]));
staticData.oldIds = [...actualNewIds, ...oldIds];

return actualNew;

This logic works as follows:

  • First run: If oldIds is undefined, the function seeds static data with the current playlist video IDs and returns all items. This prevents repeated bookmarking of existing videos in subsequent runs.
  • Subsequent runs: The function compares the current playlist video IDs against oldIds and returns only those items whose IDs were not previously recorded. It then updates oldIds by prepending the newly processed IDs.

4. Create Raindrop.io bookmarks from new items

After filtering, only new videos reach the Raindrop node. Configure the Raindrop Bookmark (create) node as follows:

  • link:
    =https://www.youtube.com/watch?v={{$json["resourceId"]["videoId"]}}
  • title:
    ={{$json["videoOwnerChannelTitle"]}} | {{$json["title"]}}
  • tags:
    youtube

    You can later expand this to dynamic tags based on channel, keywords, or other metadata.

  • collectionId: Set to 0 for the default collection or the ID of a specific Raindrop collection.

Ensure the Raindrop.io credentials are correctly selected in this node so that bookmark creation is authorized.

5. Define triggers for production and testing

Use two separate triggers for different purposes:

  • Cron node:
    • Configure to run every 30 minutes by default.
    • Adjust the interval based on playlist activity and API quota considerations.
  • Manual Trigger node:
    • Use for initial validation and troubleshooting.
    • Connect it to the same downstream nodes so you can run the entire chain on demand from the n8n editor.

Operational best practices and optimization

Managing static data growth

In high-volume scenarios, the list of processed video IDs in workflow static data can grow significantly. To keep this under control and avoid unnecessary memory usage, replace the final assignment in the filter function with a capped and deduplicated version:

// Keep a unique capped history of processed IDs
const deduped = Array.from(new Set([...actualNewIds, ...oldIds]));
staticData.oldIds = deduped.slice(0, 1000); // keep last 1000 ids

This approach retains only the most recent 1000 unique IDs, which is sufficient for most playlist monitoring use cases while keeping the storage footprint predictable.

Adding content-based filters

In more advanced setups, you might not want to bookmark every video in a playlist. Instead, you can enrich the filter logic to only pass items that match specific criteria, such as keywords in the title or description.

Within the same Function node, extend the filtering logic like this:

const keywords = ['tutorial','deep dive'];
const actualNew = items.filter(data => {  const title = (data.json.title || '').toLowerCase();  return actualNewIds.includes(data.json.resourceId.videoId) &&  keywords.some(k => title.includes(k));
});

This example only returns new videos whose titles contain the specified keywords, which is useful for curating long or mixed-content playlists.

Handling API quotas and rate limits

The workflow uses a polling strategy, so it is important to consider YouTube API quotas:

  • Increase the polling interval if the playlist does not change frequently.
  • Avoid monitoring very large numbers of playlists with aggressive schedules from the same API key.
  • Implement retry strategies or exponential backoff in additional Function or Error Trigger workflows if you expect transient API errors.

On the Raindrop.io side, typical usage for bookmarking new playlist items rarely approaches rate limits, but you should still monitor usage if you scale the pattern across multiple workflows.

Advanced enhancements and integration ideas

Once the core workflow is stable, you can extend it to better fit your information architecture and automation strategy.

  • Dynamic tagging:
    • Generate tags from the video title, channel name, or playlist name.
    • For example, add the channel as a tag to group content by creator.
  • Richer bookmark metadata:
    • Store the video description or key notes in the Raindrop note field.
    • Save the thumbnail URL or other assets as part of the bookmark metadata.
  • Notifications and downstream workflows:
    • Trigger Slack, email, or mobile push notifications whenever a new bookmark is created.
    • Feed new bookmarks into additional n8n workflows for review, tagging, or content analysis.
  • Alternative persistence layer:
    • If you need cross-workflow or cross-instance history, replace workflow static data with a database node (for example MySQL or PostgreSQL).
    • Store video IDs and metadata in a table and query it to determine which items are new.

Testing, validation, and troubleshooting

Initial end-to-end test

Before enabling the Cron trigger in production:

  1. Use the Manual Trigger node to execute the workflow once.
  2. Inspect the execution log in n8n to verify:
    • The YouTube node returns the expected playlist items.
    • The Flatten JSON node exposes the correct snippet fields.
    • The Filter new items node outputs the correct subset of videos.
    • The Raindrop node successfully creates bookmarks with the expected URL, title, and tags.
  3. Confirm that the bookmarks appear in the intended Raindrop collection.

Common configuration issues

  • Incorrect playlist ID:
    • Ensure you are using the playlist ID, not the channel ID.
    • Verify that the value after list= in the URL is used in the YouTube node.
  • Insufficient YouTube permissions:
    • Recheck the OAuth2 scopes for your Google credential.
    • Confirm the authenticated account can access the target playlist.
  • Raindrop authentication problems:
    • Validate that the token has bookmark creation permission.
    • Confirm the specified collection ID exists and is accessible.

Conclusion

This n8n workflow template provides a clean, extensible pattern for synchronizing YouTube playlists with Raindrop.io. By leveraging scheduled polling, workflow static data, and structured metadata mapping, you achieve a reliable, idempotent process that continuously enriches your bookmark repository with new video content.

From there, it is straightforward to add keyword-based filters, manage history size, or integrate notifications and analytics, turning a simple bookmark sync into a powerful content curation pipeline.

Next steps: Import the template into your n8n instance, configure your YouTube playlist ID and credentials for both YouTube and Raindrop.io, then run it manually once for validation. After confirming the behavior, enable the Cron trigger to keep your Raindrop.io collection automatically updated with the latest videos.

Build Dynamic n8n Forms for Airtable & Baserow

Build Dynamic n8n Forms for Airtable & Baserow

Static forms in Airtable or Baserow are simple to configure but become difficult to maintain as schemas evolve and logic grows more complex. By moving form generation into n8n, you gain full programmatic control over the form lifecycle, from schema-driven field creation to robust file handling and downstream processing.

This article describes a reusable n8n workflow template that:

  • Reads an Airtable or Baserow table schema
  • Converts that schema into n8n form JSON
  • Renders a dynamic form via the n8n Form node
  • Creates new rows in Airtable or Baserow based on submissions
  • Processes file uploads and attaches them reliably to the created record

Why build forms with n8n instead of native Airtable or Baserow forms?

Using n8n as the orchestration layer for forms provides a higher degree of flexibility and control than native form builders. For automation professionals and system integrators, the key advantages include:

  • Schema-driven dynamic forms – Forms are generated at runtime from the table schema, so when fields are added, removed, or changed in Airtable or Baserow, the form updates automatically without manual configuration.
  • Runtime customization and conditional logic – You can apply complex logic in n8n to show or hide fields, adjust options, or modify validation rules depending on user input or external data.
  • Centralized file and attachment handling – All file uploads are processed through n8n, which allows you to integrate virus scanning, media processing, or custom storage before attaching files to records.
  • Tight integration with broader workflows – The form is just one part of a larger automation. You can enrich data, validate against third-party systems, trigger notifications, or fan out to multiple services using standard n8n nodes.

Architecture overview

The template implements a structured, five-stage pipeline. Each stage is mapped to a set of n8n nodes and is designed to be reusable across different bases and tables.

  1. Capture user context and select the target table
  2. Retrieve and normalize the table schema
  3. Transform provider-specific fields into n8n form fields
  4. Render the form, accept submissions, and create the record
  5. Upload files and link them to the created row

1. Triggering the workflow and selecting a table

Form Trigger configuration

The workflow starts with an n8n Form Trigger. This trigger serves two purposes:

  • It exposes a webhook URL that end users can access to start the process.
  • It collects the BaseId (for Airtable) or TableId (for Baserow), ensuring the template can be reused across many tables without hardcoding identifiers.

From a best practice standpoint, keeping the table selection at the trigger level makes the workflow modular and easier to maintain, especially when working with multiple environments or tenants.

2. Retrieving and parsing the table schema

Airtable schema retrieval

For Airtable, the workflow performs the following steps:

  • Calls the Airtable base schema endpoint using the selected BaseId.
  • Uses nodes to isolate the relevant table:
    • Get Base Schema to retrieve the full base definition.
    • Filter Table to select the specific table based on user choice.
    • Fields to List to extract the fields array for further processing.

Baserow schema retrieval

For Baserow, the workflow takes a more direct route:

  • Invokes the Baserow List Fields endpoint for the selected TableId.
  • Receives a list of field definitions that can be mapped directly to n8n form fields.

In both providers, the outcome is a structured set of field metadata that describes names, types, options, and constraints. This metadata is the foundation for dynamic form generation.

3. Converting provider schemas into n8n form fields

Once the raw schema is available, code nodes are used to normalize provider-specific field types into a generic n8n form schema. This is where most of the abstraction happens.

Type mapping strategy

The workflow maps common Airtable and Baserow field types to n8n form field definitions. Typical conversions include:

  • Text-like fields:
    • singleLineText, phoneNumber, urltext
    • multilineTexttextarea
  • Numeric and date fields:
    • numbernumber
    • dateTime, datedate (using a consistent date format in the form)
  • Contact and identity fields:
    • emailemail
  • Select and boolean fields:
    • singleSelect, multipleSelectdropdown, with choices mapped to form options.
    • checkbox, booleandropdown or a boolean-style UI, depending on your preferred UX.
  • Attachment and file fields:
    • multipleAttachments, filefile in the n8n form schema, with multipleFiles set when the provider field allows multiple attachments.

Filtering unsupported fields

Not all provider field types can be rendered directly as simple form inputs. Examples include complex formulas, linked records, and certain computed fields. As a best practice, the workflow:

  • Marks fields that cannot be safely converted as unsupported.
  • Filters these unsupported fields out before passing the schema to the Form node.

This prevents confusing user experiences and avoids inconsistent data submissions.

4. Rendering and handling the n8n form

Form JSON construction

After type mapping, the workflow aggregates all supported fields into a single JSON schema that matches the n8n Form node format. The configuration typically sets:

  • defineForm = json to indicate that the form definition is provided as JSON.
  • A structured array of field definitions, each with label, name, type, options, and any additional metadata required.

Form rendering and submission

The JSON schema is then passed to the Form node, which renders the dynamic form to the user. The form supports:

  • Standard text, number, date, and select inputs
  • Binary file uploads for attachment fields

When the user submits the form, the workflow resumes with a payload that includes both structured field values and any uploaded binary files. This submission is then processed to create the corresponding row in Airtable or Baserow.

5. Preparing data and creating the record

Cleaning and shaping the payload

Before calling the provider API to create a row, the workflow separates file data from non-file data. Recommended steps include:

  • Remove all file and attachment fields from the initial payload, since these require special handling.
  • Normalize data types according to provider expectations:
    • Typecast boolean values correctly.
    • Convert multi-select values into arrays that match the provider schema.

For Airtable, you can use the dedicated Airtable node or an HTTP Request node to call the create-record endpoint. For Baserow, the workflow typically uses HTTP requests against the table row creation API.

Initial row creation

The workflow creates the record in Airtable or Baserow using only non-file fields. This ensures that:

  • The row is created even if file uploads encounter transient issues.
  • You have a definitive record identifier that can be used to attach files in a controlled second step.

6. Managing files and attachments

File handling is intentionally decoupled from row creation due to provider-specific behavior and reliability considerations.

Airtable attachment handling

For Airtable, the workflow uses the Airtable content API upload endpoint. The process is:

  1. Identify all file fields from the form submission that correspond to attachment columns.
  2. For each file:
    • Send the binary file and metadata to the Airtable content upload endpoint.
    • Target the record’s uploadAttachment route so that the file is appended to the record’s attachments array.

Airtable supports multiple upload calls that append to the attachment list, which enables incremental file uploads.

Baserow attachment handling

Baserow uses a two-step model with replacement semantics. The workflow follows this pattern:

  1. For each file field:
    • Upload the file using the /api/user-files/upload-file/ endpoint as multipart form data.
    • Capture the returned file reference for that upload.
  2. Group uploaded file references by field name into an attachments object.
  3. Issue a PATCH request to the row endpoint, providing the attachments object to set or replace the field values with the new file references.

Because Baserow replaces attachments rather than appending, the workflow should construct the complete desired state of each attachment field before issuing the PATCH request.

Operational tips, pitfalls, and troubleshooting

  • Handle attachments separately Always separate file uploads from the initial row creation call. Attempting to create records and upload files in a single request frequently leads to partial failures and inconsistent state.
  • Account for provider-specific behavior Airtable appends attachments with each upload call, while Baserow replaces the attachment set on update. Design your workflow logic accordingly, especially when updating existing records.
  • Field identifiers vs display names Some templates and APIs use field display names as keys, others require field IDs. Verify what your specific Airtable base or Baserow table expects and adjust the mapping in your code nodes to avoid mismatches.
  • Rate limiting and retries When processing many file uploads or large batches, respect provider rate limits. Implement retry logic, exponential backoff, and possibly batching strategies in n8n to reduce error rates.
  • Security and credential management Use n8n’s credential system to store API tokens and authentication headers securely. Avoid placing secrets directly in nodes or exposing them in public workflows or logs.

Practical use cases for dynamic n8n forms

This pattern is particularly valuable in environments where form configurations change frequently or must be tightly integrated into broader automation flows. Typical scenarios include:

  • Reusable form generators for multiple tables Operations teams that maintain many similar Airtable or Baserow tables can rely on a single workflow that adapts to any schema dynamically.
  • Advanced intake and onboarding flows Complex intake processes that need conditional questions, background data enrichment, or validation against external systems can be orchestrated entirely in n8n before creating records.
  • File preprocessing pipelines Workflows that must run virus scans, image transformations, document parsing, or other preprocessing steps before storing attachments benefit from centralized file handling in n8n.

Getting started with the template

To implement this architecture in your own environment:

  1. Import the n8n workflow template into your n8n instance.
  2. Configure Airtable and/or Baserow credentials using secure n8n credentials.
  3. Open the Form Trigger node and note the webhook URL that will render the dynamic form.
  4. Run a test by selecting a BaseId or TableId, then verify that:
    • The schema is fetched correctly.
    • The form fields are generated as expected.
    • Records are created and attachments are correctly uploaded and linked.

If you need to extend the template with additional validation, conditional logic, or custom integrations, you can insert logic and function nodes between schema conversion, form rendering, and record creation steps.

Next steps and resources

To explore or adapt this template further, you can:

  • Join the n8n community to discuss implementation patterns and share improvements.
  • Consult the official Airtable documentation for schema and content upload APIs.
  • Review the Baserow API documentation for field types, user file uploads, and row updates.

If you would like a ready-to-import n8n workflow tailored to your specific base or table structure, you can provide a description of your schema or share the field definitions. Based on that, a customized template can be generated for your use case.

Dynamic n8n Forms for Airtable & Baserow

Dynamic n8n Forms for Airtable & Baserow

Every growing business reaches a point where manual form building becomes a bottleneck. You tweak an Airtable or Baserow form, then update the table, then go back and fix the form again. Fields drift out of sync, options change, and you lose more time than you gain.

What if your forms could evolve automatically with your database, stay in sync, and still give you full control over logic and file handling? This is where dynamic n8n forms come in.

In this guide, you will walk through a reusable n8n workflow template that:

  • Reads your Airtable or Baserow table schema
  • Builds a JSON-driven form dynamically
  • Accepts submissions and creates new rows
  • Handles file uploads correctly for each backend

Think of this template as a stepping stone into a more automated, focused workflow. Once you set it up, you can reuse it for many tables and projects, then gradually extend it as your automation skills grow.

From manual forms to dynamic automation

Traditional forms tied directly to Airtable or Baserow are convenient at first, but they come with hidden costs. Any time you add a field, rename a column, or adjust options, you have to remember to update the form as well. Over time this leads to:

  • Out-of-date fields that confuse users
  • Duplicated work across multiple bases and tables
  • Limited control over validation and file processing

Shifting your mindset from “build a form” to “generate a form dynamically” is a powerful upgrade. With n8n at the center, your database becomes the single source of truth and your forms simply reflect it.

Why dynamic forms with n8n unlock more focus and freedom

Using n8n to render forms dynamically from your Airtable or Baserow schema gives you tangible benefits that compound over time:

  • Single source of truth – The form is generated directly from the live table schema, so labels, options, and required fields stay in sync without manual edits.
  • Reusability across projects – The same workflow can support many tables or bases. Change a BaseId or TableId at runtime and instantly get a new form.
  • Full control over logic – You own the mapping, typecasting, and conditional rules before anything is written back to Airtable or Baserow.
  • Flexible file handling – File uploads are decoupled from row creation, which is ideal when working with different attachment APIs such as Airtable and Baserow.

Instead of rebuilding forms for every new use case, you invest once in a robust template and then iterate. That is the kind of automation that frees you to focus on strategy, not plumbing.

How the template supports your automation journey

This n8n workflow template implements a five-step flow that works for both Airtable and Baserow. You can treat it as a ready-made foundation that you can understand, trust, and then customize.

Step 1 – Read the table schema

Everything starts when a user opens the form. An n8n Form Trigger (or similar entry point) kicks off the workflow. The first task is to request the table schema:

  • Airtable – The workflow reads the base schema, which includes all tables and their metadata.
  • Baserow – The workflow calls the dedicated fields endpoint for the selected table.

The returned schema provides field names, types, and select options. In other words, you get all the information needed to build a context-aware form UI automatically.

Step 2 – Convert schema into an n8n form definition

Once the schema is in n8n, Code nodes take over. Their job is to transform each column definition from Airtable or Baserow into n8n form field JSON. This is where the template maps source types to n8n form types, for example:

  • singleLineText / texttext
  • multilineText / long_texttextarea
  • numbernumber
  • dateTime / datedate
  • singleSelect / single_selectdropdown
  • multipleAttachments / filefile

During this conversion, the workflow also:

  • Builds dropdown choices from select fields
  • Marks fields as required when needed
  • Sets attributes such as isMultipleSelect or multipleFiles

This step is the “brain” that turns a raw schema into a user-friendly form definition.

Step 3 – Render a dynamic n8n form

After all fields are assembled into a single JSON payload, the workflow uses the n8n Form node in JSON mode to render the actual form. Because you are feeding the form node with JSON built at runtime, you can:

  • Hide or modify fields right before rendering
  • Provide different experiences for different users or tables
  • Support conditional UIs without maintaining separate static forms

At this point you already have a powerful outcome: a fully dynamic form that mirrors your Airtable or Baserow table, without needing to manually configure each field.

Step 4 – Create the new row from form submissions

When a user submits the form, the workflow prepares a clean payload for the target API. This preparation includes:

  • Filtering out file or attachment fields that must be handled separately
  • Typecasting checkbox and boolean values to true/false
  • Structuring the JSON so Airtable or Baserow can accept it for row creation

The template provides slightly different flows for each backend:

  • Airtable – First create the record, then append attachments via the upload endpoint.
  • Baserow – First create the row, then upload files to the user-files endpoint and finally update the row with file references.

This separation between data fields and file fields keeps your workflow reliable and easier to evolve.

Step 5 – Upload files and update the created row

File handling is processed independently because Airtable and Baserow treat attachments differently. The workflow:

  • Collects file inputs from the form submission’s binary data
  • Uploads each file to the correct endpoint
  • Groups the returned file references by field name
  • Updates the newly created row with those file references

This gives you a robust pattern for handling uploads in a way that respects each platform’s API behavior.

Inside the template – key implementation details

To adapt and extend this workflow, it helps to understand the core logic inside the Code nodes. This is where your future customizations will likely live.

Mapping rules and helper functions

The heart of the template is a set of mapping rules that translate between Airtable/Baserow schemas and n8n form fields. Typical logic includes:

  • createField helper – Builds the JSON structure expected by the n8n Form node, including:
    • fieldLabel
    • fieldType
    • formatDate
    • fieldOptions
    • requiredField
    • placeholder
    • multiselect
    • multipleFiles
    • acceptFileTypes
  • Switch-by-type logic – Maps each source field type to the correct n8n type and builds choice lists for select fields.
  • File field filtering – Excludes file fields from the initial create-row payload so they can be uploaded first or processed separately.
  • Boolean typecasting – Converts checkbox or boolean values into true/false before sending them to the API.

These pieces are all visible and editable, which makes the workflow a great learning tool as well as a production asset.

File handling differences between Airtable and Baserow

Understanding how each backend treats attachments will help you avoid subtle bugs and design better automations:

  • Airtable – Accepts attachment uploads when updating a record using a multipart POST. Uploaded files are appended to the attachments array, and you can call the upload API multiple times to add more files.
  • Baserow – Uses a two-step process:
    1. Upload files to the user-files endpoint and receive file references such as IDs or URLs.
    2. Patch the row to set the file fields using those references.

    Baserow often replaces the existing value instead of appending, so you need to upload all desired files before updating the row.

The template already accounts for these differences, so you can rely on it as a safe baseline and then refine it for your own edge cases.

How to start using this n8n template

Getting this workflow running in your own n8n instance is straightforward. Treat these steps as your first experiment in a more automated setup:

  1. Install or recreate the workflow
    Import the template into your n8n instance or manually recreate the nodes using the shared configuration.
  2. Provide credentials
    Add an Airtable personal access token for Airtable nodes and an HTTP header credential for Baserow.
  3. Configure BaseId and TableId
    Set the BaseId/TableId input fields in the initial form trigger nodes. You can also send them as values from a webhook to dynamically select which table to build the form from.
  4. Test in a safe environment
    Use a non-production table to verify that field mapping, required fields, and attachments behave as expected.
  5. Review and iterate
    Open the generated form, submit a test entry, and confirm that rows and files appear correctly in Airtable or Baserow. Adjust labels, mapping, or filters as needed.

Once this is working, you have a reusable system you can point at any compatible table.

Avoiding common pitfalls while you build

As you experiment and extend the template, a few common issues are worth watching for. Addressing them early will save you time later.

  • Missing or incorrect schema keys
    Make sure the Code nodes expect the same field key names that your Airtable or Baserow API returns. Use logs and n8n node execution output to quickly debug mismatches.
  • Binary field name mismatches
    The logic that pulls files from the form submission’s binary data relies on consistent naming. Verify that binary keys match the form field labels you expect.
  • File size and MIME restrictions
    Some APIs enforce file size or type limits. Handle upload errors gracefully and provide clear messages if a file is too large or unsupported.
  • Replace vs append behavior
    Remember that Baserow typically replaces file fields, while Airtable can append new attachments. Adjust your grouping and update logic to reflect that difference.

Each challenge you solve here will deepen your understanding of n8n and make future automations smoother.

Use cases that benefit from dynamic n8n forms

Once you see this pattern in action, you will notice many places where it can simplify your work. Some common scenarios include:

  • Internal intake forms that must map directly to structured databases for operations, support, or onboarding.
  • White-labeled front-ends where you want a consistent UX across many tables or clients without rebuilding forms each time.
  • Conditional forms where certain fields appear only for specific tables, user roles, or business rules.

From here, you can expand the template in ways that match your goals:

  • Add validation rules for stricter data quality
  • Send email or Slack notifications on new submissions
  • Control field visibility based on user role or table configuration
  • Layer in authentication, rate limiting, and logging for production use

Each improvement turns this template from a simple helper into a central hub for your form-based workflows.

Next steps – grow your automation, one template at a time

Using n8n to dynamically generate forms from Airtable or Baserow schema is more than a technical trick. It is a mindset shift toward reusable, maintainable automation. You reduce duplication, keep logic in one place, and free yourself from constantly rebuilding forms.

This template is a strong starting point. You can:

  • Plug in your BaseId/TableId
  • Connect your Airtable and Baserow credentials
  • Run a test submission and watch the row and files appear

From there, copy the workflow, explore the conversion code, and extend it with additional types or custom constraints that match your exact needs.

If you ever feel stuck, you are not alone. Join the n8n Discord or Forum, share your table schema, and ask for mapping suggestions. The community and ecosystem are there to support your automation journey.

Ready to take the next step? Import the template into your n8n instance, run a test, and see how much time you can reclaim by letting n8n build your forms for you.

Try the template now and start simplifying your Airtable and Baserow workflows with dynamic n8n forms.

n8n GitHub Release Email Notifier

n8n GitHub Release Email Notifier – Automated Release Alerts

Use n8n to automatically email your team whenever a GitHub repository publishes a new release. In this tutorial-style guide, you will learn how to set up an n8n workflow template that:

  • Checks a GitHub repository on a schedule
  • Detects if a new release was published in the last 24 hours
  • Converts release notes from Markdown to HTML
  • Sends the formatted notes via email using SMTP

What you will learn

By the end of this guide, you will be able to:

  • Configure a Schedule Trigger in n8n for daily GitHub checks
  • Call the GitHub Releases API using the HTTP Request node
  • Use an If node to compare release dates and filter recent releases
  • Split and process release content with a Split Out node
  • Convert Markdown release notes to HTML for email clients
  • Send release notifications using the Email Send node and SMTP
  • Test, secure, and extend the workflow for your own use cases

Why automate GitHub release notifications with n8n?

Manually checking GitHub for new releases is easy to forget and does not scale across multiple repositories. With n8n, you can build a reusable automation that:

  • Runs on a schedule without manual effort
  • Integrates directly with GitHub and any SMTP email provider
  • Formats release notes nicely by converting Markdown to HTML
  • Can be extended to other channels such as Slack, Microsoft Teams, RSS, or Notion

This workflow is lightweight, flexible, and ideal for teams that want to stay informed about internal or third-party project releases.

Concepts and workflow structure

The n8n GitHub release notifier template is built from a sequence of nodes. Understanding the role of each node will make configuration and customization much easier.

Main nodes in the workflow

  1. Schedule Trigger – Starts the workflow on a defined schedule, for example once per day.
  2. HTTP Request (Fetch GitHub Repo Releases) – Calls the GitHub Releases API endpoint https://api.github.com/repos/:owner/:repo/releases/latest.
  3. If (New release in the last day) – Compares the release published_at timestamp with the current time minus one day.
  4. Split Out Content – Iterates over release content if you need to process multiple items, for example body sections or assets.
  5. Markdown (Convert Markdown to HTML) – Transforms the Markdown release notes into HTML suitable for email.
  6. Email Send – Sends the formatted HTML release notes to your chosen recipients via SMTP.

Next, you will configure each of these nodes step by step inside n8n.

Step-by-step setup in n8n

Step 1 – Configure the Schedule Trigger

The Schedule Trigger controls how often n8n checks GitHub for a new release.

  1. Drag a Schedule Trigger node onto your n8n canvas.
  2. Set the trigger to run at your preferred interval:
    • Daily (common for most use cases)
    • Hourly (if you want more frequent checks)
    • Weekly (if releases are rare)
  3. Save the node. This schedule defines how often the GitHub API will be called.

Step 2 – Fetch the latest GitHub release (HTTP Request)

Next, you will call the GitHub Releases API to retrieve the latest release from a specific repository.

1. Add the HTTP Request node

  1. Add an HTTP Request node and connect it after the Schedule Trigger.
  2. Set the Method to GET.
  3. In the URL field, use the GitHub Releases API endpoint, replacing :owner and :repo:
    https://api.github.com/repos/:owner/:repo/releases/latest
  4. Set Response Format to JSON.

2. Add authentication to avoid rate limits

To access private repositories and reduce the risk of hitting rate limits, use a GitHub Personal Access Token.

  • Create a GitHub Personal Access Token with appropriate scopes (for private repos, include repo scope).
  • In n8n, store this token using the credentials system instead of hard-coding it.
  • In the HTTP Request node, add an Authorization header using the token. A typical header looks like:
{  "Authorization": "token YOUR_GITHUB_PERSONAL_ACCESS_TOKEN",  "Accept": "application/vnd.github.v3+json"
}

After this step, the node should return the latest release as JSON, including fields such as tag_name, body, published_at, assets, and more.

Step 3 – Check if the release is new (If node)

You only want to send an email when a release is recent. The If node compares the release date to a time window, typically the last 24 hours.

1. Add the If node

  1. Add an If node after the HTTP Request node.
  2. Configure it to examine the published_at field from the GitHub response.

2. Configure the date comparison

In n8n, you can use expressions to compare timestamps. The goal is to check whether published_at is after “now minus one day”. A typical configuration is:

Left:  =<= $json.published_at.toDateTime() =>
Right:  =<= DateTime.utc().minus(1, 'days') =>
Operator: dateTime after

This condition is true when the release was published within the last 24 hours. If you run the workflow less frequently, adjust the duration accordingly, for example 2 days or 7 days.

Only the items that pass this check (the true branch of the If node) will move on to the email step.

Step 4 – Split and prepare release content (Split Out node)

Some releases may include multiple pieces of content you want to process, such as different body sections or multiple assets. The Split Out node helps you iterate over these parts.

  1. Add a Split Out node to the true output of the If node.
  2. Configure it to split the field you want to iterate over. In the template, it typically uses the body field of the release.

This allows each iteration to be processed separately. For many use cases, you may only need to handle a single body of release notes, but keeping this node makes the workflow more flexible if you later include assets or multiple sections.

Step 5 – Convert Markdown release notes to HTML

GitHub release notes are commonly written in Markdown. Email clients, however, work best with HTML. The Markdown node in n8n handles this conversion.

1. Add the Markdown node

  1. Add a Markdown node after the Split Out node.
  2. Set the Mode to Markdown to HTML.

2. Point the node to the release notes field

Tell the Markdown node which field contains the Markdown text. For GitHub releases, this is usually the body field:

={{ $json.body }}

The node will output a new field that contains the HTML version of the release notes, often accessible as something like $json.html depending on your configuration. This HTML will be used as the body of your email.

Step 6 – Send the formatted release email (Email Send node)

The final step is to send an email with the HTML content generated by the Markdown node.

1. Add the Email Send node

  1. Add an Email Send node after the Markdown node.
  2. Configure your SMTP credentials in n8n, or connect to a provider such as SendGrid or Amazon SES.

2. Set email details

  • To: Set the recipient or list of recipients, for example email@example.com or your team distribution list.
  • From: Use a valid sender address that your SMTP provider accepts.
  • Subject: You can include dynamic values from the GitHub release, for example:
    • New release: {{$json.tag_name}}
    • Or a fixed subject like New n8n release
  • HTML: Set this to the HTML output from the Markdown node, for example:
    ={{ $json.html }}

Once configured, every time a new release is detected, the workflow will send a nicely formatted email containing the release notes.

Testing and validating your n8n GitHub notifier

Before you rely on the workflow in production, walk through a few checks.

  • Test the HTTP Request node Run the workflow manually and inspect the output of the HTTP Request node. Confirm you receive the expected JSON, including tag_name, body, and published_at.
  • Verify the If node logic Check the true and false branches of the If node. Make sure releases that are within your chosen time window are correctly routed to the true output. Adjust the DateTime expressions or timezone handling if needed.
  • Check Markdown rendering Inspect the output of the Markdown node. Confirm that headings, lists, links, and images look correct in HTML. Keep in mind that some email clients block remote images by default.
  • Send test emails Use test addresses (including accounts on different providers) to check:
    • If the email is delivered successfully
    • Whether it lands in the inbox or spam folder
    • How the HTML formatting appears across clients

    If you use a custom domain, verify that SPF and DKIM records are correctly configured.

Security, credentials, and rate limits

Since this workflow interacts with external APIs and email providers, it is important to treat credentials and limits carefully.

  • Use GitHub Personal Access Tokens safely Always store your GitHub Personal Access Token in n8n credentials, not directly in node fields. This keeps the token hidden and easier to rotate. Ensure the token has only the scopes you need, such as repo for private repositories.
  • Respect GitHub rate limits Authenticated requests have higher rate limits than anonymous ones, but they are still limited. If you monitor many repositories or need near real-time updates, consider switching to GitHub Webhooks instead of polling on a short interval.
  • Protect SMTP credentials Store SMTP or email provider credentials in the n8n credentials store. Restrict access to your n8n instance and avoid sharing workflows that expose sensitive connection details.

Enhancing and extending the workflow

Once your basic GitHub release email notifier is working, you can evolve it into a more powerful automation.

  • Use GitHub Webhooks instead of polling Reduce API calls and get real-time notifications by configuring a GitHub Webhook that triggers n8n when a release is published. This removes the need for a frequent Schedule Trigger.
  • Notify other channels In addition to email, you can:
    • Send messages to Slack or Microsoft Teams
    • Create an RSS feed entry
    • Save release notes to Notion or another documentation tool
  • Include release assets The GitHub release JSON includes an assets array. You can parse this array and add download links directly into your email, helping your team quickly access installers or binaries.
  • Customize email content Localize or template your email body to include dynamic fields such as:
    • tag_name (version number)
    • author.login (release author)
    • Direct links to the GitHub release page

    This makes the notification more informative and user friendly.

Troubleshooting common issues

  • No releases returned
    • Double check the repository path in the API URL (:owner/:repo).
    • Confirm your GitHub token has the required scopes, especially for private repositories.
    • Verify that the repository actually has at least one published release.
  • Emails are not delivered
    • Check SMTP logs or your email provider dashboard for error messages.
    • Verify SMTP credentials, ports, and encryption settings.
    • Confirm SPF and DKIM are configured if you use a custom sending domain.
    • Test sending a very simple text email first to rule out HTML issues.
  • Date comparison behaves unexpectedly
    • Inspect the published_at value coming from GitHub.
    • Ensure you are using DateTime.utc() or a consistent timezone in expressions.
    • Adjust the duration in minus(1, 'days') if your schedule or use case requires a different window.

Quick recap

To summarize, your n8n GitHub Release Email Notifier workflow:

  1. Uses a Schedule Trigger to run on a fixed interval.
  2. Calls the GitHub Releases API with an HTTP Request node.
  3. Checks if the latest release is recent using an If node and date comparison.
  4. Optionally iterates over content with a Split Out node.
  5. Converts Markdown release notes to HTML using a Markdown node.
  6. Sends a formatted email via the Email Send node and SMTP.

This gives you a robust, extensible foundation for keeping your team informed about new releases with minimal manual work.

FAQ

Can I monitor multiple GitHub repositories?

Yes. You can duplicate the HTTP Request and downstream nodes for each repository, or parameterize the owner and repo fields to iterate over a list of repositories.

What if I want instant notifications instead of daily checks?

Replace the Schedule Trigger with a GitHub Webhook that calls n8n when a release event occurs. This avoids polling and gives near real-time notifications.

Do I have to use email?

No. Email is only one output. You can send the HTML or plain text content to Slack, Microsoft Teams, Notion, or any other service supported by n8n.

Can I customize the email layout?

Yes. You can wrap the converted HTML in your own email template,

Automate GitHub Release Emails with n8n

Automate GitHub Release Emails with n8n

Keeping internal teams, customers, or stakeholders informed about new GitHub releases is essential, but doing it manually does not scale. This reference guide describes a production-ready n8n workflow template that checks a GitHub repository on a schedule, evaluates whether a new release has been published, converts the release notes from Markdown to HTML, and delivers a formatted email via SMTP.

The goal is a minimal, reliable automation that integrates directly with the GitHub Releases API and your existing email infrastructure. This guide focuses on technical configuration, node behavior, data flow, and how to adapt the template for advanced use cases.

1. Workflow Overview

The workflow is designed to run unattended on a fixed schedule. At a high level it:

  1. Triggers on a daily schedule (or any custom interval).
  2. Calls the GitHub Releases API to fetch the latest release for a repository.
  3. Checks whether the latest release was published within a configurable time window.
  4. Extracts the release notes from the response payload.
  5. Converts the Markdown release notes to HTML.
  6. Sends an HTML email via SMTP with the formatted release notes and metadata.

This pattern is easy to extend to Slack, Microsoft Teams, or other notification channels, since all relevant data is already normalized inside the workflow.

2. Architecture & Data Flow

The template is composed of the following n8n nodes:

  • Schedule Trigger – starts the workflow on a defined interval.
  • HTTP Request (Fetch GitHub Repo Releases) – retrieves the latest release from the GitHub API.
  • If (If new release in the last day) – evaluates whether the release is recent enough to notify about.
  • Split Out (Split Out Content) – isolates the body field that contains release notes in Markdown.
  • Markdown (Convert Markdown to HTML) – transforms Markdown release notes into HTML.
  • Email Send (Send Email) – sends an HTML email using SMTP credentials configured in n8n.

Data flows linearly from the trigger through each node. The HTTP node outputs the GitHub release JSON, the If node filters based on published_at, and only when the condition passes do subsequent nodes execute to process and send the email.

3. Use Cases & Benefits

Automating GitHub release notifications with n8n provides:

  • Consistent checks – scheduled execution ensures no release is missed.
  • Readable emails – Markdown release notes are converted to HTML with preserved formatting.
  • Flexible targeting – send to teams, mailing lists, or specific stakeholders.
  • Multi-channel extension – reuse the same data to notify Slack, Teams, or internal tools.

This is particularly useful for SaaS release announcements, internal changelog distribution, or informing customers of SDK or API updates.

4. Node-by-Node Breakdown

4.1 Schedule Trigger Node

Purpose: Initiate the workflow on a periodic schedule.

Configuration:

  • Trigger type: Time (Schedule Trigger).
  • Mode: Every Day (or a custom cron expression).
  • Time / Interval: Set the exact time of day or repeat interval that fits your process.

The Schedule Trigger node does not require credentials. It simply emits an item that starts the rest of the workflow. Adjust the frequency based on how quickly you need to surface new releases.

4.2 HTTP Request Node – Fetch GitHub Repo Releases

Purpose: Retrieve the latest release for a given GitHub repository.

HTTP configuration:

  • HTTP Method: GET
  • URL:
    https://api.github.com/repos/OWNER/REPO/releases/latest
  • Response Format: JSON

Replace OWNER and REPO with the appropriate repository identifiers, for example:

https://api.github.com/repos/n8n-io/n8n/releases/latest

Authentication & headers:

  • To avoid GitHub rate limits and to access private repositories, configure a GitHub Personal Access Token (PAT) and set an Authorization header:
    Authorization: token <YOUR_TOKEN>
  • In n8n, store the token using the Credentials system and reference it in the node so it is not hardcoded in parameters.

Key response fields used later:

  • published_at – ISO timestamp used to determine if the release is new.
  • body – Markdown release notes that will be converted to HTML.
  • tag_name – version tag, used in the email subject or body.
  • html_url – link to the release page on GitHub.

The node should output a single JSON item representing the latest release. If the repository has no releases, GitHub returns an error; in that case, use n8n’s built-in error handling or manual test runs to verify behavior.

4.3 If Node – Check for New Release in Last Day

Purpose: Only continue the workflow if the latest release is recent (for example, within the last 24 hours).

The If node compares the published_at timestamp from the GitHub response to the current time minus a defined offset. The template uses a date comparison based on n8n expressions.

Conceptual expression:

= $json.published_at.toDateTime() is after DateTime.utc().minus(1, 'days')

Example n8n expression style:

={{ $json.published_at.toDateTime() }} >?={{ DateTime.utc().minus(1, 'days') }}

Exact syntax can vary slightly depending on your n8n version and the date comparison operator available. The important points are:

  • $json.published_at is parsed as a date-time.
  • It is compared against DateTime.utc().minus(1, 'days') or another offset you choose.
  • If the condition is true, the execution continues along the “true” branch to process and send the email.
  • If false, the workflow exits without sending a notification.

Edge cases:

  • If published_at is missing or malformed, the expression may fail. Use n8n’s error handling or additional checks if you expect inconsistent data.
  • Adjust the offset (for example, minus(6, 'hours') or minus(7, 'days')) to match your notification window.

4.4 Split Out Content Node

Purpose: Isolate the release notes stored in the body field so they can be processed independently.

The template uses a Split Out node (or equivalent logic) with configuration similar to:

  • Field to split out: body

Practically, this means the node focuses on the body property from the JSON object returned by GitHub. If you prefer, you can achieve a similar effect with a Set node or a Function node that copies $json.body to a dedicated field.

After this step, downstream nodes can safely reference $json.body as the Markdown content that needs to be converted.

4.5 Markdown Node – Convert Markdown to HTML

Purpose: Convert Markdown-formatted release notes into HTML suitable for email clients.

Configuration:

  • Mode: markdownToHtml
  • Input field: $json.body (Markdown release notes).
  • Output field: for example html (the generated HTML string).

The Markdown node parses headings, lists, links, and other Markdown constructs and produces valid HTML. This HTML will be used as the body of the email, preserving the structure of your GitHub release notes.

Notes:

  • Ensure the input field exists; if body is empty, the output HTML will also be empty.
  • If you want to add a wrapper template (header, footer, company branding), you can do so in a subsequent Set or Function node that concatenates additional HTML around $json.html.

4.6 Email Send Node – SMTP Delivery

Purpose: Deliver the HTML release notes via email to the configured recipients.

Key configuration parameters:

  • To: One or more recipients, for example:
    team@example.com
  • Subject: Can be static or dynamic. Example using the release tag:
    =New release: {{$json.tag_name}}
  • HTML: Set this to the HTML output from the Markdown node, for example:
    {{$json.html}}
  • SMTP credentials: Configure via n8n’s Credentials system (host, port, username, password, TLS/SSL options).

The Email Send node uses your SMTP server (for example, a corporate mail server or a transactional email provider) to send the message. Make sure the “From” address is properly configured and allowed by your SMTP provider.

5. Expression & Template Examples

Below are some useful expressions you can embed in node parameters to enrich the email output.

  • Dynamic email subject with tag name:
    =New release: {{$json.tag_name}}
  • Link to the GitHub release page in the email body:
    <a href="{{$json.html_url}}">View release</a>
  • Format the published date for display:
    {{$json.published_at.toDate('YYYY-MM-DD HH:mm')}}

These expressions can be used in the Email Send node, a Set node, or any other node that supports n8n expressions.

6. Configuration Notes & Best Practices

6.1 GitHub API & Rate Limits

  • Always configure an Authorization header with a Personal Access Token to avoid anonymous rate limits:
    Authorization: token <YOUR_TOKEN>
  • Use the n8n Credentials system to securely store your token instead of hardcoding it.
  • For private repositories, a token with appropriate scopes is required.

6.2 SMTP & Email Delivery

  • Store SMTP credentials in n8n Credentials, not directly in node fields.
  • Verify that the “From” address is authorized on your SMTP server to reduce the risk of spam filtering.
  • Consider sending to a mailing list address rather than many individual recipients to simplify management.

6.3 Security Considerations

  • Do not include sensitive information in release notes if those notes are emailed broadly.
  • If release notes may contain secrets or internal URLs, consider redacting or sanitizing them in a Function or Set node before sending.
  • Restrict access to the n8n instance and credentials to trusted administrators only.

7. Enhancements & Advanced Customization

The core template is intentionally minimal, but it can be extended in several directions:

  • Authentication via GitHub App or advanced tokens: Use a GitHub App or scoped PAT to access private repositories and improve rate limit allowances.
  • Alternative channels: Instead of, or in addition to, email, forward the release data to:
    • Slack (via Slack node or webhook).
    • Microsoft Teams (via webhook or Teams connector).
    • Other internal systems that consume webhooks or APIs.
  • Release assets: Read asset URLs from the releases payload and:
    • Include links to assets in the email body.
    • Optionally attach files, depending on your email provider and size constraints.
  • Multiple releases handling: If you want to process more than the latest release:
    • Call /repos/OWNER/REPO/releases instead of /releases/latest.
    • Iterate over the returned array of releases using n8n’s built-in looping mechanisms.
    • Apply the date filter per release, then send separate or aggregated notifications.
  • Rich HTML templating: Wrap the Markdown-generated HTML with:
    • A custom header (logo, title, intro text).
    • A footer (unsubscribe link, company info, CTA buttons).

8. Troubleshooting

If the workflow does not behave as expected, verify the following:

  • HTTP 403 from GitHub:
    • Check that the Authorization header is present and valid.
    • Ensure the token has the required scopes for the repository.
  • Missing or unexpected fields:
    • Inspect the raw JSON response in the HTTP Request node.
    • Confirm that fields like published_at, body, tag_name, and html_url exist and match your expressions.
  • Broken or unstyled HTML email:
    • Use a Debug or similar node to inspect the html field output from the Markdown node.
    • Copy the HTML into an email client or browser to preview and adjust styling if needed.
  • No email sent:
    • Check the If node condition. If the release is older than the defined window, the workflow will exit without sending.
    • Run the workflow manually with a known recent release to validate the flow.

9. Deployment Workflow

To get this automation running with your own repository:

  1. Import the n8n template from the provided link.
  2. Open the HTTP Request node and update the URL to your repository:
    https://api.github.com/repos/OWNER/REPO/releases/latest
  3. Configure GitHub authentication using a Personal Access Token and set the Authorization header.
  4. Configure SMTP credentials in n8n Credentials, then link them to the Email Send node.
  5. Adjust the If

Automate Upwork Proposals with n8n + OpenAI

Automate Upwork Proposals with n8n + OpenAI

Imagine opening Upwork, spotting a perfect job, and having a polished, personalized proposal ready in seconds. No more staring at a blank text box or rewriting the same intro for the hundredth time.

That is exactly what this n8n + OpenAI Upwork proposal workflow is for. It reads the job description, mixes in your background, and spits out a strong, consistent first draft you can tweak and send. You still stay in control, but the boring part is handled for you.

Why bother automating Upwork proposals?

If you freelance on Upwork, you already know where most of your time goes: writing proposals. Not the fun, creative kind either, but the repetitive “here is who I am, here is what I do” part.

Automation helps you:

  • Speed up outreach – get from job post to proposal in a few clicks.
  • Stay consistent – same tone, same structure, fewer rushed messages.
  • Apply to more relevant jobs – without burning out on typing.

The goal here is not to spam generic copy. You are building a reusable n8n Upwork proposal generator that keeps your proposals tailored and personal, just a lot faster.

What this n8n workflow actually does

Let us break down what you will have by the end:

  • Accepts a job description as input (the “trigger”).
  • Combines that description with your pre-written “about me” facts.
  • Sends a carefully crafted prompt to OpenAI (GPT-4o-mini or similar).
  • Gets back a proposal in JSON format.
  • Stores the final proposal in a clean, predictable field so you can copy, paste, or pass it to other tools.

Think of it as your personal proposal assistant that never gets tired of writing intros.

What you need before you start

  • An n8n instance (cloud or self-hosted).
  • An OpenAI API key.
  • Basic comfort with n8n nodes and how to set credentials.

Once those are in place, you are ready to plug in the template and customize it.

How the workflow is structured

The automation is built from a few simple n8n nodes working together:

  • Execute Workflow Trigger – entry point, receives the job description.
  • Set Variable – stores your personal “about me” data.
  • OpenAI node – sends the prompt and gets the proposal back.
  • Edit Fields / Set – cleans up the response and puts it in a consistent output key.

Once you understand what each part does, tweaking and scaling this becomes straightforward.

Step-by-step: building your Upwork proposal generator

1. Start with the trigger

You need a way to send a job description into the workflow. You can use a Webhook or an Execute Workflow Trigger. Either way, the incoming payload should include the job description text.

Example payload:

{  "jobDescription": "Senior automation engineer to build outreach system..."
}

This is the raw material that OpenAI will use to shape the proposal.

2. Add your profile and “about me” facts

Next, you want the workflow to know who you are and what you do, so it can personalize each proposal. A simple Set node works perfectly here.

Use it to store concise, results-focused text that describes your background. For example:

I'm an AI and automation freelancer that builds outreach systems, CRM systems, project management systems, no-code systems, and integrations.|Some notable things I've done:- End to end project management for a $1M/yr copywriting agency- Outbound acquisition system that grew a content company from $10K/mo to $92K/mo in 12 mo- ...

You can edit this to match your own experience, but keep it tight and relevant to the types of jobs you apply for.

3. Craft the OpenAI prompt

This is where the magic happens. The quality of your proposals depends heavily on the prompt you send to OpenAI. In the OpenAI node, you will pass:

  • A system message that tells the model what it is supposed to be.
  • A user message that includes:
    • The job description.
    • Your “about me” data.
    • Instructions on tone, structure, and output format.

Here is an example prompt structure from the template:

{  "system": "You are a helpful, intelligent Upwork application writer.",  "user": "I'm an automation specialist applying to jobs on freelance platforms.\n\nYour task is to take as input an Upwork job description and return as output a customized proposal.\n\nHigh-performing proposals are typically templated as follows:\n\n`Hi, I do {thing} all the time. Am so confident I'm the right fit for you that I just created a workflow diagram + a demo of your {thing} in no-code: $$$\n\nAbout me: I'm a {relevantJobDescription} that has done {coolRelevantThing}. Of note, {otherCoolTieIn}.\n\nHappy to do this for you anytime-just respond to this proposal (else I don't get a chat window). \n\nThank you!`\n\nOutput your results in JSON using this format:\n\n{\"proposal\":\"Your proposal\"}\n\nRules:\n- $$$ is what we're using to replace links later on, so leave that untouched.\n- Write in a casual, spartan tone of voice.\n- Don't use emojis or flowery language.\n- If there's a name included somewhere in the description, add it after \"Hi\"\n\nSome facts about me for the personalization: {{ $json.aboutMe }}\n\n{\"jobDescription\":\"{{ $('Execute Workflow Trigger').item.json.query }}\"}"
}

Important things to keep in this prompt:

  • Tell the model to return JSON with a proposal field.
  • Keep the $$$ placeholder exactly as is, since you will replace it with links later.
  • Specify a casual, simple tone, no emojis, no fluff.
  • Ask it to add the client name after “Hi” when a name appears in the job description.

Once this is wired up, each run will give you a clean, structured proposal tailored to the job.

4. Extract and store the generated proposal

When the OpenAI node returns its JSON response, you will want to move the proposal into a stable key that is easy to use downstream. A Set or Edit Fields node is ideal for this.

For example, you can map the JSON field from the OpenAI response into something like:

{  "response": "Generated proposal text here..."
}

Now anything that comes after this step, such as email tools, Google Sheets, Airtable, or a clipboard integration, can rely on response as the consistent output field.

Testing, tweaking, and troubleshooting

Once everything is connected, run a few tests before you rely on it for real outreach. Here are some practical checks:

  • Try different job descriptions: short, detailed, and ones that include a client name to confirm that “Hi {Name}” works properly.
  • If OpenAI ever returns malformed JSON, you can:
    • Return the raw text from the node.
    • Add a Function node to safely parse or extract the proposal text.
  • Set the OpenAI node temperature to around 0.5-0.7 for a nice balance between consistency and creativity.
  • Log inputs and outputs for your first few dozen runs so you can refine the prompt if something feels off.

Think of this as tuning your assistant so it “sounds” like you.

Security and best practices

Since you are working with APIs and possibly client data, a bit of hygiene goes a long way.

  • Never hard-code your OpenAI API key into Set nodes or workflow JSON. Use n8n credentials and environment variables instead.
  • Protect the trigger: if you are using a webhook, limit who can access it, for example with a simple API key or by keeping it in a private workspace.
  • Monitor token usage in OpenAI and set limits so you do not get surprised by costs.

Once this is set up properly, you can safely run the workflow as often as you need.

Taking it further: scaling and improvements

When you are happy with the basic generator, you can start layering on more automation around it.

  • Auto-fill proposals into the Upwork message composer using browser automation or a clipboard tool, so you go from job post to filled proposal in seconds.
  • Add scoring logic with a small classifier prompt to rank opportunities or proposals by how strong the match looks.
  • Maintain a library of proven lines and let the model choose the best ones dynamically for each job type.
  • Connect to a CRM to track which jobs you applied to, what proposal you sent, and how many responses you get.

At that point, this simple generator starts to feel more like a full outreach system.

Example variations and A/B testing

Want to experiment with different tones or structures? You can ask the model to return multiple proposal variations for the same job description.

For instance, have it output:

  • Proposal A – more direct and concise.
  • Proposal B – slightly more detailed.

Store each variation and test which one gets better replies over time. Even basic A/B testing can give you a clearer sense of what works with your target clients.

When to use this workflow

This template is especially handy if:

  • You apply to similar types of jobs repeatedly, like automation, design, development, or marketing.
  • You want to keep proposals personal but do not want to write them from scratch every single time.
  • You are ready to treat your freelancing like a system, with repeatable processes instead of ad hoc effort.

It does not replace your judgment or your skills. It just removes the repetitive part so you can focus on picking the right jobs and delivering great work.

Wrapping up

Automating your Upwork proposals with n8n + OpenAI can dramatically cut down the time you spend on outreach while still keeping your messaging tailored and human.

This workflow is a flexible starting point. You can plug it into your CRM, connect it to your task manager, or extend it into a full-blown outreach engine as your freelancing business grows.

Ready to try it? Grab the template, plug in your OpenAI credentials, drop in your own “about me” text, and run a few test job descriptions. You will quickly see where to fine-tune the prompt so it sounds exactly like you.

If you want a custom version of this workflow or help dialing in your prompts, you can reach out for a tailored setup or subscribe to get more no-code automation walkthroughs.

Contact meSubscribe for templates and updates.


Keywords: n8n Upwork proposal generator, Upwork application automation, OpenAI n8n integration, no-code proposal generator.

Automate Upwork Proposals with n8n + OpenAI

Automate Upwork Proposals with n8n + OpenAI

Imagine opening Upwork, spotting a great job, and having a tailored, human-sounding proposal ready in seconds. No more staring at a blank text box, no more copy-pasting the same generic pitch.

That is exactly what this n8n workflow template does. It takes an Upwork job description, runs it through OpenAI with your personal details, and gives you a customized proposal you can send as-is or lightly edit. It is fast, repeatable, and easy to tweak as your freelance business grows.

What this n8n workflow actually does

Let us start with the big picture. This workflow is a compact automation that:

  • Takes in an Upwork job description as input.
  • Adds your personal “about me” info for context.
  • Sends everything to OpenAI using the OpenAI (Message Model) node.
  • Returns a polished proposal, mapped into a clean field that is ready to send to email, Slack, a CRM, or anywhere else.

The workflow is built around four main nodes:

  • Execute Workflow Trigger – kicks off the workflow manually, on a schedule, or via webhook.
  • Set Variable – stores your personal pitch in a variable called aboutMe.
  • OpenAI (Message Model) – generates the proposal based on the job description and your context.
  • Edit Fields – cleans up and structures the AI response so you can send or store it easily.

In other words, you drop in a job description and get back a proposal that sounds like you, not a robot.

Why bother automating proposal writing?

If you have ever tried to scale your Upwork outreach, you know the pain. Writing every proposal from scratch is exhausting, and reusing the same boilerplate text quickly starts to hurt your win rate.

Automation with n8n and OpenAI helps you:

  • Respond faster – generate tailored proposals in seconds instead of minutes.
  • Stay consistent – keep your messaging aligned with your personal brand and past wins.
  • Experiment easily – test different tones, structures, and prompts to see what converts best.
  • Scale outreach – plug this into your CRM, spreadsheets, or lead tracking systems to handle more opportunities without burning out.

Think of it as a proposal co-pilot. You are still in control, but you are no longer doing all the typing yourself.

How the workflow is structured

Let us walk through each node and how to configure it so you can get from “idea” to “working automation” as quickly as possible.

1. Execute Workflow Trigger – how the process starts

The first step is deciding how you want to trigger the workflow. n8n gives you a few flexible options, depending on your setup:

  • Manual trigger while you are testing or just starting out.
  • Webhook trigger if you want to send job descriptions from a scraper, another automation tool, or a custom script.
  • Schedule trigger if you are polling a job board, Google Sheet, or Airtable base for new listings.

Pick the one that fits your current workflow. You can always switch later as you scale.

2. Set Variable node – storing your “about me”

Next comes the personalization part. You do not want every proposal to sound generic, so this workflow uses a Set Variable node to store a short block of text about you in a variable called aboutMe.

This text is injected into the OpenAI prompt so the model can write as if it is you. Here is the example used in the template:

I'm an AI and automation freelancer that builds outreach systems, CRM systems, project management systems, no-code systems, and integrations.|Some notable things I've done:- End to end project management for a $1M/yr copywriting agency- Outbound acquisition system that grew a content company from $10K/mo to $92K/mo in 12 mo ...

A few tips for this section:

  • Keep it concise, about 3-6 lines is usually enough.
  • Highlight specific wins, numbers, or results.
  • Update it over time as you get better case studies.

This one variable goes a long way in making your proposals feel like they are coming from a real person with real experience.

3. OpenAI (Message Model) node – generating the proposal

This node is the core of the workflow. It takes the job description plus your aboutMe text and turns that into a tailored proposal using OpenAI.

In the template, the node is configured to use the gpt-4o-mini model with a temperature around 0.7. That gives you a good balance between creativity and consistency.

The conversation structure looks like this:

  • System message – sets the role and behavior of the assistant.
    Example: You are a helpful, intelligent Upwork application writer.
  • User message – includes instructions, the job description, and your personal info.
  • Optional data – your aboutMe variable is pulled in for personalization.

Here is a simplified version of the prompt structure used in the workflow:

{  "system": "You are a helpful, intelligent Upwork application writer.",  "user": "=I'm an automation specialist applying to jobs on freelance platforms.\n\nYour task is to take as input an Upwork job description and return as output a customized proposal...\n\nSome facts about me for the personalization: {{ $json.aboutMe }}\n\n{\"jobDescription\":\"{{ $('Execute Workflow Trigger').item.json.query }}\"}"
}

There are a few important rules baked into this prompt that you will want to keep intact:

  • Do not touch $$$ in the output. It is a placeholder where you will later inject a link, such as a workflow diagram or demo.
  • Keep the tone casual and straightforward with no emojis or overly flowery language.
  • Use the client’s name when available. If the job description mentions a name, the proposal should start with “Hi [Name]”. If not, a simple “Hi” is fine.

You can always tweak the instructions or tone, but keeping these core rules helps the proposals stay consistent and easy to post.

4. Edit Fields node – preparing the final output

Once OpenAI returns a proposal, the Edit Fields node steps in to clean and structure the result.

Typically, you will map the AI output into a field such as response. That way, the rest of your workflow can easily reference response when sending emails, posting to Slack, or saving to a database.

From this node, you can:

  • Write proposals to Google Sheets or Airtable for tracking.
  • Send them to Slack, Gmail, or your CRM for review or follow-up.
  • Insert a human review step before anything is submitted to Upwork.

Think of this as the “staging area” where the raw AI text is turned into a structured, reusable data field.

Example input and output

Curious what this looks like in practice? Here is a simple example.

Job description input:

Looking for a Make.com expert to automate lead routing from Typeform to Airtable and Slack. Must create error handling and reporting.

Example generated proposal (trimmed):

Hi - I build automation for lead routing and error handling all the time. Am so confident I'm the right fit for you that I just created a workflow diagram + a demo of your lead routing in no-code: $$$

About me: I'm an AI and automation freelancer that builds outreach, CRM, and integrations. I recently built an outbound acquisition system that scaled a content company from $10K/mo to $92K/mo.

Happy to do this for you anytime-just respond to this proposal.

Thank you!

Notice how it mentions your background, connects directly to the problem (lead routing, error handling), and leaves the $$$ placeholder untouched so you can inject a link later.

Best practices to get better proposals

Once the basic workflow is running, a few small tweaks can make your results much stronger.

  • Keep your aboutMe tight and consistent so your “voice” does not drift too much between proposals.
  • Experiment with temperature and max tokens. Lower temperature values give more predictable outputs, higher values add creativity.
  • Preserve placeholders like $$$ if you plan to add links programmatically later.
  • Add a name-detection step using a small JS or regex node so you can reliably generate greetings like “Hi Sarah,” when the client’s name appears in the job post.

Little adjustments like these can noticeably improve the feel and performance of your proposals.

Error handling and reliability

No automation is perfect, and API calls fail sometimes. To keep this workflow stable and trustworthy, it is worth adding a bit of resilience.

  • Retry logic for transient OpenAI errors so a single timeout does not break your whole pipeline.
  • Logging of inputs and outputs to a spreadsheet or database so you can review, debug, and run A/B tests.
  • Human review queues where proposals are generated automatically but a person gives them a quick check before submission.

This way you get the speed of automation without sacrificing quality or control.

Scaling your outreach with integrations

Once you are happy with the core workflow, you can start plugging it into the rest of your stack to really scale things up.

  • Google Sheets or Airtable to store job posts and generated proposals side by side.
  • Gmail or the Gmail Send node to email proposals or notifications automatically, if you are comfortable with automated submissions.
  • Slack or Discord to ping you or your team when a high-potential job is found and a proposal is ready.
  • CRMs like HubSpot, Pipedrive, or Monday.com to create opportunities or deals whenever a good-fit job appears.

The template is a great starting point, and n8n makes it easy to bolt on extra steps as your process evolves.

Security, costs, and staying compliant

A quick but important note on the “boring” parts that matter long term.

  • Store your OpenAI API keys in n8n credentials, not in plain text inside the workflow.
  • Monitor token usage and costs. Models like gpt-4o-mini are a good balance, but you can test cheaper variants if you are doing high volume.
  • Respect platform terms of service. Make sure you are not scraping or automating actions in ways that violate Upwork or other freelance marketplaces.

Handled well, this setup can be both powerful and safe.

Testing checklist before you go live

Before you fully trust the workflow, run through this quick checklist:

  1. Trigger the workflow manually with a sample job description.
  2. Check that your aboutMe variable is injected correctly into the OpenAI prompt.
  3. Open the execution log and inspect the OpenAI node input and output to confirm it looks right.
  4. Verify that the final proposal is mapped into the correct field (such as response) and that it is being stored or sent to the right place.

Once all of that looks good, you can start connecting real job sources.

How to roll this out in stages

You do not need to jump straight into full automation. A simple phased approach works best:

  • Phase 1: Use a manual trigger and review every proposal yourself.
  • Phase 2: Connect job sources (like a spreadsheet or scraper) but still keep human approval before submission.
  • Phase 3: When you are confident in the outputs, automate more of the pipeline and reserve manual review for high-value opportunities.

This lets you build trust in the system while still catching any weird outputs early on.

Call to action

If you would like to skip the setup work, you can grab my ready-to-import n8n workflow and a tested OpenAI prompt that drops straight into your instance. Reach out to get the template or subscribe for weekly automation templates and walkthroughs.

Want to see it in action? Paste a sample job description and I can show you a preview of the kind of proposal this workflow would generate.

Note: Remember to replace the $$$ placeholder with your workflow diagram or demo link only after the proposal has been generated.

Automate WordPress Posts from PDFs with Human Approval

Automate WordPress Posts from PDFs with Human Approval

Imagine turning a backlog of dense PDFs into a steady stream of polished, SEO-optimized WordPress posts, without spending your evenings copying, pasting, and reformatting. With the right automation mindset and a powerful n8n workflow, that vision is completely achievable.

This guide walks you through an n8n workflow template that converts PDFs into ready-to-review blog posts using AI, automated image generation, and a human approval step via Gmail. You will see how each node works, but more importantly, you will see how this workflow can free your time, sharpen your focus, and help your content operation grow with confidence.

The Problem: Great Content Stuck in PDFs

Many teams already have gold buried in PDF form: research reports, whitepapers, manuals, training decks, and internal documentation. The challenge is that turning them into blog posts usually means:

  • Manual copy-and-paste from PDF to WordPress
  • Reformatting headings, quotes, and sections
  • Writing SEO-friendly titles and introductions
  • Searching for or designing relevant images
  • Coordinating review and approval by email or chat

This process is slow, repetitive, and easy to postpone. As a result, valuable insights stay locked away, and your content calendar suffers.

The Possibility: Automation as a Growth Lever

Automation is not about replacing your judgment or creativity. It is about removing friction so you can spend more time thinking and less time clicking. When you automate the mechanical parts of content production, you gain:

  • More consistent publishing without extra headcount
  • Faster turnaround from research to live article
  • Space to focus on strategy, storytelling, and quality
  • A repeatable workflow you can refine and scale

n8n gives you a visual way to build that system. The workflow template in this article is a practical starting point. It shows how AI, WordPress, Gmail, and image generation can work together in a single flow, with a human firmly in control of the final outcome.

Mindset Shift: From Manual Tasks to Repeatable Systems

Before diving into the nodes, it helps to approach this workflow as a system you will grow over time, not a one-off trick. Start simple, run a few PDFs, adjust the prompts, tweak the approval steps, and watch your process mature.

Each automation you build is a small investment that pays you back every time it runs. This template is one of those investments. It turns a manual, multi-step process into a guided, semi-automated journey from PDF to published post, with you as the editor-in-chief.

The Workflow Journey: From PDF to Published WordPress Post

The n8n workflow is organized into a clear path:

  1. Upload and extract the PDF content
  2. Use AI to generate a structured, SEO-friendly blog post
  3. Validate the result and route it to human approval via Gmail
  4. Generate and upload a featured image
  5. Create the WordPress draft, publish, and notify stakeholders

Below is a step-by-step breakdown, with an emphasis on how each part supports a smoother, more focused content process.

Step 1: Upload Your PDF and Extract the Text

The journey begins with a simple action: uploading a PDF. Instead of opening it in a viewer and copying text, you let the workflow handle extraction.

Form Trigger (Upload PDF)

The Form Trigger node accepts a single PDF file from a web form. This gives your team an easy entry point: upload any eligible PDF and let the system take over.

ExtractFromFile (Convert PDF to Text/HTML)

The ExtractFromFile node parses the PDF into text or HTML that the AI can understand. It aims to preserve key elements like headings, quotes, and structure, which helps the AI generate a coherent, well-organized blog post.

By automating extraction, you remove a tedious step and ensure a consistent starting point for every article you create from a PDF.

Step 2: Turn Raw PDF Content Into an AI-Generated Blog Post

Once the text is available, the workflow passes it to an AI model to transform it into a structured article. Instead of staring at a blank editor, you get a complete first draft that you can review and refine.

LLM (gpt-4o-mini / Chain LLM)

The extracted text is sent to a GPT-based model, for example gpt-4o-mini in the template. A carefully designed prompt instructs the model to create:

  • A short, SEO-optimized H1 title
  • A 150-200 word introduction that sets the context
  • 6-8 chapters of 300-400 words each, each with an H2 heading
  • A 200-250 word conclusion with key takeaways

The output is returned as HTML, including paragraphs and <blockquote> tags for direct citations. This structure is ready to be dropped into WordPress without extra formatting work.

Code Node (Get Blog Post)

The Code node named Get Blog Post extracts the first H1 tag to use as the post title and passes the rest of the HTML content forward. This keeps your data clean and ensures the title and body are clearly separated for the next steps.

At this point, you have taken a static PDF and converted it into a complete, SEO-aware blog draft, all with minimal manual input.

Step 3: Validate, Then Keep Humans in the Loop

Automation works best when it supports your standards instead of bypassing them. This workflow includes a built-in check to ensure the AI produced valid content, followed by a human approval step using Gmail.

If Node (Is there Title & Content?)

The If node verifies that the AI has produced both a title and a body. If either is missing, the workflow does not silently fail. Instead, it triggers an error notification.

Error Handling with Telegram

When content is incomplete, a Telegram node sends an error message so you can quickly investigate. This might mean checking the PDF extraction quality or adjusting the AI prompt. Either way, you stay in control and informed.

Gmail sendAndWait (Human In The Loop)

If the content passes validation, the workflow routes it to a Gmail node configured with sendAndWait. This creates a human-in-the-loop approval flow:

  • The draft title and content are emailed to a reviewer
  • The reviewer can approve or reject the post directly from Gmail
  • The workflow only continues if the approval flag is set to true

This step protects your brand voice, compliance requirements, and editorial standards while still taking full advantage of automation for the heavy lifting.

Step 4: Generate a Featured Image and Handle Media Automatically

A strong article deserves a strong visual. Instead of searching manually for images every time, the workflow uses the post title to generate a custom image and attach it to the WordPress post.

Image Generation with pollinations.ai

After approval, an HTTP Request node calls pollinations.ai to generate an image based on the post title. This turns your content into a prompt, creating a relevant and vibrant visual that matches the theme of the article.

Upload Image to WordPress & Optional External Hosting

The generated image can be:

  • Uploaded directly to WordPress using the REST API
  • Optionally stored in an external image host like imgbb for further processing or reuse

Once uploaded, another node sets this media item as the featured image for the WordPress post. No more downloading, renaming, and uploading files by hand.

Step 5: Create the WordPress Draft, Publish, and Notify

With content and image ready, the workflow turns everything into a WordPress draft, then notifies your team or subscribers when the post is live.

Create WordPress Post

The Create WordPress Post node creates a draft using the AI-generated title and HTML content. The post status is set to draft so you can still make final edits in WordPress if needed.

Attach Featured Image

Once the image upload is complete, the workflow updates the post to set the generated image as the featured media. This ensures your blog archive and social previews look polished and consistent.

Markdown & Merge Nodes for Previews

A Markdown node, together with merge steps, prepares compact previews of the article. These previews are then used in notifications, giving recipients a quick snapshot of the new content.

Final Notifications (Telegram / Gmail)

Finally, the workflow sends out notifications through:

  • Gmail for stakeholders or internal teams
  • Telegram for subscribers, team channels, or content ops groups

This closes the loop. From PDF upload to published post and notifications, the workflow delivers a complete, repeatable pipeline.

Node-by-Node Responsibilities at a Glance

Here is a concise overview of what each node does, so you can understand and customize the template with confidence:

  • Form Trigger (Upload PDF): Accepts the PDF file from a web form.
  • ExtractFromFile: Converts PDF binary into text or HTML for the AI to analyze.
  • LLM (gpt-4o-mini / Chain LLM): Generates the SEO-friendly title and full HTML blog post based on a tailored prompt.
  • Code node (Get Blog Post): Extracts the first H1 as the post title and passes the remaining content forward.
  • If node (Is there Title & Content?): Checks that AI output contains both title and body, then routes to approval or error handling.
  • Gmail sendAndWait (Human In The Loop): Sends the draft to a reviewer and waits for explicit approval.
  • Create WordPress Post: Creates a draft post in WordPress with the provided title and HTML content.
  • Image generation (pollinations.ai): Produces a vibrant image using the post title as an image prompt.
  • Upload Image to WordPress & Set featured image: Uploads the image via WordPress media endpoints and sets it as featured media.
  • Notifications (Telegram / Gmail Final Blog): Sends previews and links to stakeholders or channels when the post is ready.
  • Error handling (Telegram Send Error Message): Alerts you when extraction or AI generation fails so you can respond quickly.

Setup: Credentials You Need Before You Start

To bring this workflow to life in n8n, you will need to configure the following credentials:

  • OpenAI API key or another LLM provider key
  • WordPress API credentials using Application Passwords or OAuth
  • Gmail OAuth2 for the sendAndWait approval step
  • Telegram Bot token if you want Telegram notifications
  • Optional: imgbb API key if you choose external image hosting

Ensure the WordPress user has permission to create posts and upload media. For media uploads via the REST API, include a proper Content-Disposition header with a filename and use authenticated requests.

Best Practices to Get the Most From This Template

Think of this workflow as a starting point. As you run it, you will discover ways to align it even more closely with your brand and processes.

  • Prompt engineering: Adjust the AI prompt to match your tone, audience, and formatting rules. Be explicit about word counts, headings, and use of HTML tags.
  • Quality control: Keep the Gmail approval step for compliance-heavy or brand-critical content. For lower-risk content, you can still keep it as a quick check.
  • Copyright and licensing: Confirm that your source PDFs can legally be repurposed. Use <blockquote> tags for direct quotes and cite sources clearly.
  • Monitor costs and limits: Track your OpenAI and image generation usage so you stay within budget and avoid rate limit surprises.
  • Security: Store API keys and credentials securely in n8n. Restrict access to your n8n instance and WordPress application passwords.
  • Testing: Try different types of PDFs, including scanned and digital text, to see where extraction might need OCR or additional tuning.

Troubleshooting Common Issues

As you experiment and optimize, you may run into a few predictable issues. Here is how to handle them:

  • No title or content generated: Check the ExtractFromFile node output. Scanned PDFs might require OCR or a different extraction tool. Also review the AI prompt for clarity.
  • Image upload failures: Verify WordPress REST API permissions, authentication headers, and the Content-Disposition header used when uploading media.
  • Gmail approval not working: Ensure your Gmail OAuth token has the correct scopes and that sendAndWait is configured and enabled properly.

Each issue you solve makes your workflow stronger and more reliable for the long term.

Benefits and ROI: From One-Off Posts to a Scalable Content Engine

When this workflow is in place, you are not just saving a few minutes on a single post. You are creating a repeatable engine that can:

  • Accelerate content production from existing PDFs
  • Increase content reuse from research, whitepapers, and internal documents
  • Reduce manual errors that come from copying and pasting
  • Maintain brand integrity through structured human approval

Over time, the hours you reclaim can be reinvested into deeper research, better storytelling, more experimentation, and higher-impact initiatives. That is the real return on investment of automation.

Your Next Step: Start Small, Then Grow Your Automation

You do not need to automate everything in one day. Start with a single PDF, connect your tools, and watch the workflow run from end to end. Then refine it based on what you learn.

Here is a simple way to begin:

  1. Import this n8n template into your n8n instance.
  2. Connect your OpenAI (or other LLM), WordPress, and Gmail credentials.
  3. Configure Telegram and imgbb if you plan to use notifications or external image hosting.
  4. Run a test with one PDF to validate extraction, AI prompts, and approval flow.
  5. Adjust prompts, wording, and approval routing as needed, then scale to more PDFs.

If you want help customizing prompts, adding structured SEO metadata, or adapting the workflow to another CMS instead of WordPress, reach out to your team, community, or automation partners. Small improvements to this template can have a big impact on your long-term workflow.

Try the template now and start transforming your backlog of PDFs into high-quality, reviewable WordPress posts with a reliable human approval safety net. Each run will save you time, sharpen your process, and move you one step closer to a truly automated content pipeline.

n8n AI Conversation Workflow Guide

n8n AI Conversation Workflow: A Story Of One Marketer And A Smarter Chatbot

By the time the third support ticket hit her inbox before 9 a.m., Lina knew something had to change.

She was the solo marketer at a fast-growing SaaS startup. Her job should have been focused on campaigns and growth, yet every day she was dragged into the same problem: their “AI chatbot” was unreliable, hard to tweak, and impossible to debug. Conversations disappeared, answers were inconsistent, and nobody could explain why.

Then the CEO asked the question she had been dreading:

“Can we trust this AI assistant to handle real customer conversations?”

Lina did not have a good answer. Not yet.


The Pain: A Chatbot You Cannot Trust

Their existing setup was a patchwork of scripts and a hosted AI tool. If responses looked weird, no one knew whether it was the prompt, the model, or an API hiccup. There was no proper logging, no clear error handling, and no way to iterate quickly.

  • Prompts were scattered across different tools.
  • API keys were buried in code and hard to rotate.
  • Conversation history was not stored in a structured way.
  • When the model failed, customers saw awkward error messages or nothing at all.

Lina needed something different: a transparent, reliable way to orchestrate AI conversations that her team could actually understand and improve. She was comfortable with tools like Zapier and Make, so a visual automation tool felt natural. That is when she discovered n8n.


Discovery: Why n8n Was The Missing Piece

Lina stumbled onto an n8n AI conversation workflow template while searching for “n8n GPT chat automation with logging.” The promise sounded almost too good to be true:

  • Drag-and-drop workflow design instead of opaque code
  • Nodes for data preparation, conditional logic, and HTTP APIs
  • Easy integration with language models like GPT-5 preview
  • Built-in debugging, logging, and error handling

It was exactly what she needed: a way to build a reliable AI conversation workflow that her team could see, tweak, and trust.

So she imported the template into n8n and started to explore the nodes that would soon become the backbone of their customer assistant:

  • Manual Trigger for testing conversations
  • Set node (set-initial-data) to prepare system prompt, user message, and context
  • AI Agent node (ai-conversation-handler) to orchestrate logic and memory
  • Language Model node (gpt5-language-model) to connect to GPT-5 preview
  • Set node (format-response) to clean and enrich the answer
  • HTTP Request (log-conversation) to store the full transcript
  • Error handler to avoid silent failures
  • Sticky note as inline documentation

For the first time, Lina could see the entire AI conversation pipeline laid out in front of her, step by step.


Rising Action: Building The Conversation Flow In n8n

Starting Small: Triggering And Shaping The First Conversation

Lina began in the safest place possible: a Manual Trigger. No live users, no risk. Just her, the workflow, and a single test message.

Right after the trigger, the template used a Set node named set-initial-data. This node prepared a structured payload for the AI agent:

{  "systemPrompt": "You are Max, a friendly assistant.",  "userInput": "Hello! How are you doing today?",  "context": "This is a friendly AI assistant conversation"
}

She quickly realized how powerful this simple pattern was. The systemPrompt defined the assistant’s role and tone, the userInput captured the latest message, and the context provided any surrounding information.

By keeping the system prompt concise and explicit, Lina could control how the model behaved without rewriting code. If she wanted a more professional tone or a brand-specific voice, she could change it in one place.


The Brain: Configuring The AI Agent Node

The next part of the story unfolded in the ai-conversation-handler node. This was where the “agent” logic lived. It did more than just call a model. It was responsible for:

  • Assembling the full prompt from system prompt, context, and user input
  • Managing short-term memory or conversation history
  • Applying output parsing rules so responses followed a predictable format

Lina configured the node to expect structured output when needed, such as JSON for downstream actions. If the model needed to return tags, actions, or specific fields, she defined a clear schema.

Instead of a black box chatbot, she now had an AI agent layer that she could reason about. It felt like upgrading from a magic trick to a real, maintainable system.


The Voice: Connecting GPT-5 In The Language Model Node

Next came the gpt5-language-model node. This node was wired to the actual large language model, in her case GPT-5 preview via an OpenAI credential.

She double-checked a few critical details:

  • Model name availability, such as gpt-5-preview
  • API key and secret stored securely in n8n credentials, not hard-coded in nodes
  • Generation settings like temperature and max tokens

For their customer assistant, Lina chose a temperature in the 0.4 – 0.8 range. Lower values felt too robotic, higher ones too unpredictable. Settling in the middle gave them helpful but still consistent responses.

With one node, she could swap models, adjust creativity, and stay within cost and rate limits, all without touching application code.


Turning Point: From Raw Output To Production-Ready Responses

The first time Lina clicked “Execute Workflow,” the model responded politely. It was a good start, but the raw output alone was not enough. She needed structure, traceability, and logs.

Shaping The Answer: The format-response Node

The template’s format-response Set node became her favorite part. It took the model’s reply and enriched it with metadata that would matter in production.

The node performed three key tasks:

  • Normalized text by stripping extra whitespace
  • Added metadata such as timestamp, conversationId, and userId
  • Prepared structured JSON for downstream systems

The template included assignments like:

response: {{ $json.output }}
timestamp: {{ new Date().toISOString() }}
conversationId: conv_{{ Math.random().toString(36).substr(2,9) }}

Suddenly every response had a unique conversationId and a precise timestamp. That meant Lina could track entire chat sessions, correlate them with users, and debug specific interactions.


Making Conversations Traceable: Logging With HTTP Request

Before n8n, conversations disappeared into the hosted chatbot tool. Now, with the log-conversation HTTP Request node, Lina could send a POST request containing the full response payload to their own API.

This opened up several possibilities:

  • Store transcripts in their database for analysis and compliance
  • Send analytics events to their monitoring stack
  • Trigger follow-up workflows, such as billing events or support tickets

She made sure their logging endpoint supported idempotency and could handle retries if the workflow restarted. That way, they would not accidentally duplicate logs when recovering from failures.


Facing Reality: Error Handling And Failures

The real turning point came when Lina simulated an outage by using an invalid API key. Previously, that kind of error would have surfaced as a cryptic message or an empty chat bubble. In the new n8n workflow, an error-handler node caught the failure.

She configured it with a few best practices:

  • Return a user-friendly fallback message if generation failed
  • Log detailed error context to a separate error stream
  • Implement exponential backoff for transient API errors

Now, instead of “Something went wrong,” customers would see a helpful fallback, and the team would have a clear record of what had happened.

The chatbot was no longer fragile. It was resilient.


Leveling Up: From Prototype To Production Workflow

With a working workflow in place, Lina started to think about production-readiness. She knew that once the CEO saw the new assistant in action, usage would spike. That meant she had to address security, cost, prompts, and observability.

Keeping Secrets Safe: Security And Credentials

First, she cleaned up how credentials were handled:

  • All API keys moved into n8n credentials or environment variables
  • No secrets hard-coded in Set nodes or HTTP requests
  • Logging endpoints restricted and protected
  • Any stored transcripts encrypted at rest where possible

This gave her peace of mind and made audits easier. If they needed to rotate keys, they could do it in one place.


Controlling Costs And Rate Limits

Next, Lina tackled cost and performance. Language models are powerful, but they are not free. She monitored token usage and set reasonable maxTokens values in the language model node.

To stay within budget and respect rate limits, she considered:

  • Caching common responses for FAQs
  • Using a smaller or cheaper model for simple queries
  • Adding a rate limiter or queue in front of high-volume workflows

With n8n, these adjustments were simple configuration changes, not full rewrites.


Prompt Engineering And Memory: Giving The Assistant A Real Personality

As the workflow matured, Lina focused on the assistant’s voice and memory. She refined the prompt pattern used in the Set node so that “Max” felt on-brand and consistent.

One robust pattern she adopted looked like this:

System: You are Max, a friendly assistant who responds with humor and emojis.
Context: {{ context }}
User: {{ userInput }}
Instruction: Provide a friendly, helpful answer. Keep it concise and add one emoji.

She kept system prompts short and explicit, and when they needed persistent memory, she added a database step that stored summarized context. Before each call to the model, she could load relevant history into the Set node, or even use semantic search over embeddings to retrieve longer-term context.

Suddenly, Max felt less like a toy and more like a helpful team member.


Observability: Seeing The Whole Conversation Landscape

To avoid surprises in production, Lina instrumented the workflow with observability in mind. Using the metadata she had already added, such as conversationId, userId, and timestamp, she emitted logs and metrics that answered key questions:

  • What is the success rate of AI responses?
  • How long do responses take?
  • How many tokens are used per conversation?

With this data, she could detect regressions quickly and prove to her team that the AI assistant was performing as expected.


Troubles, Tweaks, And Extensions

As usage grew, a few issues surfaced, but they were now straightforward to fix inside n8n.

Troubleshooting Common Issues

  • If the agent returned unexpected formats, she tightened the output schema in the ai-conversation-handler node and added an explicit output parser.
  • When responses felt slow, she checked network latency, model token limits, and considered using streaming where supported.
  • If they hit rate limits, she added a rate limiter node and queued requests to smooth traffic spikes.

Each problem had a visible place in the workflow where it could be addressed. No more hunting through obscure logs in a hosted chatbot tool.


Extending The Workflow Beyond Simple Chat

Once the core AI conversation workflow was stable, Lina started to dream bigger. The same n8n template could evolve into a powerful automation hub:

  • Integrate embeddings and vector databases for knowledge retrieval
  • Add multi-turn memory using a database or Redis
  • Use conditional nodes to escalate complex issues to human agents
  • Support multimedia inputs like attachments or images with pre-processing steps

What began as a simple chat automation now looked like the foundation for a scalable, multi-user AI support system.


Resolution: A Reliable AI Conversation Workflow In Production

A few weeks later, Lina sat in a product review meeting. The CEO shared his screen and opened a conversation with Max, the AI assistant now powered by the n8n AI conversation workflow.

Max answered clearly, with the right tone, and even a touch of humor. When someone asked, “What happens if the model fails?” Lina calmly explained the error handler, the logging, and the fallback messages. When another teammate asked about costs, she showed the token usage metrics and rate limit safeguards.

The room went quiet for a second, then the CEO smiled.

“Let’s roll it out to all users.”

Lina had not just fixed a chatbot. She had built a transparent, auditable, and scalable AI conversation system using n8n.


Next Steps: Make This Story Yours

n8n turned out to be the orchestration layer Lina needed to turn a fragile chatbot into a production-ready AI conversation workflow. The template she started from showed her how to:

  • Prepare structured data and prompts with Set nodes
  • Configure an AI agent node that manages logic and memory
  • Connect a language model like GPT-5 preview securely
  • Format, enrich, and log every response
  • Handle errors gracefully and monitor behavior in production

You can follow the same path. Import the template, connect your model, and start running test conversations. Then iterate on prompts, add memory and retrieval, and layer in observability until your AI assistant is something your team can trust.

Call to action: Import the template into n8n, configure your OpenAI or third-party credentials, and run a few test conversations today. Once it works, export the workflow JSON, store it in your repo, and treat it like any other critical part of your infrastructure.

If you would like help, you can:

  • Get a ready-to-import n8n workflow JSON adapted to your models and endpoints
  • Craft system prompts tailored to your brand voice and audience
  • Design an architecture for scaling multi-user AI conversation workloads

Reply with which option you want to start with, and the next chapter of your AI automation story can begin.