Generate Google Slides Thumbnails with n8n

Generate Google Slides Thumbnails with n8n

Ever wished you could grab thumbnail images for every slide in a Google Slides deck without doing it by hand? With n8n, you can turn that into a simple, reusable workflow that runs whenever you need it.

In this guide, we will walk through an n8n workflow template that pulls in all the slides from a Google Slides presentation and automatically generates thumbnails for each one. It is perfect for things like website previews, internal dashboards, newsletters, course platforms, or any place where a quick visual of each slide makes life easier.

What this n8n workflow actually does

Let us start with the big picture. This workflow is a small one, but it packs a punch. It:

  • Starts with a manual trigger (you can swap this out for any trigger later)
  • Calls the Google Slides API to list every slide in a presentation
  • Uses each slide’s objectId to request and download a thumbnail image

Once it is running, n8n loops through all the slides for you, grabs their thumbnails, and makes those images available for whatever you want to do next, such as saving them to storage or sending them somewhere else.

When should you use this template?

Think about any time you have a presentation and you want quick visual previews without opening the file. This workflow is especially handy if you want to:

  • Automatically generate thumbnails whenever a new presentation is created or updated
  • Show slide previews in a CMS, internal tool, or learning platform
  • Send thumbnail galleries in reports or emails
  • Scale thumbnail generation across multiple presentations without manual work

If you are already using n8n for automation, this template fits in nicely as a building block that you can connect to other workflows, like Drive triggers, S3 uploads, or CMS updates.

What you will build, step by step

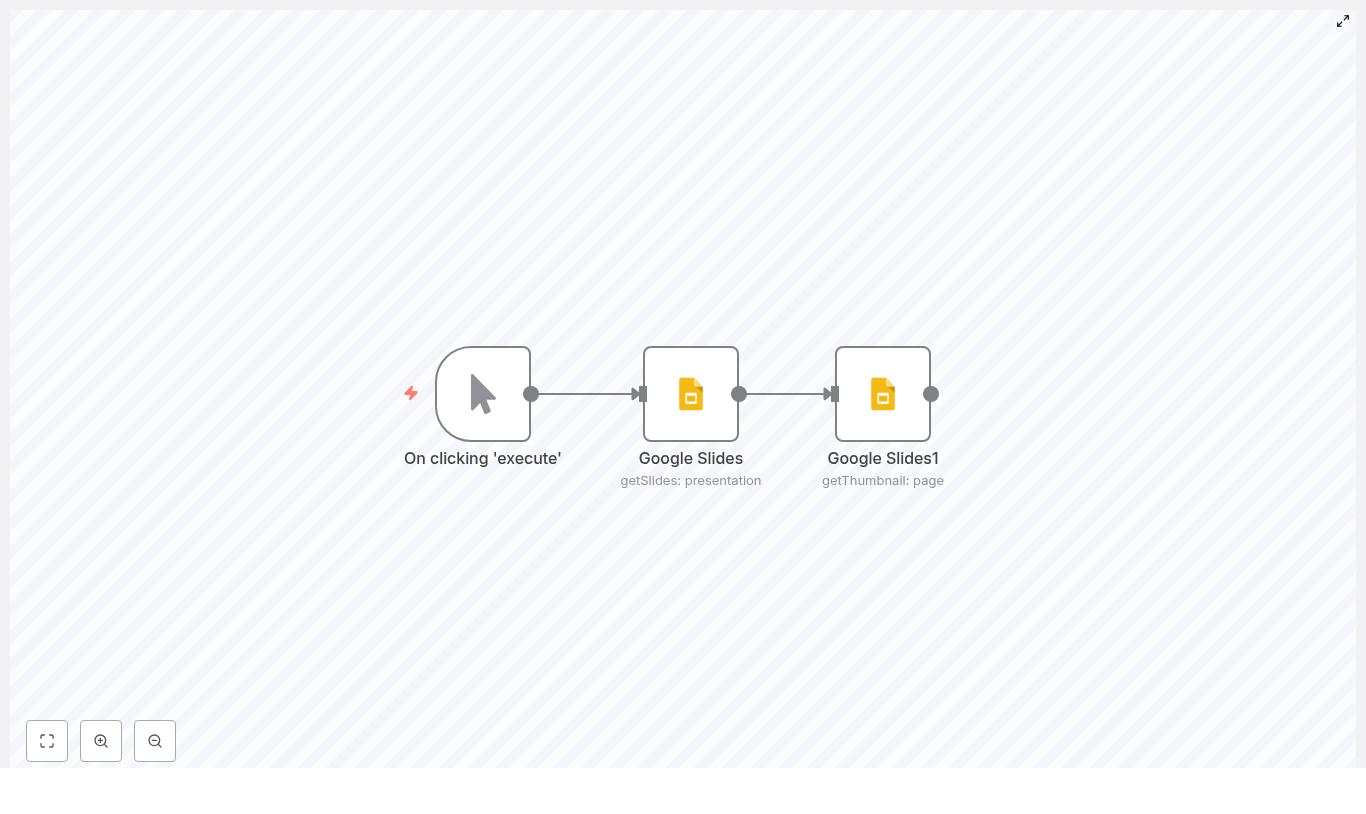
The workflow is intentionally simple so you can understand it quickly and then extend it. It uses three nodes:

  1. Manual Trigger – starts the workflow when you hit Execute in n8n. Later, you can replace this with a webhook, schedule, or Drive trigger.
  2. Google Slides (getSlides) – fetches the presentation and returns all its pages, which are the slides.
  3. Google Slides1 (getThumbnail) – uses each slide’s objectId to request and download a thumbnail image.

Once the thumbnails are downloaded, they are available as binary data in n8n. From there, you can chain on more nodes to save, upload, or email them.

What you need before you start

Before importing or running the template, make sure you have the basics ready:

  • n8n installed (either n8n Cloud or your own self-hosted instance)
  • Google Slides API enabled in your Google Cloud Console
  • OAuth2 credentials configured in n8n for Google Slides
  • The presentation ID of the Google Slides deck you want to process

The presentation ID is the long string in the Slides URL after /presentation/d/. You will plug this into the workflow template in a moment.

Importing and understanding the workflow template

Here is the JSON for the core workflow. You can import this directly into n8n and then tweak it as needed:

{  "nodes":[  {  "name":"On clicking 'execute'",  "type":"n8n-nodes-base.manualTrigger",  "position":[270,280],  "parameters":{},  "typeVersion":1  },  {  "name":"Google Slides",  "type":"n8n-nodes-base.googleSlides",  "position":[470,280],  "parameters":{  "operation":"getSlides",  "returnAll":true,  "authentication":"oAuth2",  "presentationId":"YOUR_PRESENTATION_ID"  },  "credentials":{  "googleSlidesOAuth2Api":"Google Slides Credentials"  },  "typeVersion":1  },  {  "name":"Google Slides1",  "type":"n8n-nodes-base.googleSlides",  "position":[670,280],  "parameters":{  "download":true,  "resource":"page",  "operation":"getThumbnail",  "pageObjectId":"={{$json[\"objectId\"]}}",  "authentication":"oAuth2",  "presentationId":"={{$node[\"Google Slides\"].parameter[\"presentationId\"]}}"  },  "credentials":{  "googleSlidesOAuth2Api":"Google Slides Credentials"  },  "typeVersion":1  }  ],  "connections":{...}
}

After importing, replace YOUR_PRESENTATION_ID with the actual ID from your Slides URL.

Step 1 – Set up Google OAuth2 credentials in n8n

First, n8n needs permission to talk to the Google Slides API on your behalf. In n8n:

  1. Create a new Google OAuth2 credential.
  2. Make sure it includes scopes for reading Slides, and optionally Drive if you plan to save files there.

Typical scopes you will want:

  • https://www.googleapis.com/auth/presentations.readonly
  • https://www.googleapis.com/auth/drive.file (optional, if you want to save thumbnails to Google Drive)

Once the credential is set up and tested, select it in both Google Slides nodes in your workflow.

Step 2 – List all slides with the getSlides node

Next, configure the first Google Slides node so it can fetch the slides from your presentation:

  • Operation: getSlides
  • presentationId: your Google Slides presentation ID
  • returnAll: set to true so you get every slide

This node returns an array of page objects. Each page represents a slide and includes an objectId. That ID is exactly what you need to request a thumbnail for that specific slide in the next node.

Step 3 – Generate thumbnails with the getThumbnail node

Now for the fun part. The second Google Slides node, often named something like Google Slides1 in the template, is responsible for actually downloading the thumbnails.

Configure it like this:

  • resource: page
  • operation: getThumbnail
  • pageObjectId: use an expression so it reads from each item
    {{$json["objectId"]}}
  • download: true so n8n fetches the binary image data
  • presentationId: use the same presentation ID, often referenced from the previous node:
    {{$node["Google Slides"].parameter["presentationId"]}}

Make sure this node runs once for every item coming from the getSlides node. n8n will then iterate over all slides and fetch a thumbnail for each one automatically.

Thumbnail formats and sizes you can expect

The Google Slides API supports different thumbnail sizes and MIME types. When you call getThumbnail, you can:

  • Specify width and height, or
  • Let the API return a default size

The returned thumbnail is usually a PNG or JPEG. In n8n, you receive this as binary data, which means you can pass it directly into other nodes for storage, transformation, or delivery.

What can you do with the thumbnails next?

Once the thumbnails are in n8n, you can connect almost anything to this workflow. A few common patterns:

  • Google Drive node – save each thumbnail as a file inside a chosen Drive folder.
  • AWS S3 node – upload thumbnails to a bucket and serve them via a CDN.
  • HTTP Request node – POST images to your CMS, asset manager, or custom API.
  • Email node – include thumbnails in automated summary or report emails.

Because the workflow is modular, you can insert extra steps, like image processing, renaming, or logging, anywhere in the chain.

Real world use cases for Google Slides thumbnails

1. CMS slide previews

When someone uploads a new presentation, you can trigger this workflow, generate all thumbnails, and push them into your CMS. Editors then see slide previews right next to the content, which makes choosing or organizing decks much easier.

2. Automated reporting

Maybe you are generating weekly or monthly reports as slide decks. Run this workflow to grab a gallery of slide images and then feed them into another workflow that compiles a PDF or summary email.

3. Learning and training platforms

If you host courses or training materials, you can show slide previews next to each module. Learners get a quick visual sense of what is inside before opening the full presentation.

Error handling and best practices

Like any workflow that talks to external APIs, it is worth planning for edge cases. A few tips:

  • Rate limits – Google APIs have quotas. If you are processing lots of presentations, consider adding delays, batching work, or scheduling runs during quieter times.
  • Retries – set up error handling or use the Execute Workflow node to automatically retry thumbnail downloads that fail temporarily.
  • Permissions – double check that your OAuth scopes allow reading from Slides and, if needed, writing to Drive.
  • Pagination – using returnAll = true in getSlides takes care of pagination for you. If you ever switch to a more customized query, make sure you handle pagination manually.

Troubleshooting common issues

If something is not working the way you expect, here is where to look first:

  • Authentication errors – try refreshing or recreating your OAuth2 credentials and confirm that the Slides API is enabled in your Google Cloud project.
  • Missing thumbnails – inspect the output of the getSlides node and confirm that objectId is present and correctly passed into the getThumbnail node.
  • Binary data issues – open the Binary tab on the getThumbnail node in n8n to check that the file is present and that the MIME type matches what you expect.

Security considerations

Since this workflow interacts with your Google account, it is worth keeping security in mind:

  • Use the minimum OAuth scopes necessary for your use case.
  • Store your credentials securely inside n8n and avoid sharing them between unrelated workflows.
  • Limit access to workflows that handle sensitive presentations or internal content.

Ideas for next steps and enhancements

Once you have the basic thumbnail generation working, you can build on it in lots of ways:

  • Trigger the workflow automatically when a file is added to a specific Google Drive folder using a Drive trigger.
  • Resize, crop, or watermark thumbnails using an image processing service or dedicated n8n node before uploading.
  • Create a dashboard that lists the latest presentations, their thumbnails, and direct links to the full Slides file.

Why this workflow makes your life easier

Instead of manually opening a deck, exporting slides, and uploading images one by one, you can let n8n do the repetitive work. The Manual Trigger → getSlides → getThumbnail pattern is a clean base you can reuse across projects, teams, and tools.

Once set up, all you have to do is point it at a presentation and run it, or hook it into an automatic trigger and forget about it.

Try the template yourself

Ready to see it in action?

  1. Import the workflow JSON into your n8n instance.
  2. Replace YOUR_PRESENTATION_ID with your actual Google Slides presentation ID.
  3. Select your Google Slides OAuth2 credentials in both Google Slides nodes.
  4. Click Execute on the Manual Trigger node to generate thumbnails for each slide.

You will then have all your slide thumbnails ready to store, share, or plug into other automations.

Need help customizing it? You can extend this same workflow to push thumbnails to Drive, S3, or your CMS with just a few extra nodes.

Call to action: Subscribe for more n8n automation tutorials and get a free workflow template delivered to your inbox.

Automate Image Generation with n8n + OpenAI

Automate Image Generation with n8n and OpenAI: Turn Repetitive Design Work into a Creative Engine

Every growing project reaches a point where visuals become a bottleneck. Product photos, recipe images, marketing creatives – they all take time, coordination, and budget. If you have ever wished you could simply describe the image you need and have it appear, you are already thinking like an automation builder.

This guide walks you through a ready-to-use n8n workflow template that connects OpenAI image generation with Google Sheets and Google Drive. It turns plain text prompts into images, updates existing photos, and stores everything neatly in Drive. Along the way, you will see how this template can become a stepping stone toward a more automated, focused, and scalable workflow.

From Manual Design Chaos to Calm, Repeatable Systems

Manually creating or updating visual assets often feels like an endless loop of briefings, revisions, and file management. It is slow, it is expensive, and it rarely scales gracefully when your content or product catalog grows.

Automation changes that story. With n8n and OpenAI image models you can:

  • Generate new images automatically from simple text prompts
  • Edit existing images at scale with consistent style and branding
  • Store results in a structured way in Google Drive

Instead of spending hours on repetitive tasks, you design a workflow once and let it work for you. That shift frees your time and attention for strategy, storytelling, and experimentation.

Adopting the Automation Mindset

Before we dive into nodes and endpoints, it helps to approach this template with a particular mindset: treat it as a launchpad, not a rigid tool.

As you explore this n8n workflow, notice where you currently copy-paste, manually upload, or tweak images one by one. Each of those friction points is an opportunity to:

  • Translate a repeated step into an n8n node
  • Replace manual judgment with a well-crafted prompt
  • Turn a one-off task into a reusable, scalable process

The template you are about to use already covers common scenarios like recipe visuals and product photography. Once you understand how it works, you can customize prompts, folder structures, triggers, and data sources so it fits your exact workflow and brand.

What This n8n Template Unlocks

The supplied n8n template is divided into four powerful sections. Together, they form a practical toolkit for automated image generation and editing:

  • Generate image – create a single image from a prompt for quick experiments or one-off needs.
  • Recipe book – read rows from Google Sheets, generate a styled ingredients image for each recipe, and save the results to Google Drive.
  • Edit image – download an existing file from Drive, apply edits using OpenAI, and store the updated version back in Drive.
  • Update product photos – batch-edit all images in a Drive folder, add environments or props, and upload polished versions to a new folder.

Think of these as starting points. You can keep them as-is to save time right away or extend them into full creative pipelines that run daily, weekly, or whenever new data appears.

What You Need Before You Start

To use the template effectively, make sure you have:

  • An n8n instance (cloud or self-hosted)
  • An OpenAI API key with image capabilities enabled
  • A Google account with access to Drive and Sheets
  • Basic familiarity with n8n nodes and OAuth credential setup

Once these are in place, you are ready to connect everything and let the workflow start creating for you.

Core n8n Nodes That Power the Workflow

This template is built on a small set of reusable nodes. Understanding them will help you adapt and extend the workflow confidently:

  • Google Sheets (getRecipe) – reads rows that contain recipe names, ingredients, or other descriptive fields.
  • HTTP Request (createImage / editImage) – sends requests to OpenAI image generation and image edit endpoints.
  • Convert to File – turns base64 image responses into binary files that n8n can handle and upload.
  • Google Drive (saveImage / saveImage1) – uploads generated or edited images to specific folders in Drive.
  • SplitInBatches / Loop Over Items – processes rows or files one by one so your workflow scales smoothly.

These nodes form a pattern you can reuse in other automations: read data, call an API, transform the response, then store the result. Once you grasp this pattern, you can build far beyond image workflows.

A Guided Tour of the Main Flows

1. Recipe Book: Turn Spreadsheet Rows into Styled Images

Imagine a Google Sheet full of recipes. Instead of manually briefing a designer for every new dish, this flow reads each row and generates a matching ingredients image.

  1. Read recipes from Sheets
    The Google Sheets node (getRecipe) pulls each row, including the recipe name and fields like Ingredients.
  2. Process rows one by one
    SplitInBatches or Loop Over Items passes each row individually to the next step so you can scale to hundreds of recipes without overwhelming the API.
  3. Generate images with OpenAI
    An HTTP Request node calls images/generations on OpenAI. The prompt includes the Ingredients field and any style guidance you add, such as composition, lighting, and mood.
  4. Convert base64 output to a file
    The Convert to File node transforms the base64 response into a binary file object that n8n can upload.
  5. Save images to Google Drive
    A Google Drive node uploads each generated image with a dynamic file name, for example the recipe name. You end up with an organized folder of consistent, on-brand visuals.

This flow turns a simple spreadsheet into a living image library and it runs whenever you are ready to add more recipes.

2. Edit Image: Apply Targeted Changes to Existing Photos

Sometimes you do not need a brand new image, you just want to tweak an existing one. This flow lets you do that programmatically.

  1. Download the base image
    A Google Drive node fetches the existing image you want to update.
  2. Send it to OpenAI for editing
    An HTTP Request node calls the images/edits endpoint. The downloaded image is sent as multipart input, along with a prompt that explains the desired changes.
  3. Convert and save the edited version
    The Convert to File node turns the edited image response into a file, which is then saved back to Drive, either overwriting or alongside the original, depending on your configuration.

With this, you can standardize backgrounds, add subtle enhancements, or apply brand elements across many images without manual editing.

3. Update Product Photos: Batch-Edit an Entire Folder

If you manage a catalog of products, the real magic happens when you apply edits at scale. This flow updates all images in a Drive folder in a single automated run.

  1. Start the flow
    A trigger (manual or scheduled) kicks off the workflow whenever you are ready to refresh your product visuals.
  2. List product images
    A Google Drive node lists all files in a designated products folder.
  3. Iterate, edit, and save
    SplitInBatches processes each file in turn:
    • Download the image
    • Call the images/edits API with a dynamic prompt that references product flavor or branding
    • Add complementary ingredients, water splashes, or props based on your prompt
    • Save the edited result to a separate Drive folder for easy comparison and rollout

What used to be a long, repetitive design task becomes a repeatable, scalable pipeline that you can refine with better prompts over time.

Prompt Engineering Tips That Elevate Your Results

The quality of your images depends heavily on your prompts. Treat them as your creative direction notes to the model.

  • Be clear about composition
    For example: “top-down ingredients arranged neatly on a light, neutral background”.
  • Describe lighting, palette, and mood
    Try prompts like: “natural lighting, soft color palette, modern aesthetic”.
  • For edits, define what stays and what changes
    Example: “preserve label legibility, add splashes and fruit relevant to the flavor”.
  • Add small details for extra polish
    Mention touches like handwritten labels, shallow depth of field, or subtle shadows for a more refined look.

As you test, adjust your prompts and rerun small batches. Over time, you will develop a library of prompts that reflect your brand and style perfectly.

Authentication and Credentials: Secure the Foundation

Automation should make your life easier, not risk your data. n8n helps you keep credentials safe while your workflows run in the background.

  • OpenAI
    Store your API key in an n8n HTTP Request credential or environment variable. Avoid hard-coding keys in public workflows or sharing them in screenshots.
  • Google OAuth
    Use OAuth credentials to connect Google Drive and Google Sheets. This lets n8n read and write files securely without exposing your login details.

Error Handling, Retries, and Staying Resilient

Even the best workflows occasionally hit rate limits or network hiccups. Building in resilience means your automation keeps working without constant supervision.

  • Use n8n Execute Workflow settings to retry failing nodes or wrap HTTP calls in try/catch logic.
  • Log API responses and save intermediate files when failures occur so you can quickly debug issues.
  • Watch for rate limits or very large image sizes and reduce batch sizes or add backoff where needed.

This kind of robustness lets you trust your workflow enough to run it on larger data sets and more critical projects.

Cost and Performance: Scale Smart, Not Just Big

OpenAI image endpoints are powerful, and like any powerful tool they come with costs. A few simple habits help you scale responsibly.

  • Run small batches first and refine prompts locally before you commit to large bulk runs.
  • Cache generated images and only re-generate when the underlying input actually changes.
  • Use lower resolution outputs for previews, then reserve high quality renders for final assets.

This way, you protect your budget while still enjoying the benefits of automated image creation.

Practical Use Cases to Inspire Your Next Workflow

The same template can support many different projects. Here are a few concrete ideas:

  • Recipe sites – automatically create ingredient spreads for new recipes added to Google Sheets.
  • Ecommerce – refresh product photography with consistent branded backdrops, props, or environmental elements.
  • Marketing teams – bulk-generate social media visuals that pair templated copy with on-brand imagery.

Once you see the results, you may find yourself thinking about every spreadsheet, folder, or content calendar as a potential automation source.

Security and Best Practices for Long-Term Confidence

As your automations grow, security matters more and more. A few simple practices go a long way.

  • Limit your OpenAI key to only the services you actually use and rotate keys periodically.
  • Restrict Google Drive access to the specific folders required by your workflows.
  • Avoid exposing credentials in logs, screenshots, or public templates.

With this foundation, you can confidently scale your n8n and OpenAI usage across teams and projects.

Quick Troubleshooting Guide

If something does not work as expected, use this checklist to get back on track quickly:

  • No image returned?
    Check HTTP headers, authorization, and content-type. Confirm you are calling the correct endpoint (generations vs edits) with all required parameters.
  • Image corrupt or cannot convert?
    Make sure the response includes base64 JSON and that Convert to File points to the right property, such as data[0].b64_json in the template.
  • Uploads failing?
    Verify Google Drive folder IDs, your OAuth token validity, and that the Drive node is using the correct credentials.

Getting Started: Turn This Template into Your Own Automation Journey

You now have a clear view of what this n8n template can do and how it works. The next step is to put it into action and make it your own.

  1. Import the template into your n8n instance.
  2. Connect your credentials for OpenAI, Google Drive, and Google Sheets.
  3. Customize the prompts to match your brand, style, and use case.
  4. Run a small test using a sample Drive folder and a single spreadsheet row.
  5. Iterate and scale as you refine prompts, folder structures, and batch sizes.

As you gain confidence, experiment with new variations: different prompt styles, additional nodes, or triggers based on new rows in Sheets or new files in Drive. Every improvement compounds, and over time you build an ecosystem of workflows that quietly support your business or creative projects in the background.

Call to action: If you would like help tuning this to your specific niche, I can suggest prompts for your product category (beverages, baked goods, cosmetics, and more) or outline a short checklist to secure and optimize your n8n + OpenAI integration. Tell me which use case you want to automate next and I will share tailored prompts and recommended node settings.


Keywords: n8n, OpenAI, image generation, image editing, Google Drive, Google Sheets, workflow automation, n8n template, automate product photos, AI image workflows

n8n + OpenAI Image Workflow: Automate Image Creation

n8n + OpenAI Image Workflow: Automate Image Creation

By the time the third campaign of the quarter rolled around, Maya was exhausted.

As the lead marketer for a fast-growing recipe blog that had just spun up an e-commerce line, she was responsible for everything visual. Ingredient spreads for blog posts, product photos for their new pantry items, seasonal ad creatives for social channels. Each new recipe or product meant another round of photo shoots, design briefs, and late-night editing sessions.

Her team loved the creative work, but not the endless repetition. Every time a new recipe went live, someone had to hunt down the right props, shoot top-down ingredient photos, tweak the lighting in post, then upload and organize everything in Google Drive. The same story repeated for product updates, colorways, and seasonal edits.

One Tuesday evening, staring at a spreadsheet full of upcoming recipes and products, Maya realized something had to change. There were already rows of structured data in Google Sheets: recipe names, ingredient lists, product metadata. Why were they still doing all the visual work by hand?

That question led her to n8n, the OpenAI Images API, and a workflow template that would quietly transform how her team created and managed images.

The problem: Great ideas, no time to execute

Maya’s content calendar was packed. Her challenges will sound familiar to many marketers and content teams:

  • Every recipe needed consistent ingredient photos for blog posts and social media.
  • New product variants required updated imagery at scale.
  • Marketing campaigns demanded quick variations, such as different background colors or seasonal props.

Manual photo shoots and graphic design were not just slow, they were expensive and hard to keep consistent. A single delay in getting images ready could push back a campaign launch.

Maya needed a way to turn the structured data she already had into visuals, with as little manual work as possible. That is when she stumbled across an n8n template that combined Google Sheets, Google Drive, and the OpenAI Images API.

The discovery: An n8n image workflow hiding in plain sight

Late one night, while searching for “automate image generation with n8n,” Maya found a template titled almost exactly that: an n8n workflow that integrates the OpenAI Images API with Google Sheets and Google Drive to generate, edit, and store images automatically.

Reading through the description, she realized it did nearly everything she had been trying to piece together in her head:

  • Read rows from a Google Sheets document, like recipes or product metadata.
  • Send prompts to OpenAI Images to generate or edit visuals.
  • Convert the base64 image data that OpenAI returns into actual files inside n8n.
  • Upload the final images into neatly organized Google Drive folders.

The workflow canvas was split into four main areas, which felt almost like chapters in her new process: Generate image, Recipe book, Edit image, and Update product photos. Each section mirrored a problem she already had.

For the first time, she could see a path to turning her Google Sheets into a visual content engine.

Setting the stage: Preparing the tools

Before Maya could run anything, she needed to set up the basics. The template came with a clear checklist, which she treated like a pre-flight routine:

  • An n8n instance with internet access, running in the cloud so her team could collaborate.
  • An OpenAI API key with quota for images, stored securely as a credential inside n8n.
  • Google OAuth credentials connected in n8n for both Drive and Sheets.
  • A Google Sheets file with columns such as Recipe name, Ingredients, and Image ID.
  • Target Google Drive folders created for uploads and edited images.

Inside the HTTP Request node that talked to OpenAI, she set the header:

Authorization: Bearer <YOUR_OPENAI_KEY>

She double checked that her Google credentials in n8n had permission to read from the right Sheet and write to the correct Drive folders. With the foundations in place, it was time to see if this workflow could really replace hours of manual work.

Rising action: Turning spreadsheet rows into images

Maya started with her biggest time sink: ingredient spreads for recipes. The bottom section of the template used a manual trigger node, labeled “When clicking ‘Test workflow'”. For a first run, that was perfect. She clicked “Test workflow” and watched the nodes light up, one by one.

Reading the source data from Google Sheets

The getRecipe node was the first character in this story to act. It pulled data from her Google Sheets document, where each row represented a recipe. The sheet already contained:

  • Recipe name
  • Ingredients
  • Other metadata and an optional Image ID column

The template used the Ingredients field as a key part of the prompt. Each row in the sheet would become a unique image request to the OpenAI Images endpoint, with the ingredient list inserted directly into a carefully crafted prompt.

Generating images with OpenAI Images

Next, an HTTP Request node called the OpenAI image generation endpoint using the model gpt-image-1. Maya opened the node and examined the prompt. It was more detailed than she expected:

  • It specified a top-down view of the ingredients.
  • It asked for a neutral, light background.
  • It described the overall style and lighting.

When the node ran, the OpenAI API returned base64-encoded image data. That was not something Maya could use directly, but the template had already accounted for this. A ConvertToFile node converted the base64 data into an actual image file inside n8n, ready for storage.

Saving the results into Google Drive

Once converted, the image file passed into the saveImage node. This node uploaded the generated image into a designated Google Drive folder, named by the recipe. For Maya, this solved a surprisingly painful problem: keeping assets organized.

Now, each recipe had its own folder in Drive, filled with automatically generated ingredient spreads that were consistent in style and composition. Her CMS could point to those folders, and her design team no longer had to dig through chaotic directories.

The turning point: From simple generation to powerful edits

The first run was a success. Maya now had dozens of ingredient images created in minutes. But her work was not just about new images. She also had a backlog of product photos that needed updates: seasonal backgrounds, new props, subtle retouching.

This is where the template’s second major capability came into play: image editing.

Editing existing product photos with OpenAI

The workflow included an edit pipeline specifically for cases like hers. It worked in a sequence:

  1. Download an existing file from Google Drive.
  2. Send that file to the OpenAI Images /edits endpoint.
  3. Provide a new instruction, such as “place fruit around the can and add water splashes”.
  4. Convert the returned base64 data into a new file.
  5. Save the edited image back to Drive, often into a separate folder for edited assets.

With this, Maya could take a single base product photo and generate multiple variants tailored to different campaigns. Summer version, holiday version, minimal version for the product page. Instead of booking another shoot, she let the automation handle the visual variations.

Behind the scenes: How the workflow fits together

As she grew more comfortable, Maya began to tweak the workflow to fit her team’s habits. The template’s structure made it easy to adapt:

  • Trigger node Initially, she used the manual trigger to test. Later, she swapped it for a scheduled trigger so new recipes in the Sheet would generate images overnight. For future plans, she considered a webhook trigger so that when a new row was added, the workflow would run automatically.
  • Recipe book and product sections The “Recipe book” section focused on image generation from ingredient lists. The “Update product photos” and “Edit image” sections focused on editing existing assets. Maya could enable or disable parts depending on the project.

What started as a static template turned into a flexible visual pipeline for her entire content operation.

Crafting the prompts: Where the magic really happens

Maya soon realized that the quality and consistency of the images depended heavily on how she wrote prompts. The template provided guidelines that she refined over time.

Prompt engineering tips Maya adopted

  • Be explicit about composition For top-down ingredient shots, she used language like: “Top-down view, ingredients arranged neatly on a light neutral background.”
  • Define style and lighting To keep her brand consistent, she added: “Natural lighting, soft color palette, minimal shadows.”
  • Separate optional elements For extra flair, she wrote: “Optionally include small handwritten-style labels below each item.” Keeping optional parts as separate sentences helped avoid confusing the model.
  • Keep variable insertion clean In Google Sheets, she stored ingredient lists in a single cell per recipe. This prevented malformed prompts where line breaks or stray characters could confuse the API.

By treating prompts as part of her brand guidelines, Maya achieved a consistent visual identity across hundreds of automatically generated images.

Debugging the bumps in the road

Of course, no automation journey is completely smooth. Maya hit a few predictable issues along the way, but the template had already mapped out how to handle them.

Common issues she encountered

  • Authentication errors When a token expired, the workflow failed fast. She learned to double check the OpenAI API key in the HTTP Request header and refresh Google OAuth tokens in n8n regularly.
  • Malformed prompts or data Occasionally, a strange character in the Sheets data would cause problems. Inspecting the data passed from Google Sheets and adding a Function node to sanitize strings solved this.
  • Large payloads and timeouts Image generation is not instant. For large batches, she adjusted node timeouts and introduced batching to avoid overloading the API or hitting time limits.
  • Drive upload failures When uploads failed, it usually came down to incorrect folder IDs or missing permissions. Verifying the folder IDs and ensuring Drive credentials had write access fixed these quickly.

Each time she solved an issue, she updated the workflow with small guards and checks, turning it into a robust part of her infrastructure.

Costs, rate limits, and staying in control

Maya was careful about cost from the beginning. Automated image generation and edits can add up, especially when running bulk jobs. Before she unleashed the workflow on her full catalog, she put a few guardrails in place:

  • She estimated the cost per image and monitored usage in the OpenAI dashboard.
  • She implemented batching so that images were generated in controlled groups, respecting rate limits and avoiding sudden spikes.
  • She tested with lower resolution or sample images while fine tuning prompts, so she did not burn credits on images she might discard.

With these practices, the automation remained a cost-effective investment rather than a surprise line item.

Security, governance, and who gets to press “go”

As the workflow proved its value, other teams started asking to use it. Maya realized she needed some governance around such a powerful and potentially costly tool.

  • She restricted who could trigger the workflow, especially the bulk jobs that touched hundreds of rows.
  • She logged generated images and their prompts to an audit log, so any odd result could be traced back to its source.
  • She set quota alerts in OpenAI to avoid unexpected spend if someone ran a large batch by accident.

With these policies in place, the automation became a trusted internal service instead of a risky experiment.

The payoff: Real-world wins across the team

Within a few weeks, the impact was obvious.

  • Recipe publishing Ingredient spreads were auto generated from recipe rows in Google Sheets. New posts went live with on-brand visuals, even when the photo studio was fully booked.
  • E-commerce updates Seasonal edits for product photos, such as new backgrounds or props, were created using the image editing pipeline. No reshoots, no extra coordination.
  • Marketing campaigns The team produced rapid A/B image variants for ads, testing different compositions and colorways without burning out designers.

What started as a single marketer’s frustration turned into a reusable template that could help founders, developers, agencies, and content teams alike. Anyone with structured data in Google Sheets and a need for scalable visuals could adapt the same approach.

From manual grind to automated flow: What Maya would tell you now

If Maya could talk to her past self, the one drowning in photo shoot schedules, she would say this:

You already have the data. Let automation handle the visuals.

The n8n + OpenAI image workflow template gave her a way to:

  • Turn spreadsheet rows into consistent, on-brand images.
  • Edit existing assets programmatically for different campaigns or seasons.
  • Store everything neatly in Google Drive, ready for CMS or design tools.

All without losing control over quality, cost, or governance.

Take your next step: Make the template your own

If you see yourself in Maya’s story, you can follow a similar path:

  1. Import the n8n template into your own workspace.
  2. Connect your OpenAI and Google credentials.
  3. Point the workflow at a small test Sheet and run a limited batch.
  4. Tweak the prompts to match your brand’s visual style.
  5. Once you are happy, add scheduled triggers or webhooks to scale up.

Need help customizing this template? You can bring in an automation expert to fine tune prompts, adjust batching logic, and integrate with your preferred storage, whether that is Google Drive, S3, or another system.

Try the template now and turn your image pipeline into a quiet, reliable automation that keeps your visuals consistent across every site, product page, and campaign.

Author: Automation Team • Updated: 2025

Automate CV Screening with n8n & Google Gemini

Automate CV Screening with n8n & Google Gemini

Hiring at scale quickly becomes overwhelming. Manually reading every resume is slow, inconsistent, and hard to track. With n8n, Google Gemini (PaLM), and common Google tools like Sheets and Gmail, you can build a secure automation that:

  • Collects applications through a form
  • Extracts text from PDF resumes
  • Uses AI to rate candidate fit
  • Logs all results in a spreadsheet
  • Automatically notifies HR and candidates

This guide walks you step by step through a ready-to-use n8n CV screening workflow template and shows how each node works, so you can understand, adapt, and safely run it in production.

What you will learn

By the end of this tutorial, you will know how to:

  • Explain why automated CV screening is useful and where it fits in your hiring process
  • Understand the overall n8n + Google Gemini CV screening workflow
  • Configure each node in the template, from form input to AI analysis and email notifications
  • Customize the workflow for different roles, skills, or data outputs
  • Apply best practices for privacy, fairness, security, and reliability
  • Test, monitor, and iterate on your automation before going live

Why automate CV screening?

Early-stage resume review is one of the most repetitive parts of hiring. Automating this step with n8n and Google Gemini helps you:

  • Save time by automatically filtering out clearly irrelevant applicants
  • Standardize evaluations with consistent criteria and prompts
  • Speed up communication with automated emails to HR and applicants
  • Maintain an audit trail with a structured log of ratings and decisions

Automation does not replace human hiring decisions. Instead, it handles the repetitive screening work so your team can focus on interviewing the most relevant candidates.

How the n8n + Google Gemini CV screening template works

The template is built as an n8n workflow made of several nodes, each responsible for one part of the process. At a high level, it:

  1. Accepts applications through an Application Form node
  2. Converts the uploaded PDF resume to text using Extract from PDF
  3. Sends the resume text and job description to Google Gemini via LangChain for analysis
  4. Writes candidate details and AI rating into a Google Sheets candidate list
  5. Notifies HR and the candidate using Gmail nodes

Here are the key building blocks you will work with:

  • Application Form (formTrigger) – collects candidate data and a PDF CV
  • Convert Binary to JSON (Extract from PDF) – extracts readable text from the uploaded resume
  • Using AI Analysis & Rating (LangChain chainLlm) – sends the resume and job description to the LLM prompt
  • Google Gemini Chat Model – the underlying language model (PaLM / Gemini) used by LangChain
  • Candidate Lists (Google Sheets) – stores candidate metadata and AI rating
  • Inform HR New CV Received (Gmail) – emails HR with candidate details and rating
  • Confirmation of CV Submission (Gmail) – emails a confirmation to the applicant

Concepts to understand before you start

n8n workflow basics

In n8n, a workflow is a set of connected nodes. Each node performs an action, such as:

  • Listening for form submissions
  • Transforming data (for example, PDF to text)
  • Calling an AI model
  • Writing to a spreadsheet
  • Sending emails

Data flows from one node to the next. In this template, the CV file starts as binary data, is converted to text, then passed into the AI node, and finally into Google Sheets and Gmail.

Binary vs JSON in n8n

Uploaded files (such as PDFs) arrive as binary data. Most nodes, especially AI and spreadsheet nodes, expect JSON text. The Extract from PDF node bridges this gap by taking the binary file and producing a text field that you can pass into the AI prompt.

Google Gemini and LangChain in n8n

n8n integrates with Google Gemini (PaLM) through LangChain. You configure:

  • The LangChain chainLlm node with your prompt, inputs, and output format
  • The Google Gemini Chat Model as the model used by LangChain

This separation lets you change model parameters without rewriting your prompt logic.

Step-by-step: building and understanding the workflow

Step 1: Capture applications with the Application Form (formTrigger)

The Application Form node is the public entry point of your automation. It exposes a form that candidates fill in. Configure it to collect at least:

  • Full Name
  • E-mail
  • LinkedIn URL
  • Salary Expectation
  • Resume / CV (PDF upload)

Teaching tip: treat this form as your input contract. Whatever you collect here is what you can later pass to AI and store in Google Sheets.

Important configuration details:

  • Make the resume upload field required
  • Validate the file type so only PDFs are accepted
  • Mark essential text fields (name, email) as required to avoid incomplete submissions

Step 2: Extract text from the PDF with Convert Binary to JSON (Extract from PDF)

Next, you need to turn the uploaded PDF into text. Use n8n’s Extract from PDF node for this job.

Key configuration:

  • Set binaryPropertyName to the resume file field from the form, for example: Your_Resume_CV

This node reads the PDF from that binary property and outputs the extracted text as JSON. The resulting text field is what you will feed into the AI node.

Step 3: Analyze and rate candidates with Using AI Analysis & Rating (LangChain chainLlm)

The LangChain chainLlm node is where the AI evaluation happens. It takes two main inputs:

  • The job description you want to hire for
  • The resume text extracted from the PDF

Inside this node, you define the prompt and output rules. In the template, the prompt is designed to:

  • Produce a compatibility rating between 1 and 10
  • Give a short recommendation about the candidate
  • Limit the response to 75 words for easier reading and parsing

Configuration tips:

  • Include both the job description and the resume text in the prompt context
  • If you need localized output, define a variable such as ${output_language} and reference it in the prompt
  • Constrain response length (75 words maximum) and use a predictable format so you can later extract the rating or decision if needed

Step 4: Connect Google Gemini Chat Model (PaLM) as the LLM

The LangChain node needs a model to run the prompt. Here you use the Google Gemini Chat Model (PaLM/Gemini).

Setup checklist:

  • Store your Google PaLM/Gemini API credentials in n8n’s credential manager
  • Configure the LangChain node to use the Gemini model as its backend
  • Experiment with parameters like:
    • Temperature around 0 - 0.2 for more deterministic, repeatable ratings
    • Model variant if you need a balance between speed and quality

Lower temperature is especially helpful when you want consistent scoring logic for CV screening.

Step 5: Log candidates and ratings in Candidate Lists (Google Sheets)

Once the AI has produced a rating and recommendation, you need to store it in a structured way. The Google Sheets node creates a simple candidate list that works like a lightweight ATS.

Typical columns to append for each candidate:

  • CV filename
  • Full Name
  • E-mail
  • Salary Expectation
  • LinkedIn URL
  • AI Rating (1 – 10)
  • AI Recommendation or summary

Best practices:

  • Give HR view or edit access only as needed
  • Restrict sharing of the sheet to authorized HR users
  • Use filters and conditional formatting to highlight high-rated candidates

Step 6: Notify HR and candidates with Gmail nodes

The final step is communication. The template uses two separate Gmail nodes:

  1. Inform HR New CV Received:
    • Sends an email to HR or the recruiter
    • Includes key candidate details (name, email, LinkedIn, salary expectation)
    • Includes the AI rating and summary so HR can quickly prioritize
    • Optionally links to the Google Sheet or internal hiring system
  2. Confirmation of CV Submission:
    • Sends a polite confirmation email to the applicant
    • Thanks them for applying and confirms receipt of their CV
    • Avoids sharing detailed AI evaluation or sensitive internal notes

Keep both messages professional, concise, and aligned with your employer brand.

How to customize the CV screening template

Once you understand the default workflow, you can adapt it to your hiring process. Here are some practical ideas:

  • Support multiple roles
    Instead of a single job description, maintain a set of role templates. Use form fields or routing logic to map each application to the correct role profile before sending it to the AI node.
  • Extract structured skills and experience
    Add a second AI step that focuses only on structured extraction, such as:
    • Programming languages
    • Frameworks or tools
    • Years of experience

    Write these into separate Google Sheets columns for more advanced filtering.

  • Automate interview scheduling
    For candidates above a certain rating threshold, integrate calendar nodes to propose or book interview slots automatically.
  • Improve data security
    Store full resumes in a secure storage bucket (for example, Google Drive or S3) and keep only the necessary metadata and extracted text in the sheet to reduce exposure.

Best practices: privacy, fairness, and reliability

Automated CV screening is powerful, but it also comes with legal and ethical responsibilities. Keep the following in mind:

Privacy and legal compliance

  • Comply with relevant regulations such as GDPR or CCPA
  • Include clear consent text on your application form
  • Link to your privacy policy and explain how data and AI are used
  • Limit the storage of sensitive personal data when possible

Fairness and bias reduction

  • Design prompts that focus on skills and experience, not demographic attributes
  • Test AI outputs with a diverse set of resumes to identify potential bias
  • Regularly review ratings against human judgments to ensure fairness

Reliability and observability

  • Log AI decisions, prompt versions, and scoring criteria to build an audit trail
  • Implement error handling and retry logic in n8n, for example:
    • Catch failures from PDF extraction
    • Handle LLM API timeouts or errors
    • Notify an admin if a step fails

Testing, monitoring, and iteration

Before you rely on this workflow for real candidates, treat it like any other production system and test thoroughly.

Pre-production testing

  • Run the workflow in a sandbox with a representative set of resumes
  • Ask hiring managers to review the AI ratings and summaries
  • Record where human reviewers disagree with the AI and adjust prompts or scoring rules

Ongoing monitoring

  • Track API usage and costs for Google Gemini
  • Set rate limits and budget alerts in your cloud billing console
  • Schedule periodic prompt reviews, especially when job requirements change

Security checklist for your n8n CV workflow

To keep your automation secure, follow these guidelines:

  • Store all API keys and tokens in n8n’s credential manager, not in node parameters or plaintext
  • Restrict Google Sheets and Gmail OAuth scopes to only what the workflow needs
  • Use HTTPS for any externally accessible form endpoints
  • Enable CAPTCHA or rate limiting on public forms to reduce spam and abuse

Recap: how the template fits together

To summarize, your automated CV screening with n8n and Google Gemini works as follows:

  1. Candidates submit their details and PDF resume through the Application Form
  2. The Extract from PDF node converts the binary PDF file into readable text
  3. The LangChain chainLlm node sends the resume text and job description to Google Gemini for evaluation
  4. The workflow logs candidate data and AI ratings in a Google Sheets candidate list
  5. Gmail nodes notify HR and send confirmation emails to applicants

This setup gives you a practical, extensible way to speed up hiring, reduce manual screening work, and maintain a clear record of how candidates were evaluated.

Quick FAQ

Can I change the rating scale or output format?

Yes. Edit the prompt in the LangChain chainLlm node. You can change the rating scale, include additional fields, or adjust the word limit as long as the format remains consistent for downstream processing.

What if I have multiple job openings?

You can route each application to a different job description based on the form input, then pass the appropriate description into the AI node. This lets you reuse the same workflow for multiple roles.

Is this a full ATS replacement?

n8n Workflow: Best Tools In Category Guide

n8n Workflow: Best Tools In Category Guide

This reference-style guide documents the “Content – Write Best Tools In Category Article” n8n workflow. It explains how the workflow automates the full pipeline from form submission to CMS publishing for “best tools in category” content, and how each node participates in data retrieval, research, LLM content generation, validation, and delivery.

1. Workflow Overview

The workflow is designed to generate a complete, SEO-optimized “best tools in category” article from a single structured input. It is particularly useful for content teams that want repeatable, auditable production of list-style articles while keeping tight control over the underlying tool catalog.

1.1 Functional scope

  • Accepts a form input with:
    • Category Slug (required)
    • Audience (required)
    • Tool Slugs To Include (optional)
  • Fetches category metadata and the canonical tool list via HTTP requests.
  • Constructs a structured, tightly scoped research prompt and supporting JSON artifact.
  • Uses Slack as the integration point for a deep research step and human or external system review.
  • Parses the research output and maps tools to canonical _id values.
  • Generates all article sections via LLM nodes:
    • Introduction
    • Ranking criteria / methodology
    • Per-tool profiles
    • Meta description
    • Conclusion
  • Aggregates all generated content into a single JSON payload.
  • Pushes the final article to a category content endpoint via an HTTP PUT request.

1.2 Primary use cases

  • Automated “best tools for X” articles driven from an internal catalog.
  • Standardized content production across multiple categories or audiences.
  • Scalable workflows that combine LLM generation with manual QA gates.

2. Architecture and Data Flow

The workflow is structured as a sequence of clearly separated phases. Each phase uses dedicated n8n nodes for I/O, transformation, and validation.

2.1 High-level data flow

  • Input phase A form trigger node captures the category context and optional tool filters.
  • Fetch phase HTTP Request nodes retrieve:
    • Category metadata
    • Canonical tool list for that category
  • Research preparation phase The tool list is normalized into JSON, written to a file, and uploaded to Slack (or another storage). A structured research prompt is constructed as a separate file.
  • Deep research phase Slack integration posts the prompt and JSON, waits for a research report, and then returns the result into n8n.
  • Extraction & mapping phase An LLM node parses the research output and selects the final tools, mapping them back to canonical _id values from the original tool JSON.
  • Content generation phase Multiple LLM nodes generate article sections. Parser nodes validate and normalize these outputs.
  • Aggregation & publishing phase All sections and selected tools are aggregated into a single JSON payload and sent to the CMS or content API via a PUT request.

2.2 Core input and output contracts

  • Input contract (Form Trigger):
    • categorySlug – string, required
    • audience – string, required
    • toolSlugsToInclude – string or array, optional
  • Fetch contract (Category & tools HTTP responses):
    • Category JSON with fields like title, slug, and other metadata.
    • Tool array JSON with at least: _id, title, slug, websiteUrl (and any other fields your CMS expects).
  • Output contract (Final PUT payload):
    • List of selected “best tools” with exact _id values.
    • Intro, ranking criteria, per-tool content, meta description, conclusion.
    • Any additional category fields required by the target CMS.

3. Node-by-Node Breakdown

3.1 Form Trigger

Role: Entry point for each article generation run.

Key configuration:

  • Fields:
    • Category Slug – identifies which category JSON to fetch.
    • Audience – used to tailor tone and positioning in LLM prompts.
    • Tool Slugs To Include (optional) – can bias selection toward certain tools.
  • Trigger type: Webhook or native n8n form, depending on your environment.

Data considerations:

  • Validate that Category Slug is non-empty before progressing.
  • If Tool Slugs To Include is provided, downstream nodes can prioritize or filter tools accordingly, but must still respect the canonical tool list.

3.2 fetch_category & fetch_category_tools

Role: Retrieve the authoritative category and tool data from your catalog or CMS API.

Node type: HTTP Request (typically GET).

Typical configuration:

  • fetch_category:
    • URL template using categorySlug from the form.
    • Authentication via n8n credentials (API key, OAuth, etc.).
  • fetch_category_tools:
    • URL template that returns the tool list for the given category.
    • Same or compatible credentials as fetch_category.

Output:

  • Category JSON – metadata for the article context.
  • Tool list JSON – array of tools that must be treated as the canonical set.

Edge cases:

  • Empty tool array: downstream nodes should short-circuit or raise an error rather than generating content with no tools.
  • Missing required fields like _id, title, slug, websiteUrl: should be caught by schema validation before research or LLM steps.

3.3 set_category_tools, create_tools_json_file, upload_tools_json_file

Role: Normalize the tool list into a canonical JSON artifact and make it available for research and auditing.

  • set_category_tools A Set or Function node that:
    • Extracts and formats the tool array from fetch_category_tools.
    • Ensures the structure is consistent (for example, only required fields, standardized keys).
  • create_tools_json_file A node that serializes the normalized tool array into a JSON file buffer.
  • upload_tools_json_file A Slack (or alternative storage) node that uploads this JSON file to a channel or file store.

Purpose of the JSON artifact:

  • Provides a single canonical representation of tools used across:
    • Deep research step
    • LLM prompts
    • Audits and debugging
  • Improves reproducibility: the same JSON can be referenced if the article needs to be regenerated.

3.4 Deep Research Prompt Construction

Role: Build a structured, constrained prompt that guides the deep research process.

Typical behavior:

  • Assemble a large, explicit instruction set that includes:
    • How to search for information (e.g., search operators, preferred sources).
    • Rules for excluding specific domains, such as:
      • Append -site:aitools.inc to queries to avoid that domain.
    • Requirement to only consider tools present in the provided JSON file.
    • Instructions to extract and preserve exact _id values from the tool JSON.
    • Guidance to prioritize recent content, usually within the last 12 to 18 months.
  • Embed the canonical tool JSON or refer to the uploaded file so that researchers or external systems know the exact candidate set.
  • Save this prompt as a file that can be sent to Slack or other research systems.

Outcome: A consistent, repeatable deep research specification that reduces ambiguity and enforces catalog integrity.

3.5 Slack Integration: share_research_prompt_and_wait

Role: Hand off the prompt and tool JSON to a research channel, then wait for the completed research report.

Node type: Slack node(s) plus optional Wait or webhook-based callback.

Behavior:

  • Posts a message to a dedicated Slack channel with:
    • The research prompt file.
    • The tools JSON file.
  • Allows either:
    • Manual research by humans who follow the instructions and upload a report, or
    • An external automated process that reads the prompt and JSON, performs research, and posts back the result.
  • Waits for the research result to be returned to n8n (for example via a Slack trigger, webhook, or polling pattern).

Purpose:

  • Acts as a quality control gate between catalog data and LLM synthesis.
  • Allows human reviewers to inspect or augment findings before content generation.

3.6 extract_tools

Role: Parse the research output and map referenced tools back to canonical tool IDs.

Node type: LLM node with an output parser.

Responsibilities:

  • Read the research report returned from Slack.
  • Identify the tools selected as “best” or recommended.
  • For each selected tool:
    • Map it to the exact _id present in the original tool JSON.
    • Output a structured list of selected tools with their _id, slug, and other relevant metadata.

Why exact ID mapping matters:

  • The CMS or content API expects stable, canonical IDs.
  • Any mismatch or fabricated ID can lead to broken references or incorrect tool associations.
  • Downstream nodes rely on these IDs when constructing the final article payload.

Error handling considerations:

  • If the LLM cannot find a matching _id for a tool mentioned in the research, the workflow should:
    • Halt or branch to a manual review step.
    • Present a candidate list of tools for human selection rather than guessing.

3.7 LLM Content Generation Nodes

Role: Produce all textual components of the article from structured prompts and research data.

Typical breakdown:

  • Introduction node Generates a category-specific intro that:
    • Explains the category and its importance.
    • Addresses the specified audience.
    • Sets expectations for the list of tools.
  • Ranking criteria / methodology node Describes how tools were evaluated, referencing:
    • Deep research findings.
    • Factors like features, usability, pricing, integrations, etc.
  • Per-tool profile node Iterates over the selected tools and generates:
    • Short description and positioning.
    • Key features or differentiators.
    • Ideal use cases for the target audience.
  • Meta description node Produces an SEO-friendly meta description that respects character limits and keyword usage.
  • Conclusion node Summarizes the recommendations and may include a call to action or guidance on choosing among tools.

Output parsers:

  • Each LLM node feeds into a parser that:
    • Validates JSON structure or specific schema.
    • Enforces formatting rules such as:
      • Required headings (H2/H3, lists, etc.).
      • Maximum length for meta description and titles.
    • Normalizes whitespace, bullet styles, and basic HTML or Markdown conventions as needed.

3.8 Aggregation & put_category_best_tools_content

Role: Combine all generated and selected data into a single payload and publish it to the CMS.

Aggregation step:

  • Merge:
    • Selected tools with exact _id values.
    • Introduction content.
    • Ranking criteria section.
    • Per-tool profiles.
    • Meta description.
    • Conclusion.
  • Structure the payload to match the category content endpoint’s contract.

put_category_best_tools_content node:

  • Node type: HTTP Request (PUT).
  • Targets the category content endpoint of your CMS or content store.
  • Includes authentication credentials managed within n8n.

Expected outcome: The CMS receives a fully formed, structured “best tools in category” article that is ready for publishing or further editorial review.

4. Rules, Validation, and Safety Checks

4.1 Exact ID matching

  • Every reference to a tool must use the _id value from the original tool JSON without modification.
  • Parsers and validation nodes should:
    • Reject any tool entry that lacks a valid _id.
    • Prevent the workflow from publishing if IDs do not match the canonical list.

4.2 Canonical tool list enforcement

  • Only tools present in the fetched category tool JSON are eligible for inclusion.
  • The deep research prompt explicitly instructs

Automate Shopify Product Announcements with n8n, X & Telegram

Automate Shopify Product Announcements with n8n, X & Telegram

Ever launched a shiny new product on Shopify, then realized you still have to:

  • Write a post for X
  • Write a message for Telegram
  • Paste the same link three times
  • Check if you already posted it or just dreamed about doing it

If that routine feels a bit like manual labor in the age of robots, this guide is for you. We are going to set up an n8n workflow that quietly watches your Shopify store, and every time you create a product, it automatically:

  • Posts a short announcement on X (Twitter)
  • Sends a matching message to your Telegram group or channel

No more copy-paste marathons. Just create the product and let automation do the boring bits.

Why bother automating product announcements?

Because you have better things to do than manually shouting “New product!” on every platform, every time. With an n8n workflow running this for you, you:

  • Save time by skipping repetitive posting tasks
  • Stay consistent so every new product actually gets announced
  • Reach customers faster as soon as the product is created
  • Keep channels in sync so X and Telegram stay on-brand and up to date

In short, automation handles the “I’ll post it later” part that never quite happens.

What this n8n workflow actually does

This template is simple but effective. It connects three main pieces:

  • Shopify Trigger (products/create) – wakes up whenever a new product is created in your Shopify store
  • X (Twitter) create tweet – publishes a tweet (or post on X) with product info
  • Telegram sendMessage – sends a similar message to a Telegram chat, group, or channel

In the n8n editor, the flow looks like:

Shopify Trigger -> X Node -> Telegram Node

Both social nodes get their data from the Shopify webhook payload, so your messages stay tied to the actual product details.

What you need before you start

Before building the workflow, make sure you have:

  • An n8n instance (self-hosted or n8n cloud)
  • Shopify admin access to the store where products are created
  • X (Twitter) credentials – either developer or OAuth credentials connected to n8n
  • A Telegram bot token and the chat ID for your group or channel

Once those are in place, you are ready to let n8n take over the announcement chores.

Quick setup guide: from “new product” to auto-announcement

Here is the whole process broken down into four steps. You can follow along with the template or recreate it manually in your n8n instance.

Step 1 – Add the Shopify Trigger node

First, tell n8n to listen to your store:

  • Add a Shopify Trigger node to your workflow
  • Set the Topic to products/create

When you activate the workflow, n8n will register a webhook with Shopify. From that point on, every time a product is created, Shopify will send a payload directly to this node. That payload includes fields like title, vendor, product_type, images, handle and more.

Step 2 – Configure the X (Twitter) node

Next, let X handle the public excitement so you do not have to type the same sentence over and over.

  • Add an X (Twitter) node and connect it to the Shopify Trigger
  • Set the operation to create:tweet
  • Use an expression to build the message using data from the Shopify payload

Example tweet template:

=Hey there, my design is now on a new product ✨
Visit my {{$json["vendor"]}} shop to get this cool {{$json["title"]}} (and check out more {{$json["product_type"]}}) 🛍️

A few X-specific tips:

  • Stay under 280 characters. Product names can get long, so test your template with a few real examples.
  • If you want to include a link, use a short URL or build one from the Shopify handle to keep it compact.
  • If your brand talks about “X” instead of “Twitter” now, make sure your copy reflects that tone too.

Step 3 – Configure the Telegram node

Now for Telegram, your loyal broadcast channel for fans, customers, and that one friend who reacts to every post.

  • Add a Telegram node and connect it to the same Shopify Trigger
  • Choose the sendMessage operation
  • Set the chatId to your target group or channel, for example -1001234567890 for a channel
  • Paste the same expression as your X message, or tweak it to be slightly more detailed

Example Telegram message:

=Hey there, my design is now on a new product!
Visit my {{$json["vendor"]}} shop to get this cool {{$json["title"]}} (and check out more {{$json["product_type"]}})

The nice part is that both X and Telegram messages are powered by the same Shopify data, so you only maintain one source of truth.

Step 4 – Test the workflow

Before you unleash this on your real audience, give it a safe test run:

  • Create a test product in Shopify, ideally as a draft or hidden product
  • Check that:
    • The X node posts the announcement correctly
    • The Telegram node sends the message to the right chat or channel
  • Open n8n’s execution log and inspect the Shopify node output to see exactly which fields are available:
    • title
    • vendor
    • product_type
    • images
    • handle
    • and more

If both platforms receive the message, you are ready to let automation handle your next real launch.

Going further: make your announcements smarter and prettier

Once the basic text-only version works, you can start upgrading the workflow so it feels less like a robot and more like a social media assistant who actually tries.

Include product images

Plain text works, but images sell. To add product images to your X or Telegram posts:

  • Use an HTTP Request node to fetch the product image URL, or
  • Use the image URL directly from the Shopify payload if it is already available
  • Attach the media in your X and Telegram nodes according to their media upload settings

Keep in mind that:

  • The X API and Telegram API handle media uploads differently
  • You should check their documentation and the n8n docs for the exact steps to upload and attach images

Shorten product links

If your carefully crafted message keeps bumping into character limits, your URLs might be the culprit. A couple of options:

  • Build a short link using your store and the product handle, for example:
    https://your-shop.com/products/{{$json["handle"]}}
  • Integrate a link shortener like Bitly or Rebrandly using an HTTP Request node

Your posts stay neat, readable, and less “giant blue link with 40 tracking parameters.”

Add error handling and basic logic

Not every product needs a big public announcement. You can use n8n’s control nodes to add some brains to the flow:

  • Use Retry options to automatically reattempt failed posts
  • Add an If node to:
    • Skip certain product_type values
    • Exclude specific vendors
  • Use a Set node to:
    • Clean up product titles
    • Strip out HTML
    • Normalize text before posting

This way, your workflow does not just blast everything, it behaves more like a curated marketing assistant.

Security, rate limits, and other “grown up” details

Automation is fun until an API says “no.” Here are some guardrails to keep things healthy.

  • Protect your tokens
    Do not hardcode API keys or tokens inside nodes. Store them using n8n credentials so they are handled securely.
  • Watch X (Twitter) rate limits
    X has limits on how often you can post and upload media. If you plan to announce frequently, consider:
    • Using n8n’s retry options
    • Adding exponential backoff logic
  • Check Telegram permissions
    Make sure your Telegram bot:
    • Is added to the correct group or channel
    • Has permission to post messages there

Common issues and how to fix them

If something does not work on the first try, it is usually a small detail. Here are some quick checks:

  • No webhook events from Shopify?
    Confirm the workflow is active and that the webhook registration succeeded. You can check n8n logs to see if the webhook was created properly.
  • Conditions not matching or fields missing?
    Open the raw JSON payload from the Shopify node in the execution log. Verify the exact field paths you are using in expressions and conditionals.
  • Media upload errors?
    Make sure:
    • The image URL is publicly accessible
    • The URL format matches what the X or Telegram API expects

Helpful n8n expressions for Shopify product data

Here are some common expressions you might use in your X or Telegram messages:

  • Title: {{$json["title"]}}
  • Vendor: {{$json["vendor"]}}
  • Product type: {{$json["product_type"]}}
  • Product URL: https://your-shop.com/products/{{$json["handle"]}}

These let you turn Shopify data into human friendly messages without manual editing.

Bringing it all together

With this n8n workflow in place, every new Shopify product can automatically trigger announcements on X and Telegram. No more “I forgot to tweet that new launch” moments, and no more copying the same text into multiple apps.

Start with a simple text-only setup, then gradually:

  • Add images for visual impact
  • Use link shorteners for cleaner URLs
  • Introduce conditional logic to announce only specific products

Final checklist before going live

  • Shopify, X, and Telegram credentials are correctly set up in n8n
  • You have tested with a draft or hidden product
  • Workflow logs are clean and you have basic retry logic in place
  • Your posts follow X and Telegram content and rate policies

Once that is done, you can spend less time posting and more time creating products worth announcing.

Call to action: Try this n8n workflow template in your own environment, subscribe for more automation templates, or share your Shopify store URL and preferred message format so I can help you generate a customized, ready-to-import n8n workflow JSON with exactly the fields you want.

n8n: Auto-Post Shopify Products to Twitter & Telegram

Automate Shopify Product Announcements with n8n (Twitter & Telegram)

Every time you publish a new product in Shopify, you are creating an opportunity. An opportunity to reach customers faster, keep your brand visible, and stay focused on the work that truly grows your business. Yet, if you are still copying and pasting product details into Twitter and Telegram by hand, those opportunities can quickly turn into busywork.

This is where automation becomes a game changer. With a simple n8n workflow, you can turn every new Shopify product into an instant social media announcement on Twitter and Telegram, without lifting a finger. In this guide, you will walk through a practical n8n template that does exactly that, and you will see how a small automation like this can be a first step toward a more focused, scalable workflow.

The problem: manual posting slows you down

Manually announcing products might feel manageable at first, but as your catalog grows, it becomes a drain on your time and attention. You have to:

  • Log in to Shopify, copy product details, and open multiple social apps
  • Rewrite similar messages over and over
  • Try to remember to post at the right time, every time
  • Fix typos or missed links after the fact

All of that effort takes you away from designing, marketing, and serving your customers. It also introduces inconsistency and delays. New products might appear quietly in your store, instead of being announced confidently across your channels.

Shifting your mindset: let automation handle the routine

Automation is not about replacing your creativity. It is about protecting it. When you automate repetitive tasks like product announcements, you free up mental space to:

  • Plan better campaigns instead of just posting ad hoc updates
  • Experiment with pricing, bundles, and offers
  • Engage directly with customers who respond to your posts
  • Think about the next automation that can move your business forward

n8n gives you a visual, flexible way to build these automations without locking you into one provider. You can start small with a single workflow and gradually layer on more logic, channels, and data. The template in this article is a great first step: it listens for new Shopify products and automatically posts personalized announcements to Twitter and Telegram.

What this n8n workflow helps you achieve

This workflow is designed to:

  • Listen for new product events in Shopify using a Shopify Trigger node
  • Use product details like vendor, title, and product_type directly from the Shopify payload
  • Post a tweet via the Twitter node whenever a new product is created
  • Send a Telegram message to a chosen chat via the Telegram node

In other words, once it is active, every new product you create in Shopify automatically becomes a consistent, branded announcement across your social channels. You set it up once, then let it run in the background while you focus on higher value work.

Core building blocks of the workflow

The automation uses three core n8n nodes:

  • Shopify Trigger (topic: products/create) – listens for new product creation events in your Shopify store
  • Twitter node – posts a tweet using dynamic data from the Shopify event
  • Telegram node – sends a message to a specific Telegram chat

The Shopify Trigger receives the event payload when a product is created. That payload is then passed to the Twitter and Telegram nodes, which use n8n expressions to inject live Shopify values into your messages. This way, every tweet and Telegram message is personalized to the product that just went live.

Template example: JSON workflow for n8n

You can import the following JSON directly into n8n as a starting template. From there, you can customize the messages, add more nodes, or expand into additional automations.

{  "nodes": [  {  "name": "Twitter",  "type": "n8n-nodes-base.twitter",  "position": [720, -220],  "parameters": {  "text": "=Hey there, my design is now on a new product ✨\nVisit my {{$json[\"vendor\"]}} shop to get this cool{{$json[\"title\"]}} (and check out more {{$json[\"product_type\"]}}) 🛍️",  "additionalFields": {}  },  "credentials": {"twitterOAuth1Api": "twitter"},  "typeVersion": 1  },  {  "name": "Telegram",  "type": "n8n-nodes-base.telegram",  "position": [720, -20],  "parameters": {  "text": "=Hey there, my design is now on a new product!\nVisit my {{$json[\"vendor\"]}} shop to get this cool{{$json[\"title\"]}} (and check out more {{$json[\"product_type\"]}})",  "chatId": "123456",  "additionalFields": {}  },  "credentials": {"telegramApi": "telegram_habot"},  "typeVersion": 1  },  {  "name": "product created",  "type": "n8n-nodes-base.shopifyTrigger",  "position": [540, -110],  "webhookId": "2a7e0e50-8f09-4a2b-bf54-a849a6ac4fe0",  "parameters": {"topic": "products/create"},  "credentials": {"shopifyApi": "shopify_nodeqa"},  "typeVersion": 1  }  ],  "connections": {  "product created": {  "main": [[{"node": "Twitter", "type": "main", "index": 0}, {"node": "Telegram", "type": "main", "index": 0}]]  }  }
}

Important: Update the credential names (twitter, telegram_habot, shopify_nodeqa) and the Telegram chatId with your own values. The webhookId in the Shopify Trigger is generated automatically by n8n when you save the node in your own instance.

Step-by-step: building the workflow in n8n

Let us walk through the setup as if you are building it from scratch. Treat this as a guided journey. Once you complete it, you will have a working automation that you can continue to refine.

1. Install and open n8n

You can run n8n locally or use n8n cloud, depending on what fits your workflow best. After installation:

  • Open the n8n editor UI
  • Create a new workflow
  • Save it early so that trigger nodes can generate their webhook IDs

Saving early is a small habit that keeps your triggers reliable as you build.

2. Add the Shopify Trigger node

This node is the starting point of your automation. It listens for new products and passes the data downstream.

  • Drag the Shopify Trigger node onto the canvas
  • In the node settings, set the topic to products/create
  • Connect your Shopify credentials in the credentials section

Once connected, this node will receive a payload every time a product is created in your Shopify store. Fields like vendor, title, and product_type will be available for use in your messages.

3. Add and configure the Twitter node

Next, you will turn those product details into a live tweet.

  • Drag a Twitter node onto the canvas
  • Connect your Twitter OAuth1 credentials
  • In the text field, use an expression so the tweet is dynamic

For example, you can use:

=Hey there, my design is now on a new product ✨
Visit my {{$json["vendor"]}} shop to get this cool {{$json["title"]}} (and check out more {{$json["product_type"]}}) 🛍️

This expression pulls values directly from the Shopify payload, so each tweet reflects the actual product that just went live. Feel free to adjust the wording to match your brand voice while keeping the expressions intact.

4. Add and configure the Telegram node

Now, you will mirror that announcement to Telegram, where your community or team can see it instantly.

  • Add a Telegram node to the workflow
  • Enter your chatId and select your Telegram API credentials
  • Use an expression in the text field to build a dynamic message

For example:

=Hey there, my design is now on a new product!
Visit my {{$json["vendor"]}} shop to get this cool {{$json["title"]}} (and check out more {{$json["product_type"]}})

You can customize the tone, add emojis, or adjust formatting to fit the audience of that specific chat or channel.

5. Connect the nodes and run a test

To complete the workflow:

  • Connect the output of the Shopify Trigger node to both the Twitter and Telegram nodes
  • Save the workflow
  • Activate it

Next, create a test product in Shopify or use the Shopify admin to trigger a product creation event. Once the product is created:

  • Check Twitter for the new tweet
  • Check your Telegram chat for the new message

That first successful run is a milestone. You have just turned a manual task into an automatic system that works for you in the background.

Tips to make your automation more reliable and impactful

Once the basic workflow is running, you can refine it to be more robust and more aligned with your goals.

  • Include the product URL: If the Shopify payload includes a product URL, add it to your messages. You can use expressions or Liquid-style formatting to build the URL, which helps drive immediate traffic and conversions.
  • Respect rate limits: Twitter and Telegram APIs have rate limits. If you publish many products at once, consider adding delays or batching logic to avoid hitting those limits.
  • Add error handling: Use a Function node or an Error Trigger node to log failed posts and optionally retry. This gives you visibility into issues without having to watch every execution manually.
  • Optimize formatting: Shorten long product titles for Twitter, and use emojis thoughtfully to increase engagement without cluttering your message.
  • Track performance: Connect a Google Sheets node or a database node to log each post. Over time, you can analyze which product types or vendors get more engagement.

Ideas to customize and grow your workflow

Think of this template as a foundation, not a finished system. Once you see it working, you can expand it in many directions:

  • Include product images: Map image URLs from the Shopify payload to your Twitter and Telegram nodes so your posts are more visual and clickable.
  • Post to multiple channels: Add more Telegram nodes, a Slack node, or other social media integrations with different messages tailored for each audience.
  • Use tags and collections: Include product tags or collections in your messages, or route products with specific tags to specific channels.
  • Schedule follow-ups: Add a Wait node and send a follow-up message a few hours after a product goes live to boost visibility and remind your audience.

Each small improvement compounds. Over time, your n8n setup can become a powerful automation layer for your entire eCommerce workflow.

Security and best practices

As your automations grow, keeping them secure is just as important as making them powerful.

  • Store API keys and tokens using n8n credentials instead of hardcoding them in nodes
  • Limit who can access your workflows and credentials, especially in team environments
  • Restrict webhook visibility and avoid exposing secrets in logs or public URLs
  • Rotate credentials periodically and remove unused access to reduce risk

By following these practices, you protect both your store and your automation infrastructure.

Troubleshooting: when posts do not appear

If your tweets or Telegram messages are not showing up, use this quick checklist:

  • Review n8n execution logs to see any errors or non-200 response codes from Twitter or Telegram
  • Confirm that your Twitter and Telegram credentials are valid and have the required permissions
  • Check your Shopify admin to verify that the webhook for products/create is registered correctly
  • Inspect the incoming Shopify payload in n8n execution data to make sure fields like vendor, title, and product_type are present and mapped correctly

Most issues can be solved by adjusting credentials, fixing field paths, or re-registering the webhook. Once resolved, your automation should continue to run quietly in the background.

SEO and discovery note

This workflow touches several powerful concepts: n8n, Shopify automation, Shopify trigger, Twitter posting, Telegram notifications, webhooks, social media automation, and the product created event. As you build more workflows, you can reuse these patterns to automate other parts of your eCommerce and marketing stack.

From one workflow to a more automated business

Automating Shopify product announcements with n8n is more than a convenience. It is a signal that you are ready to scale your time and energy. This single workflow:

  • Ensures every new product gets a timely, consistent announcement
  • Reduces manual work and context switching
  • Gives you a reusable pattern for future automations

The template you saw here is intentionally simple so you can understand it quickly and build confidence. From there, you can expand it with images, error handling, logging, analytics, and multi-channel distribution. Each improvement makes your system more resilient and your marketing more consistent.

Next step: Import the workflow into n8n, connect your Shopify, Twitter, and Telegram credentials, and create a test product. Watch as your announcements appear automatically. Then, iterate. Tweak the wording, add new nodes, and shape the automation to fit your brand.

Call-to-action: Import this workflow into n8n, customize the messages for your brand voice, and subscribe to our newsletter for more n8n automation recipes and practical eCommerce tips.

Want a tailored workflow for your store? Reply with your use case and I will help you map the automation so you can keep building momentum toward a more automated, focused business.

n8n Tutorial: Automate Tweets with Conditional Logic

n8n Tutorial: Automate Tweets with Manual Trigger, Twitter (X) Node & Conditional IF Logic

This guide explains how to implement a compact n8n workflow that posts to Twitter (X) on demand and routes execution through an IF node based on a simple condition. The tutorial keeps the workflow minimal while demonstrating key n8n concepts: manual triggers, authenticated API calls, conditional branching, and safe placeholders for future extensions.

1. Workflow overview

The template consists of four core n8n nodes connected in a linear flow with a conditional split:

  • Manual Trigger – Executes the workflow on demand when you click Execute Workflow in the editor.
  • Twitter (X) Node – Sends a tweet with text content using authenticated Twitter/X credentials.
  • IF Node – Evaluates a condition and splits the execution into true and false branches.
  • NoOp Node – A no-operation node used as a placeholder target for one of the branches.

At a high level the execution path is:

Manual Trigger → Twitter (X) → IF → (true | false) → NoOp

This pattern is useful when you want a controlled, testable automation that can later be expanded into a more complex flow without changing the basic structure.

2. Architecture and data flow

2.1 Execution path

  1. Manual Trigger node starts the execution with a single item and no external input data.
  2. Twitter (X) node receives the item, uses configured credentials, and calls the Twitter/X API to create a tweet with static text.
  3. IF node evaluates a numeric condition based on the special variable {{$runIndex}}:
    • If the condition evaluates to true, the item continues on the true output.
    • If the condition evaluates to false, the item continues on the false output.
  4. NoOp node receives the item from one of the IF outputs and performs no transformation. It simply passes the item along, making it a safe placeholder for future steps.

2.2 Why this pattern is useful

This architecture is intentionally minimal yet covers several common automation patterns in n8n:

  • Interactive testing – Use the Manual Trigger to test tweet formatting, credentials, and branching logic without scheduling or external webhooks.
  • Conditional workflows – Use the IF node to enable or disable downstream actions based on run index, API responses, or expression-based rules.
  • Safe layout for future changes – The NoOp node keeps the visual structure intact and provides a stable connection point for later additions such as Slack notifications, logging, or retry logic.

3. Node-by-node breakdown

3.1 Manual Trigger node

Purpose: Start the workflow manually from the n8n editor.

  • Node type: n8n-nodes-base.manualTrigger
  • Typical label: On clicking 'execute' or any descriptive name.
  • Configuration: No additional parameters are required. The node simply provides a single item when you run the workflow manually.

You use this node primarily during development and for ad-hoc runs. It is ideal when you want to test tweet content or IF logic without configuring a Cron or Webhook trigger.

3.2 Twitter (X) node

Purpose: Post a tweet using the Twitter/X API.

  • Node type: n8n-nodes-base.twitter
  • Input: Item(s) from the Manual Trigger node.
  • Action: Create Tweet (or the equivalent action name in your n8n version / connector).

Key configuration parameters:

  • Action: Select Create Tweet.
  • Text: Provide the tweet body, for example:
    Hello from n8n!
  • Authentication / Credentials:
    • Open the Credentials section of the node.
    • Select or create a Twitter/X OAuth credential in the n8n credential manager.
    • Ensure you have valid API keys, access tokens, and any required elevated access level according to current Twitter/X API policies.

Integration specifics & notes:

  • Twitter/X API naming and endpoints may change over time. If the node name or action labels differ slightly, select the option that corresponds to posting a new tweet with text.
  • If authentication fails, the node will return an error in the execution log. Typical causes include invalid tokens, revoked access, or insufficient permissions.
  • The node output typically contains metadata about the posted tweet (such as IDs and timestamps), which you can later reference in expressions if you expand the workflow.

3.3 IF node

Purpose: Conditionally route execution into separate branches based on a boolean evaluation.

  • Node type: n8n-nodes-base.if
  • Input: Output of the Twitter node.
  • Outputs: Two separate outputs:
    • true – items that match the condition.
    • false – items that do not match the condition.

Condition used in this template:

The template compares the workflow run index to the numeric value 4:

{{$runIndex}} == 4

This means:

  • {{$runIndex}} is a special n8n variable that starts at 0 for the first item.
  • The condition evaluates to true only when {{$runIndex}} equals 4, which corresponds to the fifth item or run.

Common IF node checks you can use:

  • Value comparisons: equals, not equals, greater than, less than, contains, etc.
  • API response checks: Inspect values from the previous node using expressions such as:
    {{$json["fieldName"]}}
  • Loop or index-based logic: Use {{$runIndex}} or other contextual variables to control when certain actions occur.

This node is central to adding conditional logic to your automation. In this template it is kept intentionally simple so you can easily adapt the expression to your own conditions.

3.4 NoOp node

Purpose: Provide a stable endpoint or placeholder for one branch of the IF node without changing the data.

  • Node type: n8n-nodes-base.noOp
  • Input: Output from either the true or false branch of the IF node.
  • Behavior: The node does not modify or enrich the data. It simply passes the item through.

This is helpful when you are still designing your workflow. You can:

  • Keep the branching structure visible and connected.
  • Later replace or extend the NoOp node with real logic, such as:
    • Sending a Slack notification.
    • Writing logs to a database or Google Sheets.
    • Adding retry or error handling steps.

4. Template JSON reference

The following JSON is a compact representation of the workflow structure. It reflects the same node types and connections described above.

{  "nodes": [  {  "name": "On clicking 'execute'",  "type": "n8n-nodes-base.manualTrigger"  },  {  "name": "IF",  "type": "n8n-nodes-base.if"  },  {  "name": "NoOp",  "type": "n8n-nodes-base.noOp"  },  {  "name": "Twitter",  "type": "n8n-nodes-base.twitter",  "parameters": {  "text": "Hello from n8n!"  }  }  ],  "connections": {  /* connections: Manual -> Twitter -> IF -> (true|false) -> NoOp */  }
}

In a full export from your own instance you will also see credentials references, node positions, and other metadata. The snippet above focuses on the conceptual structure.

5. Configuration & setup notes

5.1 Credentials and authentication

  • Configure Twitter/X OAuth credentials in the n8n Credentials section.
  • Do not hard-code API keys or tokens directly inside text fields. Use the credential manager to keep secrets secure.
  • If tokens expire or permissions change, you may need to re-authorize the Twitter credential in n8n.

5.2 Expressions and indices

  • {{$runIndex}} is zero-based:
    • 0 is the first item.
    • 4 is the fifth item.
  • When processing multiple items per execution, the run index is evaluated per item, which affects when your IF condition becomes true.
  • Use the expression editor in n8n to validate syntax for expressions like:
    {{$json["field"]}}

    before saving the node configuration.

6. Testing, debugging & common pitfalls

6.1 Testing the workflow

  • Click Execute Workflow to run from the Manual Trigger node.
  • Inspect each node’s output in the execution panel:
    • Confirm that the Twitter node successfully posts the tweet.
    • Verify that the IF node routes items into the expected branch.
    • Check that the NoOp node receives the item as expected.
  • For predictable testing of IF conditions, you can:
    • Use a Set node (if you add one) to define static fields.
    • Temporarily simplify the condition to something you can easily trigger.

6.2 Debugging Twitter node failures

  • Review the error message in the node execution details. Common problems:
    • Invalid or expired tokens.
    • Revoked access or changed permissions.
    • API rate limits reached.
  • If you hit rate limits, space out your tests and consider adding retry logic or scheduling less frequent runs.
  • Re-check that the configured action is Create Tweet and that the text field is not empty.

6.3 Common pitfalls

  • Authentication errors: When credentials are updated or revoked on Twitter/X, you must re-connect or re-authorize them in n8n.
  • Incorrect expressions: Mis-typed JSON paths like {{$json["field"]}} can cause runtime errors. Always validate in the expression editor.
  • Misunderstanding indices: Remember that {{$runIndex}} is per item and starts at 0. If you expect the condition to be true earlier, adjust the comparison accordingly.

7. Advanced customization & next steps

7.1 Replace Manual Trigger with Cron

To move from ad-hoc testing to scheduled automation, replace the Manual Trigger with a Cron node:

  • Delete or disable the Manual Trigger.
  • Add a Cron node and configure the desired schedule (for example, hourly or daily).
  • Connect the Cron node to the Twitter node.

This transforms the workflow into a recurring job that posts tweets at predefined times.

7.2 Extend IF logic

The IF node can do more than compare the run index. You can:

  • Inspect tweet content or metadata and route based on:
    • Presence of keywords.
    • Flags or status values from previous nodes.
  • Send items that match a condition to:
    • Slack for notifications.
    • Google Sheets for basic analytics.
    • Additional validation nodes before posting.

In all these cases, the pattern remains the same: Twitter → IF → different branches, with NoOp easily replaced by functional nodes.

7.3 Error handling and retry strategies

To make the workflow more robust, you can introduce dedicated error handling:

  • Add a Catch Error branch to handle failures from the Twitter node.
  • Use a Function node for custom retry logic, such as:
    • Retrying on rate limit errors after a delay.
    • Logging error details to an external system.
    • Sending alerts to an administrator or support channel.

These enhancements build on the same structure without changing the core logic of the template.

8. Security & policy considerations

  • Always store API keys and tokens in n8n credentials, not in plain text fields or code.
  • Review Twitter/X platform rules and content policies before automating posts, especially at scale.
  • Monitor rate limits to avoid automated workflows hitting caps and failing unexpectedly.

9. Putting it all together

This template illustrates a foundational n8n automation pattern:

Manual Trigger → Twitter (X) → IF → NoOp

With this small workflow you get:

  • Interactive, manual execution for safe development and testing.
  • An authenticated action node that integrates with an external API.
  • Conditional branching using the IF node and expressions like {{$runIndex}}.
  • A NoOp placeholder that keeps the structure extensible and maintainable.

From here you can scale to scheduled tweets, multi-channel notifications, analytics, and more advanced error handling without discarding the core design.

Try it in your instance: Import the template, connect your Twitter/X credentials, and click Execute Workflow. Experiment with different IF conditions and replace the NoOp node with real actions such as Slack messages, database logging, or retry logic.

Get the Workflow Template

Looking for more n8n automation templates and tutorials? Subscribe to our newsletter or follow the blog for weekly, in-depth workflow guides.

n8n: Trigger on Trello List Updates (Step-by-Step)

n8n: Trigger on Trello List Updates (Step-by-Step)

Automating Trello list updates with n8n allows you to turn card changes into structured, event-driven workflows. This reference-style guide explains how to configure the Trello Trigger node to receive real-time updates for a specific Trello list, how data flows through the workflow, and how to integrate those events with systems like Slack, email, or databases.

1. Overview & Use Cases

The Trello Trigger node in n8n creates a Trello webhook that notifies your workflow whenever a relevant action occurs. Instead of polling Trello or manually checking boards, n8n reacts immediately to events such as:

  • Cards created in a list
  • Cards moved into or out of a list
  • Cards updated or archived
  • Other card-related actions, depending on the configured event types

Typical automation scenarios include:

  • Sending Slack or email notifications when work enters an “In Progress” list
  • Logging Trello activity to Google Sheets or a database
  • Triggering downstream workflows when cards change state

The workflow described here uses Trello’s webhook mechanism through n8n to listen at list level or, optionally, at board level when the list ID is omitted.

2. Architecture & Data Flow

The high-level architecture of an n8n workflow that reacts to Trello list updates looks like this:

  1. Trello Trigger node
    • Registers a webhook with Trello using your API key and token
    • Receives JSON payloads for configured events
    • Emits one n8n item per incoming Trello action
  2. Processing nodes (Set / IF / Function)
    • Filter events by action type, list, labels, members, or custom fields
    • Transform payloads into human-readable messages or normalized records
  3. Target integration nodes (for example, Slack)
    • Post messages to channels
    • Write to storage systems
    • Trigger other APIs

The Trello Trigger node is the entry point. It receives a rich payload that typically includes:

  • Details about the card (id, name, url, etc.)
  • The board and list context
  • An action object that describes what changed and who performed it

Downstream nodes then use this payload to apply business logic, enforce filters, and call other services.

3. Prerequisites

Before configuring the workflow, make sure you have:

  • An n8n instance (n8n Cloud or self-hosted)
  • A Trello account with access to the target board and list
  • A Trello API key and token for authentication

3.1 Generate Trello API Key and Token

To obtain Trello credentials:

  1. Open https://trello.com/app-key.
  2. Copy the displayed API Key.
  3. Use the page controls to generate an API Token for the Trello account that has access to the board you want to monitor.

Store the key and token securely. You will use them to configure Trello credentials in n8n.

4. Node-by-Node Breakdown

4.1 Trello Credentials in n8n

First, create a Trello credential entry in n8n so the Trello nodes can authenticate against the Trello API and manage webhooks.

  1. In n8n, navigate to Credentials.
  2. Create a new credential of type Trello.
  3. Enter your API Key and Token.
  4. Save the credential. This will be referenced by the Trello Trigger node.

Using credentials instead of hardcoding values in nodes keeps secrets out of workflow definitions and improves security.

4.2 Trello Trigger Node Configuration

Next, add and configure the Trello Trigger node that will receive list-level updates.

  1. Add the node
    • Open your workflow in n8n.
    • Drag a Trello Trigger node into the canvas.
  2. Select credentials
    • In the node’s parameters, choose the Trello credential you created earlier.
  3. Configure events
    • Set the Event or multiple events you want to receive.
    • Typical event types include:
      • cardCreated
      • cardUpdated
      • cardMoved
    • Select only the events that are relevant to reduce noise and processing overhead.
  4. Scope the trigger to a list
    • Locate the ID field in the Trello Trigger parameters.
    • Paste the Trello List ID that you want to monitor.
    • If you leave this field empty, the webhook will listen at the board level instead of a single list.

With a list ID set, the trigger focuses on that specific list. Without it, you can handle board-level events and implement custom logic to filter by list in downstream nodes.

4.3 Activating and Testing the Trigger

After configuration, verify that the webhook is working correctly.

  1. Save and activate the workflow
    • Save your workflow in n8n.
    • Enable it to allow n8n to register the webhook with Trello.
  2. Generate test events
    • In Trello, perform actions on the monitored list, such as creating a card or moving a card into the list.
  3. Inspect the payload
    • Open the Trello Trigger node in n8n and review the latest execution.
    • Inspect the node’s output to examine the incoming JSON payload, including action, card, list, and board data.

This payload inspection step is critical for mapping fields correctly in subsequent nodes.

5. Obtaining the Trello List ID

Trello’s web interface does not display list IDs directly. You can obtain them using the Trello API or by inspecting the DOM in the browser.

5.1 Using the Trello API (Recommended)

The most reliable method is to query Trello’s API for all lists on a board:

curl "https://api.trello.com/1/boards/{BOARD_ID}/lists?key={API_KEY}&token={TOKEN}"

Replace:

  • {BOARD_ID} with the Trello board ID
  • {API_KEY} with your Trello API key
  • {TOKEN} with your Trello API token

The response is an array of list objects. For each list you will see fields such as:

  • id – the list ID required by the Trello Trigger node
  • name – the list name as shown in the UI
  • Additional metadata

Copy the id of the list you want to monitor and paste it into the Trello Trigger node’s ID parameter.

5.2 Browser-Based Quick Method

As an alternative, you can inspect the Trello board page in your browser:

  1. Open the Trello board.
  2. Right-click the header of the target list and choose Inspect.
  3. Search the DOM for attributes such as data-list-id or embedded JSON snippets that contain the list object.

In many cases, the list ID appears in these attributes or JSON structures. However, the API method is generally more consistent and should be preferred in production workflows.

6. Example Workflow: Notify Slack on “In Progress” List Updates

This example illustrates a common integration: notifying a Slack channel whenever a card enters a specific Trello list, such as “In Progress”.

6.1 Node Overview

  • Trello Trigger
    • List ID set to the “In Progress” list
    • Events configured: cardCreated and cardMoved
  • Processing node (IF or Set)
    • Extracts card name, URL, and optionally members or labels
    • Formats a message body suitable for Slack
  • Slack node
    • Posts a message to a specific Slack channel when triggered

With this setup, when a card is created directly in “In Progress” or moved into it from another list, the workflow sends a structured notification to your team, eliminating the need for manual status updates.

7. Event Filtering & Data Mapping

The Trello Trigger node forwards a detailed payload that can be filtered and transformed before calling downstream services. Commonly used n8n nodes for this purpose include Set, IF, and Function.

7.1 Typical Filtering Strategies

  • Filter by action type
    • Use an IF node to check action.type in the payload.
    • Ignore events that are not relevant, such as comment-only updates, if your workflow should only react to card creations or movements.
  • Filter by labels, members, or custom fields
    • Inspect the card object for labels or assigned members.
    • Only continue the workflow if specific criteria are met, for example, a particular label is present.

7.2 Data Transformation

Use the Set or Function node to:

  • Extract key fields such as card name, URL, description, due date, or member usernames.
  • Build a human-readable string for notifications, logs, or other outputs.
  • Normalize the Trello payload into a consistent schema for storage in databases or spreadsheets.

8. Permissions & Security Considerations

Correct permission and security configuration is essential when working with Trello webhooks and n8n.

  • Least privilege Trello token
    • Use a Trello account that has access only to the boards and lists required by your automation.
    • Avoid using tokens tied to accounts with unnecessary administrative privileges.
  • Secure credential storage
    • Store the Trello API key and token in n8n’s Credentials section.
    • Do not hardcode them in workflow parameters or Function nodes.
  • Webhook security
    • If you run n8n self-hosted, ensure webhook URLs are served over HTTPS.
    • Restrict public access where possible and rely on n8n’s secure webhook handling instead of exposing additional endpoints.

9. Troubleshooting Reference

If the Trello Trigger node is not behaving as expected, use the following checklist.

  • No events received
    • Verify that the workflow is activated in n8n.
    • Open the Trello Trigger node and confirm that a webhook URL is present.
    • Use Trello’s API to list existing webhooks and check whether the webhook is registered and valid.
  • Incorrect list or board ID
    • Re-fetch the list ID using the Trello API method described above.
    • Ensure that you are not mixing board-level and list-level configuration unintentionally. A board-level webhook will deliver broader events, and you may need additional filtering logic.
  • Permissions issues
    • Confirm that the Trello token belongs to a user with access to the specific board and list.
    • If the token lacks permission, Trello will not deliver events for that resource.
  • Duplicate or multiple events
    • Certain actions, such as moving a card between lists, can result in multiple related events (for example, removal from one list and addition to another).
    • Inspect the action.type and other action fields in the payload and filter out events that should not trigger processing.

10. Best Practices for Production Workflows

  • Limit monitored scope
    • Monitor only the lists you actually need to track to reduce webhook noise and processing costs.
  • Environment-specific credentials
    • Use separate Trello credentials for staging and production environments.
    • This avoids accidental cross-environment changes and simplifies debugging.
  • Inspect payloads during development
    • Log incoming events or temporarily connect the trigger to a node that captures full payloads for analysis.
    • This helps you understand the exact structure of the data you are working with.
  • Handle Trello rate limits
    • Trello applies API rate limits. When your workflow makes additional Trello API calls downstream, implement retry logic where appropriate.

11. Advanced Configuration & Customization

Beyond simple list-level triggers, you can build more advanced Trello automations with n8n.

11.1 Board-Level Webhooks with List Transitions

If you need to react to cards moving between multiple lists, consider:

  • Configuring the Trello Trigger at the board level by leaving the list ID field empty.
  • Inspecting fields such as listBefore and listAfter in the incoming action payload to detect transitions between lists.

Automate RSS to BlueSky with n8n

Automate RSS to BlueSky with n8n

Every new piece of content you publish is an opportunity to connect, grow, and build momentum. Yet, manually sharing each article or update to every platform can feel like a never-ending chore. What if that repetition could disappear, and your content could quietly, reliably, and automatically reach your audience on BlueSky while you focus on the work that truly matters?

This guide walks you through an n8n workflow template that does exactly that. It reads your RSS feed, downloads and uploads images, creates a BlueSky session, and publishes posts with link previews and images using BlueSky’s XRPC endpoints. Think of it as a small but powerful step toward a more automated, focused, and scalable workflow.

The problem: Manual posting slows you down

If you publish regularly, you know the pattern:

  • New article goes live in your CMS.
  • You copy the link, write a short caption, grab an image, and post it to BlueSky.
  • You repeat this again and again, often at odd hours, just to keep up.

Over time, this repetition chips away at your energy and attention. Important tasks get delayed, and your creative focus is split between making things and promoting them.

Automation changes that dynamic. Instead of reacting to every new piece of content, you can design a system once and let it work for you every day.

The possibility: Let automation amplify your work

Automating RSS to BlueSky with n8n is more than a technical trick. It is a mindset shift. You are moving from “I have to remember to post this” to “I have designed a system that takes care of it.”

With a simple workflow you can:

  • Ensure every new RSS item reaches BlueSky consistently.
  • Save time on manual posting and reduce context switching.
  • Keep a steady presence on BlueSky even when you are busy, offline, or focused on deep work.
  • Lay the foundation for more advanced automations later, like translation, content transformation, or multi-channel posting.

n8n gives you a visual, extensible canvas to design this system. You can start small with this template, then gradually add filters, schedules, or creative refinements as your automation skills and needs grow.

The tool: An n8n workflow that connects RSS to BlueSky

The workflow template you will use is built around a clear, reliable sequence of steps. At a high level, it:

  • Watches your RSS or Atom feed for new items.
  • Creates a BlueSky session using an app password and retrieves an access token.
  • Captures the current datetime for accurate post metadata.
  • Downloads the enclosure image from the feed, then uploads it to BlueSky.
  • Creates a BlueSky post that includes your link, text, and an external embed with an optional thumbnail.
  • Uses sticky notes inside the workflow to remind you of configuration details.

Each node is a building block. Together, they create a repeatable publishing pipeline that you can adapt to your own style and strategy.

Node-by-node journey through the workflow

RSS Feed Trigger – where your automation begins

The journey starts with the RSS Feed Trigger node. This node watches the RSS or Atom feed you care about and wakes up the workflow whenever a new item appears.

In this node:

  • Set the feedUrl to the RSS or Atom feed you want to monitor.
  • Use a poll interval that fits your needs. The example checks every minute, but you can adjust this based on how often your feed updates and any API rate limits you want to respect.

Once this is configured, n8n quietly keeps an eye on your feed so you do not have to.

Create Session – securely connecting to BlueSky

Next, you need a safe way for n8n to talk to BlueSky on your behalf. This happens in the Create Session node.

  1. Create an app password in your BlueSky settings. Do not use your primary password.
  2. In the Create Session node, send your BlueSky username and app password to: https://bsky.social/xrpc/com.atproto.server.createSession
  3. The response includes an accessJwt. This token is used in the Authorization header for later requests: Authorization: Bearer <token>.

This step is what empowers the rest of the workflow to act securely and reliably on your account.

Get current datetime – keeping your posts in sync

The Get current datetime node might look simple, but it keeps your data clean and consistent.

It produces an ISO timestamp that the Create Post node uses for the createdAt field of the BlueSky post. This ensures your post metadata accurately reflects when n8n published the item.

Download image – capturing visuals from your feed

Visuals matter, and your automation can handle them for you.

The Download image node:

  • Fetches the feed’s enclosure image URL.
  • Uses responseFormat=file so that the image is treated as binary data inside n8n.

This step transforms the image from a simple URL in your RSS feed into a file that can be uploaded to BlueSky.

Upload image – sending media to BlueSky

Once the image is in n8n as binary data, the Upload image node sends it to BlueSky using the com.atproto.repo.uploadBlob endpoint.

Key details for this node:

  • Use contentType: binaryData so n8n knows you are sending file data.
  • Provide the binary field name, for example data.
  • Forward the original MIME type from the feed, such as image/jpeg, using the feed’s enclosure.type so BlueSky receives the correct Content-Type.

The response includes a blob reference. This reference is later used as the thumbnail in the external embed, giving your BlueSky posts a richer visual presence.

Create Post – publishing to BlueSky automatically

Finally, the Create Post node brings everything together and publishes your content to BlueSky.

It calls com.atproto.repo.createRecord with a JSON payload similar to this:

{  "repo": "{your-did}",  "collection": "app.bsky.feed.post",  "record": {  "text": "(post text or excerpt)",  "$type": "app.bsky.feed.post",  "embed": {  "$type": "app.bsky.embed.external",  "external": {  "uri": "(link)",  "title": "(feed title)",  "description": "(content snippet)",  "thumb": { /* blob reference from uploadBlob */ }  }  },  "createdAt": "(ISO timestamp)",  "langs": [ "es-ES" ]  }
}

You can:

  • Adjust text to be a teaser, a full excerpt, or a custom caption.
  • Change langs to match your target language or audience.
  • Map feed fields into these values with n8n expressions, such as: {{ $node['RSS Feed Trigger'].json['link'] }}.

At this point, a new item in your RSS feed automatically becomes a well-formatted BlueSky post, complete with a link preview and optional thumbnail image.

Critical configuration details to get right

To keep your automation reliable, pay attention to these settings:

  • Authorization Header
    Use the access token from the Create Session node in both the upload and create post steps:
    Authorization: Bearer {{ $item("0").$node["Create Session"].json["accessJwt"] }}
  • Binary data handling
    In the Upload image node:
    • Set contentType to binaryData.
    • Specify the correct binary field name, such as data.
  • Content length limits
    BlueSky may limit text length. The template often trims the RSS excerpt to around 200 characters. If your content is longer, validate and truncate as needed so posts do not fail.
  • MIME type for upload
    Forward the original enclosure.type from the feed to the upload request. This ensures that BlueSky receives the right MIME type and can handle the image correctly.

Customization ideas to grow your automation

Once the basic workflow is running, you can start shaping it to fit your unique goals. Here are some ways to expand and refine it:

  • Filter by relevance
    Only post items that match certain keywords, categories, or authors. This keeps your BlueSky feed focused and on-brand.
  • Summarize multiple items
    Aggregate several feed items into a single summary post, for example a daily or weekly roundup.
  • Work in multiple languages
    Automatically translate the post text or adjust the langs field to match your audience.
  • Simplify visuals
    If your feed does not include images, remove the image upload step and post only the external embed with title, description, and link.
  • Post to multiple accounts
    Add more Create Session nodes and branch the flow so the same RSS item can be posted to several BlueSky accounts.

Each customization is another step toward a tailored, personal automation system that reflects your style and strategy.

Troubleshooting: turning obstacles into learning

As you experiment and refine, you may encounter some common issues. Treat them as part of the learning curve that strengthens your automation skills.

Authentication errors

If you see 401 responses or similar authentication issues:

  • Confirm you are using an app password, not your primary password.
  • Verify that the Create Session node returns an accessJwt.
  • Check that the Authorization header includes: Bearer <token-from-accessJwt>.

Image upload fails

If images do not appear as expected:

  • Check the file size and confirm it is within acceptable limits.
  • Verify that the MIME type is supported and correctly forwarded from enclosure.type.
  • Use n8n’s binary preview to confirm the Download image node is actually returning a file.

Duplicate posts

If you notice repeated posts:

  • Remember that the RSS Feed Trigger node usually handles deduplication.
  • If you modify items downstream, make sure you are not accidentally re-triggering on previously processed items.
  • Consider saving processed GUIDs in a persistent data store or rely on n8n’s built-in item history to avoid re-posting.

Security best practices for peace of mind

As your automation grows in importance, so does the need to protect it.

  • Store BlueSky credentials and sensitive values in n8n credentials or environment variables, not hardcoded in the workflow JSON.
  • Rotate app passwords regularly and revoke any that might be compromised.
  • Where possible, limit the permission scope of app passwords so that any single token has only the access it truly needs.

Quick setup checklist: your first win

Ready to turn this into a working automation? Use this checklist to get your first success quickly:

  1. Create an app password in your BlueSky settings.
  2. Import or recreate the n8n workflow template.
  3. Fill in the Create Session node with your BlueSky username and app password.
  4. Set your RSS feed URL in the RSS Feed Trigger node.
  5. Run a test with a single item and check BlueSky for the published post with link preview and image.

Once that first automated post appears, you will see how much potential there is to build on top of this foundation.

From one workflow to a more automated life

This n8n template is more than a one-off tool. It is a starting point for a broader shift in how you handle repetitive tasks. By automating RSS to BlueSky, you reclaim time, reduce friction, and create space for deeper, more meaningful work.

From here, you can:

  • Tweak content mapping to match your voice and brand.
  • Add filters, transforms, or schedules to shape when and how posts appear.
  • Monitor n8n logs and refine the workflow as you learn what works best.

If you would like support, you can:

  • Ask for help customizing the workflow for a specific feed or content format.
  • Request filtering rules based on keywords, categories, or authors.
  • Create variants that post only text, only images, or different styles depending on the content.

You do not need to automate everything at once. Start with this single workflow, get it running, and then iterate. Each improvement is a step toward a smoother, more intentional way of working.

Call to action: Import this template into n8n, test it with one RSS item, and see your content appear on BlueSky automatically. Then keep exploring new automation templates and tutorials to expand what you can delegate to your systems.