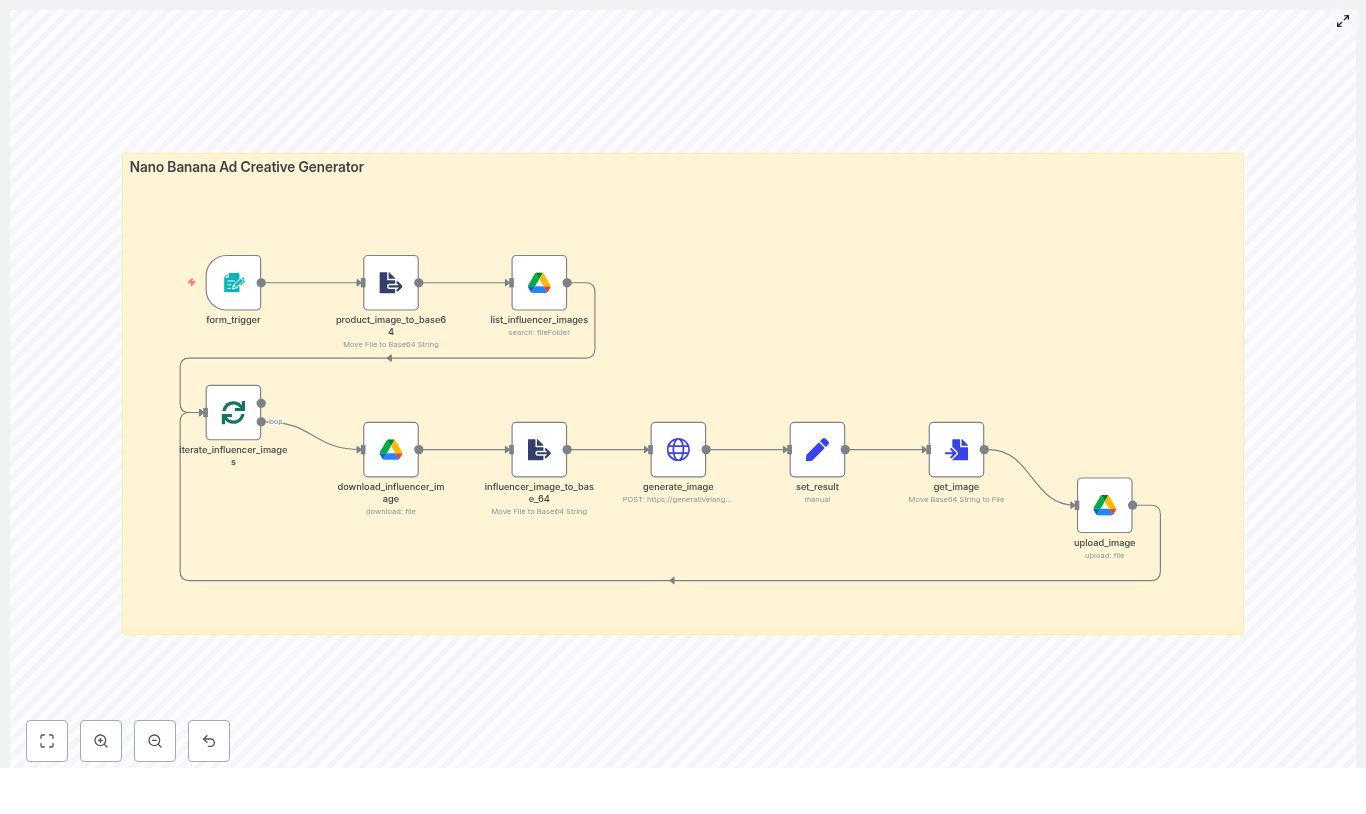
Auto-Publish to 9 Social Platforms with n8n: A Marketer’s Story
By Tuesday afternoon, Lena’s browser looked like a game of tab Tetris. Instagram, YouTube, TikTok, Facebook, LinkedIn, Threads, Twitter (X), Bluesky and Pinterest were all open, each waiting for the same video, the same caption and the same thumbnail.
She was the only marketer at a fast-growing startup, and every new campaign meant the same ritual: download the video, upload it nine times, tweak titles, paste descriptions, double check links, and hope she did not forget a platform. Her team wanted consistency. Her calendar wanted mercy.
What she really wanted was one thing: a way to publish once and have the rest happen on its own.
The Problem: One Video, Nine Platforms, Endless Repetition
Lena tracked everything in a Google Sheet – video URLs, titles, descriptions, and a quick note on whether a post was live or still pending. It worked, but only up to a point. Posting manually to nine social platforms was not just tedious, it was risky.
- She spent hours repeating the same steps for each video.
- Captions sometimes went over platform limits and were silently cut off.
- She occasionally missed a platform entirely or posted with the wrong title.
- There was no reliable audit trail of what had gone out where.
Her sheet was supposed to be the single source of truth, but in reality it was just a checklist she hoped she had followed correctly.
After one particularly long afternoon of copy-paste gymnastics, Lena decided she needed to automate social publishing. She did not want a black box tool that locked her into a specific platform. She wanted something flexible that could grow with her workflow.
That search led her to n8n and a workflow template that promised exactly what she needed: automated video distribution to all nine platforms, using Google Sheets and Blotato’s API.
Discovering an n8n Workflow Template That Changes Everything
Lena had heard of n8n, but she had never built a full automation in it. The idea of wiring together APIs for Instagram, YouTube, TikTok, Facebook, LinkedIn, Threads, Twitter (X), Bluesky and Pinterest sounded intimidating.
Then she found a prebuilt n8n workflow template that did almost all of it for her. The promise was simple:
Use a single Google Sheet as the source of truth, send each video to Blotato once, then auto-publish to nine platforms using a scheduled n8n workflow.
The template handled the heavy lifting:
- Trigger on a schedule.
- Read the next row from Google Sheets.
- Assign social media account IDs in one place.
- Upload the video to Blotato and get a unified media URL.
- Fan out POST requests to each social platform through Blotato’s
/v2/posts endpoint.
- Update the Google Sheet status to mark the video as done.
If she could get this running, her daily grind would turn into a background process.
Setting the Stage: Preparing n8n, Google Sheets and Blotato
Before Lena could press play on her new automation, she needed to get a few pieces in place. The template was clear on the prerequisites, and she decided to tackle them one by one.
What She Needed Before Starting
- An n8n instance, either cloud or self-hosted, with enough execution limits for regular runs.
- Google Sheets API credentials configured inside n8n so it could read and write rows.
- A Blotato account and API key, with access to the media and post endpoints.
- Account IDs for each social network that she wanted to publish to.
- A Google Sheet with these columns:
- PROMPT (optional)
- DESCRIPTION
- URL VIDEO
- Titre
- STATUS
- row_number
Her sheet already had most of these, so she added STATUS and row_number to turn it into a proper control panel. From now on, she would let the sheet decide what was ready to publish and what was not.
Rising Action: Building the Automation Step by Step
With the groundwork in place, Lena imported the n8n workflow JSON into her n8n editor. The template unfolded into a series of nodes that looked surprisingly understandable. Each one mapped to a step in the story of her video.
1. Schedule Trigger – When the Story Starts
The first node was the Schedule Trigger. This was the heartbeat of the workflow. It controlled when the automation would wake up, check the sheet and push a new video out into the world.
Lena configured it to run once per day at a time that matched her audience’s peak engagement, and she set the correct timezone so she would not accidentally publish in the middle of the night. The template also mentioned that she could swap this for a webhook trigger later if she wanted on-demand publishing.
2. Get My Video – Reading From Google Sheets
The next node, Get my video, connected n8n to her Google Sheet. Here she entered her documentId and sheetName, then mapped the columns the workflow expected:
- PROMPT (optional, for creative hints or AI generated copy later)
- DESCRIPTION for the main caption text
- URL VIDEO pointing to the video file
- Titre for titles or headlines
- row_number to keep track of the exact row
- STATUS to mark each item as pending, test, done or failed
The workflow used this sheet as a single source of truth. Any row with the right status could be picked up, posted and then updated. That meant no more guessing what had already gone live.
3. Assign Social Media IDs – One Place for All Accounts
Next came a Set node labeled Assign Social Media IDs. This node stored the account IDs for Instagram, YouTube, TikTok, Facebook, LinkedIn, Threads, Twitter (X), Bluesky and Pinterest inside a JSON object.
Lena replaced the placeholder values with her real account IDs. If she ever needed to manage multiple brands or regions, she could extend this node to pull IDs from another sheet or a secure vault, but for now one set of IDs was enough.
By centralizing these IDs in a single node, she made it easy to reuse them across all platform POST requests that would follow.
4. Upload Video to Blotato – One Media Host to Rule Them All
The workflow then sent the video to Blotato using an HTTP Request node.
It called:
POST https://backend.blotato.com/v2/media
with the video URL from her sheet. Blotato handled the upload and returned a media URL that could be reused for every platform.
This was a turning point in the workflow. Instead of juggling platform-specific upload rules, Lena relied on Blotato as a centralized media host. The video went up once, came back as a single URL, and every platform could use it.
5. Platform POST Nodes – Fanning Out to 9 Channels
With the media URL in hand, the workflow branched into multiple HTTP Request nodes, one per social platform. Each node called the same Blotato endpoint:
POST https://backend.blotato.com/v2/posts
and sent a payload that looked like this:
{  "post": {  "accountId": "<ACCOUNT_ID>",  "target": { "targetType": "instagram" },  "content": {  "text": "<DESCRIPTION>",  "platform": "instagram",  "mediaUrls": ["<MEDIA_URL_FROM_BLOTATO>"]  }  }
}
The target object held platform specific metadata, like title, privacy settings, pageId or boardId when needed. The content object carried the text and the media URLs.
Lena repeated this pattern for each platform, adjusting the targetType and platform specific fields. All of them reused the same Blotato media URL, which made the whole setup dramatically simpler.
6. Google Sheets Update – Closing the Loop
The final step was a Google Sheets update node. Once the platform requests completed, the workflow wrote back to the same row it had read earlier.
It set:
- STATUS to
DONE when everything succeeded, or a failure note if something went wrong.
- row_number to confirm which row had been processed.
This simple update created an audit trail and prevented duplicates. If she saw DONE in the sheet, she knew that video had already gone out across her channels.
The Turning Point: First Test Run
All the pieces were in place, but Lena was not ready to unleash the workflow on her live accounts yet. She followed the template’s recommendation and set up a careful test.
Step-by-Step Setup in Practice
- She imported the n8n workflow JSON into her n8n editor.
- She configured Google Sheets credentials and set the correct
documentId and sheetName in both the Get my video and update nodes.
- She replaced all placeholder account IDs in the Assign Social Media IDs node with real IDs.
- In each HTTP Request node that called Blotato endpoints, she added her
blotato-api-key header value.
- She created a single test row in her sheet, with a non-public description like
test, and set the STATUS to something that the workflow would recognize as ready to post.
- She ran the workflow manually, watched the Execution view and verified that:
- The media upload to Blotato succeeded.
- A valid media URL came back.
- The platform POST requests used that URL correctly.
- Only after that did she switch the Schedule Trigger to the correct timezone and hour, and enable the workflow.
Her first successful test run felt like a small miracle. One row in a sheet had become nine posts across her staging accounts, without a single copy-paste.
Staying Safe: Best Practices Lena Adopted
Before moving to production, Lena took a moment to harden her setup based on the workflow’s best practices. She wanted automation, but not at the cost of broken posts or API bans.
Using Staging Accounts and Platform Limits
- She used a set of staging or test social accounts to validate format and length limits for each platform.
- She kept descriptions under known platform limits. TikTok and Instagram caption lengths differ, so she considered adding platform specific caption columns to her sheet for more control.
- She rate limited posting by staggering runs and making sure she did not hit API quotas.
Logging and Security
- She logged HTTP status codes and responses from Blotato and each platform to a separate sheet, so she could audit and debug later.
- She stored her API keys using n8n credentials and environment variables, not in the workflow JSON, to avoid exposing sensitive values.
Handling Errors: When Things Do Not Go as Planned
No automation is perfect. Lena knew that at some point a platform API would hiccup, a token would expire or a media file would be too large. The workflow template gave her a plan for that too.
Error Handling and Monitoring in n8n
- She added an Error Trigger node in n8n to catch runtime failures and send alerts to her via Slack or email.
- For transient errors, she used branch nodes to implement retries with exponential backoff, especially around upload or post steps.
- If a specific platform failed, the workflow updated the sheet with a message like
FAILED: instagram, so she could see at a glance which part had broken and re run only that item later.
With this in place, a single failed request no longer meant a mystery. It became a clear, traceable event.
From Pilot to Production: Rolling Out the Workflow
To avoid surprises on launch day, Lena rolled out her automation gradually.
Testing and Rollout Strategy
She started with just one platform, YouTube, and set the videos to unlisted. That gave her a safe way to verify that:
- The media URL from Blotato propagated correctly.
- The titles and descriptions looked right.
- The Google Sheet row was updated at the end of the process.
Once that flow was stable, she enabled the rest of the platforms in the workflow and ran a small pilot with a handful of videos. Only after that did she trust it with her main content calendar.
Security, Compliance and Peace of Mind
As the automation took over more of her posting, Lena made sure she was staying on the right side of platform rules and internal policies.
- She reviewed each platform’s terms of service and automation policies.
- She kept API keys and account IDs encrypted in n8n credentials and limited access to them.
- She was selective about what content went out automatically, especially branded or sponsored posts that might have extra rules.
The result was not just convenience, but a workflow she could defend to her team and leadership.
Scaling Up: Customizations That Took Her Workflow Further
Once the basic automation was solid, Lena started to see new possibilities. The same template could be extended and customized for more sophisticated campaigns.
Enhancements She Considered
- Reading multiple rows at once and queuing them with delays to spread posting over time.
- Adding extra columns in Google Sheets for platform specific captions, so Instagram, TikTok and LinkedIn could each get tailored messaging.
- Conditional branching in n8n, for example:
- Only post to Pinterest if a thumbnail image URL is present.
- Skip certain platforms for short teaser clips.
- Switching from Google Sheets to a database like Postgres or Airtable for higher throughput and better concurrency control once the content volume grew.
The template was no longer just a quick fix. It was the backbone of a scalable, multi platform distribution system.
When Things Break: Lena’s Troubleshooting Checklist
On the rare occasions when something did not work, she turned to a simple checklist that mirrored the template’s guidance.
- Blotato returns errors:
- Check the API key.
- Validate the media URL format.
- Confirm that the video size is within content limits.
- Google Sheets read or write fails:
Send Weather to Slack with n8n: Weather via Slack Template
Imagine dropping a simple command into Slack and instantly getting a clean, readable weather forecast for any U.S. location. No extra tabs, no searching, no fuss. That is exactly what this n8n workflow template does for you.
In this guide, we will walk through the “Weather via Slack” n8n template in a friendly, practical way. You will see how it:
- Accepts a location from a webhook (for example, a Slack slash command)
- Turns that location into coordinates with OpenStreetMap (Nominatim)
- Asks the U.S. National Weather Service (NWS) for the forecast
- Formats the results and posts them straight into a Slack channel
We will cover what the template does, when to use it, and how to set it up step by step, plus some ideas to take it further once you have it running.
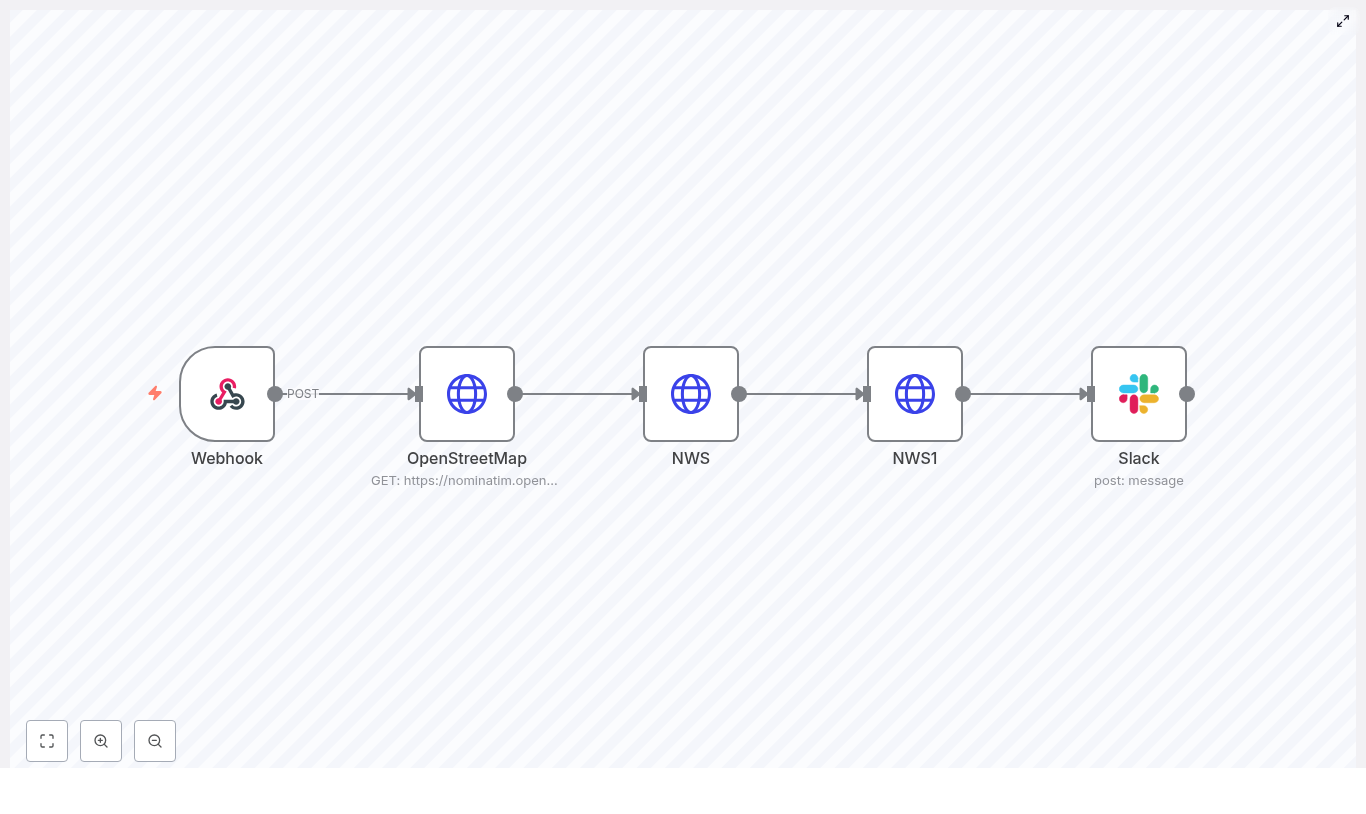
What this n8n “Weather via Slack” workflow actually does
Let us start with the big picture. This workflow is a small but powerful automation that connects four main things:
- A webhook that receives a location string, like
Seattle, WA.
- OpenStreetMap (Nominatim) to convert that text into latitude and longitude.
- The NWS API to grab an accurate forecast for those coordinates.
- Slack to post a nicely formatted forecast into a channel using OAuth2.
In more detail, the workflow:
- Accepts a POST request with a location text field
- Resolves that text to coordinates using Nominatim
- Uses those coordinates to call the NWS
/points endpoint
- Builds the NWS gridpoints forecast URL from the returned gridId, gridX, and gridY
- Parses the forecast JSON and turns it into a human-friendly Slack message
- Posts the message to a specific Slack channel using a Slack app with OAuth2
So from a user’s perspective, it feels like magic: type a command, get the weather.
Why you might want this template
You will probably love this workflow if any of these sound familiar:
- You are always checking the weather before standups, field work, or travel.
- Your team lives in Slack and you want quick weather lookups without leaving it.
- You want a real-world n8n example that chains together:
- Webhook input
- Geocoding (OpenStreetMap / Nominatim)
- Third-party APIs (NWS)
- Slack posting via OAuth2
- You would like a starting point that you can extend with:
- Daily scheduled forecasts
- Alerts and notifications
- Richer Slack messages using Block Kit
In short, this template is both a handy tool and a great pattern to learn from if you are exploring n8n automations.
What you need before you start
Before you plug this template into your stack, make sure you have:
- An n8n instance Self-hosted or n8n cloud, either is fine.
- A Slack app with OAuth2 The app should have at least the
chat:write permission and be installed in your workspace. Add its OAuth credentials in the n8n credentials manager.
- A respectful User-Agent header Both OpenStreetMap (Nominatim) and NWS expect a descriptive User-Agent. The template uses:
alexk1919 (alex@alexk1919.com)
- Basic n8n familiarity You should be comfortable adding nodes, connecting them, and editing node parameters.
How the workflow is structured (node-by-node)
Now let us break down what happens inside the workflow. We will go through it in the order that the data flows.
1. Webhook – receiving the location
Node type: Webhook (POST)
This is the entry point. The Webhook node exposes an HTTP endpoint, which in the template uses the path /slack1. You will typically point a Slack slash command or another tool at this URL.
The expectation is that the incoming POST body includes a text field with the location, for example:
"Portland, OR""New York, NY""Seattle WA"
Once the webhook receives that location text, it passes it to the next node.
2. OpenStreetMap (Nominatim) – turning text into coordinates
Node type: HTTP Request
Next, the workflow needs to figure out where that location actually is on the map. The HTTP Request node calls the Nominatim search endpoint at:
https://nominatim.openstreetmap.org/search
It sets the query parameter q to the incoming location text from the webhook. Nominatim responds with one or more geocoded results. In this template, the first result is used.
Important detail: you must set a clear User-Agent header when calling Nominatim. The template includes:
alexk1919 (alex@alexk1919.com)
From the response, the workflow extracts the latitude and longitude and passes them to the next step.
3. NWS (points) – mapping coordinates to a forecast endpoint
Node type: HTTP Request
With latitude and longitude in hand, the workflow calls the NWS points endpoint to discover which forecast grid to use. The request URL looks like this:
https://api.weather.gov/points/{{lat}},{{lon}}
The response from this endpoint includes:
These values are exactly what the template needs to construct the gridpoints forecast URL in the next node.
4. NWS1 (gridpoints forecast) – getting the actual forecast
Node type: HTTP Request
Using gridId, gridX, and gridY from the previous step, this node builds the forecast endpoint like:
https://api.weather.gov/gridpoints/{gridId}/{gridX},{gridY}/forecast
The response is a JSON object that contains a properties.periods array. Each item in periods represents a forecast period (typically day and night entries) with useful fields such as:
name (for example, Tonight, Tuesday, Tuesday Night)temperaturetemperatureUnit (usually F)windSpeedwindDirectionshortForecast (a concise description)
That structured data is exactly what the Slack node formats into a message.
5. Slack – posting a readable forecast
Node type: Slack node (chat.postMessage via OAuth2)
The final step takes the NWS forecast and turns it into a human-friendly Slack message. The template uses the Slack node with OAuth2 credentials to post into a chosen channel.
Inside the Slack node, there is an inline JavaScript expression that:
- Parses the JSON from the NWS1 node
- Loops through the forecast periods
- Builds a nicely formatted block of text
The expression looks like this:
={{  JSON.parse($node["NWS1"].json.data).properties.periods  .map(period =>  `*${period.name}*\n` +  `Temp: ${period.temperature}°${period.temperatureUnit}\n` +  `Wind: ${period.windSpeed} ${period.windDirection}\n` +  `Forecast: ${period.shortForecast}`  )  .join("\n\n")
}}
That results in a Slack message similar to:
*Tonight*
Temp: 55°F
Wind: 5 to 10 mph N
Forecast: Mostly Clear

*Tuesday*
Temp: 72°F
Wind: 5 mph SE
Forecast: Sunny
You can customize this formatting later, but this default already reads very nicely for most teams.
How to deploy and test the workflow
Once the nodes are configured, getting it live is pretty straightforward. Here is a simple flow you can follow:
- Deploy and activate the workflow in n8n Save the workflow, then enable it so the Webhook node is reachable.
- Hook up Slack to the webhook In your Slack app settings, configure a slash command (for example
/weather) or another integration to send a POST request to the Webhook URL that n8n shows for this workflow.
- Send a test location In Slack, try something like:
/weather Seattle WA
If everything is wired correctly, the workflow will:
- Receive the location
- Geocode it with Nominatim
- Fetch the NWS forecast
- Post the forecast into your chosen Slack channel
Ideas to enhance the template and best practices
Once you have the basic version working, you might want to refine it. Here are some practical enhancements and good habits to consider.
Handle tricky or ambiguous locations
- If Nominatim returns multiple matches, you could:
- Ask the user to be more specific, or
- Build a Slack selection menu to let them choose the right place
- Encourage input like
"City, State" for U.S. locations to improve accuracy.
Reduce API calls with caching
- For locations that your team checks often, you can:
- Store recent Nominatim and NWS results in a database
- Use n8n variables or workflow data to cache the last few lookups
- This helps with performance and keeps you polite with external services.
Make Slack messages richer
- Instead of plain text, you can switch to:
- Slack Block Kit for sections, fields, and dividers
- Weather icons or emojis for quick visual scanning
- Buttons for “next days”, “refresh”, or “change location”
Respect rate limits and usage expectations
- Both Nominatim and
api.weather.gov have usage guidelines.
- Always:
- Use a descriptive User-Agent header
- Add caching or rate limiting if you expect high traffic
Add solid error handling
- Use additional nodes to:
- Catch HTTP 4xx/5xx errors from Nominatim or NWS
- Send an error message to a Slack channel or a specific user
- Log failures for debugging later
Security considerations you should not skip
Since this workflow exposes a webhook and uses credentials, it is worth tightening up security a bit.
- Protect your webhook endpoint If it is publicly accessible:
- Use validation tokens or signing secrets to verify that requests truly come from Slack
- Reject requests that do not match expected signatures
- Store credentials properly Keep Slack OAuth2 credentials in the n8n credentials manager. Avoid hardcoding any tokens directly inside nodes or expressions.
- Sanitize incoming input Treat the location text as untrusted input:
- Validate or clean it before passing it to external APIs
- Avoid logging raw user input where it is not needed
Where this template really shines: example use cases
Not sure how you would use this in your own workspace? Here are a few real-world scenarios where it fits nicely.
- Team standups Automatically post the morning weather for your team’s city before daily standup. Everyone knows what to expect for the day at a glance.
- On-call or field operations If your team travels or works on-site, a quick
/weather command before heading out can be surprisingly helpful.
- Public or community Slack workspaces Offer a simple weather lookup command that anyone in the workspace can use, without leaving Slack.
Troubleshooting common issues
If something does not work on the first try, here are some typical problems and how to approach them.
- No geocode results from Nominatim
- Check that the request body actually contains the expected
text field.
- Confirm that Nominatim is reachable from your n8n instance.
- Try a more specific query like
"New York, NY" instead of just "New York".
- NWS 404 or grid-related errors
- Some offshore or unsupported locations may not return valid grid data.
- Add logic to detect these cases and return a friendly message instead of failing silently.
- Slack permission issues
- Make sure your Slack app is installed in the workspace where you are testing.
- Verify that it has
chat:write or equivalent scopes.
- Confirm that you are using the correct OAuth2 credentials in n8n.
Wrapping up
With just a handful of nodes, this n8n template takes a simple location string, turns it into coordinates, fetches a live forecast from NWS, and posts a clean summary into Slack. It is a great example of how you can combine geocoding, government APIs, and Slack integration to solve a real everyday problem with automation.
If you want to go a bit further, you can easily:
- Schedule daily forecasts instead of waiting for slash commands
- Upgrade the message to use Slack Block Kit with icons and action buttons
- Add validation, caching, or a selection step for ambiguous locations
Ready to automate weather in Slack? Grab the template, plug in your credentials, and start sharing forecasts with your team right where they are already chatting.
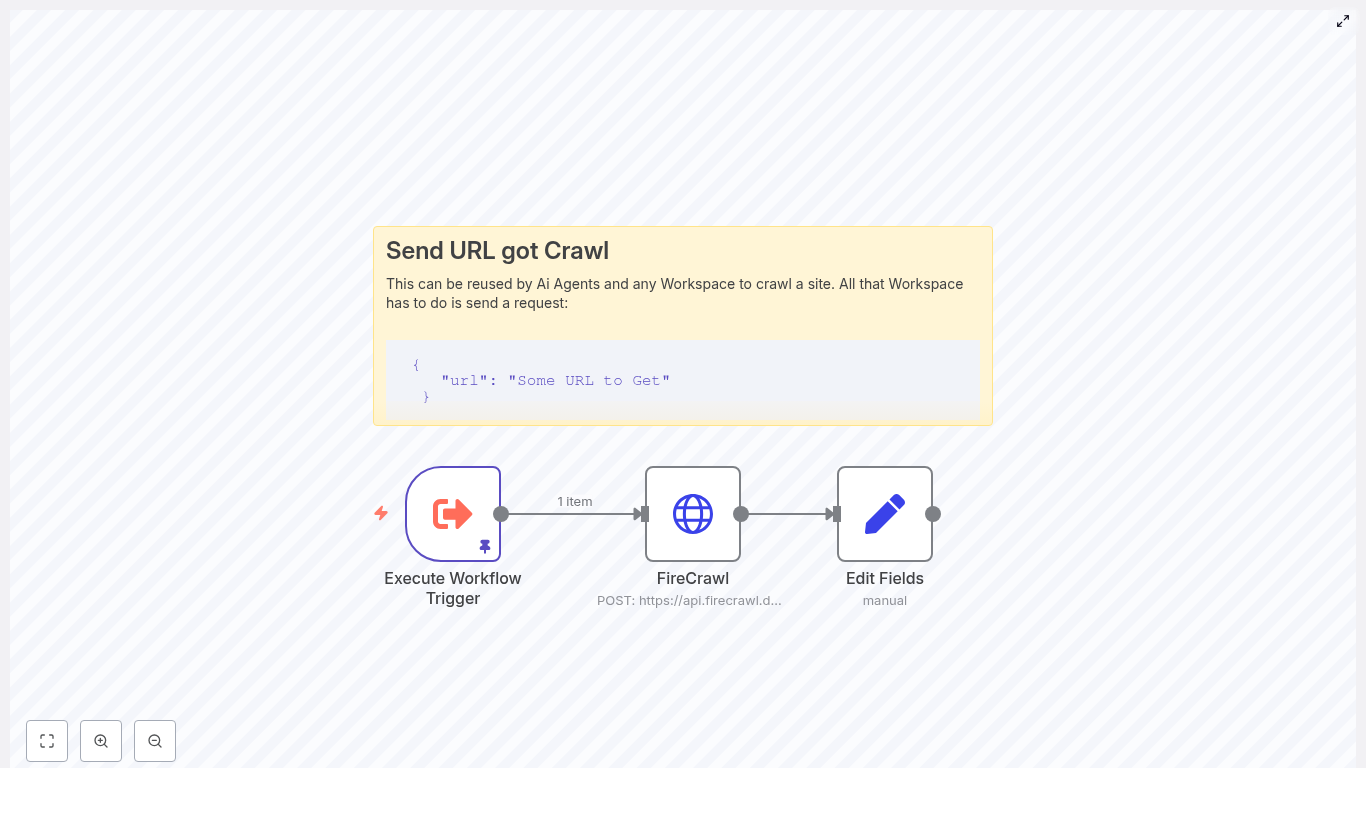
n8n + FireCrawl: Technical Guide to a Simple Web Crawl Workflow
This reference guide describes how to implement a compact, production-ready web crawling workflow in n8n using the FireCrawl API. The workflow accepts a URL as input, sends it to FireCrawl for scraping, receives the page content in Markdown format, and exposes that content in a dedicated field for downstream automation such as storage, enrichment, or AI processing.
The focus here is on a minimal architecture that is easy to debug and extend, while keeping all configuration steps and data flows explicit and transparent.
1. Workflow Overview
1.1 High-level behavior
The n8n + FireCrawl workflow performs the following core actions:
- Receives a URL to crawl via a trigger node (for example,
Execute Workflow Trigger).
- Sends a POST request to
https://api.firecrawl.dev/v1/scrape with the URL and the requested output format set to markdown.
- Extracts the returned Markdown content from the FireCrawl JSON response and maps it into a dedicated field (for example,
response) for further processing in subsequent nodes.
This pattern is suitable for:
- Content aggregation pipelines
- Research automation workflows
- Preprocessing content for AI models or vector databases
1.2 Node architecture
The reference workflow uses three primary nodes:
- Execute Workflow Trigger – Entry point that accepts a JSON payload containing the target URL.
- HTTP Request (FireCrawl) – Sends the URL to FireCrawl and retrieves the scraped content as Markdown.
- Set (Edit Fields) – Normalizes the response by mapping the Markdown into a clean
response field.
You can then attach additional nodes for storage, summarization, or CMS ingestion depending on your use case.
2. Architecture & Data Flow
2.1 End-to-end data flow
- Input The workflow is triggered with a JSON payload containing:
{  "query": {  "url": "https://example.com/page"  }
}
The URL is accessed in n8n via the expression $json.query.url.
- Request to FireCrawl The HTTP Request node constructs a JSON body:
{  "url": "{{ $json.query.url }}",  "formats": ["markdown"]
}
and sends a POST request to https://api.firecrawl.dev/v1/scrape using an API key in the header.
- FireCrawl response FireCrawl returns structured JSON. The relevant field for this workflow is:
$json.data.markdown
which contains the scraped page content as Markdown.
- Normalization The Set node creates a new field (for example,
response) and assigns:
response = {{ $json.data.markdown }}
This gives downstream nodes a stable, human-readable field to consume.
2.2 Trigger options
The template uses Execute Workflow Trigger for simplicity and testing. In a real deployment you can replace or complement it with:
- Webhook – For external systems to send URLs to crawl in real time.
- Cron – For scheduled crawling of known URLs.
- Other workflows – Using
Execute Workflow from parent workflows.
3. Node-by-node Breakdown
3.1 Execute Workflow Trigger node
Purpose
Defines the workflow entry point and provides a convenient way to test the workflow with static or pinned data. It exposes the $json object that downstream nodes use to access the incoming URL.
Key behavior
- Accepts a JSON payload that includes
query.url.
- Allows pinning test data in the UI for repeatable runs.
- Can be replaced with other trigger nodes (Webhook, Cron, etc.) without changing the HTTP Request body expression, as long as the same JSON structure is preserved.
Example test payload (pinData)
Use this payload when testing manually:
{  "query": {  "url": "https://en.wikipedia.org/wiki/Linux"  }
}
This instructs FireCrawl to scrape the Linux Wikipedia page and return it as Markdown.
3.2 HTTP Request node (FireCrawl integration)
Purpose
Calls the FireCrawl scraping API, passing the target URL and requesting Markdown output. This node is the integration point between n8n and FireCrawl.
Endpoint and method
- Method:
POST
- URL:
https://api.firecrawl.dev/v1/scrape
Authentication
Use HTTP Header Auth with your FireCrawl API key. In the node configuration:
Store the API key in n8n credentials, not directly in node parameters, to avoid exposing secrets in plain text.
Request body
Configure the body as JSON. The body should pass the URL from the trigger payload and request Markdown output:
{  "url": "{{ $json.query.url }}",  "formats": ["markdown"]
}
url – The URL to be scraped. It is dynamically populated from the incoming JSON using an n8n expression.formats – An array specifying the output formats. In this workflow it is limited to ["markdown"] to keep the response focused.
Response structure
FireCrawl returns JSON that typically includes a data object containing format-specific fields, for example:
data.markdown – The scraped content as Markdown.- Other fields such as
data.html or data.text may also be present, depending on FireCrawl’s configuration and response model.
The HTTP Request node also exposes:
- The HTTP status code in the node output metadata.
- The raw JSON body, which is accessed via
$json in subsequent nodes.
3.3 Set node (Edit Fields)
Purpose
Transforms the raw FireCrawl response into a clean, predictable field that downstream nodes can consume. It avoids coupling later logic directly to the nested API response structure.
Configuration
In the Set node:
This produces an output structure similar to:
{  "response": "## Page title\n\nMarkdown content..."
}
Subsequent nodes can now simply reference $json.response without needing to know about FireCrawl’s internal JSON schema.
4. Step-by-step Setup in n8n
- Create a new workflow In the n8n UI, create a new workflow and give it a descriptive name, for example FireCrawl Markdown Scraper.
- Add the trigger node
- Add and configure the HTTP Request node
- Add the Set node
- Attach downstream nodes (optional) Depending on your use case, you can add:
- Storage nodes such as Write Binary File, Google Drive, or S3.
- AI or summarization nodes to generate summaries or metadata.
- CMS integration nodes for Notion, WordPress, or other systems.
5. Handling Responses, Errors, and Edge Cases
5.1 Response validation
FireCrawl returns structured JSON along with an HTTP status code. To make the workflow robust:
- Inspect the HTTP status code in the HTTP Request node output.
- Ensure
data and data.markdown exist before attempting to read them.
5.2 Branching on success vs failure
To avoid propagating invalid data, add an If node or a Function node after the HTTP Request:
5.3 Retry and backoff strategies
For transient errors or rate limiting:
- Use a Wait node combined with a Repeater or loop logic to implement simple backoff.
- Log errors and the original URL so failed requests can be retried later.
5.4 Common issues
- Empty response
- Verify that the target URL is reachable from the FireCrawl environment.
- Check if the site is blocking bots or restricted by
robots.txt.
- Test the URL in a browser or via
curl to confirm it loads correctly.
- Authentication errors
- Confirm that the API key is valid and active.
- Check that the
Authorization header is correctly formatted.
- Ensure the n8n credentials are correctly referenced by the HTTP Request node.
- Partial or malformed Markdown
- Inspect the raw JSON from FireCrawl to see all available fields (for example,
data.html, data.text, data.markdown).
- Confirm you are mapping the correct field in the Set node.
6. Best Practices for Web Crawling with n8n and FireCrawl
- Respect site policies Always follow
robots.txt, website terms of service, and applicable legal requirements when scraping content.
- Use a descriptive User-Agent If FireCrawl or your configuration allows, set a clear User-Agent string to identify your use case.
- Implement rate limiting Avoid sending too many requests in a short time. Space out calls using Wait nodes or queueing logic and respect your FireCrawl API plan limits.
- Sanitize URLs Validate and sanitize the input URL before forwarding it to FireCrawl to reduce the risk of SSRF or malicious inputs.
- Cache results For URLs that do not change frequently, consider caching results in a database or storage system and reusing them instead of scraping repeatedly.
7. Extensions and Advanced Customization
7.1 Persisting scraped Markdown
To store the Markdown content for later use, connect the Set node to storage or CMS nodes, for example:
- Write Binary File – Save the Markdown to disk in self-hosted environments.
- Google Drive – Store as a file in a shared drive or folder.
- Amazon S3 – Save content to an S3 bucket for archival or downstream processing.
- CMS connectors – Create or update posts in systems like WordPress or Notion.
7.2 Automated ingestion into CMS or knowledge bases
Once you have $json.response as Markdown, you can:
- Convert it into a CMS post body for WordPress or Notion.
- Store it in a knowledge base or document management system.
- Feed it into a vector database for semantic search and AI-driven retrieval.
7.3 Scheduled crawling
To keep content up to date:
- Replace the Execute Workflow Trigger with a Cron node.
- Maintain a list of URLs to crawl and iterate over them on a schedule.
- Add logic to detect and process only pages that changed since the last crawl, if your architecture tracks versions or hashes.
7.4 AI summarization and extraction
Use the scraped Markdown as input to AI or LLM nodes:
- Generate concise summaries of long articles.
- Extract structured metadata such as title, author, and publish date.
- Parse entities or structured data using parser or function nodes combined with AI output.
8. Security and Compliance Considerations
- Secret management Store FireCrawl API keys in n8
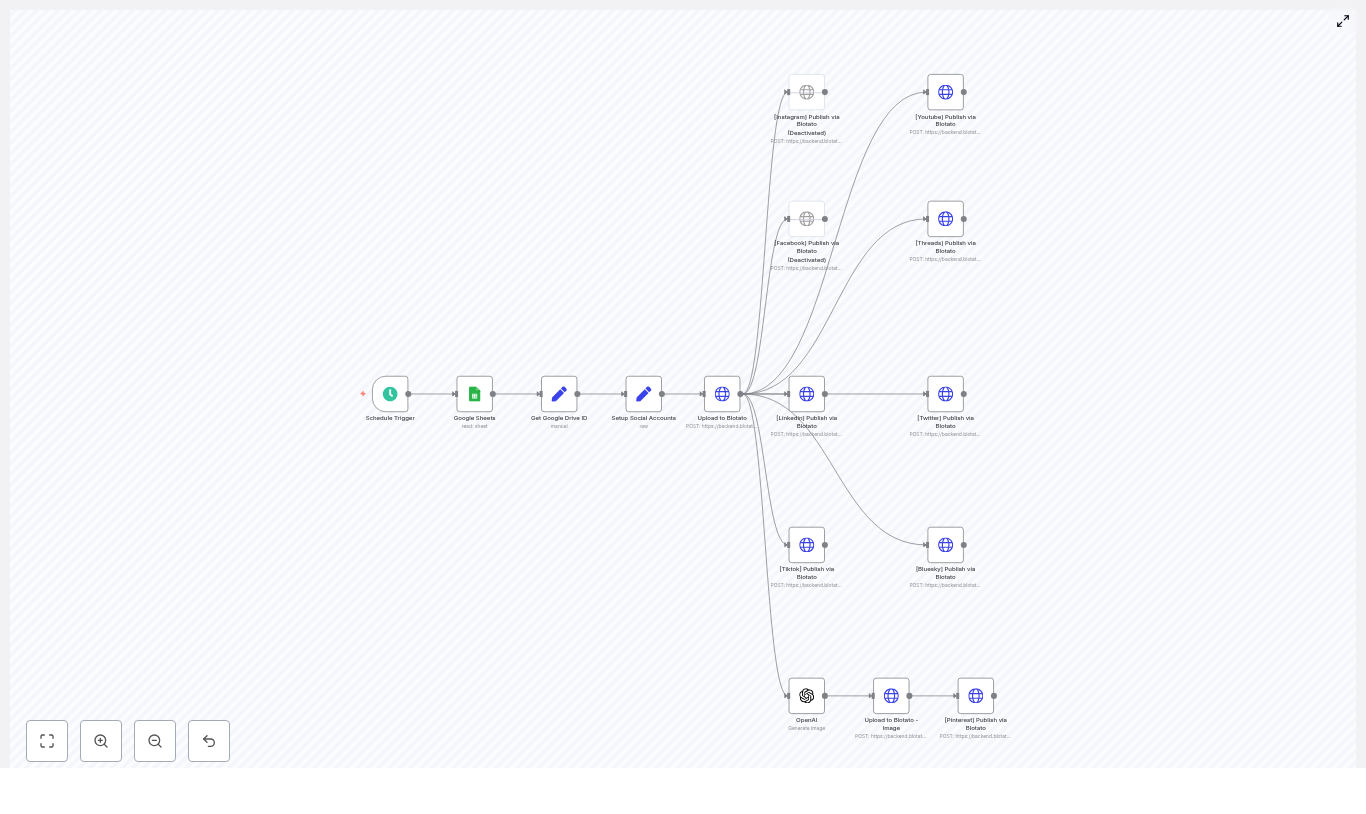
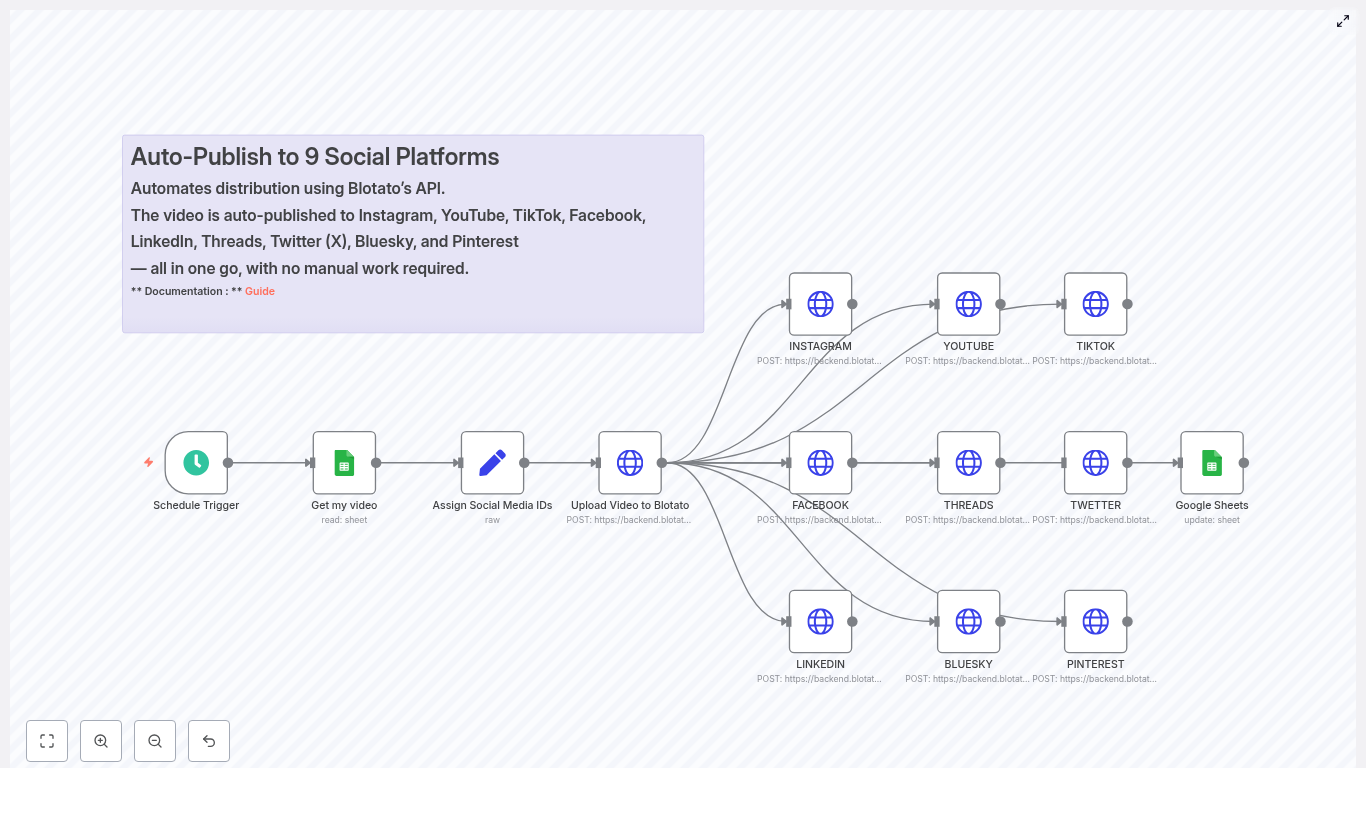
Automate Posts to 9 Platforms with n8n
Publishing the same content manually to multiple social platforms is slow, error-prone, and hard to scale. This reference-style guide documents an n8n workflow template that automates distribution of a single video and image to nine social networks using Google Sheets, Google Drive, the Blotato API, and OpenAI.
The goal is to provide a technical, implementation-focused overview of how the template works, how data flows through each node, and how to customize or extend it for your own automation stack.
1. Workflow Overview
This n8n workflow template automates end-to-end social publishing for a single row in a Google Sheet. It is designed for recurring, scheduled execution and uses Blotato as the posting gateway to multiple platforms.
1.1 High-level capabilities
- Triggers on a schedule using the Schedule Trigger node.
- Reads a single row from Google Sheets where
Status = "Ready to Post".
- Extracts a Google Drive file ID from a URL and constructs a direct download link.
- Uploads media (video or image) to Blotato and obtains a Blotato media URL.
- Publishes the media and caption to:
- Instagram
- Facebook
- LinkedIn
- TikTok
- YouTube
- Threads
- Twitter/X
- Pinterest
- Bluesky
- Optionally generates a new image with OpenAI for Pinterest, uploads that image to Blotato, and uses it as platform-specific media.
All posting is executed via Blotato’s API. n8n handles orchestration, credential management, and data transformation between Google Sheets, Google Drive, OpenAI, and Blotato.
2. Architecture & Data Flow
2.1 Logical architecture
- Trigger layer
- Schedule Trigger starts the workflow at a defined interval (for example, hourly or daily).
- Content selection layer
- Google Sheets node queries the content planning sheet and returns the first row marked as
Ready to Post.
- The row is assumed to contain at least:
- Video URL (google drive)
- Caption
- Status
- Media preparation layer
- Set node extracts the Drive file ID via regex.
- The Drive ID is converted into a direct download URL that Blotato can fetch.
- Account & credential setup layer
- A Set node centralizes API keys, Blotato account IDs, and platform-specific identifiers (for example, page IDs).
- Media upload layer
- An HTTP Request node uploads the media to Blotato’s
/v2/media endpoint.
- Blotato returns a media URL used in all subsequent post creation requests.
- Publishing layer
- One HTTP Request node per platform calls
/v2/posts on Blotato.
- Each node sends a JSON body that defines:
target (platform and platform-specific parameters)content (caption and mediaUrls)accountId (Blotato account identifier)
- Some nodes apply character limits or formatting adjustments to the caption per platform.
- Optional image generation layer
- An OpenAI node generates an image from a prompt.
- The generated image is uploaded to Blotato using the same
/v2/media mechanism.
- Pinterest uses this generated image instead of the original video if configured that way in the template.
2.2 Data dependencies
- The Google Sheets node must output a valid Drive URL and caption for the rest of the workflow to function.
- The regex-based Set node must match the Drive URL format to successfully extract a file ID.
- Blotato media upload depends on the constructed direct download URL returning a 200 status and accessible content.
- All platform posting nodes depend on the media upload node’s response, typically the returned
mediaUrl field.
3. Node-by-Node Breakdown
3.1 Schedule Trigger
Node type: Schedule Trigger
This node starts the workflow automatically at a fixed cadence. Typical use cases:
- Hourly checks for new content to publish.
- Daily publishing windows (for example, at 09:00 local time).
Key configuration points:
- Use simple intervals (e.g., every 1 hour) for basic automation.
- Use cron expressions for precise timing (for example, specific days and times for campaigns).
Changing the schedule does not affect the downstream logic, only when the workflow is invoked.
3.2 Google Sheets – Content Filter
Node type: Google Sheets
This node reads from your content planning spreadsheet and returns the first row where Status = "Ready to Post". The template expects certain column names to exist.
Expected columns:
Video URL (google drive) – A shareable Google Drive link to the source media.Caption – The text caption that will be used across platforms, with later modifications for character limits if needed.Status – Used to mark rows as Ready to Post, Draft, Posted, etc.
Key configuration parameters:
documentId – The ID of your Google Sheet.sheetName – The name of the sheet/tab that contains the content rows.- Filter condition – Ensure the node is configured to return only rows where
Status = "Ready to Post".
If no rows match the filter, the node will not output any items. In that case, the rest of the workflow will not execute unless you explicitly add logic to handle empty results.
3.3 Get Google Drive ID (Set node)
Node type: Set
This node extracts the Google Drive file ID from the URL provided in the sheet. The file ID is required to construct a direct download link compatible with Blotato.
Example expression:
= {{ $('Google Sheets').item.json['Video URL (google drive)'].match(/\/d\/([A-Za-z0-9]+-[A-Za-z0-9]+)/i)[1] }}
Behavior and assumptions:
- The regex assumes a URL pattern that includes
/d/<FILE_ID>/.
- The capturing group
([A-Za-z0-9]+-[A-Za-z0-9]+) matches typical Drive IDs that contain alphanumeric characters and hyphens.
- If the URL format differs (for example, a different sharing pattern or query-based ID), the regex must be updated accordingly.
Edge cases:
- If the regex does not match, the expression will throw an error when attempting to access index
[1].
- To make this more robust, you can wrap the extraction in a Function or add validation before using the result.
3.4 Setup Social Accounts (Set node)
Node type: Set
This configuration node centralizes account-related values for Blotato and each connected social platform. It does not perform API calls itself, but subsequent HTTP Request nodes reference its fields.
Typical data stored:
- Blotato API key or token.
- Blotato account ID.
- Platform-specific identifiers, for example:
- Facebook
pageId
- YouTube channel-related parameters such as title or privacy settings (passed later in the request body)
- Other platform account IDs as required by Blotato.
Security note:
- Do not hard-code secrets directly into the Set node in production.
- Use n8n credentials or environment variables and reference them in expressions inside this node.
3.5 Upload to Blotato (HTTP Request)
Node type: HTTP Request
This node uploads the media from Google Drive to Blotato. It constructs a direct download URL from the Drive file ID and sends it to the Blotato API.
Endpoint: POST https://backend.blotato.com/v2/media
Direct download URL pattern:
https://drive.google.com/uc?export=download&id=DRIVE_ID
Where DRIVE_ID is the value extracted in the previous Set node.
Typical request body (conceptual):
- Contains the direct download URL so Blotato can fetch the media.
- May include additional metadata as required by Blotato (not detailed in the template description).
Response:
- Blotato returns a JSON object that includes a media URL.
- This media URL is referenced by all subsequent
/v2/posts requests in the workflow.
Failure scenarios:
- If the Drive link is not publicly accessible or not shared correctly, Blotato may return an error.
- If the constructed URL is invalid (incorrect ID or URL format), the upload will fail.
- Always inspect the response body for error messages and status codes when troubleshooting.
3.6 Publish to Platforms via Blotato (HTTP Request nodes)
Node type: HTTP Request (multiple instances, one per platform)
Each social platform is handled by a dedicated HTTP Request node that calls Blotato’s post creation endpoint.
Endpoint: POST /v2/posts (hosted on https://backend.blotato.com)
Core JSON structure:
target – Specifies the platform and platform-specific fields such as:
- Platform identifier (for example, Instagram, Facebook, LinkedIn, etc.).
- Optional parameters like:
pageId for Facebook pages.title and privacyStatus for YouTube uploads.
content – Contains:
caption or equivalent text field.mediaUrls – An array that includes the media URL returned from the Blotato upload node.
accountId – Refers to the Blotato account used for posting.
Caption handling:
- Some nodes apply length constraints:
- Twitter/X: truncated to 280 characters.
- Threads: truncated to 500 characters.
- These truncations are typically implemented via JavaScript slices in expressions or intermediate Set/Function nodes.
- You should adjust these limits if platform policies change.
Platform list in this template:
- Instagram
- Facebook
- LinkedIn
- TikTok
- YouTube
- Threads
- Twitter/X
- Pinterest
- Bluesky
Each platform node can be independently enabled, disabled, duplicated, or removed without affecting the others, as long as the shared dependencies (Blotato media URL and account configuration) remain intact.
3.7 OpenAI Image Generation & Pinterest
Node type: OpenAI (image generation) + HTTP Request (Blotato media upload) + HTTP Request (Pinterest post)
This optional branch generates a new image using OpenAI and posts it specifically to Pinterest via Blotato.
Flow:
- The OpenAI node generates an image from a prompt, for example a creative description derived from the caption or your own static prompt.
- The resulting image URL or binary (depending on configuration) is then uploaded to Blotato using the same
/v2/media endpoint used for video uploads.
- The Pinterest HTTP Request node uses the newly returned media URL in its
mediaUrls field when calling /v2/posts.
Use case:
- Create custom thumbnails or promotional images optimized for Pinterest, independent of the original video asset.
You can disable this branch if you prefer to reuse the main video or image for Pinterest instead of generating a new one.
4. Configuration & Customization
4.1 Adjusting the schedule
To change how often the automation runs:
- Open the Schedule Trigger node.
- Switch between:
- Simple interval mode (for example, every 2 hours).
- Cron mode for specific times or days.
For time-sensitive campaigns, use cron expressions to align publishing with audience peak times.
4.2 Adding or removing platforms
Each platform is represented by a dedicated HTTP Request node that calls /v2/posts. To modify the platform list:
- Add a new platform supported by Blotato:
- Duplicate an existing platform node.
- Update the
target fields to the new platform’s values (for example, targetType or platform name, as required by Blotato).
- Set the correct
accountId and any required platform-specific parameters.
- Remove a platform:
- Disable the corresponding node or delete it.
- Ensure any downstream references to that node are removed or adjusted.
4.3 Modifying caption rules
Caption preparation is typically done via:
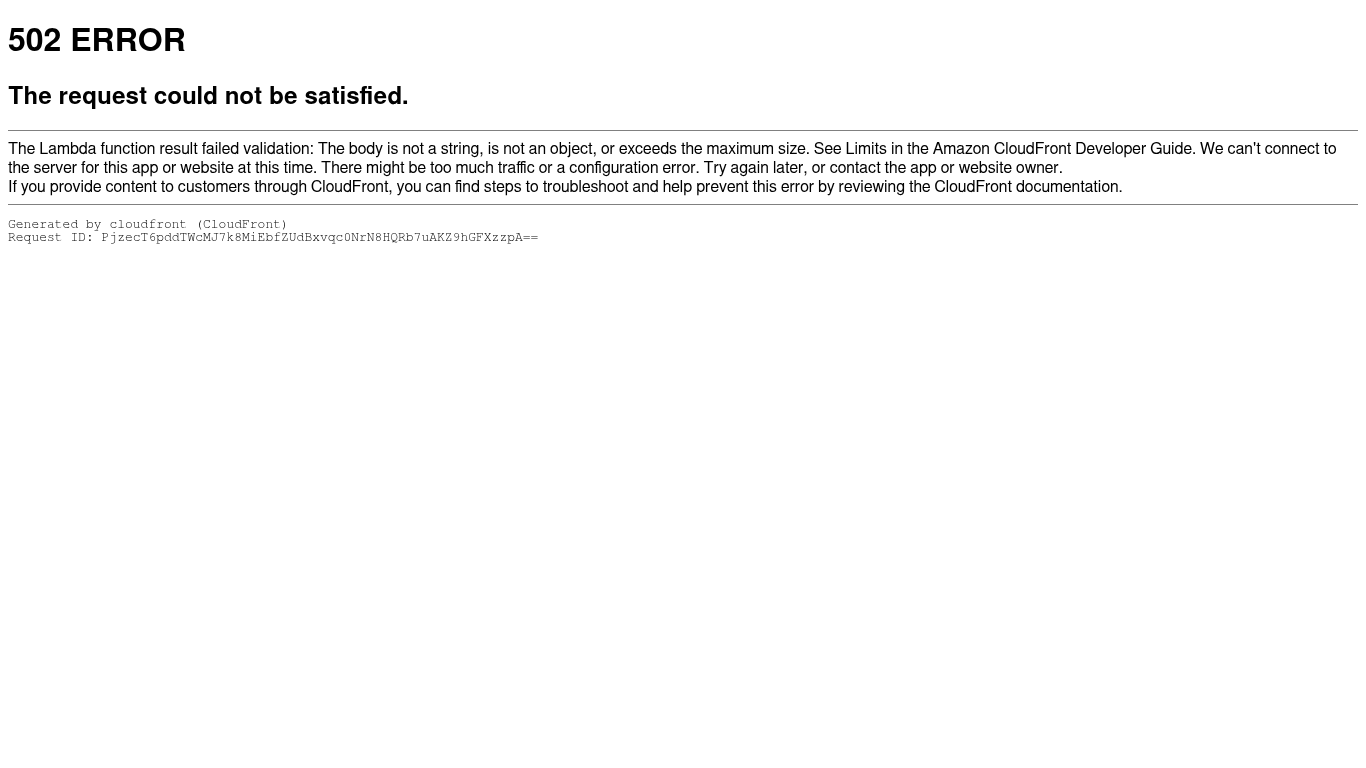
Fixing CloudFront 502: Lambda Function Result Failed Validation
When CloudFront displays a 502 error with the message "The Lambda function result failed validation: The body is not a string, is not an object, or exceeds the maximum size", it is signaling that the response generated by a Lambda@Edge function, or by an origin behind CloudFront, does not comply with CloudFront’s expected response schema.
For automation professionals, platform engineers, and teams orchestrating workflows with tools like n8n, understanding this validation behavior is essential. This article explains what the error means, outlines a practical diagnostic workflow, and provides implementation patterns and configuration tips to prevent and resolve these failures.
Understanding the CloudFront 502 Lambda Validation Error
CloudFront performs strict validation on any response that passes through a Lambda@Edge function that modifies viewer or origin requests and responses. If the returned object is malformed or exceeds platform limits, CloudFront discards it and surfaces a 502 error.
In practice, this error usually indicates one or more of the following issues:
- The
body field is not a string (or not a Base64 string when isBase64Encoded is set to true).
- The overall response is not a plain JSON object that CloudFront can serialize.
- The body size exceeds CloudFront or Lambda@Edge payload limits.
Typical Scenarios Where This Appears
This validation error is frequently observed in these contexts:
- Lambda@Edge response manipulation for viewer or origin responses.
- Edge middleware that returns HTML, JSON, or binary assets directly from the function.
- API proxy patterns via CloudFront, for example when routing requests to:
- Serverless backends or microservices
- Third-party APIs
- Automation platforms such as n8n or integrations like FireCrawl
Required Response Structure for Lambda@Edge
To pass CloudFront validation, a Lambda@Edge function must return a response object with a specific shape and data types. A compliant structure looks like this:
{  status: '200',  statusDescription: 'OK',  headers: {  'content-type': [  { key: 'Content-Type', value: 'text/html; charset=utf-8' }  ],  'cache-control': [  { key: 'Cache-Control', value: 'no-cache' }  ]  },  body: '<html>...</html>',  isBase64Encoded: false
}
Key validation requirements:
- status must be a string, for example
'200', not a number.
- headers must be an object whose keys are lowercase header names and whose values are arrays of objects with
key and value fields.
- body must be a string. For binary content, set
isBase64Encoded: true and provide a Base64-encoded string as body.
Minimal Node.js Lambda@Edge Handler Example
The following Node.js example illustrates a minimal, valid Lambda@Edge response returning HTML:
exports.handler = async (event) => {  const response = {  status: '200',  statusDescription: 'OK',  headers: {  'content-type': [  { key: 'Content-Type', value: 'text/html; charset=utf-8' }  ]  },  body: '<html><body><h1>Hello from edge</h1></body></html>',  isBase64Encoded: false  };  return response;
};
Using this pattern as a baseline makes it easier to introduce additional headers or dynamic bodies without breaking CloudFront’s validation logic.
Fast Diagnostic Workflow for CloudFront 502 Validation Errors
When you encounter the validation error, follow this structured checklist to isolate the root cause efficiently:
- Inspect CloudWatch logs for the Lambda@Edge function.
- Logs are in the region where the function was created, typically
us-east-1 for Lambda@Edge.
- Look for serialization errors, type mismatches, or stack traces around the time of the 502.
- Validate the response object shape.
- Confirm the function returns a plain JSON object.
- Ensure values are valid primitives (strings, numbers, booleans) and not complex types that cannot be serialized.
- Confirm the body semantics.
body must be a string.- If returning binary data, set
isBase64Encoded: true and supply a Base64-encoded string.
- Check header formatting.
- Header names must be lowercase.
- Each header value must be an array of objects with
key and value properties.
- Verify response size.
- Ensure the body does not exceed CloudFront or Lambda@Edge limits.
- Avoid sending multi-megabyte responses directly from the function.
- Test the origin directly.
- Bypass CloudFront and call the origin endpoint to examine the raw payload.
- Confirm whether the origin itself is returning an invalid or oversized response.
Capturing and Using the CloudFront Request ID
The CloudFront 502 page includes a Request ID. Preserve this value, as it is critical for:
- Correlating user-facing failures with CloudWatch log entries.
- Providing AWS Support or an API provider with a precise reference to the failing edge location and time window.
Common Implementation Mistakes and How to Correct Them
1. Returning Objects or Buffers Instead of Strings
Problem: The function returns a JavaScript object or a Buffer directly as body. CloudFront expects body to be a string and rejects non-string types.
Resolution:
- For JSON payloads, convert the object to a string with
JSON.stringify().
- For binary data, Base64-encode the content and set
isBase64Encoded: true.
2. Incorrect Header Structure
Problem: Headers are returned as a flat object with string values, or header names are not in the required structure.
Resolution:
3. Oversized Response Payloads
Problem: The Lambda@Edge function returns a large HTML document or data blob that exceeds platform limits.
Resolution:
- Serve large static content directly from S3 or your origin.
- Keep Lambda@Edge responses small and focused on dynamic logic, routing, or lightweight transformations.
Troubleshooting Integrations and API Proxies (n8n, FireCrawl, Third-party APIs)
In many automation and integration architectures, CloudFront fronts a third-party API or a workflow engine such as n8n. When these services are invoked through Lambda@Edge or CloudFront and you encounter the validation error, use the following approach:
- Call the upstream API directly.
- Bypass CloudFront and query the origin endpoint.
- Inspect the raw response body, headers, content type, and size.
- Identify binary or complex payloads.
- Check whether the upstream service returns binary data, Markdown, or rich HTML that is passed through without proper encoding.
- Ensure any Lambda@Edge transformation does not forward unsupported types directly.
- Validate integration node configuration (e.g. n8n HTTP Request node).
- Set an appropriate
Content-Type, such as application/json or text/markdown.
- Ensure you request the correct response format (string vs JSON) and handle it consistently.
- Normalize mismatched formats.
- If the origin returns Markdown or HTML but the integration expects JSON, either:
- Adjust the origin to return JSON, or
- Convert the payload to a string or JSON inside your Lambda@Edge logic before returning it to CloudFront.
n8n HTTP Request Node – Practical Tips
When using n8n in conjunction with CloudFront and Lambda@Edge, consider these configuration practices:
- Set the request body explicitly as a JSON string when required, using n8n expressions or raw JSON mode.
- Align the
Content-Type header with the actual payload, for example:
application/json for structured API responsestext/markdown or text/html for document content
- Control response sizes. If a third-party returns large Markdown or HTML, prefer:
- Requesting summaries or smaller payload variants, or
- Downloading or streaming large assets directly from the origin rather than via Lambda@Edge.
Safe Reproduction and Debugging Techniques
To debug without impacting production traffic more than necessary, use controlled tests that mirror the failing path.
When to Escalate and Contact Support
If you have validated the response structure and types, and CloudFront still reports a failed validation, it may be time to open a support case with your cloud provider or API vendor. Before doing so, collect:
- The CloudFront Request ID from the 502 error page.
- A reproducible
curl command (or equivalent) and the exact timestamp of the failure.
- Relevant Lambda@Edge CloudWatch logs around that timestamp, including the serialized response object.
Providing this information upfront significantly shortens the time to resolution.
Key Takeaways and Best Practices
The CloudFront 502 error that states "Lambda function result failed validation" nearly always indicates that the response object returned to CloudFront is not shaped or typed exactly as required, or that it exceeds size constraints.
To avoid and resolve these issues:
- Always return a properly structured JSON object from Lambda@Edge with string
status, correctly formatted headers, and a string body.
- Use Base64 encoding and
isBase64Encoded: true for binary data.
- Keep response payloads small and offload large content to S3 or your origin.
- Use CloudWatch logs and direct origin calls to pinpoint exactly where formatting or size violations occur.
- For integrations like n8n, ensure HTTP nodes and transformations align with CloudFront’s expectations regarding content type, encoding, and body format.
Need Help With a Specific Case?
If you are diagnosing a production issue and want a more targeted review, you can:
- Share a redacted version of the Lambda@Edge return object.
- Provide your n8n HTTP Request node configuration and the relevant CloudWatch error snippet.
With those details, it is usually straightforward to identify the exact field or structure that is causing CloudFront’s validation to fail. If you are fully blocked in production, contact your cloud provider’s support team and include the CloudFront Request ID displayed on the 502 page along with your diagnostic notes.
Looking to integrate language learning seamlessly into your daily routine using automation? This guide walks through a production-ready n8n workflow template that automatically retrieves top Hacker News headlines, extracts unique vocabulary, translates each term into German, stores the results in Airtable, and delivers a concise SMS summary via Vonage every morning – without any manual effort.
Use case: automated micro-learning for professionals
Consistent, low-friction exposure to new vocabulary is one of the most effective ways to build language skills over time. For busy professionals, manual curation is rarely sustainable. By orchestrating this flow in n8n, you create a reliable pipeline that:
- Surfaces fresh, context-rich vocabulary from real-world tech headlines
- Standardizes and deduplicates the extracted words
- Automatically translates and persists them to a structured datastore
- Delivers a short, actionable list to your phone every morning
The result is a lightweight, automated language-learning routine that fits naturally into your existing workflow.
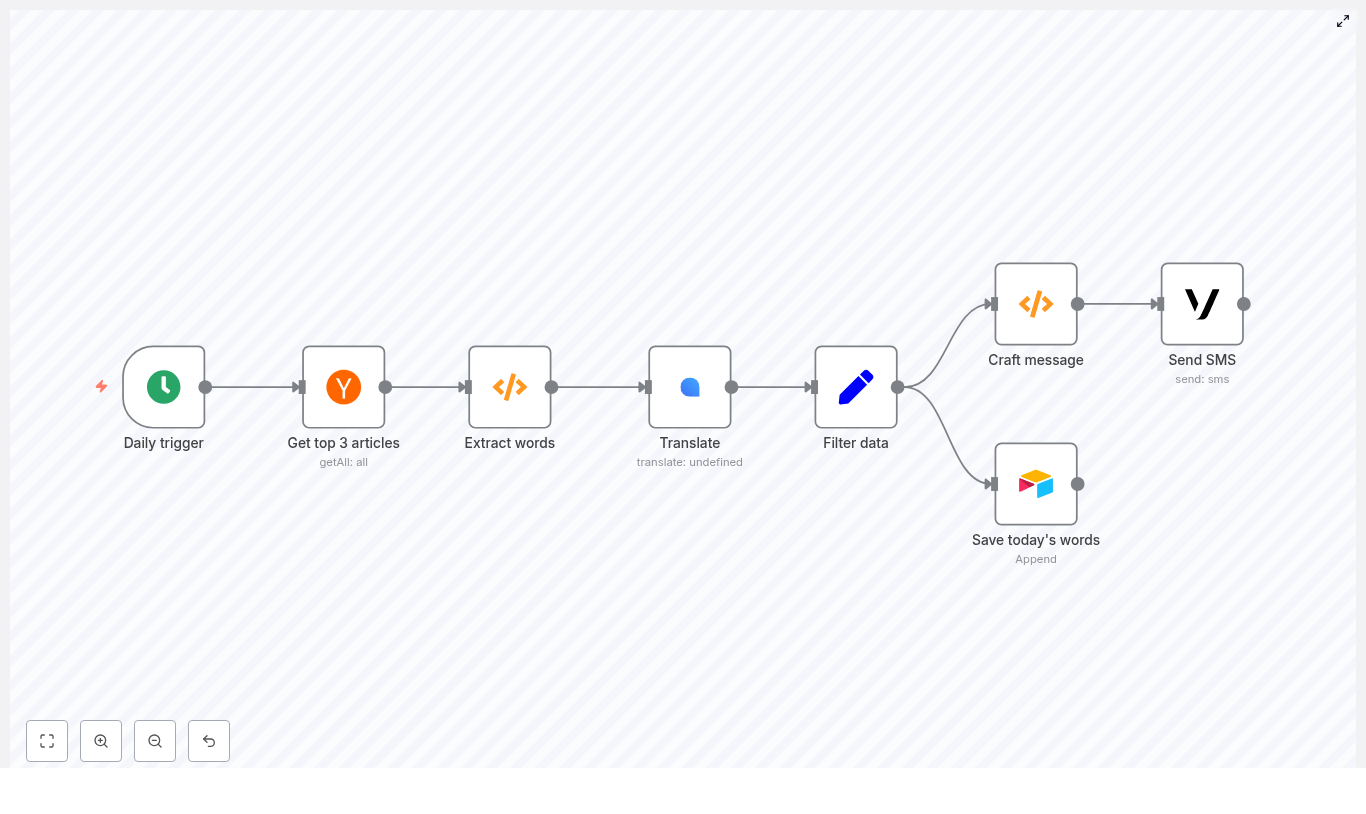
Solution architecture overview
The n8n workflow is built from a series of interoperable nodes, each focused on a single responsibility. At a high level, the pipeline consists of:
- Cron – triggers the workflow daily at a fixed time (08:00)
- Hacker News – fetches the top 3 front-page stories
- Function (Extract words) – tokenizes titles, cleans and deduplicates vocabulary
- LingvaNex – translates words into German
- Set – normalizes output fields for downstream systems
- Airtable – appends vocabulary pairs for long-term review
- Function (Craft message) – formats a compact SMS summary
- Vonage – sends the final message to your phone
This modular design makes it straightforward to swap services (for example, a different translation API or notification channel) while preserving the core logic.
Detailed workflow: from trigger to SMS
1. Scheduling the workflow with Cron
Start with a Cron node configured to run once per day at 08:00. This schedule creates a predictable learning cadence and ensures your SMS arrives at the same time each morning.
- Mode: Every Day
- Time: 08:00 (adjust to your preference and timezone)
2. Ingesting content from Hacker News
Next, add the Hacker News node to pull the input data for your vocabulary set. Configure it to fetch the top three front-page articles.
- Operation: Get Top Stories
- Limit: 3
Using current headlines from a technology-focused source ensures that the extracted terms are contemporary and contextually relevant, which is valuable for professionals working in tech and related fields.
3. Extracting and normalizing vocabulary
The first Function node performs text processing on the article titles. It:
- Splits titles into tokens
- Removes punctuation and numbers
- Converts tokens to lowercase
- Filters out common stopwords
- Deduplicates the resulting list of words
- Applies a cap on the number of terms for cost control
Use the following code in the Function node to implement this logic:
const stopwords = new Set([  "the","a","an","and","or","of","to","in","on","for","with",  "is","are","was","were","by","from","that","this","it"
]);

const words = [];

for (let i = 0; i < items.length; i++) {  const title = items[i].json.title || '';  const tokens = title.split(/\s+/);  for (let t of tokens) {  // Remove punctuation and numbers, convert to lower-case  const cleaned = t.replace(/[^\p{L}']/gu, '').toLowerCase().trim();  if (!cleaned) continue;  if (stopwords.has(cleaned)) continue; // optional stopword filtering  words.push(cleaned);  }
}

const uniqueWords = [...new Set(words)];

// Limit to a reasonable number (e.g. 25) to avoid API overuse
const limited = uniqueWords.slice(0, 25);

const newItems = limited.map(w => ({ json: { word: w } }));
return newItems;
Implementation notes for automation engineers:
- Unicode-aware regex: The pattern
\p{L} ensures that alphabetic characters from multiple languages are preserved, not just ASCII.
- Noise reduction: Lowercasing and stopword removal significantly improve the quality of the vocabulary list.
- Cost management: The
slice(0, 25) limit keeps translation API usage and latency under control.
4. Translating vocabulary with LingvaNex
Each item leaving the extraction node contains a single field word. Feed these items into a LingvaNex (or equivalent translation provider) node to obtain the German translations.
Key configuration points:
- Source text:
{{$node["Extract words"].json["word"]}}
- Target language:
de_DE (German)
If the translation node offers batch translation, enable it to process multiple words per request. This approach reduces the number of API calls and helps mitigate rate limits. If batching is not available, consider throttling or chunking requests to avoid provider-side throttling.
5. Normalizing translation output with Set
Once translations are returned, use a Set node to standardize the structure of your data. This ensures consistent fields for Airtable and the SMS formatter.
Example mappings:
- English word =
{{$node["Translate"].json["source"]}}
- Translated word =
{{$node["Translate"].json["result"]}}
By normalizing the payload at this stage, you decouple downstream nodes from any changes in the translation provider’s response format.
6. Persisting vocabulary in Airtable
Use an Airtable node configured in append mode to store each word pair. This creates a structured dataset that can later be fed into flashcard tools, spaced repetition systems, or analytics dashboards.
Recommended fields per record:
- Date of ingestion
- English word
- Translated word (German)
- Source headline (optional, for context)
- Article URL (optional, for deeper reading)
- Status / error flag (optional, for failed translations)
Over time, this Airtable base becomes a lightweight corpus and a practical source for building additional learning tools.
7. Crafting an SMS-friendly summary
Before sending the notification, a second Function node aggregates the top N word pairs into a compact, SMS-ready string. This keeps the message readable and within standard SMS length limits.
Use the following code in the Function node:
const number_of_words = 5; // choose how many to send
const pairs = [];

for (let i = 0; i < Math.min(items.length, number_of_words); i++) {  pairs.push(  items[i].json['English word'] + ' : ' + items[i].json['Translated word']  );
}

const words_of_the_day = pairs.join(', ');

return [{ json: { words_of_the_day } }];
Adjust number_of_words based on your preferred message length and SMS cost constraints.
8. Delivering the daily SMS via Vonage
Finally, connect a Vonage node to send the prepared content to your mobile number. Keep the body concise to avoid multipart messages and unexpected billing.
Example message configuration:
=Good morning, here are your words for today
{{$node["Craft message"].json["words_of_the_day"]}}
This yields messages similar to:
Good morning, here are your words for today innovation : Innovation, startup : Start-up, scale : skalieren, protocol : Protokoll, latency : Latenz
Security, reliability and operational best practices
Credential management
Handle all secrets through n8n’s credential management system:
- Store API keys for LingvaNex, Vonage and Airtable as credentials.
- Do not embed credentials in Function node code or hard-code them in parameters.
- Restrict access to workflows and credentials based on least privilege principles.
Error handling and resilience
To operate this workflow reliably in a production context:
- Enable retries on nodes that interact with rate-limited external APIs.
- Add an error branch or separate workflow to log failures to Airtable, Slack or another monitoring endpoint.
- Mark failed translations with an error flag but still persist the original English word for traceability.
Edge case considerations
Improve robustness by accounting for irregular input:
- Skip titles that are empty or contain primarily numbers and symbols.
- Optionally filter out proper nouns if they are not useful for your learning goals.
- Handle translation failures gracefully by recording the issue instead of dropping the item silently.
Cost control, privacy and rate limits
When automating language workflows at scale, cost and compliance must be considered:
- Translation costs: Limit the maximum number of words per day and leverage batch translation where available.
- SMS costs: Keep messages short and restrict the number of daily recipients or environments (for example, separate test and production numbers).
- Privacy: Avoid sending personal or sensitive content to third-party translation APIs. Review the privacy policies of LingvaNex, Vonage and any other external services before transmitting user-related data.
Advanced extensions and enhancements
Once the core workflow is stable, there are several ways to extend it for more advanced learning scenarios:
- Pronunciation and audio: Integrate a text-to-speech service and store audio URLs in Airtable for listening practice.
- Spaced repetition: Generate review schedules (for example, after 1, 3 and 7 days) and trigger follow-up notifications using additional Cron nodes or Airtable views.
- Alternative channels: Replace or augment SMS with Telegram, email, push notifications or a custom mobile app.
- Language detection: Automatically bypass words that are already in German to avoid redundant translations.
- NLP preprocessing: Apply lemmatization or stemming so that learners focus on base forms rather than inflected variants.
Testing and validation checklist
Before enabling the daily schedule, validate the workflow end to end:
- Run the workflow manually and confirm that the Hacker News node returns valid titles.
- Inspect the output of the Extract words Function node to verify tokenization, cleaning and deduplication.
- Execute a single translation request and confirm that the source and result fields map correctly.
- Check Airtable to ensure that new rows are appended with the expected fields, values and date formats.
- Send a test SMS to your device and verify readability, length and character encoding.
Putting it into practice
This n8n template provides a practical, extensible blueprint for automated daily vocabulary learning. The workflow is intentionally modular so you can:
- Swap translation providers without rewriting core logic
- Change the notification channel from SMS to chat or email
- Integrate more advanced NLP or analytics over time
To get started, import the template into your n8n instance, configure credentials for LingvaNex, Vonage and Airtable, and run the workflow once in manual mode to validate the full pipeline.
Next steps: Import the workflow, execute a test run, and decide which target language you want to support next. The same architecture can be easily adapted for Spanish, French, Japanese or any other language supported by your translation provider.