Telegram Chatbot with Multiple Sessions (n8n)

Build a Telegram Chatbot with Multiple Sessions using n8n

Imagine chatting with a Telegram bot that actually remembers what you were talking about last week, lets you pause and resume different conversations, and can even summarize everything for you in a neat little recap. That is exactly what this n8n workflow template helps you build.

In this guide, we will walk through how the template works, when you would want to use it, and how all the pieces fit together: n8n for orchestration, Google Sheets as a lightweight session database, and OpenAI via LangChain for all the natural language magic.

We will keep things practical: you will see the high-level architecture, the role of each node, the commands your bot supports, and the code snippets you can paste directly into your n8n Code nodes.

What this n8n Telegram chatbot template actually does

This workflow turns your Telegram bot into a session-aware assistant. Instead of treating every message like a one-off request, it tracks separate conversation sessions and lets you:

  • Start a fresh session when you want to change topics
  • Check which session is currently active
  • Resume an older session by its id
  • Get a summary of everything discussed in the current session
  • Ask questions about the full history of a session

Behind the scenes, the workflow uses:

  • A Telegram Trigger node in n8n to receive incoming messages
  • Google Sheets as a simple database for sessions and conversation history
  • LangChain + OpenAI (gpt-4o-mini in the example) for chat replies, summaries, and Q&A
  • A small memory buffer so the bot can keep recent context without overloading the model
  • Code nodes to clean up inputs, extract parameters, and build text for summarization and question answering

So instead of a forgetful “answer this one question” bot, you get a multi-session Telegram chatbot that feels more like an ongoing, organized assistant.

Why session management matters for Telegram bots

Most simple Telegram bots are stateless. They see each message, respond, and move on. That is fine for quick utilities, but it falls apart when you want:

  • Multi-turn conversations where context actually matters
  • To pause a topic and come back later
  • To keep different projects or topics in separate “threads”
  • To summarize what has been discussed so far

Session management solves this by assigning messages to a specific session and tracking which session is currently active. With this template you can:

  • Mark one session as current
  • Expire old sessions when starting a new one
  • Switch the current session using a simple command
  • Use the stored history for summaries and Q&A

In short, your bot stops acting like a goldfish and starts behaving like a proper conversational assistant.

When to use this Telegram chatbot template

This n8n template is a great fit if you want to:

  • Run multiple parallel conversations, for example different projects, clients, or topics
  • Give users the ability to resume older discussions by id
  • Offer summaries of long chats without manually scrolling through Telegram
  • Let users ask questions about what was said earlier in a session
  • Prototype a production-style chatbot before moving to a more advanced database

If you only need a one-off Q&A bot, this might be more than you need. If you want something that can grow into a serious assistant, this is a solid starting point.

What you need before you start

Before you plug in the template, make sure you have a few basics ready:

  • An n8n instance, either cloud or self-hosted
  • A Telegram bot token and a configured Telegram node in n8n
  • A Google account and a Google Sheets file to store:
    • Sessions (session id, state)
    • Conversation history (prompts and responses)
  • An OpenAI API key, with LangChain nodes installed and configured in n8n

Once those are in place, you are ready to connect the template and start testing.

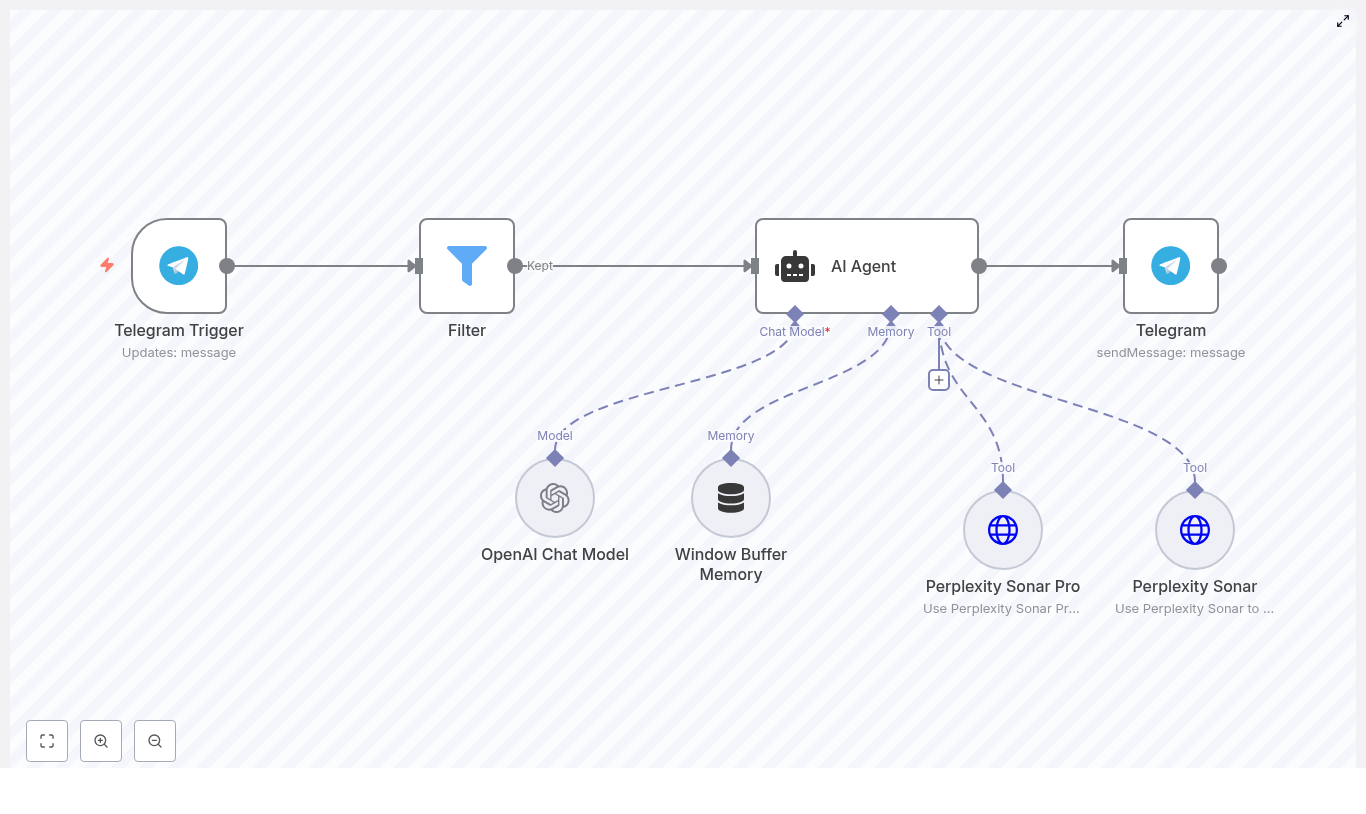
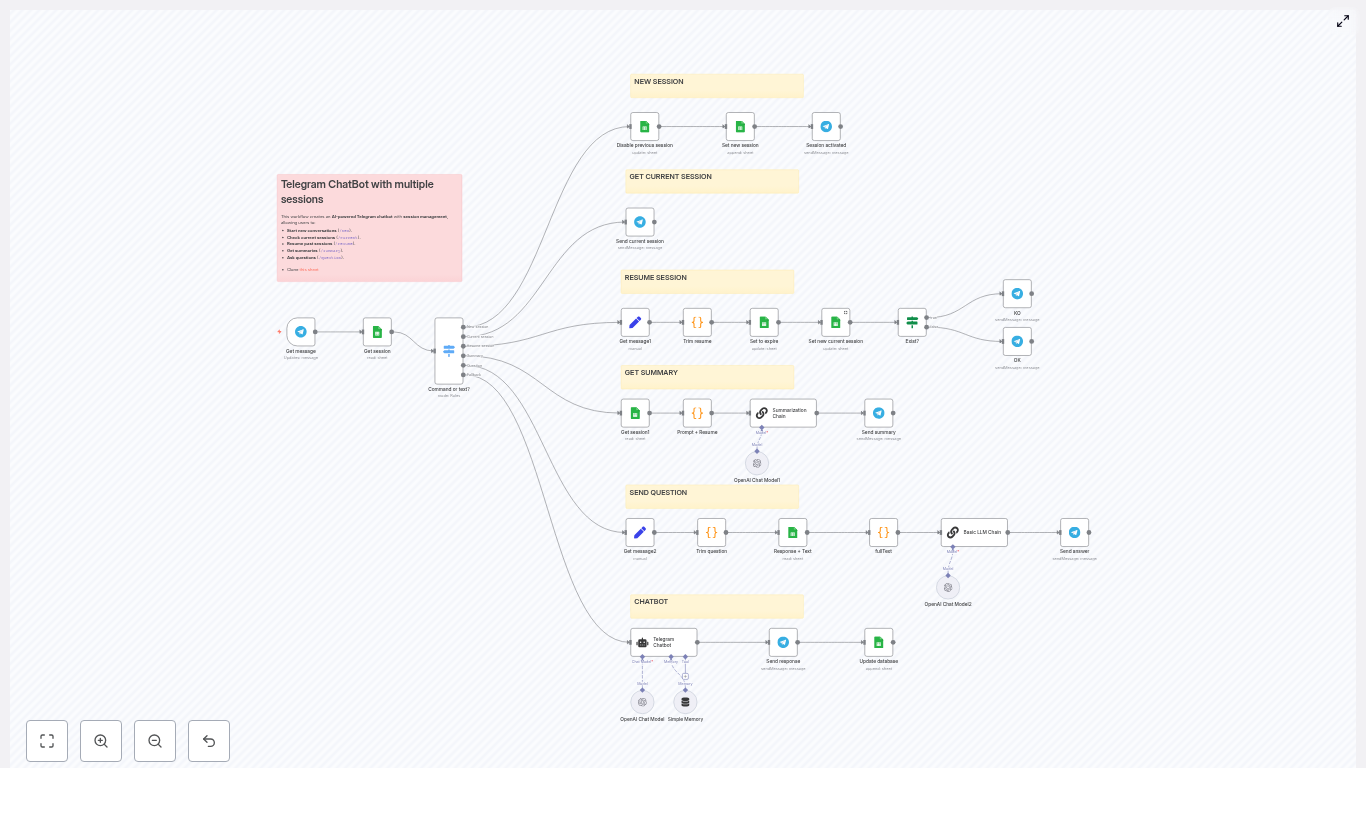
How the architecture fits together

Let us look at the big picture first, then we will zoom into each part.

High-level workflow

  • Telegram Trigger listens for new messages and passes the raw payload into n8n.
  • Session lookup in Google Sheets finds which session is currently marked as current.
  • Switch node (Command router) decides what to do based on the message text, for example commands vs normal chat.
  • Google Sheets updates create, expire, or resume sessions, and store conversation history.
  • LangChain + OpenAI nodes handle:
    • Regular chat responses
    • Summaries of the entire session
    • Question answering based on session history
  • Code nodes help extract parameters like session ids and questions, and build the fullText used for summaries and Q&A.

Commands your Telegram chatbot supports

The template comes with a small but powerful set of commands. You can always expand them later, but these cover the main session use cases:

  • /new – Start a brand new session
  • /current – Show the id of the active session
  • /resume <session-id> – Switch back to a previous session
  • /summary – Generate a concise summary of the current session
  • /question <text> – Ask a question about the current session history

Everything that is not a command is treated as regular chat and routed to the chatbot agent with a small memory buffer.

Step-by-step: what each node does

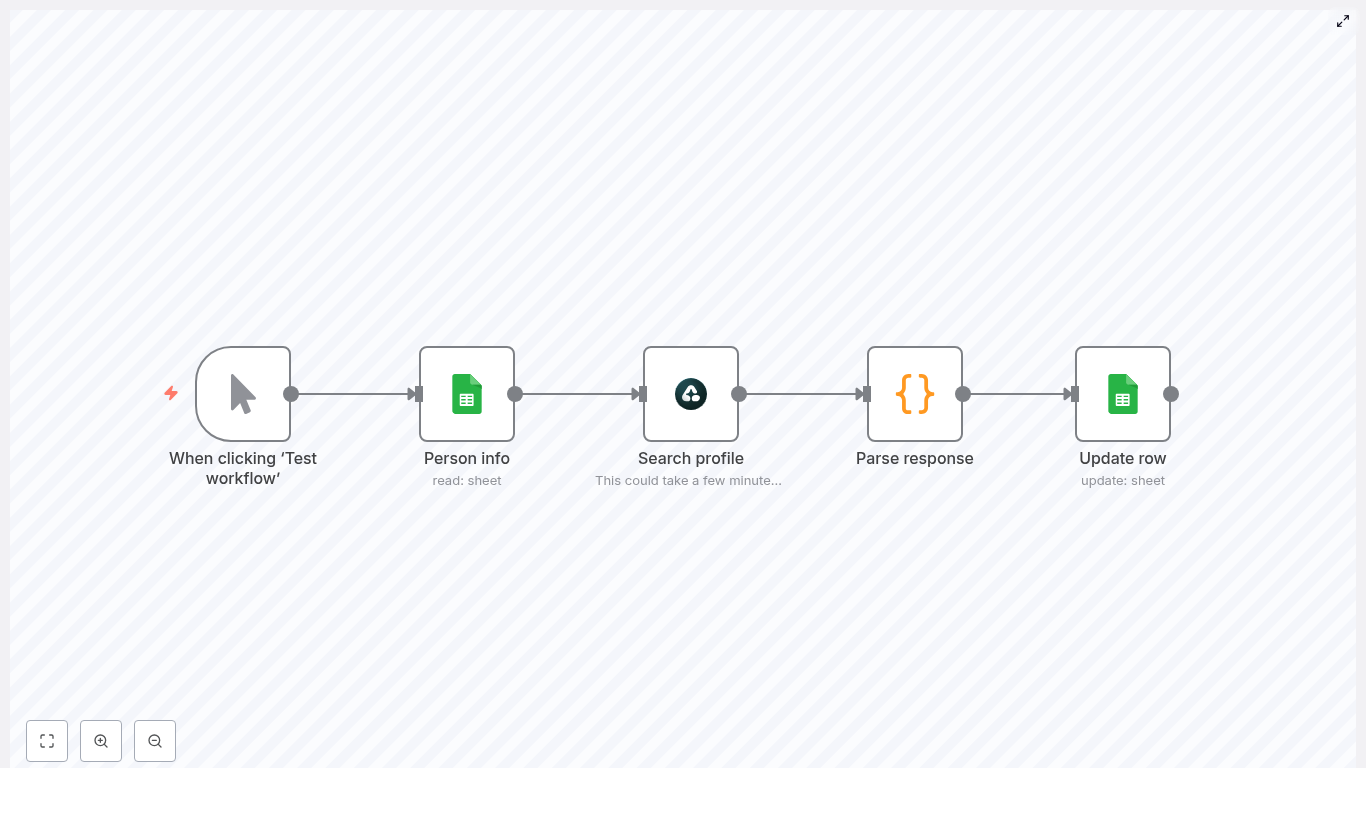
1. Telegram Trigger – entry point for every message

The Telegram Trigger node listens for incoming updates from your bot. It receives the raw message payload and hands it off to the rest of the workflow.

Think of it as the front door. Every command, every piece of text, all of it starts here before being routed through the flow.

2. Get session from Google Sheets

Next, the workflow needs to know which session is currently active. A Google Sheets node reads from your Sessions sheet and finds the row where STATE is set to current.

The SESSION value from that row becomes:

  • The sessionKey for the memory node
  • The session id used when appending chat data to the Database sheet

This is how the workflow keeps all messages and responses tied to the right conversation.

3. Command router with a Switch node

Once the current session is known, a Switch node checks the message text and decides what to do with it.

It looks for messages that start with:

  • /new
  • /current
  • /resume
  • /summary
  • /question

If none of these match, the message is treated as a normal chat input.

This clean routing makes it easy to add more commands later without turning your workflow into a tangle of conditions.

4. Managing the session lifecycle in Google Sheets

Two commands affect the actual lifecycle of sessions: /new and /resume.

/new – Start a new session

When a user sends /new, the workflow:

  • Marks the existing current session as expire in the Sessions sheet
  • Appends a new row with:
    • STATE set to current
    • SESSION set to a unique id (in this template, the Telegram update_id is used)
  • Sends a confirmation message back to the user that a new session is active

From that point on, all new messages and responses are recorded under this new session id.

/resume <session-id> – Resume a past session

For /resume, the workflow needs to extract the session id from the message text, then update the right rows in Google Sheets:

  • The current session is set to expire
  • The requested session row is updated so STATE becomes current
  • The bot replies to confirm the switch or returns an error if that session id does not exist

This is where the “Trim resume” Code node comes into play, which we will look at in a moment.

5. Storing conversations in the Google Sheets “Database” sheet

Every message and response pair is recorded in a Database sheet. Each row contains:

  • SESSION – Which session this interaction belongs to
  • DATE – Timestamp of the exchange
  • PROMPT – The user’s message
  • RESPONSE – The bot’s reply

Because everything is stored per session, it is straightforward to:

  • Fetch all rows for the current session
  • Build a long fullText representation of the conversation
  • Pass that text into summarization or Q&A chains

6. LangChain + OpenAI for chat, summaries, and Q&A

The template uses LangChain nodes connected to OpenAI to handle three main tasks:

  • Chatbot agent for regular conversation, using a small memory buffer so the model sees recent context without exceeding token limits.
  • Summarization Chain that takes the full session history (as fullText) and returns a concise summary of the conversation.
  • LLM Chain for question answering that reads the same fullText plus a user’s question and generates an answer grounded in that history.

The example uses gpt-4o-mini, but you can swap the model for another OpenAI model that fits your needs and budget.

Key Code node snippets for this template

Several Code nodes help prepare data for session management and language model calls. You can paste these snippets directly into n8n Code nodes where the template indicates.

Trim resume – extract the session id from /resume

This snippet looks for text following /resume and stores it in item.json.resume. If no id is found, it sets the value to null.

for (const item of $input.all()) {  const text = item.json.text || '';  const match = text.match(/\/resume\s+(.*)/);  if (match) {  item.json.resume = match[1].trim();  } else {  item.json.resume = null;  }
}

return $input.all();

Trim question – extract the question text from /question

Similarly, this node pulls out everything after /question and saves it as item.json.question for the Q&A chain.

for (const item of $input.all()) {  const text = item.json.text || '';  const match = text.match(/\/question\s+(.*)/);  if (match) {  item.json.question = match[1].trim();  } else {  item.json.question = null;  }
}

return $input.all();

Prompt + Resume – build fullText for summarization

This node loops through all conversation rows for a session and concatenates them into a single string. That string becomes the input for your summarization chain.

let fullText = '';

for (const item of $input.all()) {  const prompt = item.json.PROMPT || '';  const response = item.json.RESPONSE || '';  fullText += `PROMPT: ${prompt}\nRESPONSE: ${response}\n`;
}
const chat_id=$('Get message').first().json.message.from.id

return [{ json: { fullText, chat_id } }];

fullText node for question answering

This version also includes the extracted question from the “Trim question” node, so the LLM can answer based on the full history plus the user’s query.

let fullText = '';

for (const item of $input.all()) {  const prompt = item.json.PROMPT || '';  const response = item.json.RESPONSE || '';  fullText += `PROMPT: ${prompt}\nRESPONSE: ${response}\n`;
}
const chat_id=$('Get message').first().json.message.from.id;
const question=$('Trim question').first().json.question;

return [{ json: { fullText, chat_id, question } }];

How to test your multi-session Telegram bot

Once you have the template wired up, it is worth spending a few minutes testing different paths to make sure everything behaves as expected.

  • Check session transitions Start with:
    • /new
    • Send a few normal messages
    • Trigger /summary and see if the summary reflects the right conversation
  • Validate /resume behavior Try resuming:
    • A valid session id and confirm it becomes current
    • An invalid session id and make sure your error handling responds clearly
  • Watch Google Sheets in real time Keep the Sessions and Database sheets open while you test:
    • Check that rows are appended correctly
    • Verify that STATE switches from current to expire when expected
    • Look out for permission or rate-limit issues from the Sheets API

Security, privacy, and cost considerations

This template is intentionally simple so you can get started quickly, but there are a few practical things to keep in mind if you are planning to go beyond experiments.

  • Storage security Google Sheets is convenient and easy to work with, but it is not a secure production database. If you are handling sensitive information, consider moving to a more robust and encrypted datastore such as Postgres or Firestore.
  • OpenAI token usage and costs Summaries and Q&A over long histories can consume a lot of tokens. To keep costs under control:
    • Limit how much history you include in fullText
    • Use chunking or extraction strategies for very long sessions
    • Choose cost-effective models where appropriate
  • Memory window size The memory buffer window node should not be too large. A smaller window:
    • Keeps context length manageable
    • Reduces API calls and token usage
    • Still gives the model enough recent context for coherent

n8n + Milvus: Scrape Paul Graham Essays into a Vector DB

n8n + Milvus Workflow: Index Paul Graham Essays for an AI Retrieval Agent

This guide describes a complete n8n automation that scrapes Paul Graham essays, extracts and chunks the content, generates OpenAI embeddings, and stores the vectors in a Milvus collection. The indexed corpus is then exposed to an AI agent in n8n so you can run semantic, retrieval-augmented chat queries over the essays.

Use case and architecture

Combining vector search with a conversational AI agent is a proven pattern for building knowledge-aware assistants. Instead of relying solely on the model’s training data, you maintain a curated, up-to-date knowledge base that the agent can query in real time.

In this workflow, Paul Graham essays serve as the reference corpus. The automation:

  • Scrapes the essay index and individual articles from paulgraham.com
  • Extracts clean text content from HTML
  • Splits long essays into smaller chunks for efficient retrieval
  • Generates embeddings with OpenAI for each chunk
  • Persists embeddings in a Milvus vector database collection
  • Lets an AI Agent in n8n use Milvus as a retrieval tool during chat

The result is a retrieval-augmented generation (RAG) pipeline that supports accurate, context-grounded answers to questions about Paul Graham’s writing.

What you will implement

The completed n8n workflow consists of two coordinated subflows: an indexing pipeline and an interactive chat flow.

Indexing pipeline (scrape, process, embed, store)

  • Scraper for the Paul Graham article index and a subset of essays
  • HTML text extraction that ignores navigation and images
  • Text splitting and embedding generation using OpenAI
  • Milvus vector store integration targeting a collection named n8n_test

Chat pipeline (retrieval-augmented agent)

  • Chat trigger to receive user messages
  • n8n AI Agent using an OpenAI chat model
  • Milvus vector store configured as a retrieval tool for the agent

Prerequisites

  1. n8n instance
    Either self-hosted or n8n Cloud, with access to install and configure nodes.
  2. Milvus deployment
    A running Milvus server with a collection named n8n_test. This can be standalone or via Docker Compose. Refer to the official Milvus documentation for setup details.
  3. OpenAI credentials
    API key with access to an embedding model and a chat completion model.
  4. Network connectivity
    Your n8n instance must be able to reach http://www.paulgraham.com and the Milvus endpoint.

High level workflow design

On the n8n canvas, the workflow is logically separated into two areas:

  • Step 1 – Scrape and load into Milvus
  • Step 2 – Chat with the AI Agent using Milvus retrieval

The following sections detail each node and provide configuration guidance and best practices.

Step 1 – Scrape and load Paul Graham essays into Milvus

1.1 Trigger and essay discovery

  • Manual Trigger
    Use the Manual Trigger node to start the indexing process on demand. Click “Execute Workflow” in n8n whenever you want to refresh or rebuild the Milvus collection.
  • Fetch Essay List (HTTP Request)
    Configure an HTTP Request node to perform a GET request against the Paul Graham articles index page, for example:
    http://www.paulgraham.com/articles.html
    This returns the HTML that contains links to individual essays.
  • Extract essay names (HTML node)
    Feed the HTML response into an HTML node. Use a CSS selector such as:
    table table a
    to extract all essay links from the nested tables on the page. The output should be an array of anchor elements or URLs representing individual essays.
  • Split out into items (SplitOut)
    Add a SplitOut (or similar item-splitting) node to convert the array of links into separate items. This ensures that each essay is processed in isolation downstream.
  • Limit to first 3 (Limit)
    For testing or cost control, insert a Limit node to restrict the number of essays processed, for example to the first three. This step is optional and can be removed once you are comfortable with the pipeline.

1.2 Essay retrieval and text extraction

  • Fetch essay texts (HTTP Request)
    For each essay URL produced by the previous step, use another HTTP Request node to perform a GET request and retrieve the full HTML of the essay page.
  • Extract Text Only (HTML node)
    Pass the essay HTML into an HTML node dedicated to text extraction. Configure a selector such as:
    body
    and output the textual content. This should exclude navigation elements, images, and other non-article noise, resulting in a clean text blob for each essay.

1.3 Prepare documents and split into chunks

  • Default Data Loader
    Use the Default Data Loader node (from the LangChain integration) to convert the raw text into document objects suitable for downstream processing. This node standardizes the structure for the text splitter and embedding nodes.
  • Recursive Character Text Splitter
    Add the Recursive Character Text Splitter node to segment long essays into smaller, semantically manageable chunks. Example configuration:
    • chunkSize: 6000 characters (or adjust based on your embedding budget and retrieval granularity)

    Smaller chunks typically improve retrieval precision but increase the number of embeddings and associated cost. For many use cases, a range of 500 to 2000 characters is a good starting point.

1.4 Generate embeddings and store in Milvus

  • Embeddings OpenAI
    Configure the Embeddings OpenAI node with your OpenAI API credentials and the preferred embedding model. This node converts each text chunk into a dense vector representation. Ensure you monitor usage, since embedding cost scales with total text volume and chunk count.
  • Milvus Vector Store
    Finally, connect the embeddings to a Milvus Vector Store node that writes vectors into the n8n_test collection.
    Key considerations:
    • Set the collection name to n8n_test.
    • Confirm the Milvus endpoint is reachable from n8n.
    • Use the appropriate Milvus credentials in the n8n credential node.
    • Optionally enable a setting to clear the collection before inserting new data if you want a clean reload.

    This completes the indexing phase and makes the essay embeddings available for retrieval.

Step 2 – Chat with an AI Agent backed by Milvus

2.1 Chat trigger

  • When chat message received (Chat Trigger)
    Add a Chat Trigger node that listens for incoming chat messages, typically via a webhook or integrated chat interface. Each incoming message will start a new execution of the chat subflow.

2.2 Configure the AI Agent

  • AI Agent node
    Insert an AI Agent node and configure it with:
    • An OpenAI chat model, for example gpt-4o-mini or another suitable model
    • Optional memory settings if you want multi-turn conversational context
    • Tools, including the Milvus vector store, to provide retrieval capabilities

    The agent will receive the user’s question from the Chat Trigger and can decide when to call tools to gather context.

  • Milvus Vector Store as a tool
    Configure the Milvus Vector Store node as a retrieval tool within the AI Agent. This exposes a search interface that the agent can use to:
    • Query the n8n_test collection
    • Retrieve the most relevant document chunks based on the user’s question
    • Ground its responses in specific passages from Paul Graham’s essays

    If the agent output feels generic, consider increasing the number of retrieved chunks or refining your chunking strategy so that relevant context is consistently available.

Key configuration and tuning guidelines

Milvus collection setup

Before running the workflow, ensure that:

  • A Milvus collection named n8n_test exists with an appropriate schema for vector data.
  • The Milvus server endpoint is correctly configured in n8n.
  • Authentication credentials in the Milvus credential node are valid.
  • Network rules or firewalls allow n8n to access the Milvus service.

OpenAI models and cost management

  • In the Embeddings OpenAI node, select a current, recommended embedding model.
  • In the AI Agent node, choose a chat model that meets your latency and cost requirements.
  • Monitor token and embedding usage, particularly if you remove the Limit node and index the full essay corpus.

Text splitting strategy

Chunking is central to retrieval quality and cost control:

  • Smaller chunks (for example 500-2000 characters) typically yield more precise, targeted retrieval but result in more vectors and higher embedding costs.
  • Larger chunks reduce the number of vectors but may mix multiple topics, which can dilute retrieval relevance.
  • The example workflow uses a relatively large chunkSize of 6000 as a demonstration; adjust this parameter to align with your budget and accuracy requirements.

Security, compliance, and operational best practices

  • Credential management
    Store OpenAI and Milvus credentials in n8n’s secure credential store. Never commit API keys or secrets to source control or share them in logs.
  • Content and scraping considerations
    Confirm that you have the right to scrape and repurpose content from the target site. Review and respect any robots.txt rules and applicable copyright or usage policies.
  • Network security
    Restrict Milvus exposure to trusted networks. Use appropriate firewall rules, authentication, and TLS where applicable to protect the vector database.

Troubleshooting and diagnostics

Common failure points

  • HTTP Request failures
    If the HTTP Request node fails, verify the URL, DNS resolution, and outbound network access from your n8n instance. Test the URL from the same environment using curl or a browser.
  • Empty HTML extraction
    If the HTML node returns no text, inspect the page structure and refine the CSS selector. The layout of paulgraham.com is relatively simple, but minor changes can break brittle selectors.
  • Milvus insert errors
    Errors during vector insertion typically indicate issues with the collection schema, server availability, or credentials. Check Milvus logs, confirm the collection name, and test connectivity from the n8n host.
  • Generic or low quality agent responses
    If answers seem generic or ungrounded:
    • Increase the number of retrieved documents per query.
    • Adjust chunk size to provide more focused context.
    • Confirm that embeddings were generated and stored correctly for the expected essays.

Extensions and enhancements

Once the base workflow is running, you can extend it to support more advanced production scenarios.

  • Automated refresh scheduling
    Add a Cron node to periodically re-run the scraping and indexing pipeline. This is useful if the source content changes over time or you want to keep the Milvus collection synchronized.
  • Richer metadata
    Store additional fields such as title, URL, author, and publication date alongside each vector. This improves traceability, enables better filtering, and allows you to display richer context in responses.
  • Advanced splitting strategies
    Use splitters that support overlapping windows so that important context is preserved across chunk boundaries. This often improves answer coherence for multi-paragraph reasoning.
  • Alternative retrieval strategies
    Experiment with hybrid search that combines keyword and vector retrieval, re-ranking strategies, or different context window sizes passed to the chat model.

Conclusion and practical next steps

This n8n workflow demonstrates a complete, reusable pattern for converting web content into a vectorized knowledge base backed by Milvus and making it accessible to an AI agent. The same approach can be applied to internal documentation, support portals, technical blogs, and any other corpus you want your automation to reason over.

To get started:

  1. Deploy Milvus and create the n8n_test collection.
  2. Configure your OpenAI credentials in n8n.
  3. Import or recreate the described workflow.
  4. Run the Manual Trigger to scrape and index a few essays.
  5. Send a chat message to the AI Agent asking about a Paul Graham topic and verify that responses are grounded in essay content.

If you need support, you can:

  • Request help fine-tuning CSS selectors for more reliable text extraction.
  • Ask for guidance on optimal chunk sizes balancing cost and retrieval quality.
  • Obtain a sample n8n workflow JSON export that matches this architecture.

Call to action: Ready to build more capable, knowledge-aware assistants with n8n and Milvus? Deploy this workflow, run a few test queries, and iterate on chunking and retrieval settings. If you would like a ready-made workflow JSON or a detailed implementation walkthrough, ask and it can be provided.

n8n + Milvus: Index Paul Graham Essays for AI

n8n + Milvus Workflow Template: Indexing Paul Graham Essays for AI-Powered Search

Introduction

This guide describes how to implement an end-to-end retrieval augmented generation (RAG) pipeline using n8n, Milvus, and OpenAI embeddings. The workflow automatically scrapes Paul Graham essays, converts them into vector embeddings, stores them in a Milvus collection, and exposes that collection to a conversational AI agent for high-quality, context-aware responses.

The template covers the complete lifecycle: scraping, text extraction, chunking, embedding, vector storage, and conversational retrieval. It is designed for automation engineers and AI practitioners who want a reproducible pattern for building private knowledge bases backed by vector search.

Architecture Overview

The n8n workflow is organized into two primary phases that run as part of a single automated pipeline:

  1. Indexing phase – Scrapes Paul Graham essays, extracts clean text, splits it into chunks, generates embeddings, and inserts them into a Milvus collection named n8n_test.
  2. Chat and retrieval phase – Uses an AI Agent backed by an OpenAI chat model and Milvus as a retrieval tool to answer user questions grounded in the indexed essays.

By separating indexing from retrieval in a single orchestrated workflow, you can easily re-index content, tune chunking and embedding settings, and immediately validate changes through the same conversational interface.

Why Use n8n, Milvus, and OpenAI Together?

This combination provides a robust and scalable pattern for production-grade RAG systems:

  • n8n – Handles orchestration, scheduling, retries, and integration with multiple data sources through a visual workflow engine.
  • Milvus – A high-performance vector database optimized for similarity search over large embedding collections.
  • OpenAI embeddings – Provide dense vector representations of text that enable semantic search and context retrieval for LLMs.

With this setup you can:

  • Index long-form essays into a searchable vector store.
  • Expose a chat interface that retrieves semantically relevant passages from your Milvus collection.
  • Automate refresh and re-indexing workflows as new content is published or updated.

Prerequisites

Before importing or recreating the workflow, ensure the following components are available:

  • An n8n instance (self-hosted or n8n Cloud).
  • A running Milvus server (standalone or cluster). This template assumes a collection named n8n_test. You can use the official Milvus Docker Compose setup to get started.
  • An OpenAI API key configured in n8n credentials for both embeddings and the chat model.
  • Basic familiarity with n8n nodes, especially the AI and LangChain-style nodes used for loading, splitting, embedding, and retrieval.

Workflow Breakdown

1. Scraping and Document Preparation

The first part of the workflow focuses on acquiring the essays and converting them into a structured document set suitable for embedding.

1.1 Fetching the Essay Index

  • HTTP Request (Fetch Essay List)
    The workflow starts with an HTTP Request node that performs a GET on the Paul Graham essays index page, for example paulgraham.com/articles.html. The response contains links to individual essays.
  • HTML Extract (Extract Essay Names and URLs)
    An HTML Extract node parses the index page, targeting anchor tags that represent essay links. This node outputs a structured list of essay URLs that will be processed downstream.

1.2 Controlling the Volume for Testing

  • Split Out
    The Split Out node converts the list of essay links into individual items, allowing n8n to iterate over each essay independently.
  • Limit
    During development or testing, a Limit node can be used to restrict processing to the first N essays. The template uses a limit of 3 essays as an example. You can remove or adjust this limit when running in production.

1.3 Retrieving and Cleaning Essay Content

  • HTTP Request (Fetch Essay Texts)
    For each essay URL, an HTTP Request node fetches the full HTML page.
  • HTML Extract (Extract Text Only)
    Another HTML Extract node isolates the main article body, excluding navigation, images, and other non-essential elements. The result is clean textual content that can be converted into documents for embedding.

2. Chunking and Embedding

After the raw text is extracted, the workflow transforms it into embedding-friendly chunks.

2.1 Document Loading and Splitting

  • Default Data Loader
    The Default Data Loader node converts the extracted HTML or text into document objects compatible with the downstream AI nodes.
  • Recursive Character Text Splitter
    This node segments each document into smaller chunks based on character length. In the template, the chunkSize is set to 6000 characters. This value can be tuned depending on:
    • The token limit of your embeddings model.
    • The desired granularity of retrieval.
    • The typical length and structure of the source content.

    For many RAG systems, smaller chunks (for example, 500-2,000 characters) improve retrieval precision but increase the number of embedding calls and overall storage.

2.2 Generating Embeddings

  • Embeddings OpenAI
    The OpenAI Embeddings node computes vector representations for each chunk. These vectors are later inserted into Milvus. When running at scale, consider:
    • Batching embedding requests to reduce API overhead.
    • Monitoring cost and rate limits from OpenAI.
    • Implementing retry and backoff strategies for robustness.

3. Vector Storage in Milvus

Once embeddings are generated, they are persisted in a Milvus collection that serves as the knowledge base for the AI agent.

3.1 Connecting to Milvus

  • Milvus Vector Store
    The Milvus Vector Store node writes embeddings into the specified collection, for example n8n_test. In the template:
    • The node uses Milvus credentials stored in the n8n credentials manager.
    • You can configure the node to clear the collection before inserting new data, which is useful when you want a fresh index on each run.

3.2 Collection and Metadata Strategy

For production use, it is advisable to:

  • Define a stable collection schema and naming convention, such as one collection per domain or content type.
  • Store metadata alongside each vector, for example:
    • Essay URL
    • Title
    • Publication date
    • Paragraph or chunk index

    This enables the AI agent or downstream applications to provide citations and traceability.

4. Conversational Retrieval with AI Agent

The second major phase turns the Milvus collection into a tool that an AI agent can use during conversations.

4.1 Exposing Milvus as a Tool

  • Milvus Vector Store as Tool
    This node exposes Milvus retrieval as a callable tool for the AI Agent. It is configured to query the same collection that was populated during indexing, such as n8n_test. At runtime, the agent can perform similarity search to retrieve the most relevant chunks for a given user query.

4.2 Configuring the AI Agent and Chat Model

  • AI Agent + OpenAI Chat Model
    The AI Agent node is wired to an OpenAI chat model, for example gpt-4o-mini. Key configuration points include:
    • Defining a system prompt that instructs the agent to rely on Milvus retrieval as its primary knowledge source.
    • Ensuring the agent is allowed to call the Milvus tool whenever it needs additional context.
    • Controlling temperature and other model parameters to balance creativity and factual accuracy.

    With this setup, user questions are answered based on semantically relevant passages from the Paul Graham essays stored in Milvus, which reduces hallucinations and improves answer grounding.

Configuration Guidelines and Best Practices

Milvus Collections and Credentials

To ensure reliable indexing and retrieval:

  • Create a Milvus collection such as n8n_test before running the workflow.
  • Configure Milvus credentials securely in the n8n credentials manager.
  • Decide whether each workflow execution should:
    • Clear the collection and fully re-index, or
    • Perform incremental updates and upserts for new or changed essays.
  • Implement collection lifecycle policies as your dataset grows to manage storage and performance.

Chunking Strategy

Chunking is a key lever for retrieval performance:

  • Align chunkSize with the context window of your embeddings and chat models.
  • Experiment with smaller chunks (for example, 500-2,000 characters) if you observe low relevance or overly broad matches.
  • Include overlaps between chunks if you want to preserve context across paragraph boundaries.

Embeddings Model and Cost Management

  • Use the OpenAI embeddings node with a suitable model for your use case.
  • Batch requests where possible to reduce latency and cost.
  • Monitor error rates and apply retry/backoff logic to handle transient API issues.

Chat Model Configuration

  • Select a chat model such as gpt-4o-mini that balances quality and cost.
  • Design a system prompt that:
    • Emphasizes use of the Milvus tool for factual information.
    • Discourages speculation when no relevant context is found.
  • Optionally instruct the agent to surface citations, for example by including essay titles or URLs from metadata in its responses.

Security and Operational Maintenance

  • Store all API keys and Milvus connection details in n8n credentials, not in plain-text nodes.
  • Audit indexing runs by logging timestamps, number of documents processed, and any errors encountered.
  • Implement incremental indexing where feasible:
    • Detect new or updated essays.
    • Only re-embed and upsert affected chunks instead of reprocessing the entire corpus.
  • Plan for backup and restore of your Milvus data if the collection becomes a critical knowledge asset.

Troubleshooting Guide

  • No results during chat
    Verify that:
    • Embeddings were successfully inserted into Milvus.
    • The Milvus Vector Store as Tool node is configured to read from the correct collection.
    • There are no credential or connectivity issues between n8n and Milvus.
  • Low relevance or off-topic answers
    Consider:
    • Reducing chunk size to create more granular vectors.
    • Storing and using metadata such as URL and paragraph index for filtering or re-ranking.
    • Increasing the number of retrieved neighbors per query.
  • Rate limits or API errors from OpenAI
    Address by:
    • Batching embedding requests.
    • Implementing retry with exponential backoff.
    • Monitoring usage against your OpenAI account limits.
  • HTML extraction misses or truncates content
    Improve the HTML Extract node by:
    • Refining CSS selectors to precisely target the article body.
    • Testing against several essays to ensure consistent extraction.

Example Scenarios

  • Interactive Q&A over Paul Graham essays
    Ask the AI Agent: “What does Paul Graham say about startups and product-market fit?”
    The agent queries Milvus, retrieves the most relevant essay chunks, and synthesizes a response grounded in those passages.
  • Internal research assistant
    Build an assistant that not only answers questions, but also cites the specific essay and paragraph where the information originated, using metadata stored in Milvus.
  • Automated periodic refresh
    Schedule the workflow to run periodically, detect newly added essays, and update the Milvus collection without manual intervention.

Implementation Best Practices

  • Always attach source metadata (URL, title, publication date, chunk index) to each embedded document to support provenance and debugging.
  • Maintain an audit trail of indexing runs, including counts of documents and embeddings, to track growth and diagnose issues.
  • Test on a small subset of essays with the Limit node before scaling to the full corpus, so you can tune chunking, embedding, and retrieval parameters safely.

Getting Started

To deploy this workflow in your environment:

  1. Clone or recreate the template in your n8n instance.
  2. Create a Milvus collection named n8n_test (or adjust the workflow to use your preferred collection name).
  3. Configure Milvus and OpenAI credentials in the n8n credentials manager.
  4. Execute the workflow to scrape and index the sample Paul Graham essays.
  5. Start a chat session with the AI Agent node and validate that responses are grounded in the indexed content.

Need assistance? If you require help setting up Milvus, tuning chunk sizes, or refining AI Agent prompts for your specific domain, feel free to reach out or leave a comment. Follow our blog for more patterns and templates focused on production-ready RAG workflows and n8n automation best practices.

How to Convert YouTube Videos into SEO Blog Posts

How to Convert YouTube Videos into SEO Blog Posts with n8n

Systematically transforming YouTube videos into long-form, search-optimized articles is one of the most efficient ways to scale content production. With a well-structured n8n workflow, you can automate transcript extraction, AI-assisted writing, image generation, and delivery of web-ready HTML, all while maintaining editorial control and SEO quality.

This guide explains how to implement and optimize an n8n workflow template that converts YouTube videos into SEO blog posts. It is written for automation professionals and content teams who want a repeatable, production-grade process rather than a one-off experiment.

Strategic Value of Converting YouTube Videos to Articles

Repurposing video into written content is not only a time saver, it is also a strategic SEO and distribution play. By operationalizing this workflow in n8n, you can:

  • Expand search visibility by turning spoken content into indexable text that ranks for long-tail and question-based queries.
  • Improve accessibility for readers who prefer text or rely on transcripts, including hearing-impaired users.
  • Increase content ROI by deriving multiple assets from a single recording, such as blog posts, social snippets, and gated resources.
  • Reach new audiences that rarely consume video but actively search and read blog content.

Automating this pipeline with n8n allows you to standardize quality, reduce manual effort, and integrate seamlessly with your existing content stack.

Architecture of the n8n Workflow

The n8n template implements a linear but configurable pipeline that starts from a YouTube URL and ends with an SEO-ready article and featured image delivered by email. At a high level, the workflow consists of:

  1. Variable initialization for input parameters.
  2. Transcript retrieval from YouTube via an external API.
  3. LLM-based content generation for the blog post.
  4. AI image generation for the featured visual.
  5. Markdown-to-HTML conversion for publishing readiness.
  6. Image download and email dispatch of the final assets.

Each stage can be adapted to your own APIs, models, and editorial standards, while the overall orchestration remains the same.

Key Nodes and Integrations in the Template

Input & Configuration: Set Variables

The workflow begins with a variable configuration step. This makes the automation reusable and easy to trigger from different sources, such as forms, webhooks, or scheduled jobs. Typical variables include:

  • YouTube Video URL – the canonical link to the source video that will be transcribed and converted.
  • Recipient Email Address – the destination mailbox for the generated HTML article and image assets.

By centralizing these values in a single node, you can parameterize the workflow for different teams, channels, or campaigns without modifying downstream logic.

Transcript Extraction: Get YouTube Transcript

The next phase is transcript acquisition. The template uses a transcript API such as Dumpling AI to fetch captions from the YouTube video. When configuring this node, consider the following:

  • Verify that captions or subtitles are available on the video. Auto-generated captions can be used but may require additional cleaning.
  • Specify the language if your channel publishes in multiple locales.
  • Optionally request timestamps if you plan to generate time-coded sections, show notes, or reference markers.

Ensuring transcript quality at this step significantly affects the accuracy and reliability of the generated article.

Content Generation: LLM-Powered Blog Post Creation

Once the transcript is retrieved and optionally pre-processed, the workflow passes it to a large language model. The template references GPT-4o, but any compatible LLM can be integrated through n8n’s HTTP or dedicated AI nodes.

The LLM node should be instructed to:

  • Analyze the transcript to identify the primary topics, narrative flow, and key arguments.
  • Structure the content into a coherent long-form article with clear H2 and H3 headings.
  • Generate an SEO-focused title and meta description, along with suggested keywords.
  • Produce output in Markdown for easy downstream conversion, or directly in HTML if your stack prefers it.

A concise example prompt used in the workflow is:

“Create a long-form, SEO-optimized blog post based on this transcript. Include a title, meta description, headings, introduction, body, conclusion, and suggested keywords. Keep tone informative and action-oriented.”

For production deployments, you should version and maintain prompt templates, enforce constraints such as word count, and explicitly instruct the model to remain faithful to the transcript to limit hallucinations.

Visual Asset Creation: Generate AI Image

To complete the blog package, the workflow generates a featured image using an AI image API. In the template, the FLUX.1-dev model is used, but you can substitute any compatible provider.

Best practices for this node include:

  • Use prompts that reflect the article’s theme and your brand’s visual language.
  • Favor relatively simple, abstract, or conceptual imagery that works across devices and layouts.
  • Standardize image dimensions and aspect ratios to match your CMS requirements.

The resulting image URL is then passed to subsequent nodes for download and attachment.

Formatting: Convert Markdown to HTML

Most content teams prefer to work with HTML for publishing, email review, or CMS ingestion. If the LLM output is in Markdown, the workflow uses a conversion node to transform it into HTML while preserving headings, lists, links, and emphasis.

This step ensures that the final article renders predictably across platforms and can be directly copied into your CMS or used as-is in automated publishing pipelines.

Delivery: Download Image & Send Email

AI-generated image URLs are frequently short-lived or tied to a specific session. To avoid broken assets, the workflow downloads the image and either attaches it to the outgoing email or stores it in your media library before sending a reference.

The email node then sends the compiled HTML article and the associated image to the configured recipient address. Typical recipients include:

  • Content editors for review and refinement.
  • A publishing mailbox or ticketing system for further processing.
  • Automation endpoints that trigger downstream workflows, such as CMS imports.

SEO Optimization Guidelines for Generated Articles

Automating content generation does not remove the need for SEO strategy. To ensure the resulting blog posts perform well in search, apply the following practices to your prompts and editorial review:

  • Define a primary keyword such as convert YouTube videos to blog posts and ensure it appears in the title, opening paragraph, at least one H2, and the meta description.
  • Leverage long-tail phrases that emerge naturally in the transcript, especially question-style queries that viewers might search for later.
  • Enforce scannable structure using clear H2/H3 headings, short paragraphs, and bullet lists to improve readability and on-page engagement.
  • Integrate internal and external links to related resources, documentation, or authoritative references.
  • Implement technical SEO such as Article schema, descriptive alt text for the generated image, and consistent URL and heading conventions.

Editorial Quality Control Checklist

Even with a robust automation pipeline, human oversight remains essential. Before publishing any AI-assisted article, validate it against a quality checklist:

  • Verify factual accuracy for names, dates, statistics, and product references mentioned in the transcript.
  • Refine the title and meta description to maximize click-through rate and alignment with your content strategy.
  • Ensure the tone, style, and terminology match your brand guidelines and target audience.
  • Check that any code snippets, quotes, or citations are correctly attributed and formatted.
  • Run a basic SEO and readability audit, including keyword placement, internal links, alt text, and heading hierarchy.

Position the n8n workflow as a high-quality first draft generator, with editorial review as a mandatory final step.

Troubleshooting and Reliability Considerations

Improving Transcript Quality

Transcription quality directly affects the coherence and accuracy of the generated article. If you observe issues such as misheard terms or fragmented sentences, consider:

  • Using a manually prepared caption file when available, rather than relying solely on auto-generated captions.
  • Adding a pre-processing step in n8n to normalize recurring mishearings using find-and-replace or simple text-cleaning logic.

Mitigating LLM Hallucinations

Large language models may introduce information that does not appear in the source transcript. To reduce this behavior within the workflow:

  • Explicitly instruct the model to only use facts contained in the transcript and avoid external assumptions.
  • Ask the model to flag statements it cannot verify and, where relevant, include timestamps from the transcript for easier human validation.

Aligning Generated Images with Brand Standards

If the AI-generated images do not align with your visual identity, iterate on your prompt templates or introduce brand constraints:

  • Specify color palettes, composition preferences, and subject matter in the prompt.
  • Use a brand-guided template that references logo placement, typography style, or recurring motifs.

Practical Applications of the Workflow

This n8n template is flexible enough to support a variety of content types and operational contexts. Common use cases include:

  • Product demos converted into detailed how-to guides, onboarding documentation, or help center articles.
  • Educational videos transformed into evergreen blog posts, course notes, or downloadable study materials.
  • Interviews and podcasts repurposed into long-form show notes, highlight summaries, or Q&A articles with timestamps.
  • Marketing webinars distilled into actionable recap posts, landing page copy, and CTA-driven content blocks.

By standardizing this workflow, teams can maintain consistent quality across a large volume of repurposed assets.

Example LLM Prompt Used in the Workflow

<!-- Example prompt sent to GPT-4o -->
"You are an experienced content writer. Use the transcript below to write a 1,000-1,500 word SEO-optimized blog post. Provide:
- a compelling title
- a meta description (max 160 chars)
- H2/H3 structured article
- target keywords
- short conclusion and CTA
Only use facts and content from the transcript. Indicate any statements you cannot verify with timestamps."

This prompt can serve as a baseline. In production, you may maintain multiple prompt variants for different content types, industries, or tones and select them dynamically in n8n based on metadata about the video.

Operational Takeaways

Automating the conversion of YouTube videos into SEO blog posts with n8n enables content teams to scale output without losing control over quality. The template discussed here implements a robust pipeline: capture the transcript, generate a structured article with an LLM, create a supporting image, convert to HTML, and deliver everything to your editorial inbox.

When combined with strong prompts, SEO-aware guidelines, and a disciplined review process, this workflow can become a core component of your content operations, driving more value from every video you publish.

Next Steps

If you are ready to operationalize video-to-article conversion, deploy this n8n workflow and connect it to your preferred transcript and LLM providers. Iterate on prompts, image styles, and editorial checks until the outputs match your standards.

For teams that need deeper customization, such as integration with specific CMS platforms or advanced prompt orchestration, consider extending the template or collaborating with automation specialists. You can also subscribe to ongoing tutorials and prompt libraries to keep improving performance over time.

© 2025 Content Automation Guide. All rights reserved.

Convert YouTube Videos into SEO Blog Posts

Convert YouTube Videos into SEO Blog Posts: Turn One Idea into Many

Every time you hit publish on a YouTube video, you create a powerful asset. But if that content lives only on YouTube, you are leaving visibility, traffic, and leads on the table. Imagine taking each video and effortlessly turning it into a polished, SEO-ready article that keeps working for you long after the video goes live.

In this guide, you will walk through a complete journey: from the challenge of doing everything manually, to a new mindset of automation, and finally to a practical, ready-to-use n8n workflow template. Along the way, you will see how a simple automated pipeline, powered by transcripts, AI models, and n8n, can free your time, amplify your reach, and help you focus on higher-value work.

The Problem: Great Content, Limited Reach

You pour effort into planning, recording, and editing your YouTube videos. Yet:

  • Search engines cannot fully understand your video content without text.
  • Some of your audience prefers reading or skimming, not watching a full video.
  • Your team spends hours manually transcribing, outlining, and drafting blog posts.

Manually turning each video into a blog post is possible, but it is slow and hard to scale. As your library grows, the gap between what you have created and what is actually discoverable gets wider.

The Possibility: A New Mindset Around Automation

Instead of seeing repurposing as another task on your to-do list, you can treat it as a system. With the right workflow in place, every new YouTube video can automatically trigger a repeatable process that:

  • Pulls the transcript.
  • Transforms it into an SEO-focused article.
  • Generates a featured image.
  • Delivers everything straight to your inbox or CMS.

This is where n8n comes in. By using an n8n workflow template, you turn scattered manual steps into a reliable pipeline. Instead of starting from scratch each time, you simply feed the workflow a YouTube URL and let automation handle the heavy lifting.

This shift is more than a time saver. It is a mindset change. You are not just creating content anymore, you are building a content engine.

The Solution: An Automated n8n Workflow Template

The workflow you will use in this guide is built around n8n, with AI services layered in where they add the most value. At a high level, the workflow:

  1. Accepts a YouTube video URL and configuration details.
  2. Fetches the transcript from a transcript API or YouTube captions.
  3. Sends the transcript to an AI writing model to create an SEO-optimized blog post.
  4. Generates a featured image using an AI image model.
  5. Converts the AI output from Markdown to HTML.
  6. Downloads the image and delivers everything via email or CMS.

The example template uses Dumpling AI for transcripts and images, and an OpenAI model for blog generation. You are free to swap in your preferred providers, but the structure and logic of the workflow remain the same.

What You Need Before You Start

Before you run the template, make sure you have access to the following:

  • An n8n instance, either cloud-hosted or self-hosted.
  • API access to a transcript service, or rely on YouTube captions. The template references Dumpling AI.
  • Access to an AI writing model such as the OpenAI GPT family or an equivalent model.
  • An account to generate images (optional). The workflow uses FLUX.1-dev via Dumpling AI.
  • A Gmail account or a CMS integration for delivering or publishing the final post.

Once these pieces are in place, you are ready to turn automation into a core part of your content workflow.

The Journey Through the Workflow

Step 1 – Set Your Variables and Make the Workflow Reusable

Begin with a variables node in n8n. This is where you define the inputs that will change from video to video, such as:

  • YouTube video URL
  • Recipient email address
  • Language or locale
  • Target keyword or topic focus

By centralizing these variables, you make the workflow easy to reuse, scale, and even batch-process multiple videos. Instead of editing nodes throughout the workflow, you adjust a few variables and run it again.

Step 2 – Pull the YouTube Transcript

Next, the workflow fetches the transcript. You can use:

  • A transcript API such as Dumpling AI, or
  • YouTube captions when available.

Make sure the video has captions enabled. Auto-generated captions are usually good enough as a starting point, but you may want to review them for accuracy, especially for technical or brand-specific terms. If you plan to create media-rich posts with timestamps and anchors, request timestamps from the transcript endpoint as well.

Step 3 – Turn the Transcript into an SEO Blog Post with AI

Now the transformation begins. The transcript is sent to an AI writing model, such as an OpenAI GPT model, with a clear prompt that guides the structure and SEO focus of the output. Strong prompts are the key to high-quality articles.

Make sure your prompt instructs the model to:

  • Identify and organize the main topics and themes from the transcript.
  • Create an SEO-friendly title and meta description.
  • Write a full article with a clear introduction, structured H2/H3 headings, and a conclusion.
  • Include suggested keywords, internal link ideas, and a recommended slug.
  • Return the content in Markdown format for easy conversion to HTML.

Here is an example snippet you can adapt in your workflow:

Analyze the transcript and write a 1,000-1,500 word SEO-optimized blog post. Include:
- A compelling SEO title (under 60 characters)
- Meta description (under 160 characters)
- H2/H3 headings, short paragraphs, and bullet lists where helpful
- Target keywords: [insert keywords]
- Suggested slug, featured image prompt, and 3 suggested internal links
Tone: informative and professional. Output in Markdown.

Once this step is in place, every new video can generate a consistent, on-brand blog post with minimal manual input.

Step 4 – Generate a Featured Image with AI

To complete the blog post, the workflow calls an AI image model, such as FLUX.1-dev via Dumpling AI, to create a featured image. You can use the image prompt suggested by the writing model or craft your own.

For best results, keep your prompts specific. For example:

  • Describe the scene, such as a YouTube play button transforming into a blog page.
  • Specify the style, like modern, minimal, or abstract.
  • Mention colors and key visual elements, such as SEO icons or subtle AI motifs.

This step gives each article a visual identity that aligns with your brand and topic, without needing a designer for every post.

Step 5 – Convert Markdown to HTML

Most AI writing models, including OpenAI, return content in Markdown. To make this usable in your CMS or email tool, add a Markdown-to-HTML converter node in your n8n workflow.

This node transforms headings, lists, links, and formatting into clean HTML that you can paste directly into your blog platform or send as part of an email template.

Step 6 – Download the Image and Prepare It for Use

AI image APIs often provide a temporary URL. To avoid broken images later, your workflow should:

  • Download the generated image.
  • Attach it to an email or upload it to your CMS, CDN, or cloud storage.

As part of this step, you can also standardize:

  • File names that include the post slug or main keyword.
  • Alt text that describes the image and, where appropriate, includes the target keyword.
  • Image sizes that match your website’s layout requirements.

Step 7 – Deliver or Publish the Final Post

Finally, the workflow brings everything together and delivers it to you in a ready-to-use format. Common options include:

  • Sending the HTML article, title, meta description, and featured image via Gmail for review.
  • Integrating directly with WordPress or a headless CMS to create a draft or publish automatically.

In this step, you can include:

  • The generated SEO title.
  • Meta description.
  • Suggested slug.
  • Featured image attachment or URL.

From here, your role shifts from manual creator to editor and strategist. You review, refine where needed, and hit publish.

Why This Workflow Matters for SEO and Growth

By turning YouTube videos into SEO-ready blog posts with n8n, you multiply the impact of each piece of content. Some key benefits include:

  • Boosted SEO visibility: Blog posts give search engines structured, crawlable content that can rank for long-tail queries related to your video topics.
  • Improved accessibility: Written articles and transcripts support readers who prefer text or are hearing-impaired.
  • Extended reach: You reach people who discover content through Google, newsletters, or social feeds instead of YouTube.
  • Higher content efficiency: One video can become a blog post, social snippets, email content, and more.
  • More leads and backlinks: Articles can include calls to action, gated resources, and internal links that drive conversions and engagement.

Instead of choosing between video or written content, you can have both, powered by one automated workflow.

SEO Best Practices for Your Generated Articles

Automation gives you a strong first draft, but good SEO still depends on smart structure and details. As you review and refine AI-generated posts, keep these guidelines in mind:

  • Titles and meta descriptions: Keep titles under 60 characters and meta descriptions under 160. Place your primary keyword near the beginning.
  • Clear headings: Use H2 for main sections and H3 for subsections. Integrate keywords naturally into headings without stuffing.
  • Keyword placement: Mention your primary keyword in the first 100 words and sprinkle related terms throughout the article.
  • Readable formatting: Use short paragraphs of 2 to 4 sentences, bullet lists, and subheadings to make the article easy to scan.
  • Image optimization: Give each image descriptive alt text and include your target keyword when it fits naturally.
  • Internal links: Add two or three links to related posts on your site to increase time on site and guide readers deeper into your content.
  • Schema and canonical tags: Add article schema markup and set canonical URLs if the content appears in multiple places.

With these practices, your automated posts will not only be fast to produce, they will also be positioned to perform well in search.

Prompting Tips to Get Better AI Output

The quality of what you get from the AI model depends heavily on what you put into it. To consistently generate strong blog posts, be specific about:

  • Audience: Who you are writing for, such as marketers, founders, or developers.
  • Tone: For example, professional, friendly, or in-depth technical.
  • Structure: Ask explicitly for an introduction, H2/H3 sections, conclusion, and a call to action.
  • SEO details: Provide a short list of target keywords and ask for a meta description, suggested slug, and featured image prompt.
  • Extras: Request 2 to 3 suggested internal links and ask for the output in Markdown.

Do not hesitate to iterate. If the first result is not quite right, refine your prompt, run it again, or generate the article section by section.

Troubleshooting and Common Issues

As you scale your automated workflow, you may encounter a few recurring challenges. Here is how to handle them:

  • No transcript available: If a video does not have captions, use a transcription service on the audio file or request permission to use an uploaded transcript.
  • Unsatisfying AI output: Tighten your prompt with clearer constraints, ask for an outline first, or generate the introduction and key sections separately.
  • Expiring image URLs: Always download the image immediately and store it on your own CDN, CMS, or storage bucket to prevent broken images.
  • API rate limits: Monitor usage and implement retries, batching, or scheduling to keep high-volume runs stable.

These small adjustments help you turn a good workflow into a robust, production-ready system.

Real-World Use Cases for This Template

This n8n workflow template is flexible enough to support many content strategies. A few practical examples include:

  • Podcast episodes on YouTube: Automatically generate show notes and long-form blog posts for each episode.
  • Product demos: Turn demo videos into how-to guides, onboarding content, and documentation.
  • Webinars: Break long webinars into multiple SEO articles, resource hubs, or downloadable summaries.

Once your workflow is set up, adding a new use case is often just a matter of tweaking prompts and variables.

Your Next Step: Turn This Template Into Your Content Engine

Converting YouTube videos into SEO blog posts with n8n is more than a clever hack. It is a way to scale your impact without scaling your workload. You increase visibility, improve accessibility, and get more value from every piece of content you create.

Instead of spending hours on repetitive tasks, you invest a bit of time up front to set up an automation that keeps paying off. Over time, this becomes a foundation for a more focused, strategic workflow where you spend your energy on ideas, not on copy-pasting.

Ready to start? Use the n8n template, connect your API keys, and run your first video through the workflow. From there, iterate, customize it for your CMS or brand voice, and keep improving it as you learn.

Call to action: Try the template today or download the workflow to automate your content repurposing. If you need a custom integration or want help tailoring the prompts and delivery to your stack, reach out for a consultation.

Pro tip: Always review AI-generated content for factual accuracy, nuance, and brand voice before publishing. Automation gives you leverage, your judgment keeps the quality high.

High-Protein Breakfast: Science-Backed Benefits


High-Protein Breakfast: Science-Backed Benefits

High-Protein Breakfast: Science-Backed Benefits

If you’ve ever grabbed a sugary pastry in the morning and crashed by 10 a.m., you’re not alone. The good news is that a small shift in your first meal of the day can change a lot. A high-protein breakfast is one of those simple habits that pays off in appetite control, energy, body composition, and overall metabolic health. Let’s walk through what that actually means in real life, what the science says, and how to put it into practice without overcomplicating your mornings.

What counts as a high-protein breakfast?

When people talk about a “high-protein breakfast,” they’re usually referring to a meal where protein is a major player, not a tiny side note. For most adults, that means aiming for roughly 20 to 40 grams of protein in the morning.

You can hit that range with a lot of different foods, for example:

  • Eggs or egg-based dishes
  • Dairy like Greek yogurt or cottage cheese
  • Lean meats such as chicken, turkey, or smoked salmon
  • Plant-based options like tofu, tempeh, or legumes
  • A well-formulated protein shake or smoothie

Your ideal amount depends on things like your age, body size, activity level, and goals, whether that is weight loss, muscle gain, or better blood sugar control. You do not have to hit a “perfect” number on day one. Think of 20 to 40 grams as a helpful range, not a strict rule.

Why protein at breakfast matters so much

So why focus on protein at breakfast instead of just getting enough by the end of the day? Research suggests that front-loading protein in the morning can have some unique advantages. Here are the main mechanisms at work, in plain language.

  • Appetite regulation: Protein helps you feel full and stay full. It influences hunger hormones and boosts satiety, which often means fewer random snacks and smaller portions later in the day.
  • Muscle protein synthesis (MPS): Your muscles need amino acids regularly, not just at dinner. A solid dose of protein in the morning supports muscle maintenance and growth, especially if you lift weights or do resistance training.
  • Glycemic stability: When you pair protein with carbs, it slows down digestion and smooths out blood sugar spikes. That can help you avoid mid-morning crashes and wild energy swings.
  • Higher thermic effect: Your body uses more energy digesting protein than it does digesting carbs or fats. It is not a magic fat burner, but it does slightly increase daily energy expenditure.

Key benefits you will actually notice

Let’s connect the science to what you might feel in your day-to-day life. Here are the main benefits people tend to experience when they consistently eat a high-protein breakfast.

1. Easier appetite control and fewer cravings

If you find yourself raiding the snack drawer by 11 a.m., this is where protein shines. Studies repeatedly show that a higher-protein breakfast can:

  • Reduce hunger later in the morning
  • Lower overall calorie intake across the day
  • Cut down on mindless snacking and oversized lunches

Instead of trying to “willpower” your way through cravings, you are using biology to your advantage. That makes sticking to a calorie target or general healthy eating pattern feel much more manageable.

2. Better support for muscle maintenance and growth

Muscle is not just for athletes. It supports your metabolism, strength, and long-term health. A protein-rich breakfast helps provide the amino acids your body needs to:

  • Preserve lean mass during weight loss
  • Support muscle growth when combined with resistance training
  • Combat age-related muscle loss, which is especially important as you get older

Instead of loading most of your protein at dinner, spacing it across the day, including breakfast, is often recommended to keep muscle protein synthesis humming along.

3. More stable blood sugar and energy

If your mornings feel like a roller coaster of “wired then wiped,” your breakfast might be mostly carbs with very little protein. Adding protein can:

  • Slow gastric emptying so glucose enters the bloodstream more gradually
  • Reduce sharp blood sugar spikes and dips
  • Help you feel more steady, focused, and less driven by sudden hunger

This can be especially helpful if you have insulin resistance or are actively watching your blood sugar, but many people notice better concentration and fewer energy crashes simply from rebalancing their first meal.

4. Sharper focus and mental performance

It is not just about your body. A steadier energy supply and more stable blood sugar can support clearer thinking. Some research and plenty of real-world experience suggest people feel:

  • More alert in the morning
  • Less distracted by hunger
  • More able to focus on work or study

In other words, a protein-rich breakfast can quietly set you up for a more productive day.

5. Long-term support for body composition and metabolic health

Over the long haul, consistently eating enough high-quality protein at breakfast can help you:

  • Maintain or build lean muscle mass
  • Support a healthier metabolic rate
  • Improve functional strength and overall physical resilience

When you pair this habit with regular exercise and an overall balanced diet, it fits neatly into a broader strategy for better body composition and long-term health markers.

How much protein should you aim for in the morning?

Let’s get more specific. A practical target for most adults is about 20 to 40 grams of protein at breakfast.

Here is a simple way to think about it:

  • 20 to 25 grams: Often enough for younger, smaller, or less-active adults.
  • 30 to 40 grams: Often better for larger individuals, athletes, or older adults who want to maximize muscle protein synthesis and satiety.

If you are new to tracking protein, you do not need a food scale to start. Use rough estimates (like the sample meals below), pay attention to how full you feel, and adjust based on your hunger, activity, and goals.

Simple strategies to build a high-protein morning routine

You do not need a gourmet kitchen or an extra hour in the morning to make this work. Here are some practical ways to weave a high-protein breakfast into a busy schedule.

  • Start with whole-food proteins: Eggs, Greek yogurt, cottage cheese, lean chicken or turkey, smoked salmon, tofu, and tempeh give you protein plus vitamins, minerals, and healthy fats.
  • Build a balanced plate: Add fiber-rich veggies, whole grains, or fruit to your protein to keep you full longer and boost overall nutrient quality.
  • Prep ahead when you can: Make a batch of egg muffins, overnight oats with added protein, or yogurt parfait jars so mornings are grab-and-go instead of stressful.
  • Use protein powders strategically: A quality whey, casein, or plant-based blend can be a lifesaver on hectic days. It is not mandatory, just a convenient tool.
  • Time it with your training: If you work out in the morning, aim for a protein-containing meal or shake within a couple of hours of exercise to support recovery and muscle repair.

Easy high-protein breakfast ideas you can use tomorrow

Need some inspiration to get started? Here are straightforward, high-protein breakfast ideas that work well for busy mornings.

  • Three-egg omelet with veggies and toast: Use three eggs with spinach and mushrooms, and add a slice of whole-grain toast. Eggs give you complete protein, and you can swap in any vegetables you like.
  • Greek yogurt parfait: Fill a bowl or jar with Greek yogurt, then top with berries, a handful of nuts, and a spoonful of nut butter. It is quick, portable, and packs a solid protein punch.
  • Protein smoothie: Blend protein powder with frozen berries, a handful of greens, and unsweetened milk or water. Ideal if you need something you can drink on the go.
  • Cottage cheese bowl: Pair cottage cheese with sliced tomato and avocado for a savory option, or with pineapple for a sweet-salty combo.
  • Tofu scramble with vegetables: Crumble tofu and cook it with your favorite veggies for a plant-based scramble, and serve with whole-grain toast or a small baked sweet potato.

Common questions about high-protein breakfasts

Will a high-protein breakfast make me gain weight?

Protein itself does not automatically lead to weight gain. In fact, because it increases fullness, a higher-protein breakfast often helps people eat fewer calories overall throughout the day.

Weight change ultimately comes down to your total daily calorie intake and activity level. A high-protein breakfast can support weight loss or maintenance when it helps you:

  • Feel satisfied longer
  • Reduce overeating later in the day
  • Maintain muscle while losing fat

Is animal protein better than plant protein in the morning?

Both can work well, so it mostly depends on your preferences and dietary pattern.

  • Animal proteins like eggs, dairy, and meat typically contain all essential amino acids in higher concentrations, which can be helpful for muscle building and repair.
  • Plant proteins such as tofu, tempeh, legumes, and combinations of grains and seeds can also meet your needs when portions and variety are planned thoughtfully.

If you are plant-based, just be a bit more intentional about combining sources and getting enough total protein, and you can absolutely enjoy the same benefits.

How to track your progress without obsessing over numbers

You do not have to micromanage every gram of protein to know whether this habit is helping. Focus on real-life outcomes that matter to you. Useful signs of progress include:

  • Less mid-morning hunger and fewer emergency snacks
  • Better workout recovery and strength gains over several weeks
  • More stable energy with fewer sugar crashes
  • Gradual changes in body composition, if that is one of your goals

Checking in on these areas every week or two can tell you a lot more than staring at a nutrition tracker all day.

A simple 7-day high-protein breakfast experiment

If you are curious but not sure where to start, try this as a low-pressure experiment: commit to a protein-focused breakfast for seven days.

Here is how to approach it:

  • Pick 2 or 3 of the sample breakfasts above that sound appealing.
  • Rotate them through the week so you are not eating the same thing every day.
  • Pay attention to hunger, energy, focus, and workout recovery during the week.

At the end of the seven days, ask yourself: Do I feel less hungry mid-morning? Am I snacking less? Do I feel more steady and focused? If the answer is yes to even one of those, it is a strong sign this habit is worth keeping.

Conclusion: Make your first meal work for you

A high-protein breakfast is a simple, science-backed way to support appetite control, muscle maintenance, blood sugar stability, and daily energy. It is flexible enough to fit into almost any eating style, from omnivorous to fully plant-based, and it works best alongside regular resistance training and an overall balanced diet.

You do not need perfection. Start small, lean on whole-food protein sources, and use a bit of planning or prep to make your mornings smoother. Over time, this one habit can quietly support better health from the moment you wake up.

Call to action: Want a free 7-day high-protein breakfast plan and shopping list to make this even easier? Sign up for our newsletter or download the printable meal guide and jumpstart better mornings today.


Deep Research + RAG in n8n: Build a Knowledge Pipeline

Deep Research + RAG in n8n: Build a Knowledge Pipeline That Thinks With You

If you ever find yourself sinking an afternoon into “just a bit of research,” this one’s for you. Retrieval-Augmented Generation (RAG) paired with n8n can turn those messy, ad-hoc deep dives into a clean, repeatable research pipeline. Think of it as a research assistant that never gets tired, remembers everything, and hands you a polished report at the end.

In this walkthrough, we will unpack what this Deep Research + RAG workflow in n8n actually does, when you should use it, and how all the pieces fit together. We will also go step by step through the main stages so you can adapt the template to your own stack.

What this n8n Deep Research + RAG template actually does

At a high level, this workflow takes a question or topic, runs a deep research process behind the scenes, and delivers a structured, sourced report back to you. Along the way it also builds a reusable “second brain” of knowledge you can query later.

Here is what happens under the hood:

  • You send a research request (for example over Telegram).
  • n8n triggers the workflow and validates what kind of request it is.
  • The workflow calls search APIs such as Tavily or your own custom search to gather relevant sources.
  • Content is chunked, embedded with an embeddings model like OpenAI, and stored in a Supabase vector database.
  • RAG retrieval pulls the most relevant chunks back out and feeds them into LLM nodes (DeepSeek, OpenAI, etc.) for synthesis.
  • The workflow assembles a structured report, logs it to Google Sheets, generates HTML and a PDF, and sends it back to you on Telegram or by email.

The result: a repeatable deep research pipeline that turns a simple question into a traceable, source-backed knowledge artifact.

When to use n8n + RAG for deep research

This template shines whenever you need more than a quick one-line answer. It is a great fit if you:

  • Regularly produce long-form research reports, briefs, or deep dives.
  • Want every answer to be backed by verifiable sources, not just model guesses.
  • Need a “second brain” that stores both raw sources and final summaries in a searchable way.
  • Work with a mix of tools like Supabase, Google Sheets, Telegram, PDFs, and LLM APIs.

Research teams, content studios, knowledge managers, and product teams all benefit from this type of workflow. The ROI comes from faster report creation, consistent structure, and a growing knowledge base that you can reuse instead of starting from scratch each time.

How the deep research pipeline is structured

The template is built around a simple idea: separate each part of the research process into clear stages, then let n8n orchestrate the flow.

Core building blocks

  1. Trigger & input acquisition – For example a Telegram trigger or webhook that captures the user’s request.
  2. Search & retrieval – External search APIs such as Tavily or your own data sources.
  3. Embeddings & vector storage – OpenAI (or another embeddings provider) plus Supabase as the vector database.
  4. LLM orchestration – Structured LLM chains using DeepSeek, OpenAI, or other models.
  5. “Second brain” storage – Google Sheets and Supabase for human-friendly logs and machine-friendly indexes.
  6. Delivery & exports – HTML generation, PDF conversion, and Telegram or email delivery.

Data flow at a glance

Here is how information moves through the workflow from question to final report:

  • The user sends a topic or question. The Telegram Trigger node (or webhook) receives it.
  • Validation logic checks what kind of request it is, for example “deep research report” vs “quick answer.”
  • Search nodes call Tavily or other APIs to pull in URLs, snippets, and content.
  • Content is normalized, de-duplicated, and split into chunks ready for embedding.
  • Embedding nodes create vector representations and store them in a Supabase table with rich metadata.
  • Retrieval queries Supabase for the most similar chunks to the user’s question.
  • LLM nodes run a chain of prompts to propose sections, write the report, and summarize sources.
  • Final outputs are logged to Google Sheets, turned into HTML and PDF, then sent back to the requester.

By the end, you have both a nicely formatted report and a persistent record of what was searched, what was used, and where it came from.

Deep dive into the main components

1. Trigger and input handling

Everything starts with a trigger. In this template, you typically use a Telegram Trigger node, but a webhook works just as well if you want to integrate with other apps.

Right after the trigger, you add filters or a Switch node to route different request types. For deep research flows, you might look for phrases like “deep research report” or “long-form” in the incoming text.

Why bother with early validation? It keeps your costs under control and avoids unnecessary API calls. If the request does not match your deep research pattern, you can send a quick reply instead of running the full pipeline.

2. Retrieval layer with Tavily and search APIs

Once you know you are handling a deep research request, the workflow moves into the retrieval layer.

  • An HTTP Request node calls Tavily or another search endpoint.
  • The API returns a list of results such as URLs, titles, snippets, and possibly full content.
  • n8n parses these results into a consistent JSON structure so later nodes do not have to guess field names.
  • Duplicate or near-duplicate results are removed, then content is prepared for chunking.

You can also combine multiple sources here, such as:

  • Web search via Tavily or similar APIs.
  • Your own internal document store or knowledge base.
  • Other APIs that expose structured data.

By tweaking search depth and chunk size, you can balance between coverage and noise. Deeper search and smaller chunks usually improve recall but will use more tokens and storage.

3. Embeddings and Supabase vector store

Next comes the embeddings layer, which is what makes RAG possible in the first place.

The basic steps:

  • Split each document into chunks, often in the range of about 500 to 1,000 tokens, using semantic boundaries such as paragraphs or sections.
  • Send those chunks to an embeddings provider such as OpenAI.
  • Store the resulting vectors in a Supabase table along with metadata like:
    • URL or document ID
    • Title and snippet
    • Original text content
    • Timestamp and query that produced it

Why store embeddings instead of recomputing them every time? Two big reasons:

  • Cost – You avoid paying for the same embeddings repeatedly.
  • Speed – Retrieval from a vector store is much faster than re-embedding large volumes of text.

With vectors saved in Supabase, you can run fast cosine similarity queries whenever a new research question comes in and immediately reuse your existing knowledge base.

4. LLM orchestration with chains, not just one prompt

Instead of throwing everything at a single giant prompt, this workflow uses modular LLM chains. That means multiple smaller, focused steps, each with a clear job.

Typical stages in the chain include:

  • Proposing sub-topics or research angles based on the original question.
  • Drafting a strong introduction that sets context and scope.
  • Writing individual sections, each grounded in the retrieved sources.
  • Compiling a list of references or source summaries.
  • Generating a conclusion that ties everything together.

This approach gives you several advantages:

  • You can re-run a single step, such as “rewrite the conclusion,” without regenerating the entire report.
  • Each step is easier to debug and audit because you see exactly which prompt produced which output.
  • You can swap models or prompts for specific stages without breaking the whole chain.

In n8n, you can implement these chains using LLM nodes connected in sequence, with clear instructions and, where useful, a few-shot example or two for more consistent style.

5. Second-brain storage with Google Sheets and Supabase

One of the most powerful parts of this setup is that it does not just give you a one-off answer. It builds a persistent knowledge pipeline.

The template uses a dual storage pattern:

  • Google Sheets for human-readable logs and reports.
    • Store the final report text.
    • Log source URLs and key metadata.
    • Track when a report was generated and by whom.
  • Supabase for machine-readable indexes and embeddings.
    • Store vectors and raw chunks for RAG retrieval.
    • Keep metadata like retrieval scores and timestamps.

Sheets give your team a familiar place to browse, comment, and review. Supabase gives you a robust retrieval backbone that LLMs can use to stay grounded in actual data.

6. Delivery and export: HTML, PDF, Telegram

After the LLM chain finishes, the workflow still has a bit of work to do: turning the text into a nice deliverable and getting it to the right person.

Typical steps:

  • Convert the report into a styled HTML document.
  • Use a PDF conversion API such as PDFShift or wkhtmltopdf to turn that HTML into a shareable PDF.
  • Send the PDF back to the requester via Telegram or email.
  • Store a copy of the PDF in your knowledge base so it is easy to find later.

The end user just sees a clean, formatted report show up in their chat or inbox, while all the complexity stays safely hidden inside n8n.

Step-by-step: building or customizing the workflow in n8n

Let us walk through the main build steps so you can adapt the template to your own environment.

Step 1 – Set up triggers and routing

  • Add a Telegram Trigger node or a webhook trigger in n8n.
  • Use a Filter or Switch node to detect deep research requests by keywords such as “deep research report” or “long-form.”
  • Route non-research messages to a lighter, cheaper response path if needed.

Step 2 – Fetch sources via search APIs

  • Add one or more HTTP Request nodes to call external search providers like Tavily.
  • Normalize the results into a consistent JSON schema, for example:
    • title
    • url
    • snippet
    • content
  • Optionally query both web search and internal document stores to broaden your coverage.

Step 3 – Split content and create embeddings

  • Implement a text-splitting step that chunks content into roughly 500 to 1,000 token segments, using semantic boundaries where possible.
  • Send each chunk to an embeddings provider such as OpenAI.
  • Store the resulting vectors plus metadata in a Supabase vector table.

Make sure you save provenance information like the original URL and title so you can reference sources directly in your final report.

Step 4 – Retrieve and assemble context for the LLM

  • When you are ready to write the report, query Supabase for the top N nearest neighbors to the current question or sub-topic.
  • Combine those retrieved chunks into a context window for your LLM nodes.
  • Attach source attribution tags so the LLM can mention where each fact came from.

This is the R in RAG: retrieval. Instead of relying purely on the model’s training data, you give it fresh, relevant context from your own vector store.

Step 5 – Run the LLM synthesis chain

  • Define a sequence of LLM nodes that:
    • Propose sub-research areas or a table of contents.
    • Generate an introduction.
    • Write each section using the retrieved context.
    • Compile a source list with links and descriptions.
    • Produce a conclusion and optional executive summary.
  • Keep prompts explicit and clear about style, citations, and length.
  • Use few-shot examples if you want consistent tone or formatting.

Step 6 – Store, export, and distribute

  • Write the final report and key metadata to Google Sheets for easy review.
  • Generate an HTML version of the report.
  • Convert HTML to PDF using a conversion API such as PDFShift or wkhtmltopdf.
  • Send the PDF back to the original requester via Telegram or email.
  • Log the PDF and related metadata to Supabase so you can reuse it later.

Best practices for a reliable n8n RAG workflow

Once the basic pipeline is working, a few tweaks can make it much more robust and cost efficient.

  • Log rich metadata Always store source URL, retrieval score, timestamp, and original query. This gives you an audit trail and makes debugging much easier.
  • Chunk on semantic boundaries Split by paragraphs or sections instead of arbitrary character counts. It usually improves retrieval quality and makes the LLM’s job easier.
  • Cache intermediate results Save embeddings, search results, and partial outputs so repeat or similar queries are faster and cheaper.
  • Keep context tight Do not overload the LLM with every chunk you have. Use retrieval to keep the prompt concise and focused on the most relevant pieces.
  • Design for modularity Structure your chain so you can re-run one piece, like “rewrite the introduction,” without rebuilding the whole report.

Security, privacy, and compliance

Because this workflow touches APIs and potentially sensitive data, it is worth setting up guardrails from day one.

  • Store API keys for OpenAI, Tavily, Supabase, and others using n8n credentials and environment variables, not hardcoded in nodes.
  • Avoid storing sensitive personal data

Build a Deep Research Agent with n8n, OpenAI, and Perplexity

Build a Deep Research Agent with n8n, OpenAI, and Perplexity

This guide describes how to implement a Deep Research Agent in n8n that connects a Telegram bot to an AI Agent node. The workflow integrates OpenAI for natural language generation and Perplexity Sonar / Sonar Pro for information retrieval and research. The result is a Telegram-based assistant that returns concise, source-backed answers directly to end users.

1. Solution Overview

The Deep Research Agent is an n8n workflow that:

  • Receives user questions from Telegram
  • Optionally validates and filters incoming requests
  • Uses Perplexity Sonar for fast lookups and Perplexity Sonar Pro for deeper multi-source research
  • Uses OpenAI to synthesize a structured answer with citations
  • Sends the final response back to the user via Telegram

This pattern is particularly useful for research-heavy roles such as product teams, journalists, researchers, and knowledge workers who need rapid answers with traceable sources, without building a custom backend.

2. Workflow Architecture

At a high level, the workflow follows this sequence of nodes:

  • Telegram Trigger – Ingests user messages from a Telegram bot
  • Filter – Optionally restricts access and validates input
  • AI Agent – Central orchestrator that decides when and how to use tools
  • Window Buffer Memory – Maintains short-term conversation context
  • Perplexity Sonar – Fast retrieval for quick facts and simple queries
  • Perplexity Sonar Pro – Deep research across multiple sources
  • OpenAI Chat Model – Generates the final answer text with citations
  • Telegram (send) – Returns the response to the user

The AI Agent node coordinates calls to the Perplexity tools and the OpenAI Chat Model, using the Window Buffer Memory node to provide conversational context. The Telegram nodes handle inbound and outbound communication.

3. Node-by-Node Breakdown

3.1 Telegram Trigger

The Telegram Trigger node is responsible for receiving messages sent to your Telegram bot.

  • Trigger mode: configure either webhook or polling, depending on your n8n deployment and network constraints.
  • Chat filtering: optionally specify a chat ID if the workflow should only react to a particular chat or group.
  • Security: combine with the Filter node to restrict usage to specific user IDs or commands.

Typical configuration steps in n8n:

  • Attach Telegram credentials using the bot token obtained from @BotFather.
  • Choose the update types you want to receive (for this use case, standard text messages are sufficient).
  • Ensure your n8n instance is reachable if you use webhooks.

3.2 Filter Node

The Filter node (or an equivalent conditional node) is used to gate access and validate the incoming payload before the AI Agent is invoked.

Common checks include:

  • User authorization: allow only specific Telegram user IDs or groups.
  • Command routing: process messages that start with commands such as /research or /summarize, and ignore others.
  • Input validation: reject empty messages or malformed requests (for example, messages below a minimum length).

In practice, this node should output only valid, authorized requests to the AI Agent node. For rejected requests, you can either drop them silently or respond with a brief error message via a separate Telegram send branch.

3.3 AI Agent (Central Orchestrator)

The AI Agent node is the core of the workflow. It orchestrates:

  • OpenAI Chat Model – for language generation and answer composition
  • Window Buffer Memory – for short-term conversation history
  • Perplexity Sonar and Perplexity Sonar Pro – as external research tools

Key responsibilities of the AI Agent:

  • Interpret the user query and determine whether a quick lookup or deep research is needed.
  • Call Perplexity Sonar for short, fact-based questions.
  • Call Perplexity Sonar Pro when the query requires multi-source synthesis, comparison, or more in-depth analysis.
  • Pass retrieved snippets and source URLs into the OpenAI Chat Model for final synthesis.
  • Use Window Buffer Memory to maintain context for follow-up questions.

The AI Agent node can be configured with tool usage rules that encode this decision logic. It effectively acts as a tool-using agent that chooses between Sonar and Sonar Pro based on the query type.

3.4 Perplexity Sonar and Sonar Pro

Both Perplexity tools are integrated as dedicated nodes in the workflow and are accessed via a Perplexity API key.

Perplexity Sonar

  • Optimized for quick lookups and .
  • Useful for definitions, simple factual questions, and concise summaries.
  • Typically returns a small set of sources, often suitable when a single or limited number of citations is enough.

Perplexity Sonar Pro

  • Designed for deeper research and multi-source synthesis.
  • Appropriate for market research, competitor analysis, academic-style overviews, and structured extraction tasks.
  • Returns richer, more comprehensive results that can be combined into longer, more nuanced answers.

In the AI Agent configuration, you can encode rules such as:

  • Short, fact-oriented queries → Sonar
  • Comparisons, analyses, or broad-topic research → Sonar Pro

3.5 Window Buffer Memory

The Window Buffer Memory node maintains a sliding window of recent messages to provide conversational context to the AI Agent and OpenAI Chat Model.

  • Configure it to store the last N messages (for example, 6 recent interactions).
  • Include both user messages and assistant responses to preserve the dialogue.
  • Attach it to the AI Agent so that follow-up questions can reference earlier parts of the conversation.

This is particularly important for multi-turn queries where users refine their questions or ask for clarification.

3.6 OpenAI Chat Model

The OpenAI Chat Model node is responsible for transforming raw retrieved content into a coherent, well-structured answer.

  • Input: snippets and source URLs from Perplexity Sonar / Sonar Pro, plus contextual prompts and memory.
  • Output: a concise answer, typically 3 to 6 short paragraphs, with clickable citations.
  • Controls: temperature, maximum tokens, and other generation parameters for precision vs creativity.

The node should be configured with a system prompt that clearly instructs the model to use only retrieved information and to include explicit citations.

3.7 Telegram (send) Node

The final Telegram node sends the synthesized answer back to the user.

  • Use the same Telegram credentials as the Trigger node.
  • Map the chat ID from the incoming message to ensure the response is routed to the correct user or group.
  • Format the answer text to include clickable links for sources, consistent with Telegram’s supported formatting (for example, Markdown or HTML modes, depending on your preference and configuration).

4. Configuration & Setup Steps

4.1 Create a Telegram Bot

  1. Open Telegram and start a conversation with @BotFather.
  2. Create a new bot and follow the prompts.
  3. Copy the generated API token, which you will use later in n8n Telegram credentials.

4.2 Prepare n8n Environment

  1. Install n8n locally or use a hosted instance, depending on your infrastructure requirements.
  2. In the workflow editor, add the following nodes:
    • Telegram Trigger
    • Filter (or equivalent conditional node)
    • AI Agent
    • OpenAI Chat Model
    • Window Buffer Memory
    • Perplexity Sonar
    • Perplexity Sonar Pro
    • Telegram (send)
  3. Connect the nodes in this order:
    • Telegram Trigger → Filter → AI Agent → Telegram (send)

    Within the AI Agent configuration, attach:

    • Window Buffer Memory
    • Perplexity Sonar
    • Perplexity Sonar Pro
    • OpenAI Chat Model

4.3 Add Required API Credentials

In n8n’s credentials section, configure:

  • OpenAI:
    • Set your OpenAI API key.
    • Reference it from the OpenAI Chat Model node.
  • Perplexity:
    • Set your Perplexity API key.
    • Use it in both Perplexity Sonar and Perplexity Sonar Pro nodes.
  • Telegram:
    • Use the bot token from @BotFather to create Telegram credentials.
    • Attach these credentials to both Telegram Trigger and Telegram (send) nodes.

4.4 Configure AI Agent Tool Logic

Within the AI Agent node:

  • Define when to call Perplexity Sonar vs Sonar Pro. Example rules:
    • If the user asks for a definition, quick fact, or short summary → use Sonar.
    • If the user requests multi-source comparisons, market analysis, or broad-topic overviews → use Sonar Pro.
  • Ensure that all retrieved source URLs and relevant snippets are passed as input to the OpenAI Chat Model node.
  • Connect the Window Buffer Memory node to the Agent so that it can retrieve recent conversation context.

4.5 Prompt Template Design

Craft clear, concise prompts for the OpenAI Chat Model. A typical system prompt might look like:

"You are a research assistant. Given retrieved snippets and source links, produce a concise answer (3-6 short paragraphs) and include clickable source citations."

Guidelines for prompt configuration:

  • Explicitly instruct the model to rely on the provided snippets and sources.
  • Specify the desired length and structure of the answer.
  • Require inclusion of source URLs in a consistent citation format.

4.6 Testing and Iteration

After initial configuration:

  • Send a range of queries via Telegram to verify:
    • Filter node behavior and access control.
    • Correct routing between Sonar and Sonar Pro based on query type.
    • That Perplexity returns expected sources and Sonar Pro provides comprehensive results.
  • Adjust OpenAI parameters:
    • Lower temperature for more deterministic, research-focused answers.
    • Adjust maximum tokens to balance completeness with cost.
  • Iterate on prompts to improve clarity, citation quality, and answer style.

5. Best Practices & Operational Considerations

  • Rate limiting:
    • Implement per-user or global rate limits to avoid excessive API usage.
    • Use conditional logic or additional nodes to enforce throttling if necessary.
  • Caching:
    • Cache frequently requested answers to reduce latency and API costs.
    • Consider caching by normalized query text.
  • Citation formatting:
    • Define a consistent citation style (for example, numbered links at the end or inline links).
    • Ensure source URLs are always included for traceability and verification.
  • Logging and auditing:
    • Log queries and responses securely for quality monitoring and prompt tuning.
    • Avoid logging sensitive data in plain text where not required.
  • Cost monitoring:
    • Track API usage for both OpenAI and Perplexity.
    • Prefer Sonar for lightweight queries and reserve Sonar Pro for high-value, deep research requests.

6. Common Use Cases

This Deep Research Agent template can support multiple workflows:

  • Journalism:
    • On-demand research summaries, background checks, and quick fact validation.
  • Product management:
    • Competitor one-pagers, feature comparisons, and market snapshots.
  • Academic research:
    • High-level literature scans and topic overviews for initial exploration.
  • Customer support:
    • Knowledge lookups across documentation, FAQs, and public web sources.

7. Troubleshooting & Edge Cases

7.1 Perplexity Returns Incomplete Sources

If Sonar or Sonar Pro returns limited or incomplete sources:

  • Increase the depth or coverage settings in Sonar Pro if available in your configuration.
  • Run multiple Sonar queries with slightly different phrasings of the question.
  • Verify that your Perplexity API key is valid and has the required access level for Sonar Pro.

7.2 OpenAI Responses Contain Hallucinations

To reduce hallucinations in OpenAI answers:

  • Always pass the relevant retrieved snippets and URLs to the OpenAI Chat Model node.
  • Reinforce in the system prompt that the model should:
    • Rely on the provided sources.
    • Avoid speculating beyond the retrieved information.
    • Indicate when information is not available.
  • Lower the temperature setting to prioritize factual consistency over creativity.
  • Emphasize a “source-first” approach in the prompt, instructing the model to base its answer strictly on the retrieved content.

7.3 Excessive API Calls or High Cost

If you observe too many API calls

Deep Research Agent n8n Template Guide

Deep Research Agent n8n Template Guide

The Deep Research Agent template is a production-ready n8n workflow that combines Telegram automation with AI-powered research using OpenAI and Perplexity Sonar / Sonar Pro. This reference guide explains the workflow architecture, node configuration, data flow, and operational considerations so you can deploy a robust research assistant with minimal trial and error.

1. Overview

At a high level, the Deep Research Agent template listens for incoming Telegram messages, filters which requests should be processed, then passes valid queries into an AI Agent node that is connected to:

  • An OpenAI Chat Model for natural language reasoning and response generation
  • A window buffer memory node for short-term conversational context
  • Perplexity Sonar and Perplexity Sonar Pro tools for external web research

The AI Agent decides whether to use Sonar or Sonar Pro based on the query characteristics, aggregates and interprets the research results with the LLM, and finally returns a formatted answer to the user via Telegram.

2. Architecture & Data Flow

The workflow is organized as a linear entry pipeline from Telegram into a branching research layer, followed by a unified response stage:

  1. Telegram Trigger node receives user messages via webhook.
  2. Filter node applies authorization or message-level rules (for example, allowed chat IDs).
  3. AI Agent node orchestrates:
    • Interaction with the OpenAI Chat Model node.
    • Access to Perplexity Sonar and Perplexity Sonar Pro via HTTP-based tools.
    • Use of Window Buffer Memory to maintain local context.
  4. Telegram sendMessage node sends the final response back to the originating chat.

All user-facing interactions begin and end in Telegram, while the AI Agent and research tools operate in the internal n8n execution context.

3. Node-by-Node Breakdown

3.1 Telegram Trigger

The Telegram Trigger node is the entry point for the Deep Research Agent workflow. It listens for new updates from a specific Telegram bot using a webhook.

  • Purpose: Capture user queries as soon as they are sent to your bot.
  • Key configuration:
    • Credentials: Telegram Bot API token created via BotFather.
    • Webhook URL: Must match your n8n public URL and be correctly registered in Telegram.
    • Update types: Typically configured to receive messages; you can extend to callbacks or other update types if needed.
  • Output data:
    • chat.id for identifying the conversation.
    • message.text containing the user query.
    • Metadata such as username, message ID, and timestamp.

This node should be the only trigger in the workflow to avoid unexpected parallel executions for the same bot.

3.2 Filter (Authorization / Routing Logic)

The Filter node enforces simple business rules before the query reaches the AI stack. In the template, it primarily controls which Telegram chat IDs are allowed to use the agent.

  • Purpose:
    • Restrict access to specific users, groups, or channels.
    • Optionally route or ignore messages based on content patterns.
  • Typical conditions:
    • Numeric comparison on chat.id (for example, equals one or more authorized IDs).
    • Optional keyword checks in message.text (for example, only process messages containing a specific prefix or command).
  • Behavior:
    • If the filter condition passes, the workflow continues to the AI Agent node.
    • If it fails, the execution ends or can be optionally routed to a different branch (for example, a polite denial message).

In the provided template, the default behavior is a numeric filter that allows only predefined chat IDs. This is a simple but effective access control mechanism during early testing.

3.3 AI Agent Node

The AI Agent node is the central orchestrator that connects the language model, memory, and external research tools. It receives the user query and decides how to satisfy it.

  • Inputs:
    • Text content from the Telegram message.
    • Session identifiers (for example, chat.id) used by the memory node.
  • Connected components:
    • OpenAI Chat Model for reasoning, summarization, and natural language responses.
    • Window Buffer Memory for short-term context.
    • Perplexity Sonar and Perplexity Sonar Pro as tools accessible via the Agent.
  • Core behavior:
    • Analyzes the query to determine whether a fast factual lookup or deeper research is required.
    • Invokes Sonar for short, fact-focused queries.
    • Invokes Sonar Pro for open-ended, multi-source, or analytical tasks.
    • Combines the tool outputs with the LLM to generate a final answer.

The decision logic between Sonar and Sonar Pro can rely on heuristics or classification rules embedded in the Agent configuration. The template encourages a heuristic approach, such as detecting query length or specific research-related keywords.

3.4 OpenAI Chat Model

The OpenAI Chat Model node is the primary LLM used for:

  • Natural language understanding of Telegram messages.
  • Summarizing and interpreting Perplexity search results.
  • Generating structured, user-friendly responses.
  • Key configuration:
    • Credentials: OpenAI API key.
    • Model: A chat-capable model (for example, GPT-style chat model) suitable for multi-turn conversations.
    • Prompt / System instructions: Define the role of the agent (for example, “You are a research assistant…”).
  • Integration with AI Agent:
    • The AI Agent delegates language tasks to this node.
    • Tool outputs from Sonar and Sonar Pro are fed into the model as context for summarization and synthesis.

3.5 Window Buffer Memory

The Window Buffer Memory node maintains a short rolling history of the conversation so the AI Agent can handle follow-up questions and maintain continuity.

  • Purpose:
    • Preserve only the last N exchanges instead of the entire chat history.
    • Reduce token usage while keeping enough context for coherent answers.
  • Important parameters:
    • Session key: Should be set to a stable identifier like chat.id so each Telegram conversation has its own memory state.
    • Window size: Typically 5 to 15 messages for general research chat scenarios.
  • Data flow:
    • The node stores recent messages and responses.
    • The AI Agent reads from this memory when constructing prompts for the LLM.

If the session key is misconfigured or missing, the workflow will behave as if there is no memory, and each request will be treated as a standalone query.

3.6 Perplexity Sonar & Sonar Pro

The template uses Perplexity Sonar and Perplexity Sonar Pro as external research tools, integrated via HTTP request nodes and exposed to the AI Agent as tools.

  • Sonar:
    • Optimized for quick factual answers, definitions, and high-level summaries.
    • Best suited for short, specific questions where latency and cost are a priority.
  • Sonar Pro:
    • Designed for multi-source research, deeper analysis, and structured outputs.
    • Ideal for business, academic, or market research queries that require synthesis and citations.
  • Key configuration:
    • Credentials: HTTP header authentication using your Perplexity API key.
    • Endpoints & payload: Configured according to Perplexity Sonar and Sonar Pro API specifications.
  • Integration with AI Agent:
    • Each HTTP node is registered as a tool that the AI Agent can call programmatically.
    • The Agent decides which tool to invoke based on query complexity or heuristics you define.

3.7 Telegram sendMessage

The final node in the workflow sends the AI-generated response back to the user over Telegram.

  • Inputs:
    • chat.id from the original Telegram Trigger output.
    • Response text constructed by the AI Agent and OpenAI Chat Model.
  • Optional enhancements:
    • Embed links to sources returned by Perplexity.
    • Add basic formatting (Markdown or HTML, depending on Telegram settings).
    • Include images or quick-reply buttons if your bot permissions and design require it.

4. Step-by-Step Setup

  1. Create a Telegram bot
    Use @BotFather in Telegram to create a new bot and obtain the bot token. Store this token securely.
  2. Configure Telegram credentials in n8n
    In n8n, create Telegram credentials using the bot token, then configure the Telegram Trigger node and set up the webhook so Telegram can reach your n8n instance.
  3. Add OpenAI credentials
    Create OpenAI credentials with your API key and link them to the OpenAI Chat Model node. Choose an appropriate chat model and configure basic parameters such as temperature and max tokens.
  4. Set up Perplexity Sonar & Sonar Pro
    Create HTTP header authentication credentials for Perplexity. Attach these credentials to the Sonar and Sonar Pro HTTP request nodes and configure the request body and headers according to the Perplexity API.
  5. Adjust Filter logic
    Edit the Filter node so it allows the chat IDs or message patterns you want to process. During initial testing, you can limit access to your own chat ID.
  6. Configure Window Buffer Memory
    Set the session key to use the Telegram chat.id (or a custom identifier derived from it) so each conversation maintains its own memory window. Adjust the window size according to your use case.
  7. Run tests
    Send messages to your Telegram bot and observe the workflow in the n8n execution logs. Confirm that:
    • The trigger fires correctly.
    • The Filter behaves as expected.
    • The AI Agent calls Sonar or Sonar Pro appropriately.
    • The final response is delivered via the sendMessage node.

5. Configuration Notes & Best Practices

5.1 Routing Between Sonar and Sonar Pro

The effectiveness of the Deep Research Agent depends heavily on how you decide which Perplexity tool to use for each query.

  • Use Sonar when:
    • The query is short and factual (for example, “What is the market cap of Company X?”).
    • The user needs quick definitions or trending summaries.
  • Use Sonar Pro when:
    • The query implies research, comparison, or multi-source synthesis.
    • The user asks for briefs, reports, or structured analysis (for example, “Prepare a 3-paragraph investor brief on fintech trends in LATAM.”).

You can implement simple heuristics inside the AI Agent configuration or with a preceding node, for example:

  • Route to Sonar Pro if the query length exceeds a certain number of words.
  • Trigger Sonar Pro if the query contains terms like “compare”, “market”, “study”, “analysis”, or “report”.

5.2 Memory Sizing

The window buffer memory should balance context quality with token and cost constraints.

  • General guidance:
    • 5 to 15 recent messages are usually sufficient for casual research chats.
    • Increase the window size if users frequently refer back to earlier parts of the conversation.
  • Cost implications:
    • Larger windows increase prompt size and OpenAI token usage.

5.3 Rate Limits & Error Handling

Both OpenAI and Perplexity enforce rate limits. To avoid degraded user experience:

  • Configure retry logic with exponential backoff on HTTP request nodes where supported.
  • Handle error responses from OpenAI and Perplexity gracefully and log them in n8n for diagnostics.
  • Send user-friendly fallback messages, for example: “Sorry, I am having trouble reaching my research tools, please try again in a minute.”

For high-traffic use cases, consider adding queueing or throttling mechanisms at the workflow or infrastructure level.

5.4 Privacy & Security

  • Avoid storing sensitive user data unless strictly required for your use case.
  • If you must persist data, encrypt it at rest and restrict access at the database and n8n levels.
  • Keep bot tokens and API keys inside n8n credentials, not hard-coded in nodes.
  • Consider redacting or anonymizing personally identifiable information in execution logs.

6. Example Use Cases

6.1 Quick Fact-Checking via Telegram

Example query

Automate LinkedIn Profile Discovery with n8n

Automate LinkedIn Profile Discovery with n8n

Finding LinkedIn profiles for a long list of contacts in Google Sheets can quickly turn into repetitive, manual work. With n8n, you can turn this into a reliable, automated workflow that searches for LinkedIn URLs, validates them, and writes them back to your sheet.

This tutorial walks you through an n8n workflow template that connects Google Sheets and Airtop to automate LinkedIn profile discovery. You will learn how each node works, how to configure it, and how to handle errors, rate limits, and edge cases in a clean and maintainable way.

What you will learn

By the end of this guide, you will be able to:

  • Build an n8n workflow that reads contact data from Google Sheets
  • Use Airtop to run a Google search for each contact and extract a LinkedIn profile URL
  • Parse the Airtop response in a Code node and merge it with the original row data
  • Update the correct row in Google Sheets with the LinkedIn URL and a validation status
  • Test, validate, and harden the workflow with rate limiting, error handling, and compliance best practices

Why automate LinkedIn profile discovery?

Manual LinkedIn lookups do not scale. For every contact you typically:

  • Search their name (and maybe company) on Google or directly on LinkedIn
  • Open multiple results to find the correct profile
  • Copy and paste the URL into your spreadsheet or CRM

Automating profile discovery with n8n helps you:

  • Save time by processing many rows automatically instead of one by one
  • Keep your Google Sheets contact list enriched with consistent, verified LinkedIn URLs
  • Scale lead enrichment for sales, recruiting, or marketing workflows
  • Feed LinkedIn URLs into downstream automations such as CRM updates or outreach sequences

How the n8n workflow is structured

The template uses a simple, linear workflow with five core nodes:

  • Manual Trigger – starts the workflow manually while you test, or can be replaced by a Cron node for scheduled runs
  • Google Sheets (Read) – reads contact data from your sheet, including a field like Person Info
  • Airtop – runs a Google search using the person info and extracts a LinkedIn URL
  • Code – parses the Airtop response, merges it with the original row data, and prepares the payload for updating
  • Google Sheets (Update) – writes the LinkedIn URL and validation status back to the correct row

On the n8n canvas this appears as a straight flow:

Manual Trigger → Google Sheets (Read) → Airtop → Code → Google Sheets (Update)

Key concepts before you start

1. Person Info as your search input

Your Google Sheet should contain a column that combines the person’s name and optionally their company. In the workflow this is referred to as Person Info, for example:

  • John Smith, Acme Corp
  • Jane Doe Product Manager

This value is used to build the Google search query that Airtop will process.

2. Tracking row numbers

To update the right row later, you need a way to identify it. You can:

  • Add a dedicated row_number column in your sheet, or
  • Use the row index that n8n returns when reading from Google Sheets

This identifier is passed through the workflow so the update node can target the correct row.

3. Validated status

It is useful to include a Validated column in your sheet. This lets you:

  • Mark rows where a LinkedIn URL was found and accepted
  • Flag rows where no profile was found or where manual review is needed

Step-by-step: building the workflow in n8n

Step 1 – Configure the trigger

Start with a Manual Trigger node:

  • Add a Manual Trigger node as the first node in your workflow.
  • Use this trigger while developing and testing so you can run the workflow on demand.

Once your workflow is stable, you can replace the Manual Trigger with a:

  • Cron node to run on a schedule (for example every hour or once per day), or
  • Webhook trigger if you want to start the workflow from an external system

For large datasets, plan to run the workflow in batches to stay within rate limits and avoid timeouts.

Step 2 – Read contact data from Google Sheets

Next, add a Google Sheets node to read your contacts:

  1. Set the operation to Read or Read Rows.
  2. Connect your Google account using OAuth with Google Drive access.
  3. Select the correct spreadsheet and sheet tab.
  4. Ensure your sheet has clear header rows so n8n can map column names reliably.

Recommended columns:

  • Person Info – name plus optional company or role
  • row_number – a unique identifier for each row (or rely on n8n’s row index)
  • LinkedIn URL – initially empty, will be filled by the workflow
  • Validated – can be left empty initially, will be updated to show status

Make sure the Google Sheets node output includes Person Info and the row identifier, because both are needed in later steps.

Step 3 – Use Airtop to search for a LinkedIn profile

The Airtop node takes the person info and runs a Google search, then uses an extraction prompt to return only a LinkedIn profile URL.

3.1 Build the Google search URL

In the Airtop node, use a field (for example a URL or text field) that builds a Google search query from the Person Info value. The template uses:

=https://www.google.com/search?q={{ encodeURI($json['Person Info']) }}

This expression does the following:

  • Takes the Person Info value from the current item
  • Encodes it safely for use in a URL
  • Appends it to a Google search URL

3.2 Prompt Airtop to extract only a LinkedIn URL

Configure the Airtop prompt so that the model knows exactly what to return. The template uses:

=This is Google Search results. the first results should be the Linkedin Page of {{ $json['Person Info'] }}
Return the Linkedin URL and nothing else.
If you cannot find the Linkedin URL, return an empty string.
A valid Linkedin profile URL starts with "https://www.linkedin.com/in/"

This prompt instructs Airtop to:

  • Look at Google search results for the person
  • Return only a LinkedIn profile URL that starts with https://www.linkedin.com/in/
  • Return an empty string if no suitable profile is found

3.3 Tips for the Airtop step

  • You can replace Airtop with a search engine API or a headless browser node if you prefer a different approach to fetching search results.
  • To avoid being blocked by Google, consider adding delays or processing rows in smaller batches.
  • Monitor your Airtop usage and any applicable limits.

Step 4 – Parse Airtop response in a Code node

After Airtop returns a result, use a Code node to prepare a clean JSON object that combines:

  • The LinkedIn URL (or empty string) from Airtop
  • The original row data from the Google Sheets read node

Example JavaScript used in the template:

const linkedInProfile = $json.data.modelResponse
const rowData = $('Person info').item.json

return { json: {  ...rowData,  'LinkedIn URL': linkedInProfile
}};

What this script does step by step:

  • linkedInProfile reads the modelResponse from the Airtop node, which should be either a LinkedIn URL or an empty string.
  • rowData fetches the original row JSON from the node that provided Person Info (the Google Sheets read node).
  • The returned object spreads rowData and adds a new field called LinkedIn URL that holds the Airtop result.

After this node, each item contains all the fields from the original row plus the new LinkedIn URL field. This makes it easy for the update node to write everything back to the correct row.

Step 5 – Update the row in Google Sheets

Finally, add a second Google Sheets node configured to update existing rows.

  1. Set the operation to Update or Update Rows.
  2. Use the same spreadsheet and sheet as in the read node.
  3. Choose row_number (or your chosen identifier) as the matching column so n8n knows which row to update.
  4. Map the LinkedIn URL field from the Code node output to the corresponding column in your sheet.
  5. Set the Validated column to a value such as true, found, or a more detailed status.

You can either:

  • Use auto-mapping if your column names match the field names in the JSON, or
  • Manually map each field if your sheet uses custom column names

Testing and validating your workflow

Before running the workflow on hundreds or thousands of rows, test it carefully with a small sample.

Run a small test batch

Start with 5 to 10 rows and check:

  • That the Airtop search returns the correct LinkedIn profile URLs for each contact
  • That the right rows are updated in Google Sheets based on row_number or the row index
  • That the Code node behaves correctly when Airtop returns an empty string

Add simple validation rules

To avoid writing incorrect URLs into your sheet, add a basic check:

  • If the returned URL does not start with https://www.linkedin.com/in/, treat it as invalid.
  • In such cases, leave the LinkedIn URL cell empty and set Validated to something like manual review.

This gives you a clear list of contacts that need human attention while still automating the majority of the work.

Handling rate limits, errors, and edge cases

Rate limiting and batching

  • Insert a Wait node between items or between batches to slow down requests and avoid search engine throttling.
  • Process your sheet in chunks (for example 50 or 100 rows per run) instead of the entire dataset at once.
  • Monitor how long each run takes and adjust batch sizes accordingly.

Empty or missing results

  • If Airtop cannot find a LinkedIn URL, it should return an empty string as defined in the prompt.
  • Write an empty string into the LinkedIn URL column and set Validated to not found or a similar label.
  • You can later filter rows with not found and decide whether to retry or handle them manually.

False positives and ambiguous profiles

  • Always check that the URL starts with https://www.linkedin.com/in/, not a company page or other LinkedIn path.
  • Optionally, extend your validation by checking whether the name or company in the search snippet matches your sheet data before accepting the URL.

Error handling patterns in n8n

  • Use a Try / Catch pattern in your workflow to catch node errors and continue processing other rows.
  • Configure n8n’s built-in error workflow to log failures, send notifications, or write error details to a separate sheet.
  • Ensure that transient errors (like network timeouts) do not break the entire run.

Privacy, compliance, and best practices

Automating LinkedIn profile discovery involves personal data and third-party services, so keep these guidelines in mind:

  • Review and respect LinkedIn and search engine Terms of Service. Automated scraping can violate platform policies.
  • If you process data of EU residents, follow GDPR requirements, including lawful basis for processing and data minimization.
  • Use the discovered data only for legitimate business purposes such as recruiting or B2B outreach.
  • Maintain clear opt-out options for individuals who no longer wish to be contacted.

Scaling and integrating with other tools

Once your workflow is stable and accurate, you can extend it into a larger automation system.

Ideas for downstream integrations

  • CRM enrichment: Send the LinkedIn URLs to tools like HubSpot, Salesforce, or Pipedrive to update contact records.
  • Personalized outreach: Trigger email sequences or LinkedIn InMail campaigns using your outreach platform of choice.
  • Data enrichment services: Call APIs like Clearbit or ZoomInfo to add company, role, or firmographic details based on the LinkedIn URL.

Scaling considerations

  • Run the workflow on a schedule using a Cron node so new or changed rows are processed automatically.
  • If you rely on search APIs, monitor quota usage and consider multiple API keys if permitted by the provider.
  • Use logging or dashboards to track how many profiles are found, how many fail, and how long runs take.

Troubleshooting checklist

If something is not working as expected, walk through this list:

  • Empty or incorrect LinkedIn URLs:
    • Review your Airtop prompt to ensure it clearly instructs the model to return only a profile URL.
    • Check that the Code node is reading $json.data.modelResponse correctly.
  • Rows not updating in Google Sheets:
    • Confirm that row_number (or your chosen identifier) is present and correctly mapped.
    • Verify that your Google Sheets node has the right spreadsheet, sheet, and permissions.
  • Slow runs or temporary blocks:
    • Add Wait nodes or delays between items.
    • Reduce batch size so fewer rows are processed per run.
    • Consider using a dedicated search API instead of direct Google search pages.
  • Authentication or credential errors:
    • Reconnect your Google OAuth credentials for Google Sheets and Google Drive.
    • Check and refresh Airtop credentials or API keys if needed.

Recap: how the template works