Build an n8n YouTube-to-Chatbot Pipeline

Transform long-form YouTube content into a structured, searchable knowledge base and conversational chatbot using n8n. This guide presents a production-ready workflow that orchestrates Apify actors, Google Sheets, Supabase vector storage, and OpenAI embeddings to automatically collect videos, extract transcripts, generate embeddings, and serve responses through a chat interface.

Overview: From YouTube Channel to AI Chatbot

For brands, content creators, and product teams, video libraries often contain high-value information that is difficult to search and reuse. Manually transcribing, indexing, and maintaining this content does not scale. An automated n8n pipeline solves this by:

  • Scraping a YouTube channel for new or updated videos
  • Fetching accurate transcripts for each video
  • Splitting and embedding transcript text into a Supabase vector database
  • Powering a chatbot that answers user questions using relevant video snippets

The result is a repeatable, maintainable workflow that turns unstructured video into a queryable knowledge system, suitable for internal enablement, customer education, or public-facing assistants.

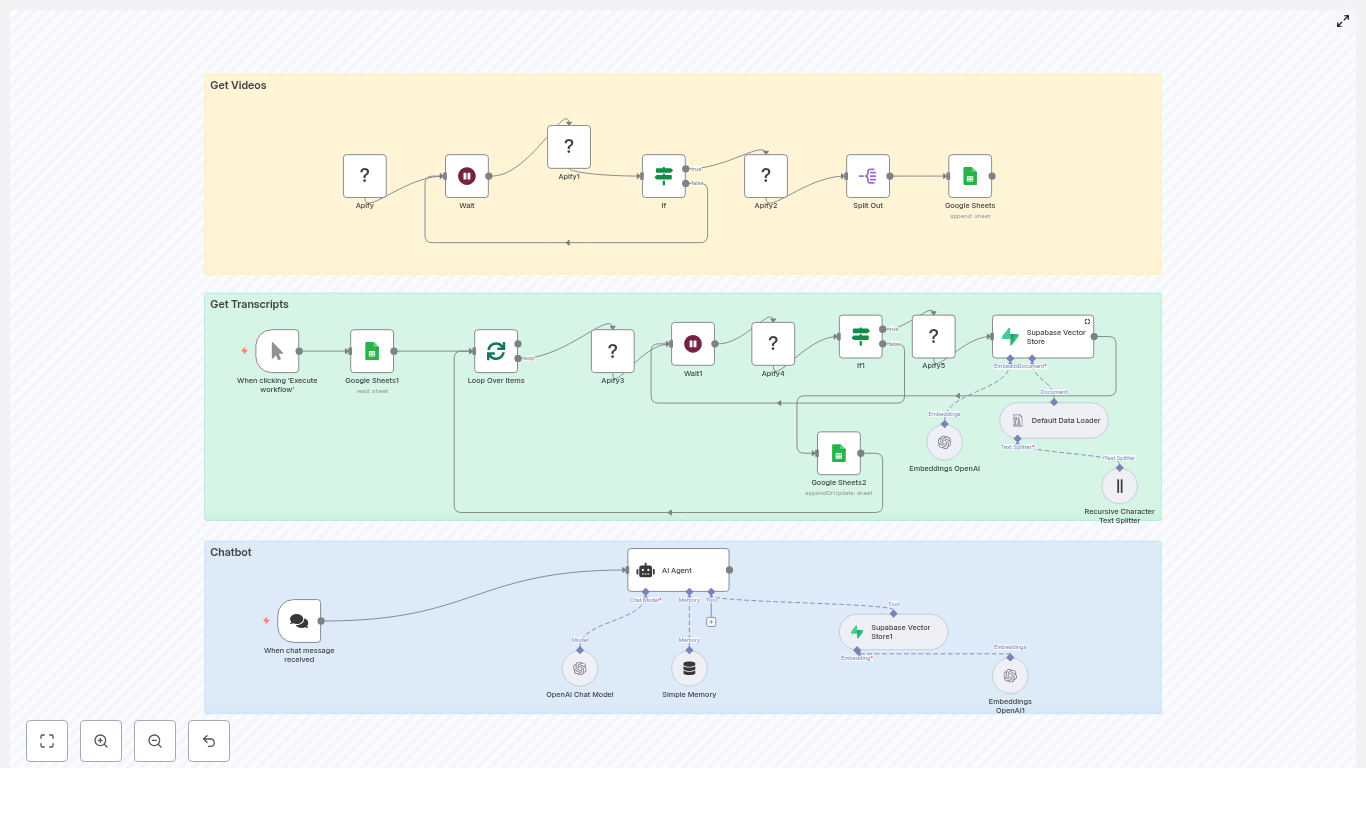
Solution Architecture

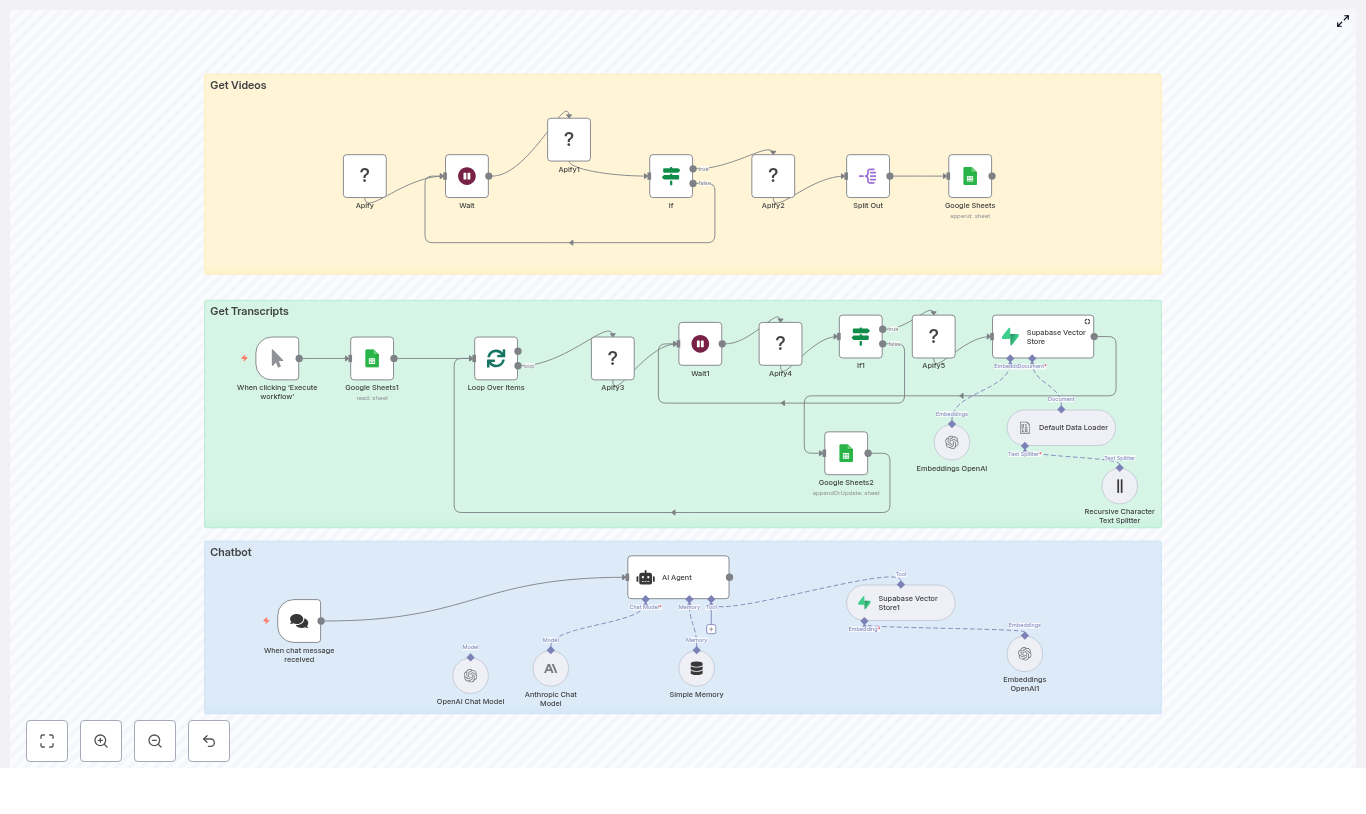
The n8n workflow is organized into three logical stages that together form an end-to-end YouTube-to-chatbot pipeline:

  • Ingestion layer (Get Videos) – Uses an Apify YouTube channel scraper actor to enumerate channel videos and track them in Google Sheets.
  • Enrichment and indexing (Get Transcripts & Embeddings) – Retrieves transcripts with a second Apify actor, splits text into chunks, generates embeddings, and writes them into Supabase.
  • Serving layer (Chatbot) – Exposes a LangChain-style agent via n8n that performs vector search in Supabase and uses an LLM such as OpenAI or Anthropic to generate grounded answers.

Prerequisites and Required Services

Before building the workflow, ensure the following components are provisioned and accessible from n8n:

  • n8n (self-hosted or cloud) with credentials configured for all external services
  • Apify account with access to:
    • YouTube channel scraper actor
    • YouTube transcript scraper actor
  • Google Sheets with OAuth credentials for:
    • Queueing video processing
    • Tracking completion status
  • Supabase project with:
    • Postgres database
    • Vector extension and table for embeddings and metadata
  • OpenAI (or compatible provider) for:
    • Text embeddings
    • LLM responses in the chatbot

Stage 1: Collecting YouTube Videos

Configuring the Apify YouTube Channel Scraper

The workflow begins by discovering videos on a target YouTube channel. In n8n, configure an Apify node that triggers the YouTube channel scraper actor. Provide a JSON input payload that includes:

  • channelUrl – The URL of the YouTube channel you want to index
  • maxResults – Maximum number of videos to retrieve per run

Use a Wait node in n8n to poll Apify for the actor run status. Once the run is complete, read the resulting dataset and map each video to a row in a Google Sheet. At minimum, the sheet should contain:

  • Video Title
  • Video URL
  • Done (a status flag used for idempotency)

Operational Tips for the Ingestion Layer

  • Store the channel URL and maxResults as environment variables or n8n variables if you plan to reuse the template across multiple channels or environments.
  • Initialize the Done column with a default value such as No so you can easily filter unprocessed rows.
  • Use the Google Sheet as a simple work queue that provides transparency into which videos are pending, in progress, or completed.

Stage 2: Transcript Retrieval and Embedding

Looping Through Pending Videos

Once videos are listed in the sheet, the next stage processes only those that are not yet ingested. In n8n:

  1. Use a Google Sheets node to read rows where Done != "Yes".
  2. Feed the result into a Split In Batches node to limit how many videos are processed per run. This helps control concurrency and external API usage.

Fetching Transcripts via Apify

For each video URL in the batch, invoke the Apify YouTube transcript scraper actor. Configure the input so that the startUrl parameter receives the specific video URL from the sheet. As in the previous stage, use a Wait node combined with a status check to ensure the actor run completes successfully before proceeding.

Transcript Configuration Considerations

  • Timestamps: Decide whether to include timestamps in the transcript output. If your chatbot needs to reference exact moments in a video or support deep-linking, timestamps are valuable metadata.
  • Language handling: For multilingual channels, ensure the Apify actor is configured to request the correct language or to handle multiple language tracks as needed.

Creating Embeddings and Writing to Supabase

After the transcript data is available, the workflow prepares documents for vector storage:

  1. Concatenate the video title and transcript text into a single document payload. Include any additional metadata you may need later, such as channel name or publication date.
  2. Use a text splitter, such as a recursive character splitter, to break long transcripts into smaller, semantically coherent chunks. Chunk sizes around 500 to 1,000 tokens typically provide a good balance between recall and precision.
  3. For each chunk, call the OpenAI embeddings API (or another embeddings provider) to generate a vector representation.
  4. Insert each embedding into your Supabase vector table, storing at least:
    • Embedding vector
    • Video URL
    • Video title
    • Chunk index
    • Timestamps or segment boundaries if available

Why Transcript Chunking Matters

Using a single vector for an entire video transcript typically leads to diluted semantic signals and less relevant retrieval. Splitting transcripts into smaller, contextually consistent chunks improves:

  • Similarity search quality – The vector store can target specific segments instead of the entire video.
  • LLM grounding – The language model receives focused context for each answer, which reduces hallucinations and improves factual accuracy.

Marking Videos as Processed

After all chunks for a given video have been embedded and stored in Supabase, update the corresponding row in Google Sheets to set Done = "Yes". This step is critical to keep the pipeline idempotent and to avoid duplicate ingestion when the workflow runs on a schedule.

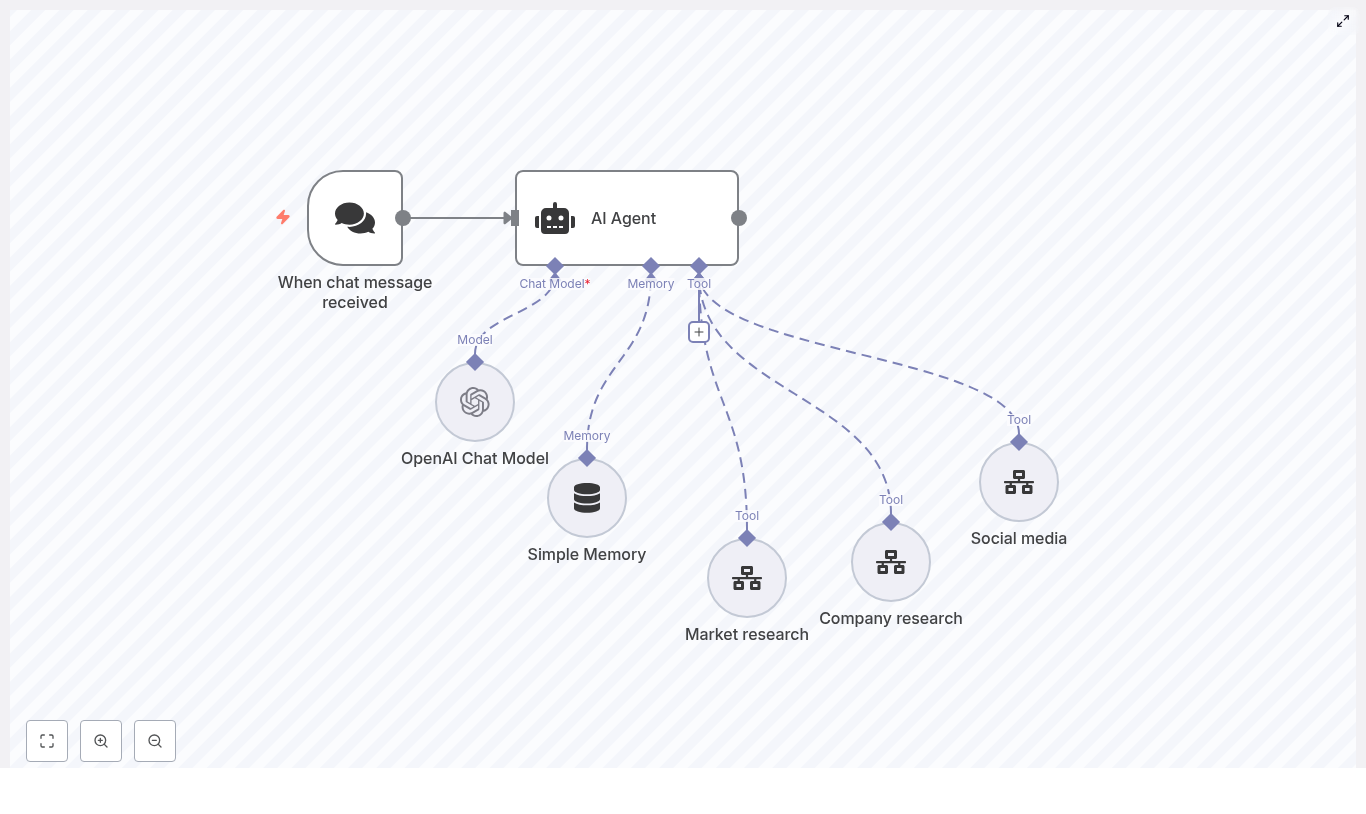
Stage 3: Building the Chatbot with n8n and LangChain

Retrieval-Augmented Generation Flow

The final stage exposes the indexed content through a conversational agent. A typical LangChain-style agent in n8n operates as follows:

  1. The user submits a question through a chat interface or an n8n webhook.
  2. The workflow converts the user query into an embedding or directly uses it to perform a vector similarity search in Supabase.
  3. Supabase returns the top matching transcript chunks along with their metadata.
  4. The workflow passes:
    • The original user prompt
    • The retrieved transcript segments

    to the LLM (e.g., OpenAI or Anthropic) as context.

  5. The LLM generates an answer that is grounded in the retrieved video content.

Prompting and Answer Formatting

Configure the system prompt for the LLM to enforce behavior that aligns with your use case. Common instructions include:

  • Answer concisely and avoid speculation outside the provided context.
  • Reference the source video title and URL in the response.
  • Include timestamp references when available, so users can jump directly to the relevant segment.

Security, Reliability, and Operational Best Practices

Credential and Data Security

  • Store all API keys, database credentials, and tokens in n8n’s credential manager or environment variables. Avoid hardcoding secrets directly inside workflow nodes.
  • Configure Supabase Row Level Security (RLS) policies appropriately. Use a service-role key only where necessary and prefer a restricted key with minimal permissions for embedding inserts and retrievals.

Scaling, Performance, and Cost Management

  • Batch processing: Use the Split In Batches node to control how many videos and transcript chunks are processed in parallel. This prevents hitting rate limits for Apify and OpenAI.
  • Chunk sizing: Monitor embedding costs and adjust chunk sizes to balance precision with budget. Smaller chunks increase the number of embeddings but may improve retrieval quality.
  • Caching strategies: If your chatbot frequently receives similar queries, consider caching popular retrievals or introducing a secondary index to reduce repeated vector searches.

Error Handling and Observability

  • Use If nodes and conditional logic to detect failed Apify runs or API calls. For robustness, implement retries with backoff where appropriate.
  • Route failed items to a dedicated Google Sheet or error table for manual inspection and replay.
  • Log Apify actor run IDs and dataset IDs so you can easily correlate workflow runs with external executions for debugging.

Extending the Workflow

Once the core pipeline is operational, several common extensions can further enhance its value:

  • Automated content repurposing: Add media processing and summarization steps to publish short clips or text summaries to social channels.
  • Multi-channel support: Parameterize the initial Apify call to rotate between multiple YouTube channels, using environment variables or inputs to control which channel is processed.
  • Advanced retrieval: Integrate a cross-encoder or reranking model to refine search results when you need even higher precision in the returned segments.

Preflight Checklist

Before running the workflow in a production or scheduled environment, confirm the following:

  • Apify actors are provisioned, tested manually, and you know their IDs and input schemas.
  • Google Sheets OAuth is configured and a sheet exists with at least:
    • Video Title
    • Video URL
    • Done
  • A Supabase project is created with a vector-enabled table for embeddings and associated metadata.
  • An OpenAI (or alternative LLM/embedding) API key is configured and connected within n8n.

Conclusion

This n8n template provides a robust, repeatable way to convert YouTube channels into a searchable knowledge base and an AI-powered chatbot with minimal manual effort. It is well suited for:

  • Creators who want audiences to query their content by topic rather than browsing playlists
  • Companies converting training or webinar libraries into interactive knowledge assistants
  • Teams building domain-specific conversational agents grounded in video material

To get started, clone the workflow, plug in your credentials, and run a small batch of videos to validate transcript ingestion, embedding, and retrieval behavior. From there, you can iterate on prompts, metadata, and chunking strategies to fine-tune answer quality.

Call to action: Connect your Apify, Google Sheets, Supabase, and OpenAI credentials in n8n, then execute the template on a limited set of videos to verify the end-to-end flow. If you need help adapting the pipeline for specific channels, additional languages, or a custom chatbot frontend, share your use case and constraints and we can refine the design together.

Auto-classify Linear Bugs with n8n and OpenAI

Auto-classify Linear Bugs with n8n and OpenAI

Manual triage of incoming bug reports is slow, repetitive work that does not scale. By combining n8n, Linear, and OpenAI, you can automate the classification of bug tickets, assign them to the correct team, and only involve humans when the model is uncertain. This guide explains an n8n workflow template that operationalizes this pattern in a robust, production-ready way.

Overview of the automation workflow

This n8n template connects Linear, OpenAI, and Slack into a single automated flow. When a bug is created or updated in Linear, the workflow evaluates whether the ticket needs classification, sends the relevant context to OpenAI, maps the AI decision to a Linear team, and either updates the issue or alerts a Slack channel if no clear assignment is possible.

At a high level, the workflow includes the following key components:

  • Linear Trigger to receive issue updates from Linear in real time
  • Filter node to restrict AI calls to tickets that actually require classification
  • Configuration node that defines teams and responsibilities in a machine-readable format
  • OpenAI node to classify the bug and select the most appropriate team
  • HTTP Request node to fetch all Linear teams and their IDs via GraphQL
  • Merge and decision logic to combine AI output with Linear metadata and branch accordingly
  • Linear update nodes to set the team on the issue when a match is found
  • Slack notification to escalate ambiguous cases to a human triage channel

Why automate ticket classification in Linear?

For engineering leaders and operations teams, automated ticket routing is a straightforward way to improve responsiveness without increasing headcount. The workflow described here delivers several benefits:

  • Faster triage – tickets are classified as soon as they are created or updated, reducing queue times
  • Reduced human error – consistent mapping rules and AI-based pattern recognition reduce misrouted bugs
  • Focus for senior engineers – leads can focus on complex prioritization and architecture decisions instead of repetitive sorting
  • Structured handoff – when the model is unsure, the workflow routes tickets to Slack for human review instead of silently failing

By pairing Linear webhooks with n8n orchestration and OpenAI classification, you gain a repeatable triage pipeline that still leaves room for human oversight where it matters.

Architecture and node responsibilities

Linear Trigger – entry point for issue updates

The workflow starts with a Linear Trigger node. This node listens for issue updates in your Linear workspace via a webhook. You can scope this trigger to specific teams or projects so that only relevant bugs enter the classification pipeline.

Configuration highlights:

  • Use your Linear OAuth or API credentials for the trigger
  • Define the appropriate team or project scope in line with your workspace structure

Filter node – only classify relevant tickets

Sending every issue to OpenAI would be inefficient and expensive. The Filter node ensures that only tickets that actually require classification are passed to the AI node. In the template, the filter is configured to allow issues that:

  • Do not contain the placeholder description text "Add a description here"
  • Are currently in a specific Triage state, identified by a state ID
  • Carry a specific label, for example the "type/bug" label, checked by label ID

These conditions can and should be adapted to your Linear configuration. Update the label IDs, state IDs, or broaden the criteria if your triage process uses different states or labels.

Configuration node – defining teams and responsibilities

The template includes a node typically named “Set me up”, which requires manual configuration. This node holds a curated list of teams and their domains of responsibility in the format:

[Teamname][Areas of responsibility]

The OpenAI prompt uses this list as the closed set of allowed answers. It is important that team names in this node exactly match the team names returned by Linear. Any mismatch will prevent the workflow from mapping AI output to a valid Linear team ID.

OpenAI node – bug classification logic

The OpenAI node is responsible for deciding which team should work on the ticket. It sends a carefully structured prompt to the model that includes the team list, the ticket title, and the ticket description.

Key prompt design decisions in the template:

  • A system message instructs the model to respond only with a team name from the provided list
  • The team definitions and the ticket content (title and description) are included in system messages to keep instructions clear and consistent
  • The expected output is exactly one team name, with no additional text, which simplifies downstream logic

For best results, use a capable model from the GPT-4 family to handle nuanced classification. If cost is a concern, you can validate performance with a smaller model first, then upgrade if accuracy is insufficient.

Fetching Linear teams with HTTP Request

Linear’s API updates issues by team ID, not by team name. To bridge this gap, the workflow uses an HTTP Request node to call Linear’s GraphQL endpoint and retrieve all teams and their corresponding IDs.

Once the list of teams is available in the workflow context, it becomes possible to map the AI-selected team name to the correct teamId for the Linear update operation.

Merge and decision branch – handling ambiguous outcomes

After both the OpenAI result and the Linear teams list are available, a Merge node combines these data streams. A subsequent decision node (typically an If node) evaluates the AI output.

In the template, the logic checks whether the chosen team is a fallback such as "Other" or another designated value that signals low confidence or no clear match. If the AI result is ambiguous or maps to this fallback:

  • The workflow sends a Slack notification to a configured channel
  • Human triagers can then review the ticket, assign it manually, and optionally refine the prompt or team definitions later

Set team ID and update the Linear issue

If the AI returns a valid team name that matches one of the teams retrieved from Linear, the workflow proceeds with automated assignment:

  • A Set node computes the teamId by finding the Linear team whose name equals the AI-selected team name
  • A Linear Update node then updates the issue’s team property with this ID

This direct mapping ensures that tickets are reassigned to the correct team without manual intervention, provided the AI classification and configuration are correct.

End-to-end setup checklist

To deploy this workflow in your own environment, follow the checklist below:

  1. Import or create the n8n workflow template in your n8n instance.
  2. Configure Linear credentials (OAuth or API key) for:
    • The Linear Trigger node
    • The Linear Update node
    • The HTTP Request node used for GraphQL queries
  3. Add your OpenAI API key to the OpenAI node.
  4. Customize the “Set me up” node:
    • List each team in the format [Teamname][Responsibilities]
    • Ensure team names match the names defined in Linear exactly
  5. Update the Slack channel configuration in the same node or in the Slack node to point to your triage or incident channel.
  6. Adjust the Filter node to align with your Linear setup:
    • Update label IDs, such as the "type/bug" label
    • Update state IDs for your triage state
    • Modify or extend conditions if your triage flow differs
  7. Run tests with a set of real or representative tickets:
    • Verify that classification is correct for typical bugs
    • Review cases that fall back to Slack and refine the prompt or team definitions accordingly

Prompt engineering guidelines and best practices

Effective prompt design is central to reliable automated classification. The following practices help maintain accuracy and predictability:

  • Constrain the answer space by providing an explicit list of candidate teams with clear responsibilities, so the model selects from known options rather than hallucinating new ones.
  • Use system messages to enforce strict output formats, for example:
    • "Respond with exactly one team name from the list."
  • Provide clean input text for the ticket title and description. Avoid sending long raw HTML or noisy markup. Prefer concise, cleaned summaries when possible.
  • Monitor and iterate by logging model predictions and periodically reviewing misclassifications. Use this feedback loop to refine the teams list, responsibilities, or prompt wording.

Example prompt structure

The template uses a system message sequence similar to the following:

<system>You will be given a list of teams in this format: [Teamname][Responsibilities]. Only answer with one exact team name from the list.</system>
<system>Teams: [Adore][...], [Payday][...], [Nodes][...], [Other][...]</system>
<system>Ticket Title: ... Description: ...</system>

The model is then asked a direct question such as: "Which team should work on this bug?". The workflow expects the model to return only the chosen team name, which downstream nodes then map to a Linear team ID.

Handling edge cases and extending the workflow

Once the core flow is stable, you can extend it to handle more advanced scenarios:

  • Confidence handling – request a brief explanation or confidence indicator from the model and use that to decide whether to auto-assign or escalate to Slack.
  • Multi-team routing – for bugs that span multiple domains, have the model return a ranked list of teams and either:
    • Assign the top choice automatically, or
    • Create additional watchers or mentions for secondary teams
  • Embeddings-based matching – index historical tickets per team using embeddings and use similarity search as an additional signal for routing decisions.
  • Human-in-the-loop inside Linear – instead of or in addition to Slack notifications, automatically add a comment to the Linear issue when the AI is unsure, prompting a human triager to classify it.

Security, cost management, and rate limits

As with any production automation involving third-party APIs, you should enforce basic security and cost controls:

  • API key security – store OpenAI and Linear credentials securely in n8n’s credentials store and rotate them periodically.
  • Cost estimation – estimate monthly OpenAI cost by:
    • Measuring the average token usage per classification call
    • Multiplying by the expected number of tickets per month
  • Rate limiting and resilience – respect both Linear and OpenAI rate limits. Implement retry and backoff strategies in n8n for transient errors to avoid workflow failures.

Troubleshooting common issues

If the workflow does not behave as expected, the following checks usually resolve most problems:

  • No team matched or incorrect assignment:
    • Verify the team list in the “Set me up” node
    • Confirm that team names exactly match those in Linear
  • Tickets are not reaching OpenAI:
    • Inspect the Filter node conditions
    • Confirm that label IDs and state IDs are correct for your workspace
  • OpenAI responses include extra text or are noisy:
    • Tighten the system instructions to enforce the output format
    • Validate model output before using it to update Linear, for example by checking that the response matches one of the known team names

Operational impact and next steps

By deploying this n8n + Linear + OpenAI workflow, you can significantly reduce manual triage workload while preserving human control over edge cases. Tickets are classified and routed consistently, Slack notifications handle uncertain scenarios, and engineering teams can focus on resolution rather than sorting.

To get started, import the template into your n8n instance, configure your credentials, define your teams and responsibilities, and run a short pilot with a subset of projects or labels. Use the results to refine prompts and conditions before rolling out more broadly.

Looking to adapt this pattern to your organization? Deploy the workflow in your n8n environment, involve your automation or platform engineering team, and share a few sanitized example tickets internally. Collaborative review of misclassifications is one of the fastest ways to converge on a robust, low-friction triage system.

Keywords: n8n workflow, Linear automation, OpenAI triage, automated ticket classification, Slack notifications, bug routing.

Automate Job Applications with n8n & OpenAI

Automate Job Applications with n8n & OpenAI

Job hunting can feel like a full-time job, right? You scroll through endless listings, copy details into a spreadsheet, try to decide if each role is worth your time, then write yet another customized cover letter. It gets old fast.

That is exactly where this n8n workflow template comes in. With a simple setup, you can:

  • Automatically pull job listings from RSS feeds
  • Use OpenAI to extract key details from each posting
  • Score how well each job matches your resume
  • Generate a personalized cover letter
  • Save everything neatly into Google Sheets for tracking

In this guide, we will walk through what the “Job Seeking” n8n template does, when to use it, and how to set it up step by step. Think of it as your always-on assistant that never gets tired of job boards.

Why automate your job search in the first place?

If you have ever spent an evening copying job descriptions into a spreadsheet, you already know the answer. Most of job hunting is repetitive, not strategic. You:

  • Scan job boards, RSS feeds, or curated lists
  • Copy and paste job titles, companies, and links
  • Skim descriptions to see if you are a good fit
  • Write custom cover letters from scratch

Automation takes that repetitive part off your plate so you can focus on decisions, not data entry. With this n8n workflow, you can:

  • Save time by letting n8n collect and parse new listings for you
  • Standardize your data so you can filter and sort jobs easily in Google Sheets
  • Generate tailored cover letters quickly using OpenAI
  • Prioritize roles using a match score that compares the job to your resume

Instead of hunting for jobs manually every day, you can have a scheduled system that quietly builds a job pipeline in the background.

What this n8n “Job Seeking” template actually does

At a high level, the template is a complete job search pipeline. It starts with job listings from RSS feeds, enriches them with AI, then stores everything in Google Sheets. Here is what happens behind the scenes:

  1. Schedule Trigger runs your workflow on a set schedule (for example every hour or once a day).
  2. RSS Read pulls the latest job postings from your chosen RSS feed or feeds.
  3. Limit keeps each run under control by restricting how many jobs are processed at once.
  4. HTTP Request fetches the full job posting page when the RSS item only contains a short summary or a link.
  5. OpenAI (content extraction) parses the job content and extracts structured fields like company name, benefits, short description, and location.
  6. OpenAI1 (scoring) compares each job to your resume and returns a match score.
  7. OpenAI2 (cover letter) writes a personalized cover letter for each job based on the role and your resume.
  8. Google Sheets appends or updates a row with all of that information so you can review and track it.

You end up with a spreadsheet that might include columns like:

  • Job title
  • Company name
  • Location
  • Short job description
  • Benefits
  • Job link
  • Match score
  • Generated cover letter

From there, you can sort by score, read the most promising roles, tweak cover letters if needed, and apply in a fraction of the time.

How the data flows through the workflow

Let us walk through the data flow in a simple, story-like way so you can picture what is happening.

  1. The workflow wakes up
    The Schedule Trigger node starts the workflow on your chosen interval. No more manually clicking “Execute workflow” every time you want new jobs.
  2. Jobs are fetched from RSS
    The RSS Read node reads your configured RSS feed URL or URLs and pulls in the latest items.
  3. Batch size is controlled
    The Limit node makes sure you do not process too many items at once, which helps avoid rate limits and large AI bills.
  4. Full job content is retrieved
    Some RSS feeds only give you a short snippet and a link. The HTTP Request node visits that link and grabs the full page content so OpenAI has enough text to work with.
  5. Key fields are extracted with OpenAI
    The first OpenAI node (content extraction) uses a carefully crafted prompt to pull out structured details and return JSON, including:
    • company_name
    • benefits
    • job_description (short, around 200 characters)
    • location
  6. Each job is scored against your resume
    The OpenAI1 node compares the extracted job details to your resume and outputs a numeric match score. You can then sort or filter by this number in Sheets.
  7. A custom cover letter is written
    The OpenAI2 node takes the job information plus your resume and generates a tailored cover letter. The prompt can be tuned to your tone and style.
  8. Everything is saved to Google Sheets
    Finally, the Google Sheets node appends or updates rows in your chosen spreadsheet, using the job link as a unique identifier so you do not get duplicates.

The result is a continuously updated job search dashboard that you can work from each day.

When this template is especially useful

This workflow is a great fit if you:

  • Check the same job boards or RSS feeds regularly
  • Apply to a lot of roles and want to keep everything organized
  • Want an AI-powered n8n job search system without building it from scratch
  • Need consistent, structured data to filter by location, benefits, or match score

It also works well in a few specific scenarios:

  • Recent graduates automating applications to internships or junior roles
  • Career switchers targeting niche roles and highlighting transferable skills
  • Recruiters pre-screening job posts against candidate profiles

Step-by-step: setting up the n8n job application workflow

Ready to get this running? Here is how to set up the template in n8n.

1. Import the workflow template

Start in your n8n instance and import the provided JSON file for the “Job Seeking” workflow. Once imported, you should see all the nodes connected in sequence, roughly matching the flow we described above.

2. Add and configure your credentials

Next, connect the services that the workflow needs:

  • OpenAI API
    In n8n, create an OpenAI credential using your API key. The template uses several OpenAI nodes, and you can reuse the same credential for each one.
  • Google Sheets
    Set up OAuth2 credentials for Google in n8n and connect your Google account. This lets the workflow write rows into your spreadsheet.
  • HTTP Request
    For public job pages, you usually do not need credentials. If you are pulling from a site that requires headers or authentication, configure those details in the HTTP Request node.

3. Plug in your preferred RSS job feeds

Replace any sample RSS URL in the RSS Read node with the feeds you actually care about, such as:

  • Job boards that provide RSS feeds
  • Curated job lists in your niche
  • Company career pages that expose RSS

The template also demonstrates how to handle multiple feeds and iterate over them if you want to scan several sources in one run.

4. Connect the Google Sheets node to your sheet

In the Google Sheets node, point to the spreadsheet where you want your job data stored:

  • Set the Document ID (you can copy it from the Google Sheets URL)
  • Choose the Sheet name where rows should be written
  • Use the appendOrUpdate operation with the Link column as the matching key to avoid duplicate entries

5. Customize your OpenAI prompts

This is where you can make the workflow feel like it is truly “yours.” Each OpenAI node has a prompt that you can adapt.

  • Content extraction prompt
    The template asks OpenAI to return JSON in this exact format:
    {"company_name":"","benefits":"","job_description":"","location":""}
    Keeping this structure consistent is important so downstream nodes know where to find each field.
  • Scoring prompt
    This prompt includes:
    • Your resume text
    • The job description
    • A clear scoring rubric

    The goal is to output a numeric score that you can sort or filter by in Google Sheets.

  • Cover letter prompt
    The final OpenAI node uses:
    • Job title
    • Short job_description
    • Company_name
    • Location
    • Your resume

    It then generates a concise, personalized cover letter. The template has it return this in JSON as well, which keeps everything easy to parse and store.

You can adjust tone, length, and level of detail so the cover letters sound like you and fit your target roles.

Template prompt examples in practice

To keep the workflow stable, the prompts are written to produce predictable, machine-readable output. Here is how each one is typically structured:

  • Extraction prompt
    Instructs the model to analyze the job posting and return exactly:
    {"company_name":"","benefits":"","job_description":"","location":""}
    This makes it easy to map fields in subsequent nodes.
  • Scoring prompt
    Provides:
    • A description of your background (resume text)
    • The job description or extracted details
    • A scoring scale and criteria, so the model returns a clear numeric score
  • Cover letter prompt
    Combines the job details and your resume, then tells the model to output a short, tailored cover letter in JSON. This keeps the workflow consistent and makes it easy to store the letter in Google Sheets.

Ideas to customize and extend the workflow

Once the basic template is running, you can start making it your own. Here are some practical ways to extend it:

  • Get alerts for top matches
    Add an Email or Slack node so that jobs above a certain match score are pushed directly to your inbox or a Slack channel.
  • Create follow-up tasks
    Connect Trello or Notion and automatically create a card or page for high-score roles so you remember to apply or follow up.
  • Save on AI costs
    Insert a Filter node before the cover letter generation step. Only jobs with a decent match score get a cover letter, which keeps OpenAI usage in check.
  • Tag job types
    Extend the benefits or description parsing to detect and tag roles as remote, on-site, full-time, contract, or part-time. This makes filtering in Sheets even more powerful.

Troubleshooting tips and best practices

As with any automation, a few small tweaks can make the workflow more reliable and cost effective.

  • Handling rate limits
    Use the Limit node to cap how many jobs you process per run. If you run into throttling from RSS or job sites, add Delay or Wait nodes between HTTP requests.
  • Improving prompt reliability
    Be explicit about the JSON format you expect. Including a schema and one or two examples in the prompt can dramatically reduce parsing errors.
  • Avoiding duplicates
    Configure the Google Sheets node to use the job Link field as the matching column in appendOrUpdate mode. That way, if a job appears again in the feed, the existing row is updated instead of duplicated.
  • Protecting sensitive data
    Avoid storing resumes with personal identifying information in public or shared documents. Keep your Google Sheet private and limit access to trusted accounts.

Security and cost considerations

OpenAI usage is not free, so it helps to be intentional about when you call the API.

  • Minimize unnecessary requests
    Filter out obviously irrelevant roles before sending them to OpenAI nodes. For example, you might skip jobs outside your location or salary range.
  • Secure your API keys
    Store OpenAI keys and other credentials securely in n8n, rotate them periodically, and avoid hard-coding them in workflows.
  • Use least-privilege access
    For Google Sheets, grant only the access that is needed for the workflow, and restrict who can open or edit the document.

Real-world use cases

To give you a sense of how flexible this template is, here are a few ways people might use it:

  • Recent grads setting up a daily feed of internships and entry-level roles, then auto-generating first-draft cover letters.
  • Career changers scanning niche job lists and using the scoring step to highlight where their transferable skills stand out.
  • Recruiters feeding in new job postings and scoring them against candidate profiles for faster pre-screening.

Getting started: your next steps

If you are ready to make your job search a lot less manual, here is a simple way to begin:

  1. Import the “Job Seeking” template into n8n.
  2. Connect your OpenAI and Google Sheets credentials.
  3. Swap in your own RSS job feed URLs.
  4. Run a small test with 2 to 5 jobs to check the prompts and field mappings.
  5. Adjust prompts for tone, length, and scoring until the results feel right.
  6. Increase the Limit and let the workflow run on a schedule.

Try it now: Import the template, point it at your favorite job source, and run the workflow to see your first results appear in Google Sheets. If you want help tuning the cover letter prompts or adapting the workflow to your specific resume, feel free to reach out or leave a comment.


Tip: Keep a versioned record of your prompts and note any changes you make. As job sites and AI models evolve, having a history of what worked will make it much easier to keep your

n8n Recruitment Automation: Build a Smart Hiring Pipeline

n8n Recruitment Automation: Build a Smart Hiring Pipeline

Every hiring cycle starts with good intentions: find the right people, move fast, and give every candidate a great experience. Then the reality hits. Inboxes fill up, spreadsheets get messy, and manual follow-up drags you away from what really matters – evaluating fit and building your team.

It does not have to stay that way. With a simple mindset shift and the right tools, you can turn recruitment from a reactive grind into a smooth, largely automated pipeline that works for you in the background.

In this guide, you will walk through a production-ready n8n recruitment workflow template that:

  • Captures applications from Indeed or Gmail
  • Uses OpenAI to extract the job title automatically
  • Writes structured candidate data to Google Sheets
  • Sends onboarding emails and test requests
  • Schedules and tracks interviews via Cal.com

Think of this template as your starting point. It is a working foundation you can adapt, extend, and refine as your hiring process grows more sophisticated.

From manual chaos to an automated hiring system

Recruitment is full of repetitive, interrupt-driven tasks that quietly consume your day. You copy names into spreadsheets, search through email threads, paste links, send reminders, and try to remember who is at which stage.

Those tasks are important, but they do not require your creativity or judgment. They are exactly the kind of work automation is built for.

n8n, an open-source automation tool, lets you connect your hiring tools so that your pipeline reacts instantly and consistently. When you wire these steps together, you unlock benefits such as:

  • Faster responses so candidates feel acknowledged quickly
  • Consistent onboarding and screening steps across roles
  • Reduced manual data entry and fewer spreadsheet errors
  • Clear visibility through an audit trail in Google Sheets

Instead of juggling tabs and emails, you can focus on conversations, culture, and decision making. Automation takes care of the rest.

Adopting an automation-first mindset

Before diving into nodes and triggers, it helps to approach this workflow with the right mindset. You are not just building a one-off script. You are creating a system that can grow with your team.

As you follow the steps below, keep asking:

  • What repetitive action can I remove from my plate?
  • What information do I always need but currently hunt for manually?
  • Where are candidates waiting on me instead of a system?

This template answers many of those questions out of the box. It captures applications, structures data, and nudges candidates forward. Once it is running, you can extend it with more advanced steps like resume parsing or scoring, all from the same foundation.

The recruitment automation journey with n8n

The template workflow connects your tools in a clear, logical sequence:

  • Gmail Trigger listens for new application emails
  • OpenAI node parses the email subject and extracts the job title
  • Google Sheets appends or updates a candidate row
  • Gmail sends an onboarding email with a unique code
  • Form submission node collects onboarding responses and updates the sheet
  • Webhook + Switch routes sheet updates to the right next step
  • Cal.com Trigger captures booked interviews and marks the sheet

Let us walk through this pipeline step by step so you can understand not just how to set it up, but how to adapt it to your own hiring style.

Step 1: Capture incoming applications with Gmail Trigger

Everything begins when a candidate applies. Instead of manually scanning your inbox, you let n8n listen for you.

Start with the Gmail Trigger node:

  • Filter by sender or subject so you only catch job application messages
  • Example filter: indeed subject:applied on Indeed
  • Choose a poll frequency (for example, every hour) or use push-style triggers if available

Make sure the trigger captures key fields that you will need downstream:

  • subject
  • from.name
  • from.address
  • date
  • message body

This single step turns your inbox into a structured input stream for your hiring pipeline.

Step 2: Use OpenAI to extract the job title

Application subjects are rarely tidy. They might look like:

Freelance Video Editor - Grace-Elyse Pelzer applied on Indeed

Instead of manually parsing these lines, you can let the OpenAI node pull out exactly what you need: the job title.

Configure the OpenAI (or LangChain) node to:

  • Send a clear system instruction, for example:
    You are an intelligent bot capable of pulling out the job title from an email subject line.
  • Pass the subject dynamically: {{ $json.subject }}
  • Ask for JSON-only output, such as:
{  "job": ""
}

By constraining the prompt and requiring JSON, you get a robust, structured value even when subjects vary. Save the parsed job field so downstream nodes, especially Google Sheets, receive a clean, normalized job title.

Step 3: Build your single source of truth in Google Sheets

Next, you want every candidate to appear in a central place where you can filter, sort, and track progress. Google Sheets is perfect for this, especially in the early stages of building out your hiring stack.

Use the Google Sheets node with the appendOrUpdate operation, keyed on the candidate email or the unique code you generate. Map columns such as:

  • First Name
  • Last Name (you can split this from from.name)
  • Job (from the OpenAI node)
  • Date Added
  • Code (generated with Math.random or a deterministic hash)
  • Indeed Email or source email

This sheet becomes your candidate pipeline dashboard and audit log. It is where you can monitor stages, trigger bulk actions, and later connect analytics tools.

Step 4: Send a personalized onboarding email automatically

Once the candidate is safely recorded, it is time to make a strong first impression without manually drafting the same message over and over.

Use a Gmail node to send an onboarding email that includes:

  • A link to your onboarding form
  • The unique code that will match form responses to their row in the sheet
  • Clear, friendly next-step instructions

Personalize the message with variables, for example:

Hey {{ $json['First Name'] }},

Thanks for applying for the {{ $('OpenAI').item.json.message.content.job }} position...

This small touch keeps your process human and warm, even though the workflow is doing the heavy lifting behind the scenes.

Step 5: Collect onboarding and test submissions with n8n Forms

Now that candidates have their link and code, you want their responses to flow directly into your system. No more copy and paste, no more lost forms.

Create an n8n Form Trigger for your onboarding and test forms. In your form:

  • Include a required Code field
  • Use that code to match responses back to the correct row in Google Sheets

In the Sheets node, still using appendOrUpdate, set the matching column to Code. This keeps each candidate’s data unified, even as they submit multiple forms.

You can also introduce basic screening logic at this stage. For example:

  • If Years Of Experience is less than or equal to 3, set Rejected = TRUE

These simple rules free you from manually scanning every response and let you focus your time on the most promising candidates.

Step 6: Route next steps with a Webhook and Switch node

As your sheet updates, different candidates will hit different milestones. Some finish onboarding, others complete tests, some are approved for interviews.

To keep the flow organized, use a Webhook or a Filter + Switch combination that evaluates which column changed, for example:

  • Questions
  • Test Complete
  • Test Approved
  • Interview Scheduled

Based on these values, route candidates to the right Gmail node to send:

  • Test instructions when onboarding is complete
  • An interview scheduling link when the test is approved
  • Rejection or follow-up messages when criteria are not met

This modular routing keeps the workflow maintainable and easy to extend. You can add new branches and conditions without rewriting the entire pipeline.

Step 7: Track interviews with the Cal.com Trigger

When a candidate reaches the interview stage, you want scheduling to be smooth and transparent.

Use the Cal.com Trigger node to listen for booked interviews. When an event is created, update the corresponding row in Google Sheets to mark that the interview is scheduled.

This closes the loop between your calendar and your hiring dashboard, so you always know who is at which stage without manual reconciliation.

Tips and best practices for a reliable n8n recruitment workflow

To keep your automation stable and trustworthy, build in a few best practices from the start.

Design focused OpenAI prompts

  • Keep prompts constrained to extract only the fields you need
  • Require strict JSON output
  • Add a few examples if your subjects are especially noisy or varied

Avoid duplicate candidates

  • Use email or the generated Code as the match column in Google Sheets
  • Rely on appendOrUpdate so repeated applications update instead of duplicating

Protect candidate data

  • Store only the minimal PII you actually need
  • Secure Google and Gmail credentials with OAuth
  • Limit spreadsheet access to the smallest group necessary

Test thoroughly before going live

  • Use test values for the Form Trigger and Webhook, n8n offers a test mode
  • Confirm that code matching and sheet updates work from end to end
  • Check that each branch of your Switch node sends the correct email

Plan for failures and limits

  • Configure retry logic on network-dependent nodes
  • Add a Slack or email alert for failed executions
  • Respect Gmail and Google Sheets API limits by batching or spacing actions

Extending your recruitment automation as you grow

Once the core flow is stable, you have a powerful platform to build on. You can start simple and layer in sophistication as your needs evolve.

Here are some ideas to extend the template:

  • Automated resume parsing to extract skills, seniority, or key qualifications from attachments
  • Candidate scoring using an evaluation node, where OpenAI summarizes strengths and flags potential concerns
  • HRIS integrations that trigger background checks or payroll onboarding once a candidate is hired
  • Analytics dashboards by connecting Google Sheets to Looker Studio for pipeline metrics and conversion rates

Each improvement turns your n8n setup into more of a strategic asset, not just a time saver.

Security and compliance reminders

Recruiting data is sensitive, and a professional automation setup respects that from day one. Keep in mind:

  • Use least-privilege OAuth tokens for Gmail and Google Sheets
  • Enable 2FA on service accounts and Google accounts
  • Restrict who can view or edit the candidate sheet
  • Adopt a data retention policy and remove old candidate data according to local regulations

Final checklist before you switch this workflow to live

Before you trust this automation with real candidates, walk through this quick checklist:

  1. Confirm Gmail trigger filters capture only application emails
  2. Validate your OpenAI prompt against multiple real subject variations
  3. Ensure Code generation is unique and consistently used for matching
  4. Test form submissions and verify sheet updates and routing paths
  5. Enable logging and alerts so you see and fix failures quickly

Take the next step toward a smarter hiring pipeline

Every hour you spend on manual recruitment admin is an hour you are not talking to great candidates or shaping your culture. This n8n template is your shortcut to reclaiming that time.

You do not need to automate everything at once. Start with this workflow, connect your accounts, and run it in a staging spreadsheet. Watch how it handles the basics. Then iterate, improve, and expand it as you gain confidence.

Ready to reduce busywork and build a smarter hiring pipeline?

Call to action: Try the template now, then share one sample email subject you receive. I will provide a tuned OpenAI prompt that you can paste directly into your OpenAI node so your extraction is even more accurate for your specific use case.

Connect Retell Voice Agents to Custom Functions

Connect Retell Voice Agents to Custom Functions with n8n

Retell voice agents become significantly more powerful when they can trigger live automations in your backend systems. By integrating Retell with n8n through a webhook-based Custom Function, you can orchestrate complex workflows in real time while the conversation is in progress.

This article walks through a reusable hotel-booking workflow template that accepts a POST request from a Retell Custom Function, executes logic in n8n, and returns a dynamic response to the voice agent. The same pattern can be adapted to a wide range of voice automation use cases.

Why integrate Retell with n8n?

Connecting Retell and n8n using HTTP webhooks and Custom Functions creates a flexible bridge between conversational AI and your operational systems. This architecture enables you to:

  • Execute custom business logic when a Retell voice agent invokes a function during a call
  • Invoke external APIs such as CRMs, booking engines, calendar systems, or internal services
  • Generate context-aware, dynamic responses and return them to the agent in real time
  • Trigger parallel automations like email notifications, Slack alerts, and database updates

For automation professionals, this pattern provides a clean, maintainable way to keep conversational flows decoupled from backend implementation details while still enabling rich, real-time behavior.

Template overview: hotel booking with Retell and n8n

The provided n8n workflow template is intentionally minimal so it can serve as a starting point for more complex implementations. At a conceptual level, the template:

  1. Exposes an n8n Webhook node that accepts POST requests from a Retell Custom Function.
  2. Uses a Set node to define the response payload and to serve as a placeholder for custom logic, such as external API calls or LLM prompts.
  3. Returns a string response to Retell using a Respond to Webhook node so the agent can immediately speak or display the result.

The example workflow includes a sample hotel booking payload containing details such as guest name, dates, room type, and total cost. This allows you to test a realistic booking scenario quickly and then adapt it to your own domain.

Core use case and data model

Sample payload fields

The template expects a payload that includes keys such as:

  • guest-name
  • hotel-name
  • total-cost
  • check-in-date and check-out-date
  • room-type-booked and number-of-nights

In addition to these booking-specific fields, Retell provides a rich call context in the POST body, which typically includes:

  • Call ID and session metadata
  • Transcript or partial transcript of the conversation
  • Tool or function invocation details

This context can be leveraged in n8n to implement more advanced automations, such as personalized responses, conditional flows, or post-call analytics.

Architecture and technical flow

High-level interaction

When a Retell voice agent reaches a Custom Function node in its flow, the following sequence occurs:

  1. The Custom Function sends an HTTP POST request to the configured n8n webhook URL.
  2. The request body contains the full call context and any function parameters you defined in Retell, for example booking details captured during the conversation.
  3. n8n receives the payload in the Webhook node and passes it into downstream nodes for processing.
  4. Your workflow can parse and transform the data, call external APIs, store records, or run other business logic.
  5. The Respond to Webhook node sends a response back to Retell, typically as a string that the agent uses as its next spoken output.

This request-response cycle occurs in real time, so the user experiences a seamless conversational flow while your automation layer performs the necessary operations behind the scenes.

Key n8n nodes in the template

  • Webhook node: Exposes an HTTP endpoint that Retell can call. Configured to accept POST requests and capture the incoming payload.
  • Set node: Used as a simple response builder in the template. In production, this node is often replaced or augmented with additional nodes for API calls, data transformations, or LLM interactions.
  • Respond to Webhook node: Sends the final response back to Retell. Typically returns a single string, but can also provide structured data if your function design requires it.

Prerequisites

Before deploying the template, ensure you have:

  • An active Retell AI account and a Voice Agent that includes a Custom Function node in its conversation flow
  • An n8n instance, either cloud-hosted or self-hosted, that is reachable from the public internet
  • Basic familiarity with n8n nodes, HTTP webhooks, and handling JSON payloads

Implementation guide: connecting Retell to n8n

1. Import the template and obtain the webhook URL

Start by importing the hotel booking confirmation workflow template into your n8n instance. Once imported:

  • Open the workflow in the n8n editor.
  • Select the Webhook node.
  • Copy the webhook URL generated by n8n, which will look similar to:
https://your-instance.app.n8n.cloud/webhook/hotel-retell-template

This URL is what your Retell Custom Function will call during the conversation.

2. Configure the Retell Custom Function

Next, connect your Retell agent to this webhook:

  • Open the Retell agent editor and navigate to the Custom Function node in your flow.
  • Replace the example or placeholder URL with the n8n webhook URL you copied.
  • Ensure the function is configured to send the required parameters, such as booking details and call context.
  • Save and publish the updated agent configuration.

3. Customize workflow logic in n8n

The default template uses a Set node to return a static response. For production-grade automations, you will typically expand this section of the workflow. Common enhancements include:

  • Calling a hotel booking or reservation API to create or modify bookings
  • Sending email confirmations via SMTP, SendGrid, or other email providers
  • Using an LLM node to generate personalized or contextually rich responses
  • Writing booking details to a CRM, database, or Google Sheets for reporting

You can insert additional nodes between the Webhook and Respond to Webhook nodes to perform these actions, while still ensuring that a timely response is returned to Retell.

4. Deploy and test the integration

Once your logic is in place:

  • Activate or deploy the n8n workflow.
  • Initiate a test conversation with your Retell agent via voice or text.
  • Progress through the flow until the Custom Function node is triggered.
  • Verify that Retell sends a POST request to your webhook and that n8n executes the workflow successfully.
  • Confirm that the response returned by n8n is spoken or displayed by the agent in real time.

Use this test cycle to validate both the payload structure and the correctness of your business logic.

Security and signature verification

For production environments, validating request authenticity is essential. Retell includes an x-retell-signature header in each webhook request. This header can be used to verify that the call originated from Retell and that the payload has not been tampered with.

In n8n, you can implement signature verification by:

  • Adding a Function node that computes an HMAC signature using your shared secret and compares it to the x-retell-signature header.
  • Conditionally continuing the workflow only if the signature matches, otherwise returning an error or ignoring the request.

If you prefer to centralize security, you can also place middleware or an API gateway in front of n8n to perform signature validation before forwarding requests to the webhook.

Example customization pattern

A typical enhancement to the template involves replacing the Set node with a sequence of operational steps. For example:

  1. Parse the incoming payload to extract guest details, dates, and room preferences.
  2. Call your hotel booking API to create or update a reservation.
  3. Send a confirmation email that includes booking details and terms.
  4. Return a concise response string to Retell, such as: “Booking confirmed for Mike Smith – Deluxe Suite on March 29th. A confirmation email has been sent to mike@yahoo.com.”

This pattern keeps the conversational experience focused and responsive while still executing all necessary backend processes in a structured manner.

Extension ideas for advanced automations

Once the basic integration is working, you can extend the workflow to support more sophisticated scenarios:

  • Automatically create calendar reservations and send meeting or stay invites after a booking is confirmed.
  • Use LLM providers such as OpenAI or Anthropic to generate more natural, context-aware agent replies.
  • Sync bookings or call outcomes to a CRM or Google Sheets for reporting and reconciliation.
  • Trigger downstream notifications via Slack, SMS, or other channels when a booking is created, updated, or canceled.
  • Implement conditional branching that adjusts responses based on availability, budget constraints, or loyalty program status.

Troubleshooting and operational tips

  • If the webhook is not being triggered, confirm that your n8n instance is publicly accessible and that the URL in the Retell Custom Function is correct.
  • Use n8n execution logs to inspect incoming requests and validate the payload structure against your expectations.
  • Introduce a temporary logging or debug node to persist raw payloads to a file, database, or external logging system for analysis.
  • When calling external APIs, configure timeouts and implement robust error handling. If an error occurs, return a clear, user-friendly message to the voice agent rather than exposing internal error details.

Best practices for voice-driven automations

  • Keep response times low, as latency is highly noticeable in voice interactions. Offload heavy or long-running work to asynchronous processes whenever possible and return an immediate confirmation message.
  • Sanitize and validate all user-supplied data, including emails, dates, names, and payment-related information.
  • Log call IDs, key payload fields, and relevant portions of the transcript for observability, auditing, and later analysis.
  • Design conversational fallbacks so the agent can gracefully handle scenarios where external services are unavailable or return errors.

Conclusion

Integrating Retell voice agents with n8n using a webhook-powered Custom Function provides a robust pattern for real-time, voice-driven automation. The hotel booking workflow template offers a practical baseline: import it, connect your Retell Custom Function to the n8n webhook, and then expand the workflow with your own APIs, LLM logic, and data integrations.

With a few targeted customizations, every conversational interaction can trigger reliable, traceable business actions across your systems.

Ready to implement? Import the template into your n8n instance, update the webhook URL in your Retell Custom Function, and run a test booking flow. For assistance with advanced integrations or conversation analytics, contact us at hello@agentstudio.io.

Pro tip: For production deployments, always enable signature verification and consider asynchronous processing for longer-running tasks to maintain a fast and consistent voice experience.

Call to action:

Import the n8n template, connect your Retell webhook, and extend the workflow with at least one API integration today. Need strategic guidance or a custom implementation? Email hello@agentstudio.io for consultation.

YouTube Chatbot with n8n, Apify & Supabase

Build a YouTube-powered Chatbot with n8n, Apify, Supabase and OpenAI

This guide walks you through a complete, production-ready n8n workflow that turns YouTube videos into a searchable knowledge base for a chatbot. You will learn how to scrape a YouTube channel with Apify, extract transcripts, create OpenAI embeddings, store them in Supabase, and finally connect everything to a conversational chatbot inside n8n.

What You Will Learn

By the end of this tutorial you will be able to:

  • Automatically pull videos from a YouTube channel using Apify actors
  • Extract and process video transcripts at scale
  • Convert transcripts into vector embeddings with OpenAI
  • Store and search those embeddings in a Supabase vector table
  • Build an n8n chatbot that answers questions based on YouTube content

Why This Architecture Works Well

The goal is to transform long-form YouTube content into structured, searchable knowledge that a chatbot can use in real time. The chosen stack provides a clear division of responsibilities:

  • Apify for reliable scraping of channel videos and transcripts
  • n8n for orchestration, automation, and scheduling
  • Google Sheets for human-friendly review and progress tracking
  • OpenAI for embeddings and chat model responses
  • Supabase for fast semantic search over transcript embeddings
  • AI Agent nodes in n8n for a LangChain-style question-answering chatbot

This combination lets you build a YouTube chatbot that is easy to maintain and extend, while still being robust enough for production use.

Conceptual Overview of the n8n Workflow

The template is organized into three main sections inside n8n:

  1. Get Videos
    Discover videos from a YouTube channel with Apify, then store basic metadata (title and URL) in Google Sheets as a queue for later processing.
  2. Get Transcripts & Build Vector Store
    Loop through the sheet, retrieve transcripts for each video, split text into chunks, create OpenAI embeddings, and store them in a Supabase vector table.
  3. Chatbot
    Receive user messages, query Supabase for relevant transcript chunks, and generate helpful answers using an OpenAI chat model.

Before You Start: Required Services & Credentials

Make sure you have access to the following:

  • Apify account with:
    • API key
    • Actor ID for a YouTube channel scraper
    • Actor ID for a YouTube transcript scraper
  • Google account with:
    • Google Sheets OAuth credentials
    • A target spreadsheet for storing video metadata and processing status
  • OpenAI account with:
    • API key
    • Access to an embeddings model
    • Access to a chat model (the template uses gpt-4o, but you can choose another)
  • Supabase project with:
    • Project URL
    • Anon or service role key
    • A vector-enabled table (for example, a documents table) to store embeddings
  • n8n instance with:
    • Sufficient memory to handle embeddings
    • Webhook exposure if you want an external chat trigger

Section 1 – Getting YouTube Videos into Google Sheets

In this first section, you will configure an Apify actor that scrapes videos from a YouTube channel, then pushes any new video information into a Google Sheet. This sheet becomes your central list of videos to process.

Nodes Used in the “Get Videos” Section

  • Apify (Actor: YouTube channel scraper)
  • Wait
  • Apify (Get run)
  • If (check status == SUCCEEDED)
  • Datasets → Split Out
  • Google Sheets (Append rows)

Step-by-Step: Configure Video Scraping

  1. Set up the Apify YouTube channel scraper node
    • In the Apify node, choose the actor for scraping YouTube channels.
    • Set the actorId to your YouTube channel scraper actor (the template uses a cached ID).
    • Provide the channel URL, for example: https://www.youtube.com/@channelName.
  2. Trigger the actor and wait
    • After starting the actor, add a Wait node.
    • Set the wait duration to around 10-30 seconds, depending on the expected queue time on Apify.
  3. Poll the run status
    • Use the Apify – Get run node to check the run status.
    • Add an If node that checks whether status == SUCCEEDED.
    • If not succeeded, you can loop back or extend the wait period to allow more time.
  4. Retrieve dataset and split items
    • Once the run is successful, use the dataset output of the actor run.
    • Apply a Datasets → Split Out node so that each video becomes a separate item in the workflow.
  5. Append new videos to Google Sheets
    • Configure a Google Sheets – Append node.
    • Map the dataset fields to your sheet columns, for example:
      • Video Title
      • Video URL
      • Done (initially empty, used later to mark processed videos)

Section 2 – Getting Transcripts and Building the Vector Store

After you have a list of videos in Google Sheets, the next step is to fetch transcripts, create embeddings, and store them in Supabase. This is the core of your “knowledge base” for the chatbot.

Nodes Used in the “Get Transcripts” Section

  • Google Sheets (Read only rows where Done is empty)
  • SplitInBatches or Loop Over Items
  • Apify (YouTube transcript scraper actor)
  • Wait
  • Apify (Get run)
  • If (check status == SUCCEEDED)
  • Datasets → Get transcript payload
  • LangChain-style nodes:
    • Default Data Loader
    • Recursive Character Text Splitter
    • Embeddings (OpenAI)
    • Supabase Vector Store
  • Google Sheets (Update row: set Done = Yes)

Step-by-Step: From Video URLs to Vector Embeddings

  1. Read unprocessed rows from Google Sheets
    • Use a Google Sheets node in read mode.
    • Filter rows so that only entries where the Done column is empty are returned.
    • These rows represent videos whose transcripts have not yet been processed.
  2. Process videos in batches
    • Add a SplitInBatches or Loop Over Items node.
    • Choose a batch size that fits your rate limits, for example 1-5 videos per batch.
  3. Run the Apify transcript scraper actor
    • For each video URL from the sheet, call the Apify YouTube transcript scraper actor.
    • Pass the video URL as input to the actor.
  4. Wait for transcript extraction to finish
    • Add a Wait node after starting the actor.
    • Then use Apify – Get run to check the run status.
    • Use an If node to confirm that status == SUCCEEDED before continuing.
  5. Extract transcript text from the dataset
    • Once the actor run is successful, access the dataset that contains the transcript.
    • Use a dataset node or similar step to get the transcript payload.
  6. Load and split text into chunks
    • Feed the transcript text into the Default Data Loader node.
    • Connect the output to a Recursive Character Text Splitter node.
    • Configure the splitter to break the transcript into overlapping chunks to preserve context.
  7. Create OpenAI embeddings
    • Connect the text splitter to an OpenAI Embeddings node.
    • Choose the embeddings model you want to use.
    • Each text chunk will be converted into a vector representation.
  8. Store embeddings in Supabase
    • Send the embeddings to the Supabase Vector Store node.
    • Configure it to write into your vector table (for example, a documents table).
    • Include metadata such as video title, URL, or timestamps if available.
  9. Mark the video as processed in Google Sheets
    • After a successful insert into Supabase, update the corresponding row in Google Sheets.
    • Set the Done column to Yes so the video is not reprocessed later.

Practical Tips for Transcript Processing

  • Chunk size and overlap
    A good starting point is 500-1,000 characters per chunk with about 10-20% overlap. This balances context preservation with token and cost efficiency.
  • Batching to respect rate limits
    Use SplitInBatches so you do not hit Apify or OpenAI rate limits. Smaller batches are safer if you are unsure of your limits.
  • Idempotency via Google Sheets
    The Done column is essential. Only process rows where Done is empty, and set it to Yes after successful embedding storage. This prevents duplicate processing and simplifies error recovery.

Section 3 – Building the Chatbot in n8n

With your transcripts embedded and stored in Supabase, you can now connect a chatbot that answers questions using this knowledge base. The chatbot is implemented using n8n’s AI Agent and OpenAI Chat nodes, with Supabase as a retrieval tool.

Nodes Used in the “Chatbot” Section

  • Chat trigger node (When a chat message is received)
  • AI Agent node (with a system message and a Supabase vector store tool)
  • OpenAI Chat model node (for LLM responses)
  • Simple memory buffer (to keep session context)

Step-by-Step: Configure the Chatbot Flow

  1. Set up the chat trigger
    • Add a chat trigger node or webhook that receives user messages.
    • This entry point starts the conversation flow in n8n.
  2. Configure the AI Agent with a system message
    • Use the AI Agent node to orchestrate retrieval and response.
    • Write a system message that instructs the agent to:
      • Always query the Supabase vector store before answering
      • Use retrieved transcript chunks as the primary knowledge source
  3. Connect Supabase as a retrieval tool
    • Set the Supabase vector store node to retrieve-as-tool mode.
    • Expose it to the AI Agent as a tool the agent can call.
    • The agent will receive transcript chunks plus relevance scores for each query.
  4. Generate the final answer with OpenAI Chat
    • Attach an OpenAI Chat node that the AI Agent uses to craft responses.
    • The model combines the user question and retrieved transcript snippets to produce a conversational answer.
  5. Add memory for multi-turn conversations
    • Use a simple memory buffer node to store recent conversation history.
    • This helps the model answer follow-up questions more naturally.

Design Considerations for Better Answers

When configuring the chatbot:

  • Make the system message explicit about using only YouTube transcript content as the knowledge source.
  • Limit the number of retrieved chunks (for example, top 3-5) to keep prompts small and responses fast.
  • If you want citations, include transcript metadata (such as video titles or timestamps) in the retrieved context and instruct the model to reference them.

Configuration Checklist

Before running the full workflow, verify that you have:

  • Apify:
    • API key set up in n8n credentials
    • Actor IDs for both the channel scraper and transcript scraper
  • Google Sheets:
    • OAuth credentials configured in n8n
    • Spreadsheet ID and sheet/gid correctly referenced in all nodes
  • OpenAI:
    • API key stored in n8n credentials
    • An

Build an n8n Research Agent with LangChain

Build an n8n Research Agent with LangChain

Imagine turning hours of scattered research into a focused, automated flow that works for you in the background. With n8n and LangChain, you can move from tab-hopping and copy-pasting to a streamlined research engine that gathers insights while you focus on strategy, creativity, and growth.

This guide walks you through a reusable n8n workflow template that acts like a research partner. It routes your questions to three specialized tools – Social media, Company research, and Market research – then returns clear, actionable answers. Along the way, you will see how this template can be a powerful first step toward a more automated, calm, and scalable workflow.

The problem: research that drains your time and focus

Modern research rarely lives in one place. You might be:

  • Scrolling social channels to understand sentiment and conversations
  • Digging through company profiles, press releases, and databases
  • Scanning reports and articles to gauge market size and trends

Each task uses a different skill set and a different set of tools. Switching contexts like this is exhausting and slow. Important decisions end up waiting on manual work, and results vary depending on who did the research and how much time they had.

Automation with n8n and LangChain offers a different path. Instead of juggling everything yourself, you can design a research agent that:

  • Collects data from multiple sources consistently
  • Summarizes and structures findings in a repeatable way
  • Frees you and your team to focus on interpretation and action

Shifting your mindset: from manual researcher to research architect

Before diving into the template, it helps to adopt a new mindset. You are not just doing research anymore. You are designing how research happens in your business.

With n8n and LangChain, you can:

  • Capture your research process once, then let the workflow repeat it for every new question
  • Scale your efforts without scaling your workload
  • Continuously improve the system as you learn what works best

Think of this template as a starting point, not a finished product. You can launch it quickly, see immediate time savings, then refine and extend it as your needs grow.

The vision: a unified research agent in n8n

The template combines n8n workflows with a LangChain-powered agent to create a single entry point for your research questions. You ask a question once, and the agent decides which specialized tool workflows to call:

  • Social media research for sentiment and conversations
  • Company research for profiles, offerings, and recent updates
  • Market research for trends, competitors, and opportunity sizing

Instead of manually deciding where to look each time, you let the agent orchestrate the process. This is where the real leverage begins.

Template architecture: how your research engine is structured

Inside n8n, the template follows a modular architecture that is easy to understand and extend:

  • TriggerWhen chat message received starts the workflow whenever a user sends a research request.
  • AI Agent – A LangChain agent that chooses which research tools to use and how to combine them.
  • OpenAI Chat Model – The language model (for example GPT-4o-mini) that powers reasoning and text generation.
  • Simple Memory – Short-term memory that keeps context across follow-up messages.
  • Tool Workflows – Three separate n8n workflows: Social media, Company research, and Market research.

This modular approach means you can start small, then plug in additional tools as your research needs evolve.

Walking through the core components

1. Trigger: When chat message received

The journey begins when a user sends a message. The When chat message received node captures that input and can be connected to different channels, such as:

  • A chatbot interface
  • Slack or other team chat tools
  • Email or custom forms

Whatever the source, the trigger passes the raw user message to the AI Agent node so the agent can interpret the request.

2. AI Agent: the decision-making brain with LangChain

The AI Agent is where the intelligence lives. Guided by a system prompt, it knows that it has three tools available and understands when and how to use each one. The agent will:

  • Detect the intent behind the query, such as social monitoring, competitive analysis, or market sizing
  • Decide which tool workflows to call and how to map the inputs
  • Combine all returned data into a clear, structured response
  • Ask clarifying questions when the original request is ambiguous

This is what transforms your workflow from a static script into a flexible research partner that adapts to each new question.

3. OpenAI Chat Model: the reasoning engine

The AI Agent relies on an OpenAI Chat Model, such as GPT-4o-mini, to handle natural language understanding and generation. In n8n, you configure:

  • Your chosen OpenAI model
  • Secure credentials stored as n8n credentials (never in node metadata)

This model parses user intent, builds prompts for your tools, and composes final answers that are easy to act on.

4. Simple Memory: keeping conversations coherent

The Simple Memory node provides short-term context. It allows the agent to remember previous messages within a conversation, so users can say things like:

“Drill into competitor pricing”

without repeating the company name or market. Memory helps the agent respond naturally while keeping your workflow structured and predictable.

5. Tool Workflows: Social media, Company research, Market research

Each tool is its own n8n workflow that focuses on a specific research domain. These workflows can use:

  • HTTP Request nodes
  • Scrapers
  • Database queries
  • External APIs and data providers

The AI Agent calls these tool workflows when needed and receives structured data in return. It then synthesizes that data into a single, coherent answer for the user. This separation of concerns makes it easy to improve each tool independently over time.

How the decision flow unfolds

To understand how everything works together, follow this step-by-step flow:

  1. The user submits a query to the When chat message received trigger node.
  2. The AI Agent uses the OpenAI Chat Model to interpret the intent behind the query.
  3. Based on its system instructions and the detected intent, the agent selects one or more tool workflows to call.
  4. Each selected tool workflow runs, collects or analyzes data, and returns structured results.
  5. The agent aggregates these results, composes a final response with summaries, findings, and next steps, then sends it back to the user.

This flow turns a single question into a coordinated research effort, without you needing to orchestrate every step by hand.

Real-world scenarios: what your agent can handle

Competitive profile

User request: “Gather key details on Acme Inc – product lines, pricing, and recent news.”

Agent behavior: The agent may trigger the Company research workflow to fetch core company data, use the Market research workflow for pricing context and positioning, and optionally call the Social media workflow to surface recent mentions or sentiment.

Social listening

User request: “What are people saying about our new feature on Twitter and LinkedIn?”

Agent behavior: The agent calls the Social media workflow to gather mentions, perform sentiment analysis, and highlight recurring themes, examples, and potential risks or opportunities.

Market opportunity brief

User request: “Summarize the current market opportunity for subscription-based fitness apps in EMEA.”

Agent behavior: The agent uses the Market research workflow to pull TAM/SAM/SOM approximations, competitor lists, pricing models, and trend indicators from social and news sources, then presents a concise brief.

These examples are not limits. They are starting points that show how a single workflow can support product strategy, marketing, sales, and leadership decisions.

Designing your agent: configuration and best practices

Crafting a powerful system prompt

The system prompt is how you teach your agent to think. A clear prompt explains:

  • Which tools exist
  • What inputs and outputs each tool expects
  • When to use each tool and when to ask follow-up questions

For example, you might tell the agent:

“You have three tools: Social media, Company research, Market research. Use the minimal set of tools needed and ask clarifying questions if the request is ambiguous.”

As you test the workflow, refine this prompt. Small improvements here can significantly boost accuracy and reliability.

Mapping inputs and outputs for consistency

To keep your tools predictable, define a clear schema for each workflow. Common fields include:

  • Query
  • StartDate
  • EndDate
  • Region
  • Sources

Consistent schemas make it easier for the AI Agent to build prompts and map data correctly. This structure is key if you plan to scale your tooling beyond the initial three workflows.

Handling rate limits and errors gracefully

As you rely more on automation, resilience becomes critical. Protect your setup by:

  • Storing API keys securely in n8n credentials
  • Adding retry logic where external services might fail
  • Designing the agent to return partial results and explain any errors if a tool fails

This way, your research engine stays helpful even when one data source is temporarily unavailable.

Privacy and compliance considerations

Automation should respect user privacy and legal requirements. As you design your workflows:

  • Mask or redact personal data when storing memory or logs
  • Follow platform terms of service when scraping social content
  • Comply with regulations like GDPR and CCPA when handling personal information

Building with privacy in mind from the start will make your system more sustainable and trustworthy.

Testing, learning, and iterating

To turn this template into a high-performing research engine, treat it as an ongoing experiment. Create a small test suite of queries that reflect your real-world needs, such as:

  • Short, simple questions
  • Ambiguous or underspecified requests
  • Multi-part research tasks

Track how often the agent:

  • Selects the right tools
  • Provides the depth of insight you expect
  • Needs clarifying questions

Then refine your system prompt, tool descriptions, and schemas. Each iteration makes your workflow more reliable and more valuable to your team.

Growing with your needs: scaling and extension ideas

Once the core template is running smoothly, you can expand your research capabilities step by step. Some ideas:

  • Add more specialized tools, such as:
    • Financials
    • Patent search
    • External databases like Crunchbase or Glassdoor
  • Introduce vector search to enhance company and market knowledge retrieval
  • Build a UI dashboard to visualize aggregated results and export reports

Because the architecture is modular, you can plug in these enhancements without rewriting the entire system.

Security checklist: protecting your automation

As your workflow becomes central to your research process, security should be non-negotiable. Use this quick checklist:

  • Store all API keys in n8n credentials, not directly in node metadata
  • Limit how long memory retains sensitive information and purge it regularly
  • Log tool calls and errors so you can audit behavior and troubleshoot issues

Sample prompts to get you started

Clear prompts help your agent perform better. Here are some examples you can try immediately:

1) "Find recent funding announcements and press coverage for Acme Inc (last 12 months)."
2) "Analyze social sentiment for Product X launch on Twitter and Reddit (past 30 days)."
3) "Estimate market size for subscription meal kits in the US. Include top 5 competitors and pricing tiers."

Use these as a base, then adapt them to your own products, markets, and questions.

Measuring success: proving the value of automation

To see the impact of your n8n research agent, track a few key metrics over time:

  • Accuracy of tool selection – How often queries are routed to the correct tools
  • User satisfaction – Feedback scores from people who rely on the agent
  • Average completion time – How long a typical research task takes before and after automation
  • Rate of follow-up clarifying questions – Lower is better if your initial prompts and workflows are clear

These numbers help you demonstrate the return on investment and identify where to improve next.

From template to transformation: your next steps

This n8n + LangChain research agent template gives you a practical, modular foundation for automating multi-source research. It is not just a workflow. It is a stepping stone toward a more focused, less reactive way of working.

You can start small:

  • Launch with a single tool workflow, such as Company research
  • Validate the quality of results on a handful of core use cases
  • Gradually add Social media and Market research as your confidence grows

With thoughtful prompt design, consistent schemas, and secure credentials, you can dramatically reduce manual research time and unlock faster, better-informed decisions across your team.

Ready to take the next step? Import the template into n8n, connect your OpenAI credential, wire up the three tool workflows, and run a few test queries. Treat each run as feedback, then refine and extend your agent until it feels like a natural part of how you work.

If you want support refining the system prompt, designing tool schemas, or tailoring the workflow to your data sources, our team can help you accelerate that journey.

Get a free template review

Build a Telegram AI Chatbot with n8n & OpenAI

Build a Telegram AI Chatbot with n8n & OpenAI

Imagine opening Telegram and having an assistant ready to listen, think, and respond in seconds, whether you send a quick text or a rushed voice note on the go. No context switching, no manual copy-paste into other tools, just a smooth flow between you and an AI that understands your message and remembers what you said a moment ago.

That is exactly what this n8n workflow template helps you create. By combining the low-code power of n8n with OpenAI models, you can build a Telegram AI chatbot that:

  • Handles both text and voice messages
  • Automatically transcribes audio to text
  • Preserves short-term chat memory across turns
  • Replies in Telegram-safe HTML formatting

This article reframes the template as more than a technical setup. Think of it as a first step toward a more automated, focused workday. You will see how the workflow is structured, how each node contributes, and how you can adapt it to your own needs as you grow your automation skills.

The problem: Constant context switching and manual work

Most of us already use Telegram for quick communication, brainstorming, or capturing ideas. Yet when we want AI help, we often jump between apps, retype messages, or upload audio files manually. It breaks focus and steals time that could be spent on deeper work, creative thinking, or serving customers.

Voice messages are especially underused. They are fast to record, but slow to process if you have to transcribe, clean up, and then feed them into an AI model yourself. Multiply that by dozens of messages a day and you quickly feel the friction.

The opportunity is clear: if you can connect Telegram directly to OpenAI through an automation platform, you can turn your everyday chat into a powerful AI interface that works the way you already communicate.

The mindset shift: Let automation carry the routine

Building this Telegram AI chatbot with n8n is not just about creating a bot. It is about shifting your mindset from manual handling of messages to delegating repeatable steps to automation. Instead of:

  • Checking every message and deciding what to do
  • Downloading audio files and transcribing them yourself
  • Copying content into OpenAI-compatible tools

you can design a system that:

  • Listens for messages automatically
  • Detects whether they are text or voice
  • Transcribes audio in the background
  • Feeds clean, normalized input into an AI agent
  • Returns formatted answers directly in Telegram

Once this is in place, you free your attention for higher-value work. You can then iterate, refine prompts, adjust memory, and extend the bot with new tools. The template becomes a foundation for ongoing improvement, not a one-off experiment.

Why n8n + OpenAI is a powerful combination for Telegram bots

n8n shines when you want to integrate multiple services without building a full backend from scratch. Its visual workflow builder makes it easy to connect Telegram, OpenAI, file storage, and more, while keeping each responsibility clear and maintainable.

Paired with OpenAI models, and optionally LangChain-style agents, you gain:

  • Rapid prototyping with reusable nodes instead of custom code
  • Voice-to-text transcription through OpenAI audio endpoints
  • Simple webhook handling for Telegram updates
  • Clean separation of concerns between ingest, transform, AI, and respond steps

This structure means you can start small, get value quickly, and then scale or customize as your use cases grow.

The journey: From incoming message to AI-powered reply

The workflow follows a clear, repeatable journey every time a user sends a message:

  1. Listen for incoming Telegram updates
  2. Detect whether the content is text, voice, or unsupported
  3. Download and transcribe voice messages when needed
  4. Normalize everything into a single message field
  5. Send a typing indicator to reassure the user
  6. Call your AI agent with short-term memory
  7. Return a Telegram-safe HTML reply
  8. Gracefully handle any formatting errors

Let us walk through each part so you understand not just what to configure, but how it contributes to a smoother, more automated workflow.

Phase 1: Receiving and preparing messages

Listening for Telegram updates with telegramTrigger

The journey starts with the telegramTrigger node. This node listens for all Telegram updates via webhook so your bot can react in real time.

Configuration steps:

  • Set up a persistent webhook URL, using either a hosted n8n instance or a tunneling tool such as ngrok during development.
  • In Telegram, use setWebhook to point your bot to that URL.
  • Connect the trigger to the rest of your workflow so every new update flows into your logic.

Once this is in place, you no longer have to poll or manually check messages. The workflow is always listening, ready to process the next request.

Detecting message type with a Switch node

Not every Telegram update is the same. Some are text, some are voice messages, and some might be attachments you do not want to handle yet. To keep the workflow flexible and maintainable, use a Switch node to classify the incoming content.

Typical routing rules:

  • Text messages go directly to the AI agent after normalization.
  • Voice messages are routed to a download and transcription chain.
  • Unsupported types are sent to a friendly error message node that asks the user to send text or voice instead.

This decision point is powerful. It lets you add new branches later, for example, handling photos or documents, without disrupting the rest of your automation.

Downloading and transcribing voice messages

For voice messages, the workflow takes an extra step before talking to the AI. It first downloads the audio file from Telegram, then sends it to OpenAI for transcription.

Key steps:

  • Use the Telegram node with the get file operation to retrieve the voice file.
  • Pass the resulting binary file into an OpenAI audio transcription node.
  • Optionally set language or temperature parameters depending on your needs.
// Example: pseudo-request to OpenAI audio transcription
// (n8n's OpenAI node handles this; shown for clarity)
{  model: 'whisper-1',  file: '<binary audio file>',  language: 'auto'
}

Once this step is done, you have clean text that you can treat just like a regular typed message. The user speaks, the workflow listens, and the AI responds, all without manual transcription.

Combining content and setting properties

Whether the message started as text or voice, the next step is to normalize it. Use a node to combine the content into a single property, for example CombinedMessage, and attach useful metadata.

Common metadata includes:

  • Message type (text or voice)
  • Whether the message was forwarded
  • Any flags you want to use later in prompts or routing

This normalization step simplifies everything downstream. Your AI agent can always expect input in the same format, and you can adjust the behavior based on metadata without rewriting prompts every time.

Improving user experience with typing indicators

While the workflow is transcribing or generating a reply, you want the user to feel that the bot is engaged. That is where the Send Typing action comes in.

Using the sendChatAction operation with the typing action right after receiving an update:

  • Makes the bot feel responsive and human-like
  • Prevents users from assuming the bot is stuck or offline
  • Creates a smoother experience, especially for longer audio or complex AI responses

This is a small detail that significantly improves perceived performance and trust in your automation.

Phase 2: AI reasoning, memory, and response

Using an AI agent with short-term memory

The heart of the workflow is the AI Agent node. Here you pass the normalized user message along with recent conversation history so the model can respond with context.

Typical setup:

  • Use a LangChain-style agent node or n8n’s native OpenAI nodes.
  • Attach a Window Buffer Memory node that stores recent messages.
  • Configure the memory window to a manageable size, for example the last 8 to 10 messages, to control token usage and cost.

This short-term memory lets the chatbot maintain coherent conversations across turns. It can remember what the user just asked, refer back to earlier parts of the dialogue, and feel more like a real assistant instead of a one-shot responder.

Behind the scenes, the agent uses an OpenAI Chat Model to generate completions. You can adjust the model choice, temperature, and other parameters as you refine the bot’s personality and tone.

Designing prompts and safe HTML formatting

Prompt design is where you shape the character and behavior of your Telegram AI chatbot. Since Telegram only supports a limited set of HTML tags, your system prompt should clearly instruct the model to respect those constraints.

For example, you can include a system prompt excerpt like this:

System prompt excerpt:
"You are a helpful assistant. Reply in Telegram-supported HTML only. Allowed tags: <b>, <i>, <u>, <s>, <a href=...>, <code>, <pre>. Escape all other <, >, & characters that are not part of these tags."

If you use tools within an agent, also define how it should format tool calls versus final messages. Clear instructions here reduce errors and make your bot’s output predictable and safe.

Sending the final reply back to Telegram

Once the AI agent has generated a response, the workflow needs to deliver it to the user in a way Telegram accepts.

Key configuration points in the Telegram sendMessage operation:

  • Set parse_mode to HTML.
  • Ensure any raw <, >, and & characters that are not part of allowed tags are escaped.

The sample workflow includes a Correct errors node that acts as a safety net. If Telegram rejects a message because of invalid HTML, this node escapes the problematic characters and resends the reply.

The result is a polished, formatted response that feels native to Telegram, whether it is a short answer, a structured explanation, or a code snippet.

Production-ready mindset: Reliability, cost, and privacy

As you move from experimentation to regular use, it helps to think like a system designer. A few careful decisions will keep your Telegram AI chatbot reliable and sustainable.

  • Rate limits and costs:
    • Transcription and large model calls incur costs.
    • Batch or limit transcription where possible.
    • Apply token caps and sensible defaults on completion requests.
  • Security:
    • Store API keys securely in n8n credentials.
    • Restrict access to your webhook endpoint.
    • Validate incoming Telegram updates to ensure they are genuine.
  • Error handling:
    • Use fallback nodes for unsupported attachments.
    • Return human-readable error messages when something cannot be processed.
    • Log failed API calls for easier debugging.
  • Privacy:
    • Decide how long to retain conversation history.
    • Define data deletion policies that align with your privacy and compliance requirements.

By addressing these points early, you set yourself up for a bot that can grow with your team or business without unpleasant surprises.

Debugging and continuous improvement

Every automation improves with testing and iteration. n8n gives you the visibility you need to understand what is happening at each step.

  • Turn on verbose logging and inspect node input and output to trace where a workflow fails.
  • Use the “Send Typing action” early so users stay confident while audio is being transcribed or the model is generating a long reply.
  • Test with both short and long voice messages, since transcription quality and cost scale with duration.
  • Limit message length or summarize long inputs before sending them to the model to reduce token usage and cost.

Each tweak you make, whether in prompts, memory window size, or branching logic, is another step toward a chatbot that fits your exact workflow and style.

Extending your Telegram AI chatbot as you grow

Once the core pipeline is working reliably, you can start turning this chatbot into a richer assistant tailored to your world. The same n8n workflow can be extended with new capabilities, such as:

  • Multilingual support by passing language hints to the transcription node.
  • Contextual tools such as weather lookup, calendar access, or internal APIs using agent tools.
  • Persistent user profiles stored in a database node for personalized replies and preferences.
  • Rich media responses using Telegram’s photo, document, and inline keyboard nodes.

This is where the mindset shift really pays off. You are no longer just “using a bot.” You are designing a system that helps you and your users think, decide, and act faster.

From template to transformation: Your next steps

The n8n + OpenAI approach gives you a flexible, maintainable Telegram chatbot that:

  • Accepts both text and voice inputs
  • Automatically transcribes audio
  • Keeps short-term conversational memory
  • Responds in Telegram-friendly HTML

Use the provided workflow template as your starting point. First, replicate it in a development environment, for example with ngrok or a hosted n8n instance. Then:

  1. Test with your own text and voice messages.
  2. Adjust prompts to match your tone and use cases.
  3. Fine-tune memory settings and cost controls.
  4. Add new branches or tools as your ideas grow.

Every improvement you make is an investment in your future workflows. You are building not just a Telegram AI chatbot, but a foundation for more automation, more focus, and more time for the work that truly matters.

Call to action: Try this workflow today, experiment with it, and make it your own. If you want a ready-made starter or support refining prompts and memory, reach out or leave a comment with your requirements.

Happy building, and keep an eye on cost and privacy as you scale your automation journey.

Responder Comentários no Instagram com n8n e IA

Como um fluxo n8n com IA salvou o Instagram de um pequeno negócio

Quando a caixa de entrada do Instagram começou a virar um caos, Ana achou que estava perdendo o controle. Ela era dona de uma pequena agência de marketing digital, cuidava de vários perfis ao mesmo tempo e, como muita gente, acreditava que conseguiria responder manualmente a todos os comentários.

Por um tempo, funcionou. Mas, conforme os perfis cresceram, os comentários começaram a se acumular: dúvidas técnicas, elogios rápidos, reclamações, spam de promoções aleatórias. Ana começou a notar algo preocupante: comentários importantes ficavam sem resposta por dias, enquanto o algoritmo do Instagram “recompensava” perfis mais rápidos e consistentes na interação.

Foi nesse cenário de pressão, com clientes cobrando mais engajamento e menos tempo de resposta, que ela decidiu que precisava de algo mais inteligente do que simplesmente “tentar responder tudo”. Precisava de automação, mas não queria perder o tom humano da marca. Foi aí que encontrou um template de fluxo no n8n para automatizar respostas de comentários no Instagram usando IA.

O problema de Ana: engajamento crescendo, tempo acabando

Ana sabia que:

  • Responder comentários rápido aumentava o engajamento e a percepção de cuidado.
  • Manter um tom consistente em todas as respostas era quase impossível com várias pessoas ajudando.
  • Spam e comentários irrelevantes tomavam tempo que deveria ser gasto com clientes reais.

Ela já tinha ouvido falar de n8n e de integrações com IA, mas nunca tinha montado um fluxo completo para redes sociais. A ideia de automatizar respostas com inteligência artificial, sem perder o controle, parecia perfeita. Só faltava entender como transformar isso em um fluxo real, seguro e escalável.

O encontro com o template de automação no n8n

Em uma madrugada de pesquisa, Ana encontrou um template específico: um fluxo n8n que recebia webhooks do Instagram, filtrava comentários, enviava o texto para um modelo de IA via OpenRouter (como Gemini ou similar) e publicava automaticamente a resposta nos comentários.

Olhando a descrição, ela percebeu que não era apenas um “bot de respostas genéricas”, mas uma arquitetura bem pensada, com etapas claras:

  • Receber eventos de comentários via Webhook do Instagram.
  • Extrair e mapear os dados essenciais do payload.
  • Validar para não responder aos próprios comentários do perfil.
  • Enriquecer o contexto com dados do post, como a legenda.
  • Enviar o comentário para um agente de IA com um prompt controlado.
  • Publicar a resposta final via Instagram Graph API.

Era exatamente o que ela precisava. Mas, como toda boa história de automação, a jornada começou com a parte mais “chata” e crítica: o webhook.

Rising action: o dia em que o webhook começou a falar com o Instagram

Primeiro passo de Ana: fazer o Instagram confiar no fluxo

Para que o Instagram avisasse o n8n sempre que chegasse um novo comentário, Ana precisou configurar um Webhook. Ela descobriu que o primeiro contato do Facebook/Instagram não é um comentário real, mas uma verificação.

O Instagram envia uma requisição com três parâmetros importantes:

  • hub.mode
  • hub.challenge
  • hub.verify_token

No n8n, Ana criou um nó Webhook e, em seguida, um nó Respond to Webhook configurado para devolver exatamente o valor de hub.challenge quando o hub.verify_token correspondesse ao token configurado no app dela.

Ela usou a expressão:

={{ $json.query['hub.challenge'] }}

Com isso, o Instagram finalmente confirmou: “OK, vou começar a mandar eventos de comentários para este endpoint”. O fluxo de Ana estava oficialmente conectado ao mundo real.

Quando os primeiros comentários chegaram ao n8n

Assim que o primeiro comentário real entrou, Ana viu o payload bruto e percebeu que precisava organizar aqueles dados. O fluxo do template sugeria exatamente isso: usar um nó Set para extrair e padronizar as informações essenciais.

Ela mapeou campos como:

  • conta.id: o ID do perfil que recebeu o comentário.
  • usuario.id e usuario.name: o autor do comentário.
  • usuario.message.id: o ID do comentário.
  • usuario.message.text: o texto do comentário.
  • usuario.media.id: o ID do post relacionado.

Esse objeto padronizado virou a base para todas as próximas decisões do fluxo. A partir daqui, o n8n sabia exatamente quem comentou, em qual post e o que foi escrito.

Um erro evitado a tempo: a conta respondendo a si mesma

Nos primeiros testes, Ana percebeu um risco óbvio: e se o próprio perfil da marca respondesse a um comentário e o fluxo tentasse responder de novo, gerando um loop infinito de “obrigado”, “de nada”, “obrigado”, “de nada”?

O template já trazia a solução. Ela implementou uma condição simples, porém essencial:

  • conta.id != usuario.id

Em outras palavras, o fluxo só seguiria em frente se o comentário viesse de alguém que não fosse o próprio perfil. Isso impediu que a conta respondesse a si mesma e garantiu que apenas comentários de seguidores reais fossem processados.

O ponto de virada: quando a IA começou a responder como a marca

Buscando contexto no post original

Alguns clientes de Ana tinham posts educativos, outros eram mais promocionais, e alguns traziam perguntas nas legendas. A resposta certa a um comentário muitas vezes dependia do contexto do post.

Seguindo a arquitetura do template, Ana adicionou um passo de enriquecimento. Com o media.id em mãos, ela fez uma chamada ao Instagram Graph API para buscar dados relevantes do post, como:

  • Caption (legenda do post).
  • Hashtags principais.

Essas informações passaram a ser enviadas junto com o comentário para o modelo de IA, permitindo respostas mais inteligentes, alinhadas com o conteúdo original.

Desenhando a “personalidade” da IA

O momento mais delicado foi configurar o agente de IA. Ana não queria um robô genérico. Ela queria um assistente que soasse como a marca: amigável, profissional e direto ao ponto.

Seguindo as boas práticas do template, ela estruturou um prompt controlado com:

  • Definição clara de tom: amigável, profissional e educacional quando necessário.
  • Orientação para personalização: sempre mencionar o @usuario no início da resposta.
  • Regras de spam: quando identificasse algo irrelevante ou spam, a IA deveria retornar apenas [IGNORE].
  • Limite de tamanho: respostas curtas, adequadas para comentários de Instagram.

Ela decidiu usar uma integração típica:

  • n8n -> LangChain agent -> OpenRouter (com um modelo como Google Gemini ou similar).

O fluxo foi ajustado para receber apenas o texto final da resposta, sem metadados extras, pronto para publicação.

O prompt resumido que guiou tudo

Depois de alguns testes, Ana chegou a um prompt base em português, simples e direto:

Você é um assistente de IA para perfil de Inteligência Artificial e Automações. Responda em português brasileiro.
- Nome do usuário: {{username}}
- Comentário: {{comentário}}
Regras:
1) Inicie: "Olá @{{username}},"
2) Se for spam ou totalmente irrelevante, responda com: [IGNORE]
3) Seja conciso, útil e amigável. Máx. 2 frases.

A partir daqui, cada comentário que chegava era analisado, contextualizado e respondido pela IA, seguindo exatamente as regras da marca.

O fluxo fecha o ciclo: publicação automática no Instagram

Com a resposta pronta, faltava o passo final: publicar o comentário diretamente no Instagram.

O template orientava usar o endpoint /{comment_id}/replies do Instagram Graph API. Ana configurou um nó HTTP no n8n com:

  • Autenticação via headers, usando o token de acesso armazenado em variáveis de ambiente.
  • Corpo da requisição contendo o campo message com o texto gerado pela IA.

Quando ela rodou o fluxo em modo de teste, viu o primeiro comentário respondido automaticamente, com um “Olá @usuario,” seguido de uma resposta útil e no tom da marca. Foi o ponto de virada: o que antes era ansiedade por não dar conta, virou alívio por ver o processo funcionando sozinho.

Os bastidores que mantêm tudo seguro e confiável

Ana sabia que não bastava “funcionar”. Precisava funcionar com segurança, controle e escalabilidade. O template ajudou com uma lista de práticas que ela passou a seguir.

Segurança e integridade das requisições

  • Validação de assinaturas: ela passou a verificar os headers x-hub-signature ou x-hub-signature-256 para garantir que os eventos vinham realmente do Facebook/Instagram.
  • Tokens e permissões: os tokens de acesso foram guardados como variáveis de ambiente no n8n, e ela garantiu que as permissões certas estavam ativas, como pages_manage_comments, instagram_basic e instagram_manage_comments.
  • Rate limits: ela implementou uma lógica de retry com backoff exponencial para lidar com erros 429 da Graph API, evitando sobrecarregar o serviço.
  • Idempotência: IDs de comentários já respondidos passaram a ser registrados, evitando respostas duplicadas em reexecuções.
  • Logs e monitoramento: requests, respostas da IA e status de publicação começaram a ser armazenados para auditoria e diagnóstico.
  • Privacidade: nenhum dado sensível ou informação pessoal identificável era exposto nas respostas.

Moderação e personalidade de marca

Com o fluxo estável, Ana começou a refinar o “jeito” da IA responder. Ela ajustou o prompt do agente para garantir:

  • Que toda resposta começasse com uma saudação e o @username (por exemplo, “Olá @usuario,”).
  • Que perguntas técnicas recebessem orientações práticas, enquanto dúvidas mais complexas direcionassem para um post ou conteúdo mais aprofundado.
  • Que elogios fossem respondidos de forma curta, incentivando a seguir e acompanhar o perfil.
  • Que, em casos de spam ou conteúdo fora de tópico, a IA retornasse apenas [IGNORE], deixando a decisão de moderação manual para depois.

Assim, a automação não só respondia rápido, mas também refletia fielmente a voz das marcas que ela gerenciava.

Testando o fluxo antes de soltar na vida real

Antes de ligar o fluxo em produção, Ana decidiu seguir uma rotina de testes bem cuidadosa.

  • Ambiente de teste: ela expôs temporariamente o endpoint local do n8n via ferramentas como ngrok ou exposr para validar a verificação do webhook.
  • Simulação de payloads: enviou requisições de teste com exemplos reais de comentários: perguntas técnicas, elogios, apenas emojis e casos de spam.
  • Métricas monitoradas: passou a acompanhar taxa de respostas, latência da IA, erros de publicação e o percentual de comentários marcados como [IGNORE].

Isso deu confiança para colocar o fluxo em produção nos perfis dos clientes, sem medo de respostas erradas ou comportamentos inesperados.

Quando os comentários explodiram, o fluxo aguentou

Com o tempo, o trabalho de Ana começou a dar resultado: os perfis cresceram, o número de comentários disparou e o fluxo virou parte crítica da operação. Foi aí que ela começou a pensar em escalabilidade e custos.

Otimizando para volume e custo de IA

Ela aplicou algumas estratégias sugeridas pelo próprio template:

  • Fila intermediária: considerou o uso de uma fila como RabbitMQ ou SQS para enfileirar pedidos de resposta e controlar a taxa de chamadas à IA.
  • Batching: para comentários não urgentes, planejou agrupar solicitações e processá-las em lote, reduzindo o número de chamadas ao modelo.
  • Cache de respostas comuns: identificou perguntas frequentes e passou a reutilizar respostas aprovadas, economizando tokens de IA.
  • Prompt enxuto: manteve o prompt o mais curto possível, incluindo apenas o contexto essencial para reduzir o consumo de tokens.

Com isso, o fluxo não só manteve o desempenho, como também se tornou financeiramente viável à medida que os perfis cresciam.

O resultado: mais engajamento, menos sobrecarga

Meses depois, Ana percebeu que algo tinha mudado na rotina dela e dos clientes:

  • Comentários passaram a ser respondidos em minutos, não em horas ou dias.
  • O tom das respostas era consistente, refletindo a marca em cada interação.
  • Spam deixou de consumir tempo, já que o fluxo ignorava automaticamente o que não valia a pena responder.
  • O time dela pôde focar em estratégias, conteúdo e campanhas, em vez de apenas “apagar incêndio” na caixa de comentários.

Automatizar respostas com n8n e IA não substituiu o lado humano do trabalho de Ana. Pelo contrário, liberou espaço para que ela fosse mais estratégica, enquanto o fluxo cuidava do operacional repetitivo, com segurança e controle.

Quer repetir a jornada da Ana no seu perfil?

Se você também está sentindo o peso de responder comentários manualmente, mas não quer abrir mão de um tom humano e alinhado à marca, esse tipo de fluxo pode ser o que está faltando na sua operação.

Com um fluxo bem projetado – verificação de webhook, extração e mapeamento de dados, filtragem de comentários do próprio perfil, enriquecimento com dados do post, geração de resposta com IA e publicação automática – você ganha um sistema robusto, escalável e alinhado à sua estratégia de conteúdo.

Próximos passos sugeridos:

  • Baixe o template e importe para o seu n8n.
  • Teste em um ambiente controlado, com um perfil de teste ou posts específicos.
  • Ajuste o prompt da IA para refletir a voz e personalidade da sua marca.

Call to action: Baixe o template, teste no seu n8n e comente abaixo se quiser que eu crie um prompt personalizado para o seu perfil. Se você prefere ajuda profissional para implementar tudo com segurança e boas práticas, entre em contato, ofereço consultoria especializada em automações com n8n e IA.

Automate Daily Meeting Social Briefs with n8n

Automate Daily Meeting Social Briefs with n8n

Picture this: it is 8:55 a.m., your meeting starts in five minutes, and you are frantically opening LinkedIn and Twitter in 17 different tabs trying to figure out what your prospect has been posting lately. By the time you find their latest update, the call has already started and you are still reading their tweet from last month.

Or, alternative universe: you open your inbox, sip your coffee, and there is a neat little email waiting for you that already lists the latest LinkedIn posts and tweets from every company you are meeting today. No tab chaos, no panic. Just instant context.

This n8n workflow template gives you the second universe. It automatically collects social media activity for your meeting attendees, turns it into a clean HTML email, and sends it to you before your day gets going. Your meetings stay smart and your mornings stay calm.

What this n8n workflow actually does (in plain English)

At its core, this is a social media briefing bot for your calendar. Here is what the workflow handles for you:

  • Runs automatically every morning at 07:00 with a Schedule Trigger.
  • Checks your Google Calendar for all events happening that day.
  • Pulls out attendee email domains and enriches them via Clearbit to find company names and social profiles.
  • Uses RapidAPI to grab recent LinkedIn posts and tweets from those companies.
  • Wraps the posts in a nicely formatted HTML email, per company.
  • Sends that email to a predefined list of recipients using the Gmail node with OAuth2.

Translation: less time stalking people on social media, more time pretending you always knew what they were up to.

Why this automation is worth your 10 minutes of setup

This workflow is especially handy for sales teams, account managers, founders, and executives who need to sound informed without spending half the morning researching. Instead of:

  • Manually opening LinkedIn and Twitter for every meeting attendee,
  • Guessing which company profile is the right one,
  • Skimming endless feeds to find anything remotely relevant,

you get a curated, data-driven briefing delivered straight to your inbox each morning. That means:

  • Faster meeting prep.
  • Better questions and talking points.
  • Less repetitive research that slowly drains your will to work.

Before you start: keys, tools, and accounts you need

To get this n8n workflow up and running, you will need a few accounts and API keys ready:

RapidAPI subscriptions

On RapidAPI, register and subscribe to:

  • Fresh LinkedIn Profile Data (for LinkedIn company posts, endpoint get-company-posts)
  • Twitter (twitter154) (for company tweets, endpoint for user tweets)

Other required credentials

  • Clearbit API key for company enrichment.
  • Google Calendar credentials configured in n8n.
  • Gmail OAuth2 credentials configured in n8n for sending the emails.

You will store the RapidAPI keys and recipient email addresses in a dedicated Set node called Setup inside the workflow.

How the workflow works, step by step

Let us walk through what happens under the hood once the workflow kicks off at 07:00. You only set this up once, then it quietly does the boring work for you every day.

1. Start with a daily Schedule Trigger

The workflow begins with a Schedule Trigger node. It is configured to run once a day at 07:00, which is early enough to prepare you for most morning meetings without requiring you to be awake at an unreasonable hour.

2. Configure the “Setup” node

Next comes a Set node named Setup. Think of it as the control center for:

  • Your RapidAPI keys for LinkedIn and Twitter.
  • The list of recipient email addresses who should receive the daily digest.

This keeps your configuration tidy and makes it easy to change recipients or rotate keys later without hunting through multiple nodes.

3. Pull today’s meetings from Google Calendar

The workflow then queries your Google Calendar for events that fall within the current day. It uses:

  • timeMin and timeMax set to today,
  • singleEvents enabled so that recurring meetings appear as separate instances.

This gives you a clear list of today’s meetings to work with.

4. Extract attendee domains from email addresses

Next, a Set node processes each event and pulls out the attendees’ email addresses. For each email, it extracts the domain, which is everything after the @ symbol.

This domain is used as a proxy for the company, which makes it easier to:

  • Group attendees by organization,
  • Enrich the company using Clearbit,
  • Fetch the right social accounts later on.

5. Split and filter the events

To handle each domain on its own, the workflow uses a Split Out node. This lets n8n process every domain individually rather than as one big blob of data.

After that, a Filter node removes any entries that do not have a valid domain. That way you are not wasting API calls on incomplete or irrelevant data.

6. Enrich each company with Clearbit

With clean domains in hand, the workflow calls Clearbit’s Enrichment API. For each domain, Clearbit returns handy company details like:

  • Company name,
  • Likely LinkedIn profile,
  • Twitter handle and other social links,
  • Extra context that can inform your meeting.

These enrichment results feed into the next step, where the workflow decides which social networks to query.

7. Decide what to fetch with a Switch node

A Switch node then looks at the Clearbit data and routes each company down the right path:

  • If a LinkedIn handle is present, it sends the company to the LinkedIn RapidAPI branch.
  • If a Twitter account or ID is available (either from Clearbit or the original calendar event), it sends the company to the Twitter RapidAPI branch.
  • If both exist, both branches can run in parallel so you get a fuller picture.

You get maximum coverage without manually checking which company is on which platform.

8. Fetch the latest posts using RapidAPI

Two HTTP Request nodes are responsible for talking to RapidAPI:

  • Fresh LinkedIn Profile Data with the get-company-posts endpoint.
  • Twitter API via twitter154 to fetch recent user tweets.

In both cases, you must include:

  • X-RapidAPI-Host header,
  • X-RapidAPI-Key header.

Make sure you respect the rate limits documented by RapidAPI. Your future self will thank you when nothing randomly breaks at 7:01 a.m.

9. Turn raw posts into readable HTML

Once the posts come back, Code nodes step in as your formatting assistants. They:

  • Build simple HTML tables for LinkedIn posts and tweets,
  • Include post text and links,
  • Add basic reaction counters like likes, comments, and retweets for quick context.

The result is a compact, scannable layout that looks good in an email and does not require you to open each social network unless you really want to.

10. Merge everything and prepare the email body

A Merge node then combines the LinkedIn and Twitter data for each company so you get a unified view per organization.

After merging, a Set node:

  • Pulls in the attendee email,
  • Includes the meeting time,
  • Collects all the formatted HTML snippets.

This data is then passed into an HTML node, which assembles the final HTML email body that will land in your inbox.

11. Send the briefing with Gmail

Finally, a Gmail node uses your OAuth2 credentials to send the generated HTML email to the recipient list defined in the Setup node.

You can send it to yourself, your team, or anyone else who needs a quick social briefing before hopping into calls.

Troubleshooting and best practices

Handle rate limits and batching gracefully

Both RapidAPI and Clearbit enforce rate limits. To avoid angry APIs:

  • Use the HTTP Request node’s batching options where appropriate.
  • Add small delays between requests to stay under the limit.
  • For high-volume calendars, consider staggering workflow runs or queuing requests.

The provided template already uses modest batching and delay settings, which you can tune based on your usage.

Privacy and compliance reminders

As fun as enrichment data can be, it comes with responsibilities:

  • Only enrich and contact companies you are allowed to research.
  • Do not send sensitive calendar or attendee data to third parties if it violates your organization’s policies.
  • Review internal compliance guidelines before rolling this out broadly.

Build in error handling

APIs sometimes fail, tokens expire, and networks have bad days. To avoid silent breakage:

  • Add error triggers or an IF fallback branch to catch failed API calls.
  • Send yourself a Slack or email alert when enrichment or social fetches fail.
  • Log unexpected responses in temporary nodes while you debug.

Testing tips before going fully automatic

  1. Run the workflow manually with a sample calendar event to confirm credentials and formatting.
  2. Open the resulting HTML email in multiple email clients to check that everything renders nicely.
  3. During development, log full API responses in extra nodes so you can inspect raw data and adjust your mapping if needed.

How to extend and customize the workflow

This template is intentionally modular, so you can customize it instead of building from scratch. A few ideas:

  • Add more social platforms found by Clearbit, such as Facebook, Instagram, or GitHub, by creating additional HTTP Request nodes plus formatting branches, then merging their outputs.
  • Highlight sentiment or keywords by aggregating mentions of specific topics or tracking basic sentiment for a quick at-a-glance summary.
  • Pull in news mentions using a news API so you see both social posts and press coverage in one email.
  • Create Slack or Microsoft Teams summaries in parallel with the email for teams that live in chat apps.

The core flow stays the same, you just bolt on extra branches where you need more context.

Security tips for a safe setup

Since this workflow touches multiple APIs and a Gmail account, keep things locked down:

  • Store API keys as credentials in n8n or as environment variables, not hardcoded in nodes.
  • Limit the scope of the Gmail account used to send emails and monitor access to it.
  • Rotate API keys periodically.
  • Follow least-privilege principles for service accounts and credentials.

Wrap-up: from tedious research to automatic briefings

With a few API keys and this n8n workflow template, you can turn meeting prep from a repetitive scavenger hunt into a calm, automated ritual. Instead of doom-scrolling through company feeds before every call, you get a concise social briefing delivered to your inbox each morning.

Import the template, plug in your RapidAPI and Clearbit keys in the Setup node, connect Google Calendar and Gmail, then run a manual test with a sample event. Once it looks good, let the Schedule Trigger take over and enjoy the extra time back in your day.

Ready to try it? Import the workflow into n8n, configure your credentials, and see your first daily social digest land in your inbox. If you want to adapt it for your team with extras like Slack alerts, CRM links, or sentiment highlights, you can easily extend the existing nodes and branches or share it with your automation-savvy colleague to tweak further.