Automate Proxmox with n8n + AI Agent
On a quiet Tuesday evening, Mia stared at her Proxmox dashboard for what felt like the hundredth time that day. She was the lone DevOps engineer at a fast-growing startup, and every new feature launch meant another wave of virtual machines to create, resize, migrate, or delete. None of it was hard, but all of it was constant.
Slack messages like “Can you spin up a test VM with 4GB RAM?” or “Please delete VM 105 on psb1” pinged her at all hours. She knew Proxmox had a powerful REST API, and she had heard about n8n and AI agents, but connecting all three into something reliable felt like another project she did not have time for.
Then one day she came across an n8n workflow template that promised exactly what she needed: an AI agent powered by Google Gemini, wired directly into the Proxmox REST API, wrapped in a safe, structured, and auditable automation layer.
This is the story of how Mia went from manual VM babysitting to conversational, API-driven automation with n8n, Proxmox, and an AI agent.
The pain: repetitive VM management and fragile scripts
Mia’s problems were not dramatic, just relentless:
- Endless repetitive VM lifecycle tasks like creating, cloning, starting, and deleting VMs
- Hand-written curl scripts that broke whenever parameters changed
- Colleagues who could not use the Proxmox UI safely but still needed VMs on demand
- Fear of making a typo in a critical API call and impacting production
She wanted something better. Ideally, her teammates could simply type natural-language requests like “Create a VM with 2 cores and 4GB RAM on psb1” and an automated system would handle the rest. It needed to be:
- Flexible enough to understand human language
- Strict enough to never send malformed or dangerous API calls
- Auditable, so she could see exactly what had been done and by whom
That is when she decided to try the n8n Proxmox AI agent template.
The discovery: an n8n workflow that speaks Proxmox and human
The template description sounded almost too good to be true. It combined:
- n8n for low-code automation and routing
- Proxmox REST API for full control over VM lifecycle
- Google Gemini as an AI agent to translate natural language into structured API commands
Instead of Mia writing complex logic for every possible VM operation, the workflow used an AI agent to interpret plain text and then enforced a strict JSON schema before anything touched Proxmox.
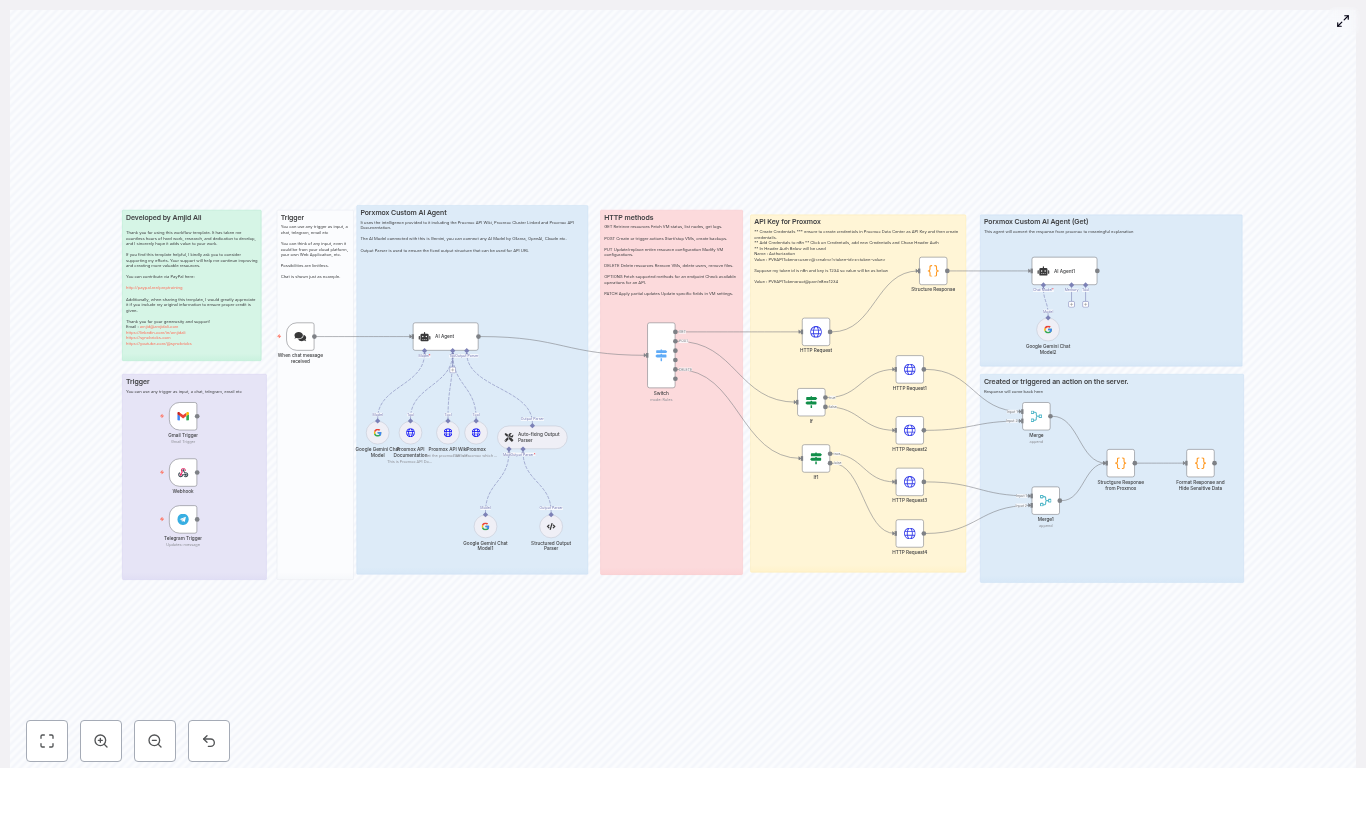
How the architecture clicked for Mia
As Mia explored the template in n8n, she realized it followed a clear architecture that mapped perfectly to her needs. The workflow was broken into logical sections:
- Triggers to capture user intent from chat, Telegram, Gmail, or webhooks
- AI Agent (Gemini) to understand the request and generate a structured command
- Structured output and auto-fixing parsers to enforce valid JSON
- Switch and If nodes to route by HTTP method and payload presence
- HTTP Request nodes to talk directly to the Proxmox API
- Response formatting to redact secrets and return human-friendly results
Instead of a typical “click here, then there” tutorial, she began to see a story: user intent flows in, the AI interprets it, the workflow validates it, and only then does Proxmox get a clean, safe API call.
Rising action: Mia wires up the first trigger
Mia started simple. She configured a single n8n webhook trigger that her teammates could hit from a chat integration. The idea was straightforward:
Someone would send a message like:
“Create a VM with 2 cores, 4GB RAM, and 40GB disk on psb1 using virtio.”
The trigger would forward that text to the AI agent node inside n8n. The template already supported multiple triggers, including:
- Chat messages
- Telegram
- Gmail
- Plain n8n webhooks
She liked that she could add more channels later without touching the core logic.
The AI agent: translating human requests into strict JSON
The heart of the workflow was the AI agent node using Google Gemini. It was configured with clear instructions:
- Interpret natural-language input like “Start VM 202 on psb1”
- Reference Proxmox API documentation and wiki tools embedded in the workflow
- Always return a strict JSON object with
response_type,url, anddetails
When Mia tested her first request, the agent produced output like this:
{  "response_type": "POST",  "url": "/nodes/psb1/qemu",  "details": {  "vmid": 201,  "cores": 2,  "memory": 4096,  "net0": "virtio,bridge=vmbr0",  "disk0": "local:32,format=qcow2",  "sockets": 1  }
}
It was exactly what she wanted: human intent on one side, clean Proxmox API parameters on the other.
The turning point: enforcing structure so nothing breaks
Mia had used AI tools before and knew they could occasionally hallucinate or format JSON incorrectly. The template anticipated that problem.
Structured Output Parser and Auto-fixing Parser
Right after the AI agent, the workflow passed the JSON through two critical nodes:
- Structured Output Parser to enforce the exact schema
- Auto-fixing Output Parser to re-prompt or correct the AI if the schema was violated
If the AI ever produced malformed JSON or missed required fields, these nodes would catch it and fix or retry before n8n attempted any Proxmox call. That meant fewer broken executions and a much lower chance of sending a bad request to the API.
For Mia, this was the turning point. The workflow did not just “use AI,” it wrapped the AI in strict validation. That combination of flexibility and safety was what made her comfortable moving toward production usage.
Routing logic: from JSON command to the right Proxmox call
Once the JSON command passed validation, the workflow used n8n’s routing nodes to decide what to do next.
Switch and If nodes in action
The response_type field from the AI output told n8n which HTTP method to use. The Switch node checked whether it was:
GETPOSTPUTDELETEOPTIONS- or
Invalid
From there, If nodes checked whether a details payload existed. If it did, the workflow attached it as a JSON body. If not, it called endpoints that did not require a payload.
This routing layer turned the AI’s structured output into a deterministic, auditable set of HTTP Request nodes, each mapped to specific Proxmox API endpoints.
Talking to Proxmox: HTTP Request nodes that do the real work
At the bottom of the workflow, Mia found the HTTP Request nodes that actually spoke to Proxmox. They handled:
- Header-based authentication using a
PVEAPITokenin theAuthorizationheader - The
allowUnauthorizedCertsflag for self-signed TLS certificates (used cautiously) - Setting the HTTP method and attaching a JSON body when needed
Because the AI and parsers had already enforced the structure, these nodes could focus on one job: send a clean request to the right Proxmox endpoint and return the response.
Default behaviors that made Mia’s life easier
As Mia experimented, she discovered a few default behaviors built into the template that removed even more friction:
- If no node was specified in the request, the system defaulted to psb1.
- The AI agent could query Proxmox to find the next available
vmidby checking the highest existing ID, so users did not have to supply it. - Optional fields that users omitted were stripped out, allowing Proxmox to apply its own defaults cleanly.
These conveniences meant her teammates could be less precise in their wording while still getting correct, safe behavior.
Security: Mia’s non-negotiable requirement
Before she let anyone else touch the system, Mia walked through the template’s security recommendations and added her own checks.
Security and best practices she followed
- Stored API tokens in n8n Credentials using Header Auth, never hard-coded in nodes or messages
- Created a dedicated PVE API token in Proxmox with only the permissions the automation needed
- Confirmed that sensitive values were redacted in the response-formatting node before being sent back to users
- Preferred valid TLS certificates on Proxmox and only used
allowUnauthorizedCertsfor tightly controlled internal workflows - Monitored API activity using both Proxmox logs and n8n execution history
With these in place, she felt confident the workflow would not leak secrets or overstep its privileges.
Real-world examples from Mia’s daily work
Within days, Mia had several everyday tasks fully automated through the template.
1. Creating a VM with natural language
A developer sent a request:
“Create a VM with 2 cores, 4GB RAM, and 40GB disk on psb1 using virtio.”
The AI agent produced:
{  "response_type": "POST",  "url": "/nodes/psb1/qemu",  "details": {  "cores": 2,  "memory": 4096,  "disk0": "local:40,format=qcow2",  "net0": "virtio,bridge=vmbr0"  }
}
The workflow validated the JSON, routed it to the correct HTTP Request node, and Proxmox created the VM. The response was reformatted into a human-friendly confirmation message, with any sensitive fields redacted.
2. Deleting a VM safely
Another teammate asked:
“Delete VM 105 on psb1.”
The agent emitted a DELETE request with:
/nodes/psb1/qemu/105
Again, the routing logic handled the method, and the Proxmox API did the rest.
3. Starting and stopping VMs on demand
For operations like starting or stopping VMs, Mia saw clean mappings such as:
Input:
“Start VM 202 on psb1.”
Resulting call:
POST /nodes/psb1/qemu/202/status/start
Her team could now manage VM lifecycles conversationally without direct access to the Proxmox UI.
How Mia set it up: her personal checklist
Looking back, Mia realized that getting from “curious” to “fully working” followed a clear setup path. Here is the sequence she used:
- Create a PVE API token in Proxmox Data Center and assign only the necessary permissions.
- Add the token to n8n Credentials as Header Auth with:
- Header name:
Authorization - Value format:
PVEAPIToken=<user>@<realm>!<token-id>=<token-value>
- Header name:
- Install or enable the AI provider node (Gemini in the template) and configure its credentials.
- Import the workflow template and adjust the Proxmox base URLs if her cluster used different addresses.
- Run dry-run queries and inspect n8n execution logs before enabling production triggers.
This gave her the confidence that every part of the chain, from AI output to Proxmox response, behaved as expected.
When things went wrong: troubleshooting in the real world
Not everything worked perfectly on the first try, but the template included practical troubleshooting tips that saved her time.
- HTTP 401/403 Mia checked token correctness and privileges in Proxmox when she hit authentication errors.
- Blank or malformed JSON from the AI She inspected the Structured Output Parser and Auto-fixing Parser logs to see how the workflow re-prompted the agent.
- Self-signed certificate issues For internal environments, she temporarily enabled
allowUnauthorizedCertswhile planning a move to valid certificates. - Unexpected routing behavior When the AI returned
Invalidasresponse_type, the workflow responded with guidance to the user, and she refined the prompt instructions where needed.
Extending the workflow: Mia’s roadmap
Once the basics were stable, Mia started thinking about how to extend the automation further.
- Swap Gemini for other LLM providers like OpenAI, Ollama, or Claude by changing the chat model node and credentials.
- Add RBAC checks so that only certain users could trigger destructive operations like delete or reset.
- Log every executed command to an external system like Elastic, Splunk, Slack, or Microsoft Teams for audit trails and alerts.
- Support multiple tenants or workspaces by adding tenant context into the AI prompt and Proxmox requests.
The template gave her a solid foundation, and n8n’s modular design made these extensions feel approachable instead of overwhelming.
The resolution: from constant interruptions to controlled automation
A few weeks after adopting the n8n Proxmox AI agent template, Mia noticed something surprising. The constant Slack pings had dropped. Her teammates still got the VMs they needed, but now they sent natural-language requests that the workflow handled automatically.
She had:
- Turned chat and webhook inputs into valid Proxmox API requests
- Reduced mistakes using a strict JSON schema and auto-fixing parsers
- Enabled complex tasks like cloning, resizing, and migrating VMs via natural language
- Audited and formatted responses before they reached users
Most importantly, she reclaimed focus time for higher-value work while her automation quietly managed VM lifecycles in the background.
Try the same journey with your own Proxmox cluster
This n8n template is more than a quick integration. It is a reusable, structured foundation for conversational and automated control over Proxmox using the REST API, AI agents, and safe routing logic.
Get started in your environment:
- Import the workflow into your n8n instance.
- Add your Proxmox API token to Credentials using Header Auth.
- Run a simple test like: “List all VMs on psb1.”
If you need help customizing the workflow, want a commercial integration, or prefer a walkthrough video, you can reach out via the author links in the template notes.
Call to action: Import the template, secure your credentials, and start automating routine Proxmox tasks today. Share your feedback or feature requests so this automation can keep evolving with real-world needs.
Smart Home Energy Saver with n8n & LangChain
Smart Home Energy Saver with n8n & LangChain-Style Components
Efficient energy management in a smart home can lower electricity costs, reduce wear on appliances, and cut your carbon footprint. This technical guide explains how to implement a Smart Home Energy Saver workflow in n8n using LangChain-style building blocks such as text splitting, embeddings, and a vector store, combined with a lightweight agent and Google Sheets logging.
The workflow accepts JSON payloads from sensors or APIs, transforms free-text fields into semantic embeddings for context-aware retrieval, and uses an agent to generate recommendations or log events based on historical data.
1. Solution Overview
This n8n workflow template is designed for users who want to automate smart home energy optimization using:
- n8n as the orchestration and automation platform
- LangChain-style components for text splitting, embeddings, and vector storage
- A lightweight agent powered by a language model
- Google Sheets for persistent logging and auditing
At a high level, the workflow:
- Receives sensor or event data via an HTTP Webhook.
- Splits long text fields into manageable chunks.
- Generates embeddings for each chunk using Cohere (or another provider).
- Stores embeddings and metadata in a Supabase vector store.
- Retrieves relevant past events using semantic search.
- Maintains short-term conversational memory for the agent.
- Uses a language model to generate human-readable recommendations or actions.
- Writes outputs to Google Sheets for analytics and auditability.
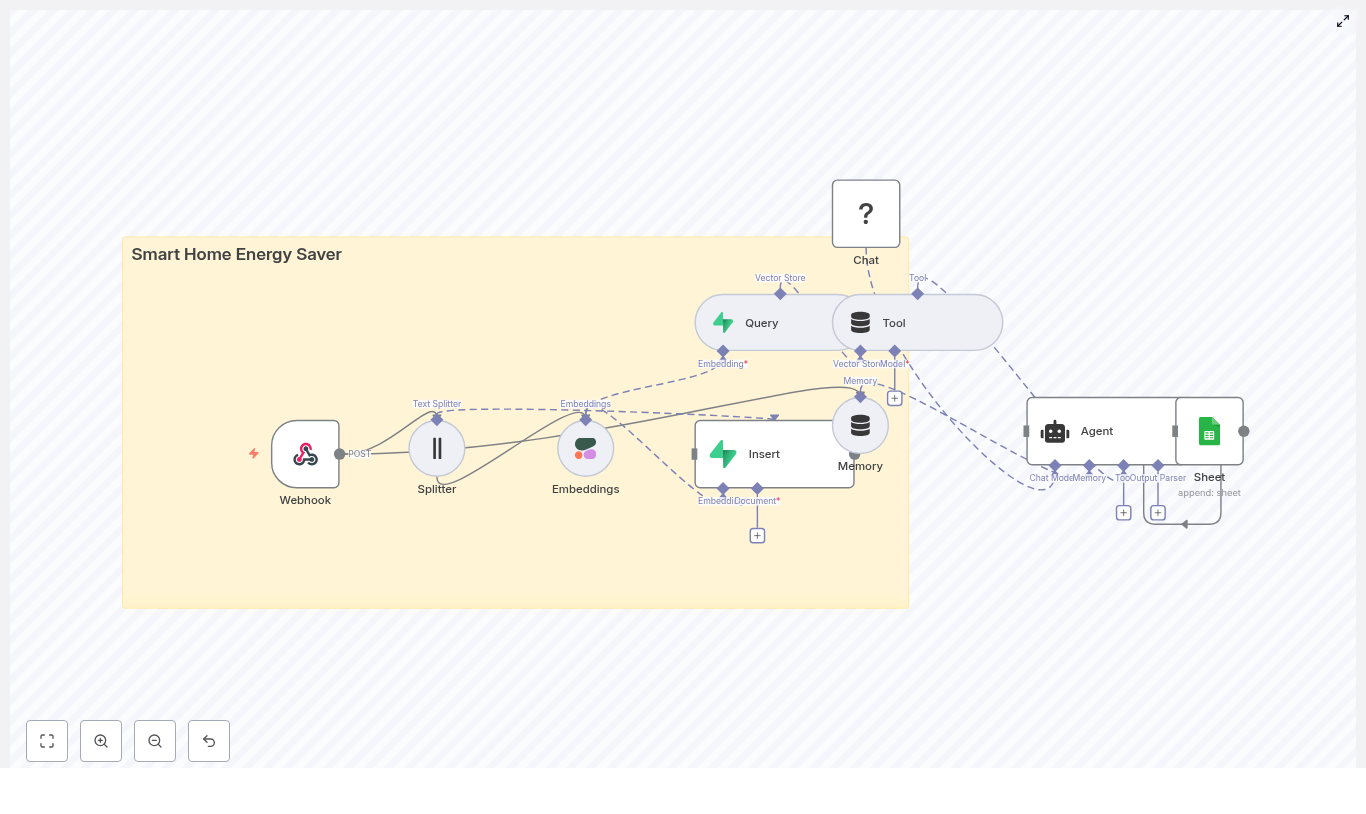
2. Architecture & Data Flow
2.1 High-level architecture
The template is composed of the following logical components:
- Input & ingestion
- Webhook node – accepts POST requests from smart home sensors or gateways.
- Preprocessing & embedding
- Splitter node – segments long text into chunks.
- Embeddings node (Cohere) – converts chunks into high-dimensional vectors.
- Insert node (Supabase vector store) – persists embeddings and associated metadata.
- Retrieval & reasoning
- Query node – performs similarity search over the Supabase vector index.
- Tool node – exposes retrieval results as a tool for the agent.
- Memory node (Buffer) – stores recent interactions for conversational continuity.
- Chat node (Hugging Face LM) + Agent – generates recommendations and reasoning.
- Logging & analytics
- Google Sheets node – appends a row with the agent’s output and key metadata.
2.2 End-to-end data flow
- Event ingestion A sensor, smart hub, or intermediate gateway sends a JSON payload to the n8n Webhook via HTTP POST. Typical fields include:
device_idtimestamppower_wattsnotesor other descriptive text
- Text splitting The Splitter node processes long text fields (for example, logs, notes, or event descriptions) and divides them into overlapping chunks. In the template:
chunkSize = 400characterschunkOverlap = 40characters
This improves embedding quality by preserving local context and preventing oversized inputs for the embeddings model.
- Embedding generation For each chunk, the Embeddings node calls the Cohere embeddings API. The result is a vector representation that captures semantic similarity between events. While the template is configured for Cohere, you can substitute providers such as OpenAI or Hugging Face as long as you keep the vector dimensions and API usage consistent with your Supabase configuration.
- Vector storage The Insert node writes each embedding to a Supabase-backed vector store along with metadata such as:
device_idtimestamporiginal_textornotes- Any additional contextual fields you pass through from the Webhook
Supabase then supports fast similarity search so the workflow can retrieve past events similar to new anomalies or queries.
- Contextual retrieval When the system needs to answer a question or explain an event (for example, “Why did the kitchen fridge spike?”), the Query node executes a semantic search over the Supabase index. The Tool node wraps this retrieval capability so the agent can call it as needed and reason over the returned documents.
- Conversation memory The Memory (Buffer) node maintains a short history of recent messages or interactions. This enables the agent to:
- Handle follow-up questions
- Refer back to recent recommendations
- Maintain context across a short multi-step conversation
The memory window is intentionally small to control token usage and latency.
- Agent reasoning & response The Chat node, configured with a Hugging Face language model, is used by the agent to produce natural language responses. The agent uses:
- Current event data from the Webhook
- Relevant historical context from the vector store
- Short-term context from the Memory node
The output can include recommended actions such as:
- “Lower thermostat by 2°C between 14:00 and 16:00.”
- “Schedule an appliance inspection for the kitchen fridge.”
- Logging & audit trail Finally, the Google Sheets node appends a new row that records:
- Key input fields (for example, device, timestamp, power level)
- The agent’s recommendation or explanation
- Optional additional metadata for analytics or compliance
This provides an easily accessible audit trail and a dataset for further analysis in BI tools.
3. Input Specification: Webhook Payload
The following example illustrates a typical JSON payload that the Webhook node receives:
{  "device_id": "fridge_kitchen_01",  "timestamp": "2025-08-01T14:22:00Z",  "power_watts": 220,  "notes": "sudden spike while door opened"
}
In practice, you can extend this schema with additional fields such as room, circuit, or status codes, as long as the workflow nodes are configured to handle them.
4. Node-by-Node Breakdown
4.1 Webhook node
Purpose: Entry point for sensor or gateway events.
Key configuration aspects:
- HTTP Method: Typically
POSTfor JSON payloads. - Authentication:
- Use a secure URL and, where possible, apply authentication or IP allowlists.
- If devices cannot connect directly to the internet, route events through a secure gateway that buffers and forwards them to the Webhook.
- Response handling: You can return a simple acknowledgment (for example, HTTP 200 with a minimal JSON body) to confirm receipt to the sensor or gateway.
4.2 Splitter node
Purpose: Segment long text fields to improve embedding performance and retrieval quality.
Typical parameters:
chunkSize: 300 to 500 characters is a practical range for log or notes text.chunkOverlap: 20 to 50 characters helps maintain context between adjacent chunks.
Behavior:
- Operates on one or more text fields, such as
notesor aggregated log text. - Outputs multiple items, one per chunk, each preserving the original metadata fields where needed.
Edge considerations:
- If the text is shorter than
chunkSize, only a single chunk is produced. - Very large payloads may generate many chunks, which increases embedding cost. Consider truncation or filtering upstream if necessary.
4.3 Embeddings node (Cohere)
Purpose: Convert text chunks into semantic embeddings.
Provider: Cohere (as configured in the template). Compatible alternatives include OpenAI and certain Hugging Face models, but those require corresponding credential and node configuration changes.
Configuration notes:
- Set the model name according to your Cohere plan and performance targets.
- Ensure that the embeddings dimensionality is compatible with your Supabase vector column definition.
- Test with representative payloads to verify that semantically similar events yield high similarity scores.
Cost and rate limits:
- Each chunk results in a separate embeddings request. High-frequency sensors or verbose logs can increase costs quickly.
- Use batching, throttling, or event sampling if you expect large bursts of events.
4.4 Supabase vector store – Insert node
Purpose: Persist embeddings and associated metadata for later semantic retrieval.
Stored fields typically include:
- Embedding vector
device_idtimestamporiginal_textornotes- Any additional fields useful for filtering (for example, room, circuit, event type)
Configuration notes:
- Use Supabase credentials with the minimum required privileges to insert and query vectors.
- Define indexes that support both vector similarity search and common filters such as device ID or time range.
- Ensure that the vector column type and dimension match the embeddings model output.
4.5 Supabase vector store – Query node
Purpose: Retrieve relevant historical events via similarity search.
Usage pattern:
- Given a query embedding or query text, the node searches the vector index and returns the most similar documents.
- Used when the agent needs context, for example to answer “Why did the kitchen fridge spike?”
Key parameters:
- Number of results (top-k) to return.
- Optional filters, such as:
- Specific
device_id - Date or time range
- Specific
Integration with the Tool node:
- The Tool node exposes the query capability to the agent so it can call the vector store when needed.
- The agent then receives the retrieved documents as part of its reasoning context.
4.6 Memory node (Buffer)
Purpose: Maintain a bounded history of recent interactions to support short conversational flows.
Typical configuration:
- Store the most recent 5 to 10 messages, or
- Limit to interactions from the last 24 hours of events, depending on your usage pattern.
Trade-offs:
- A larger memory window provides richer context but increases token usage and latency.
- A smaller window is cheaper and faster but may lose context across longer conversations.
4.7 Chat node (Hugging Face LM) & Agent
Purpose: Generate natural language recommendations, explanations, or action suggestions based on current and historical data.
Components:
- Chat node: Calls a Hugging Face-hosted language model.
- Agent: Orchestrates tool usage (for example, the vector store Tool) and memory to answer user or system queries.
Typical outputs:
- Actionable recommendations such as:
- “Lower thermostat by 2°C between 2 and 4 pm to reduce peak load.”
- “Schedule a maintenance check for the kitchen fridge due to repeated spikes.”
- Explanations referencing past events retrieved from Supabase.
Configuration considerations:
- Prompt design is important to ensure the agent focuses on energy optimization and safety.
- For production systems that control physical devices, consider adding a rule layer or human approval step before executing actions.
4.8 Google Sheets node
Purpose: Append a log entry for each agent interaction or recommendation.
Commonly logged fields:
- Timestamp of the event or recommendation
- Device identifier
- Power reading or other key metrics
- Agent summary or recommended action
- Any additional flags for severity or follow-up
Benefits:
- Provides a simple, accessible audit trail.
- Supports ad-hoc analysis in spreadsheets or export to BI tools.
- Acts as a fallback record if vector or model logs are unavailable.
5. Configuration Guidelines & Best Practices
5.1 Webhook security
- Use HTTPS for all inbound requests.
- Apply authentication or signed requests when supported by your devices or gateway.
- If direct device access is not possible, deploy a gateway that:
- Receives raw sensor data on the local network.
- Validates and batches events.
- Forwards them securely to the n8n Webhook.
5.2 Splitter parameters
- Start with:
chunkSize: 300 to 500 characterschunkOverlap: 20 to 50 characters
- Increase
chunkSizeif you see fragmented context in retrieval results. - Adjust
chunkOverlapto balance redundancy vs. cost.
5.3 Embeddings model selection
- Choose a model that fits your:
- Budget and API rate limits
- Desired semantic accuracy for your domain
- Validate performance by:
- Indexing a small set of known similar and dissimilar events.
- Running similarity queries and confirming that related events rank higher.
5.4 Supabase indexing & metadata
- Store at least:
device_idtimestamporiginal_textor
Automate Trello Cards with n8n & RAG Agent
Automate Trello Cards with n8n & a RAG Agent (So You Never Manually Copy-Paste Again)
Picture this: you are staring at yet another bug report, copying the title into Trello, trimming the description, hunting for similar past issues, trying to guess labels and priority. By the fifth ticket, your soul quietly leaves your body.
Good news: you can hand most of that drudgery to an automation that actually reads your issues, looks up related context, and drafts smart Trello card content for you. This n8n workflow template uses a vector-backed RAG (retrieval-augmented generation) agent, Supabase, Cohere embeddings, and Anthropic to do just that, with Google Sheets for auditing and Slack for “something broke” alerts.
Below is a fresh walkthrough of what the template does, how it works, and how to set it up without losing your weekend.
What this n8n workflow actually does
This automation is built to take incoming issue payloads from any external system, enrich them with past context, and output Trello-ready card content. Under the hood, it:
- Receives issue data via an HTTP webhook
- Splits long descriptions into chunks for better semantic search
- Creates vector embeddings with Cohere
- Stores and queries those embeddings in a Supabase vector index
- Uses a window-based memory to keep short-term context
- Calls a RAG agent (Anthropic + Supabase vector tool) to generate Trello card content
- Logs the final result into Google Sheets for auditing and analytics
- Sends Slack alerts if anything explodes along the way
The end result: smarter, context-aware Trello cards that feel like someone actually read the issue, without you doing the reading every single time.
Why you might want this workflow in your life
This setup combines classic workflow automation with modern LLM tooling, so you get more than just “if X then create card Y.” You get:
- Automatic Trello card creation from incoming issues Issues, bug reports, feature requests, or form submissions can be turned into Trello card drafts with context-aware titles, descriptions, labels, and priority suggestions.
- A searchable vector index of past issues Every issue you send through is embedded and stored in Supabase, so the RAG agent can pull similar past problems and avoid reinventing the wheel.
- Audit trails and observability Google Sheets keeps a log of what the agent produced, and Slack alerts immediately tell you when something goes wrong instead of silently failing at 2 a.m.
If you are tired of manual triage, repetitive copy-paste, and “didn’t we already fix this?” moments, this workflow helps you reclaim that time.
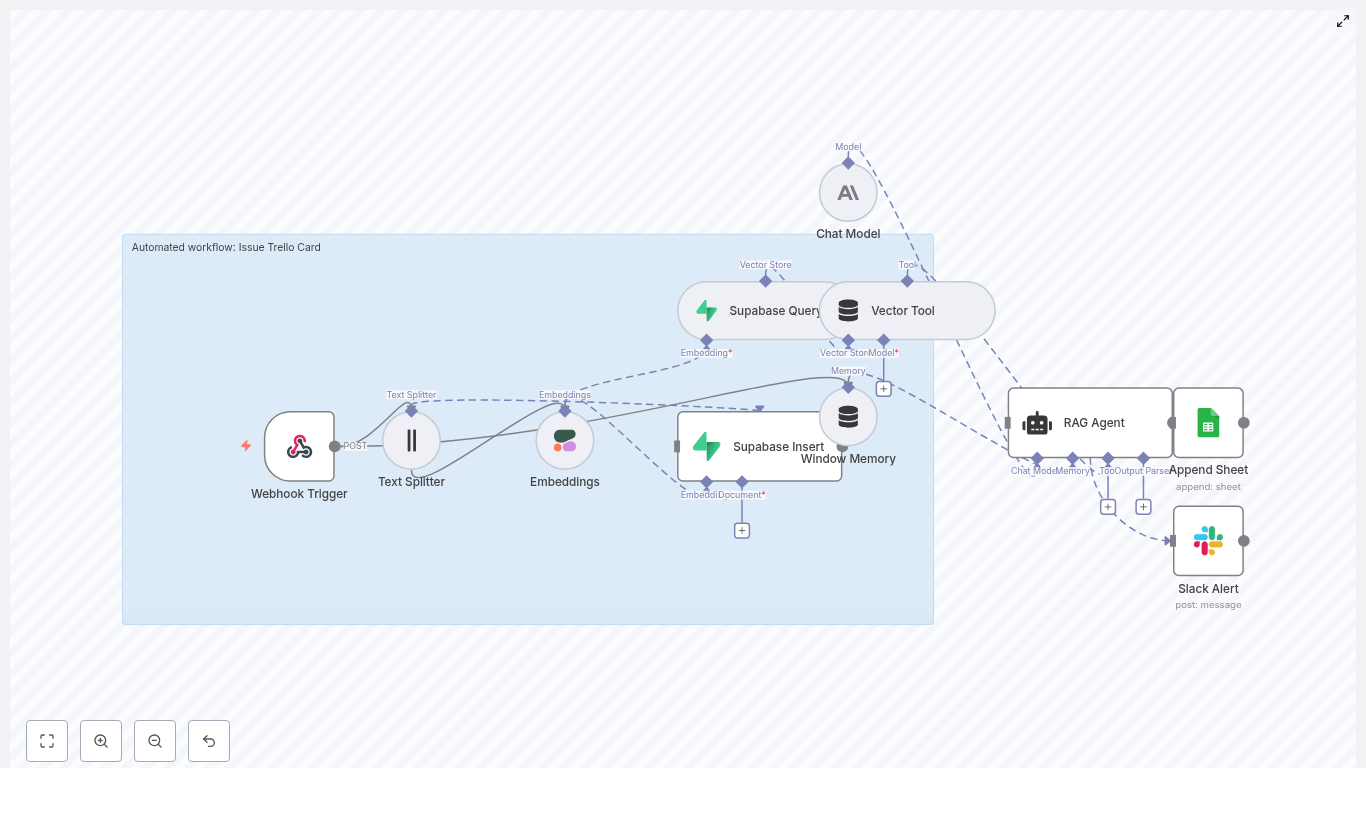
How the architecture fits together
Here is the high-level map of the template’s building blocks:
- Webhook Trigger – receives incoming POST requests with issue payloads
- Text Splitter – chops large descriptions into overlapping chunks
- Embeddings (Cohere) – converts those chunks into vector embeddings
- Supabase Insert & Query – stores embeddings and runs vector similarity search
- Window Memory – keeps short-term context available for the agent
- RAG Agent (Anthropic + Vector Tool) – retrieves relevant context and generates Trello-ready content
- Append Sheet (Google Sheets) – logs results for auditing and metrics
- Slack Alert – sends error notifications for quick debugging
Think of it as a little assembly line: data comes in, gets chopped, embedded, stored, retrieved, generated, logged, and monitored. You just see the Trello content at the end.
Quick setup guide: from webhook to Trello-ready content
Step 1 – Accept issues with a Webhook Trigger
First, the workflow needs something to chew on. That is where the Webhook Trigger node comes in.
- Configure an HTTP POST webhook in n8n.
- Set a path, for example
/issue-trello-card. - Secure it with either:
- a secret token in the headers, or
- an IP-restricted gateway in front of n8n.
The incoming JSON payload (from GitHub, a form, an internal tool, or any other system) becomes the starting input for the flow.
Step 2 – Split long descriptions with Text Splitter
Issue descriptions are often novels in disguise. To make them usable for semantic search, the template uses a Text Splitter node.
- Use a character-based splitter.
- Set a chunk size of about 400 characters.
- Add an overlap of about 40 characters to preserve context across chunks.
This chunking strategy helps the RAG agent retrieve relevant bits later, instead of missing important details that got buried in a massive blob of text.
Step 3 – Turn text into vectors with Cohere Embeddings
Next, each text chunk is sent to an embeddings model. The template uses Cohere’s embed-english-v3.0 model.
- Each chunk is converted into a vector embedding.
- Those vectors allow you to perform semantic similarity queries later on.
Embeddings are what make it possible to say “find me past issues that are like this one in meaning, not just keyword.” That context is crucial for the RAG agent to generate better, more informed Trello content.
Step 4 – Store and search context with Supabase Insert & Query
Once you have embeddings, you need somewhere to put them. That is where Supabase comes in.
- Insert each embedding into a Supabase vector index. In the template, the index is named
issue_trello_card. - Use Supabase’s vector query capabilities to:
- retrieve similar past issues when a new one arrives, and
- feed that context to the agent.
Supabase gives you Postgres-backed persistence and scaling options, so your context store can grow with your issue volume without turning into a science experiment.
Step 5 – Keep short-term context with Window Memory
The Window Memory node acts like a short-term brain for the workflow. It can:
- keep track of recent interactions or runs, and
- provide the agent with incremental state within a defined time window.
This is useful if the same issue or user flows through the system multiple times and you want the agent to remember what just happened, instead of starting from zero each time.
Step 6 – Generate Trello content with a RAG Agent
Now for the star of the show: the RAG agent.
In this template, the agent is configured with:
- Chat model: Anthropic as the generative core
- Vector tool: a tool that queries Supabase for relevant context
- System prompt: something like “You are an assistant for Issue Trello Card” to guide style and formatting
The agent receives three key ingredients:
- The original webhook JSON (the current issue)
- Relevant context retrieved from Supabase
- Window memory for recent state
Using all of that, it outputs a structured result that typically includes:
- Card title
- Description
- Suggested labels
- Priority
- Other metadata you define in the prompt
In other words, it drafts the Trello card content for you, using both the current issue and similar past issues as reference.
Step 7 – Log results in Google Sheets and alert on errors in Slack
Finally, the workflow keeps everything auditable and observable.
- Google Sheets Append: The agent’s final output is appended to a Google Sheet. This gives you:
- a record of what the agent produced,
- data for analytics, and
- a safe way to review results before wiring up automatic Trello card creation.
- Slack Alert: An
onErrorpath sends a message to a Slack alerts channel if something in the workflow fails. You find out quickly, instead of via a mysterious drop in new Trello cards.
Configuration and security tips (so this does not become a public issue firehose)
- Secure the webhook Validate an HMAC signature or require an API key in the headers so random bots cannot spam your workflow.
- Lock down Supabase access Use service roles and restrict query capabilities to your n8n server or a known IP range.
- Watch your costs Embeddings and LLM calls are incredibly helpful, but they are not free. Batch requests where possible and add rate limits for high-volume sources.
- Use retries and idempotency Make the webhook consumer idempotent so retries do not create duplicate Trello cards or duplicate logs.
Customization ideas to level up the template
Once the base workflow is running smoothly, you can start adding quality-of-life upgrades.
- Automatically create Trello cards The template focuses on generating card content and logging it. Add a Trello node that:
- reads the agent’s output, and
- creates Trello cards automatically with the generated title, description, labels, and due dates.
- Automatic deduplication Use the Supabase query step to detect high-similarity matches. If a new issue is basically a clone of an old one, you can:
- link them,
- merge them, or
- flag them as duplicates before creating a new card.
- Multi-channel inputs Point different sources to the same webhook:
- email-to-webhook services,
- web forms,
- Slack slash commands, or
- internal tools.
All roads lead to the same smart card generation process.
- More advanced prompts For consistent output, give the agent a stricter schema. For example, ask for JSON with keys like:
titledescriptionlabelschecklistdueDate
This makes it easier to plug into Trello or other tools later.
Testing and safe rollout
Before you let this automation loose on your production issues, give it a proper shakedown.
- Send varied test payloads Try:
- short, simple issues,
- long descriptions with logs,
- edge cases like stack traces or very large attachments.
- Log everything in staging Keep raw inputs and agent outputs in a staging Google Sheet. This helps you:
- audit what the agent is doing,
- tune prompts,
- adjust chunk size or overlap if retrieval is off.
- Canary rollout Start by sending a small percentage of production traffic through the workflow. Once you are happy with the results, gradually increase the share until the manual process is the exception, not the rule.
Troubleshooting common “what is this doing?” moments
- Empty or irrelevant context from Supabase Try:
- increasing chunk overlap, or
- expanding the retrieval window size.
This helps the agent see more of the original issue when searching for related content.
- Model hallucinations If the agent starts confidently inventing details:
- tighten the system prompt,
- explicitly instruct it to rely only on retrieved facts,
- feed the retrieved context into the prompt in a clearly marked section.
- Rate limits and timeouts When APIs push back:
- add exponential backoff for retries,
- break large jobs into smaller, asynchronous batches,
- offload heavy embedding generation to a worker queue so the webhook does not time out.
Costs and scaling considerations
As usage grows, two cost centers will stand out first: embeddings and LLM calls.
- Cache aggressively Only embed new or meaningfully changed content. Reuse embeddings whenever possible.
- Scale Supabase smartly Use Supabase’s scaling options or other vector stores as your corpus grows, so queries stay fast and reliable.
- Move heavy work off the webhook path If throughput increases, shift embedding generation and other heavy tasks into a worker queue to avoid webhook timeouts and keep things snappy.
Wrapping up: from manual triage to smart automation
This n8n workflow template shows how you can combine webhooks, embeddings, vector storage, and a RAG agent to generate smarter, context-aware Trello cards, while keeping a clear audit trail and robust error alerts.
Instead of manually triaging every issue, you get an automated assistant that:
- reads incoming payloads,
- remembers similar past issues,
- drafts Trello card content, and
- logs everything for future review.
Your team keeps visibility, loses repetitive busywork, and gains a more consistent triage process.
Ready to try it? Import the template into n8n, secure your webhook, and plug in your own Cohere, Supabase, Anthropic, Google Sheets, and Slack credentials. Once you have customized it, you can export your workflow and share it on GitHub, or reach out if you want a walkthrough or extra customization help.
Cron Success Slack: n8n RAG Automation
Automating cron job notifications with retrieval-augmented generation (RAG) enables richer, context-aware incident handling and long-term observability. This reference guide documents a production-ready n8n workflow template, Cron Success Slack, that integrates webhook triggers, text splitting, OpenAI embeddings, a Weaviate vector database, a LangChain-style RAG agent, Google Sheets logging, and Slack alerts.
Overview
The Cron Success Slack workflow ingests outputs from scheduled jobs via an HTTP webhook, transforms them into semantic embeddings, stores and retrieves historical context from Weaviate, and uses a chat model to generate human-readable summaries. These summaries are persisted in Google Sheets for auditing and are optionally pushed to Slack when manual investigation is required.
This documentation is intended for engineers and operators already familiar with n8n concepts such as nodes, credentials, and data routing, as well as basic vector database and LLM/RAG patterns.
Use Cases & Objectives
The workflow is designed for teams that run recurring cron jobs or scheduled tasks that emit logs, status messages, or small reports. The main objectives are to:
- Determine whether a cron execution is routine or anomalous based on historical runs.
- Attach relevant historical context, notes, or remediation guidance to each run.
- Persist structured, queryable logs in Google Sheets for audits and reporting.
- Send Slack alerts selectively, focusing human attention on runs that need action.
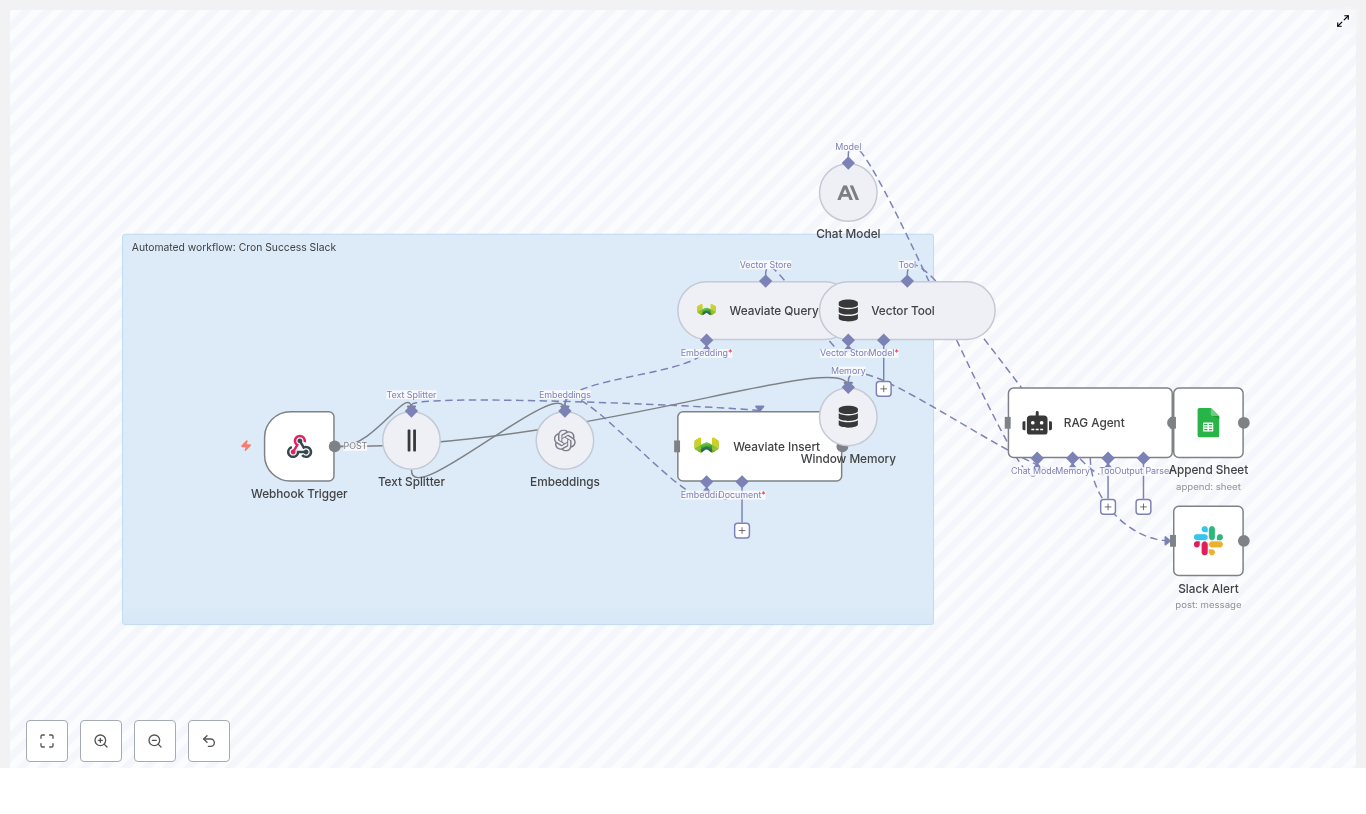
Architecture
The workflow is organized as a left-to-right data pipeline in n8n, with branching for success and error handling. Core building blocks:
- Webhook Trigger – Receives incoming cron job payloads via HTTP POST.
- Text Splitter – Segments long log messages into smaller chunks to optimize embedding quality.
- OpenAI Embeddings – Converts text chunks into embedding vectors.
- Weaviate Vector Store
- Insert – Persists new embeddings with metadata.
- Query – Retrieves semantically similar historical entries.
- Vector Tool – Exposes Weaviate query as a tool callable by the RAG agent.
- Window Memory – Maintains short-term conversational or event context for the agent.
- RAG Agent with Chat Model – Synthesizes a status summary using the latest payload and retrieved context.
- Google Sheets Append – Writes structured results to a sheet for long-term storage.
- Slack Alert – Posts notification messages on agent errors or when flagged by logic as needing human review.
Data Flow Summary
At a high level, the workflow executes the following sequence for each cron event:
- Cron job sends an HTTP POST to the n8n Webhook Trigger.
- Payload text is passed through the Text Splitter to create manageable chunks.
- Each chunk is processed by the OpenAI Embeddings node to generate vectors.
- Vectors and associated metadata are written into Weaviate via a Weaviate Insert node.
- In parallel or immediately after insert, a Weaviate Query node retrieves similar historical records.
- The query is exposed as a Vector Tool, which the RAG Agent can call for context.
- Window Memory and the raw payload are provided to the RAG Agent along with tool access.
- The Chat Model inside the RAG Agent generates a status summary that includes historical references.
- On successful generation, the result is appended to Google Sheets.
- On error (for example, LLM failure or tool error), an onError path sends a Slack Alert with diagnostic details.
Node-by-Node Breakdown
1. Webhook Trigger
Purpose: Entry point for cron job outputs.
- Node type: HTTP Webhook (n8n core).
- HTTP Method:
POST. - Path: Use a non-guessable path such as
/cron-success-slack.
Security considerations:
- Restrict inbound requests by IP allowlist if possible.
- Include a shared secret or validation token in the payload and validate it inside the workflow.
- Ensure HTTPS is used so logs and tokens are encrypted in transit.
The webhook output typically includes fields such as cron_job_name, status, timestamp, and a log or message body. These are passed as JSON to downstream nodes.
2. Text Splitter
Purpose: Normalize and segment large cron outputs before embedding.
- Strategy: Character-based text splitting.
- Typical parameters:
chunkSize: 400overlap: 40
This configuration balances semantic coherence and granularity. It produces overlapping text chunks so important context that falls near boundaries is not lost. The splitter node should accept the raw log text from the webhook and output an array of chunked strings.
Edge cases:
- Very small messages might not require splitting and will pass through as a single chunk.
- Very large logs may result in many chunks; consider monitoring node execution time and output size if your logs are extremely verbose.
3. OpenAI Embeddings
Purpose: Convert text chunks into numerical vectors for semantic search.
- Node type: OpenAI Embeddings.
- Model example:
text-embedding-3-small. - Credentials: Configure an OpenAI API key in n8n credentials and reference it in this node.
The node iterates over each text chunk from the Text Splitter and returns a vector per chunk. These vectors are then attached to records stored in Weaviate.
Operational notes:
- Use a cost-efficient model like
text-embedding-3-smallby default. - If semantic matches are weak, you may later switch to a larger or more capable embedding model while ensuring vector dimensions align with your Weaviate schema.
4. Weaviate Insert
Purpose: Persist embeddings and associated metadata in a vector store.
- Node type: Weaviate Insert (or equivalent custom node).
- Index name: Recommended value
cron_success_slack.
For each embedding, the node writes:
- The embedding vector produced by the OpenAI Embeddings node.
- Metadata such as:
timestampof the cron run.cron_job_nameor equivalent identifier.status(for example, success, failure, degraded).- Raw text snippet corresponding to that chunk.
Configuration notes:
- Ensure the Weaviate class schema matches the embedding dimension and includes fields for metadata like
cron_name,status, andtimestamp. - Validate that the index name in the node exactly matches the class or index name defined in Weaviate.
5. Weaviate Query & Vector Tool
Purpose: Retrieve semantically similar historical logs and expose them as a tool to the RAG agent.
- Node type: Weaviate Query.
- Query input: Embeddings or text from the current cron event.
When a new cron event is processed, the workflow queries the cron_success_slack index for similar past messages. Typical filters might use metadata such as cron_job_name or time ranges, though the exact filters depend on your Weaviate schema.
The query results are wrapped in a Vector Tool node so that the RAG agent can call this tool dynamically. The tool returns the most relevant historical entries, which the agent uses to provide context in its summary.
6. Window Memory
Purpose: Maintain short-term context across related events or agent calls.
- Node type: Window Memory (LangChain-style memory in n8n).
- Behavior: Stores the last N messages or exchanges for use by the RAG agent.
This is particularly useful when multiple cron events are related (for example, retries, follow-up runs, or sequences of dependent jobs). The memory node should be wired so that previous agent outputs and relevant payloads are available as context, without overwhelming the model.
7. Chat Model & RAG Agent
Purpose: Generate a human-readable status summary enriched with historical context.
- Node type: RAG Agent (LangChain-style) with a Chat Model.
- Chat model examples: OpenAI Chat models or Anthropic Claude.
The RAG agent receives:
- The Vector Tool that queries Weaviate.
- Window Memory for recent context.
- The raw payload from the Webhook Trigger (for example, cron job name, status, logs).
Using these inputs, the agent calls the vector tool as needed, reads the retrieved documents, and generates a concise summary. A typical output might be:
"Cron job `daily-report` completed successfully at 03:02 UTC. No errors found. Similar past runs indicate a transient delay on 2025-08-21. No action required."
System prompt configuration:
Define a system prompt to constrain and standardize the agent behavior, for example:
"You are an assistant for Cron Success Slack. Summarize status and include relevant historical context or remediation steps if needed."
This ensures that outputs remain focused on operational status, relevant history, and actionable guidance only when required.
8. Append to Google Sheets
Purpose: Persist a structured audit trail of cron runs and AI-generated summaries.
- Node type: Google Sheets Append.
- Required configuration:
- Google Sheets credentials configured in n8n.
- Target spreadsheet ID and sheet name.
On successful RAG output, the workflow appends a new row with fields such as:
timestampof the cron run.cron_job_name.- LLM-generated
status_summaryor similar field. - Additional metadata such as raw status, error flags, or job duration if available.
The resulting sheet can be used for audits, trend analysis, or export to BI tools.
9. Slack Alert on Error
Purpose: Notify engineers when the RAG agent or workflow encounters errors, or when a run requires manual attention.
- Node type: Slack node (chat.postMessage style behavior).
- Channel example:
#alerts.
Configure the onError path of the RAG agent node to trigger this Slack node. The alert should include:
- The error message or exception details from the failing node.
- An identifier or link to the workflow execution so engineers can inspect logs.
- Key payload fields such as cron job name and timestamp for quick triage.
Configuration Notes & Best Practices
Security
- Protect the Webhook Trigger with tokens or shared secrets validated inside the workflow.
- Restrict inbound traffic to known IP ranges when feasible.
- Always use HTTPS endpoints for the webhook.
- Limit access to Weaviate and OpenAI credentials using n8n credential management and appropriate network controls.
Observability & Logging
- Extend the Google Sheets schema with execution metadata such as run ID, duration, and error flags.
- Optionally forward key events to a centralized monitoring system for alerting and dashboards.
Chunking Strategy
- Start with
chunkSize: 400andchunkOverlap: 40. - For very short logs, chunking will have minimal effect and can be left as-is.
- For very long logs, consider whether all content needs to be embedded, or if you can pre-filter noise before splitting.
Embedding Model Selection
- Use
text-embedding-3-smallfor cost-effective baseline retrieval. - If similarity results are weak, test a more capable embedding model and update your Weaviate schema to match the new vector dimension.
Weaviate Schema & Queries
- Include searchable metadata fields such as
cron_name,status, andtimestampin your schema. - Use these fields to pre-filter before vector similarity search to reduce noise and latency.
Rate Limiting & Reliability
- Be aware of OpenAI and Weaviate rate limits.
- Where supported, configure retries or exponential backoff on embedding and Weaviate nodes to handle transient failures.
Testing & Validation
- Simulate webhook payloads for typical success and failure runs.
- Verify that the RAG agent summary references relevant historical entries retrieved from Weaviate.
- Check that Google Sheets rows are appended correctly and Slack alerts are triggered only when expected.
Troubleshooting
Embeddings Missing or Poor Semantic Matches
If retrieval quality is low or embeddings are not generated as expected:
- Confirm that the Text Splitter output is correctly mapped to the Embeddings node input.
- Verify that the embedding model returns vectors and that no API errors are being suppressed.
- Experiment with larger
chunkSizeor a more capable embedding model if matches remain weak.
Weaviate Insert Failures
When records fail to insert into Weaviate:
- Check Weaviate credentials and endpoint configuration in the node.
- Validate that the index or class name (for example,
cron_success_slack) exactly matches your Weaviate schema. - Ensure the vector dimension in Weaviate matches the dimension of your chosen embedding model.
Noisy or Unfocused RAG Agent Outputs
If the agent responses are verbose, irrelevant, or inconsistent:
- Tighten the system prompt to be more explicit about desired format and scope.
- Reduce the amount of window memory if older context is not needed.
- Limit the number of retrieved documents (for example, top N results) to avoid information overload.
Automated CRM Patient Intake Workflow

Automated CRM Patient Intake Workflow with n8n, Embeddings & RAG
Imagine if every new patient intake just quietly handled itself in the background, organized all the details, made them searchable, and even suggested next steps for your team. No messy copy-paste, no lost context, no “who was supposed to follow up with this person?” moments.
That is exactly what this n8n workflow template does. It ties together form submissions, embeddings, a Weaviate vector store, and a Retrieval-Augmented Generation (RAG) agent so you can:
- Ingest patient intake forms automatically
- Split long notes into manageable chunks
- Create embeddings and store them in Weaviate
- Use a RAG agent (powered by a chat model) to process everything intelligently
- Log results into Google Sheets
- Get Slack alerts when something breaks
Let’s walk through how it works, when you should use it, and how to set it up in your own n8n instance.
Why automate CRM patient intake in the first place?
If you are still doing intake manually, you probably know the pain:
- New submissions sit in an inbox waiting for someone to copy them into the CRM
- Details from long notes get summarized inconsistently or missed entirely
- Historical context is scattered across tools and impossible to search properly
By automating CRM patient intake with n8n, embeddings, and RAG, you get:
- Faster triage and routing so new patients are not waiting on manual data entry
- Context-aware responses that use past records and reference data
- Searchable intake history via vector embeddings in Weaviate
- Reliable audit logs and alerts when something fails
In short, you spend less time wrangling data and more time actually helping patients.
How the workflow fits together: high-level architecture
This template uses a collection of n8n nodes that work together as a pipeline. At a high level, it:
- Listens for incoming form submissions through a webhook
- Splits long text into chunks so embeddings stay meaningful
- Creates embeddings using OpenAI
- Stores and retrieves those embeddings in Weaviate
- Maintains short-term memory for the current intake session
- Runs a RAG agent powered by an Anthropic chat model
- Logs results into Google Sheets
- Sends Slack alerts if anything goes wrong
Here are the key components you will see in the n8n workflow:
- Webhook Trigger – receives POST requests at
/crm-patient-intake - Text Splitter – chunks long text fields (size 400, overlap 40)
- Embeddings (OpenAI) – turns chunks into vectors
- Weaviate Insert & Query – stores and queries vectors in the
crm_patient_intakeindex - Window Memory – keeps short-term session context
- Chat Model (Anthropic) – LLM used by the RAG agent
- Vector Tool & RAG Agent – retrieves context and generates final output
- Append Sheet (Google Sheets) – logs status and audit data
- Slack Alert – notifies a channel when errors occur
When should you use this n8n template?
This workflow is a good fit if:
- You collect patient intake via web forms, portals, or external systems
- You use a CRM or similar system to track patients and follow-ups
- You want a searchable history of patient notes, not just flat text
- You need structured outputs like triage level, recommended follow-up, or formatted CRM entries
Even if your exact tools differ, you can adapt this pattern to your own stack as long as you can hit the webhook and connect to the APIs used here.
Step-by-step: inside the workflow
1. Webhook Trigger – catching new patient submissions
Everything starts with a webhook node. Configure it to accept POST requests at:
/crm-patient-intake
Your form system, middleware, or application should send the patient intake payload to this endpoint whenever a new form is submitted. The payload might look something like this:
Sample webhook payload
{  "patient_id": "12345",  "name": "Jane Doe",  "submitted_at": "2025-09-01T12:34:56Z",  "notes": "Patient reports recurring headaches for 3 months...",  "source": "web_form"
}
From here, n8n takes over and moves the data through the rest of the pipeline.
2. Text Splitter – preparing long notes for embeddings
Free-text fields like medical history or notes can get long, and that is where the Text Splitter node comes in. It breaks the text into overlapping chunks so the embeddings stay coherent and token limits are not exceeded.
Recommended settings in the template:
- Chunk size: 400 characters
- Chunk overlap: 40 characters
The overlap helps preserve context across chunks, which makes the later retrieval step much more accurate.
3. Embeddings (OpenAI) – turning text into vectors
Each chunk is then passed to an Embeddings node using a small OpenAI model such as:
text-embedding-3-small
In n8n, store your OpenAI credentials as:
OPENAI_API– your OpenAI API key
These embeddings are what allow you to do semantic similarity search later in Weaviate, which is the backbone of the RAG part of this workflow.
4. Weaviate Insert & Query – building your semantic patient history
Next, the workflow inserts those embedding documents into a Weaviate index named:
crm_patient_intake
The Weaviate Insert node handles storing each chunk along with any useful metadata. Later, a Weaviate Query node searches the same index to retrieve the most relevant context for a given patient or question.
You will configure Weaviate and its credentials in n8n as:
WEAVIATE_API– Weaviate endpoint and API key
This is what makes your intake history actually searchable in a meaningful, semantic way.
5. Window Memory – keeping track of the current session
The Window Memory node stores recent data for the current transaction. Think of it as short-term memory for the RAG agent. It helps the agent keep track of what has already been seen during this specific intake process so responses remain consistent and contextual.
6. Chat Model & RAG Agent – turning context into useful outputs
Now for the “brains” of the operation.
The template uses an Anthropic chat model node as the LLM. You can swap this for another provider if you prefer, as long as you update the credentials and settings.
ANTHROPIC_API– Anthropic API key for the chat model
The RAG agent is configured with a system message like this:
You are an assistant for CRM Patient Intake
Process the following data for task 'CRM Patient Intake':

{{ $json }}
The agent uses:
- Context retrieved from Weaviate via the Vector Tool
- Short-term context from the Window Memory node
With that, it produces a concise output, which could be:
- A recommended follow-up action
- A triage level
- A formatted summary suitable for your CRM
You can customize the prompt to better fit your own intake logic and CRM fields.
7. Append Sheet (Google Sheets) – logging everything for review
Once the RAG agent has done its job, the workflow appends the final status and any key fields to a Google Sheet named:
Log
This gives you:
- An audit trail for each intake
- A simple place to manually review outputs
- A handy data source for downstream teams or reporting
In n8n, store your Google credentials as:
SHEETS_API– Google Sheets OAuth2 credentials
8. Slack Alert – catching errors before they pile up
Things go wrong sometimes. APIs rate limit, vector stores go down, credentials expire. The template already includes a Slack Alert node wired to the onError output of the RAG Agent.
On any error, the workflow sends a message to a Slack channel, for example:
#alerts
The alert includes exception details so your operations team can troubleshoot quickly.
Configure your Slack credentials in n8n as:
SLACK_API– Slack bot token
Configuration checklist: credentials & environment
Before you hit “Execute Workflow”, make sure you have these set up in n8n’s credential manager or as environment variables:
- OPENAI_API – OpenAI API key for embeddings
- WEAVIATE_API – Weaviate endpoint and API key
- ANTHROPIC_API – Anthropic (or your chosen LLM) API key
- SHEETS_API – Google Sheets OAuth2 credentials
- SLACK_API – Slack bot token for error notifications
Once these are in place, you can import the template, hook up the credentials, and start testing.
Security, privacy, and compliance considerations
Because this workflow touches patient data, you need to treat it with care. If your intake forms include PHI, keep in mind:
- Run the workflow in a HIPAA-compliant environment where required
- Enable encryption in transit and at rest for Weaviate and any storage layers
- Use strong access controls and audit logs for all API credentials
- Define data retention policies for both vectorized data and logs
For highly sensitive fields, consider pseudonymization or tokenization before sending anything to third-party APIs, especially LLM providers.
Error handling & observability: going beyond Slack alerts
The template gives you a solid starting point with Slack alerts on errors, but you can expand observability further by:
- Sending logs to an ELK stack, CloudWatch, or your observability platform of choice
- Tracking processing time for each webhook invocation
- Adding retry logic to critical nodes like embeddings and Weaviate insert operations
This helps you catch performance issues and ensure the workflow behaves reliably under load.
Scaling and managing costs
As traffic grows, you will want to keep an eye on both performance and API spend. A few practical tips:
- Batch embeddings when you can, grouping small submissions into a single API call
- Use a smaller embeddings model for storage, and reserve larger or more expensive models for higher value RAG steps if needed
- Scale or shard Weaviate based on query QPS and data volume
That way, you keep the workflow responsive without letting costs get out of control.
Testing & validation before going live
Before you plug this into a real patient intake form, run through a few test cycles:
- Send synthetic test submissions that cover edge cases like:
- Very long notes
- Missing or null fields
- Special characters and unusual formatting
- Validate Weaviate retrieval by querying with known vectors and checking that the right context comes back
- Review the Google Sheets log to confirm formatting, completeness, and correctness of the outputs
This gives you confidence that the pipeline behaves the way you expect before clinicians or coordinators rely on it.
Best practices to get the most from this template
To keep your automated CRM patient intake workflow clean and robust, consider:
- Normalizing text before splitting, such as lowercasing and trimming excessive whitespace
- Adding metadata like submission timestamp, source, or patient ID to each vector document for better filtering
- Limiting PHI sent to external models to only what is absolutely needed
- Documenting your RAG agent system message and updating it as your intake and CRM workflows evolve
These small steps can significantly improve both retrieval quality and compliance posture.
Next steps: getting this running in your n8n instance
Ready to try it out?
- Import the template into your n8n environment (self-hosted or cloud)
- Connect your credentials:
- OpenAI (
OPENAI_API) - Weaviate (
WEAVIATE_API) - Anthropic or your LLM provider (
ANTHROPIC_API) - Google Sheets (
SHEETS_API) - Slack (
SLACK_API)
- OpenAI (
- Send a few test submissions through the webhook
- Tune the RAG agent prompt and outputs to match your CRM fields and triage logic
Once it is tuned, this pipeline can dramatically reduce manual intake work and surface the right patient context exactly when your team needs it.
Call to action: Import this n8n workflow template, hook it up to your tools, and run a few realistic test cases. If you need help adapting it for HIPAA requirements or integrating with a specific CRM, reach out to our team or subscribe for a step-by-step walkthrough.
Want a downloadable JSON of the template or guidance tailored to your stack? Reply with your preferred environment (self-hosted or cloud) and the CRM you are using, and I will send you customized instructions.
Automate Court Date Reminders with n8n
Automate Court Date Reminders with n8n
Automating court date reminders is a practical way to reduce risk, improve client communication, and centralize case information. In this guide, you will learn how to implement a production-ready reminder workflow in n8n that uses a webhook for intake, Cohere embeddings, a Supabase vector store, an n8n agent backed by OpenAI, and Google Sheets for logging. The result is a searchable, auditable, and extensible automation pipeline tailored to legal and case-management scenarios.
Use case and business value
Court dates are legally binding and time-critical. Missed appearances can trigger penalties, defaults, or lost strategic opportunities. Manual reminder processes are error-prone and difficult to audit, especially when case volumes scale.
By implementing an n8n-based automation, you can:
- Systematically capture court date information from upstream systems or forms.
- Store case details in a vector database for semantic search and retrieval.
- Leverage an agent to reason over stored data and maintain conversational context.
- Log all reminder-related actions in Google Sheets for transparency and review.
This architecture combines modern NLP techniques (embeddings and vector search) with n8n’s visual workflow engine and integrations, without requiring a heavy custom engineering effort.
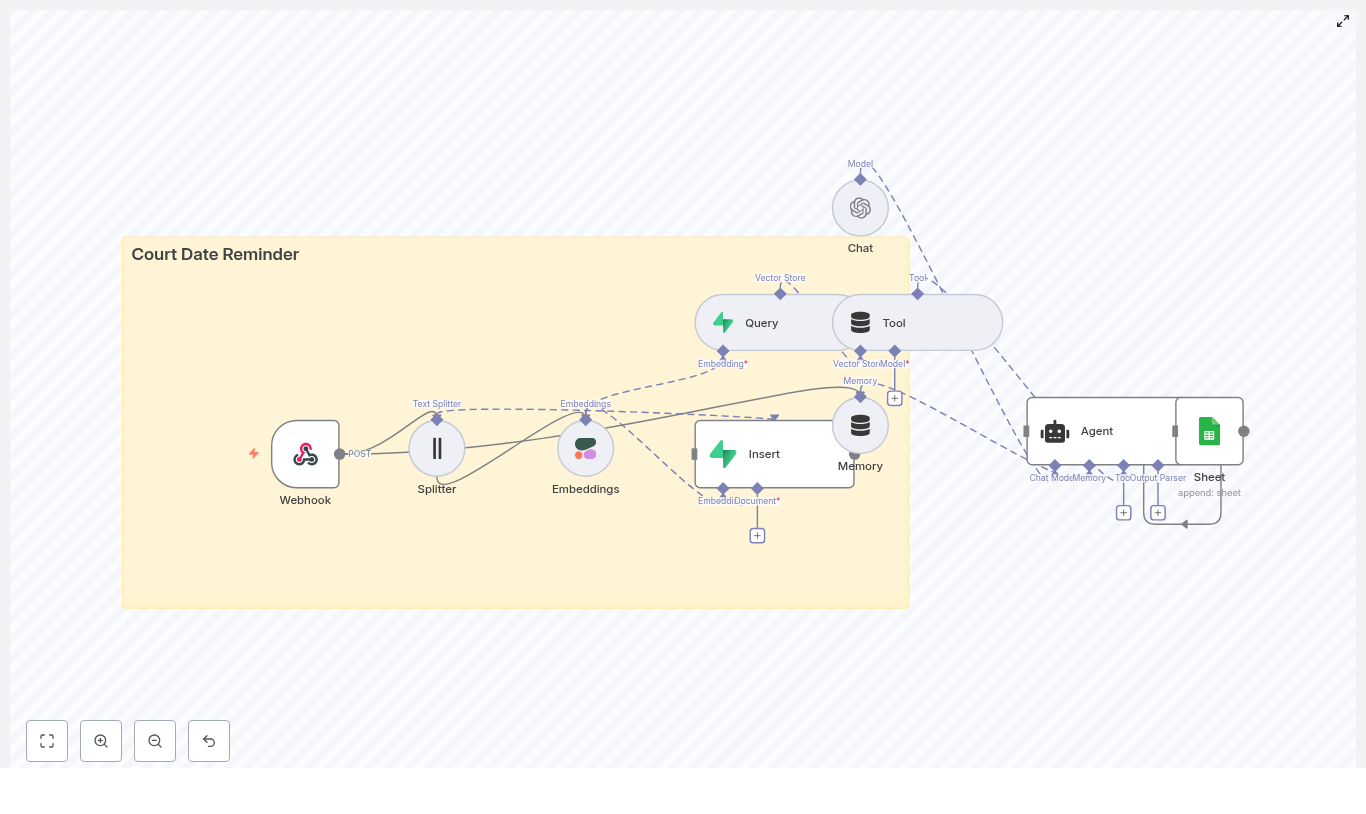
High-level architecture of the n8n workflow
The workflow is built as a modular pipeline. Each node covers a specific responsibility, which makes the system easier to maintain and extend.
Core components
- Webhook – Receives POST requests containing court date data.
- Text Splitter – Breaks long text fields into smaller chunks.
- Embeddings (Cohere) – Converts text chunks into numeric vectors.
- Supabase Vector Store (Insert + Query) – Persists and retrieves embeddings with metadata.
- Memory (Buffer Window) – Maintains short-term conversational context for the agent.
- Chat Model (OpenAI) – Interprets queries and generates structured responses.
- Agent – Orchestrates tools and reasoning, then triggers downstream actions.
- Google Sheets – Stores a log of reminders and agent decisions.
The workflow starts with data ingestion through the webhook, then enriches and indexes that data using embeddings and Supabase, and finally leverages an agent to answer questions and log reminder activity.
Data ingestion: designing the webhook
1. Configure the Webhook node
Begin by creating a Webhook node in n8n and set it to accept POST requests on a path such as /court_date_reminder. This endpoint acts as the intake layer for new court dates, whether they originate from a case management system, an internal form, or another automation.
A typical JSON payload might look like this:
{  "case_id": "ABC123",  "name": "Jane Doe",  "court_date": "2025-09-15T10:00:00Z",  "court_address": "123 Main St, City, State",  "notes": "Bring exhibits A and B"
}
Best practices at this stage include:
- Validating required fields such as
case_idandcourt_date. - Normalizing date formats (for example, ISO 8601) so downstream nodes can parse them reliably.
- Sanitizing free-text inputs to avoid injection issues and to ensure clean embeddings.
- Minimizing stored PII or encrypting sensitive fields at rest where required.
Preparing text for vector search
2. Chunking with the Text Splitter node
Long-form text, such as case notes or history, should be broken into smaller segments before embedding. This improves semantic search quality and avoids truncation issues in embedding models.
Use the Text Splitter node and configure parameters similar to:
- Chunk size: around 400 characters.
- Chunk overlap: around 40 characters.
The overlap ensures that important context is not lost between adjacent chunks. Each resulting chunk is then passed to the embedding model.
3. Creating embeddings with Cohere
Connect the output of the Text Splitter to an Embeddings node configured with Cohere (or another supported provider). The Embeddings node transforms each chunk of text into a numeric vector that captures semantic meaning.
These vectors are the foundation for semantic retrieval: they allow the system to answer questions such as “When is Jane Doe’s next hearing?” even if the query wording does not exactly match the stored text.
Persisting and querying case data with Supabase
4. Inserting embeddings into a Supabase vector store
Next, add a Supabase Vector Store Insert node. Configure it to write to an index or table dedicated to this workflow, for example court_date_reminder.
For each embedded chunk, store:
- The embedding vector itself.
- Key metadata such as
case_id,court_date, andname. - The original text chunk (for example, the specific notes segment).
This structure allows you to perform fast semantic lookups while preserving the ability to reconstruct the relevant text for context.
5. Configuring a Supabase query tool
To enable retrieval, create a Query node that targets the same Supabase vector store. This node will perform similarity searches based on an incoming query or question.
When the agent receives a request such as When is Jane Doe’s next hearing?
, it will:
- Transform the question into an embedding.
- Use the Supabase Query node to retrieve the most similar stored vectors.
- Return the associated metadata and text chunks to the agent for reasoning.
Fine-tuning similarity thresholds and result limits in this node can significantly impact response relevance.
Adding conversational intelligence with memory and a chat model
6. Memory and Chat nodes
To support multi-step reasoning and follow-up questions, introduce a Memory node configured as a buffer window. This node retains a short history of the conversation or interaction so the agent can respond with context-aware answers.
Then, add a Chat node configured with OpenAI as the language model. This node is responsible for interpreting user queries, synthesizing retrieved information, and formatting outputs for downstream systems such as Google Sheets or notification channels.
Typical responsibilities of the Chat node include:
- Parsing natural language questions into structured intents.
- Combining retrieved Supabase records into a cohesive answer.
- Generating structured data (for example, JSON-like summaries) for further automation steps.
Orchestrating logic with an agent and logging to Google Sheets
7. Building the agent workflow
The Agent node ties together the Query tool, Memory, and Chat model. It acts as the orchestration layer that decides when to call the Supabase tool, how to interpret the results, and when to log or trigger reminders.
A typical agent flow might:
- Receive a question or event related to a court date.
- Use the Supabase Query tool to retrieve relevant case records.
- Apply the Chat model, with Memory, to interpret the retrieved data.
- Decide whether a reminder should be logged or sent.
8. Appending logs to Google Sheets
To maintain an auditable record of reminders and agent decisions, connect a Google Sheets node after the Agent. Configure it to append a new row each time an action is taken.
Recommended columns include:
timestampcase_idnamecourt_datereminder_sent(boolean or status)notesoragent_comment
This log provides a simple but effective audit trail, which can be exported, filtered, or joined with other reporting tools.
Testing the workflow with sample payloads
Before moving to production, validate the end-to-end workflow using test requests. You can use curl, Postman, or any HTTP client to send sample payloads to the webhook.
Example curl command:
curl -X POST https://your-n8n.example/webhook/court_date_reminder \ -H "Content-Type: application/json" \ -d '{"case_id":"ABC123","name":"Jane Doe","court_date":"2025-09-15T10:00:00Z","notes":"Bring exhibits A and B"}'
During testing, verify that:
- The Webhook node receives and parses the payload correctly.
- Text is split into chunks, embedded, and inserted into Supabase without errors.
- The agent can query the vector store and retrieve the correct case data.
- A corresponding row is appended to Google Sheets with the expected values.
Use n8n’s execution logs to inspect intermediate outputs and quickly identify configuration issues.
Security, privacy, and compliance considerations
Legal workflows often involve sensitive personal and case information. Treat this automation as part of your broader compliance posture.
- PII protection: Encrypt personally identifiable information in storage where appropriate and limit access with role-based permissions across n8n, Supabase, and Google Sheets.
- Regulatory compliance: Consult legal counsel regarding jurisdiction-specific rules for storing court-related data and sending reminders via SMS or email.
- Secrets management: Store API keys and credentials for Cohere, OpenAI, Supabase, and Google in n8n’s credentials store. Avoid hardcoding secrets in node parameters.
- Rate limiting: Monitor API usage and configure alerts to avoid hitting provider rate limits or incurring unexpected costs.
Scaling, reliability, and observability
Scaling the solution
For production deployments, design for resilience and horizontal scale:
- Run n8n in a containerized environment such as Kubernetes or Docker Compose with a process manager.
- Use a managed Supabase instance and configure automated backups for both vector and metadata tables.
- Implement retry and error handling patterns in n8n, for example with Error Trigger or Catch nodes, to handle transient failures gracefully.
Monitoring and observability
Establish metrics and logging from day one. Track:
- Webhook throughput and latency.
- Embedding generation failures or timeouts.
- Vector query latency and error rates.
- Agent errors or unexpected outputs.
Forward n8n logs to a centralized platform such as Datadog, Grafana, or an ELK stack. Configure alerts for anomalies so issues can be addressed before they affect users.
Extending the workflow: common enhancements
Once the core pipeline is stable, you can extend it with additional automations that leverage the same data foundation.
- SMS and email notifications: Integrate Twilio or n8n’s email nodes to send scheduled reminders ahead of each court date.
- Two-way communication: Capture replies from clients and feed them back into the workflow for status updates, rescheduling logic, or confirmation tracking.
- Advanced search and filters: Add query parameters for court location, date ranges, or attorney identifiers to refine Supabase queries.
Because the system is built on n8n, you can add new branches and nodes without rewriting the core architecture.
Troubleshooting and operational tips
If issues arise, focus on validating each stage of the pipeline independently.
- Embeddings not inserting into Supabase: Confirm Cohere API credentials, verify that embedding vectors are present in node output, and check Supabase schema and permissions.
- Irrelevant or low-quality query results: Experiment with different chunk sizes and overlaps, adjust similarity thresholds, or review the embedding model configuration.
- Agent fails to log to Google Sheets: Recheck Google Sheets OAuth credentials, ensure the target spreadsheet ID and sheet name are correct, and verify that the account has write access.
Conclusion
By combining n8n’s visual workflow engine with embeddings, a Supabase vector store, and an intelligent agent, you can build a robust court date reminder system that is both searchable and auditable. This design centralizes case context, automates reminder-related actions, and provides a clear log of what was done and when.
From here, you can iterate: add communication channels, refine search behavior, or integrate with existing case management platforms, all while keeping the core pipeline intact.
Next step: Deploy the workflow, send a test payload to your webhook, and use the resulting execution trace as a checklist to harden the system for production.
Automate Course Completion Certificates with n8n

Automate Course Completion Certificates with n8n
Issuing course completion certificates manually does not scale and is prone to delays and inconsistencies. This article presents a production-ready n8n workflow template that automates certificate generation and logging using OpenAI embeddings, Supabase as a vector store, a retrieval-augmented generation (RAG) agent, Google Sheets, and Slack alerts.
The goal is to provide automation professionals with a clear, technically accurate reference that can be deployed as-is, then extended for more advanced use cases such as PDF generation and LMS integration.
Business case for automating certificates
Automating course completion certificates delivers several operational advantages:
- Speed and scalability – Certificates are issued as soon as completion data is received, without manual intervention.
- Consistency and auditability – Every issuance is logged in a structured way, which simplifies compliance and reporting.
- Reduced human error – Rules and templates are applied programmatically, minimizing incorrect or missing certificates.
- Dynamic, context-aware content – A RAG-driven approach allows the system to incorporate course-specific rules, policies, and templates at runtime.
By combining n8n with a vector database and LLM-based reasoning, the workflow can generate accurate, personalized certificate content while keeping the architecture maintainable and cost-efficient.
High-level architecture
The workflow is triggered when a learner completes a course and the LMS (or another system) sends a POST request to an n8n webhook. The request flows through a RAG-based pipeline that retrieves relevant context from Supabase, generates or validates certificate content using OpenAI, then logs results and handles errors.
Key components in the architecture:
- Webhook Trigger (n8n) – Receives course completion payloads.
- Text Splitter – Splits long documents into manageable chunks for embedding.
- OpenAI Embeddings – Converts text chunks into vector embeddings.
- Supabase Insert / Query – Stores and retrieves embeddings in a vector index.
- Vector Tool + Window Memory – Provides contextual retrieval and short-term memory to the RAG agent.
- Chat Model (OpenAI) & RAG Agent – Generates or validates certificate content based on retrieved context.
- Google Sheets (Append) – Persists the outcome and status as an audit trail.
- Slack (Alert on error) – Notifies operators when failures occur.
End-to-end request lifecycle
The following sequence describes what happens when a single course completion event is processed:
- The LMS or platform sends a POST request with student and course data to the n8n webhook endpoint.
- The RAG agent queries the Supabase vector store (through the Vector Tool) to retrieve relevant course rules, templates, and policy text filtered by
course_id. - Using the retrieved context and the incoming payload, the agent either:
- Generates the certificate text, or
- Validates that the learner satisfies issuance criteria and returns a structured status.
- The result is appended to a Google Sheet for logging and can be returned to the caller. This output can later be used for PDF generation or emailing.
- If any error occurs during processing, the workflow sends a Slack alert and records the failure in the log sheet.
Core workflow components in detail
1. Webhook Trigger configuration
The workflow begins with a POST webhook, for example at:
/webhook/course-completion-certificate
This endpoint should receive a JSON payload when a learner completes a course. A typical payload might look like:
{  "student_name": "Jane Doe",  "course_id": "COURSE_101",  "completion_date": "2025-08-01",  "score": 95,  "metadata": { "email": "jane@example.com" }
}
For production use, implement authentication or signature verification, especially if the webhook is publicly accessible. Common patterns include HMAC signatures, bearer tokens, or IP whitelisting, configured in front of or within n8n.
2. Preparing context with the Text Splitter
To support retrieval-augmented generation, course descriptions, certificate templates, and policy documents must be embedded and stored in the vector database. Long documents are first processed by a Text Splitter node.
Typical configuration values in this workflow:
chunkSize = 400chunkOverlap = 40
These parameters ensure that each chunk is small enough for high-quality embeddings while preserving continuity between segments. Adjust these values based on your average document length and complexity. Overly large chunks reduce retrieval precision and increase token usage.
3. Generating embeddings with OpenAI
The embeddings step uses the text-embedding-3-small model to convert text chunks into vector representations suitable for similarity search. This smaller model is cost-effective and sufficient for most certificate-related content.
When creating embeddings, store rich metadata alongside each vector so that future queries can be filtered efficiently. Recommended metadata fields include:
course_id– to scope retrieval to a specific course.chunk_index– to maintain ordering if needed.source– such as “template”, “policy”, or “course_description”.version– optional, useful when policies or templates change over time.
4. Supabase vector store: Insert and Query
Supabase is used as the vector store for this workflow. Two primary operations are involved:
- Insert – Embeddings are written into a Supabase vector index, for example named
course_completion_certificate. Each row contains the vector plus its associated metadata. - Query – At runtime, the workflow queries the index for nearest neighbors that match the context of the current request.
When querying, use metadata filters such as course_id or source to restrict results to relevant documents. This significantly improves the quality of the RAG agent’s responses and reduces noise.
5. Vector Tool and Window Memory
To expose the Supabase vector store to the language model, the workflow uses a Vector Tool node. This node turns the vector search capability into a callable tool that the RAG agent can invoke when it needs additional context.
Alongside this, a Window Memory node maintains short-term conversational context within the lifetime of a single request. It stores recent inputs and outputs, which allows the agent to reference prior steps without repeated retrieval or recomputation.
6. Chat Model and RAG Agent configuration
The Chat Model node is configured with your OpenAI API credentials and is used by the RAG Agent to perform the actual reasoning and text generation.
Typical setup includes:
- System message that defines the role of the agent, for example:
“You are an assistant for Course Completion Certificate.” - Task-specific prompt that passes the incoming JSON payload, for example:
“Process the following data for task ‘Course Completion Certificate’: {{ $json }}”
The RAG agent can:
- Call the Vector Tool to retrieve certificate templates, course rules, and policies.
- Use Window Memory to keep track of intermediate reasoning steps within the same run.
- Return either a finalized certificate text or a structured status object indicating whether issuance is allowed and why.
For robust downstream processing, instruct the agent to output structured JSON, for example with keys such as status, certificate_text, and reason. Clear output contracts simplify integration with other systems.
7. Logging to Google Sheets
On successful completion, the workflow appends a row to a Google Sheet to create a durable, human-readable log. In the template, the sheet is configured as:
- Sheet name:
Log - Columns: for example, a
Statuscolumn mapped to{{$json["RAG Agent"].text}}or to a more structured JSON field if you adopt a schema.
This provides an immediate, low-friction audit trail that can be reviewed by non-technical stakeholders or exported for reporting.
8. Slack alerting on errors
Any errors raised by the RAG Agent or other critical nodes are routed to a Slack node configured to post to an #alerts channel. The alert typically includes:
- A short description of the failure.
- Relevant error messages or codes.
- Optional identifiers such as
course_idorstudent_nameto assist in triage.
This pattern ensures that operational issues are visible in near real-time and can be addressed before they impact a larger number of learners.
Sample webhook payloads
The workflow expects a standard structure for course completion events. Here is a representative example:
{  "student_name": "Jane Doe",  "course_id": "COURSE_101",  "completion_date": "2025-08-01",  "score": 95,  "email": "jane@example.com"
}
You can extend this schema with additional fields such as localization preferences, certificate variants, or custom metadata, as long as the RAG prompt and downstream mapping are updated accordingly.
Implementation best practices
Chunking and retrieval quality
- Adjust
chunkSizeandchunkOverlapbased on your content. Smaller, overlapping chunks usually improve retrieval accuracy. - Test retrievals with representative queries to validate that the correct segments are returned for each
course_id.
Metadata strategy
- Always include
course_id,source, and optionallyversionin your embeddings metadata. - Use these fields as filters in Supabase queries to avoid mixing content from different courses or outdated templates.
Prompt and output design
- Define a strict output schema in the agent prompt, for example:
“Return JSON with keys: status, certificate_text, reason.” - Validate the agent output in n8n before logging or acting on it to handle malformed responses gracefully.
Cost and performance management
- Use
text-embedding-3-smallfor embeddings to control storage and query costs. - Reserve larger or more capable chat models only for the generation step when absolutely necessary.
- Monitor latency across embedding lookup and generation to keep SLAs under control.
Security and credential management
- Protect the webhook using tokens or HMAC-based signatures.
- Store all API keys (OpenAI, Supabase, Google, Slack) in n8n credentials, not directly in node fields.
- Apply role-based access control in Supabase and Google Sheets to limit who can view or modify sensitive data.
Extending the workflow
Once the core certificate automation is stable, you can extend the workflow with additional capabilities:
- Email delivery – Integrate with SendGrid, SMTP, or another email provider to send the certificate to the learner automatically.
- PDF generation – Add a PDF generation node or external service that uses a template to create a branded certificate populated with the learner’s details.
- Automated re-indexing – When course content, templates, or policies change, trigger a reindex job to update embeddings in Supabase so the RAG agent always uses current information.
- Resilience features – Implement retry logic for transient API failures and refine Supabase and Sheets permissions for stronger access control.
Monitoring and ongoing maintenance
To operate this workflow reliably at scale, treat it as a production service and monitor key indicators:
- Webhook metrics – Invocation volume, success rate, and HTTP error codes.
- RAG agent latency – Time spent on vector queries plus LLM generation.
- Supabase usage – Vector store size, query counts, and associated costs.
- Google Sheets growth – Daily row appends and sheet size to anticipate archival needs.
Schedule periodic jobs (for example, via n8n Cron nodes) to:
- Re-embed and re-index documents after major content changes.
- Run health checks that validate connectivity to OpenAI, Supabase, Google Sheets, and Slack.
Security and compliance considerations
Because certificate data often contains personally identifiable information, treat the workflow as part of your broader data protection strategy. Consider:
- Data minimization and masking – Encrypt or redact sensitive fields before storing them in logs or embeddings where possible.
- Retention policies – Define how long personal data is retained in Supabase and Google Sheets, and implement automated cleanup processes.
- Access controls – Restrict access to Supabase projects and Sheets using role-based access control aligned with your internal policies.
Key benefits summary
- Automated, consistent issuance of course completion certificates at scale.
- Context-aware generation powered by vector retrieval and a RAG agent.
- Transparent audit trail in Google Sheets and proactive error visibility via Slack alerts.
- Scalable, modular architecture based on n8n, Supabase vector store, and OpenAI embeddings.
Getting started with the template
This n8n workflow template combines webhooks, embeddings, a vector store, and a RAG agent to streamline certificate issuance. It can be used as a standardized foundation for your platform and then extended to include PDF creation, email delivery, or deep LMS integration.
To deploy:
- Import the workflow into your n8n instance.
- Configure credentials for OpenAI, Supabase, Google Sheets, and Slack.
- Set up your webhook at
/webhook/course-completion-certificate(or your preferred path). - Run a test POST using a payload similar to the sample JSON above.
- Verify that entries appear in your Google Sheet
Logtab and that Slack#alertsreceives notifications on failures.
For more advanced use, refine the RAG prompt to output structured JSON tailored to your downstream processes, or work with an automation specialist to integrate PDF signing and email dispatch.
Contract Clause Extractor with n8n & Weaviate
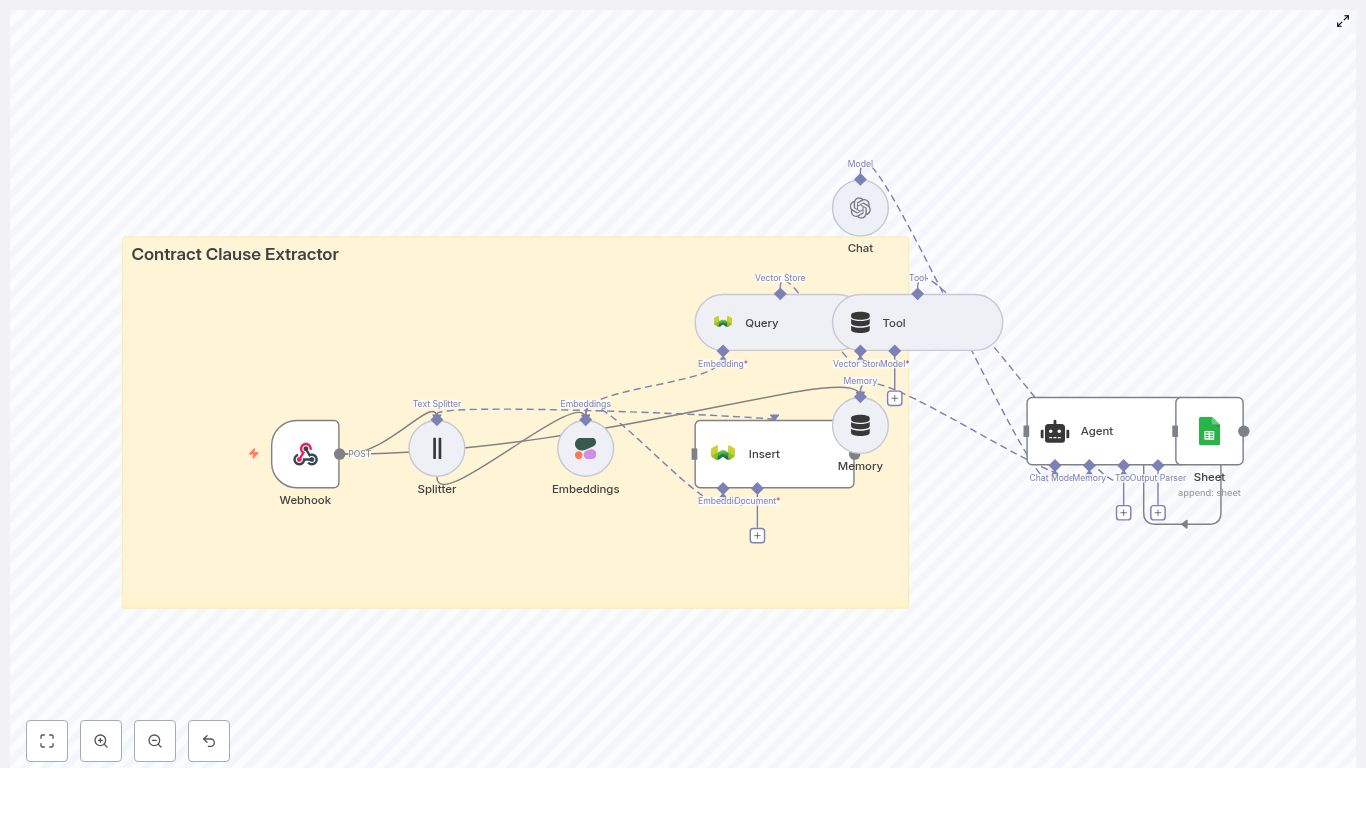
Contract Clause Extractor: Automate Contract Review With n8n, Embeddings, and Weaviate
Imagine this: it is 5:30 p.m., you are ready to log off, and a 47-page contract lands in your inbox with the message, “Can you just quickly check the indemnity and termination clauses?” You blink twice, question your life choices, and reach for more coffee.
Or, you could let automation do the heavy lifting.
This guide walks you through a complete contract clause extractor built with an n8n workflow, document embeddings, a Weaviate vector store, and a chat agent. It automatically slices contracts into chunks, indexes them for semantic search, extracts relevant clauses, and logs everything for auditability. In other words, it turns “ugh, another contract” into “sure, give me 10 seconds.”
What This n8n Contract Clause Extractor Actually Does
At its core, this workflow is an automated contract analysis pipeline. You send it contracts, it breaks them into smart chunks, turns those chunks into embeddings, stores them in Weaviate, and lets an AI agent pull out the exact clauses you care about.
It is especially handy for repetitive legal operations work like:
- Finding indemnity, termination, and data privacy clauses across many contracts
- Speeding up due diligence and intake reviews
- Keeping clause tagging consistent between reviewers
- Creating a searchable contract repository that behaves like “Ctrl+F on legal steroids”
The magic combo behind this template is:
- Text splitting to break contracts into semantically meaningful chunks
- Embeddings to represent the meaning of each chunk as vectors
- Weaviate vector search to quickly retrieve relevant clauses
- An AI agent to interpret the results, extract clauses, and explain them
- Logging to keep an audit trail of what was found and why
How the Workflow Is Wired Together
Here is the high-level architecture of the n8n contract clause extractor, from “contract arrives” to “beautifully formatted answer appears”:
- Webhook (n8n) – Receives uploaded contracts or links via HTTP POST.
- Text Splitter – Breaks long contracts into smaller, coherent chunks (chunkSize 400, overlap 40).
- Embeddings (Cohere / OpenAI) – Converts each chunk into a vector representation.
- Weaviate vector store – Indexes embeddings in a class named
contract_clause_extractorfor fast semantic retrieval. - Query + Tool – Runs semantic searches and exposes results to an AI agent.
- Memory (Buffer) – Keeps short-term context when you ask follow-up questions.
- Chat/Agent (OpenAI) – Understands your query, extracts clauses, and formats responses.
- Google Sheets Logging – Stores results for audits, reviews, and downstream workflows.
So instead of scrolling through PDFs looking for “Termination,” you send a query like “Show me the termination clauses” and let the workflow handle the rest.
Quick Setup Walkthrough in n8n
Below is a streamlined guide to configuring each part of the n8n template. You keep all the power of the original design, without needing to reverse-engineer it from scratch.
Step 1 – Webhook: Feed the Workflow With Contracts
Start with an n8n Webhook node that accepts POST requests. This is your entry point for contracts.
The webhook should be able to handle:
- File uploads such as PDF or DOCX
- Raw text payloads that contain the contract body
Before passing anything on, make sure you:
- Validate that the upload is what you expect
- Convert non-text documents to text using a PDF or DOCX parser
- Output clean text that you can safely send to the splitter node
Once that is in place, every contract sent to this webhook automatically kicks off the extraction pipeline. No more “can you just scan this one” requests.
Step 2 – Text Splitting: Chunk Size and Overlap That Actually Work
Next comes the Text Splitter. The goal is to split the document into pieces that are big enough to contain full clauses, but not so large that embeddings become noisy.
Recommended configuration:
- Chunk size: about 400 characters
- Overlap: about 40 characters
This setup helps avoid cutting a clause in half, while staying efficient for embedding and retrieval. If your contracts are very long or heavily structured, you can go one level up in sophistication and try:
- Section-aware splitting based on headings
- Splitting on numbered clauses or article markers
In short, smarter chunking tends to mean smarter search results.
Step 3 – Embeddings: Turning Clauses Into Vectors
Once you have chunks, you need to represent their meaning as vectors. That is where embeddings come in.
Use an Embeddings node with a provider such as:
- Cohere (used in the reference workflow)
- OpenAI or another embedding model that fits your accuracy, latency, and budget needs
For each chunk, generate an embedding and attach helpful metadata. This metadata will save you later when you want to trace answers back to the original contract. Useful metadata fields include:
- Document ID
- Original clause or chunk text
- Page number or location marker
- Source filename
Think of metadata as your “where did this come from” label for every vector in your store.
Step 4 – Indexing in Weaviate: Your Contract Clause Vector Store
Now that you have embeddings plus metadata, it is time to index them in Weaviate.
Set up a Weaviate class or index named contract_clause_extractor and configure the schema to store:
- The embedding vectors
- Your chosen metadata fields (source, page, clause text, etc.)
Weaviate gives you:
- Hybrid search that mixes vector and keyword search
- Filters so you can limit results to certain contract types or date ranges
- Per-class schemas to organize different document types
Use those filters when you want to narrow retrieval, for example to “only NDAs from last year” or “only vendor contracts.”
Step 5 – Querying and the AI Agent: Ask for Clauses, Get Answers
Once your data is in Weaviate, you can finally start asking useful questions like:
- “Find termination clauses.”
- “Show the indemnity language across these contracts.”
- “What are the data privacy obligations in this agreement?”
The workflow handles this by:
- Issuing a semantic query to Weaviate based on the user’s request.
- Retrieving the most relevant chunks from the
contract_clause_extractorindex. - Passing those chunks to an OpenAI chat model that acts as an agent.
The agent then synthesizes everything and returns a clean, human-readable answer. To keep it useful and predictable, use a prompt template that instructs the agent to:
- List matching clause excerpts with metadata such as filename and clause location.
- Summarize each clause in plain language.
- Flag potentially risky terms like unlimited liability or automatic renewal.
This gives you both the raw clause text and an interpretation layer, without having to read every word yourself.
Step 6 – Logging and Audit Trail in Google Sheets
Legal teams love answers, but they really love auditability.
The final step in the template appends extraction results to Google Sheets (or you can swap in a database if you prefer). Log at least:
- The original query
- IDs of the returned snippets or chunks
- Timestamps
- The agent’s summary and any risk flags
This way, reviewers can always trace “where did this answer come from” back to the original contract text. It also gives you a simple way to build dashboards and downstream workflows.
Best Practices for Accuracy, Compliance, and Sanity
To keep your contract clause extractor accurate, compliant, and generally well behaved, keep these guidelines in mind.
Make Metadata Your Best Friend
- Always store source filename, page, and clause tags.
- Use metadata to quickly jump from an extracted clause back to its original context.
Handle PII and Confidentiality Carefully
- Encrypt sensitive documents at rest.
- Restrict access to the Weaviate index and your n8n instance.
- Redact or tokenize personally identifiable information before indexing when possible.
Tune Your Chunking Strategy
- Experiment with different chunk sizes and overlaps.
- Prefer clause-aware or section-based splitting over blind character splits when you can.
Use Prompt Engineering to Avoid Hallucinations
- Tell the agent to always quote original excerpts from Weaviate results.
- Instruct it not to invent clauses that are not present in the text.
- Ask it to cite metadata like filename and location for each clause.
Balance Model Quality and Cost
- Higher accuracy models usually reduce manual review time but cost more.
- Choose a language model that fits your latency, accuracy, and budget constraints.
Where This Contract Clause Extractor Shines
Once this workflow is live, you can plug it into several legal operations and contract management processes, such as:
- Automated due diligence and intake screening Quickly surface indemnity, limitation of liability, or non-compete clauses across many documents.
- Compliance reviews Check data privacy, export control, or regulatory clauses at scale.
- Post-signature monitoring Track renewal and termination triggers without manually revisiting every contract.
- Portfolio analytics Analyze clause frequency and patterns across thousands of agreements.
Basically, anywhere you are repeatedly hunting for the same types of clauses, this template saves time and reduces “scroll fatigue.”
Troubleshooting and Optimization Tips
If your results look noisy, irrelevant, or suspiciously unhelpful, try adjusting a few knobs.
- Improve chunking Increase overlap or move to section-based splitting to keep full clauses together.
- Tighten retrieval filters Use Weaviate metadata filters to narrow by contract type, date, or source.
- Add reranking Fetch the top N results, then rerank using a cross-encoder model or a second-pass heuristic.
- Deduplicate chunks Remove identical or near-duplicate embeddings so you do not see the same clause 12 times.
- Watch for embedding drift If you change embedding providers or models, reindex your data to keep search quality consistent.
Security, Governance, and Compliance
Contracts are usually full of sensitive information, so treat this workflow like production infrastructure, not a side project running on someone’s laptop.
- Role-based access Limit who can access the n8n instance, Weaviate index, and ML API keys.
- Audit logs Track who queried what and when, using Google Sheets or a dedicated logging database.
- Data retention and backups Apply clear retention policies and encrypt backups of both documents and embeddings.
- Prompt and agent reviews Regularly review prompts, instructions, and agent behavior to avoid data leakage or hallucinated content.
Putting It All Together
By combining n8n, embeddings, and Weaviate, you turn manual contract review into a scalable, auditable, and mostly drama-free process. The pattern looks like this:
Webhook → Splitter → Embeddings → Insert in Weaviate → Query → Agent → Google Sheets
You get automated ingestion, intelligent splitting, vector indexing, semantic retrieval, and an AI agent that surfaces and explains clauses. The same pattern can be adapted for many other legal automation tasks, from NDAs to vendor agreements.
Ready to try it? Clone or build an n8n workflow using the nodes above, then test it with a few sample contracts. Iterate on chunk size, overlap, and prompts until the retrieval quality feels good enough that you are not tempted to reach for a highlighter.
If you want help getting this into production or adapting it to your specific contract templates and policies, you can reach out for a consultation or grab our implementation checklist to speed things up.
Content Idea Brainstormer with n8n & OpenAI
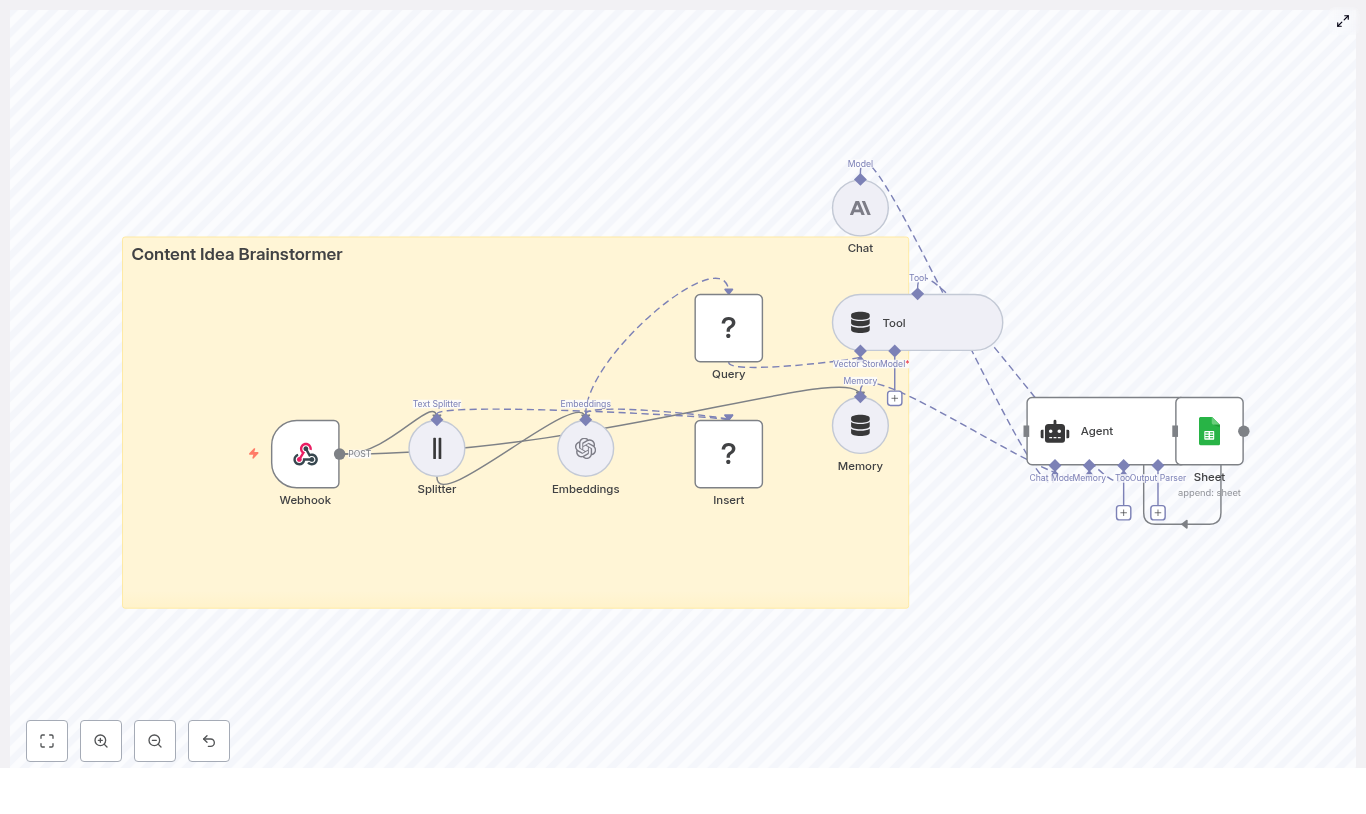
Content Idea Brainstormer with n8n & OpenAI
In this guide, you will learn how to turn a simple webhook into a powerful content idea engine using n8n, OpenAI, and Redis. We will walk through the full workflow so you can understand each component, how they connect, and how to adapt the template for your own content strategy.
What you will learn
By the end of this tutorial-style walkthrough, you will be able to:
- Explain the architecture of a content idea brainstormer built in n8n
- Configure a webhook to receive content briefs and topic seeds
- Use OpenAI embeddings and a Redis vector store for retrieval-augmented generation
- Set up tools, memory, and a conversational agent to generate structured content ideas
- Log results automatically into Google Sheets for review and planning
- Apply best practices for chunking, prompting, and privacy
Why build a Content Idea Brainstormer in n8n?
Content teams, marketers, and product managers often need a steady stream of high quality content ideas. Doing this manually is slow and hard to scale. An n8n workflow that automates idea generation can help you:
- Save time by automating brainstorming for blog posts, videos, and social content
- Standardize idea quality with consistent prompts and formatting
- Reuse and build on past ideas with a searchable knowledge base
- Scale ideation across different topics, audiences, and tones
This template uses AI-powered retrieval and prompting so your ideas are not just random, but grounded in previous inputs and stored context.
Concept overview: How the system works
At a high level, this n8n workflow takes an incoming content brief, turns it into embeddings, stores them in Redis, and then uses a conversational agent to generate ideas using both memory and vector search.
Main components in the workflow
- Webhook – Receives new topic seeds or briefs via HTTP POST.
- Text Splitter – Breaks long input text into smaller chunks.
- OpenAI Embeddings – Converts text chunks into vector representations.
- Redis Vector Store (Insert & Query) – Stores and retrieves embeddings for similarity search.
- Tool & Memory – Exposes vector search as a tool and keeps a short-term conversation history.
- Agent / Chat Model – Uses a conversational AI model (OpenAI or Anthropic) to generate ideas.
- Google Sheets – Logs the generated ideas into a shared spreadsheet.
Next, we will walk through each part step by step, in the order you would experience it when a new content brief arrives.
Step-by-step: Building the Content Idea Brainstormer in n8n
Step 1 – Webhook: Receive a content seed
The workflow starts with a Webhook node in n8n. This node waits for incoming HTTP POST requests that contain your content brief or topic seed.
A typical JSON payload might look like this:
{  "seed": "AI for small business: blog post ideas",  "audience": "small business owners",  "tone": "practical"
}
You can send this payload from a web form, Slack command, internal tool, or any other automation that can make a POST request. As soon as the webhook receives the data, the n8n workflow starts running.
Step 2 – Text Splitter: Chunk long input for embeddings
Long briefs or rich descriptions can be too large to embed as a single block. To handle this, the workflow uses a Text Splitter node.
In the template, a character-based splitter is used with:
chunkSize = 400characterschunkOverlap = 40characters
This approach has two goals:
- Improve embedding performance by working with smaller pieces of text
- Maintain context between chunks by overlapping them slightly
The overlap helps avoid losing important information that sits at the boundary between chunks.
Step 3 – Embeddings: Turn text into semantic vectors
Each chunk produced by the splitter is then sent to an OpenAI Embeddings node. This node calls an OpenAI embeddings model to create a vector representation of each text segment.
These embeddings capture the semantic meaning of the text. Instead of matching keywords, the system can later perform similarity search based on meaning. This is what makes retrieval-augmented generation work effectively.
Step 4 – Insert: Store embeddings in a Redis vector index
Next, the workflow uses an Insert node connected to a Redis vector store. The embeddings are written into a Redis index named:
content_idea_brainstormerStoring embeddings in Redis gives you:
- Fast similarity search over previously stored content briefs and ideas
- A scalable solution for medium-sized knowledge bases
- A way to reuse past context when generating new ideas
Step 5 – Query & Tool: Retrieve relevant context from Redis
When the agent is ready to generate new ideas, it needs context. The workflow uses two key nodes here:
- Query node – Searches the same
content_idea_brainstormerRedis index to find the most relevant existing passages for the current seed. - Tool node – Wraps the vector store as a tool that the agent can call during reasoning.
In practice, the Query node performs a similarity search using the new seed or related text. The top matching chunks are then made available as context. By exposing this through a Tool node, the agent can pull in this context when deciding what ideas to generate.
Step 6 – Memory: Keep short-term conversation history
The workflow also includes a Memory component. This maintains a rolling buffer of recent interactions between the user and the agent.
Short-term memory is useful when:
- Multiple seeds are submitted in a single session
- The user corrects or refines a previous brief
- You want consistent style and tone across related idea lists
By remembering what happened earlier in the conversation, the agent can produce more coherent and consistent outputs.
Step 7 – Agent & Chat: Generate structured content ideas
The heart of the system is the Agent node connected to a Chat model (for example, Anthropic or OpenAI). This is where the actual content ideas are generated.
The Agent node:
- Receives the incoming JSON payload (seed, audience, tone, etc.)
- Uses the Tool node to retrieve relevant context from Redis
- Consults the Memory buffer for recent conversation history
- Runs internal reasoning to produce structured content ideas
In this workflow, the promptType = define behavior is used. That means the entire incoming JSON object is treated as the prompt, which ensures all fields (like audience and tone) influence the output.
Step 8 – Google Sheets: Log ideas for tracking and review
Finally, the generated ideas are passed to a Google Sheets node. This node appends each new set of ideas to a designated sheet.
Storing results in Sheets lets you:
- Build a content backlog that your team can review
- Filter, sort, and prioritize ideas before production
- Connect the sheet to your content calendar or project management tools
Configuring the workflow: Practical tips & best practices
Choosing chunk size and overlap
Text splitting is a key part of any embedding-based workflow. As a general guideline:
- Use chunk sizes between 300 and 800 characters
- Set overlap to around 10 to 20 percent of the chunk size
The example configuration of chunkSize = 400 and chunkOverlap = 40 works well in many cases. It provides enough context per chunk without creating too many vectors, which can increase cost and slow down queries.
Selecting an embedding model
When choosing an OpenAI embedding model, aim for a balance between cost and quality. A few points to keep in mind:
- Use a modern, recommended embedding model from your provider
- Monitor for model updates, as providers sometimes deprecate older models
- If you switch models, consider re-running embeddings to keep your Redis index consistent
Tuning the Redis vector store
The quality of retrieval has a big impact on the ideas your agent generates. To tune your Redis vector store:
- Adjust the similarity threshold if your integration supports it
- Experiment with the number of results returned (top-k), for example 3 to 7 matches
- Avoid sending too many passages to the model, which can dilute focus
The goal is to give the agent enough context to be helpful, but not so much that it becomes noisy or confusing.
Prompt engineering for content ideation
A clear, structured prompt is essential for consistent content ideas. In your Agent or Chat node, make sure to:
- Explicitly pass the seed, audience, and tone
- Specify how many ideas you want and in what format
- Include any constraints, such as word counts or specific content types
- Add examples if you need a very particular style or structure
Example agent prompt structure
Here is a sample prompt structure that works well for this kind of workflow:
Prompt:
You are a content strategist. Using the seed, audience, and retrieved context, generate 8 content ideas: titles, short descriptions (1 sentence), and suggested formats (blog, video, social). Prioritize practicality and SEO.

Seed: "AI for small business: blog post ideas"
Audience: "small business owners"
Tone: "practical"

Context: [retrieved passages...]

Output: JSON array of ideas.
You can adapt this template to match your brand voice, content formats, or internal naming conventions.
Privacy and compliance considerations
When working with embeddings and vector stores, be careful with personal and sensitive data:
- Scrub or anonymize any personally identifiable information (PII) before embedding
- Remember that embeddings are not trivial to delete selectively once stored
- Implement a lifecycle or deletion policy for data that must not be kept indefinitely
These steps are important for privacy, compliance, and responsible AI usage.
Extensions and improvements for your brainstormer
Once the basic workflow is running, you can extend it in several useful ways:
- Add a web UI so non-technical team members can submit seeds and adjust parameters.
- Schedule recurring jobs to refresh popular topics with new context or data.
- Collect user feedback on generated ideas and use it to refine prompts or prioritize topics.
- Integrate with your CMS or task manager to automatically create draft entries or tasks from accepted ideas.
Monitoring, maintenance, and reliability
To keep your n8n content brainstormer running smoothly, plan for ongoing monitoring and maintenance:
- Track API usage and latency for OpenAI or Anthropic calls
- Monitor Redis index growth and storage usage
- Reindex embeddings if you change to a new embedding model
- Add error handling in n8n to log failures and retry transient errors
These practices reduce downtime and help you catch issues before they affect your team.
Common pitfalls and how to avoid them
- No overlap in text splitting – If you split text without overlap, important context at the edges can be lost, which reduces retrieval quality.
- Too many retrieved passages – Passing a large number of chunks to the model can overwhelm it and lead to generic or unfocused ideas.
- Embedding sensitive data – Failing to remove PII before embedding can create compliance and privacy risks.
Quick recap
This Content Idea Brainstormer template in n8n:
- Accepts content briefs through a webhook
- Splits and embeds text with OpenAI embeddings
- Stores vectors in a Redis index for fast similarity search
- Uses tools and memory to give a conversational agent rich context
- Generates structured content ideas tailored to your audience and tone
- Logs outputs into Google Sheets for easy review and planning
It is flexible enough for solo creators and scalable for larger content teams, and it can be expanded into a full content production pipeline.
FAQ: Using the n8n Content Idea Brainstormer
Can I use a different chat model or provider?
Yes. The Agent node can be configured with different chat models, such as OpenAI or Anthropic, as long as they are supported by your n8n setup.
Do I have to use Redis as the vector store?
This template uses Redis for speed and simplicity, but in principle you could adapt the workflow to other vector stores if n8n and your infrastructure support them.
How many ideas should I generate per request?
Eight ideas per seed is a practical starting point, as shown in the sample prompt. You can increase or decrease this number depending on your use case and token limits.
Can I change the output format?
Yes. You can adjust the prompt to output markdown, plain text, or more complex JSON structures that match your CMS or planning tools.
Get started with the template
To start using this Content Idea Brainstormer:
- Import the template into your n8n instance.
- Connect your OpenAI (or other provider) credentials.
- Configure your Redis connection and ensure the
content_idea_brainstormerindex is set up. - Link the Google Sheets node to your desired spreadsheet.
- Send a test seed to the webhook and review the ideas in your sheet.
If you want to adapt this workflow for your team, you can extend the prompts, add custom fields to the JSON payload, or connect it directly to your content calendar.
Call to action
Ready to build your own content idea engine with n8n and OpenAI? Use this template, plug in your OpenAI and Redis credentials, and start sending seeds via the webhook. If you need help customizing the workflow for your organization, reach out to us or subscribe for more n8n automation templates and in-depth guides.
Connected Car Alert: n8n Workflow Guide
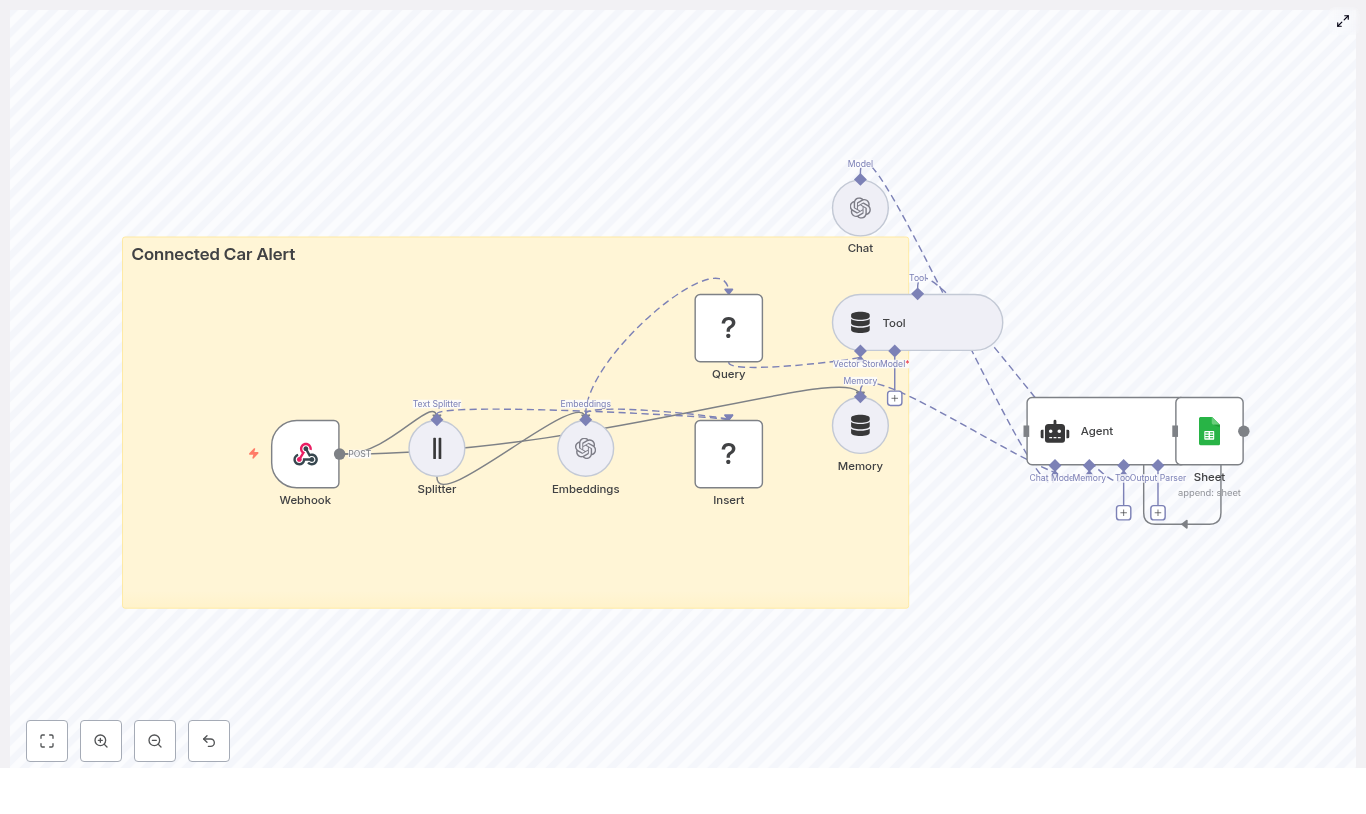
Connected Car Alert Automation in n8n: Expert Implementation Guide
Modern connected vehicles emit a constant flow of telemetry, diagnostic data, and driver behavior signals. Converting this raw stream into actionable, real-time alerts requires a robust automation pipeline that can ingest, enrich, store, reason over, and log events with low latency.
This guide explains how to implement a Connected Car Alert workflow in n8n using LangChain components and common infrastructure services. The reference template combines:
- An n8n Webhook for event ingestion
- A Text Splitter and OpenAI embeddings to vectorize diagnostic content
- Redis as a vector store for semantic search and historical context
- A LangChain Agent and Tool to reason over events
- Google Sheets logging for auditability and downstream operations
The result is a modular, production-ready pattern for connected car alerting that can be extended or adapted to your own fleet, telematics, or IoT scenarios.
Business Rationale: Why Automate Connected Car Alerts
For fleets, OEMs, and mobility providers, timely interpretation of vehicle signals directly affects safety, uptime, and customer experience. A connected car alert system built on n8n delivers:
- Real-time ingestion of vehicle events via webhooks and HTTP gateways
- Context-aware reasoning using vector embeddings and a language model
- Fast retrieval of similar historical events via a vector store
- Operational visibility through structured logging into spreadsheets or other systems
By centralizing this logic in n8n, teams can iterate quickly on alert rules, prompts, and downstream actions without rewriting backend services.
Solution Architecture Overview
The template is organized as a linear but extensible workflow that processes each incoming vehicle event through several stages:
- Ingestion: A Webhook node accepts HTTP POST requests from vehicle gateways or brokers.
- Preprocessing: A Text Splitter breaks long diagnostic notes into smaller, overlapping chunks.
- Vectorization: An Embeddings node converts text chunks into vector representations.
- Persistence: A Redis vector store node inserts vectors for later semantic search.
- Retrieval and reasoning: An Agent and Tool query Redis to retrieve similar events and generate an alert.
- Short-term memory: A Memory component maintains context across related events.
- Logging: A Google Sheets node appends the final alert record for audit and reporting.
This architecture separates concerns clearly: ingestion, enrichment, storage, reasoning, and logging. Each layer can be swapped or scaled independently.
Core n8n Nodes and Components
Webhook: Vehicle Event Ingestion
The Webhook node is the entry point for the workflow. It exposes an HTTP POST endpoint, for example:
Path: connected_car_alert
Method: POST
Your telematics gateway, MQTT bridge, or API integration should send JSON payloads to this endpoint. Typical fields include:
vehicleIdtimestampodometererrorCodeslocationdiagnosticNotesor other free-text fields
Best practice is to standardize the schema and validate payloads early so the downstream nodes can assume consistent structure.
Text Splitter: Preparing Content for Embeddings
Diagnostic notes and event descriptions can be long and unstructured. The workflow uses a character-based Text Splitter to divide this content into manageable segments before vectorization.
Default parameters in the template are:
chunkSize: 400characterschunkOverlap: 40characters
This overlap preserves context between chunks, which improves the semantic quality of the embeddings and avoids fragmenting important information across unrelated vectors.
Embeddings: Vectorizing Vehicle Diagnostics
The Embeddings node uses an OpenAI embeddings model (configured via your n8n OpenAI credentials) to convert each text chunk into a high-dimensional vector.
Configuration considerations:
- Select an embeddings model that balances cost and semantic fidelity for your volume and accuracy requirements.
- Ensure API quotas and rate limits are sufficient for peak ingestion rates.
- Optionally, batch multiple chunks in a single embeddings call to reduce overhead.
The resulting vectors are then ready to be inserted into a Redis-based vector store.
Redis Vector Store: Insert and Query
Insert: Persisting Embeddings
The Insert operation writes embedding vectors and associated metadata to Redis. The template uses an index name such as:
indexName: connected_car_alert
This index acts as a dedicated semantic memory for your connected car events. Metadata can include vehicle identifiers, timestamps, and other attributes that you may want to filter on later.
Query and Tool: Semantic Retrieval for Context
The Query node connects to the same Redis index to perform similarity search over historical vectors. This is exposed to the Agent through a Tool node so that the language model can dynamically retrieve relevant past events when generating an alert.
Typical use cases include questions such as:
- “What similar alerts occurred for this vehicle in the last 30 days?”
- “Have we seen this combination of error codes before?”
By coupling the Tool with the Agent, the workflow enables retrieval-augmented reasoning without hard-coding query logic.
Memory: Short-Window Context Across Events
The Memory component maintains a short history window that the Agent can access. This is particularly useful when:
- Multiple events arrive in quick succession for the same vehicle.
- An incident evolves over time and the alert message must reflect prior context.
- Follow-up diagnostics or driver notes are appended to an existing case.
Short-window memory helps the Agent handle multi-turn reasoning and maintain coherence without overloading the language model with the entire history.
Agent and Chat: Generating the Alert
The Agent node orchestrates the language model (Chat) and the vector store Tool. Its responsibilities are to:
- Receive the current event and any relevant memory.
- Call the Tool to query Redis for similar historical events.
- Combine current and retrieved context to generate an actionable alert message.
The Chat model then produces a human-readable alert that can include:
- Problem summary in natural language
- Recommended actions, for example schedule maintenance, notify driver, or escalate to operations
- References to similar past incidents if available
Tuning the Agent prompt and behavior is critical to ensure consistent formatting and reliable recommendations.
Google Sheets: Logging and Operational Visibility
The final stage is a Google Sheets node configured to append each generated alert as a new row. This provides:
- A low-friction audit trail for all alerts
- An easy integration point for operations teams that already use spreadsheets
- A quick way to export data into BI tools or reporting pipelines
In more advanced deployments, Sheets can be replaced or augmented with databases, ticketing systems, Slack notifications, or incident management platforms.
Step-by-Step Setup in n8n
To deploy the Connected Car Alert workflow template in your environment, follow these steps:
- Prepare credentials
Set up and store in n8n:- OpenAI API credentials for embeddings and chat
- Redis access (host, port, authentication) for the vector store
- Google Sheets OAuth credentials for logging
- Import and review the template
Import the provided n8n template and inspect each node. Confirm that the Webhook pathconnected_car_alertaligns with your vehicle gateway configuration. - Adapt the Text Splitter
AdjustchunkSizeandchunkOverlapbased on typical diagnostic note length and complexity. Larger chunks may capture more context, while smaller chunks can improve specificity and reduce token usage. - Select the embeddings model
In the Embeddings node, choose the OpenAI embeddings model that fits your cost and performance profile. Verify that your rate limits and quotas match expected event throughput. - Configure the Redis vector index
SetindexNameto a project-specific value, for exampleconnected_car_alert. For multi-environment setups, use separate index names per environment. - Tune the Agent prompt and response format
Define the Agent’spromptType, system instructions, and example outputs. Specify:- How severity should be expressed
- What metadata must appear in the alert (vehicleId, timestamp, key codes)
- Preferred structure for recommendations
- Run end-to-end tests
Send representative sample payloads to the Webhook. Validate that:- Text is split correctly
- Embeddings are created and inserted into Redis
- Semantic queries return relevant historical records
- The Agent generates clear and accurate alert messages
- Alerts are appended correctly to Google Sheets
- Implement monitoring and resilience
Configure retries and error handling on the Webhook, Redis, and external API nodes. Add logging and notifications for failures or latency spikes.
Key Use Cases for Connected Car Alert Automation
The template supports a range of operational scenarios for connected vehicles and fleets. Common applications include:
- Fleet safety alerts
Combine harsh braking or acceleration events with error codes to trigger targeted notifications to operations teams. - Predictive maintenance
Correlate recurring diagnostics with past failures, then prioritize maintenance tasks based on similarity to historical incidents. - Driver coaching
Aggregate and summarize risky driving patterns, then feed structured insights into driver coaching workflows. - Incident triage
Automatically generate human-readable recommendations, classify severity, and escalate incidents that meet predefined thresholds.
Automation Best Practices
To operate this workflow reliably at scale, consider the following practices:
- Namespace vector indexes
Separate Redis indexes for development, staging, and production to avoid cross-contamination of embeddings and test data. - Protect sensitive data
Filter or redact personally identifiable information (PII) before sending text to embeddings or LLMs, especially if using public cloud providers. - Manage retention and pruning
Define policies for how long vectors are retained and when old entries are pruned to control storage growth and maintain search performance. - Monitor model usage and cost
Track both embeddings and chat calls. These have different pricing characteristics, so monitor them separately and optimize batch sizes where appropriate. - Control ingestion rates
Rate-limit incoming webhook traffic or buffer events in a queue to prevent sudden spikes from overloading the embeddings API or Redis.
Security and Compliance Considerations
Vehicle telemetry often includes sensitive operational and location data. Secure handling is essential:
- Use HTTPS for all webhook traffic.
- Protect the Webhook with authentication (shared secret, HMAC signatures, or API keys).
- Review data residency and privacy requirements when using cloud LLMs and embeddings.
- For sensitive deployments, evaluate on-premise embeddings or private LLM instances.
- Encrypt vectors at rest in Redis and secure access with strong credentials and network controls.
Scaling Strategy and Cost Management
As the volume of connected vehicle data grows, you will need to scale both storage and compute:
- Redis scaling
Monitor memory usage and performance. Plan for sharding, clustering, or managed Redis services as your vector index grows. - Batching embeddings
Use batching to reduce the number of API calls and lower overhead, while staying within token and payload limits. - Specialized vector databases
For very large-scale similarity search, consider dedicated vector databases such as Milvus or Pinecone, or managed Redis offerings with vector capabilities. - Asynchronous ingestion
If ingestion volume is high, decouple the webhook from the embeddings and storage steps using queues or background workers.
Testing, Validation, and Monitoring
Robust testing and observability are essential before promoting this workflow to production:
- Automated tests
Build test cases with realistic payloads that validate the full path from ingestion to alert logging. - Alert quality checks
Periodically sample generated alerts and verify that:- Historical events retrieved from Redis are relevant.
- Recommendations are accurate and aligned with operational policies.
- Metrics and logging
Track key metrics such as:- End-to-end latency from webhook to alert
- Error rates for external dependencies (OpenAI, Redis, Google Sheets)
- Volume of events and alerts per vehicle or fleet
Conclusion: A Modular Pattern for Real-Time Vehicle Intelligence
This Connected Car Alert template demonstrates how to combine n8n, LangChain components, OpenAI embeddings, and Redis into a cohesive, real-time alerting pipeline. The architecture separates ingestion, vectorization, retrieval, reasoning, and logging, which makes it straightforward to:
- Swap embeddings providers or LLMs
- Persist alerts in databases or ticketing systems instead of spreadsheets
- Extend downstream automation with notifications, workflows, or integrations
By adopting this pattern, automation and data teams can rapidly move from raw vehicle telemetry to actionable, context-aware alerts that improve safety, maintenance planning, and driver experience.
Ready to deploy? Import the n8n template, configure your credentials, and run test payloads with representative vehicle data. If you require support with prompt engineering, scaling vector storage, or integrating with enterprise systems, our team can provide a tailored implementation.
Contact us for a deployment checklist or a guided walkthrough of the workflow.