n8n Creators Leaderboard Reporting Workflow

n8n Creators Leaderboard Reporting Workflow

This guide walks you step by step through an n8n workflow template that pulls community statistics from a GitHub repository, ranks top creators and workflows, and generates a daily leaderboard report. It is ideal for community managers, maintainers, or anyone who wants automated insights into contributors and the most-used workflows.

What you will learn

By the end of this tutorial-style walkthrough, you will understand how to:

  • Set up an automated n8n workflow that runs on a schedule.
  • Fetch and parse JSON stats from a GitHub repository.
  • Sort and limit creators and workflows based on weekly activity.
  • Merge creator and workflow data into a single enriched dataset.
  • Use an LLM (OpenAI or Google Gemini) to generate a human-readable Markdown report.
  • Convert the report to HTML and deliver it via Google Drive, Gmail, Telegram, or local storage.
  • Customize ranking metrics, notifications, and storage for your own needs.

Why automate a creators leaderboard in n8n?

Manually tracking community contributions is time-consuming and easy to delay or skip. An automated n8n workflow:

  • Quantifies contributor impact using consistent metrics.
  • Highlights top workflows and creators regularly without manual effort.
  • Surfaces trends in adoption and attention (visitors, inserters, etc.).
  • Outputs shareable reports in Markdown and HTML that can be emailed, posted, or archived.

At its core, this workflow pulls JSON statistics, enriches them, ranks creators and workflows, then generates a report and delivers it through your chosen channels.


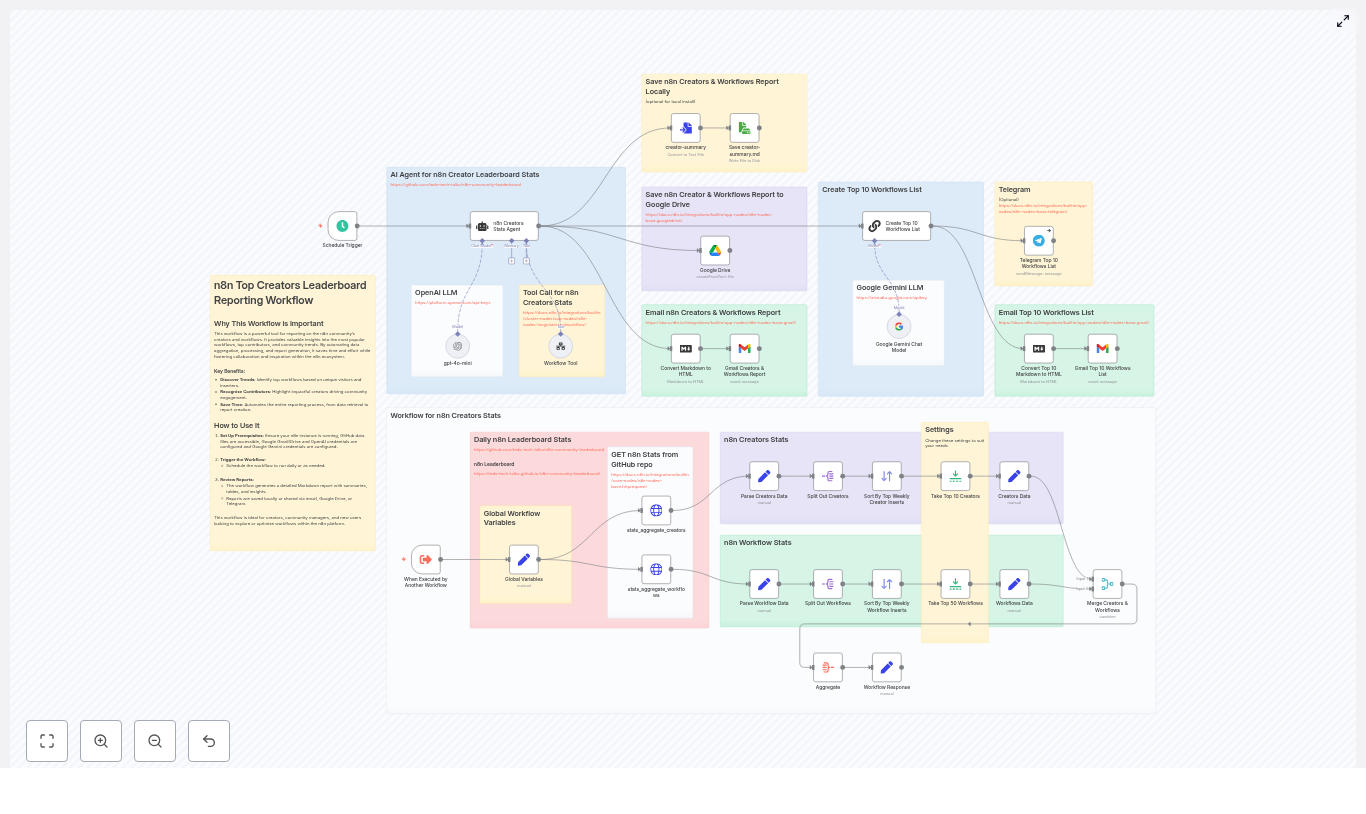
Core concepts and data flow

Before jumping into the setup, it helps to understand the overall data flow inside n8n. The workflow runs through these main stages:

1. Trigger and configuration

  • Schedule Trigger node starts the workflow on a daily schedule (or any cadence you configure).
  • Global Variables (Set node) defines reusable values like:
    • GitHub raw base path.
    • Filenames for stats (stats_aggregate_creators and stats_aggregate_workflows).
    • Runtime datetime for timestamping reports.

2. Data collection from GitHub

  • HTTP Request nodes (one for creators, one for workflows) fetch JSON files from a GitHub repository using URLs like:
    https://raw.githubusercontent.com/teds-tech-talks/n8n-community-leaderboard/refs/heads/main/{{filename}}.json
  • Each node retrieves a raw JSON file that contains aggregated stats for either creators or workflows.

3. Parsing and splitting records

  • Parse Creators Data / Parse Workflow Data (Set nodes) normalize the raw JSON into a consistent data array. This creates a uniform structure that downstream nodes can rely on.
  • Split Out Creators / Split Out Workflows nodes break the data array into individual items so each creator or workflow can be processed, sorted, and limited separately.

4. Ranking creators and workflows

  • Sort nodes order:
    • Creators by sum_unique_weekly_inserters.
    • Workflows by unique_weekly_inserters.
  • Limit nodes keep only the top N records (for example, top 10 creators and top 50 workflows) so your report remains focused and readable.

5. Enriching data and merging

  • Set nodes for Creators Data and Workflows Data map only the fields you care about into compact records, such as:
    • Creator name and username.
    • Avatar URL.
    • Unique visitors and inserters.
    • Workflow titles, slugs, or identifiers.
  • Merge Creators & Workflows combines these records using username as the key. This step enriches each creator with their associated workflows and metrics, giving you context about what is driving their popularity.

6. Aggregation and report generation

  • Aggregate node collects all merged items into a single structured payload that represents the full leaderboard and stats.
  • n8n Creators Stats Agent / LLM integrations (OpenAI or Google Gemini) take this aggregated payload and:
    • Generate a Markdown report.
    • Add narrative summaries, highlights, and insights.

7. Output formatting and delivery

  • Convert Markdown to HTML node transforms the Markdown report into HTML, which is ideal for email.
  • Delivery nodes then send or store the report:
    • Gmail to email the report.
    • Google Drive to store the report file.
    • Telegram to send a summary or link.
    • ConvertToFile / ReadWriteFile to save locally (for example, creator-summary.md).

Step-by-step setup in n8n

1) Prerequisites

Before importing the template, make sure you have:

  • An n8n instance (cloud or self-hosted).
  • Access to the GitHub repository that contains the stats JSON files, or your own data source with similar JSON structure.
  • An OpenAI or Google Gemini API key if you want to use the LLM-based report generation.
  • Google Drive and Gmail credentials if you plan to store or email the reports through those services.

2) Import the workflow template

Download or copy the template JSON from the repository and import it into your n8n instance. The imported workflow will already connect nodes such as:

  • Schedule Trigger
  • HTTP Request
  • Set (for Global Variables and data mapping)
  • Split Out
  • Sort
  • Limit
  • Merge
  • Aggregate
  • Convert Markdown to HTML and file handling nodes

3) Configure the schedule

Open the Schedule Trigger node and choose how often you want the leaderboard to run. Common options include:

  • Daily at a fixed time for a regular report.
  • Weekly for a longer-term summary.
  • Manual execution during testing or ad-hoc reporting.

4) Set up global variables

Next, open the Global Variables (Set) node. Here you define the values that the rest of the workflow will reference:

  • path: the base GitHub raw URL or your equivalent data source.
  • creators filename: stats_aggregate_creators (without the .json extension).
  • workflows filename: stats_aggregate_workflows (also without the extension).
  • datetime: optional timestamp value that can appear in your report title or file name.

If your repository uses different filenames or folders, update these values accordingly so the HTTP Request nodes can build the correct URLs.

5) Connect API credentials

Now attach the necessary credentials to the relevant nodes:

  • LLM agent nodes:
    • Connect OpenAI or Google Gemini credentials if you want AI-generated summaries.
  • Google Drive and Gmail nodes:
    • Authenticate with your Google account or service account.
    • Verify scopes allow writing files to Drive and sending emails through Gmail.
  • Telegram or other messaging nodes (if present):
    • Configure bot tokens or webhooks as required.

If you prefer not to use an LLM, you can replace the agent node with a standard Set node or a simple Markdown template to build a static report from the aggregated data.

6) Verify data fetching and parsing

Before relying on the full automation, test the data path:

  1. Run the workflow manually.
  2. Inspect the output of the HTTP Request nodes:
    • Confirm the JSON matches what you expect from the GitHub repository.
  3. Check the Parse Creators Data and Parse Workflow Data nodes:
    • Ensure each one produces a data array.
    • Confirm the fields like username, sum_unique_weekly_inserters, and unique_weekly_inserters are present.
  4. Look at the Split Out nodes to verify that each item in the array becomes its own n8n item.

7) Check sorting, limiting, and merging

Once data is flowing correctly, examine the ranking logic:

  • Sort nodes:
    • Creators should be sorted by sum_unique_weekly_inserters.
    • Workflows should be sorted by unique_weekly_inserters.
  • Limit nodes:
    • Adjust the limit values (for example, 10 creators, 50 workflows) to match how long you want your leaderboard to be.
  • Set nodes for compact records:
    • Confirm that each record includes the fields you plan to show in the report, such as creator name, username, avatar, and workflow details.
  • Merge Creators & Workflows:
    • Verify that the merge key is username in both datasets.
    • Check that creators now have attached workflow lists and metrics.

8) Validate aggregation and report generation

Next, focus on the reporting section:

  • Aggregate node:
    • Inspect the output to ensure it contains all merged creator records in a single structured payload.
  • LLM agent node:
    • Confirm the prompt references the aggregated data and instructs the model to generate a Markdown leaderboard.
    • If the wording or tone of the report is not what you want, refine the prompt or adjust temperature and other parameters.

9) Configure HTML conversion and delivery

Finally, configure how the report is presented and delivered:

  • Convert Markdown to HTML:
    • Check that the Markdown from the LLM is successfully converted to HTML.
    • Preview the HTML in an email client or browser if possible.
  • Gmail node:
    • Set the recipient list, subject line, and body content.
    • Use the HTML output as the email body for a nicely formatted report.
  • Google Drive node:
    • Specify the folder and filename pattern, for example including the date from the Global Variables node.
  • Telegram or other channels:
    • Send a short summary message, link, or attached file, depending on what the node supports.
  • Local saving:
    • Use ConvertToFile and ReadWriteFile to write a local creator-summary.md or HTML file for archival.

Customizing and extending the workflow

Adjust ranking metrics

You are not limited to the default metrics. You can:

  • Rank by unique visitors instead of unique inserters if you care more about attention and traffic than actual adoption.
  • Combine metrics in a custom field using a Set node before sorting, for example a weighted score.

Change notification channels

If Gmail or Telegram are not part of your stack, replace or supplement those nodes with:

  • Slack nodes for posting leaderboard summaries to a channel.
  • Microsoft Teams nodes for internal dashboards.
  • Other messaging or webhook-based integrations supported by n8n.

Store historical data for trends

To analyze trends over time, you can:

  • Append a CSV line to a Google Sheet after each run.
  • Insert records into a database (for example, PostgreSQL or MySQL) for more advanced querying and visualization.
  • Keep a daily archive of Markdown or HTML reports in Google Drive or local storage.

Enhance the LLM agent prompts

The default LLM prompt can be expanded to include more narrative structure, such as:

  • Community highlights or shout-outs to new contributors.
  • Short bios or profile snippets for top creators.
  • Gratitude messages and calls to action for the community.

Small adjustments to the prompt can significantly change the style and depth of the generated report.


Troubleshooting common issues

  • HTTP Request returns 404:
    • Check that the GitHub raw path is correct.
    • Verify the branch name (for example main) and file names match your repository.
  • Merge node produces empty results:
    • Confirm that username exists in both creators and workflows JSON records.
    • Ensure the Merge node is configured to use username as the join key on both inputs.
  • LLM report is not what you expect:
    • Lower the temperature for more consistent, less creative output.
    • Refine the system or user prompt to clearly describe the desired report structure and tone.
  • Permission errors with Google Drive or Gmail:
    • Re-authenticate OAuth credentials in n8n.
    • Check that the account or service account has access to the target Drive folder and permission to send emails.

Security and privacy considerations

When working with contributor data and automated reports, keep the following in mind:

  • Avoid exposing personal data if your reports are public. Consider anonymizing usernames or aggregating results.
  • Restrict access to n8n credentials, especially API keys for OpenAI, Google Gemini, Gmail, and Drive.

AI Agent Chatbot with Jina.ai Web Scraper

AI Agent Chatbot with Jina.ai Web Scraper: Turn Live Web Data into Action

Imagine a chatbot that never goes out of date, that reads the web for you in real time, and that remembers what you talked about last time. With n8n, Jina.ai’s web scraper, and a language model, you can build exactly that. This guide shows you how to turn a simple idea into a powerful, automated AI agent that pulls fresh answers from live web pages and frees you to focus on higher-value work.

The problem: static information in a fast-moving world

Most chatbots are built on static knowledge. They are trained once, updated occasionally, and slowly drift out of sync with reality. Documentation changes, pricing pages get updated, competitors ship new features, and your chatbot keeps answering based on yesterday’s information.

If you are supporting customers, doing research, or tracking competitors, this lag can cost you time, money, and trust. You end up manually checking pages, copying content, summarizing it, and sending it on. It is repetitive, it is fragile, and it pulls you away from the work that truly moves your business forward.

From limitation to possibility: adopting an automation mindset

Instead of accepting manual lookups as “just part of the job,” you can turn them into an automated, repeatable workflow. With n8n, you do not need to be a full-time developer to build something powerful. You can:

  • Let an AI agent fetch and read web pages for you
  • Summarize and transform the content into clear, actionable answers
  • Preserve conversation context so follow-up questions feel natural
  • Scale from one use case to many without starting from scratch each time

Think of this workflow as a stepping stone. You start with a single chatbot that reads one documentation page, then you expand it to multiple sites, then to new teams and new processes. Each improvement compounds the time you save and the value you deliver.

The n8n template: your shortcut to a smarter AI agent

To help you move from idea to reality quickly, this n8n workflow template combines conversational AI, Jina.ai’s web scraper, and memory management into one practical, ready-to-adapt flow. You can plug it into your stack, experiment, and then customize it as your needs grow.

At a high level, the template connects:

  • A chat entry point where users submit questions and URLs
  • An AI agent that orchestrates tools, memory, and a language model
  • The Jina.ai web scraper to pull readable text from live pages
  • A language model like gpt-4o-mini to generate context-aware answers
  • Window Buffer Memory to keep multi-turn conversations coherent

Let’s walk through each piece so you understand how it works and how you can extend it.

Key building blocks of the workflow

1. Chat Trigger: where the conversation begins

The journey starts with the Chat Trigger node. This node listens for incoming user messages and passes them into the workflow. The user message should contain both a URL and a question, for example:

“How do I install Ollama on Windows using the docs from https://github.com/ollama/ollama?”

As soon as the Chat Trigger receives this prompt, the automation kicks in. No manual copy-paste, no switching between tabs. The workflow takes over from here.

2. AI Agent: the Jina.ai Web Scraping Agent as conductor

The AI Agent node is the brain of the operation. In this template, it acts as a Jina.ai Web Scraping Agent that:

  • Extracts the URL from the user’s message
  • Decides which web pages to fetch
  • Calls the Jina.ai web scraper tool
  • Combines scraped content with the user’s question and conversation history
  • Hands the processed input to the language model

Agents in n8n let you bundle tools, memory, and a language model into one intelligent unit. This is where your workflow starts to feel less like a static script and more like a responsive assistant.

3. Jina.ai Web Scraper Tool (HTTP Request): clean text from live pages

To turn web pages into something an AI model can understand, you need structured, readable text. That is where the Jina.ai web scraper comes in.

In n8n, you configure an HTTP Request node that uses a URL template such as:

https://r.jina.ai/{url}

With this pattern, you do not need an API key for many setups. The scraper endpoint returns the text content of the page, often already simplified or summarized, which makes it ideal for feeding into a language model.

4. Language model integration with gpt-4o-mini

Once the scraper has done its work, the content flows back to the agent and then into a language model like gpt-4o-mini. At this stage the model can:

  • Summarize long documentation pages
  • Extract step-by-step instructions
  • Highlight prerequisites or common pitfalls
  • Transform raw text into a concise, user-friendly answer

Instead of your users reading through entire pages, the model delivers exactly what they asked for, grounded in the latest version of the source.

5. Window Buffer Memory: keeping the conversation flowing

Real conversations are rarely one-and-done. Users ask follow-up questions, refine their requests, or need clarification. Window Buffer Memory keeps recent messages in scope so the agent understands context across multiple turns.

By storing only the most relevant recent exchanges, you keep the chatbot responsive and coherent without overwhelming the model with unnecessary history.

How the workflow runs: from question to real-time answer

Here is how all the pieces come together in n8n when a user interacts with your AI agent chatbot:

  1. The user sends a prompt that includes both a URL and a question.
  2. The Chat Trigger node activates and forwards the message to the Jina.ai Web Scraping Agent.
  3. The agent identifies the URL in the prompt and calls the Jina.ai Web Scraper Tool via an HTTP request to the scraper endpoint.
  4. The scraper returns clean text from the target page. The agent blends this content with the user’s question and any relevant memory.
  5. The combined input is sent to the language model (for example, gpt-4o-mini), which generates an accurate, concise response.
  6. The chatbot returns the answer to the user, and Window Buffer Memory is updated so that follow-up questions stay in context.

Once this is in place, you are no longer manually hunting for answers on the web. The workflow does it for you, consistently and at scale.

Designing for reliability: best practices that pay off

As you refine and expand this template, a few design habits will help you build something robust enough for real-world use.

Validate and sanitize user-provided URLs

Always check that the URL a user submits is valid and allowed. Consider:

  • Ensuring the URL is well-formed
  • Restricting scraping to a whitelist of trusted domains
  • Applying rate limits to avoid abuse or accidental overload

Respect robots.txt and terms of service

Even though Jina.ai simplifies scraping, it is your responsibility to respect each site’s policies. Review:

  • robots.txt directives
  • Terms of service for the sites you plan to scrape
  • Any limits on frequency or volume of requests

Keeping this in mind from the start helps you scale responsibly.

Keep responses focused and manageable

Long pages can easily turn into long answers. To keep your chatbot helpful and efficient:

  • Ask the model to answer only the specific question
  • Summarize lengthy content into actionable steps or bullet points
  • Limit output length to control token usage and maintain clarity

Use memory strategically

Window Buffer Memory works best when it stores what is truly needed. Instead of keeping entire documents in memory, store:

  • Short summaries
  • Relevant metadata
  • Pointers back to the source URL

This keeps your workflow efficient while still preserving context for meaningful conversations.

Seeing it in action: a concrete example

To make this feel more tangible, here is a simple scenario you can test as soon as your workflow is running.

Example prompt

How do I install Ollama on Windows using the docs from https://github.com/ollama/ollama?

What the agent should do

  • Detect the GitHub URL in the user’s message and send it to the Jina.ai scraper.
  • Pull back the relevant installation instructions from the page.
  • Generate a concise, step-by-step Windows installation guide.
  • Highlight any prerequisites and common pitfalls.
  • Include a link back to the original documentation for deeper reading.

This is the kind of repetitive task that automation excels at. Once you see it working for one page, it becomes easy to imagine how many similar tasks you can offload.

Security and privacy: building trust into your automation

As you scale an AI agent that reads the web and interacts with users, security and privacy are essential. Treat scraped data and user inputs with care:

  • Avoid collecting or exposing sensitive or personally identifiable information (PII).
  • Redact sensitive content where necessary.
  • Maintain logs for auditing, but ensure they are access-controlled and protected.
  • If you scrape authenticated or internal pages, manage credentials securely and follow your organization’s security policies.

Thoughtful safeguards help your automation become a trusted part of your workflow rather than a risk.

Where this template can take you: real-world use cases

Once you have this n8n template running, it becomes a flexible platform you can adapt to many scenarios.

Customer support that scales with your product

Connect your chatbot to product docs, support articles, or knowledge base pages. The agent can:

  • Fetch the latest documentation in real time
  • Offer tailored troubleshooting steps
  • Reduce the number of tickets that require human intervention

Research assistants for teams and individuals

Researchers and knowledge workers can point the agent at:

  • Academic articles or technical documentation
  • GitHub READMEs and project pages
  • Long-form blog posts and reports

The chatbot can summarize key findings, extract citations, and surface the details that matter, all from live web content.

Competitive monitoring and market awareness

Use the same template to stay informed about your market by:

  • Scraping competitor product pages and release notes
  • Tracking pricing changes or feature updates
  • Delivering concise summaries directly to stakeholders

Instead of manually checking sites, you can have an automated AI layer that keeps you up to date.

Practical implementation tips for n8n

As you adapt this template, a few technical details will help you get the most out of it:

  • Use the built-in toolHttpRequest node and configure it to call the Jina.ai endpoint:
    https://r.jina.ai/{url}
  • Create an agent node that:
    • Receives input from the Chat Trigger
    • Attaches the Jina.ai scraper tool
    • Uses Window Buffer Memory
    • Connects to a language model such as gpt-4o-mini
  • Add pre-processing steps to clean or normalize scraped text.
  • Add post-processing to limit tokens, enforce concise outputs, and format answers clearly.
  • Test with different site types like docs, blogs, and GitHub READMEs so you can fine-tune scraping and summarization behavior.

Each iteration you run in n8n will make the workflow more aligned with your specific needs and your users’ expectations.

Pros and cons: knowing your toolset

Advantages of this approach

  • Access to live, up-to-date information directly from web pages.
  • Automation of repetitive research and support tasks.
  • No API key required for the Jina.ai scraper endpoint in many configurations.
  • A flexible n8n template that you can extend and adapt over time.

Trade-offs and considerations

  • Legal and ethical constraints around web scraping must be respected.
  • Page layouts and structures can change, which may require adjustments.
  • Production setups need careful rate limiting, error handling, and monitoring.

Understanding these trade-offs helps you design a solution that is both powerful and responsible.

Bringing it all together: your next step in automation

By combining Jina.ai’s web scraper, a capable language model, and memory in an n8n workflow, you create more than a chatbot. You build an AI agent that can read the web for you, answer with context, and grow alongside your business and your ideas.

Start small. Connect a Chat Trigger node, an agent that uses the Jina.ai Web Scraper Tool, Window Buffer Memory, and a model like gpt-4o-mini. Limit it to a handful of whitelisted domains. Watch how much time you reclaim when routine questions answer themselves.

Then, iterate. Add new sources, refine prompts, and experiment with different memory strategies. Each improvement is an investment in a more focused, automated workflow where your energy goes into strategy and creativity, not repetitive lookup tasks.

Ready to build your own AI agent chatbot? Deploy this workflow in n8n and test it with a documentation URL today. If you want a step-by-step template or a sample n8n workflow file, reach out to the team or download the starter flow from the project repository, and use it as the foundation for your own automation journey.

Automated Server Health with Grafana + n8n RAG

Automated Server Health with Grafana + n8n RAG

Monitoring server health at scale requires more than basic alerts. To respond effectively, you need context, memory of past incidents, and automated actions that work together.

This guide walks you through an n8n workflow template that connects Grafana alerts, Cohere embeddings, Weaviate vector search, and an Anthropic LLM RAG agent, with results logged to Google Sheets and failures reported to Slack.

The article is structured for learning, so you can both understand and implement the workflow:

  • What you will learn and what the workflow does
  • Key concepts: n8n, Grafana alerts, vector search, and RAG
  • Step-by-step walkthrough of each n8n node in the template
  • Configuration tips, scaling advice, and troubleshooting
  • Example RAG prompt template and next steps

Learning goals

By the end of this guide, you will be able to:

  • Explain how Grafana, n8n, and RAG (retrieval-augmented generation) work together for server health monitoring
  • Configure a Grafana webhook that triggers an n8n workflow
  • Use Cohere embeddings and Weaviate to store and search historical incidents
  • Set up an Anthropic LLM RAG agent in n8n to generate summaries and recommendations
  • Log outcomes to Google Sheets and handle failures with Slack alerts

Core idea: Why combine n8n, Grafana, and RAG?

This workflow template turns raw alerts into contextual, actionable insights. It does that by combining three main ideas:

1. Event-driven automation with n8n and Grafana

Grafana detects issues and sends alerts. n8n receives these alerts via a webhook and automatically starts a workflow. This gives you:

  • Immediate reaction to server incidents
  • Automated downstream processing, logging, and notifications

2. Vectorized historical context with Cohere and Weaviate

Instead of treating each alert as a one-off event, the workflow:

  • Uses Cohere embeddings to convert alert text into vectors
  • Stores them in a Weaviate vector database, along with metadata such as severity and timestamps
  • Queries Weaviate for similar past incidents whenever a new alert arrives

This gives your system a memory of previous alerts and patterns.

3. RAG with an Anthropic LLM

RAG (retrieval-augmented generation) means the LLM does not work in isolation. Instead, it:

  • Receives the current alert payload
  • Uses retrieved historical incidents as context
  • Generates a summary, likely causes, and recommended actions

The LLM here is an Anthropic model, orchestrated by n8n as a RAG agent.


End-to-end architecture overview

At a high level, the n8n workflow template implements this pipeline:

  1. Webhook Trigger – Receives a POST request from Grafana with alert data.
  2. Text Splitter – Breaks long alert messages into smaller chunks.
  3. Cohere Embeddings – Converts each chunk into a vector representation.
  4. Weaviate Insert – Stores vectors and metadata in a Weaviate index.
  5. Weaviate Query + Vector Tool – Fetches similar past incidents when a new alert arrives.
  6. Window Memory – Maintains short-term context in n8n for related alerts.
  7. Chat Model & RAG Agent (Anthropic) – Uses the alert and retrieved context to generate summaries and recommendations.
  8. Append to Google Sheets – Logs the outcome for auditing and analytics.
  9. Slack Alert on Error – Sends a message if any node fails.

Next, we will walk through these steps in detail so you can understand and configure each node in n8n.


Step-by-step n8n workflow walkthrough

Step 1: Webhook Trigger – receive Grafana alerts

The workflow starts with a Webhook node in n8n.

What it does

  • Listens for POST requests from Grafana when an alert fires
  • Captures the alert payload (for example JSON with alert name, message, severity, and links)

How to configure

  • In n8n, create a Webhook node and set the HTTP method to POST.
  • Choose a path, for example: /server-health-grafana.
  • In Grafana, configure a notification channel of type Webhook, and set the URL to your n8n webhook endpoint.
  • Secure the webhook using:
    • A secret header, or
    • IP allowlisting, or
    • Mutual TLS, depending on your environment.

Once this is set up, any new Grafana alert will trigger the n8n workflow automatically.

Step 2: Text Splitter – prepare alert text for embeddings

Long alert descriptions can cause issues for embedding models and vector databases. The Text Splitter node solves this.

What it does

  • Splits long alert messages into smaller chunks
  • Uses configurable chunk size and overlap to preserve context

Recommended settings

  • Chunk size: around 300-500 characters
  • Overlap: about 10-50 characters

The overlap ensures that important context at the boundaries of chunks is not lost, which improves the quality of the embeddings later.

Step 3: Embeddings (Cohere) – convert text to vectors

Next, the workflow uses a Cohere Embeddings node to convert each text chunk into a numerical vector.

What it does

  • Calls a Cohere embedding model, for example embed-english-v3.0
  • Outputs a dense vector for each chunk

Metadata to store

Alongside each vector, include metadata fields such as:

  • timestamp of the alert
  • alert_id or unique identifier
  • severity level
  • source or origin (service, cluster, etc.)
  • original text or raw_text

This metadata is critical later for filtering and understanding search results in Weaviate.

Step 4: Weaviate Insert – build your incident memory

Once you have vectors, the next step is to store them in Weaviate, a vector database that supports semantic search.

What it does

  • Inserts each chunk’s vector and metadata into a Weaviate collection
  • Creates a persistent, searchable history of incidents

Example setup

  • Create a Weaviate class or collection, for example: server_health_grafana
  • Define a schema with fields like:
    • alert_id
    • severity
    • dashboard_url
    • raw_text

The n8n Weaviate node will use this schema to insert data. Make sure your Weaviate endpoint and API keys are configured securely and are not exposed publicly.

Step 5: Weaviate Query + Vector Tool – retrieve similar incidents

Now that you have a history of incidents, you can use it as context whenever a new alert arrives.

What it does

  • Queries Weaviate with the new alert’s embedding
  • Retrieves the most similar past incidents using semantic search
  • Returns a top N list of matches, typically:
    • 3 to 10 results, depending on your use case

These retrieved incidents become the knowledge base for the RAG agent. They help the LLM identify patterns, recurring issues, and likely root causes.

Step 6: Window Memory – maintain short-term context

In many environments, alerts are not isolated. You might see multiple related alerts from the same cluster or service in a short period.

What it does

  • The Window Memory node in n8n keeps a rolling window of recent context
  • Stores information from the last few alerts or interactions
  • Makes that context available to the RAG agent

This is especially useful when you expect follow-up alerts or want the LLM to understand a short sequence of related events.

Step 7: Chat Model & RAG Agent (Anthropic) – generate insights

At this stage, you have:

  • The current alert payload
  • Retrieved similar incidents from Weaviate
  • Optional short-term context from Window Memory

The Chat Model node uses an Anthropic LLM configured as a RAG agent to process all this information.

What it does

  • Summarizes the incident in clear language
  • Suggests likely causes and next steps
  • Produces a concise log entry that can be written to Google Sheets

System prompt design

Use a system prompt that clearly defines the assistant’s role and the required output structure. For example:

  • Set a role like: You are an assistant for Server Health Grafana.
  • Specify strict output formatting so that downstream nodes can parse it easily.

In the example later in this guide, the model returns a JSON object with keys such as summary, probable_causes, recommended_actions, and log_entry.

Step 8: Append to Google Sheets – build an incident log

To keep a human-readable history, the workflow logs each processed alert to Google Sheets.

What it does

  • Uses an Append Sheet node to add a new row for each incident
  • Stores both structured data and the RAG agent’s summary

Typical columns

  • timestamp
  • alert_id
  • severity
  • RAG_summary
  • recommended_action
  • raw_payload

This sheet becomes a simple but effective tool for:

  • Audits and compliance
  • Reporting and trend analysis
  • Sharing incident summaries with non-technical stakeholders

Step 9: Slack Alerting on Errors – handle failures

Even automated workflows can fail, especially when they rely on external APIs or network calls. To avoid silent failures, the template includes Slack error notifications.

What it does

  • Uses n8n’s onError handling to catch node failures
  • Sends a message to a dedicated Slack channel when errors occur
  • Includes the error message and the alert_id so engineers can triage quickly

This ensures that issues in the automation pipeline are visible and can be addressed promptly.


Configuration tips and best practices

Security

  • Protect your n8n webhook with:
    • A secret header
    • IP allowlisting
    • Or mutual TLS
  • Never expose Weaviate, Cohere, Anthropic, or other API credentials in public code or logs.

Schema design in Weaviate

  • Store both:
    • Raw text (for reference)
    • Structured metadata (for filtering and analytics)
  • Include fields like alert_id, severity, dashboard_url, and raw_text.

Chunking strategy

  • Use overlapping chunks to avoid cutting important sentences in half.
  • Adjust chunk size and overlap based on your typical alert length.

Cost control

  • Batch embedding calls where possible to reduce overhead.
  • Limit retention of low-value events in Weaviate to control storage and query costs.
  • Consider pruning or archiving old vectors periodically.

Rate limits and reliability

  • Respect Cohere and Anthropic API rate limits.
  • Implement retry and backoff patterns in n8n for transient errors.

Scaling and resilience for production

When you move this workflow into production, think about availability, monitoring, and data retention.

High availability

  • Run Weaviate using a managed cluster or a cloud provider setup that supports redundancy.
  • Deploy n8n in a clustered configuration or use a reliable queue backend, such as Redis, to handle spikes in alert volume.

Monitoring the pipeline

  • Track embedding latency and LLM

In‑Game Event Reminder with n8n & Vector Search

In‑Game Event Reminder with n8n & Vector Search

In this guide, you will learn how to implement a robust in‑game event reminder system using n8n, text embeddings, a Supabase vector store, and an Anthropic chat agent. The article breaks down the reference workflow template from the initial webhook trigger through vector storage and retrieval, all the way to automated logging and auditability.

Use Case: Why Automate In‑Game Event Reminders?

Live games increasingly rely on scheduled events, tournaments, and limited‑time activities to maintain player engagement. Managing these events manually or with simple time‑based triggers often leads to missed opportunities, inconsistent messaging, and limited insight into how players interact with event information.

By combining n8n with vector search and conversational AI, you can:

  • Automatically ingest and index event data as it is created.
  • Answer player questions about upcoming events using semantic search, not just keyword matching.
  • Trigger contextual reminders based on event metadata and player queries.
  • Maintain a persistent log of decisions and responses for analytics and compliance.

The template described here provides a production‑oriented pattern for building such an in‑game event reminder engine on top of n8n.

High‑Level Architecture of the n8n Workflow

The workflow template connects several components into a single automated pipeline:

  • Webhook intake to receive event payloads from your game backend.
  • Text processing with a splitter to convert long descriptions into manageable chunks.
  • Embeddings generation to transform text chunks into vectors.
  • Supabase vector store for persistent storage and semantic retrieval.
  • Retriever tool and memory to provide contextual knowledge to the agent.
  • Anthropic chat model to drive decision logic and generate responses.
  • Google Sheets logging to capture an auditable trail of events and agent outputs.

This architecture enables a loop where event data is ingested once, indexed semantically, and then reused across multiple player interactions and reminder flows.

End‑to‑End Flow: From Event Payload to Logged Response

At runtime, the workflow behaves as follows:

  1. The game backend or scheduler sends a POST request to the n8n webhook endpoint for new or updated events.
  2. The incoming text (for example, event title and description) is split into overlapping chunks to preserve semantic continuity.
  3. Each chunk is converted into a vector embedding using the Embeddings node.
  4. These vectors are stored in a Supabase index named in‑game_event_reminder with relevant metadata.
  5. When a player or system query arrives, the workflow queries the vector store for semantically similar items.
  6. The retrieved context is exposed as a tool to the Anthropic‑powered agent, together with short‑term memory.
  7. The agent decides how to respond (for example, send a reminder, summarize upcoming events, or escalate) and returns a message.
  8. The final decision and response are appended to a Google Sheet for monitoring and audit purposes.

Key n8n Nodes and Their Configuration

Webhook: Entry Point for Event Data

The Webhook node serves as the public interface for your game services.

  • Path: in‑game_event_reminder
  • Method: POST (recommended)

Use this endpoint as the target for your game backend or job scheduler when a new in‑game event is created, updated, or canceled. For production use, do not expose the webhook without protection. Place it behind an API gateway or authentication layer and validate requests using HMAC signatures or API keys before allowing them into the workflow.

Text Splitter: Preparing Content for Embeddings

Long descriptions and lore documents need to be split into smaller segments so that embeddings and vector search remain efficient and semantically meaningful. The template uses the Text Splitter node with the following configuration:

  • chunkSize = 400
  • chunkOverlap = 40

This configuration provides a balance between context preservation and storage efficiency. For shorter event descriptions, you can reduce chunkSize. For long, narrative‑style content, maintaining a small chunkOverlap helps keep references and context consistent across chunks.

Embeddings Node: Converting Text to Vectors

The Embeddings node transforms each text chunk into a numeric vector suitable for similarity search. The template uses the default embeddings model in n8n, but in a production environment you should choose a model aligned with your provider, latency requirements, and cost constraints.

Key considerations:

  • Use a single, consistent embeddings model for all stored documents to ensure comparable similarity scores.
  • Document any custom parameters (such as dimensions or normalization) so that downstream services remain compatible.

Supabase Vector Store: Insert Operation

Once embeddings are generated, they must be persisted in a vector database. The template uses Supabase with pgvector enabled.

  • Node mode: insert
  • Index name: in‑game_event_reminder

Before using this node, ensure that:

  • Your Supabase project has pgvector configured.
  • The table backing the in‑game_event_reminder index contains fields for:
    • Vector embeddings.
    • Event identifiers.
    • Timestamps.
    • Any additional metadata such as event type, region, or platform.

Storing rich metadata enables more refined filters and advanced analytics later on.

Vector Query and Tool: Retrieving Relevant Context

When the agent needs contextual knowledge, the workflow uses a Query node to search the Supabase index for nearest neighbors to the current query.

The Query node:

  • Accepts embeddings derived from the user or system query.
  • Returns the top‑k most similar vectors along with their associated metadata.

The Tool node then wraps this vector search as a retriever that the agent can call as needed. This pattern is particularly useful when you want the agent to decide when to consult the knowledge base rather than always injecting context manually.

Memory: Short‑Term Conversational Context

The Memory node is configured as a buffer window that maintains a short history of the interaction. This helps the agent:

  • Track the flow of a conversation across multiple turns.
  • Reference previous questions or clarifications from the player.
  • Avoid repeating information unnecessarily.

By combining memory with vector retrieval, the agent can respond in a way that feels both context‑aware and grounded in the latest event data.

Anthropic Chat Model and Agent: Decision Logic

The Anthropic chat node powers the language understanding and generation capabilities of the agent. The Agent in n8n orchestrates:

  • The Anthropic chat model for reasoning and response generation.
  • The vector store tool for on‑demand knowledge retrieval.
  • The memory buffer for conversational continuity.

Typical responsibilities of the agent in this template include:

  • Determining whether a reminder should be sent for a given event.
  • Choosing the appropriate level of detail or tone for the response.
  • Identifying when an issue should be escalated or logged for manual review.

Google Sheets: Logging and Audit Trail

To maintain observability and traceability, the workflow appends every relevant interaction to a Google Sheet.

  • Operation: append
  • Document ID: SHEET_ID
  • Sheet name: Log

This provides a human‑readable record of:

  • Incoming events and queries.
  • Agent decisions and generated messages.
  • Timestamps and other metadata.

While Google Sheets is convenient for prototypes and low‑volume deployments, you should consider a dedicated logging database or data warehouse for production workloads.

Example Scenario: Handling a Tournament Reminder

To illustrate how the template operates, consider a weekend tournament in your game:

  • Your backend posts a payload to the webhook with fields such as event title, start time, and description.
  • The workflow splits the description into chunks, generates embeddings, and inserts them into the Supabase index.
  • Later, a player asks, “What events are happening this weekend?” through an in‑game interface or chat channel.
  • The agent converts this question into an embedding and uses the Query node and tool to fetch the most relevant stored events.
  • Using the retrieved context and memory, the Anthropic chat model composes a concise, player‑friendly summary of upcoming events.
  • The response and associated metadata are appended to the Google Sheet for later analysis.

This pattern generalizes to daily quests, seasonal content, live events, or any in‑game activity that benefits from timely, contextual reminders.

Security, Privacy, and Operational Best Practices

When deploying an automation workflow that touches live game data and player interactions, security and governance are critical.

  • Secure the webhook: Validate all incoming requests with signatures or API keys. Reject unauthenticated or malformed payloads.
  • Control sensitive data: Avoid storing personally identifiable information (PII) in embeddings or vector metadata unless there is a clear policy, encryption in place, and a valid legal basis.
  • Rotate credentials: Regularly rotate API keys for Anthropic, OpenAI (if used), Supabase, and Google Sheets.
  • Manage vector growth: Monitor vector index size and embedding costs. Implement retention rules to remove outdated or low‑value vectors periodically.
  • Audit agent behavior: Keep logs of agent decisions and responses. Use Google Sheets or a logging backend to support debugging, compliance, and model evaluation.

Scalability and Performance Considerations

As your player base and event volume grow, the performance characteristics of your workflow become increasingly important.

  • Batch embeddings: When ingesting large numbers of events, batch embedding requests where possible to reduce API overhead and latency.
  • Use upserts: For frequently updated events, use incremental inserts or upserts in Supabase to prevent duplicate vectors and maintain a clean index.
  • Optimize vector search: If query latency increases, consider sharding your vectors, tuning Supabase indexes, or migrating to a specialized vector database such as Pinecone or Weaviate while preserving the same retrieval pattern.
  • Introduce caching: Cache popular queries (for example, “today’s events” or “weekend schedule”) to serve responses quickly and reduce repeated vector queries.

Testing and Debugging the Workflow

Before exposing the workflow to production traffic, validate it thoroughly using n8n desktop or a Dockerized n8n instance.

Key areas to test:

  • Webhook behavior: Confirm that only authenticated requests are accepted and that payloads are parsed correctly.
  • Chunking quality: Inspect how the Text Splitter divides content and verify that each chunk remains semantically coherent.
  • Embedding stability: Run the same text through the Embeddings node multiple times and confirm that vectors are consistent within expected tolerances.
  • Query parameters: Tune the number of neighbors (k) and similarity thresholds to achieve high‑quality retrieval without irrelevant noise.
  • Agent prompts: Iterate on system and user prompts used with the Anthropic chat model to ensure safe, consistent, and on‑brand responses for your player base.

Extending and Customizing the Template

The reference workflow is intentionally flexible and can be adapted to various game architectures and communication channels.

  • Multi‑language support: Use multilingual embeddings models or language detection to route content to language‑specific pipelines, so players receive reminders in their preferred language.
  • Additional notification channels: Integrate with push notifications, email, Discord, or in‑game UI messaging systems to deliver reminders through multiple touchpoints.
  • Advanced analytics: Forward logs to a BI platform or data warehouse to track engagement metrics, reminder effectiveness, and event participation over time.
  • Automated pruning: Implement scheduled jobs that score vectors by recency and relevance, then remove stale data to control storage and maintain search quality.

Deployment Checklist

Before going live, verify the following configuration steps:

  1. Harden the webhook endpoint and confirm that all external credentials are stored securely.
  2. Configure Supabase with pgvector, create the in‑game_event_reminder index, and validate the table schema and metadata fields.
  3. Set environment variables for Anthropic, OpenAI (if applicable), Supabase, and Google Sheets API keys in your n8n environment.
  4. Run end‑to‑end tests using representative event payloads and realistic player queries.
  5. Set up monitoring and alerts for API usage, database performance, and cost anomalies.

Conclusion and Next Steps

This n8n workflow template offers a practical foundation for building a context‑aware in‑game event reminder system powered by semantic search and conversational AI. By orchestrating webhook intake, text splitting, embeddings, Supabase vector storage, and an Anthropic agent with memory, you gain a scalable solution that can adapt across different game genres and live‑ops strategies.

To start using this pattern in your own environment, import the template into n8n, configure your API keys and Supabase vector index, and run a set of test events that mirror your production scenarios. From there, you can extend the workflow with custom channels, analytics, and governance features tailored to your studio’s needs.

Call to action: Import this template into your n8n instance, connect your Supabase and Anthropic/OpenAI credentials, and begin automating in‑game event reminders. Subscribe for additional automation patterns and deep‑dive guides for game developers and live‑ops teams.

Build a Case Law Summarizer with n8n & LangChain

How One Legal Team Turned Case Law Chaos Into Clarity With n8n & LangChain

On a rainy Tuesday evening, Maya stared at the glowing screen in front of her. As a senior associate at a mid-sized litigation firm, she had spent the last three hours buried in a 120-page appellate decision. Tomorrow morning, she had to brief a partner on the key holdings, relevant citations, and how this case might reshape their strategy.

Somewhere between pages 63 and 87, Maya realized she was reading the same paragraph for the third time. The pressure was not just the volume of work. It was the feeling that important details might slip through the cracks, that a missed citation or misread holding could cost the firm time, money, or credibility.

Her firm had hundreds of similar opinions sitting in folders, PDFs, and email threads. Everyone knew they needed fast, consistent summaries of case law. No one had the time to build such a system from scratch.

That night, Maya decided something had to change.

The Problem: Case Law Everywhere, Insights Nowhere

Maya’s firm prided itself on being data-driven, but their legal research process still relied heavily on manual reading and ad hoc notes. Each new opinion meant another scramble to extract:

  • Clear, consistent summaries of judgments
  • Key facts and holdings that could affect active matters
  • Citations and authorities worth tracking for future use
  • A reliable audit trail in case any summary later needed to be reviewed

They had tried tagging documents in a DMS and building spreadsheets of important cases, but the system never scaled. Every new opinion felt like starting from zero again.

When a partner asked, “What did the court actually hold in Smith v. Jones, and which statutes did they rely on?” the answer usually involved a frantic search, a long PDF, and someone flipping between pages trying to remember where a certain passage lived.

Maya needed something better. An automated case law summarizer that could turn long, dense opinions into concise, searchable summaries without losing legal nuance.

The Discovery: A Case Law Summarizer Template Built on n8n

While researching legal-AI tools, Maya stumbled across an n8n workflow template: an automated Case Law Summarizer powered by LangChain-style agents, embeddings, and a Supabase vector store.

It promised exactly what her team needed. A production-ready pipeline that could:

  • Ingest new case documents through a webhook
  • Split long opinions into manageable chunks
  • Generate vector embeddings for semantic search
  • Store those embeddings in Supabase for fast retrieval
  • Use a LangChain-style agent with OpenAI to draft structured summaries
  • Log everything into Google Sheets for audit and review

She was skeptical but intrigued. Could a workflow template really handle the complexity of legal decisions? Could it preserve enough context to support follow-up questions like “What are the cited statutes?” or “Which authorities did the court rely on most heavily?”

There was only one way to find out.

The Architecture Behind Maya’s New Workflow

Before she deployed anything, Maya wanted to understand how the case law summarizer actually worked. The template diagram revealed a clean, modular architecture that felt less like a black box and more like a toolkit she could tune.

At a high level, the n8n workflow connected these pieces:

  • Webhook (n8n) – receives new case documents or URLs
  • Splitter – breaks long case texts into smaller chunks
  • Embeddings (Cohere) – converts text chunks into vector embeddings
  • Vector store (Supabase) – stores embeddings and metadata for fast semantic search
  • Query + Tool – fetches the most relevant chunks for a given user query
  • Agent (LangChain / OpenAI) – composes the final summary from retrieved context
  • Memory – maintains short-term context for follow-up questions
  • Google Sheets logging – keeps an append-only audit log of requests and responses

The more she read, the more she saw how each part solved a specific pain point she faced daily. This was not a generic chatbot. It was a focused legal-AI workflow designed for case law summarization and retrieval.

Rising Action: Turning a Single Case Into a Testbed

Maya decided to test the template with a single case that had been haunting her inbox: “Smith v. Jones,” a lengthy state supreme court opinion her team kept referencing but never fully summarized.

Step 1 – Ingesting the Case via Webhook

First, she configured an n8n webhook to act as the entry point for new cases. It exposed a POST endpoint where she could send the full opinion text, along with metadata like case name, court, and date.

Her initial test payload looked like this:

{  "case_name": "Smith v. Jones",  "court": "State Supreme Court",  "date": "2024-03-12",  "text": "...full opinion text..."
}

The webhook validated the input and captured the metadata, setting the stage for the rest of the pipeline. For the first time, “Smith v. Jones” was not just a PDF. It was a structured object ready for automation.

Step 2 – Splitting Long Opinions Without Losing Context

Next came the problem of length. Opinions like “Smith v. Jones” were far too long to send to a language model in one go. The template’s text splitter node solved this by breaking the opinion into chunks of around 400 characters, with an overlap of roughly 40 characters.

This overlap mattered. It preserved continuity between chunks so that key sentences spanning boundaries would still be understandable in context. Better chunks meant better embeddings and, ultimately, more accurate summaries.

Step 3 – Generating Embeddings for Semantic Search

Once the text was split, each chunk was sent to an embeddings provider. The template used Cohere, although Maya knew she could switch to OpenAI if needed.

For every chunk, the workflow generated a vector representation and stored essential metadata, including:

  • case_id
  • chunk_index
  • character offsets for reconstruction

This step quietly transformed “Smith v. Jones” from a static document into a searchable, semantically indexed resource.

Step 4 – Persisting to a Supabase Vector Store

The embeddings and metadata were then inserted into Supabase, using Postgres with a vector extension as the underlying vector database.

To Maya, this meant something simple but powerful: she could now run semantic searches across her case corpus, instead of relying only on keyword search or manual scanning. Any future query about “Smith v. Jones” would pull the most relevant portions of the opinion, not just any text that matched a word.

The Turning Point: The First Automated Summary

With the opinion ingested, chunked, embedded, and stored, Maya was ready for the moment of truth. She opened a simple web UI connected to the workflow and typed a prompt:

“Summarize the holding and key facts of Smith v. Jones.”

Step 5 – Querying the Vector Store

Behind the scenes, the n8n workflow took her query and searched the Supabase vector store for the most relevant chunks. It used the embeddings to rank which portions of the opinion best addressed her prompt.

The top chunks were then passed to the next stage as context. No more scrolling through 120 pages. The system had already done the heavy lifting of finding the right passages.

Step 6 – Composing the Summary With an Agent and Memory

The heart of the workflow was a LangChain-style agent orchestrating an OpenAI model. The agent received:

  • The case metadata
  • The retrieved context chunks from Supabase
  • A carefully designed system prompt

The system prompt looked something like this:

System prompt:
You are a legal summarizer. Given the case metadata and provided context chunks, produce:
1) A one-paragraph summary of the holding (2-4 sentences).
2) A bulleted list of key facts.
3) A list of cited authorities (if any).
4) A confidence score (low/medium/high).

Include chunk references in parentheses when quoting.

Maya appreciated how explicit this was. It asked for a structured output, required chunk references, and could be extended with examples for even more consistent formatting. Importantly, the instructions told the model to respond with “Not present in provided context” if a fact could not be verified from the retrieved chunks, which helped reduce hallucinations.

The agent then synthesized a concise summary, extracted holdings, listed citations, and even proposed a suggested search query for deeper research. The memory component kept track of the conversation so that when Maya followed up with, “What are the cited statutes?” the system could answer without reprocessing everything from scratch.

Step 7 – Logging for Audit and Review

Finally, the workflow appended a new row to a Google Sheet. It captured:

  • The original request
  • The generated summary
  • Case metadata
  • Timestamps and any relevant IDs

For Maya’s firm, this log quickly became an informal audit trail and a review queue. If a partner questioned a summary, they could trace it back to the original request and context.

Refining the System: Prompt Design and Configuration Tweaks

With the first few summaries working, Maya began tuning the workflow to better match her firm’s needs. She focused on three areas: prompt design, configuration, and compliance.

Prompt Design That Lawyers Can Trust

Prompt engineering turned out to be crucial for reliable legal summaries. Maya refined the system prompt to:

  • Enforce concise holdings in 2 to 4 sentences
  • Require bulleted key facts
  • List cited authorities clearly
  • Include a confidence score for quick risk assessment

She also experimented with providing example summaries inside the prompt. This helped the model keep formatting consistent across different cases and practice areas.

To limit hallucinations, she made sure the instructions clearly stated that if a fact was not supported by the retrieved chunks, the model must respond with “Not present in provided context.” That simple rule dramatically improved trust in the outputs.

Key Configuration Tips From the Field

As more cases flowed through the summarizer, Maya adjusted several technical settings:

  • Chunk size and overlap – She tested different chunk sizes between 200 and 800 characters, balancing context depth with embedding cost and retrieval quality.
  • Embedding model choice – While the template used Cohere for embeddings, she confirmed that OpenAI embeddings also worked well for semantic relevance.
  • Vector indexing strategy – By storing metadata like case_id and chunk_index, the team could reconstruct the original ordering of chunks whenever they needed to review exact passages.
  • Rate limiting and batching – For bulk ingestion of many opinions, she batched embedding requests and configured retries with backoff to handle API limits gracefully.
  • Access controls – She locked down the webhook and the vector store with API keys and least-privilege roles to keep the system secure.

Staying Ethical: Privacy, Compliance, and Human Review

As the firm began to rely on the summarizer, Maya raised an important question: “What about privacy and compliance?” Even though many court opinions are public, some filings included sensitive or partially redacted information.

To stay on the right side of ethics and regulation, they implemented:

  • Access logs and role-based access control for the summarizer
  • Document retention policies aligned with firm standards
  • Human-in-the-loop review for high-stakes matters, where an attorney always checked the AI-generated summary before it was used in client work

The n8n workflow made these controls easier to enforce, since every request and response was already logged and traceable.

Measuring Impact: Testing and Evaluation

To convince skeptical partners, Maya needed more than anecdotes. She assembled a small labeled dataset of past cases and evaluated how well the summarizer performed.

The team tracked:

  • ROUGE or LU-style metrics to measure content overlap between AI summaries and attorney-written summaries
  • Precision and recall for extracted citations and key facts
  • User satisfaction based on attorney feedback
  • Estimated time saved per case
  • False hallucination rate, defined as claims not grounded in the input text

Within a few weeks, the data told a clear story. Attorneys were spending significantly less time on first-pass summaries and more time on analysis and strategy. The hallucination rate was low and dropping as prompts and configurations improved.

Keeping It Running: Operational Considerations

As usage grew, the summarizer needed to behave like any other production system in the firm. Maya started monitoring key operational signals:

  • Queue depth for incoming case summaries
  • Embedding API errors and retries
  • Vector store size growth over time
  • Per-request latency from ingestion to final summary

For scaling, she prepared a roadmap:

  • Shard vector indices by jurisdiction or year to keep queries fast
  • Archive older cases into a cold store with occasional reindexing
  • Use caching for repeated queries on major precedents that everyone kept asking about

The beauty of the n8n-based design was that each of these changes could be implemented incrementally without rewriting the entire system.

Extending the Workflow: From One Tool to a Legal-AI Platform

Once the Case Law Summarizer proved itself, the firm began to see it as a foundation rather than a one-off tool. The modular n8n workflow made it easy to add new capabilities.

On Maya’s backlog:

  • Adding OCR steps to ingest scanned PDFs that older cases often arrived in
  • Running a citation extraction microservice to normalize references and build a structured database of authorities
  • Integrating with the firm’s document management system so new opinions were summarized automatically upon upload
  • Triggering human review flows for high-risk outputs, such as cases central to active litigation

What began as a single template had evolved into a flexible legal-AI pipeline that could grow with the firm’s needs.

A Day in the Life With the New Summarizer

Several months later, “Smith v. Jones” was no longer a dreaded PDF. It was a structured entry in the firm’s case database, complete with a concise summary, key facts, citations, and an audit trail.

A typical request/response flow now looked like this:

  1. A client matter team uploaded a case PDF to the n8n webhook.
  2. The splitter chunked the text, embeddings were computed, and everything was inserted into Supabase.
  3. A lawyer opened the web UI and requested a summary for “Smith v. Jones.”
  4. The system queried Supabase, retrieved top-k relevant chunks, and the agent synthesized a structured summary.
  5. The result was logged automatically to Google Sheets for future review and compliance.

What used to take hours now took minutes. Instead of wrestling with text, attorneys could focus on arguments, strategy, and client communication.

From Chaos to Clarity: What Maya Learned

Looking back, Maya realized that the real value of the Case Law Summarizer was not just speed. It was the combination of:

  • Accuracy through careful prompt design and vector-based retrieval
  • Auditability through structured logging and metadata
  • Scalability through n8n automation and a vector store like Supabase

By blending n8n, LangChain-style agents, embeddings, and thoughtful legal prompts,

Build an n8n AI Agent with Long-Term Memory

Build an n8n AI Agent with Long-Term Memory

Conversational AI becomes significantly more useful when it can remember user details, store notes, and reuse that information across sessions. This guide describes a production-style n8n workflow template that implements an AI agent with:

  • LangChain-style tool-using agent behavior
  • Windowed short-term conversation memory
  • Google Docs as long-term memory and note storage
  • Optional Telegram integration for real user interactions

The focus is on a detailed, technical walkthrough of the workflow structure, node configuration, and data flow, so you can adapt the template to your own n8n instance.

1. Conceptual Overview

1.1 Why long-term memory in an AI agent?

Short-term context (recent turns in the conversation) is essential for coherent replies, but it is limited to the current session. Long-term memory enables:

  • Persistence of user preferences, constraints, and goals
  • Recall of recurring reminders or habits
  • Re-use of user-provided notes and instructions across sessions

In this workflow, long-term memory is implemented using Google Docs as a simple, low-friction storage backend. One document stores semantic “memories” such as preferences or important facts, and another stores user notes and reminders. This separation keeps personal memory distinct from general note-taking content.

1.2 High-level workflow behavior

At a high level, the n8n workflow performs the following steps for each incoming chat message:

  1. A chat trigger receives a new user message.
  2. The workflow fetches long-term memories and notes from two Google Docs.
  3. All context (incoming message, retrieved memories, retrieved notes) is merged into a single payload.
  4. An AI Tools Agent node processes the request, using:
    • A system prompt that defines rules and behavior
    • One or more LLM nodes (for example, gpt-4o-mini and DeepSeek-V3 Chat)
    • A window buffer memory for short-term session context
    • Tools for saving long-term memories and notes back to Google Docs
  5. The agent generates a reply and optionally writes new memory or notes.
  6. The response is returned through a Chat Response node and can optionally be forwarded to Telegram.

2. Architecture & Components

2.1 Core nodes and roles

  • When chat message received – Entry-point trigger (webhook/chat trigger) that receives user messages and session metadata.
  • Google Docs nodes:
    • Retrieve Long Term Memories – Reads a dedicated document containing stored memories.
    • Retrieve Notes – Reads another document containing user notes and reminders.
  • Merge + Aggregate – Combines the incoming message with retrieved documents into a single context object.
  • AI Tools Agent – Orchestrator node that:
    • Invokes LLM nodes
    • Uses a window buffer memory
    • Calls tools for saving memories and notes
  • LLM nodes:
    • gpt-4o-mini and/or DeepSeek-V3 Chat (or any compatible model)
  • Window Buffer Memory – Maintains short-term conversational context keyed by session.
  • Save Long Term Memories / Save Notes – Google Docs update operations used by the agent to persist data.
  • Chat Response – Formats and outputs the final response for the chat channel.
  • Telegram Response (optional) – Sends the response to a Telegram chat via a bot.

2.2 Data flow summary

Data flows through the workflow in a predictable pattern:

  1. Input: Chat trigger receives message, sessionId, and any channel-specific metadata.
  2. Retrieval: Google Docs nodes fetch the current memory and notes documents.
  3. Context assembly: Merge/Aggregate node constructs a single JSON structure containing:
    • The current user message
    • Long-term memory entries
    • Note entries
  4. Reasoning: AI Tools Agent node:
    • Loads the window buffer memory for the current session
    • Applies the system prompt and available tools
    • Chooses whether to write new memory or notes
    • Returns a reply text
  5. Output: Chat Response node outputs the reply, and Telegram Response can forward it if configured.

3. Node-by-Node Breakdown

3.1 Trigger: When chat message received

Type: Webhook/chat trigger node

This node starts the workflow whenever a new message is received from the chat interface. It typically exposes fields such as:

  • item.json.message – The raw user message text.
  • item.json.sessionId – A session or user identifier used to scope the short-term memory.
  • Optional channel-specific metadata (chat ID, user ID, etc.).

The sessionId is critical for isolating conversations between different users and preventing memory collisions.

3.2 Retrieval: Google Docs for memories and notes

3.2.1 Retrieve Long Term Memories

Type: Google Docs node (Get Document)

This node reads a specific Google Doc that stores long-term memories. Typical configuration:

  • Operation: Get
  • Document ID: ID of the memory document
  • Credentials: Google Docs OAuth credentials configured in n8n

The node returns the document content, which is later parsed or passed as text into the agent context.

3.2.2 Retrieve Notes

Type: Google Docs node (Get Document)

This node is configured similarly to the memory retrieval node, but points to a different document dedicated to notes and reminders. Separating these documents allows the agent to apply different logic to each type of information.

3.3 Merge & Aggregate context

Type: Merge/Aggregate node

The Merge + Aggregate node combines:

  • The incoming user message from the trigger
  • The long-term memory document output
  • The notes document output

The result is a single structured context payload that is passed to the AI Tools Agent node. This ensures the agent receives all relevant information in one place, simplifying prompt construction and tool usage.

3.4 AI Tools Agent and system prompt

Type: AI Tools Agent node

The AI Tools Agent is the central orchestration component. It uses a system prompt plus available tools and memory to decide how to respond and what to store. The system prompt typically encodes rules such as:

  • How to interpret user messages and when to store new memories
  • When to call the “Save Note” tool instead of “Save Memory”
  • Privacy rules and constraints on what should not be stored
  • Fallback behavior when information is missing or ambiguous
  • Instructions to always reply naturally and to avoid mentioning that memory was stored

Representative responsibilities defined in the prompt:

  • Identify and extract noteworthy information, such as user preferences, long-term goals, or important events, and store them via the Save Long Term Memories tool.
  • Detect explicit notes or reminders and route them to the Save Notes tool.
  • Generate a conversational reply that incorporates both short-term and long-term context.

3.5 LLM nodes

Type: LLM / Chat Model nodes

The workflow can use multiple LLM providers, for example:

  • gpt-4o-mini via an OpenAI-compatible node
  • DeepSeek-V3 Chat via a compatible chat model node

The AI Tools Agent selects and calls these models as part of its tool-chain. You can substitute or add other models that are supported by n8n’s LangChain/OpenAI wrapper, as long as credentials are configured correctly.

3.6 Window Buffer Memory

Type: Window Buffer Memory node

This node manages short-term conversational context. It stores a sliding window of recent messages for each session, keyed by a session identifier. The key expression usually looks like:

= {{ $('When chat message received').item.json.sessionId }}

This expression ensures that each user or session has its own isolated memory buffer. The buffer is then attached to the agent so the LLM can reference recent conversation history without re-sending the entire chat log.

Configuration typically includes:

  • Session key: Expression referencing sessionId
  • Window size: Number of messages to keep (to control token usage)

3.7 Long-term storage: Save Long Term Memories / Save Notes

3.7.1 Save Long Term Memories

Type: Google Docs node (Update / Append)

When the agent decides that a message contains memory-worthy information, it calls this tool. The node appends a structured JSON entry to the memory document. A typical JSON template used in the update operation looks like:

{  "memory": "...",  "date": "{{ $now }}"
}

This structure keeps entries compact and timestamped, which is helpful for later parsing or pruning.

3.7.2 Save Notes

Type: Google Docs node (Update / Append)

For explicit notes or reminders, the agent uses a separate tool that writes to the notes document. The template can follow the same JSON pattern as memories, but the semantics are different: notes are usually one-off instructions or reference items, not enduring personal facts.

3.8 Response & delivery

3.8.1 Chat Response

Type: Chat Response node

This node takes the agent’s generated reply and formats it for the chat channel. In the example workflow, an assignment is used so that the reply content is cleanly passed to downstream nodes. You can also map additional metadata if needed.

3.8.2 Telegram Response (optional)

Type: Telegram node

If you configure a Telegram bot token, this node can send the agent’s reply directly to a Telegram chat. This is useful for:

  • Testing and debugging with a real messaging interface
  • Deploying the agent for real users on Telegram

4. Configuration & Prerequisites

4.1 Required services

  • n8n instance – Self-hosted or n8n cloud, with webhook access enabled.
  • Google account – With Google Docs API enabled and OAuth credentials configured in n8n.
  • LLM provider – Credentials for OpenAI-compatible or other supported LLMs (for example, gpt-4o-mini, DeepSeek-V3, etc.).
  • Optional: Telegram bot – Bot token configured in n8n for sending chat messages to Telegram.

4.2 Key expressions and parameters

  • Session key for Window Buffer Memory:
    = {{ $('When chat message received').item.json.sessionId }}

    This ensures each user or conversation has its own short-term memory buffer.

  • Google Docs update templates:

    Use a compact JSON structure when appending entries, for example:

    {  "memory": "...",  "date": "{{ $now }}"
    }
    

    You can adapt the key names for notes, but keep them consistent to simplify downstream parsing.

  • System prompt design:
    • Describe the agent’s role and tone of voice.
    • Define clear criteria for when to save a memory vs. a note.
    • Explain how to use each tool (Save Long Term Memories, Save Notes).
    • Include recent memories and notes snippets in the prompt context when needed.
    • Explicitly instruct the agent not to reveal that it is storing memory.

5. Best Practices & Operational Guidance

5.1 Memory design best practices

  • Keep entries concise and structured: Avoid storing large unstructured blobs of text. Use short JSON objects with clear fields.
  • Separate data types: Use distinct documents (or collections) for long-term memories vs. notes to keep semantics clear.
  • Control short-term window size: Limit the window buffer memory length to avoid excessive token usage and stale context.
  • Sanitize sensitive data: Do not store passwords, tokens, or highly sensitive identifiers. Add explicit instructions in the system prompt to avoid this.
  • Audit tool usage: Log and monitor “Save Memory” and “Save Note” calls to understand what is being written to Google Docs.

5.2 Security & privacy considerations

When using long-term memory, treat stored data as potentially sensitive:

  • Inform users about what information is stored and why.
  • Restrict access to the Google Docs used as storage using appropriate sharing settings.
  • Rotate Google credentials periodically and follow your organization’s security policies.
  • Consider encrypting particularly sensitive data before writing it to Google Docs.
  • If applicable, comply with GDPR, CCPA, or other regional data protection regulations.

6. Troubleshooting & Edge Cases

6.1 Common issues

  • Google Docs nodes fail to read or update:
    • Verify the Document ID is correct and matches the intended file.
    • Check that Google Docs credentials are valid and have permission to access the document.
  • Inconsistent or low-quality model responses:
    • Refine the system prompt with more explicit instructions and examples.
    • Ensure that the context you pass (memories/notes) is concise and relevant.
    • Increase the context window size if important information is being truncated.
  • Too many memory writes:
    • Tighten the rules in the system prompt for what qualifies as a memory.
    • Require explicit user signals or stronger conditions before saving.
  • Session collisions or mixed conversations:
    • Ensure sessionId is truly unique per user or conversation (for example, use chat ID or user ID).
    • Confirm that the Window Buffer Memory node uses the correct session key expression.

7. Example Use Cases

  • Personal assistant: Remembers recurring preferences such as coffee orders, scheduling constraints, or favorite tools.
  • Customer support bot: Recalls non-sensitive account context or past interactions across visits, improving continuity.

Sensor Fault Detector with n8n & Vector Store

Build a Sensor Fault Detector with n8n, LangChain and Supabase

Imagine this: it is 3 a.m., an industrial sensor is having a full-on meltdown, and your phone starts screaming with alerts. You open the logs and see nothing but walls of JSON and vague notes like “sudden spike.” You squint, you scroll, you sigh. Repeatedly.

Now imagine instead that an automated workflow quietly catches the weird sensor behavior, compares it to past incidents, decides whether it is a real fault or just a drama queen sensor, and then neatly logs its reasoning in a spreadsheet for you to review later. That is what this n8n workflow template does.

This guide walks you through a ready-to-deploy Sensor Fault Detector built with n8n, OpenAI embeddings, a Supabase vector store, memory, and an LLM agent that logs decisions to Google Sheets. Less copy-paste, more coffee.


What this Sensor Fault Detector actually does

At a high level, this n8n workflow takes incoming sensor data, turns it into embeddings, stores and retrieves similar events from a Supabase vector store, reasons about what is going on using an LLM agent, and then logs everything to Google Sheets for traceability.

It combines lightweight automation with retrieval-augmented intelligence so you get:

  • Real-time ingestion using an n8n webhook for incoming sensor payloads
  • Smart retrieval using OpenAI embeddings and a Supabase vector store
  • Context-aware reasoning via an LLM agent with memory
  • Immutable logging into Google Sheets for audits, reports, and “who decided this?” moments

Instead of manually digging through logs every time a sensor freaks out, this workflow gives you an automated, explainable fault detection pipeline.


How the n8n workflow is wired together

The template is designed as a left-to-right n8n flow, with each node doing a specific job. Here is the cast of characters and what they do.

1. Webhook – your real-time sensor gate

The workflow starts with a Webhook node listening on POST /sensor_fault_detector. Every time a sensor sends data or reports an anomaly, this webhook fires and kicks off the entire process.

Think of it as the front desk for your sensors. It receives the payload, hands it off to the rest of the workflow, and never complains about night shifts.

2. Character Text Splitter – breaking long notes into chunks

Some sensor logs are short and sweet. Others read like a novel. The Character Text Splitter node takes large payloads or long notes and splits them into smaller chunks so embeddings work better and retrieval stays efficient.

Typical settings might be:

  • chunkSize: around 400 characters
  • overlap: around 40 characters

This overlap helps keep context between chunks so the model does not lose track of what is going on mid-sentence.

3. OpenAI Embeddings – turning text into vectors

Next, each text chunk goes through an Embeddings (OpenAI) node. Here, the text is converted into a vector representation that captures semantic meaning, not just keywords.

You can use OpenAI or another supported embedding model. Better embeddings usually mean better retrieval, so this is a good place to balance accuracy and cost.

4. Supabase Vector Store – your memory palace for sensor events

Those embeddings, along with their original text chunks, are stored in a Supabase vector store using an Insert node. They are saved in a vector index named sensor_fault_detector.

This index lets you run fast nearest-neighbor searches so that when a new event comes in, you can quickly find similar historical incidents, relevant logs, or documentation.

5. Vector Store Query + Tool – giving the agent context

When the workflow needs to assess a fresh sensor event, it uses a Vector Store Query node plus a Tool integration. This combo queries the Supabase index for similar past events and passes those results to the agent as a tool.

The tool returns contextual documents, which the agent uses as reference material. Instead of guessing blindly, the agent can say “I have seen something like this before” and base its decision on prior data.

6. Buffer Window Memory – short-term memory for patterns

The Memory (Buffer Window) node keeps track of recent interactions or events. This short-term memory lets the agent reason about sequences, such as repeated spikes or gradual drifts over time.

Instead of treating each reading as an isolated event, the agent can look at what happened just before and after, which is often crucial for fault detection.

7. Chat / Agent – the brains of the operation

The Chat / Agent node runs a language model, hosted via Hugging Face or another LLM provider. This agent can:

  • Call the vector store tool to retrieve relevant documents
  • Use memory to understand recent trends
  • Assess whether the sensor reading likely indicates a fault
  • Decide on an action, such as:
    • Raise an alert
    • Ignore as non-critical
    • Ask for more data

This is where the “Is this sensor actually broken or just having a moment?” decision happens.

8. Google Sheets append – the audit trail

Finally, the Google Sheets append node logs the agent’s output. It writes:

  • The decision (fault or not, and what to do)
  • Confidence scores
  • References to the supporting documents or context

All of this is stored in a Google Sheet so you have a clear audit trail and a handy dataset for analytics, dashboards, or future model tuning.


What a typical request looks like

Here is an example payload you might send to your webhook at /sensor_fault_detector:

{  "sensor_id": "temp-12",  "timestamp": "2025-08-30T14:32:00Z",  "reading": 98.7,  "units": "C",  "notes": "sudden spike compared to historical 45-55C"
}

Once this JSON hits the webhook, the flow goes like this:

  1. The Webhook node receives the payload and starts the workflow.
  2. The Text Splitter breaks any long notes into manageable chunks.
  3. The Embeddings node converts each chunk to a vector, and the Insert node stores them in Supabase.
  4. The Vector Store Query + Tool searches for similar historical incidents and returns related documents to the agent.
  5. Memory provides recent context, and the Agent reasons about whether this is a genuine fault.
  6. The final decision, along with evidence and confidence levels, is appended to Google Sheets.

The result is a structured, explainable decision instead of a random alert you have to reverse engineer.


Quick setup checklist

Before you hit deploy and start streaming sensor data, make sure you have these pieces ready:

  • An n8n instance (self-hosted or cloud)
  • An OpenAI API key or another embedding model for the Embeddings node
  • A Supabase project and API access for the vector store
    • Vector index name: sensor_fault_detector
  • A Hugging Face or other LLM API for the Chat / Agent node
  • Google OAuth credentials for the Google Sheets append node

Once those credentials are connected in n8n, you are ready to plug in the template and start testing.


How to tune the workflow for your sensors

Out of the box, the template works as a solid starting point, but a bit of tuning can significantly improve results.

Chunking strategy

  • Start with chunk sizes in the 200 to 500 character range.
  • Use an overlap of about 10 to 40 characters to preserve context.

Shorter chunks give more granular retrieval, while larger ones keep more context together. Adjust based on how verbose your sensor logs are.

Embedding model choice

  • Use higher quality embeddings when accuracy is critical.
  • Balance cost vs performance if you have a large number of events.

If your use case involves subtle fault patterns, investing in a stronger embedding model usually pays off.

Vector query settings

  • Set top-k to return around 3 to 10 nearest documents.

Too few documents and the agent might miss important context. Too many and you overload the prompt with noise. Start in the 3 to 10 range and adjust based on how repetitive or diverse your data is.

Memory window length

  • Keep recent events for a timeframe that matches your sensor frequency.
  • For fast sensors, that might be minutes; for slower ones, hours.

The goal is to capture meaningful patterns, like repeated spikes or drifts, without storing so much that the context becomes unwieldy.


Where this template really shines

This n8n Sensor Fault Detector template is flexible enough to cover a range of real-world scenarios:

  • Industrial IoT – detect sensor drift, stuck-at faults, or sudden spikes in machinery and production lines
  • Facility monitoring – catch HVAC and temperature anomalies before people start complaining it is “either a sauna or a freezer”
  • Telemetry triage – automatically classify issue severity and route alerts to the right team

Any environment where sensors can misbehave and you are tired of manual log reviews is a good candidate.


Troubleshooting the workflow

Even with automation, things can occasionally misbehave. Here is how to debug the most common issues.

No results from Supabase query

If your vector store query comes back empty:

  • Verify that embeddings are actually being inserted.
  • Double-check that the index name matches sensor_fault_detector.
  • Inspect Supabase logs and confirm the embedding pipeline is connected correctly.

Agent decisions feel low confidence

If the agent keeps saying “I am not sure,” try:

  • Increasing the top-k value to return more documents from the vector store.
  • Adding more historical examples to the index.
  • Upgrading to a stronger LLM for better reasoning.

Duplicate entries in Google Sheets

If your sheet starts looking like a copy-paste festival:

  • Add deduplication logic in the Agent node or the Sheets append step.
  • Include a unique document or reference ID to prevent multiple inserts of the same event.

Security and cost tips

Automation is great until your bill spikes harder than your sensors. A few safeguards help keep things sane.

  • Rate-limit incoming webhooks so sudden surges do not overwhelm your APIs.
  • Mask or encrypt sensitive fields in sensor payloads before embedding, especially if you have compliance requirements.
  • Monitor usage of embeddings and LLM calls and throttle or batch requests when needed to control costs.

With a bit of planning, you get powerful fault detection without surprise invoices.


Next steps: level up your sensor monitoring

Once you have the basic Sensor Fault Detector running smoothly, you can extend it in several useful ways:

  • Integrate alerting tools like Slack or PagerDuty to notify the right people when the agent confirms a fault.
  • Build dashboards that visualize sensor trends and agent decisions using data from Google Sheets or a dedicated database.
  • Retrain or fine-tune models on your labeled fault dataset to improve accuracy over time.

Each of these adds another layer of intelligence and visibility to your monitoring stack.


Wrapping up

This Sensor Fault Detector workflow combines n8n automation, embeddings, and vector search to create an intelligent, explainable pipeline for sensor monitoring. It is:

  • Modular – easy to swap out models or tools
  • Extensible – ready for alerting, dashboards, and custom logic
  • Auditable – every decision is logged in Google Sheets

If you are tired of manually triaging sensor alerts, this template lets you offload the repetitive work to an agent that never sleeps and always takes notes.

Ready to deploy? Import the n8n template, connect your credentials (OpenAI, Supabase, Hugging Face, Google Sheets), and start streaming sensor events to /sensor_fault_detector. Run a test POST, watch the decisions land in your spreadsheet, and begin building your own fault detection dataset.

Call to action: Try the template now, automate your sensor fault detection, and save your future self from another late-night log review.

n8n Inventory Slack Alert Workflow Guide

n8n Inventory Slack Alert Workflow Guide

This reference-style guide explains the “Inventory Slack Alert” n8n workflow template in depth. It focuses on how each node interacts, how data flows through the pipeline, and how to configure the workflow for reliable, production-grade inventory alerting, semantic search, and logging.

The workflow uses the following core components: a Webhook trigger, a character-based Text Splitter, Cohere embeddings, a Pinecone vector index, an n8n Vector Tool, Window Memory, an OpenAI Chat Model, a RAG Agent, Google Sheets logging, and a Slack-based error handler.


1. Workflow Overview

The Inventory Slack Alert workflow is designed to process inventory-related events (such as low stock, incoming shipments, or SKU mismatches) and produce contextual, AI-generated summaries and recommended actions. It also maintains a searchable history of events and notifies your team if the workflow encounters errors.

At a high level, the workflow:

  • Receives inventory events via a Webhook Trigger.
  • Splits the event text into chunks using a Text Splitter.
  • Generates embeddings with Cohere and stores them in Pinecone.
  • Queries Pinecone for semantically relevant context using a Pinecone Query node.
  • Wraps the vector index as a Vector Tool and feeds it into a RAG Agent with Window Memory and an OpenAI Chat Model.
  • Appends the RAG Agent’s output to a Google Sheet for logging.
  • Sends a Slack alert if the RAG Agent node fails.

This makes the workflow suitable for teams that need:

  • Fast and contextual inventory notifications.
  • A semantic, vector-based history of events for retrieval and analysis.
  • Traceable, auditable logs via Google Sheets.
  • Automated error visibility through Slack.

2. Architecture & Data Flow

2.1 High-level sequence

  1. An external system sends a POST request to the webhook endpoint /webhook/inventory-slack-alert.
  2. The workflow extracts the relevant message content and passes it to the Text Splitter.
  3. The Text Splitter produces overlapping text chunks optimized for embedding.
  4. The Cohere Embeddings node converts each chunk into a dense vector.
  5. Pinecone Insert writes these vectors to the inventory_slack_alert index, including any metadata you choose to store.
  6. Pinecone Query retrieves semantically similar context from existing vectors.
  7. The Vector Tool exposes the Pinecone-backed retrieval capability to the RAG Agent.
  8. Window Memory provides short-term context across related events or conversational steps.
  9. The RAG Agent, backed by an OpenAI Chat Model, generates a concise, human-readable summary and recommended actions.
  10. The Append Sheet (Google Sheets) node writes the resulting output to a “Log” sheet for auditing.
  11. If the RAG Agent node throws an error, the Slack Alert node sends the error details to the #alerts channel.

2.2 Error handling path

The Slack Alert node is connected via the onError route from the RAG Agent. This means:

  • If the RAG Agent executes successfully, the workflow continues to the Google Sheets logging step.
  • If the RAG Agent fails (for example, due to LLM API issues or invalid input), the onError connection triggers the Slack Alert node, which sends a message containing error information to #alerts.

This pattern provides immediate visibility into failures without interrupting upstream systems that send the webhook events.


3. Node-by-Node Breakdown

3.1 Webhook Trigger

  • Node type: Webhook Trigger
  • HTTP method: POST
  • Path: inventory-slack-alert

The Webhook Trigger is the entry point for external inventory events. Typical sources include:

  • Inventory management systems.
  • Warehouse management systems.
  • Middleware or integration platforms.

External systems should send JSON payloads to:

POST https://<your-n8n-domain>/webhook/inventory-slack-alert
Content-Type: application/json

The payload can contain fields such as sku, event, quantity, warehouse, and free-form notes. These fields are later used for embedding, retrieval, and logging.

Edge cases

  • Invalid JSON or missing fields can cause downstream nodes (especially the RAG Agent) to behave unexpectedly. Use n8n’s built-in validation or pre-processing if your upstream systems are inconsistent.
  • Ensure the webhook is reachable over HTTPS and protected with a secret token or IP allowlist where possible.

3.2 Text Splitter (Character Text Splitter)

  • Node type: Text Splitter
  • Splitter: Character Text Splitter
  • chunkSize: 400
  • chunkOverlap: 40

This node takes the incoming text (for example, notes, descriptions, or concatenated fields) and splits it into overlapping chunks. Character-based splitting is used to keep segments within an optimal length for embedding while preserving local context.

Why splitting matters:

  • It improves the quality of embeddings by focusing on smaller, contextually coherent segments.
  • It prevents overly long strings from degrading embedding performance or exceeding model limits.

Configuration notes

  • The default chunkSize = 400 and chunkOverlap = 40 are suitable for most inventory messages.
  • If your events are structured JSON, consider parsing key fields (such as SKU, quantity, and warehouse) before concatenating them into the text that is split, so the vector store captures meaningful metadata-rich text.

3.3 Embeddings (Cohere)

  • Node type: Embeddings
  • Provider: Cohere
  • Model: embed-english-v3.0
  • Credentials: Cohere API key

The Embeddings node converts each text chunk into a dense vector representation. These vectors are later stored in Pinecone for semantic search.

Key aspects:

  • The model embed-english-v3.0 is a general-purpose English embedding model suitable for inventory text, product descriptions, and operational notes.
  • Embeddings allow retrieval of relevant events even if the query uses different wording or partial information.

Edge cases

  • API rate limits or key misconfiguration will cause this node to fail, which in turn affects downstream Pinecone inserts and queries.
  • Check Cohere API quotas if you process a high volume of events.

3.4 Pinecone Insert & Pinecone Query

  • Node types: Pinecone Insert, Pinecone Query
  • Index name: inventory_slack_alert

Pinecone Insert

This node writes the generated embeddings into a Pinecone vector index named inventory_slack_alert. Each embedding is stored as a vector with optional metadata.

Typical metadata fields you may attach (via n8n expressions or mappings):

  • sku
  • warehouse
  • event (for example, low_stock, incoming_shipment)
  • timestamp

Pinecone Query

This node queries the same inventory_slack_alert index to retrieve semantically similar vectors. The query is typically based on the current event text, its embedding, or a derived query vector.

Retrieved results provide context such as:

  • Previous alerts for the same SKU or warehouse.
  • Similar anomalies or known issues.
  • Product descriptions or historical notes.

Index management considerations

  • Ensure the index inventory_slack_alert exists with a dimension that matches the Cohere embedding size.
  • Use metadata-based filters (for example, by SKU or warehouse) to narrow down retrieval when necessary.
  • Implement a retention policy for very old vectors if storage cost is a concern. You can periodically archive or delete outdated entries.

3.5 Vector Tool

  • Node type: Vector Tool

The Vector Tool node wraps the Pinecone index as a tool that can be consumed by the RAG Agent. It abstracts away the low-level query details and exposes a retrieval interface to the agent.

Functionally, this node:

  • Takes a query or input from the RAG Agent.
  • Uses Pinecone to fetch relevant context.
  • Returns document snippets or context blocks that the agent can reason over.

3.6 Window Memory

  • Node type: Window Memory

The Window Memory node maintains a sliding window of recent messages or events. It is used to give the RAG Agent short-term context without persisting all data indefinitely.

Typical uses in this workflow:

  • Preserving the last few inventory events for a SKU or warehouse within the same execution or conversational thread.
  • Helping the RAG Agent understand the immediate history when generating recommendations.

The memory buffer size can be tuned depending on how much context you want the agent to consider.


3.7 Chat Model (OpenAI)

  • Node type: Chat Model
  • Provider: OpenAI

The Chat Model node provides the underlying large language model used by the RAG Agent to generate natural language output. It receives the system prompt, user input, and retrieved context, then returns a structured response.

Typical behaviors:

  • Summarizes inventory issues.
  • Suggests immediate operational actions.
  • Flags potential follow-up tasks or investigations.

Ensure that your OpenAI credentials are correctly configured and that your selected model is supported in your account and region.


3.8 RAG Agent

  • Node type: RAG Agent
  • System message: You are an assistant for Inventory Slack Alert.

The RAG Agent orchestrates retrieval and generation. It combines:

  • The incoming event payload from the Webhook.
  • Contextual information retrieved via the Vector Tool and Pinecone.
  • Short-term history from Window Memory.
  • The generative capabilities of the OpenAI Chat Model.

Its output is a concise, human-readable description of the inventory event, often including suggested actions or diagnostics.

Prompting guidelines

A more detailed system prompt can improve reliability. For example:

You are an assistant for Inventory Slack Alert. Summarize the issue, suggest immediate actions, and flag any follow-ups needed.

Keep the system message stable and use the event payload and retrieved context as the main inputs for variability.

Error behavior

  • If the RAG Agent fails (for instance, due to LLM timeouts or malformed inputs), the workflow’s onError path triggers the Slack Alert node.
  • Capture error messages and stack traces (where available) so they can be forwarded to Slack and optionally logged elsewhere.

3.9 Append Sheet (Google Sheets)

  • Node type: Google Sheets – Append Sheet
  • Target sheet: Log
  • Credentials: Google Sheets OAuth2

This node persists each processed event and the RAG Agent’s output to a Google Sheet. The sheet provides an audit trail and a simple analytics surface.

Configuration details:

  • Specify your SHEET_ID for the Google Sheet that contains a tab named Log.
  • Ensure the Log sheet exists and has appropriate headers (for example, timestamp, SKU, event type, warehouse, summary, recommended action).
  • Map the RAG Agent’s output fields and selected payload fields to the correct columns.

This log can later be used for reporting, anomaly analysis, or manual audits.


3.10 Slack Alert (Error Handler)

  • Node type: Slack
  • Channel: #alerts
  • Connection: attached to RAG Agent via onError route

The Slack Alert node sends a message to the #alerts channel when the RAG Agent fails. It should include at least:

  • A short description of the failure.
  • Key details from the event payload, if available.
  • Error message or stack trace when provided by n8n.

This makes it easy for operations teams to triage issues quickly and investigate potential configuration or API problems.


4. Configuration Checklist

Before running the workflow, ensure the following configuration steps are complete:

  • Credentials
    • Cohere API key for embeddings.
    • Pinecone API key and environment for vector storage.
    • OpenAI API key for the Chat Model.
    • Google Sheets OAuth2 credentials with access to the target spreadsheet.
    • Slack credentials or app token with permission to post to #alerts.
  • Pinecone index
    • Create or configure the index named inventory_slack_alert.
    • Ensure the index dimension matches the Cohere embed-english-v3.0 embedding size.
  • Google Sheets
    • Set the SHEET_ID in the Append Sheet node.
    • Create a sheet/tab named Log with the headers you plan to use.
  • Webhook
    • Configure the Webhook Trigger path to inventory-slack-alert.
    • Expose the webhook URL to your inventory system using HTTPS.
  • Slack
    • Confirm the Slack channel name #alerts exists.
    • Verify that the Slack node uses the correct credentials and has permission to

Build a Carbon Footprint Estimator with n8n

Build a Carbon Footprint Estimator with n8n, LangChain and Pinecone

This guide explains how to implement a scalable, production-ready Carbon Footprint Estimator using n8n as the orchestration layer, LangChain components for tool and memory management, OpenAI embeddings for semantic search, Pinecone as a vector database, Anthropic (or another LLM) for reasoning and conversation, and Google Sheets for lightweight logging and audit trails.

The workflow is designed for automation professionals who need an intelligent, queryable knowledge base of emissions factors that can both answer questions and compute carbon footprints programmatically.

Target architecture and core capabilities

The solution combines several specialized components into a single, automated pipeline:

  • n8n as the low-code automation and orchestration platform
  • LangChain for agents, tools and conversational memory
  • OpenAI embeddings to encode emissions content into semantic vectors
  • Pinecone as the vector store for fast semantic retrieval
  • Anthropic or another LLM for reasoning, conversation and JSON output
  • Google Sheets as a simple, persistent log and audit layer

With this stack, you can:

  • Index emissions factors and related documentation for semantic search
  • Expose a webhook-based API that accepts usage data (kWh, miles, flights, etc.)
  • Retrieve relevant emissions factors via Pinecone for each query
  • Let an LLM compute carbon estimates, produce structured JSON and cite sources
  • Log all interactions and results for compliance, analytics and review

High-level workflow overview

The n8n workflow can be conceptualized as two tightly integrated flows: ingestion & indexing and query & estimation.

Ingestion and indexing flow

  1. A Webhook receives POST requests containing documents or emissions factor data to index.
  2. A Text Splitter breaks large content into smaller chunks with controlled overlap.
  3. The OpenAI Embeddings node converts each chunk into a dense vector representation.
  4. An Insert (Pinecone) node writes vectors and metadata into a dedicated Pinecone index.

Query and estimation flow

  1. The Webhook also accepts user questions or footprint calculation requests.
  2. A Query (Pinecone) node retrieves the most relevant chunks for the request.
  3. A Tool node exposes Pinecone search results to the LangChain Agent.
  4. A Memory component maintains recent conversation context.
  5. The Chat / Agent node (Anthropic or another LLM) uses tools + memory to compute a footprint, generate a structured response and cite references.
  6. A Google Sheets node appends the request, estimate and metadata for logging and auditability.

Node-by-node deep dive

Webhook – unified entry point

The workflow begins with an n8n Webhook node configured to handle POST requests on a path such as /carbon_footprint_estimator. This endpoint can be integrated with web forms, internal systems, or other applications.

The payload typically includes:

  • Consumption data for estimation, for example:
    • Electricity use in kWh
    • Distance traveled in km or miles
    • Flight segments or other transport activities
  • Documents or tabular data to index, such as:
    • CSV files with emission factors
    • Policy documents
    • Manufacturer specifications

At this stage you should also implement basic input validation and unit checks to ensure that values are clearly specified in kWh, km, miles, liters or other explicit units.

Text Splitter – preparing content for embeddings

Large or unstructured documents are not efficient to embed as a single block. The Splitter node divides text into smaller segments while preserving enough context for semantic search.

A typical configuration might be:

  • chunkSize: 400 tokens
  • chunkOverlap: 40 tokens

This approach maintains continuity between chunks and improves retrieval quality, especially for dense technical documents where a factor definition may span multiple sentences.

OpenAI Embeddings – semantic vectorization

Each chunk produced by the Splitter is passed to the Embeddings (OpenAI) node. This node generates dense vector representations that capture semantic meaning rather than exact wording.

Once embedded, you can handle queries like:

  • “What is the emission factor for natural gas per kWh?”

even if the underlying documents phrase it differently. This is crucial when building a robust emissions knowledge base that must handle varied user language.

Pinecone Insert – building the emissions knowledge base

The Insert (Pinecone) node stores each embedding, along with its source text and metadata, into a Pinecone index such as carbon_footprint_estimator.

For reliable traceability and explainability, include metadata such as:

  • source (e.g. dataset name or file)
  • document_id
  • emission_type (e.g. electricity, transport, manufacturing)
  • units (e.g. kg CO2e per kWh)
  • Reference url or document location

This metadata allows the Agent to surface precise references and supports auditing of how each emission factor was used.

Pinecone Query and Tool – contextual retrieval for the Agent

When a user submits a question or an estimation request through the Webhook, the workflow calls a Query (Pinecone) node. The query uses the user prompt to retrieve the most relevant chunks from the index.

The results are then wrapped by a Tool node that exposes the Pinecone query as a callable tool for the LangChain Agent. This pattern lets the LLM selectively pull in only the context it needs and keeps the prompt grounded in authoritative data.

Memory – maintaining conversation context

To support multi-turn interactions, the workflow uses a Memory buffer that stores recent messages and responses. This enables better handling of follow-up questions such as:

  • “Can you break that down by activity?”
  • “What if I double the mileage?”
  • “Use the same grid mix as before.”

By retaining context, the Agent can provide more coherent and consistent answers across an entire conversation rather than treating each request as an isolated query.

Chat / Agent – orchestrating tools and computing estimates

The Chat / Agent node is the central reasoning component. It receives:

  • The user request from the Webhook
  • Relevant emissions factors and documentation via the Pinecone Tool
  • Conversation history from the Memory buffer

The Agent runs a carefully designed prompt that instructs the model to:

  • Use only the provided emissions factors and context
  • Compute carbon footprint estimates based on the supplied activity data
  • Return structured, machine-readable output
  • Cite sources and references from the metadata

A recommended output format is a JSON object with fields such as:

  • estimate_kg_co2e: total estimated emissions
  • breakdown: array of activities and their contributions
  • references: list of URLs or document identifiers used

Google Sheets – logging and audit trail

Finally, a Google Sheets node appends each interaction to a spreadsheet. A typical log entry can include:

  • Timestamp
  • Raw user input
  • Computed estimate_kg_co2e
  • Breakdown details
  • References and source identifiers

This provides a quick, accessible audit trail and supports analytics and manual review. For early-stage deployments or prototypes, Google Sheets is often sufficient before moving to a more robust database.

Implementation best practices

Input quality and validation

  • Validate units at the Webhook layer and normalize them where possible.
  • Reject or flag incomplete payloads that lack essential information such as activity type or units.

Metadata and explainability

  • Include rich metadata with each vector in Pinecone, such as source, publication date and methodology.
  • Encourage the Agent via prompt engineering to surface this metadata explicitly in its responses.

Chunking and retrieval tuning

  • Adjust chunkSize and chunkOverlap based on document type. Dense technical content typically benefits from slightly larger overlaps.
  • Configure similarity thresholds in Pinecone to avoid returning loosely related or low-quality context.

Reliability and security

  • Use n8n credentials vaults to store API keys for OpenAI, Pinecone, Anthropic and Google Sheets.
  • Implement rate limiting and retry logic for bulk embedding and indexing operations.
  • Log both inputs and outputs to support transparency, especially when estimates feed into regulatory reporting.

Example Agent prompt template

A clear, structured prompt is critical for predictable, machine-readable output. The following example illustrates a simple pattern you can adapt:

System: You are a Carbon Footprint Estimator. Use only the provided emission factors and context. 
Compute emissions, explain your reasoning briefly, and always cite your sources.

User: Calculate footprint for 100 kWh electricity and 20 miles driving.

Context: [semantic search results from Pinecone and memory]

Return JSON only, with this structure:
{  "estimate_kg_co2e": number,  "breakdown": [  {  "source": "string",  "value_kg_co2e": number  }  ],  "references": ["url or doc id"]
}

You can further refine the prompt to enforce unit consistency, add rounding rules or align with your internal reporting formats.

Scaling and production considerations

As the solution matures beyond prototyping, consider the following enhancements:

  • Data layer: Migrate from Google Sheets to a relational database when you need complex queries, stronger access control or integration with BI tools.
  • Index strategy: Use separate Pinecone indexes for major domains such as electricity, transport and manufacturing to improve retrieval quality and simplify lifecycle management.
  • Batch operations: Batch embedding and insert operations to reduce API overhead and improve throughput for large datasets.
  • Governance: Introduce human-in-the-loop review for critical outputs, especially where numbers are used in regulatory or public disclosures.
  • Caching: Cache results for frequent or identical queries to reduce cost and latency.

Common use cases for the workflow

  • Real-time sustainability dashboards that display live emissions estimates for operations or customers.
  • Employee travel estimators that help staff understand the impact of business trips.
  • Automated compliance and ESG reporting that cites specific emissions factor sources.
  • Customer-facing calculators for e-commerce shipping or product lifecycle footprints.

Conclusion

By combining n8n, LangChain components, OpenAI embeddings, Pinecone and Anthropic, you can create a robust Carbon Footprint Estimator that is both explainable and extensible. The architecture enables low-code orchestration, high-quality semantic search and structured, source-backed estimates suitable for internal tools or customer-facing applications.

Start with the template workflow for experimentation, then incrementally harden it using the best practices and production considerations described above.

Next steps

To deploy this in your own environment:

  1. Import the workflow template into your n8n instance.
  2. Configure credentials for OpenAI, Pinecone, Anthropic and Google Sheets in the n8n credentials vault.
  3. Index your emissions factors and reference materials.
  4. Test the webhook with sample activities and iterate on the Agent prompt and retrieval parameters.

If you need to adapt the template for specific datasets, regulatory frameworks or reporting standards, you can extend the workflow with additional nodes, validation logic or downstream integrations.

SendGrid Bounce Alert Workflow with n8n & Weaviate

SendGrid Bounce Alert Workflow With n8n & Weaviate: A Story From Panic To Control

On a Tuesday morning that started like any other, Maya, a lifecycle marketer at a fast-growing SaaS startup, opened her inbox and froze. Overnight, unsubscribe rates had ticked up, open rates had dropped, and a warning banner from her ESP hinted at a problem she had always feared but never really prepared for: deliverability issues.

Her campaigns were still sending, but more and more messages were bouncing. Some addresses were invalid, some domains were complaining, and others were silently dropping messages. The worst part was that she had no clear way to see what was happening in real time, let alone understand why.

She knew one thing for sure: if she did not get a handle on SendGrid bounces quickly, her sender reputation and domain health could spiral out of control.


The Problem: Invisible Bounces, Invisible Risk

For months, Maya had treated bounces as an occasional annoyance. They lived in CSV exports, sporadic dashboards, and vague “bounce rate” charts. But now the consequences were real:

  • Invalid addresses and full inboxes were cluttering her lists.
  • Spam complaints and blocked messages were quietly damaging her IP reputation.
  • Domain issues were going unnoticed until too late.

Her team had no automated way to monitor SendGrid bounce events. Everything was manual. Someone would pull a report, skim it, maybe add a note in a spreadsheet, then move on to the next fire. There was no consistent logging, no context-aware analysis, and no reliable alerts.

She needed something different: a near real-time SendGrid bounce alert pipeline that did more than just collect data. It had to understand it.


The Discovery: An n8n Workflow Template Built For Bounces

While searching for “SendGrid bounce automation” and “n8n deliverability monitoring,” Maya stumbled on a template that sounded almost too good to be true: a SendGrid bounce alert workflow using n8n, Weaviate, embeddings, and a RAG agent.

The promise was simple but powerful. Instead of just logging bounces, this workflow would:

  • Ingest SendGrid Event Webhook data directly into n8n.
  • Break verbose diagnostic messages into chunks for embeddings.
  • Use OpenAI embeddings to create vector representations of bounce context.
  • Store everything in Weaviate for semantic search and retrieval.
  • Let a RAG (Retrieval-Augmented Generation) agent reason over that data.
  • Append structured results into Google Sheets.
  • Send Slack alerts if anything went wrong.

Instead of just knowing that a bounce happened, Maya could know why, see similar historical events, and get a recommended next action. It sounded like the workflow she wished she had built months ago.

So she decided to try it.


Setting The Stage: What Maya Needed Before She Started

Before she could turn this into a working SendGrid bounce alert system, Maya gathered the prerequisites:

  • An n8n instance, which her team already used for some internal automations.
  • A SendGrid account with the Event Webhook feature enabled.
  • An OpenAI API key for embeddings (or any equivalent embedding provider).
  • A running Weaviate instance to store vector data.
  • Access to Anthropic or another chat LLM to power the RAG agent.
  • A Google Sheets account for logging results.
  • A Slack workspace with a channel ready for alerts.

With the basics in place, she opened n8n and imported the template. That is when the real journey started.


Rising Action: Building The Bounce Intelligence Pipeline

1. Catching The First Signal: Webhook Trigger

Maya began at the entry point of the workflow: the Webhook Trigger node.

She configured SendGrid’s Event Webhook to send bounce events to a specific n8n URL, something like:

/sendgrid-bounce-alert

This webhook would receive events like:

{  "email": "user@example.com",  "event": "bounce",  "timestamp": 1690000000,  "reason": "550 5.1.1 <user@example.com>: Recipient address rejected: User unknown",  "sg_message_id": "sendgrid_internal_id"
}

To avoid turning her endpoint into a public door for junk traffic, she followed best practices and secured it with IP allowlisting and a shared secret. Only authenticated SendGrid payloads would make it into the pipeline.

2. Making The Text Digestible: Text Splitter

She quickly realized that SendGrid’s diagnostic messages could be long and messy. To make them suitable for embeddings, the workflow used a Text Splitter node.

This node would break the combined diagnostic text into manageable chunks:

  • chunkSize: 400
  • chunkOverlap: 40

The idea was straightforward. Instead of embedding one giant blob of text, each chunk would capture a focused piece of context. That would produce more meaningful vectors later on.

3. Turning Text Into Vectors: Embeddings

Next came the Embeddings node. Maya configured it to use OpenAI’s text-embedding-3-small model, which struck a good balance between cost and semantic quality for her volume.

Each chunk from the Text Splitter was converted into a vector representation. She kept batch sizes conservative to stay within rate limits and avoid surprises on her OpenAI bill.

These vectors were not just numbers. They were the foundation of semantic search over her bounce history.

4. Giving Memory To The System: Weaviate Insert

With embeddings ready, the workflow moved to Weaviate Insert. Here, the vectors were stored in a Weaviate collection named:

sendgrid_bounce_alert

Alongside each vector, the workflow saved structured metadata, including:

  • messageId
  • timestamp
  • eventType (bounce, delivered, dropped)
  • recipient
  • diagnosticMessage
  • the original payload

By designing a consistent schema, Maya ensured she could run both semantic and filtered queries later. She could ask Weaviate for “bounces similar to this one” or “all bounces for this recipient in the last 24 hours.”

5. Retrieving Context On Demand: Weaviate Query As Vector Tool

Storing vectors was only half the story. The real power came when the workflow needed to look back at history.

The template included a Weaviate Query node, wrapped as a Vector Tool. This turned Weaviate into a tool the RAG agent could call whenever it needed context. For example, when a new bounce arrived, the agent could fetch:

  • Previous similar bounces.
  • Historical diagnostics for the same domain.
  • Patterns related to a specific ISP or error code.

Instead of making decisions in a vacuum, the agent could reason with real, historical data.

6. Keeping Short-Term Context: Window Memory

To tie everything together, the workflow used a Window Memory node. This provided a short history of recent interactions and agent outputs.

For Maya, this meant the RAG agent could remember what it had just seen or recommended. If multiple related events came in close together, the agent could correlate them and craft a better summary or next step.

7. The Brain Of The Operation: RAG Agent

At the center of the workflow was the RAG Agent, powered by a chat LLM such as Anthropic.

She configured its system prompt along the lines of:

You are an assistant for SendGrid Bounce Alert.

The agent had access to:

  • The Vector Tool for Weaviate queries.
  • Window Memory for recent context.

Given a new bounce event, the agent would:

  1. Pull in relevant context from Weaviate.
  2. Analyze the error and historical patterns.
  3. Produce a human-readable status.
  4. Recommend an action, such as:
    • Suppress the address.
    • Retry sending later.
    • Check DNS or domain configuration.
  5. Generate a concise summary suitable for logging.

Maya was careful with prompt design and safety. She limited the agent to recommendations, not destructive actions. No automatic suppression or deletion would happen without explicit business rules layered on top.

8. Writing The Story Down: Append To Google Sheet

Once the RAG agent produced its output, the workflow passed everything to an Append Sheet node for Google Sheets.

Each row in the “Log” sheet contained:

  • Timestamp of the bounce.
  • Recipient and event type.
  • Diagnostic message.
  • Agent status and recommended action.
  • Any extra notes or context.

For the first time, Maya had a durable, searchable log of bounce events that was more than just raw errors. It was enriched with analysis.

9. When Things Go Wrong: Slack Alert On Error

Of course, no system is perfect. API outages, malformed payloads, or misconfigurations could still happen.

To avoid silent failures, the workflow used a Slack Alert node connected via On Error paths. If the RAG agent or any critical node failed, a message would land in her #alerts channel with details.

Instead of discovering issues days later, her team would know within minutes.


The Turning Point: Testing The Pipeline Under Fire

With everything wired up, Maya needed to prove that the workflow worked in practice.

Simulating Real Bounces

She used curl and Postman to send sample SendGrid webhook payloads to the n8n webhook URL. Each payload mimicked a realistic bounce, using structures like:

{  "email": "user@example.com",  "event": "bounce",  "timestamp": 1690000000,  "reason": "550 5.1.1 <user@example.com>: Recipient address rejected: User unknown",  "sg_message_id": "sendgrid_internal_id"
}

The workflow extracted the fields it needed, combined the human-readable reason with surrounding context, and passed that text to the Text Splitter. From there, the embeddings and Weaviate steps kicked in automatically.

Verifying Each Layer

  1. She checked Weaviate to confirm that embeddings were created and indexed correctly in the sendgrid_bounce_alert collection.
  2. She triggered a manual RAG agent prompt like:
    "Summarize the bounce and recommend next action."
  3. She opened the Google Sheet and saw new rows appearing, each with a clear summary and recommendation.
  4. She forced an error by temporarily breaking an API key, then watched as a Slack alert appeared in #alerts.

For the first time, she could see the entire lifecycle of a bounce event, from webhook to vector search to intelligent summary, all in one automated pipeline.


Design Choices That Saved Future Headaches

Securing Webhooks From Day One

Maya knew that an exposed webhook could be a liability. So she implemented:

  • HMAC verification or shared secrets to validate payloads.
  • IP filtering to only accept requests from SendGrid.

She treated the webhook as a production endpoint, not a quick hack.

Embedding Strategy That Balanced Cost And Quality

To keep costs predictable, she chose text-embedding-3-small and stuck to the chunking strategy:

  • Chunk sizes that stayed within token limits.
  • Overlaps that preserved context between chunks.

She also batched embedding requests where possible to minimize API calls.

Weaviate Schema That Enabled Hybrid Search

By storing both vectors and metadata, she could run hybrid queries. For example:

  • “All bounces for this recipient in the last 7 days.”
  • “Similar errors to this diagnostic message, but only for a specific ISP.”

Fields like messageId, recipient, eventType, timestamp, and diagnosticMessage made analytics and debugging much easier.

Safe Agent Behavior And Auditability

For the RAG agent, she:

  • Crafted a clear system prompt with a narrow scope.
  • Limited it to non-destructive recommendations by default.
  • Logged agent decisions in Google Sheets for future audits.

If the business later decided to auto-suppress certain addresses, they could layer business rules and confidence thresholds on top of the agent’s outputs, not hand it full control from day one.

Monitoring And Retries

To keep things stable over time, she added:

  • Retry logic for transient network or timeout errors.
  • Slack alerts for persistent issues.
  • The option to log errors in a separate sheet or monitoring dashboard.

This meant the workflow would be resilient even as APIs or traffic patterns changed.


Beyond The First Win: Extensions And Future Ideas

Once the workflow was running smoothly, Maya started thinking about how far she could take it. The template opened the door to several extensions:

  • Auto-suppress addresses based on agent confidence scores and explicit business rules.
  • Daily bounce summaries emailed to the deliverability or marketing ops team.
  • Enriching bounce data with ISP-level status from third-party APIs.
  • Dashboards in Grafana or Looker by exporting the Google Sheet or piping logs into a dedicated datastore.

She also looked at performance and cost optimization:

  • Batching embedding requests to reduce API calls.
  • Choosing lower-cost embedding models for high-volume scenarios.
  • Using TTL policies in Weaviate for ephemeral or low-value historical data.
  • Tracking usage and adding throttling if needed.

The workflow had started as a crisis response. It was quickly becoming a core part of her deliverability strategy.


The Resolution: From Panic To Predictable Deliverability

Weeks later, Maya’s inbox looked different. Instead of vague warnings and surprise deliverability drops, she had:

  • A production-ready SendGrid bounce alert system built on n8n.
  • Near real-time visibility into bounce events.
  • A semantic index in Weaviate that let her search and compare diagnostic messages.
  • A RAG agent that summarized issues and suggested clear next steps.
  • A Google Sheet log that made audits and reporting straightforward.
  • Slack alerts that surfaced problems before they became crises.

The core message was simple: by combining n8n automation, vector search with Weaviate, LLM-powered