Automated Morning Briefing Email with n8n: Turn RAG + Embeddings into Your Daily Advantage
Every morning, you and your team wake up to a familiar challenge: too much information, not enough clarity. Slack threads, dashboards, tickets, emails, docs – the signal is there, but it is buried in noise. Manually pulling it all together into a focused briefing takes time and energy that you could spend on real work and strategic decisions.
This is where automation can change the game. In this guide, you will walk through a journey from scattered data to a calm, curated Morning Briefing Email, powered by n8n, vector embeddings, Supabase, Cohere, and an Anthropic chat model. You will not just build a workflow. You will create a system that turns raw information into daily momentum.
The workflow uses text splitting, embeddings, a Supabase vector store, a RAG (retrieval-augmented generation) agent, and simple alerting and logging. The result is a reliable, context-aware morning briefing that lands in your inbox automatically, so you can start the day aligned, informed, and ready to act.
From information overload to focused mornings
Before diving into nodes and configuration, it is worth pausing on what you are really building: a repeatable way to free your brain from manual status gathering. Instead of chasing updates, you receive a short, actionable summary that highlights what truly matters.
By investing a bit of time in this n8n workflow, you create a reusable asset that:
- Saves you from daily copy-paste and manual summarization
- Aligns your team around the same priorities every morning
- Scales as your data sources and responsibilities grow
- Becomes a foundation you can extend to other automations
Think of this Morning Briefing Email as your first step toward a more automated workday. Once you see how much time one workflow can save, it becomes easier to imagine a whole ecosystem of automations doing the heavy lifting for you.
Why this n8n architecture sets you up for success
There are many ways to send a daily email. This one is different because it is built for accuracy, context, and scale. The architecture combines vector embeddings, a Supabase vector index, and a RAG Agent so your summaries are not just generic AI text, but grounded in your real data.
Here is what this architecture gives you:
- Context-aware summaries using Cohere embeddings and a Supabase vector store, so the model pulls in the most relevant pieces of information.
- Up-to-date knowledge retrieval via a RAG Agent that blends short-term memory with retrieved documents, rather than relying on a static prompt.
- Scalability and performance through text chunking and vector indexing, which keep response times predictable as your data grows.
- Operational visibility with Google Sheets logging and Slack alerts, so you can trust this workflow in production and quickly spot issues.
You are not just automating an email. You are adopting a modern AI architecture that you can reuse for many other workflows: internal search, knowledge assistants, support summaries, and more.
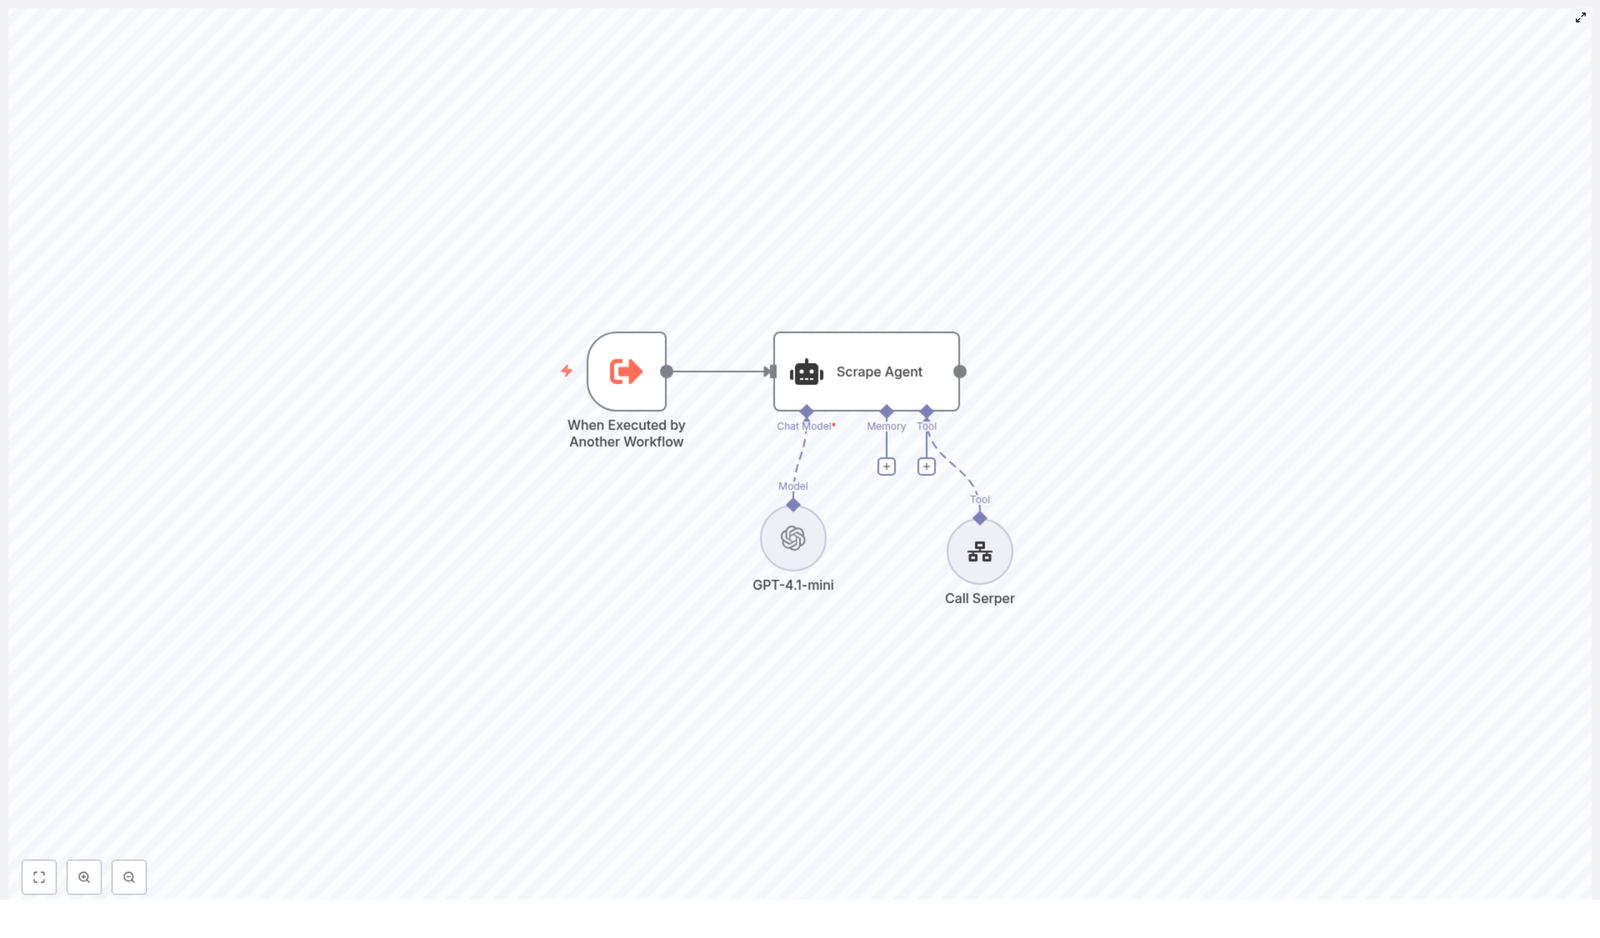
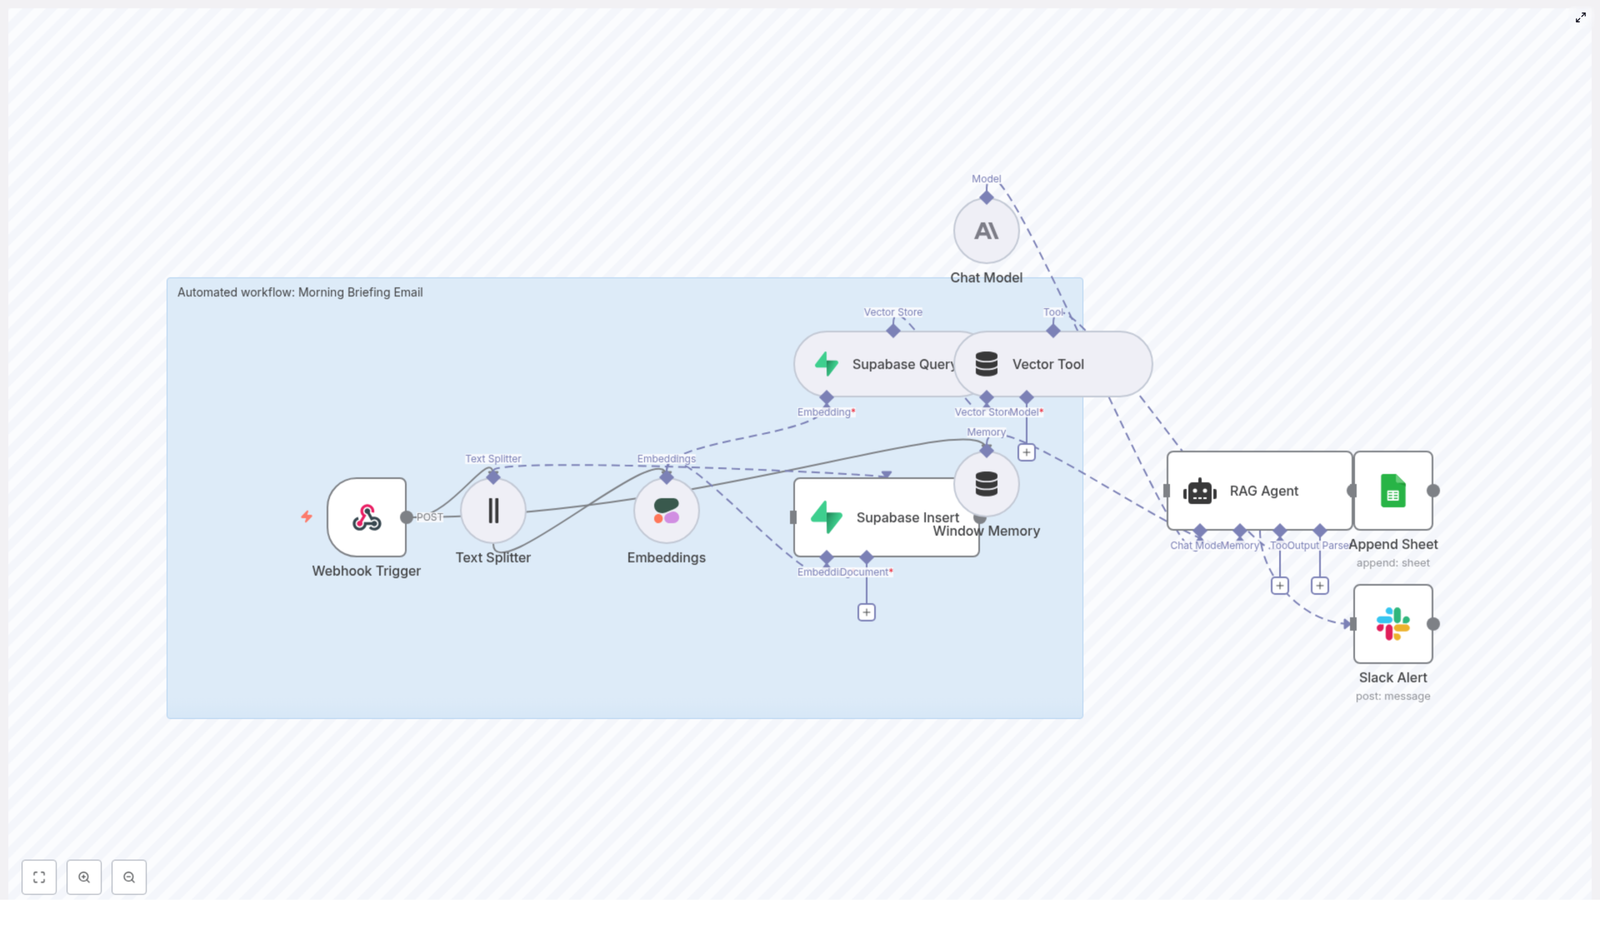
The workflow at a glance
Before we go step by step, here is a quick overview of the building blocks you will be wiring together in n8n:
- Webhook Trigger – receives the incoming content or dataset you want summarized.
- Text Splitter – breaks long content into manageable chunks (chunkSize: 400, chunkOverlap: 40).
- Embeddings (Cohere) – converts each chunk into vectors using
embed-english-v3.0. - Supabase Insert – stores those vectors in a Supabase index named
morning_briefing_email. - Supabase Query + Vector Tool – retrieves the most relevant pieces of context for the RAG Agent.
- Window Memory – maintains a short history so the agent can stay consistent across runs if needed.
- Chat Model (Anthropic) – generates the final briefing text based on the retrieved context and instructions.
- RAG Agent – orchestrates retrieval, memory, and the chat model to produce the email body.
- Append Sheet – logs the final output in a Google Sheet tab called
Log. - Slack Alert – posts to
#alertswhen something goes wrong, so you can fix issues quickly.
Each of these pieces is useful on its own. Together, they form a powerful pattern you can replicate for other AI-driven workflows.
Building your Morning Briefing journey in n8n
1. Start with a Webhook Trigger to receive your data
Begin by creating an HTTP POST Webhook node in n8n and name it something like morning-briefing-email. This will be your entry point, where internal APIs, ETL jobs, or even manual tools can send content for summarization.
Once this is in place, you have a stable gateway that any system can use to feed information into your briefing pipeline.
2. Split long content into smart chunks
Next, add a Text Splitter node. Configure it as a character-based splitter with:
chunkSize: 400chunkOverlap: 40
This balance is important. Smaller chunks keep embeddings efficient and retrieval precise, while a bit of overlap preserves context across chunk boundaries. You can always tune these numbers later, but this starting point works well for most use cases.
3. Turn text into embeddings with Cohere
Now it is time to give your workflow a semantic understanding of the text. Add an Embeddings node configured to use Cohere and select the embed-english-v3.0 model.
Make sure your Cohere API key is stored securely in n8n credentials, not hard-coded in the workflow. Each chunk from the Text Splitter will be passed to this node, which outputs high-dimensional vectors that capture meaning rather than just keywords.
These embeddings are the foundation of your retrieval step and are what allow the RAG Agent to pull in the most relevant context later.
4. Store vectors in a Supabase index
With embeddings in hand, add a Supabase Insert node to push the vectors into your Supabase vector index. Use an index named morning_briefing_email so you can easily reuse it for this workflow and related automations.
Alongside the vector itself, store useful metadata such as:
- Title
- Source (for example, which system or document it came from)
- Timestamp or date
This metadata helps later when you want to audit how a briefing was generated or trace a specific point back to its origin.
5. Retrieve relevant context with Supabase Query and the Vector Tool
When it is time to actually generate a morning briefing, you will query the same Supabase index for the most relevant chunks. Add a Supabase Query node configured for similarity search against morning_briefing_email.
Wrap this query with a Vector Tool node. The Vector Tool presents the retrieved documents in a format that the RAG Agent can easily consume. This is the bridge between your stored knowledge and the AI model that will write your briefing.
6. Add Window Memory and connect the Anthropic chat model
To give your workflow a sense of continuity, add a Window Memory node. This short-term conversational memory lets the RAG Agent maintain a small history, which can be helpful if you extend this workflow later or chain multiple interactions together.
Then, configure a Chat Model node using an Anthropic-based model. Anthropic models are well suited for instruction-following, which is exactly what you need for clear, concise morning briefings.
At this point, you have all the ingredients: context from Supabase, a memory buffer, and a capable language model ready to write.
7. Orchestrate everything with a RAG Agent
Now comes the heart of the workflow: the RAG Agent. This node coordinates three inputs:
- Retrieved documents from Supabase via the Vector Tool
- Window Memory history
- The Anthropic chat model
Configure the RAG Agent with a clear system prompt that defines the style and structure of your briefing. For example:
System: You are an assistant for Morning Briefing Email. Produce a short, actionable morning briefing (3-5 bullet points), include urgent items, outstanding tasks, and a short quick-glance summary.This is where your workflow starts to feel truly transformative. Instead of a raw data dump, you get a focused, human-readable summary you can act on immediately.
8. Log every briefing and protect reliability with alerts
To keep a record of what is being sent, add an Append Sheet node and connect it to a Google Sheets document. Use a sheet named Log to store each generated briefing, along with any metadata you find useful. This gives you an audit trail and makes it easy to analyze trends over time.
Finally, add a Slack Alert node that posts to a channel such as #alerts whenever the workflow encounters an error. This simple step is what turns an experiment into a system you can trust. If something breaks, you will know quickly and can respond before your team misses their morning update.
Configuration tips to get the most from your automation
Once the basic pipeline is working, a few targeted tweaks can significantly improve quality and robustness.
- Chunk sizing: If your source documents are very long or very short, experiment with different
chunkSizeandchunkOverlapvalues. Larger chunks reduce the number of API calls but can blur the boundaries between topics. Smaller chunks increase precision at the cost of more calls. - Rich metadata: Capture fields like source URL, timestamp, and author with each vector. This makes it easier to understand why certain items appeared in the briefing and to trace them back to the original data.
- Security best practices: Store all API keys (Cohere, Supabase, Anthropic, Google Sheets) in n8n credentials. Protect your webhook with access controls and request validation, such as an API key or HMAC signature.
- Rate limit awareness: Monitor your Cohere and Anthropic usage. For high-volume workloads, batch embedding requests where possible to stay within rate limits and keep costs predictable.
- Relevance tuning: Adjust how many nearest neighbors you retrieve from Supabase. Too few and you might miss important context, too many and you introduce noise. Iterating on this is a powerful way to improve briefing quality.
Testing your n8n Morning Briefing workflow
Before you rely on this workflow every morning, take time to test it end to end. Testing is not just about debugging. It is also about learning how the system behaves so you can refine it confidently.
- Send a test POST payload to the webhook. For example:
{ "title": "Daily Ops", "body": "...long content...", "date": "2025-01-01" } - Check your Supabase index and confirm that vectors have been inserted correctly, along with the metadata you expect.
- Trigger the RAG Agent and review the generated briefing. If it feels off, adjust the system prompt, tweak retrieval parameters, or fine-tune chunk sizes.
- Verify that the Google Sheets Append node logs the output in the
Logsheet and simulate an error to ensure the Slack Alert fires in#alerts.
Each test run is an opportunity to learn and improve. Treat this phase as a chance to shape the exact tone and depth you want in your daily emails.
Scaling your Morning Briefing as your needs grow
Once you see how effective this workflow is, you may want to expand it to more teams, more data sources, or more frequent runs. The architecture you have chosen is ready for that.
- Separate ingestion from summarization: If live ingestion becomes expensive or complex, move embeddings creation and vector insertion into a scheduled job. Your morning briefing can then query an already up-to-date index.
- Use caching for hot data: For information that changes slowly but is requested often, introduce caching to speed up retrieval and reduce load.
- Consider specialized vector databases: If you outgrow Supabase in terms of performance or scale, you can migrate to a dedicated vector database such as Pinecone or Milvus, as long as it fits your existing tooling and architecture.
The key is that you do not need to rebuild from scratch. You can evolve this workflow step by step as your organization and ambitions grow.
Troubleshooting: turning issues into improvements
Even well designed workflows hit bumps. When that happens, use these checks to quickly diagnose the problem and turn it into a learning moment.
- No vectors in Supabase? Confirm that the Embeddings node is using valid credentials and that the Text Splitter is producing non-empty chunks.
- Briefings feel low quality? Refine your system prompt, increase the number of retrieved neighbors, or adjust chunk sizes for better context.
- Rate limit errors from Cohere or Anthropic? Implement retry and backoff strategies in n8n and consider batching embedding requests.
- n8n workflow failures? Use n8n execution logs together with your Slack Alert node to capture stack traces and pinpoint where things are breaking.
Each fix you apply makes the workflow more resilient and prepares you for building even more ambitious automations in the future.
Prompt ideas to shape your Morning Briefing
Your prompts are where you translate business needs into instructions the model can follow. Here are two examples you can use or adapt:
Prompt (summary): Produce a 3-5 bullet morning briefing with: 1) urgent items, 2) key updates, 3) blockers, and 4) action requests. Use retrieved context and keep it under 150 words.Prompt (email format): Write an email subject and short body for the team’s morning briefing. Start with a one-line summary, then list 3 bullets with actions and deadlines. Keep tone professional and concise.Do not hesitate to experiment. Small prompt changes can dramatically shift the clarity and usefulness of your briefings.
From one workflow to a culture of automation
By building this n8n-powered Morning Briefing Email, you have created more than a daily summary. You have built a reusable pattern that combines a vector store, embeddings, memory, and a RAG Agent into a reliable, production-ready pipeline.
The impact is tangible: accurate, context-aware briefings that save time, reduce cognitive load, and keep teams aligned. The deeper impact is mindset. Once you see what a single well designed workflow can do, it becomes natural to ask, “What else can I automate?”
As you move this into production, make sure you:
- Protect your webhook with strong authentication and request validation
- Monitor usage and costs across Cohere, Supabase, and Anthropic
- Maintain a clear error-notification policy using Slack alerts and n8n logs
From here, you can branch out to automated weekly reports, project health summaries, customer support digests, and more, all built on the same RAG + embeddings foundation.
Call to action: Spin up this Morning Briefing workflow in your n8n instance and make tomorrow morning the first where your day starts with clarity, not chaos. If you want a downloadable n8n workflow export or guidance on configuring credentials for Cohere, Supabase, Anthropic, or Google Sheets, reach out to our team or leave a comment below. Use this template as your starting point, then iterate, refine, and keep automating.
n8n If & Switch: Conditional Routing Guide
n8n If & Switch: A Practical Guide to Smarter, Growth-Focused Automation
From manual decisions to automated clarity
Every growing business eventually hits the same wall: too many tiny decisions, not enough time. You start with simple workflows, then suddenly you are juggling edge cases, exceptions, and “if this, then that” rules scattered across tools and spreadsheets. It gets noisy, and that noise steals focus from the work that really moves you forward.
This is exactly where conditional logic in n8n becomes a turning point. With the If and Switch nodes, you can teach your workflows to make decisions for you. They quietly handle routing, filtering, and branching so you can spend your energy on strategy, creativity, and growth.
In this guide, you will walk through a real n8n workflow template that reads customer records from a datastore and routes them based on country and name. Along the way, you will see how a few well-placed conditions can turn a basic flow into a powerful, reliable automation system.
Adopting an automation mindset
Before diving into the nodes, it helps to shift how you think about automation. Instead of asking “How do I get this one task done?” try asking:
- “How can I teach my workflow to decide like I do?”
- “Where am I repeating the same judgment calls again and again?”
- “Which decisions could a clear rule handle, so my team does not have to?”
The n8n If and Switch nodes are your tools for encoding that judgment. They let you build logic visually, without code, so you can:
- Filter out noise and focus only on what matters
- Handle different customer types or regions with confidence
- Keep workflows readable and maintainable as they grow
Think of this template as a starting point. Once you understand how it works, you can extend it, adapt it to your data, and gradually automate more of the decisions that currently slow you down.
When to use If vs Switch in n8n
Both nodes help you route data, but they shine in different situations:
If node: simple decisions and combined conditions
Use the If node when you want a clear yes/no answer. It is perfect when:
- You have a single condition, such as “Is this customer in the US?”
- You need to combine a few checks with AND / OR logic, for example:
- Country is empty OR
- Name contains “Max”
The If node returns two paths: true and false. That simple split is often enough to clean up your flow and make it easier to follow.
Switch node: many outcomes, one clear router
Use the Switch node when you need to handle three or more distinct outcomes. Instead of chaining multiple If nodes, a Switch node lets you define clear rules and send each item to the right branch, such as routing customers by country.
Together, If and Switch let you express complex business logic in a way that stays understandable and scalable, even as your automation grows.
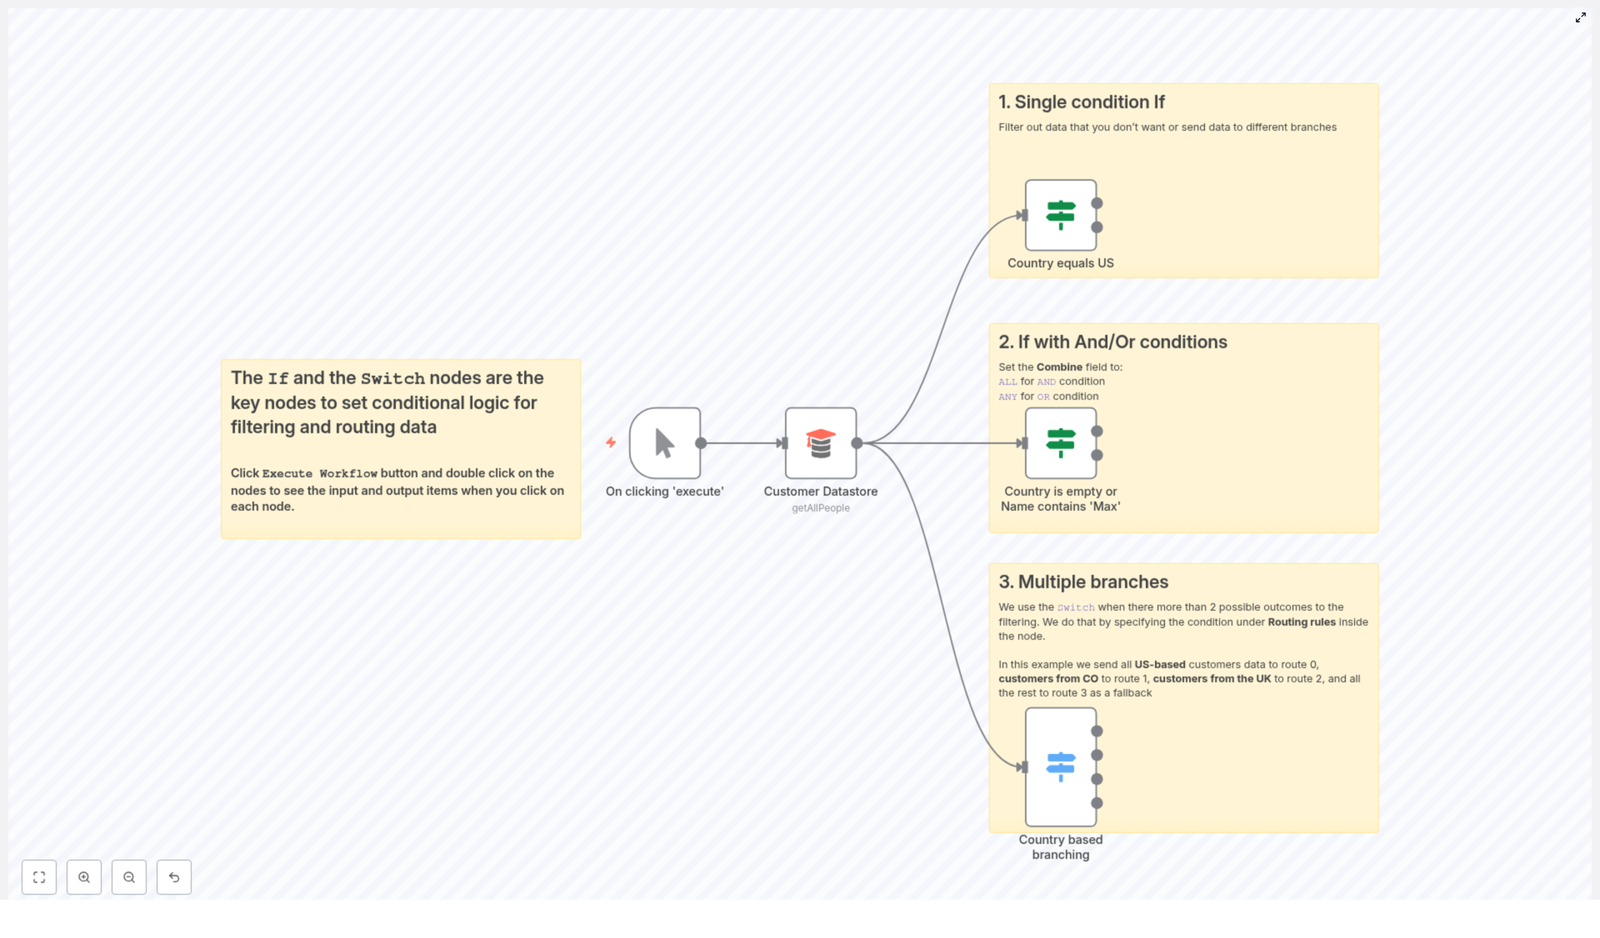
Meet the example workflow template
The n8n template you will use in this guide is built around a simple but powerful scenario: reading customer data and routing records based on country and name. It is small enough to understand quickly, yet realistic enough to reuse in your own projects.
The workflow includes:
- Manual Trigger – start the flow manually for testing and experimentation
- Customer Datastore – fetches customer records using the
getAllPeopleoperation - If nodes – handle single-condition checks and combined AND / OR logic
- Switch node – routes customers into multiple branches by country, with a fallback
Within this single template, you will see three essential patterns that apply to almost any automation:
- A single-condition If to filter by country
- An If with AND / OR to combine multiple checks
- A Switch node to create multiple branches with a safe fallback
Once you grasp these patterns, you can start recognizing similar opportunities in your own workflows and automate them with confidence.
Step 1: Build the foundation of the workflow
Let us start by creating the basic structure. This foundation is where you will plug in your conditions and routing rules.
- Add a Manual Trigger node. Use this to run the workflow on demand while you are experimenting and refining your logic.
- Add your Customer Datastore node. Set the operation to
getAllPeopleso the node retrieves all customer records you want to route. - Connect the Datastore to your logic nodes. In n8n you can connect a single node to multiple downstream nodes. Connect the datastore output to:
- The If node for the single-condition example
- The If node for combined AND / OR logic
- The Switch node for multi-branch routing
- Prepare to use expressions. You will reference fields like
countryandnameusing expressions such as:={{$json["country"]}}={{$json["name"]}}
- Run and inspect. Click Execute Workflow as you go and inspect the input and output of each node. This habit helps you trust your automations and refine them faster.
With this structure in place, you are ready to add the decision-making logic that will turn this workflow into a smart router for your customer data.
Step 2: Single-condition If – filtering by country
Imagine you want to treat US-based customers differently, for example to send them region-specific notifications or apply US-only business rules. A single If node can handle that routing for you, reliably and automatically.
Configuration for a simple country filter
Set up your If node like this:
- Condition type: string
- Value 1:
={{$json["country"]}} - Value 2:
US
With this configuration the If node checks whether $json["country"] equals US.
- If the condition is true, the item goes to the true output.
- All other items flow to the false output.
How this small step creates leverage
This simple split unlocks a lot of possibilities:
- Send US customers into a dedicated notification or marketing sequence
- Apply region-specific logic, taxes, or compliance steps only where needed
- Route customers into different tools or services based on their country
One clear condition, one If node, and you have turned a manual decision into an automated rule that runs every time, without you.
Step 3: If with AND / OR – combining multiple checks
Real-world data is rarely perfect. You might have missing fields, special cases, or customers who need extra attention. That is where combining conditions in an If node becomes powerful.
In this template you will see an example that handles records where either the country is empty or the name contains “Max”. This could represent incomplete data, test accounts, or VIPs that require special handling.
Key settings for combined conditions
Configure your If node with multiple string conditions, for example:
{{$json["country"]}} isEmpty{{$json["name"]}} contains "Max"
Then use the Combine field to decide how these conditions interact:
- Combine operation:
ANYfor OR logic - Combine operation:
ALLfor AND logic
In this template, the configuration uses combineOperation: "any". That means the If node returns true when either condition matches.
- If the country is empty, the item matches.
- If the name contains “Max”, the item matches.
- If both are true, it also matches.
Practical ways to use combined conditions
Once you understand combined conditions, you can start using them to clean data and treat important records differently:
- Data validation Route records with missing country values to a cleaning or enrichment step, such as a manual review queue or an external API.
- Special handling Flag customers whose name matches certain keywords, such as VIPs, test accounts, or internal users, and route them into dedicated flows.
This is how you gradually build smarter automations: by capturing the small rules you already follow in your head and turning them into reusable, visible logic in n8n.
Step 4: Switch node – routing to multiple branches by country
As your automation grows, you will often have more than two possible outcomes. Maybe you want different flows for the US, Colombia, and the UK, with a safety net for all other countries. A Switch node makes this kind of branching clean and easy to understand.
Example Switch configuration
Configure your Switch node as follows:
- Value to check:
={{$json["country"]}} - Data type:
string - Rules & outputs:
- Rule 0:
US(routes to output 0) - Rule 1:
CO(routes to output 1) - Rule 2:
UK(routes to output 2)
- Rule 0:
- Fallback output:
3– catches all records that do not match a rule
Why the fallback output matters
The fallback output is your safety net. It ensures that any unexpected or new country values are still processed. Without it, data could silently disappear from your workflow.
Use the fallback branch to:
- Log unknown or new country values for review
- Send these records into a manual validation queue
- Apply a default, generic flow when no specific rule exists yet
This approach gives you confidence that your automation will behave predictably, even as your data changes or your customer base expands into new regions.
Best practices to keep your automations scalable
As you build more If and Switch logic into your workflows, a few habits will help you stay organized and avoid confusion:
- Use Switch for clarity when you have 3+ outcomes. A single Switch node is almost always easier to read than a chain of nested If nodes.
- Always include a fallback route in Switch nodes. This protects you from silent data loss and makes your workflow more resilient.
- Standardize your data before comparing. If you are unsure about capitalization, use expressions like
={{$json["country"]?.toUpperCase()}}to normalize values before checking them. - Document your logic on the canvas. Use sticky notes or comments in n8n to explain why certain conditions exist. This makes onboarding collaborators faster and helps your future self remember the reasoning.
- Use Code nodes for very complex logic. When you have many conditions or intricate rules, consider a Code node, but keep straightforward boolean checks in If nodes to maintain visual clarity.
These small practices compound over time, turning your n8n instance into a clear, maintainable system instead of a tangle of ad hoc rules.
Troubleshooting your conditions with confidence
Even with a strong setup, conditions may not always behave as expected. When that happens, treat it as an opportunity to deepen your understanding of your data and your automation.
If your conditions are not matching, try this checklist:
- Inspect Input and Output data. While executing the workflow, open each node and look at the actual JSON values under Input and Output. This often reveals small mistakes immediately.
- Check for spaces and case sensitivity. Leading or trailing spaces and inconsistent capitalization can cause mismatches. Use helpers like
trim()ortoUpperCase()in your expressions when needed. - Verify operators. Make sure you are using:
isEmptyfor missing fieldscontainsfor partial matches- Equality operators for exact matches
With a little practice, debugging conditions becomes straightforward, and each fix makes your automation more robust.
Real-world ways to apply If and Switch logic
The patterns in this template show up in many real automation scenarios. Here are a few examples you can adapt directly:
- Region-based notifications Send country-specific promotions, legal updates, or compliance messages by routing customers based on their country code.
- Data cleanup flows Detect incomplete or suspicious records and route them to manual review, enrichment APIs, or dedicated cleanup pipelines.
- Feature toggles and test routing Use name or email patterns to enable or disable parts of a flow for specific users, internal testers, or beta groups.
As you explore this template, keep an eye out for similar patterns in your own processes. Anywhere you are making repeated decisions by hand is a strong candidate for an If or Switch node.
Your next step: experiment, extend, and grow
The If and Switch nodes are not just technical tools. They are building blocks for a more focused, less reactive way of working. Each condition you automate is one less decision you have to make manually, one more piece of mental space you get back.
Use this template as a safe playground:
- Open n8n and import the example workflow.
- Run it with your own sample customer data.
- Adjust the conditions for your real-world rules, such as different countries, name patterns, or validation checks.
- Add new branches, new rules, and see how far you can take it.
Start simple, then iterate. Over time, you will build a library of automations that quietly support your business or personal projects, so you can focus on the work that truly matters.
Call to action: turn this template into your own automation engine
If you are ready to move from theory to practice, now is the moment. Open n8n, load this workflow, and begin shaping it around your data and your goals. Treat it as a starting point for a more automated, more intentional way of working.
If you would like a downloadable starter template or guidance on adapting these rules to your dataset, reach out to our team or leave a comment. We are here to help you refine your logic, improve your flows, and build automations you can rely on.
n8n If vs Switch: Master Conditional Routing

n8n If vs Switch: Master Conditional Routing
What you will learn
In this guide you will learn how to:
- Understand the difference between the If node and the Switch node in n8n
- Use conditional logic in n8n to filter and route data without code
- Configure a complete country-based routing workflow step by step
- Apply AND / OR conditions with the If node
- Create multiple branches with the Switch node using a fallback route
- Test, debug, and improve your conditional workflows using best practices
This tutorial is based on a real n8n workflow template that routes customers by country. You can follow along and then adapt it to your own data.
Core idea: Conditional logic in n8n
Conditional logic is the backbone of workflow automation. It lets you decide what should happen next based on the data that flows through your n8n nodes.
In n8n, two nodes are central to this kind of decision making:
- If node – evaluates one or more conditions and splits items into true or false paths
- Switch node – compares a value against multiple possible options and routes items to different outputs
Both are used for conditional logic in n8n, but they shine in different situations. Understanding when to use each is key to clean, maintainable workflow routing and data filtering.
If vs Switch in n8n: When to use which?
The If node
The If node is ideal when you need simple checks, such as:
- A yes/no decision, for example “Is this customer in the US?”
- A small number of conditions combined with AND or OR logic
- Pre-checks before more complex routing, such as skipping invalid records
It has two outputs:
- True – items that match your conditions
- False – items that do not match
The Switch node
The Switch node is better when you need to route data into more than two branches, for example:
- Different countries should be sent to different services
- Different statuses (pending, approved, rejected) require different actions
- You want a clear visual overview of many possible outcomes
Instead of chaining multiple If nodes, a Switch node lets you define multiple rules in one place and keep the workflow readable.
Quick rule of thumb:
- Use If for simple true/false checks or small sets of conditions
- Use Switch for multiple distinct routes from the same decision point
Related keywords: n8n If node, n8n Switch node, workflow routing, data filtering, conditional logic in n8n.
Workflow we will build: Country-based routing
To see all this in action, we will walk through a practical example: a workflow that fetches customer records and routes them based on their country field.
The template uses the following nodes:
- Manual Trigger – starts the workflow on demand
- Customer Datastore (getAllPeople) – returns all customer records
- If: Country equals US – filters customers whose country is
US - If: Country is empty or Name contains “Max” – demonstrates combining conditions with AND / OR logic
- Switch: Country based branching – routes customers to separate branches for
US,CO,UK, or a fallback route
Why this example works well for learning
This pattern is very common in automation:
- You pull records from a data source
- You check specific fields, such as
countryorname - You route each record to the right process or destination
It shows how to:
- Handle missing data (empty country)
- Use partial matches (name contains “Max”)
- Create multiple routes from one decision point with a fallback
Step 1: Trigger and load your customer data
Manual Trigger
Start with a Manual Trigger node. This lets you run the workflow on demand while you are building and testing it.
Customer Datastore (getAllPeople)
Next, add the Customer Datastore (getAllPeople) node:
- Connect it to the Manual Trigger
- Configure it so that it returns all customer records
Each item typically includes fields like name and country. These fields are what you will reference in your If and Switch nodes.
Step 2: Use the If node for a single condition
First, you will use the n8n If node to filter customers from a specific country, for example all customers in the United States.
Goal
Route all customers where country = "US" to the true output, and everyone else to the false output.
Configuration steps
- Add an If node and connect it to the Customer Datastore node.
- Inside the If node, create a new condition.
- Set the Type to
String. - For Value 1, use an expression that points to the country field:
{{$json["country"]}} - Set Operation to
equals(or the equivalent in your UI). - Set Value 2 to:
US - Save the node and keep the two outputs:
- True output – all items where
countryis exactlyUS - False output – all remaining items
- True output – all items where
Tip: Use consistent country codes, such as ISO alpha-2 (US, UK, CO), to avoid mismatches between your data and your conditions.
Step 3: Combine conditions with AND / OR in the If node
The If node in n8n supports multiple conditions. You can control how they are evaluated with the Combine field.
Combine options
ALL– acts like a logical AND. Every condition must be true for the item to follow the true path.ANY– acts like a logical OR. At least one condition must be true for the item to follow the true path.
Example: Country is empty OR Name contains “Max”
In the template, there is an If node that demonstrates this combined logic. It checks two things:
- Whether the
countryfield is empty - Whether the
namefield contains the stringMax
To configure this:
- Add two string conditions in the If node:
- Condition 1:
- Value 1:
{{$json["country"]}} - Operation:
isEmpty
- Value 1:
- Condition 2:
- Value 1:
{{$json["name"]}} - Operation:
contains - Value 2:
Max
- Value 1:
Now set Combine to ANY. The result:
- Items where
countryis empty will go to the true output - Items where
namecontains “Max” will also go to the true output - All other items will go to the false output
This is a powerful pattern for building flexible filters with the If node.
Step 4: Use the Switch node for multiple branches
When you have more than two possible outcomes, multiple If nodes can quickly become hard to follow. This is where the n8n Switch node is more suitable.
Goal
Route customers based on their country value into separate branches for:
USCOUK- Any other country or missing value (fallback)
Configuration steps
- Add a Switch node and connect it to the node that provides your items (for example the Customer Datastore or a previous If node).
- Inside the Switch node, set:
- Value 1 to:
{{$json["country"]}} - Data Type to
string
- Value 1 to:
- Add rules for the countries you care about. For example:
- Rule 1:
- Value:
US - Output:
0
- Value:
- Rule 2:
- Value:
CO - Output:
1
- Value:
- Rule 3:
- Value:
UK - Output:
2
- Value:
- Rule 1:
- Set a Fallback Output, for example:
- Fallback Output:
3
This will be used for any item where
countrydoes not match US, CO, or UK, or is missing. - Fallback Output:
At runtime, the Switch node evaluates the value of {{$json["country"]}} for each item:
- If it matches
US, the item goes to output 0 - If it matches
CO, the item goes to output 1 - If it matches
UK, the item goes to output 2 - If it matches none of the above, the item goes to the fallback output 3
This gives you a clear branching structure for your workflow routing.
Working with expressions and data normalization
Both If and Switch nodes rely on expressions to read data from incoming items. In n8n, the most common pattern is to reference fields from the JSON payload of each item.
Basic expressions
To reference fields in expressions:
- Country:
{{$json["country"]}} - Name:
{{$json["name"]}}
Normalizing data before comparison
Real-world data is often inconsistent. To avoid subtle mismatches, normalize values before you compare them. You can do this in a Set node or a Function node.
Examples:
- Trim whitespace and convert to uppercase:
{{$json["country"]?.trim().toUpperCase()}} - Map full country names to codes, for example:
- “United States” → “US”
- “United Kingdom” → “UK”
This mapping can be implemented in a Function node or via a lookup table.
Normalizing early in your workflow helps your If and Switch conditions behave predictably.
Testing and debugging your conditional workflow
As you build conditional logic, testing is essential. n8n offers several features that make it easier to see how items move through your workflow.
- Execute Workflow:
- Click Execute Workflow from the editor.
- After execution, double click any node to inspect its Input and Output items.
- Logger or HTTP Request nodes:
- Insert a Logger node or an HTTP Request node in a branch to inspect what data that branch receives.
- Triggers:
- Use a Manual Trigger while developing to control when the workflow runs.
- When integrating with external systems, you can switch to a Webhook trigger and still inspect items in the same way.
- Complex conditions in JavaScript:
- For very complex logic, use a Function node.
- In the Function node, you can evaluate multiple JavaScript conditions and return a simple route key, such as:
item.route = "US"; - Then use a Switch node to route based on
item.route.
Best practices for If and Switch nodes
- Prefer Switch for many outcomes:
- Use the Switch node when you have several distinct routes.
- This is usually more readable than chaining multiple If nodes.
- Normalize data early:
- Handle case differences, extra spaces, and synonyms as soon as possible.
- This reduces unexpected behavior in your conditions.
- Keep conditions simple and documented:
- Avoid very complex logic inside a single If or Switch node.
- Use node descriptions to explain what each condition is for.
- Use fallback routes:
- Always define a fallback output in Switch nodes when possible.
- This prevents items from being lost when they do not match any rule.
- Avoid deep nesting:
- Limit deeply nested
- Limit deeply nested
Fix ‘Could not Load Workflow Preview’ in n8n

Fix “Could not Load Workflow Preview” in n8n (Step-by-Step Guide)
Seeing the message “Could not load workflow preview. You can still view the code and paste it into n8n” when importing a workflow can be worrying, especially if you need that automation working immediately.
This guide explains, in a practical and educational way, why this happens and shows you exactly how to rescue, clean, and import the workflow into your n8n instance.
What You Will Learn
By the end of this tutorial, you will know how to:
- Understand the main causes of the “Could not load workflow preview” error in n8n
- Access and validate the raw workflow JSON safely
- Import workflows into n8n even when the preview fails
- Fix version, node, and credential compatibility issues
- Use CLI or API options when the UI import is not enough
- Apply best practices so exported workflows are easier to share and reuse
1. Understand Why n8n Cannot Load the Workflow Preview
When the preview fails, it usually means the UI cannot render the workflow, not that the workflow is lost. The underlying JSON is often still usable.
Common reasons for the preview error
- Unsupported or custom nodes
Workflows created in another n8n instance may use:- Third-party or community nodes that you do not have installed
- Custom nodes created specifically for that environment
These nodes can prevent the visual preview from loading.
- Version mismatch
The workflow JSON might rely on:- Node properties added in newer n8n versions
- Features your current n8n version does not recognize
- Missing credentials
Some nodes need credentials that:- Do not exist in your instance yet
- Use a different credential type name or structure
The preview can fail if these references are inconsistent.
- Very large or complex workflows
Large JSON payloads, many nodes, or deeply nested expressions can hit UI limits and stop the preview from rendering correctly. - Invalid or corrupted JSON
If the export is truncated, malformed, or edited incorrectly, the preview cannot parse it. - Browser or UI rendering issues
In rare cases, browser extensions, caching, or UI limitations interfere with the preview, even though the JSON itself is fine.
The key idea: the preview can fail while the workflow JSON is still recoverable and importable.
2. First Rescue Step: View and Validate the Raw Workflow JSON
When the preview fails, your main goal is to get to the raw JSON. That JSON file contains everything n8n needs to reconstruct the workflow.
How to open the raw workflow code
- In the n8n UI, look for a link such as “view the code” next to the error message.
Clicking it usually opens:- A modal window with the workflow JSON, or
- A new browser tab showing the JSON
- If you downloaded an exported workflow file (typically
.json):
Open it with a text or code editor, for example:- VS Code
- Sublime Text
- Notepad++
- Any plain text editor
- Run the JSON through a validator, such as:
- jsonlint.com
- Your editor’s built-in JSON formatter or linter
This helps you detect:
- Missing or extra commas
- Broken brackets
- Encoding issues
Tip: Before editing anything, save a backup copy of the original JSON file. You can always go back if something breaks.
3. Import the Workflow JSON into n8n (Even Without Preview)
Once you have valid JSON, you can import the workflow directly into your n8n instance. The preview is optional, the import is what matters.
Step-by-step: Import a workflow JSON via the UI
- Open your n8n instance and go to the Workflows page.
- Click the Import option:
- This might be in a three-dot menu
- Or labeled as “Import” or “Import from file”
- Choose how to provide the workflow:
- Paste RAW JSON directly into the import dialog, or
- Upload the
.jsonfile you previously downloaded
- Review the import summary:
- n8n may show warnings about missing credentials or unknown nodes
- Read these messages carefully before confirming the import
- Confirm to complete the import.
Typical warnings during import and what they mean
- Missing credentials
n8n imports the workflow structure but not the actual secrets. After import you will:- Create or map the required credentials in your instance
- Attach them to the relevant nodes in the editor
- Unknown nodes
n8n has detected node types that your instance does not recognize. These are often:- Custom nodes from other installations
- Community nodes not installed in your environment
- Version incompatibility
The workflow may include:- Node parameters or properties that your n8n version does not support
- Newer node versions referenced in the JSON
In this case, you might need to edit the JSON or update n8n.
4. Fix Version and Node Compatibility Problems
If the workflow was created with newer features or custom node types, you might need to adjust the JSON before or after import.
How to inspect and edit workflow JSON safely
- Open the JSON file in a code editor.
- Search for node definitions, especially:
"type"fields that represent the node name"typeVersion"fields that indicate the node version
Compare these with the nodes available in your n8n instance.
- For custom node types:
- Install the corresponding custom node package in your n8n instance, or
- Replace the custom node with a built-in node that can perform a similar task
- If some nodes completely block import:
- Make a copy of the JSON file
- Temporarily remove or comment out (in your editor, not in actual JSON syntax) the problematic nodes
- Import the simplified workflow first
- Then re-create or replace those nodes directly in the n8n editor
- Review expressions and advanced syntax:
- Look for complex expressions like
{{$json["field"]["nested"]}}or long function-style expressions - If the import keeps failing, simplify these to static placeholder values
- After a successful import, open the workflow in the editor and rebuild the expressions there
- Look for complex expressions like
Always keep your original JSON as a reference so you can copy expressions or node configurations back as needed.
5. Reattach Missing Credentials Safely
For security reasons, credentials are never exported with workflows. This is expected behavior, not an error.
After importing, reconnect all required credentials
- In your n8n instance, create new credentials for each service used in the workflow, for example:
- API keys
- Database connections
- Cloud provider logins
- Open the imported workflow in the editor:
- Click each node that requires authentication
- In the node settings, select or create the matching credential entry
- For teams or multiple environments (dev, staging, production):
- Use environment-specific credentials in each n8n instance
- Consider using a secret manager or environment variables to standardize how credentials are created and referenced
6. Use CLI or API When UI Import Fails
If the UI keeps failing or you prefer automation, you can import workflows using the n8n CLI or REST API, depending on your setup and n8n version.
CLI / API import concepts
- Use the REST API endpoint such as
/workflowsto:- POST workflow JSON directly into n8n
- Automate imports in scripts or CI pipelines
- On self-hosted instances, check for:
- Admin utilities or CLI commands provided by your specific n8n version
- Developer or migration tools that handle workflow import programmatically
- Before sending JSON to the API:
- Confirm that the payload matches the expected workflow schema
- Ensure required top-level fields (like
nodes,connections, and metadata) are present
Because CLI and API usage can differ between releases, always refer to the official n8n documentation for your exact version for the current commands and endpoints.
7. Quick Fixes for Frequent Problems
Use this section as a checklist when troubleshooting a stubborn workflow JSON.
- Validation errors
Run the JSON through a validator and fix:- Trailing commas
- Mismatched brackets
- Encoding or copy-paste issues
- Unknown node types
If n8n reports unknown nodes:- Install the missing custom or community nodes, then restart n8n
- Or edit the JSON to replace these nodes with supported ones
- Large JSON fails to preview
Skip the preview and:- Use the “Paste RAW JSON” option directly
- Or import via file upload or API
- Browser-related issues
If you suspect the UI:- Try another browser
- Disable extensions, especially those that modify page content
- Use a private or incognito window to bypass cached scripts
8. Best Practices When Exporting and Sharing n8n Workflows
Prevent future preview and import headaches by following these recommendations whenever you share workflows with others or between environments.
- Include a README
Alongside the JSON export, add a short text file that lists:- Required custom or community nodes
- Credential types needed (for example, “Google Sheets API credential”)
- Document the n8n version
Mention the exact n8n version used to create the workflow. This helps:- Match versions for compatibility
- Decide whether to upgrade or adjust the JSON
- Use environment variables for secrets
Avoid hardcoding:- API keys
- Tokens
- Passwords
Instead, rely on environment variables and credential entries inside n8n.
- Export smaller functional units
Instead of one huge workflow:- Split automations into smaller, focused workflows
- Make each module easier to preview, import, and debug
9. Example Checklist: Cleaning a Workflow JSON for Import
Use this simple workflow JSON cleanup checklist whenever you get the “Could not load workflow preview” error.
- Validate the JSON
Run the file through a JSON validator and fix any syntax errors. - Check node types
Search for"type"values:- Compare them with the nodes available in your n8n instance
- If you find unsupported or unknown types, temporarily remove them in a copy of the JSON
- Remove environment-specific data
Delete or replace:- Absolute file paths
- Local tokens
- IDs that only exist in the original environment
- Simplify advanced expressions
For very complex expressions:- Replace them with static placeholders so the workflow imports cleanly
- Rebuild or paste the full expressions back in the n8n editor once everything loads
10. Recap and Next Steps
The message “Could not load workflow preview” usually indicates a preview or compatibility issue, not a permanently broken workflow. In most cases you can still:
- Access and validate the raw workflow JSON
- Import the workflow via the n8n UI, CLI, or REST API
- Fix problems related to:
- Custom or unknown nodes
- Version mismatches
- Missing credentials
- Large or complex workflow structures
If you have tried the steps above and still cannot import the workflow, prepare the following information before asking for help:
- Your n8n version
- A list of any custom or community nodes installed
- The exact error messages you see in the UI or logs
- A sanitized copy of the workflow JSON with all secrets removed
Turn your n8n workflows into readable, searchable docs with live Mermaid diagrams and a built-in Markdown editor, so you can spend less time documenting and more time automating. You know that moment when someone asks, “So how does this n8n workflow actually work?” and you open the editor, squint at the nodes, and mumble something about “data flowing through here somewhere”? If your documentation strategy is currently “hope for the best,” you are in good company. As your n8n automations multiply, keeping track of what each workflow does, why it exists, and how it is wired becomes a full-time job. Manually updating docs every time you tweak a node is not only tedious, it is a guaranteed way to end up with outdated, half-true documentation that nobody trusts. This workflow template steps in as your documentation assistant. It auto-generates docs from your n8n workflows, wraps them in a lightweight Docsify site, and even draws pretty Mermaid diagrams so you can stop copy-pasting screenshots into wikis. At a high level, this workflow takes your n8n instance, peeks at your workflows, and turns them into a browsable documentation site with diagrams and an editor. Here is what it handles for you: In short, it takes the repetitive “document everything” chore and hands it to automation, which feels nicely poetic. Docsify is the front-end engine that turns Markdown files into a responsive documentation site, all in the browser. No static site generator builds, no complicated pipelines. The workflow generates a main HTML page that: Mermaid.js converts text-based flowchart descriptions into SVG diagrams. The workflow reads your n8n workflow JSON and constructs a Mermaid flowchart string from node types and connections. The result is a visual schematic on each doc page, so instead of saying “the webhook goes to the function node which then branches,” you can just point to a diagram and nod confidently. Whenever a docs page is requested and does not yet exist, the workflow creates a Markdown template that includes: This guarantees that every workflow has at least a minimal, accurate doc page without you opening a blank file and wondering where to start. The template also includes an editor view. It provides a split layout: When you hit the Save button, your Markdown file is written directly to the configured project directory so future visits load your polished version instead of regenerating it. If you enable it, the workflow can call a language model to: The LLM output is formatted into Markdown and merged into the doc template. It is meant as a helpful assistant, not an unquestioned source of truth, so you can always edit or override what it writes. Behind the scenes, the workflow behaves like a tiny docs server that reacts to incoming paths. Here is the flow, simplified: These are merged into the Markdown template before returning the page. The net effect is that your documentation grows and improves naturally as you browse and edit, without manual file juggling. All the important knobs live in a single CONFIG node so you do not have to chase variables around the workflow. Here is what you configure: To get everything running smoothly, keep these points in mind: Automating documentation is great, but you still want to keep things safe and sane. Once the basics are running, you can extend this setup to match your team’s workflow. If something looks off, it is usually a small configuration detail. Here is what to check. This approach works especially well if you want: If you have ever thought “I really should document this” and then did not, this workflow is for you. Every product team knows the feeling. Your Jira board is full of rich epics, but turning them into clear, polished Product Requirement Documents (PRDs) takes hours of focused work. It is important work, yet it often pulls you away from strategy, discovery, and building the next big thing. This is where automation can become a real turning point. With n8n, OpenAI, Google Drive, and AWS S3 working together, you can transform raw Jira epics into structured PRDs automatically. The n8n workflow template in this guide is not just a technical shortcut, it is a practical stepping stone toward a more focused, automated way of working. In this article, you will walk through the journey from problem to possibility, then into a concrete, ready-to-use n8n template. You will see exactly how the workflow is built, how each node works, and how you can adapt it, extend it, and make it your own. Manually creating PRDs from Jira epics is repetitive and error prone. You copy details from Jira, reformat them in a document, try to keep a consistent structure across projects, and hope nothing gets missed. Over time, this drains energy and slows your team down. Automating PRD creation changes the equation: Instead of staring at a blank page, you start with a complete, AI-generated draft in Google Docs, plus archived copies in AWS S3. Your role shifts from “document assembler” to “editor and decision maker.” That is the mindset shift this n8n template supports. Before diving into nodes and settings, it helps to view this workflow as the first of many automations you can build. n8n makes it possible to connect tools you already use, then orchestrate them in a way that reflects how your team actually works. With this template you are: As you implement it, you will likely see other opportunities to automate: review flows, notifications, versioning, and more. Think of this PRD workflow as a foundation you can build on, not a finished endpoint. The provided n8n workflow template is a linear, easy-to-follow flow that starts with a manual trigger and ends with ready-to-edit PRDs. At a high level, here is what it accomplishes: The result is a repeatable system: whenever you are ready for a fresh PRD draft, you execute the workflow and let n8n handle the heavy lifting. The Manual Trigger node is your starting point. It lets you run the workflow when you are ready to generate or refresh PRDs. Next, the workflow reaches out to Jira to understand which projects exist and which ones you want to include. The Code1 (merge values) node then flattens batched project results so you have a single, clean list to work with: Not every Jira project needs a PRD at the same time. The workflow uses an If node to filter out projects that do not match your criteria. This is where you start tailoring the automation to your reality. You can focus on specific product lines, environments, or teams simply by updating the filter logic. Once you know which projects matter, the workflow fetches all epics for each one. This step transforms your Jira data into the raw narrative ingredients that the AI will later shape into a PRD. To make the AI’s job easier, the workflow groups epics by project and extracts only the necessary information. By structuring data clearly at this stage, you help ensure that the generated PRDs are coherent, organized, and easy to adapt to your team’s style. Now comes the transformational step. The aggregated epic data is sent to an AI agent that uses OpenAI to generate the PRD content. This is where your time savings really show up. Instead of manually synthesizing every epic, the AI gives you a starting point that you can refine, adjust, and align with your product vision. Finally, the workflow turns the AI output into shareable documents and long-term records. At this point, your workflow has turned Jira epics into living documents your team can review, comment on, and evolve, while also storing a traceable record in S3. To get the most out of this n8n PRD template, pay attention to a few critical configuration details. Automating PRD generation does not mean relaxing your security standards. You can design this workflow to respect privacy, compliance, and internal policies. Every automation journey includes a bit of debugging. When something breaks, treat it as a chance to improve the workflow. Once the basic automation is working, you can start turning it into a richer, more powerful system that matches how your team operates. Each of these extensions moves you closer to a fully integrated product documentation pipeline that runs with minimal manual effort. AI can accelerate your work, but it is most powerful when combined with human judgment. Treat PRD generation as a partnership between automation and your product expertise. Before you rely on this workflow for critical documentation, walk through a quick checklist to ensure everything is ready. Picture this: you are copying a new subscriber’s email from one tool, pasting it into MailerLite, updating their city, double checking you did not misspell “Berlin”, and then repeating that for the next person. And the next. And the next. At some point your brain quietly leaves the chat. Good news: n8n can do all of that for you, without complaining, getting bored, or mis-typing someone’s email. In this guide, you will learn how to use an n8n workflow template that: All in one neat, repeatable automation. No more copy-paste marathons. MailerLite is a solid email marketing platform. n8n is a low-code workflow automation tool that connects your apps together so they talk nicely and do the boring stuff for you. Put them together and you get a powerful combo for: The workflow in this template follows a simple pattern that you will use a lot in automation: create -> update -> get Once you understand this pattern, you can reuse it across many other integrations, not just MailerLite. This template is a small, focused workflow that shows the full lifecycle of a subscriber inside MailerLite using the dedicated MailerLite node in n8n. Here is the flow in human terms: Under the hood, this happens through three MailerLite nodes connected in sequence: It is a small workflow, but it covers the three most common subscriber operations you will likely use over and over. If you would rather not build everything from scratch (fair), you can import the ready-made template into your n8n instance and be up and running in a minute or two. Here is the exact workflow JSON used in the template: You can import this JSON directly into n8n, plug in your MailerLite API credentials, and you are ready to test. Let us walk through the setup in a clean, simple sequence. No fluff, just the steps you actually need. Start with a Manual Trigger node in n8n. This lets you click a button in the editor to run the workflow while you are still building and testing it. Later, you can replace this trigger with something more useful in real life, such as: Next, add your first MailerLite node and configure it to create a subscriber. In the node settings: The example template uses: Once this node runs, MailerLite creates a new contact and returns the subscriber data, including the email that we will reuse as the identifier in the next steps. Now add a second MailerLite node, which will handle the update operation. In the settings for this node: Then configure the custom field update: In other words, you are telling MailerLite: “For the subscriber whose ID is this email, set the custom field Finally, add a third MailerLite node and set its operation to get. Again, use the same email expression in the subscriberId field: When you run the workflow, this node fetches the latest version of the subscriber record. Open the node output and you should see the updated Before you unleash this on your actual audience, do a quick test run. If everything looks right, you have a working create-update-get flow for MailerLite. Once the basic flow works, a few small tweaks can make it more robust and less likely to break at 2 a.m. If the update or get step says the subscriber does not exist, the usual suspect is the Check that: If needed, you can trim whitespace directly in the expression: If the custom field stubbornly refuses to change, verify the In MailerLite: Make sure that ID matches what you put in the If n8n cannot talk to MailerLite at all, it is usually a credentials issue. This simple create-update-get pattern is like the “Hello world” of integrations. Once you are comfortable with it, you can start making it more powerful and more tailored to your real processes. Ideas for next steps: Before you know it, you will have a fully automated email list system that quietly keeps everything in sync while you focus on more interesting work than updating cities one by one. Ready to retire manual subscriber updates? If you want help tailoring this flow to your specific stack or use case, reach out or leave a comment. And if this guide helped you escape repetitive email list chores, consider subscribing for more n8n automation tutorials. Call-to-action: Ready to automate your email list? Import the workflow, connect MailerLite, and run it. If you liked this guide, subscribe for more n8n automation tutorials. Ever had an AI confidently say something like, “According to the document…” and then absolutely refuse to tell you which document it meant? That is what this workflow template fixes. With this n8n workflow, you can take the raw, slightly chaotic output from an OpenAI assistant that uses file retrieval, and turn it into clean, human-friendly citations. No more mystery file IDs, no more guessing which PDF your assistant was “definitely sure” about. Just clear filenames, optional links, and nicely formatted content your users can trust. This template gives you a structured, automated way to: In other words, it turns “assistant output with weird tokens and half-baked citations” into “polished, source-aware responses” without you manually clicking through logs like it is 2004. When you build Retrieval-Augmented Generation (RAG) systems with OpenAI assistants and vector stores, the assistant can pull in content from your files and attach internal citations. That is great in theory, but in practice you might see: Adding a post-processing step in n8n fixes that. With this workflow you can: Users get to see where information came from, and you get fewer “but which file did it use?” support messages. Everyone wins. Before you spin this up in n8n, make sure you have: Once that is in place, the rest is mostly wiring things together and letting automation do the repetitive work for you. Here is the overall journey your data takes inside n8n: The template uses a handful of core nodes to make this magic happen: The journey starts with the Chat Trigger node. A user types a message in your n8n chat UI, and that input is forwarded to the OpenAI Assistant node. Your assistant is configured to use a vector store, so it can fetch relevant file snippets and attach citation annotations. The initial response might include short excerpts plus internal references that point back to your files. The assistant’s immediate response is not always the full story. Some citation details live in the full thread history instead of the single message you just got. To get everything, you use an HTTP Request node to call: and you include this special header: This returns all message iterations and their annotations, so you can reliably extract the metadata you need for each citation. The Threads/Messages API response is nested. To avoid scrolling through JSON for the rest of your life, the workflow uses a series of SplitOut nodes to break it into manageable pieces: By the end of this step, you have one item per annotation or citation, ready to be resolved into something readable. Each citation usually includes a This returns the file metadata, including the filename. With that in hand, you can show something like project-plan.pdf instead of Once the file metadata is retrieved, a Set node cleans up each citation into a simple, consistent object with fields like: Then an Aggregate node merges all those citation objects into a single array. That way, the final formatting step can process every citation in one pass instead of juggling them individually. Now for the satisfying part. A Code node loops through all citations and replaces the raw annotated text in the assistant’s output with your preferred citation style, such as _(filename)_ or a Markdown link. Here is the example JavaScript used in the Code node: You can customize that replacement string. For instance, if you host files externally, you might generate Markdown links such as: Adjust the formatting to match your UI design and how prominently you want to display sources. If your chat frontend expects HTML instead of raw Markdown, you can finish with a Markdown node. It takes the Markdown-rich assistant output and converts it into HTML, ready to render in your UI. If your frontend already handles Markdown, or you prefer to keep responses as Markdown, you can simply deactivate this node. If you are resolving a lot of Some quick security reminders: Simple string replacement is convenient, but it can be a bit literal. If two citations share overlapping text, you might get unexpected substitutions. To reduce this risk: Depending on your frontend, you can experiment with different citation formats, for example: The workflow gives you the raw ingredients. How you present them is completely up to your UX preferences. Once the basic pipeline is running, you can take it further: By adding this citation processing pipeline to your n8n setup, you turn a basic RAG system into a much more transparent and reliable experience. The workflow retrieves full thread content, extracts annotations, resolves file IDs to filenames, and replaces raw tokens with readable citations or links. You can drop the provided JavaScript snippet into your n8n Code node and tweak the formatting to output Markdown links or HTML. From there, it is easy to layer on caching, numbering, or more detailed provenance data as your use case evolves. If you are tired of hunting through JSON to figure out which file your assistant used, this workflow template is for you. Spin it up in your n8n instance, connect it to your assistant, and enjoy the relief of automated, clear citations. If you need a customized version for your dataset, or want help adding caching and numbering, feel free to reach out for a consultation or share your requirements in the comments. This guide walks you through an n8n workflow template that adds clear, file-based citations to answers generated by an OpenAI Assistant that uses file retrieval or a vector store. You will learn how to extract citation metadata from OpenAI, turn file IDs into readable filenames, and format the final response as Markdown or HTML for reliable Retrieval-Augmented Generation (RAG). By the end of this tutorial, you will be able to: Retrieval-Augmented Generation combines a language model with a vector store of documents. The model retrieves relevant content from your files and then generates an answer based on those snippets. Out of the box, the assistant may know which files and text fragments it used, but the user often only sees a plain natural language answer. It may be unclear: Adding structured citations solves this. It improves: In this setup, your OpenAI Assistant is connected to a set of uploaded files. When a user asks a question, the assistant: OpenAI assistants work with threads. A thread contains all the messages exchanged between the user and the assistant. The assistant’s summarized reply that you see in n8n may not include all the raw annotation data, so you typically need to: An annotation contains a This tutorial is based on an n8n workflow that follows this high-level flow: Start with a Chat Trigger node. This node creates a chat interface inside n8n where users can type questions. When the user submits a message: Next, add an OpenAI Assistant node that is configured with your vector store (file retrieval). This node: At this point, you have a usable answer, but the raw response might not fully expose all the annotation details that you need for robust citations. To get all the citation metadata, you should retrieve the complete thread from OpenAI. Use an HTTP Request node that: This step is important because the assistant’s immediate reply may omit some annotation payloads. Working with the full thread ensures you do not miss any citation data. Once you have the full thread, you need to extract the annotations from each message. In n8n you can: Each annotation typically contains fields like: Now that you have a list of annotations with Different messages may reference the same file or multiple fragments from that file. To make formatting easier: At this stage you have: The last main step is to inject citations into the assistant’s answer. You typically do this in an n8n Code node and optionally follow it with a Markdown node if you want HTML output. Common formatting options include: The following JavaScript example shows how a Code node can replace annotated text segments in the assistant’s output with inline filename references. It assumes: This logic walks through each citation, finds the corresponding text in the assistant response, and appends an inline reference such as If you prefer numbered citations, you can extend the logic. The idea is to: In a real implementation, you would perform the string replacements in the answer text and then build a block such as: Depending on your front end, you can adjust the final citation style. Here are some options: Do not rely only on the immediate assistant reply. Make a separate request for the full thread messages so you have all annotation payloads needed to resolve citations accurately. Annotation text may include variations in whitespace or punctuation. To avoid incorrect replacements: The same file or fragment can appear multiple times in an answer. To keep citations tidy: Short text fragments can accidentally match unrelated parts of the answer if you use a simple Citations expose details about your source files, so treat them with care: You have seen how to build an n8n workflow that: By 9:30 a.m., Lina already had a headache. Her manager had just dropped a list of 120 URLs into her inbox with a cheerful note: “Need titles, meta descriptions, summaries, and keyword patterns for all of these by tomorrow. Should help with our SEO roadmap.” Lina was an experienced SEO marketer, not a magician. She knew what this meant in practice: endless tab switching, copy pasting text into documents, scanning for patterns, and trying to guess which keywords actually mattered. She had done this routine manually before. It was slow, repetitive, and error prone. This time, she decided it had to be different. Lina opened the first few pages from the list. Each one had messy layouts, pop ups, navigation menus, footers, and cookie banners. The information she actually needed was buried in the main content. Doing this manually for 10 pages was annoying. For 120 pages it was a nightmare. She had used n8n before for simple automations like sending Slack alerts and syncing form submissions, so a thought crossed her mind: “What if I can turn this into an automated website analyzer?” Searching for “n8n website analyzer” led her to a reusable workflow template built around GPT‑4.1‑mini and Serper. It promised exactly what she needed: The more she read, the more it felt like this template was designed for people exactly like her: content teams, SEO specialists, and developers who needed fast, structured insights from web pages at scale. The workflow combined three main ingredients: Instead of manually reading every page, Lina could have an AI agent do the heavy lifting, then plug the results straight into her reporting stack. Before she trusted it with her 120 URLs, Lina wanted to understand how this n8n workflow actually worked. The template followed an AI agent pattern, with a few key nodes acting like parts of a small team. In other words, the workflow did not just “call GPT on a URL.” It followed a clear step by step process that made sense even to a non developer like Lina. Lina imported the template into her n8n instance and watched the nodes appear in the editor. It looked more complex than the simple automations she was used to, but the structure was logical. She started by importing the workflow JSON file. Once loaded, she checked: With the skeleton in place, it was time to give the analyzer access to real data. Without valid API keys, the workflow was just a nice diagram. Lina opened the credentials panel and configured two key integrations: Once saved, the red warning icons disappeared. The agent was ready to think and browse. Lina opened the Scrape Agent configuration and followed the logic. For each URL, the workflow would: This was exactly the workflow she had been doing manually, only now it could run across dozens or hundreds of pages without her supervision. When Lina clicked into the system prompt for the Scrape Agent, she realized how much power lived in a few paragraphs of instruction. The template already included a solid default prompt, but she wanted to understand the rules before trusting the n‑gram output. The core prompt guidelines focused on keeping the analysis clean and consistent: She kept those rules but added a few tweaks of her own, such as slightly adjusting the way summaries were phrased to match the tone her team preferred. The prompt became the contract between her expectations and the model’s behavior. With that in place, she felt confident enough to run a real test. To avoid surprises, Lina started with one URL from her list. She triggered the workflow manually inside n8n, watched the execution log, and waited for the result. The output arrived as a clean JSON object, similar to this structure: Everything she needed was there: title, meta description, summary, and structured keyword patterns. No more scanning paragraphs and guessing which phrases mattered. With the first success, Lina queued a handful of URLs. She used n8n’s execution view to monitor each run and confirm the outputs were consistent. Each small tweak improved the reliability of the analyzer. Soon, she felt ready to let it loose on the full list of 120 URLs. Once the core analyzer was stable, Lina started to see new possibilities. The template was not just a one off solution, it was a foundation she could extend as her needs evolved. Some of the URLs her team tracked were in different languages. She added a language detection step before the n‑gram extraction so that the workflow could: Next, she used GPT‑4.1‑mini not only to summarize, but also to score content based on: These scores helped her prioritize which pages needed urgent optimization and which were already performing well. Instead of exporting CSV files manually, Lina connected the workflow to her database. Each run now: What started as a one day emergency task turned into a sustainable system for ongoing content intelligence. As she scaled the analyzer, Lina knew she had to be careful. Scraping public content did not mean she could ignore ethics or legal considerations. She put a few safeguards in place: These steps kept the workflow aligned with both technical best practices and company policies. As the number of URLs grew, Lina became more conscious of API costs and performance. She made a few optimizations: With these adjustments, the workflow stayed fast and affordable even as her team expanded its coverage. By the end of the week, Lina had more than just a completed task list. She had built an internal Website Analyzer agent that her team could reuse for: Instead of spending hours on manual copy paste work, she could now focus on strategy, content ideas, and actual optimization. The tension that began her week had turned into a sense of control. If you recognize yourself in Lina’s story, you can follow a similar path in your own n8n instance. The template gives you a ready made AI agent that combines orchestration, web crawling, and LLM analysis into one reusable workflow. You do not have to start from scratch or build your own tooling layer. Start now: import the template, plug in your OpenAI and Serper credentials, and run your first test URL. From there, you can shape the analyzer around your own SEO, content, or data enrichment workflows.Auto-generate n8n Docs with Docsify & Mermaid
Auto-generate n8n Documentation with Docsify and Mermaid
Imagine never writing another boring workflow doc by hand
What this n8n + Docsify + Mermaid setup actually does
Key building blocks of the workflow
Docsify frontend: your lightweight docs site
summary.md) on the left for browsing.README.md and workflow-specific docs such as docs_{workflowId}.md.Mermaid diagrams: visual maps of your workflows
Auto-generation logic: docs that appear when you need them
Live Markdown editor: tweak docs in the browser
Optional LLM integration: let AI handle the wordy bits
How the workflow responds to docs requests
Docsify or a user requests a specific docs path, for example /docs_{workflowId}.
A webhook node checks which file or path is being requested and decides which branch of the workflow to run. It can serve:
The workflow looks in the configured project directory:
The workflow reads your workflow JSON and constructs a Mermaid flowchart string based on the nodes and their connections. This text is embedded into the Markdown so Docsify can render it as a diagram.
If enabled, the workflow calls a language model to produce:
When you use the editor and click Save, the content is written to disk in project_path. Future requests for that page read your saved Markdown instead of regenerating it.Configuration and deployment: set it up once, enjoy forever
Deployment notes
project_path. If that is not possible, you can adapt it to store files in object storage such as S3 and serve them from a static host.instance_url to the public URL and make sure CORS and host headers are configured correctly so Docsify links behave.
Security and maintenance: a few important caveats
Customization ideas to level up your docs workflow
Store the Markdown files in a Git repository and automatically commit on save. You can add a Git client step or another automation that commits and pushes changes so every doc edit is versioned.
Protect the editor and docs behind OAuth, an identity provider, or a reverse proxy. This lets you safely offer editing to internal users without opening it to the world.
Render more than just diagrams and descriptions:
Use n8n workflow tags to filter and generate focused documentation pages for specific teams, projects, or environments. For example, docs only for “billing” workflows or “marketing” automations.Troubleshooting common issues
Mermaid diagrams not rendering
HTML_headers snippet.Docsify preview looks broken or weird
HTML_headers. A missing or incorrect stylesheet can make everything look slightly cursed.basePath and related settings are correct so Docsify can find your Markdown files.Files are not being saved
project_path exists or can be created. The workflow includes a mkdir step to create the directory if it is missing.When this template is a perfect fit
Automate PRD Generation from Jira Epics with n8n
Automate PRD Generation from Jira Epics with n8n
From manual grind to meaningful work
Adopting an automation-first mindset
What this n8n template actually does
Step-by-step journey through the workflow
1. Starting with intention: Manual Trigger
2. Gathering raw materials: Querying Jira projects
HTTP Request/project/search endpoint to retrieve projects.
responseContainsNextURL with nextPage and isLast, or adapt to Jira’s startAt and total if necessary.
Code1 (merge values)3. Focusing on what matters: Filtering projects
If
4. Pulling in the real story: Fetching Jira epics
Jira Software
issuetype = EPIC and project = {{ $json.id }}summary, description, and any relevant custom fields.5. Structuring the data: Grouping epics by project
Code
epics array that includes summary and description.6. Turning data into narrative: AI Agent with OpenAI
AI Agent (LangChain/OpenAI)
7. Making it collaborative and permanent: Google Drive and S3
Google Drive and S3
createFromText node to convert text into a Google Doc.Key configuration tips for a smooth setup
responseContainsNextURL with nextPage and isLast.startAt and total pagination.
issuetype = Epic AND project = PROJECTKEY.
createFromText operation to generate a Google Doc from plain text.Security, compliance, and responsible automation
Troubleshooting and learning from failures
fields parameter includes description and any custom field IDs you need.
Extending the template as your workflow matures
Best practices for AI-generated PRDs
Pre-production checklist for a confident launch
Create, Update & Get MailerLite Subscriber with n8n
Create, Update & Get MailerLite Subscribers with n8n (So You Never Manually Copy Emails Again)
Why bother automating MailerLite with n8n?
What this n8n + MailerLite workflow actually does
city.
create, sets email and nameupdate, uses subscriberId from Node 1 to update a custom field like cityget, uses the same subscriberId to retrieve the updated recordGrab the n8n MailerLite template JSON
{  "id": "96",  "name": "Create, update and get a subscriber using the MailerLite node",  "nodes": [  { "name": "On clicking 'execute'", "type": "n8n-nodes-base.manualTrigger", "position": [310,300], "parameters": {} },  { "name": "MailerLite", "type": "n8n-nodes-base.mailerLite", "position": [510,300], "parameters": { "email": "harshil@n8n.io", "additionalFields": { "name": "Harshil" } }, "credentials": { "mailerLiteApi": "mailerlite" } },  { "name": "MailerLite1", "type": "n8n-nodes-base.mailerLite", "position": [710,300], "parameters": { "operation": "update", "subscriberId": "={{$node[\"MailerLite\"].json[\"email\"]}}", "updateFields": { "customFieldsUi": { "customFieldsValues": [ { "value": "Berlin", "fieldId": "city" } ] } } }, "credentials": { "mailerLiteApi": "mailerlite" } },  { "name": "MailerLite2", "type": "n8n-nodes-base.mailerLite", "position": [910,300], "parameters": { "operation": "get", "subscriberId": "={{$node[\"MailerLite\"].json[\"email\"]}}" }, "credentials": { "mailerLiteApi": "mailerlite" } }  ],  "connections": {  "MailerLite": { "main": [ [ { "node": "MailerLite1", "type": "main", "index": 0 } ] ] },  "MailerLite1": { "main": [ [ { "node": "MailerLite2", "type": "main", "index": 0 } ] ] },  "On clicking 'execute'": { "main": [ [ { "node": "MailerLite", "type": "main", "index": 0 } ] ] }  }
}
Quick setup guide: from zero to automated subscriber
Step 1 – Add a Manual Trigger
Step 2 – Create the MailerLite subscriber
email: harshil@n8n.ioname: HarshilStep 3 – Update the subscriber’s custom field
{{$node["MailerLite"].json["email"]}}
value: "Berlin"
fieldId: "city"
city to Berlin.” No more manual profile editing.Step 4 – Get the subscriber to confirm the update
{{$node["MailerLite"].json["email"]}}
city custom field, now proudly set to Berlin.Testing your MailerLite automation workflow
city) was updatedget operation returns the updated dataBest practices for MailerLite automation in n8n
MailerLite lets you use the email as an identifier for many operations. This keeps things simple, especially in smaller workflows where you do not want to track multiple IDs.
If your create operation might run for an email that already exists, decide how you want to handle it:
Custom fields in MailerLite use specific IDs or keys. The example uses city, but in your account it might be different. Open your MailerLite settings to confirm the correct fieldId before wondering why nothing updates.
For real-world workflows, add a Catch node or use the “Execute Workflow on Error” pattern. This lets you log failures, retry operations, or send yourself a warning when MailerLite is not in the mood.
If you are working with large lists, keep MailerLite’s rate limits in mind. Use n8n’s HTTP Request node options or node settings to add delays or exponential backoff so your workflow plays nicely with the API.Common issues and how to fix them
Problem 1 – “Subscriber not found” on update or get
subscriberId value.
={{$node["MailerLite"].json["email"].trim()}}
Problem 2 – Custom field not updating
fieldId or key is correct.
customFieldsValues configuration in n8n.Problem 3 – Authentication or API errors
Where to go next with this workflow
Try the MailerLite n8n template now
OpenAI Citations for File Retrieval in n8n
OpenAI Citations for File Retrieval in n8n
What this n8n workflow actually does
file_id values to nice, readable filenamesWhy bother with explicit citations in RAG workflows?
What you need before you start
High-level workflow overview
file_id to a human-readable filenameMain n8n nodes involved
file_id into a filename.id, filename, and text.Step-by-step: how the template workflow runs
1. User sends a message and the assistant replies
2. Fetch the full thread content from OpenAI
GET /v1/threads/{threadId}/messagesOpenAI-Beta: assistants=v23. Split messages, content blocks, and annotations
content.text.annotations4. Turn file IDs into filenames
file_id. That is great for APIs, not so great for humans. To translate, the workflow uses another HTTP Request node to call the Files API:GET /v1/files/{file_id}file-abc123xyz. You can also use this metadata to construct links to your file hosting layer if needed.5. Regularize and aggregate all citations
idfilenametext (the snippet or text in the assistant output that was annotated)6. Replace raw text with formatted citations
// Example Code node JavaScript (n8n)
let saida = $('OpenAI Assistant with Vector Store').item.json.output;

for (let i of $input.item.json.data) {  saida = saida.replaceAll(i.text, "  _("+ i.filename+")_  ");
}

$input.item.json.output = saida;
return $input.item;
[filename](https://your-file-hosting.com/files/{file_id})7. Optional: convert Markdown to HTML
Tips, best practices, and common “why is this doing that” moments
Rate limits and batching
file_id values one by one, you may run into OpenAI rate limits. To keep things smooth:
Security and access control
Dealing with ambiguous or overlapping text matches
Formatting styles that work well in UIs
Ideas for extending this workflow
[1], [2], etc.Quick troubleshooting checklist
file_id is correct and that the file belongs to your OpenAI account.Wrapping up
Try the template in your own n8n instance
OpenAI Citations for File Retrieval (RAG)
OpenAI Citations for File Retrieval (RAG)
What you will learn
Why add citations to RAG responses?
Concepts you need to know first
OpenAI Assistant with vector store (file retrieval)
file_id – the OpenAI ID of the source file.text – the exact fragment extracted.Thread messages and annotations
content field.text.annotations.File metadata lookup
file_id, but users need something more readable, like a filename. To bridge that gap you:
file_id.filename.How the n8n workflow is structured
Step-by-step: building the citation workflow in n8n
Step 1 – Capture user questions with a Chat Trigger
Step 2 – Send the query to the OpenAI Assistant with vector store
file_id for each source file.text segments used in the answer.Step 3 – Retrieve the full thread content from OpenAI
Step 4 – Split and parse the thread messages
content structure.text.annotations.
file_id – the OpenAI file identifier.text – the snippet extracted from the file.Step 5 – Look up file metadata from the OpenAI Files API
file_id values, the next step is to turn those IDs into human-friendly filenames. For each annotation:
file_id.filename.Step 6 – Normalize and aggregate citation data
{ id, filename, text }.
Step 7 – Format the final output with citations
(source: filename).[1], with a reference list at the end.Example n8n Code node: simple inline citations
$('OpenAI Assistant with Vector Store').item.json.output.$input.item.json.data, where each entry has text and filename.// Example n8n JS (Code node)
let saida = $('OpenAI Assistant with Vector Store').item.json.output;
for (let i of $input.item.json.data) { // replace the raw text with a filename citation (Markdown-style) saida = saida.replaceAll(i.text, ` _(${i.filename})_ `);
}
$input.item.json.output = saida;
return $input.item;
_(my-file.pdf)_. Example: numbered citations and reference list
file_id.[1] or [2].// Pseudocode to create numbered citations
const citations = {};
let idx = 1;
for (const c of $input.item.json.data) { if (!citations[c.file_id]) { citations[c.file_id] = { index: idx++, filename: c.filename }; } // replace c.text with `[${citations[c.file_id].index}]` or similar
}
// append a formatted reference list based on citations
[1] my-file-1.pdf
[2] another-source.docx
Formatting choices for your UI
(source: filename) if you want minimal changes to the answer structure.[filename](https://.../file-id).Best practices for reliable citations
1) Always retrieve the complete thread
2) Normalize text before replacement
3) Deduplicate repeated citations
file_id.4) Handle partial and ambiguous matches
replaceAll. To reduce this risk:
Troubleshooting common issues
file_id actually exists in the assistant’s vector store and that you are querying the correct project or environment.replaceAll to offset-based replacements or more precise string handling.Security and privacy considerations
Recap and next steps
n8n Website Analyzer with GPT-4 & Serper
How a Stressed SEO Marketer Turned n8n, GPT‑4.1, and Serper Into a Website Analyzer Superpower
The breaking point: when manual analysis stops scaling
The discovery: an n8n Website Analyzer template
Inside the “Website Analyzer” brain
The core nodes Lina met along the way
The rising action: turning a template into her personal analyzer
Step 1 – Bringing the template into n8n
Step 2 – Wiring up GPT‑4.1‑mini and Serper credentials
Step 3 – Understanding the agent’s step by step behavior
The turning point: crafting the perfect prompt
First run: from a single URL to a reliable JSON payload
{  "url": "https://example.com/page",  "title": "Example Page Title",  "meta_description": "Short meta description or generated summary",  "summary": "2-3 sentence summary",  "n_grams": {  "unigram": ["word1", "word2", "word3"],  "bigram": ["word1 word2", "word2 word3"],  "trigram": ["word1 word2 word3"]  }
}
Scaling up: testing, iterating, and debugging like a pro
Iterating on the workflow
Beyond the basics: extending the Website Analyzer
Language detection and smarter n‑grams
Content scoring and SEO strength
Storage, dashboards, and long term insights
Staying responsible: ethics, legality, and best practices
robots.txt and site terms before adding a domain to her automated runs.Performance and cost: keeping the analyzer lean
What changed for Lina and her team
Your turn: building your own n8n Website Analyzer