On a cold Tuesday evening, Alex stared at their phone, thumb hovering over the Twitter (X) app. Another 10K run logged in Strava, another manual post to write, another few minutes spent formatting distance, time, and a half-hearted caption.
It was not the writing that bothered Alex. It was the repetition. Every run, every ride, every swim followed the same pattern: open Strava, check stats, open Twitter, type the same style of message, add a hashtag or two, hit publish. On busy weeks, Alex simply stopped sharing workouts altogether.
As a data-loving runner and part-time marketer, Alex wanted something better: a consistent, automatic way to share Strava activities on Twitter without thinking about it every time. That search led them to n8n and a simple Strava to Twitter automation template that quietly changed their routine.
The problem: manual sharing and inconsistent updates
Alex’s goals were straightforward:
Stop manually posting every single workout
Share consistent, polished messages that included key stats like distance and time
Optionally drop in hashtags, team mentions, or branded phrases without retyping them
Yet every time Alex tried to stay consistent, life got in the way. Some workouts never made it to Twitter at all. Others had messy formatting or missing metrics. The whole process felt fragile and time consuming.
As someone already experimenting with automation, Alex wondered: “Could n8n listen for new Strava activities and tweet for me automatically?”
The discovery: a tiny n8n workflow with a big impact
During a late-night search for automation ideas, Alex came across an n8n workflow template: a Strava to Twitter integration that promised to post new activities automatically.
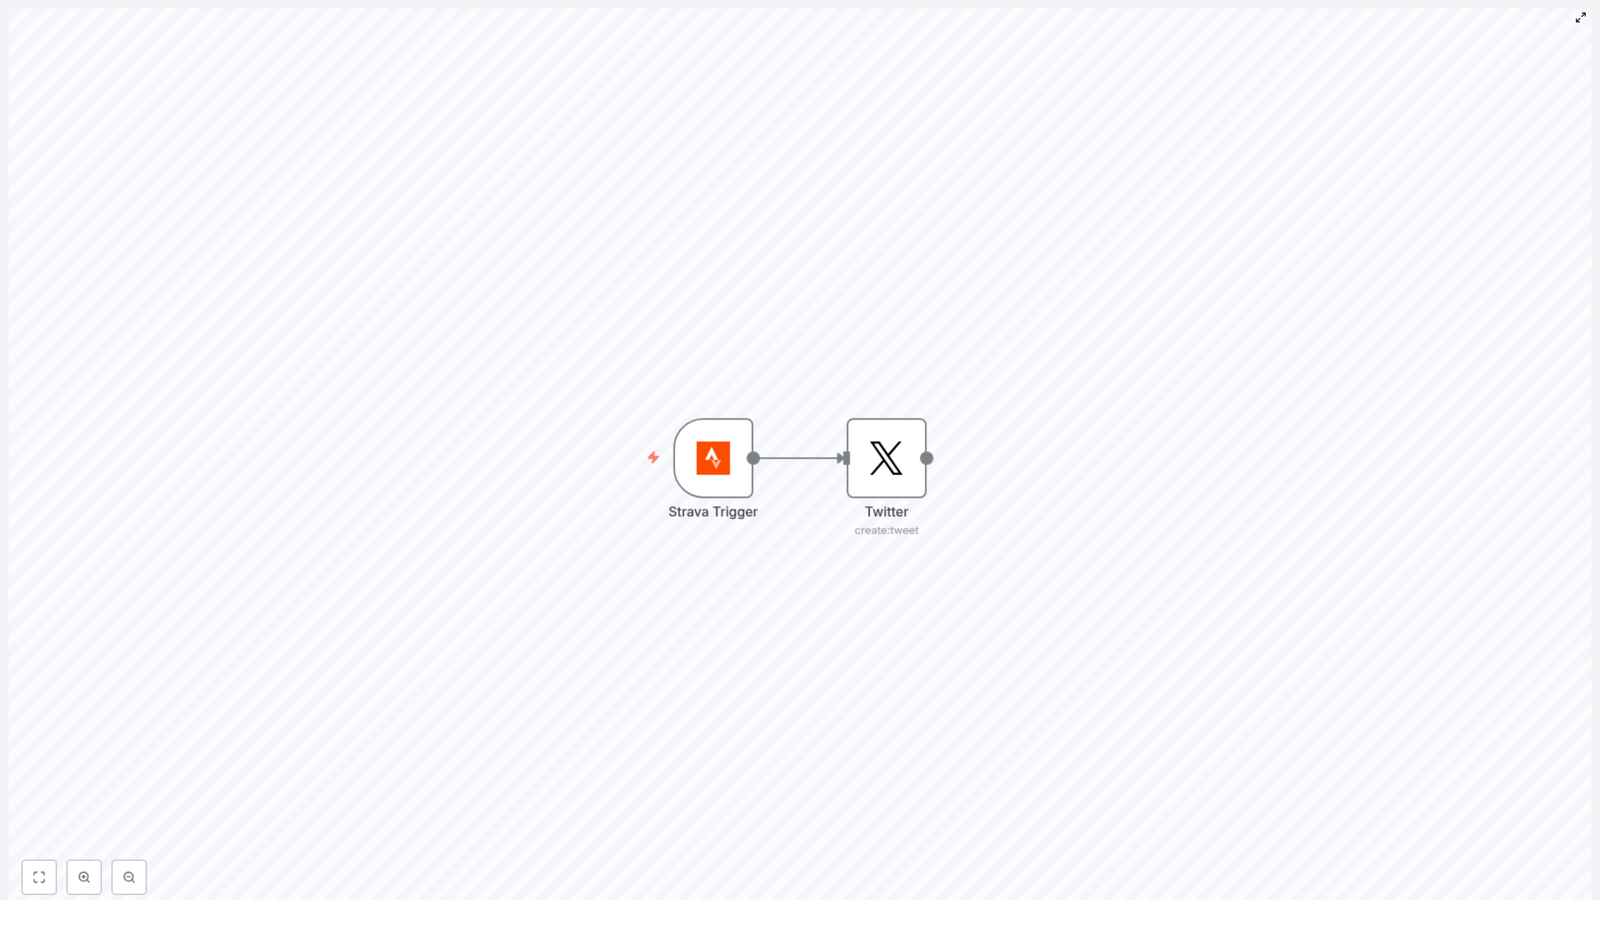
The idea was surprisingly simple. The entire workflow relied on just two nodes:
Strava Trigger – listens for new Strava activities via webhooks
Twitter (create:tweet) – posts a tweet using the data from that activity
In Alex’s mind, this looked like a tiny assembly line. Strava would send a webhook when a new workout was created, the Strava Trigger node would catch it, and the Twitter node would format a tweet and publish it right away. No more copy-pasting stats. No more forgetting to post after a long run.
There was only one question left: could Alex actually get it set up?
Setting the stage: accounts, keys, and credentials
Before the real magic could happen, Alex needed the basic pieces in place. If you follow along with their story, you will need the same prerequisites:
An n8n instance, whether desktop, cloud, or self-hosted
A Strava account and a Strava API application for webhooks or OAuth
A Twitter (X) developer account with API keys, usually OAuth 1.0a credentials for n8n
Basic familiarity with how n8n nodes and expressions work
Alex already had an n8n instance running and both Strava and Twitter accounts in use. The missing piece was the developer setup, which became the first step in the journey.
Rising action: Alex builds the workflow
Creating the Strava application
Alex headed to the Strava developer portal and registered a new application. The portal returned a Client ID and Client Secret, which would be necessary to authenticate n8n and subscribe to Strava activity events.
Those credentials felt like a key to a locked door. With them, n8n could now “speak” to Strava and receive notifications whenever Alex completed a workout.
Wiring the Strava Trigger node
Inside the n8n editor, Alex added the first piece of the automation: the Strava Trigger node.
They configured it to listen for new activities:
Event: create
Object: activity
Next, Alex connected their Strava OAuth2 credentials to the node using n8n’s credential manager. Once saved, the node was ready to receive data whenever Strava sent a webhook.
Strava’s webhook payload would arrive in a field called object_data, containing details like:
distance in meters
name of the activity
moving_time and other metrics
For the first time, Alex could see the structure of their workouts in raw JSON. It was a bit intimidating, but it also meant complete control over what the future tweet would say.
Designing the tweet with the Twitter node
With the trigger in place, Alex added the second and final node: Twitter (create:tweet). This node was connected directly to the Strava Trigger, forming a simple two-node chain.
The key step was to build a tweet text that used values from the Strava payload. In the Twitter node’s text field, Alex used an n8n expression similar to this:
=`I ran ${Math.round($node["Strava Trigger"].json["object_data"]["distance"] / 100)/10} km and completed my ${$node["Strava Trigger"].json["object_data"]["name"]}! #Strava`
A few important details immediately stood out to Alex:
Strava reports distance in meters, so the expression divided by 1000 (via a simple transformation) and rounded to one decimal place.
The activity name came directly from object_data["name"], making each tweet feel personal and specific.
Hashtags like #Strava could be customized or expanded with mentions, team tags, or branded phrases.
With this expression, Alex no longer had to think about formatting. Every time Strava sent a new activity, the tweet text would be built automatically using the latest data.
Authenticating Twitter securely
The last configuration step was to give n8n permission to post tweets on Alex’s behalf. In the Twitter node, Alex added their Twitter OAuth1 credentials through n8n’s credential manager.
Instead of storing keys in plain text, n8n kept them encrypted and reusable across workflows. That added a layer of security and made Alex feel more comfortable letting an automation access their Twitter account.
The turning point: the first automated tweet
With the workflow active, Alex did what any curious runner would do: they went for a test run.
Back home, sweaty and curious, Alex opened Strava and saved the activity. Within moments, the n8n workflow received the webhook. The Strava Trigger node passed the payload to the Twitter node, which evaluated the expression and sent off a formatted tweet.
When Alex refreshed their Twitter feed, there it was:
I ran 10.3 km and completed my Evening Run! #Strava
No manual typing, no copy-paste, no delay. The automation had quietly done the work in the background.
Under the hood: the n8n workflow JSON
Curious to understand how everything fit together, Alex examined the minimal workflow JSON that powered this automation. If you want to replicate the same setup, you can import a similar JSON into your own n8n instance and adjust the credentials:
Alex used this as a starting point, then refined the expression to convert meters to kilometers and tweak the copy. The structure, however, remained the same: a Strava Trigger node wired directly to a Twitter node.
When things go wrong: Alex’s troubleshooting journey
Of course, not everything worked perfectly on the first try. Along the way, Alex ran into a few common issues and learned how to fix them.
No trigger events arriving The workflow sat idle after a workout. Alex discovered that the Strava webhook subscription needed to be active and that the webhookId in the Strava app had to match the n8n endpoint. Once updated, events started flowing again.
Tweet failing silently When a test tweet did not appear, Alex checked the Twitter node logs. The root cause turned out to be invalid or outdated Twitter credentials. After updating OAuth1 keys and checking rate limits and tweet length, the node worked reliably.
Strange or incorrect values in the tweet At one point, the tweet showed raw meters without conversion. To debug, Alex inserted a Function node between Strava Trigger and Twitter, logging the full object_data payload. This made it easier to see which fields were available and how to reference them correctly.
Security, privacy, and what Alex chose to share
As the automation became part of Alex’s daily training, a new question appeared: “What am I actually sharing with the world?”
Strava activities can include location data and map information. Alex did not always want to reveal exact routes or home addresses. To stay safe, they decided to:
Exclude any map URLs or GPS-based fields from the tweet text
Use n8n’s credential manager to store OAuth tokens securely
Limit access to the n8n instance to trusted users only
With these safeguards in place, the automation highlighted performance stats without exposing sensitive details.
Leveling up: how Alex customized the workflow
Once the basic Strava to Twitter automation was running smoothly, Alex started to see new possibilities. The original two-node flow became a foundation for more advanced customizations.
Filtering which activities get posted
Not every workout needed to be public. Recovery jogs and short commutes could stay private. Alex added a Filter node between Strava Trigger and Twitter to enforce simple rules, such as:
Only tweet runs or rides above a certain distance
Exclude specific activity types like “Commute”
Use tags or metadata to decide what should be shared
Adding photos and richer content
To make tweets more engaging, Alex experimented with attaching images. They used an HTTP Request node to call Strava’s API for detailed activity data and photos, then configured the Twitter node to upload those images alongside the text.
This small enhancement made the feed more visual and increased engagement from followers.
Scheduling and pacing tweets
On race days or heavy training weeks, Alex preferred not to flood followers with multiple posts in a short time. To handle this, they tested queueing tweets through tools like Buffer or by adding scheduling logic inside n8n.
Instead of posting instantly, some tweets were delayed or batched, creating a more balanced presence on Twitter.
Refining metrics for storytelling
As a data enthusiast, Alex could not resist improving how metrics appeared in tweets. They adjusted expressions to format pace, moving time, and distances in a more readable way, turning raw numbers into friendly, shareable stats.
Best practices Alex learned along the way
After several weeks of running this Strava to Twitter automation in n8n, Alex had a short list of best practices to keep things smooth and follower friendly:
Limit auto-posting frequency so your feed does not feel like spam
Use consistent templates and hashtags so your posts are recognizable
Test thoroughly with a private or test Twitter account before going live
Review Strava privacy settings and tweet content to avoid oversharing
The resolution: automation as a quiet training partner
Weeks later, Alex noticed something subtle but important. Training logs on Strava and posts on Twitter were finally in sync. Every meaningful run or ride appeared on Twitter with clean formatting, accurate stats, and on-brand hashtags.
The workflow itself remained tiny: just a Strava Trigger node and a Twitter node, with optional filters and enhancements layered on top. Yet the impact on Alex’s routine was huge. No more forgotten race recaps, no more rushed posts after long runs, and more time to focus on training instead of typing.
If you want to follow the same path as Alex, you can:
Import the template JSON into your n8n instance
Connect your Strava and Twitter credentials through the credential manager
Customize the tweet expression, filters, and any extra nodes you need
Enable the workflow and let your next workout be the first automated test
From that point on, your n8n workflow becomes a silent partner, turning every new Strava activity into a polished tweet without you lifting a finger.
Call to action: Import the template, enable the workflow, and share one of your automated tweets. Tag us or subscribe if you want more n8n automation stories and templates.
How a Tired Analyst Turned TV Ratings Chaos Into an Automated Trend Report With n8n & LangChain
The night everything broke
By the time Mia hit “send” on the last TV rating report of the day, it was already 11:42 p.m.
She stared at the spreadsheet on her screen, eyes blurring over columns of ratings, shares, timestamps, and notes from a dozen regions. Programming directors were waiting on her trend summary for the flagship show, Evening News, and she had just noticed a possible spike during a special election segment. To confirm it, she had to:
Dig through old CSV files
Search emails for past anomalies
Manually copy-paste numbers into a Google Sheet
Try to remember if they had seen something similar a few months ago
Every step was manual, slow, and fragile. One wrong paste or missed filter, and her report could be off. Worse, she knew that by the time she sent it, the data was already stale.
That night, after yet another last-minute request for “a quick week-over-week comparison,” Mia closed her laptop and thought, This has to be automated. There has to be a better way to build TV rating trend reports.
The search for a smarter TV rating workflow
The next morning, Mia wrote down what her ideal system would do. If she could redesign her workflow from scratch, it would:
Ingest TV rating data in real time, without manual uploads
Understand the meaning of notes and segments, not just numbers
Find similar past events automatically, instead of forcing her to remember dates
Summarize trends and anomalies in plain language
Log everything neatly into Google Sheets for stakeholders
In other words, she wanted a pipeline that could turn raw TV rating events into actionable, contextual trend reports, with as little human effort as possible.
While researching workflow automation, she stumbled across an n8n workflow template titled “TV Rating Trend Report”, built with n8n + LangChain. The description sounded almost exactly like the system she had just described on paper.
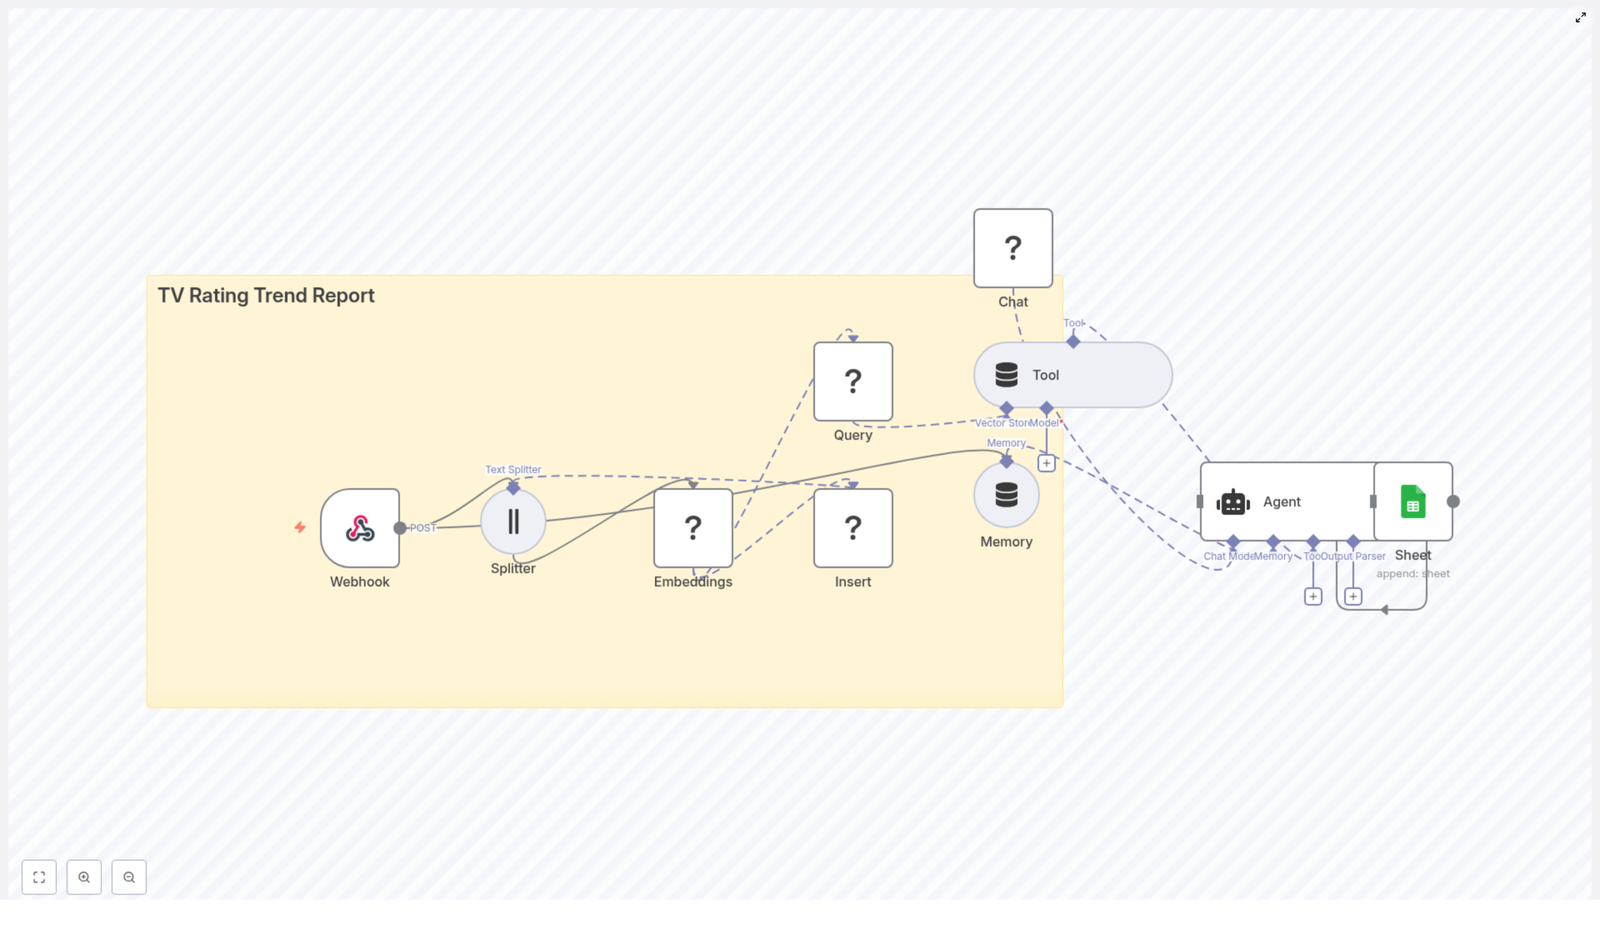
Discovering the n8n TV rating trend report template
The template promised an automated pipeline that would:
Use a webhook to ingest TV rating data in real time
Split long notes into manageable chunks with a Text Splitter
Create Hugging Face embeddings for semantic search
Store vectors in a Redis vector store for similarity queries
Use a memory buffer and LangChain-style agent to generate context-aware insights
Automatically write final trend summaries to Google Sheets
It was not just a script. It was a full workflow that could take her from an incoming rating event to a structured, contextualized trend report, without manual intervention.
Mia decided to try it with a small pilot: one week of data for Evening News.
Rising action: wiring the pipeline together
Step 1: Giving the data somewhere to land – the webhook
The first thing Mia needed was a way to get her TV monitoring system to talk to n8n. The template started with a Webhook node, configured to accept POST requests.
She set up the webhook in n8n and pointed her rating system to send payloads like this:
Now, every time a new rating event arrived, n8n would catch it instantly. No more CSV exports, no more drag-and-drop uploads.
Step 2: Teaching the system to read long notes
Mia knew that the real story often lived in the notes field. “Special segment on elections,” “guest appearance from celebrity anchor,” “breaking weather alert” – those were the details that explained spikes and dips.
The template used a Text Splitter node to handle long notes or combined reports. It was configured as a character-based splitter with:
chunkSize: 400
chunkOverlap: 40
That meant if a note or narrative ran long, it would be broken into overlapping chunks of about 400 characters, with 40 characters of overlap to preserve context. For Mia’s medium-length notes, it was a sensible starting point.
She made a small mental note: if her notes ever got very short, she could reduce the overlap to save storage. And if she ever started sending structured JSON, she could serialize only the human-readable parts for embeddings.
Step 3: Turning words into vectors with Hugging Face embeddings
Next, the template attached an Embeddings node powered by Hugging Face. This was where the magic of semantic search began.
The node took each text chunk and converted it into a vector embedding, a numeric representation of meaning. With the right model, the system could later ask questions like “show me events similar to this spike” and retrieve relevant past episodes, even if the wording was different.
In the template, the model was set to default. Mia updated her n8n credentials to reference a specific Hugging Face model from the sentence-transformers family, which is commonly used for semantic search. That gave her more predictable quality and relevance.
Step 4: Storing history in Redis for similarity search
Embeddings were useful only if she could store and query them efficiently. The template used a Redis vector store, with an index called:
tv_rating_trend_report
Each time a new chunk arrived, the workflow would:
Insert the vector into Redis
Attach metadata such as show title, timestamp, rating, and region
This metadata was crucial. It meant Mia could later filter queries like:
“Find similar events for this show in the last 7 days”
“Retrieve anomalies for the Metro region only”
Her raw rating events were slowly turning into a searchable memory.
Step 5: Letting the agent look up context on demand
Once the data was flowing into Redis, Mia needed a way for the system to use it when generating reports. The template included a Query (Redis) node wrapped as a Tool.
When it was time to build a trend report, the agent could call this tool to:
Fetch top-k similar chunks for a given show or time period
Retrieve relevant past spikes, dips, or anomalies
Because the vector store was exposed as a tool, the agent could decide when to run a similarity search during its reasoning process. The logic stayed modular and transparent, and Mia could later inspect which context had been retrieved.
Step 6: Giving the workflow a memory and a voice
To make the analysis feel less like isolated snapshots and more like a continuous narrative, the template added two more pieces:
A Memory (Buffer Window) node to keep recent interactions and summaries
An Agent (LangChain-style) node connected to a chat model, the Tool, and the Memory
The memory buffer allowed the agent to remember what it had recently said about a show or a time period, instead of treating each report as a blank slate. The agent could then synthesize:
Week-over-week changes
Notable spikes and dips
Context-aware commentary that referenced past events
Mia shaped the agent prompt using a simple pattern. She made sure it always received:
The retrieval results (most similar chunks from Redis)
Current metrics like rating and share
Relevant memory or conversation context
Her prompt looked similar to this:
Analyze the current rating data and the retrieved historical context. Provide a one-paragraph trend summary and list any significant anomalies with probable causes.
It was concise, but clear about expectations: a short trend summary plus a list of anomalies and likely explanations.
Step 7: Sending everything where stakeholders actually live – Google Sheets
Finally, the agent needed somewhere to write its findings. Mia’s team relied heavily on a shared Google Sheet, where programming directors checked daily performance.
The workflow ended with a Google Sheets node that appended a new row to a sheet named Log. The agent was configured to output a structured set of fields, which mapped to columns like:
date
show
aggregated_rating
trend_summary
notes
link_to_record
For a payload like this:
{  "show": "Evening News",  "timestamp": "2025-09-25T20:00:00Z",  "rating": 3.8,  "share": 12.4,  "region": "Metro",  "notes": "Special segment on elections; high engagement on social"
}
She expected to see a row similar to:
[2025-09-25, Evening News, 3.8, +0.4 (wk), "Spike during special segment; similar to 2025-06-12 episode", link_to_record]
For the first time, the spreadsheet would update itself with both numbers and narrative.
The turning point: from manual grind to automated insight
A few days into her pilot, Mia watched the workflow run on a real spike.
There had been a special segment on elections during Evening News. Ratings ticked up, social engagement surged, and the monitoring system fired its usual payload into n8n.
Behind the scenes, the data flowed:
The Webhook caught the POST request.
The Text Splitter chunked the notes, using chunkSize=400 and chunkOverlap=40.
The Embeddings (Hugging Face) node turned chunks into vectors.
The Insert (Redis Vector Store) node stored them with metadata under tv_rating_trend_report.
When it was time to generate the report, the Query (Redis) + Tool retrieved similar past events.
The Memory (Buffer Window) added recent context.
The Agent pulled everything together into a trend summary.
The Google Sheets node appended the final report to the Log sheet.
By the time Mia opened the Google Sheet, the row was already there. The trend summary mentioned a spike similar to one during a past election episode, highlighted the week-over-week increase, and pointed to likely causes.
There were no frantic searches through old files, no late-night spreadsheet edits, and no guesswork about whether a spike was truly unusual.
Behind the scenes: tuning and best practices Mia learned
Choosing the right embedding model
Mia noticed early on that the quality of semantic search depended heavily on the embedding model. For broadcast text and short notes, she found that models from the sentence-transformers family, or other models optimized for semantic search, delivered more relevant similarity results than generic models.
By explicitly setting a model in her Hugging Face credentials instead of relying on the default, she kept the quality consistent across runs.
Adjusting chunk size and overlap
The default chunkSize=400 with chunkOverlap=40 worked well at first, but Mia experimented:
When she saw some loss of context between chunks, she tried increasing overlap slightly.
When storage costs grew due to very frequent events, she considered reducing chunk size or filtering out low-value notes.
She kept the rule simple: if the agent seemed to miss important context, increase overlap. If the vector store grew too large or expensive, reduce chunk size or be selective about what got embedded.
Making metadata do the heavy lifting
Early on, Mia realized that good metadata was not optional. Every vector insert into Redis included:
show
region
rating
timestamp
With those fields, she could run filtered queries like “same show, last 7 days” or “same region, similar notes.” Retrieval quality improved dramatically once she combined vector similarity with basic metadata filters.
Keeping credentials safe
Mia also took care to secure her integrations. Inside n8n, she stored:
Hugging Face API keys
Redis credentials
Google Sheets OAuth tokens
All were kept in n8n’s credentials manager, with least-privilege access and periodic key rotation. It was a small step that avoided big security headaches later.
Building resilience with error handling and monitoring
As the workflow moved toward production, Mia added guardrails:
Retry logic for transient network issues and rate limits
Error handlers for failed Google Sheets appends
Monitoring for webhook latency and queue sizes
If a single step failed, the entire reporting process would not silently break. She could see what went wrong and fix it quickly.
Scaling up: from one show to the entire schedule
Once the pilot for Evening News ran smoothly, Mia expanded the workflow to cover more shows. As volumes increased, she learned a few tricks to control cost and keep performance stable.
Handling large volumes of rating events
For high-traffic schedules, Mia:
Used batch inserts into Redis instead of writing every event individually
Applied a cheaper embedding model for routine data, reserving a higher-quality model for anomalies or priority shows
Periodically archived or downsampled old vectors, especially for periods where fine-grained history was less critical
The result was a scalable vector store that did not balloon uncontrollably.
Real-world ways Mia used the workflow
Over the next few weeks, the “TV Rating Trend Report” workflow became part of Mia’s daily toolbox. Some practical use cases emerged:
Daily trend summaries automatically written to a Google Sheet and emailed to programming directors
Alerting logic when a show’s rating jumped by more than a set percentage week over week
Semantic search across past episodes to find similar spikes or dips for editorial analysis
Stakeholder-facing logs that updated themselves, with both numbers and narrative
What used to be late-night manual work turned into a mostly hands-off system that surfaced insights on its own.
Troubleshooting: the bumps along the way
Not everything worked perfectly from day one. Mia ran into a few issues and learned how to fix them:
Irrelevant retrieval results She checked whether metadata filters were set correctly and whether her embedding model was a good fit for short broadcast notes. Adjusting filters and upgrading the model improved relevance.
Agent hallucinations When the agent occasionally inferred events that did not happen, she increased the
n8n Template Reference: Add Google Drive File to Supabase Vector DB with OpenAI Embeddings
This documentation-style guide describes a production-ready n8n workflow template that ingests a document from Google Drive, extracts its textual content, generates OpenAI embeddings, and writes the resulting vectors and metadata into a Supabase vector table. It is intended for technical users who want a reliable, repeatable ingestion pipeline for knowledge retrieval, RAG/chatbots, and enterprise semantic search.
1. Workflow Overview
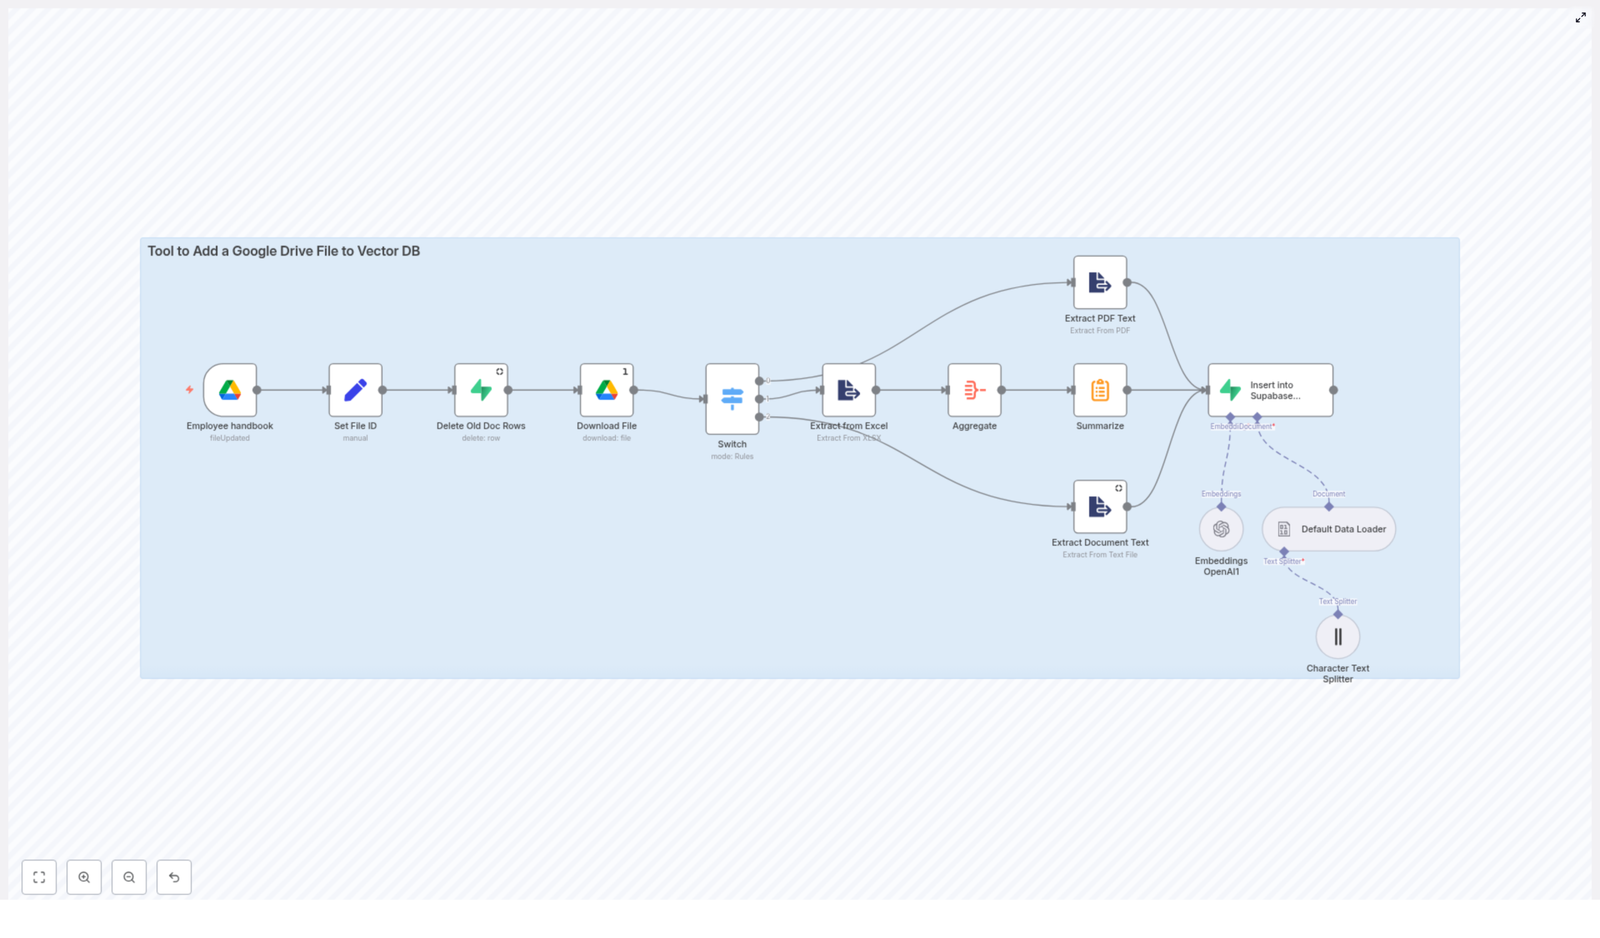
The template implements an end-to-end ingestion pipeline that:
Watches a specific Google Drive file or folder for changes
Downloads the updated file and normalizes metadata
Deletes any previous vector records for that file in Supabase
Performs file-type-specific text extraction (Google Docs, PDF, Excel, text)
Aggregates and optionally summarizes long content
Splits the text into embedding-friendly chunks
Generates embeddings using an OpenAI model
Persists vectors and metadata into a Supabase vector table
The flow is linear with a single entry trigger and a single write operation into Supabase, and it is designed to be idempotent at the file level by removing old rows before inserting new ones.
2. Architecture & Data Flow
2.1 High-level sequence
Trigger: A Google Drive Trigger node fires on file updates.
Normalization: A Set node standardizes the file ID and MIME type.
Cleanup: A Supabase node removes prior vectors for the same file.
Acquisition: A Google Drive node downloads the file content.
Routing: A Switch node routes execution based on MIME type.
Extraction: Format-specific nodes extract raw text.
Aggregation & summarization: Text is aggregated and optionally summarized.
Chunking: A Character Text Splitter node breaks content into chunks.
Document construction: A Default Data Loader node builds document objects.
Embedding: An OpenAI Embeddings node generates vector representations.
Persistence: A Supabase node inserts vectors and metadata into a vector table.
2.2 Core technologies
n8n – Orchestration engine and workflow runtime.
Google Drive – Source of documents (Docs, PDFs, Excel, text files).
OpenAI – Provider of text embeddings (for example, text-embedding-3-small).
Supabase – Postgres with pgvector extension used as a vector database.
3. Node-by-node Breakdown
3.1 Google Drive Trigger (Employee handbook)
Role: Entry point for the workflow.
Behavior: Listens for updates to a file or folder in Google Drive and starts the workflow when a change is detected.
Trigger type:fileUpdated
Configuration:
Specify either a single fileId or a folderId.
Set polling frequency according to how quickly you need updates reflected in the vector store.
For deterministic behavior, target a specific file (for example, an “Employee handbook”) rather than a broad folder.
Output: Metadata about the updated file, including its ID and MIME type, which is consumed by downstream nodes.
3.2 Set File ID
Role: Normalize and expose key identifiers for later use.
Behavior: A Set node extracts and standardizes fields such as:
file_id – The canonical ID of the Google Drive file.
mimeType – The MIME type reported by Google Drive.
These fields are stored as workflow variables and referenced throughout the pipeline, especially for routing logic and for metadata written to Supabase.
3.3 Delete Old Doc Rows (Supabase)
Role: Ensure that each file has a single, current set of vectors in Supabase.
Behavior: This Supabase node issues a delete operation against the target vector table. It filters rows by the file identifier stored in metadata.
Typical filter: using a JSONB metadata column, such as:
metadata->>'file_id' = :file_id
This step prevents duplicate or stale vector entries after a file is updated. If the delete query fails or the file is not yet present, the workflow can still proceed, but you may end up with multiple versions unless the delete is corrected.
3.4 Download File (Google Drive)
Role: Retrieve the file bytes from Google Drive.
Behavior: The Google Drive node downloads the file content using the ID from the trigger.
For Google Docs: Configure the node to export as text/plain to simplify downstream text extraction.
For other formats (PDF, XLSX, plain text): The node downloads the raw file for processing by specific extractor nodes.
At this stage, the workflow has both file metadata and raw file content available to route and transform.
3.5 Switch (file-type routing)
Role: Direct file content to the correct extractor based on MIME type.
Behavior: A Switch node evaluates the mimeType value and routes execution to one of several branches.
application/vnd.google-apps.document or text/plain → document/text extraction branch
If a MIME type does not match any configured case, the workflow will not have a valid extraction path. In that situation, add a default branch that logs or handles unsupported formats to avoid silent failures.
3.6 Extractors (PDF, Excel, Text)
Role: Convert different file formats to a normalized text representation.
Behavior by branch:
PDF extraction:
Uses a PDF extraction node or module to read selectable text.
Output is typically a set of text segments or pages.
If the PDF is image-only, you must enable OCR or use a dedicated PDF OCR node; otherwise, text may be missing.
Excel extraction:
Reads worksheets and converts rows into text representations.
Rows are usually aggregated later into larger text blocks to avoid embedding each row individually.
Text / Google Docs extraction:
For Google Docs exported as text/plain, the node works with plain text content.
For native text files, content is already suitable for direct processing.
The output of all extractor branches is raw text, ready for aggregation, summarization, and chunking.
3.7 Aggregate & Summarize
Role: Consolidate granular extractions and generate optional summaries.
Behavior:
Aggregation:
For Excel, multiple rows are concatenated into a single field or a small number of larger segments.
For PDFs or text documents, this step can merge smaller text fragments into cohesive sections.
Summarization:
Runs a lightweight summarization step to produce a short description or abstract of the document or segment.
The summary is stored as metadata and improves retrieval quality by providing a quick overview for ranking or display.
Even if you do not rely heavily on summaries at query time, they are valuable for debugging, result previews, and manual inspection of vector records.
3.8 Character Text Splitter
Role: Prepare text for embedding by splitting it into manageable chunks.
Behavior: The Character Text Splitter node divides long content into overlapping segments. Typical parameters include:
Chunk size: Approximately 1,000 to 2,000 characters.
Overlap: A smaller overlap (for example, 200 characters) to preserve context across adjacent chunks.
This approach improves embedding quality and semantic search performance by maintaining local context while respecting embedding model token limits.
3.9 Default Data Loader
Role: Convert raw text chunks into document objects with structured metadata.
Behavior: The Default Data Loader node wraps each chunk in a document-like structure that includes:
Content: The text chunk itself.
Metadata:
file_id
filename
mimeType
Optional page or section indicators
Summary or abstract, if available
Chunk index or position within the original document
These document objects form the direct input to the Embeddings node, ensuring consistent structure for all chunks regardless of source format.
3.10 Embeddings OpenAI
Role: Generate vector embeddings for each text chunk.
Behavior: The OpenAI Embeddings node calls an OpenAI embeddings model for each document object.
Typical model:text-embedding-3-small (or another supported embedding model).
Credentials: Requires a valid OpenAI API key configured in n8n credentials.
Output: An array of floating-point numbers representing the embedding vector for each chunk. These vectors are aligned with the dimension of your pgvector column in Supabase.
If the model changes, verify that the new vector dimensionality matches the schema of your Supabase vector column to avoid insertion errors.
3.11 Insert into Supabase Vectorstore
Role: Persist embeddings and metadata into Supabase for vector search.
Behavior: The final Supabase node inserts one row per chunk into the configured vector table.
Target table: In this template, the table is named policy_doc.
Automate Gumroad Sales to MailerLite & Google Sheets with n8n
Manually copying every new Gumroad buyer into your email list and spreadsheet is a special kind of torture. You open Gumroad, copy the email, paste it into MailerLite, then into Google Sheets, then swear you will “totally automate this someday.” This guide is that someday.
We will walk through an n8n workflow that quietly does all the boring stuff for you in the background. Every sale becomes:
a new subscriber in MailerLite,
assigned to the right MailerLite group, and
logged as a neat little row in your Google Sheets CRM.
You sip coffee, n8n does the admin. Fair trade.
What this n8n workflow actually does
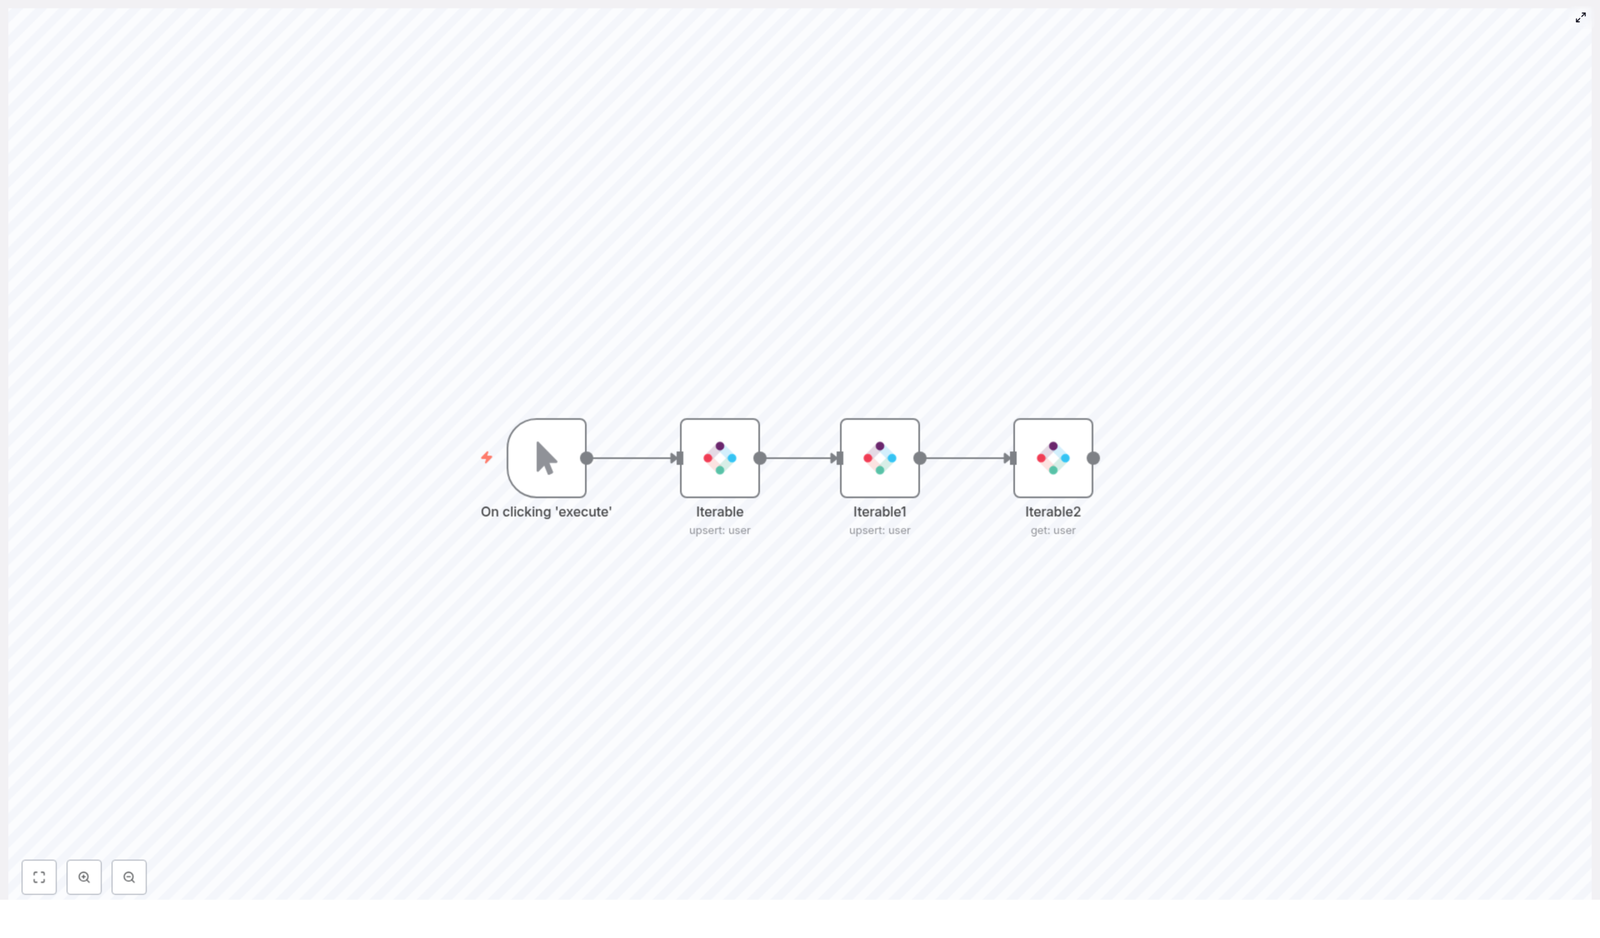
Here is the big picture of the automation you will build. Whenever a new Gumroad sale happens, your n8n workflow will:
Listen for a Gumroad sale using a Gumroad Trigger node.
Create a subscriber in MailerLite with the buyer’s email and country.
Add that subscriber to a MailerLite group using the MailerLite API.
Append a row to Google Sheets with sale timestamp, email, country, and product name.
The result is a fully automated flow from “someone bought your thing” to “they are in your email system and CRM, ready for follow-up and future marketing.”
Why bother automating Gumroad sales?
Aside from protecting your sanity, automating Gumroad sales with n8n gives you a few big advantages:
Better follow-up – Instantly enroll buyers in MailerLite sequences, onboarding, or support flows.
Always up-to-date CRM – Keep a searchable purchase log in Google Sheets without ever touching the keyboard.
Hands-free marketing – Trigger upsells, nurture campaigns, and segmenting based on what people bought and where they are from.
Once this is running, every sale automatically plugs into your marketing and tracking system. No more “I forgot to add them to the list” moments.
What you need before starting
Before you fire up n8n, make sure you have these pieces ready:
An n8n instance (cloud or self-hosted).
A Gumroad account with an API access token.
A MailerLite account plus your MailerLite API key.
A Google account with:
a Google Sheets file to act as your CRM, and
Google credentials configured in n8n.
A MailerLite group created for Gumroad buyers (you will need its group_id).
Once you have those, you are ready to build the workflow or plug in the template.
Step-by-step: building the workflow in n8n
Step 1 – Catch new sales with a Gumroad Trigger node
First, you need n8n to know when someone buys from you on Gumroad.
Add a Gumroad Trigger node to your workflow.
Configure the webhook to listen for sale events.
In the node credentials, paste in your Gumroad access token so n8n can validate incoming events.
From now on, every new Gumroad sale will fire this workflow without you lifting a finger.
Step 2 – Create the MailerLite subscriber
Next, you want your new buyer to land in MailerLite automatically.
Add a MailerLite node right after the Gumroad Trigger.
Set the operation to create subscriber.
Map the fields from the Gumroad payload to MailerLite fields using n8n expressions.
Typical field mappings:
Email: {{$json.email}}
Custom field – country: {{$json.ip_country}}
You can add extra custom fields if you like, but at minimum, email and a couple of useful attributes are enough to get started.
Step 3 – Add the subscriber to a MailerLite group
MailerLite works best when you use groups to trigger automations. So after creating the subscriber, you want to drop them into the right group.
To do that, use either:
an HTTP Request node, or
the MailerLite node if your version already supports group operations.
With the HTTP Request node, configure a POST request to:
{subscriber_id} is the id returned from the previous MailerLite node (the one that created the subscriber).
{group_id} is the id of your Gumroad buyers group in MailerLite.
In n8n, use expression syntax to construct the URL and pass your MailerLite credentials so the call is authenticated. Once this is set, every new buyer gets instantly assigned to that group and can enter your automations.
Step 4 – Log the sale in Google Sheets
Now for your lightweight CRM. You want a simple, filterable history of every sale in Google Sheets.
Add a Google Sheets node to the workflow.
Choose the operation to append a row.
Select your CRM sheet and map the values coming from the Gumroad Trigger node.
Typical columns and mappings:
date: sale timestamp (convert the format if needed).
email: buyer email.
country: buyer country.
product name: product_name from Gumroad.
You end up with a clean historical log you can sort, filter, or export whenever you feel like analyzing your sales or bragging about them.
How to test your Gumroad – n8n – MailerLite – Sheets setup
Before trusting this workflow with your entire business, give it a proper test run.
Activate the workflow in n8n so it listens for real events.
Trigger a test sale:
Either make a low-priced test purchase on Gumroad, or
Use Gumroad’s webhook test tooling if available.
Check MailerLite:
Confirm the new subscriber appears in your audience.
Verify they are assigned to the correct group.
Open your Google Sheet:
Make sure a new row was added.
Check that the timestamp, email, country, and product name look correct.
If everything looks good, your manual copy-paste job has officially been retired.
Error handling, reliability, and best practices
APIs sometimes misbehave, networks get grumpy, and rate limits are a thing. A few tweaks in n8n can make your workflow much more robust.
Retry logic: Enable n8n’s retry options on nodes that call external APIs (Gumroad, MailerLite, Google). This helps with temporary failures so a single bad request does not break your whole flow.
Idempotency: Avoid creating duplicate MailerLite subscribers. Use MailerLite’s API features to search for existing subscribers or add logic in n8n to check if the email already exists before creating a new one.
Respect rate limits: Gumroad and MailerLite both have rate limits. If you expect bursts of sales (nice problem to have), consider batching or throttling requests in n8n.
Logging and debugging: Store the raw webhook payload in a separate Google Sheet or logging service. This makes it much easier to debug weird edge cases later.
Privacy, consent, and compliance
When you are collecting buyer data and sending it into tools like MailerLite and Google Sheets, you also need to stay on the right side of privacy regulations such as GDPR and CCPA.
Make sure to:
Include clear privacy notices on your product pages.
Get proper opt-in consent for marketing emails where required.
Double-check that your MailerLite automations respect unsubscribe requests automatically.
It is your responsibility to configure everything in a compliant way, so take a moment to verify your setup before going all-in on automated sequences.
Troubleshooting common issues
If something does not work on the first try, you are not alone. Here are some quick checks:
No webhook events arriving: Confirm that the Gumroad webhook is correctly configured and that your n8n webhook URL is publicly reachable.
Subscriber not created in MailerLite: Open the n8n execution log, inspect the incoming Gumroad payload, and verify all required fields for the MailerLite node are mapped correctly.
Wrong or missing MailerLite group: Use the MailerLite API to list groups and confirm you are using the correct group_id in your HTTP Request or MailerLite node.
Most problems come down to a typo, a missing field, or a credential that did not save correctly, so the execution log is your best friend here.
Advanced ways to level up this workflow
Once the basic Gumroad to MailerLite to Google Sheets flow is running smoothly, you can start getting fancy.
Enrich buyer data: Before adding people to MailerLite, call a geo-IP or enrichment API to add extra fields like city, company, or more detailed location.
Conditional sequences: Add logic in n8n to route buyers to different MailerLite groups depending on:
which product they bought, or
which country they are in.
Sync with a full CRM later: Keep using Google Sheets as a simple CRM, then later connect it (or your n8n workflow) to tools like Pipedrive or HubSpot when you are ready to upgrade.
n8n gives you a lot of room to grow, so this starter workflow can easily become the backbone of a more sophisticated automation setup.
Wrapping up
By wiring up Gumroad, n8n, MailerLite, and Google Sheets, you turn every sale into an automated chain of useful actions: subscriber creation, group assignment, and CRM logging, all without you opening a single tab.
This is a low-cost, high-impact upgrade to your creator toolkit. You improve customer experience, stay organized, and free up your time for making products instead of maintaining spreadsheets.
Ready to set this up? Fire up your n8n instance, follow the steps above, and run a test sale to make sure everything is connected. After that, you can safely retire your copy-paste routine.
If you want help customizing this workflow, like adding conditional routing or integrating with a dedicated CRM, reply with the behavior you want and I will share a tailored n8n workflow configuration.
Automate Monthly Social Media Reports with n8n & Weaviate
If you’re tired of cobbling together monthly social media reports by hand, you’re not alone. Copying metrics, digging through past posts, trying to add “insights” at the last minute… it gets old fast.
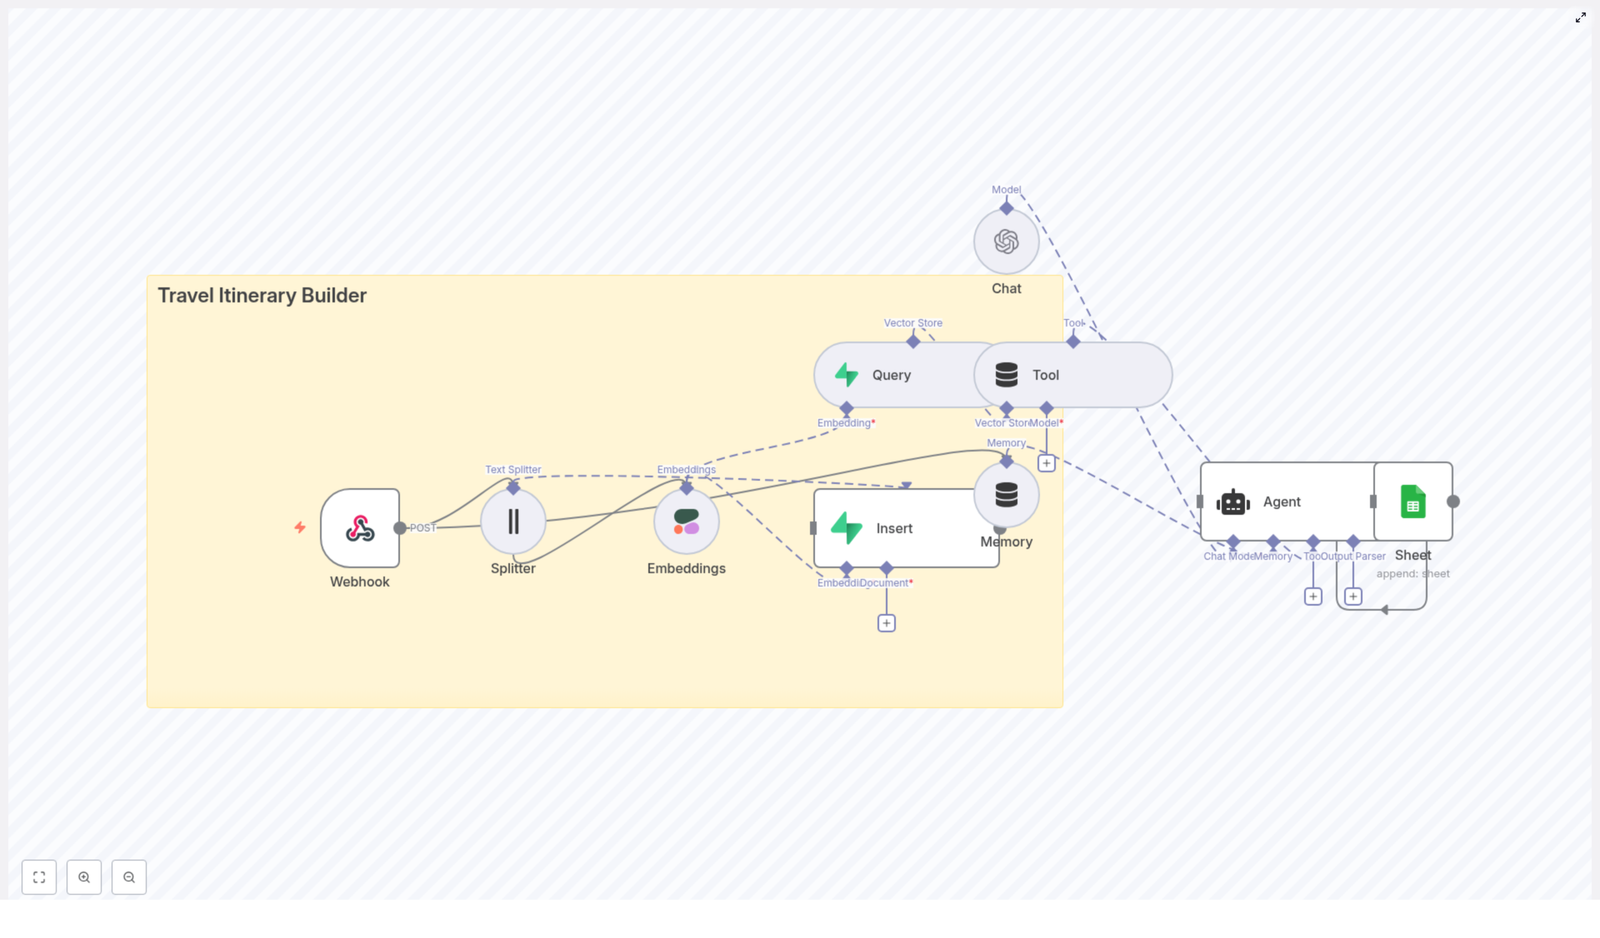
The good news: you can hand most of that work off to an n8n workflow that does the heavy lifting for you. This setup takes raw report data, chunks and embeds it, stores it in Weaviate, uses a RAG (retrieval-augmented generation) agent to add context and insights, then logs everything neatly in Google Sheets, with Slack alerts if anything breaks.
Let’s walk through what this template does, when it’s worth using, and how each part fits together, in plain language.
What this n8n workflow template actually does
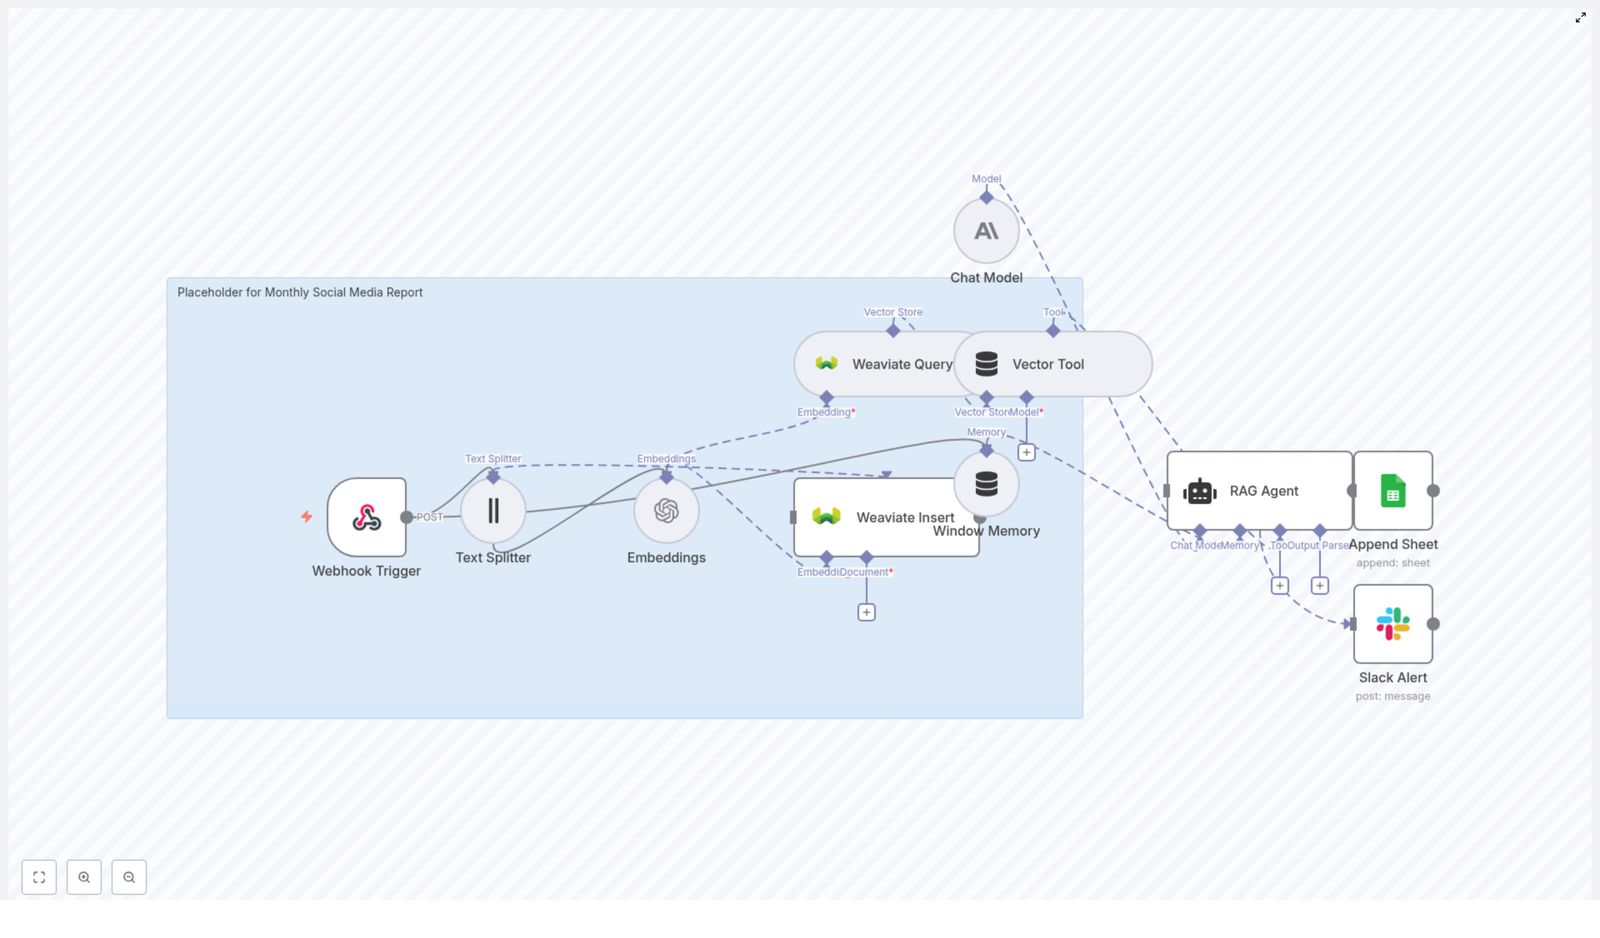
At a high level, this workflow turns raw social media data into a structured, insight-rich monthly report. Here’s the journey your data takes:
It arrives at an n8n Webhook as a POST request.
The content is split into smaller pieces with a Text Splitter.
Each chunk is turned into a vector via an Embeddings node using OpenAI.
Those vectors and their metadata are stored in a Weaviate index.
When you want a report, a Vector Tool queries Weaviate for relevant context.
A RAG Agent with Window Memory and an Anthropic chat model uses that context to generate insights.
The final report is written into a Google Sheets “Log” sheet.
If anything fails, a Slack Alert pings you in a channel like #alerts.
So instead of hunting through spreadsheets and past posts, you get a repeatable, context-aware monthly report that’s ready to share with your team.
Why automate monthly social media reports at all?
Let’s be honest: manual reporting is not the best use of anyone’s time. Automation helps you:
Save hours every month by skipping copy-paste work and manual summaries.
Reduce errors from typos, missed posts, or inconsistent formulas.
Stay consistent in how you track metrics and present insights.
React faster to trends because your data and insights are always up to date.
By combining vector search with a RAG agent, your reports also get smarter. The workflow can look back at historical posts, pull in similar content, and tailor insights to your brand’s actual performance instead of generating generic advice.
When this template is a good fit
You’ll get the most value from this n8n workflow template if:
You already collect social media metrics monthly and want to streamline the process.
You have content that benefits from historical context, like comparing performance month over month.
You want a single source of truth in Google Sheets that other tools or dashboards can use.
You’re comfortable using APIs and have access to OpenAI, Weaviate, Anthropic, Google Sheets, and Slack.
If that sounds like your setup, this workflow can become your “reporting assistant” that runs quietly in the background.
How the workflow is structured
Here’s a more detailed look at the main components and how they work together inside n8n.
1. Webhook Trigger – your data entry point
Everything starts with a Webhook node in n8n. You configure it with a POST path like:
monthly-social-media-report
This endpoint accepts JSON payloads that might include things like:
Raw content (post text, captions, descriptions)
Source or platform (e.g. Twitter, Instagram, LinkedIn)
On the caller side, protect the webhook with authentication or an API key. You do not want just anyone sending data into your reporting system.
2. Text Splitter – breaking content into chunks
Long reports or posts can be tricky for embeddings. That is where the Text Splitter node comes in. It breaks your text into smaller, overlapping chunks that are easier to embed and search.
Recommended starting settings:
chunkSize: 400
chunkOverlap: 40
You can tweak these based on how long your posts or summaries usually are. Smaller chunks often improve retrieval relevance, but if you go too small, you might lose important context.
3. Embeddings – turning text into vectors
Next, the Embeddings node converts each chunk into a numeric vector that captures semantic meaning. In this template, you can use an OpenAI model such as:
text-embedding-3-small
Make sure your OpenAI API credentials are properly configured in n8n. The output from this node is crucial, since Weaviate uses these vectors to perform semantic search later when the RAG agent needs context.
4. Weaviate Insert – storing content and metadata
Once you have embeddings, the Weaviate Insert node saves both the vectors and the original documents into a Weaviate index. In this workflow, the index is named:
monthly_social_media_report
You should map useful metadata fields, for example:
date or reporting period
platform (e.g. Facebook, Instagram)
post_id or unique identifier
metrics like engagement, reach, CTR
Good schema design pays off later. It lets you filter or sort by platform, time range, or performance during retrieval, instead of treating everything as one big pile of text.
When it is time to generate a report, the workflow queries Weaviate for relevant items. This might include:
Similar posts to a high-performing one
Recent content for the current month
Historical posts to compare performance
The Vector Tool node wraps the Weaviate query and exposes it as a tool that the RAG agent can call. That way, the agent does not just rely on the prompt, it can actively fetch context it needs from the vector store.
6. Window Memory & Chat Model – keeping short-term context
To make the agent feel more “aware” of the current conversation or reporting session, the workflow uses a Window Memory node. This stores a short history, like recent prompts or user queries, so the agent can stay on topic.
For generation, the template uses an Anthropic chat model as the core LLM. You can plug in your preferred Anthropic model, as long as your credentials are configured correctly in n8n.
7. RAG Agent – the brain of the operation
The RAG Agent node is where everything comes together. It:
Calls the Vector Tool to pull relevant context from Weaviate.
Uses the Anthropic chat model to interpret that context.
Generates the final report content and insights.
To keep the agent focused, configure a system message such as:
You are an assistant for Monthly Social Media Report
It also helps to define a clear output structure. For example, you might ask the agent to always return:
A short summary of performance
Key metrics and highlights
Notable posts or trends
Recommended actions or next steps
Having a predictable structure makes it much easier to parse and store the output in Google Sheets or feed it into other tools.
8. Append Sheet – logging everything in Google Sheets
Once the RAG agent has created the report, the Append Sheet node writes it into a Google Sheet. You can use a dedicated sheet, for example:
Sheet ID: your reporting document
Sheet name: Log
Typical columns might include:
Date or reporting period
Platform or segment
Summary
Key metrics
Insights and recommendations
Status or error info
Make sure your Google Sheets OAuth2 credentials are set up in n8n so the workflow can append rows automatically.
9. Slack Alert – catching errors early
No automation is perfect, so it is smart to plan for failure. In this template, the RAG agent’s onError path connects to a Slack node that posts a message to a channel like #alerts.
For example, you might send something like:
Monthly Social Media Report error: {$json.error.message}
That way, if a model times out, an API key breaks, or Weaviate is unavailable, you get a quick heads-up instead of silently missing a month’s report.
Best practices for a reliable reporting workflow
To keep this n8n workflow robust and scalable, a few practical tips go a long way.
Use rich metadata: Store platform, date, author, campaign, and engagement metrics as metadata in Weaviate. It makes filtered retrieval and analysis much easier.
Experiment with chunk size: Large chunks can blur meaning in embeddings, while very small ones can lose context. Start with chunkSize: 400 and chunkOverlap: 40, then adjust based on retrieval quality.
Consistent index naming: Use predictable names like monthly_social_media_report so you can manage multiple indices across projects without confusion.
Watch rate limits and costs: Embeddings and LLM calls add up. Batch data where possible and monitor usage for OpenAI and Anthropic to avoid surprises.
Plan error handling: Use the onError path not just for Slack alerts, but also to optionally log failures into your Google Sheet for later review.
Secure everything: Protect the webhook with a token or IP allowlist. Keep API keys secret and restrict IAM permissions for Google Sheets and Weaviate to the minimum needed.
Test in staging first: Start with a staging Weaviate index and a few sample payloads before sending production data through the workflow.
Ideas to extend and customize the template
Once the core flow is working smoothly, you can start layering on extra capabilities. Here are a few ideas:
Automated scheduling: Add a Cron node so the workflow runs at month-end automatically instead of waiting for an external trigger.
BI dashboards: Use the Google Sheet as a data source for Looker Studio, Tableau, or another BI tool to create visual dashboards on top of the reports.
Data enrichment: During ingestion, add sentiment analysis, detect trending hashtags, or calculate engagement rate per post before storing in Weaviate.
Per-platform reports: Generate separate reports for each platform by filtering the vector search or by using platform-specific prompts in the RAG agent.
Troubleshooting common issues
Embeddings are not storing correctly
If vectors are not showing up in Weaviate, check the following:
Verify your OpenAI API key and model configuration in the Embeddings node.
Confirm that the Embeddings node is actually outputting vectors.
Make sure the Weaviate Insert node schema matches your payload fields.
Double-check that the indexName (e.g. monthly_social_media_report) is spelled correctly.
Retrieval quality is low
If the agent is pulling irrelevant or weak context:
Experiment with different chunkSize and chunkOverlap values.
Add more descriptive metadata, like topic, campaign, or audience segment.
Use hybrid search that combines metadata filters with vector similarity to narrow results.
The agent times out or throws errors
If the RAG agent node is failing:
Check Anthropic model quotas and any rate limits.
Review response time limits in n8n and your model provider.
Add retry logic or break very complex generation tasks into smaller subtasks.
Putting it all together
By combining n8n, embeddings, and Weaviate, you can turn messy social media data into a clean, contextual monthly report that practically builds itself. The RAG agent handles the heavy thinking, Google Sheets keeps everything organized, and Slack lets you know if anything goes off the rails.
Once set up, this workflow lets you focus on strategy and creativity instead of wrestling with spreadsheets every month.
Ready to try the n8n workflow template?
If you want to see this in action, you can clone the template into your n8n instance and plug in your own credentials:
OpenAI for embeddings
Weaviate for vector storage and search
Anthropic for the chat model
Google Sheets for logging
Slack for alerts
Start with a few sample posts or a single month of data, run a test, and tweak the prompts, schema, and chunking until the insights feel right for your brand.
If you need help customizing prompts, refining your Weaviate schema, or scaling the pipeline, you can always reach out to a team experienced with n8n and RAG workflows.
Next steps: clone the workflow, secure your webhook, send some sample data, and let the automation handle your next monthly social media report.
Keywords: n8n workflow, monthly social media report, Weaviate, embeddings, RAG agent, Anthropic, Google Sheets, Slack alerts, social media automation.
n8n + YOURLS: Create Short URLs, Unlock Stats, And Free Your Focus
Every time you manually shorten a link, paste it somewhere, then log in again later to check the stats, you lose a little bit of focus. It might only be a few seconds, but those seconds add up and break your flow.
Automation gives you those moments back. With n8n and YOURLS working together, you can turn a repetitive task into a one-click, fully tracked workflow. This template shows you how to shorten a URL and instantly pull its statistics, so you can stay focused on strategy, not busywork.
Think of this workflow as a small but powerful step toward a more automated, intentional workday. Once you see how easily you can automate link creation and analytics, you will start spotting other processes you can streamline too.
The Problem: Manual Link Management Slows You Down
If you share content regularly, you probably know the routine:
Copy a long URL
Open your URL shortener
Create a short link
Paste it into your social tool, email, or document
Later, log back into your shortener to see how it performed
It works, but it is fragmented and easy to forget. Over time, that friction leads to:
Missed tracking on some links
Inconsistent analytics data
Context switching that interrupts deep work
There is a better way. Instead of manually hopping between tools, you can let n8n and YOURLS handle the entire cycle for you: create the short URL, then immediately fetch click stats, all in one automated workflow.
The Possibility: A Mindset Shift Toward Automation
Automation is not just about saving a few clicks. It is about building systems that work for you, even when you are not paying attention. When you connect n8n with YOURLS, you are doing more than shortening links. You are designing a repeatable, reliable process that supports your marketing, reporting, and growth.
Once this workflow is in place, every new link you shorten can automatically:
Generate analytics you can trust
Feed dashboards and reports with consistent data
Trigger notifications, storage, or follow-up actions
Instead of asking, “Did I remember to track that link?” you can ask, “What can I automate next?”
The Tool: An n8n + YOURLS Template That Does It For You
This n8n workflow template shows you how to:
Shorten a long URL using your YOURLS instance
Automatically pass the new short URL into a stats node
Retrieve click data and other analytics instantly
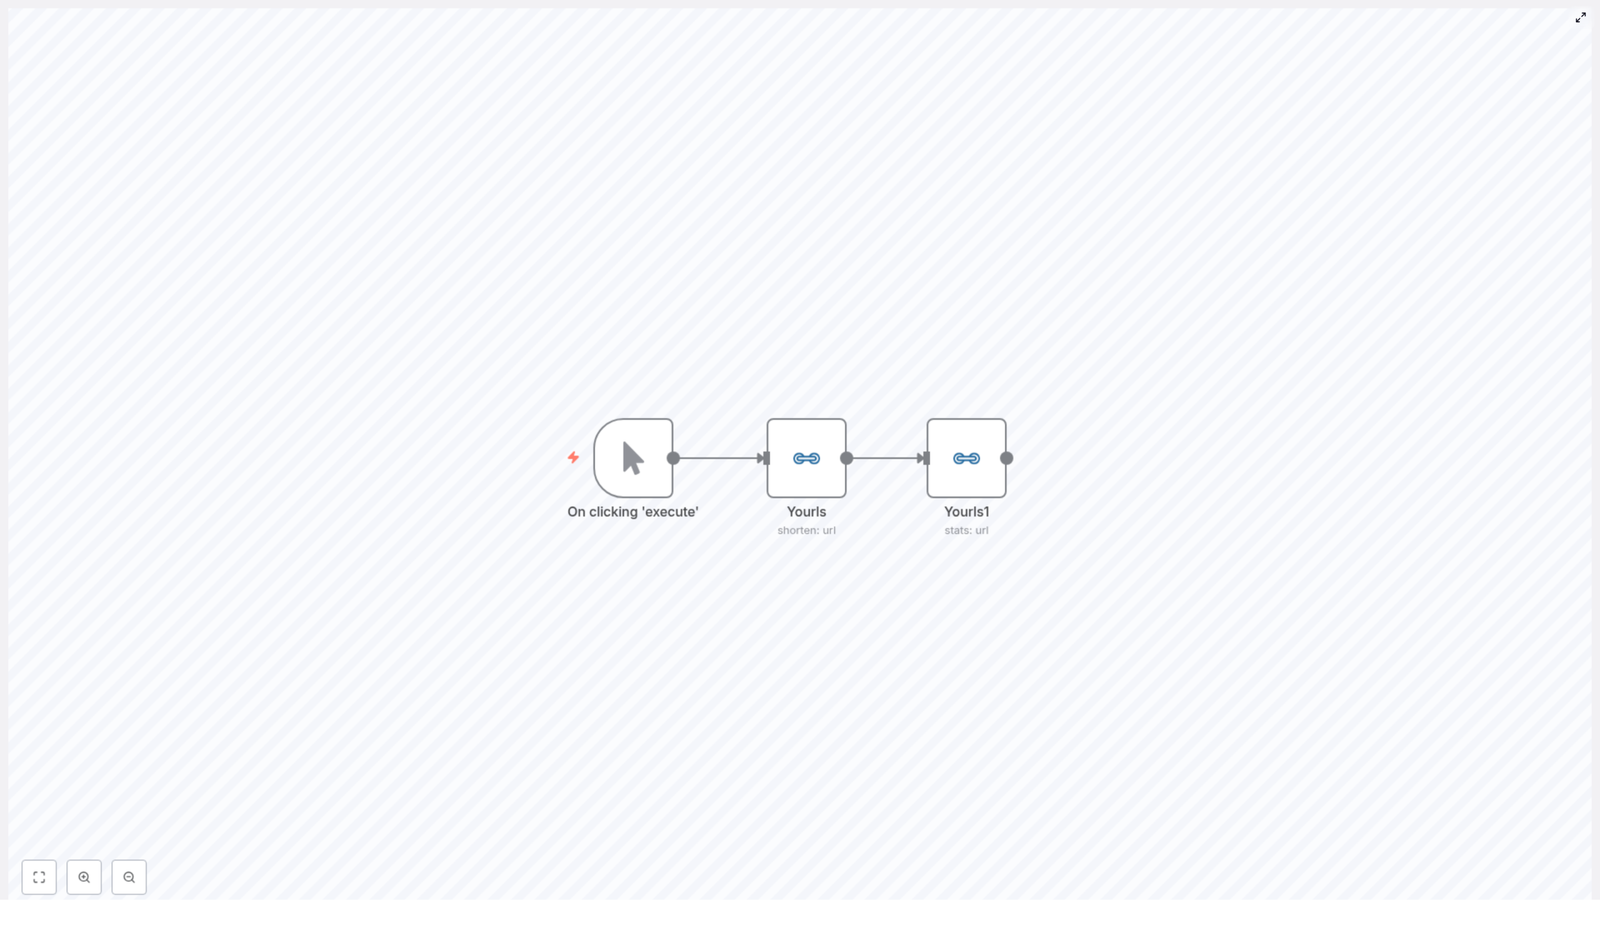
It all runs through just three nodes, which makes it a perfect starting point if you are new to n8n or to automating YOURLS:
Manual Trigger – kicks off the workflow when you click Execute in n8n
YOURLS (shorten: url) – sends your long URL to YOURLS and returns the generated short URL
YOURLS (stats: url) – takes that new short URL and fetches stats like clicks, referrers, and dates
From here, you can extend the workflow in any direction you want, from simple logging to full analytics pipelines.
Step 1: Prepare Your YOURLS Instance
Before n8n can help you automate, YOURLS needs to be ready to respond. Make sure you have:
A working YOURLS installation or an existing instance, with an API endpoint such as https://short.example.com/
An API token (signature), or a valid username and signature combination configured in YOURLS settings
This preparation is your foundation. Once YOURLS is reachable and secured, you can safely let n8n handle the repetitive calls.
Step 2: Connect YOURLS To n8n With Credentials
Next, you will teach n8n how to talk to YOURLS. This happens through credentials, which keep your secrets safe and reusable.
In n8n, open Credentials > Add New > YOURLS
Enter your YOURLS base URL and your API signature (or username and password if that is how your instance is configured)
Save the credential so n8n can use it every time the workflow runs
Once this is set up, you will not need to re-enter these details. Your workflow can run repeatedly with secure, consistent access.
Step 3: Bring The Template Into n8n
Now you are ready to build the actual automation. You can either import the provided workflow JSON directly into n8n or recreate it manually. Both paths lead to the same result, so choose the one that feels most comfortable.
Core Nodes In The Workflow
Manual Trigger A simple node that lets you test the workflow on demand. Click Execute in n8n, and the flow starts immediately.
YOURLS (shorten) This node sends your long URL to YOURLS. Key parameters:
// Key parameters for the YOURLS shorten node
url: (the long URL you want to shorten)
additionalFields.title: (optional title for the link)
For example, you might set url to https://example.com/your-long-article and provide a descriptive title. YOURLS will return the short URL and related details.
YOURLS (stats) This node reads the new short URL from the previous step and pulls analytics:
Operation: stats
shortUrl: use an expression to pass the shortened URL from the YOURLS shorten node
The template uses this expression to capture the generated short link:
={{$node["Yourls"].json["shorturl"]}}
This tells n8n to look at the output of the YOURLS shorten node, read the shorturl property, and feed it into the stats node. With this link in place, the stats node can pull click counts, referrers, and more without any extra manual work.
What The YOURLS Nodes Return
Understanding the data that comes back from YOURLS helps you build smarter automations around it.
YOURLS Shorten Node Output
When you shorten a URL, YOURLS typically returns JSON with fields like:
url – the original long URL
shorturl – the generated short identifier, such as abc123
shorturl_full or short_link – the complete short link, including domain and identifier
title – the title you provided for the link
YOURLS Stats Node Output
The stats node then returns analytics that you can feed into reports, dashboards, or notifications, including:
With this structure in mind, you can easily map fields into Airtable, Google Sheets, dashboards, or any other tool you connect through n8n.
Real-World Ways To Use This Workflow
Once your first short URL and stats flow are working, you can plug it into the rest of your stack. Here are some practical scenarios where this template becomes a growth lever:
Content publishing Automatically shorten blog post URLs when a new article goes live, then store click data in Airtable or a database for long-term reporting.
Social media scheduling Integrate the workflow with your social scheduler so that every shared link is automatically shortened and tracked. Later, pull YOURLS stats to measure which posts perform best.
Analytics dashboards Combine YOURLS stats with other analytics sources to build a unified dashboard that shows link performance alongside website metrics, campaigns, or email data.
Each of these use cases starts with the same simple building block: shorten a URL, grab the stats, and let n8n carry that data wherever it needs to go.
Troubleshooting: Turning Hiccups Into Learning Moments
As you experiment, you might hit a few snags. That is normal, and each issue you solve makes you more confident with n8n and YOURLS.
Shorten node errors If the shorten node fails, double check your YOURLS base URL and API signature in the n8n credentials. A typo or outdated token is often the cause.
Stats node cannot find the short URL Confirm the property name returned by your YOURLS version. It might use shorturl, short_link, or another field. Use n8n’s Execution Data panel to inspect the returned JSON and update your expression accordingly.
CORS or connection issues If n8n cannot reach YOURLS, review your server firewall or hosting configuration and make sure the YOURLS endpoint is accessible from your n8n instance.
Custom domain behavior When using custom domains, ensure YOURLS is configured to return the full short link if you prefer shorturl_full or similar fields instead of just the identifier.
Every fix you apply here will help you build more advanced workflows later with confidence.
Extending The Workflow: From Simple Shortcut To Analytics Engine
This template is intentionally lightweight so you can understand every step. But it is also a powerful starting point for more ambitious automation. Once it is working, try adding nodes to:
Save short URLs and stats to Airtable, Google Sheets, or any relational database for long-term tracking
Send a Slack message or email with the new short URL and initial stats so your team can act on it immediately
Schedule periodic runs that revisit each short link and update click totals for your analytics dashboards
By layering these steps, you transform a one-off shortcut into a complete link analytics pipeline that runs without your constant attention.
Security And Privacy: Protecting What You Automate
YOURLS is often self-hosted, which means you keep control over your data and your short links. To keep that control strong as you automate:
Treat your YOURLS API signature and credentials as sensitive secrets
Store them in n8n credentials, not in plain text inside workflows
Avoid exposing credentials in public workflows or shared screenshots
Rotate your API signature or password if you suspect any leak
Good security practices help you scale your automation confidently, knowing your data and access are protected.
Before You Run: Quick Checklist
Use this short checklist to make sure everything is ready for a smooth first execution:
Your YOURLS instance is online and reachable from your n8n environment
YOURLS credentials are created in n8n and tested
The YOURLS shorten node has the correct URL and optional title set
The YOURLS stats node uses the correct expression to read the short URL from the previous node
Once these items are in place, you are ready to see the workflow in action.
Your Next Step: Run The Template And Build On It
Now it is time to move from idea to execution. Import the workflow JSON into n8n, plug in your YOURLS credentials, click Execute, and watch as your long URL turns into a tracked short link with stats returned instantly.
From there, challenge yourself to extend it. Add a Slack notification, push stats into Airtable, or schedule a recurring run that updates your dashboards daily. Each small improvement compounds, freeing more of your time for creative and strategic work.
If you are ready to keep building your automation skills, explore more n8n templates and tutorials, subscribe to our newsletter, or follow our blog for new step-by-step recipes every week. Each workflow you create is another step toward a more focused, automated, and scalable way of working.
Create Short URLs and Track Stats with n8n + YOURLS
Short links are useful for marketing campaigns, internal tools, and analytics. With n8n and YOURLS you can automate both parts of the job: creating a short URL and then pulling statistics for that link, all inside a single reusable workflow.
This guide walks you through a ready-made n8n workflow template that connects to YOURLS, creates a short URL, then immediately fetches detailed stats for it. You will learn what each node does, how the data flows between them, and how to adapt the template to your own use case.
Learning goals
By the end of this tutorial, you will be able to:
Import and understand an n8n workflow template that works with YOURLS
Configure YOURLS API credentials inside n8n
Create short URLs with the Yourls node
Use n8n expressions to pass data between nodes
Fetch and inspect YOURLS statistics (hits, referrers, browsers, countries, and more)
Identify common use cases and possible enhancements for this workflow
Concept overview: What this n8n + YOURLS workflow does
The provided workflow template is intentionally simple so you can understand it quickly, then extend it as needed. It performs three main actions:
Manual trigger starts the workflow on demand.
Create short URL in YOURLS for a specific long URL (with an optional title).
Fetch statistics for the short URL using the YOURLS API.
This pattern is ideal if you want to:
Generate campaign links for newsletters or ads
Batch-shorten URLs from a CMS, Airtable, or spreadsheet
Pull link metrics into analytics tools or a database
Trigger alerts when a link reaches a certain number of clicks
What you need before you start
Make sure the following prerequisites are in place before you import or run the template:
An n8n instance, either cloud or self-hosted
A working YOURLS installation with API access enabled
Valid YOURLS API credentials, such as:
Username + signature
Or an API key, depending on your YOURLS configuration
Inside the template: nodes and data flow
The template contains three nodes connected in a straight line. Understanding this flow will make the configuration steps much easier.
1. Manual Trigger node
This node simply lets you start the workflow manually from the n8n editor. It is perfect for testing and learning. Later you can replace it with other triggers such as:
A webhook that receives URLs from external systems
A cron schedule for periodic stats updates
A trigger from Airtable, Google Sheets, or a CMS
2. Yourls node (create short URL)
The first Yourls node is responsible for creating the short URL. You provide:
The long URL to shorten
An optional title to label the link inside YOURLS
When this node runs, it sends a request to the YOURLS API and receives a JSON response. One of the most important fields in that response is:
shorturl
This field contains the new short URL that YOURLS generated. The workflow will pass this value to the next node.
3. Yourls1 node (stats for the short URL)
The second Yourls node, often named Yourls1 in the template, uses the stats operation. Its job is to query YOURLS for analytics about the short URL created in the previous step.
To do this, it needs the short URL value. Instead of hardcoding anything, the node uses an expression to read the shorturl field from the previous node’s JSON output.
Using expressions to pass data between nodes
Here is the example expression used in the template to pass the short URL from the first Yourls node to the stats node:
= {{$node["Yourls"].json["shorturl"]}}
In the n8n UI, this expression is set in the shortUrl field of the Yourls1 node. If you rename the first Yourls node, you must update the expression accordingly. For example, if the node is called Yourls - Create, you would use:
= {{$node["Yourls - Create"].json["shorturl"]}}
This pattern of referencing previous node data is fundamental in n8n and you will use it often when building more complex automations.
Step-by-step: setting up the workflow in n8n
Now let us walk through the setup process in a structured way, from credentials to testing.
Step 1: Configure YOURLS credentials in n8n
Open your n8n instance and go to Credentials.
Create a new credential of type YOURLS API (or the equivalent available in your n8n version).
Fill in:
Your YOURLS host URL (for example, https://yourls.example.com)
Your authentication details, which may be:
Signature token
Or username and password
Save the credentials.
The exact fields available can vary slightly depending on your YOURLS version and installed plugins, but the idea is always the same: n8n needs the base URL and a secure way to authenticate with the YOURLS API.
Step 2: Configure the Yourls node that creates the short URL
Next, configure the first Yourls node in the imported template.
Select credentials: Choose the YOURLS credential you just created.
Set the URL parameter:
Enter the long URL you want to shorten.
In the original template, this is set to a Medium article URL, but you can replace it with:
A static URL for testing
An expression that reads a URL from a previous node, such as a webhook or Airtable record
Optional: set a title:
Use the title field to give the link a friendly label inside YOURLS, for example "Spring Campaign Landing Page".
After configuring these options, run this node by itself in n8n. Check the output panel and confirm that:
The node executes successfully.
The JSON response includes a shorturl field.
Step 3: Configure the Yourls stats node
Now configure the second Yourls node that retrieves stats for the newly created short link.
Select credentials: Use the same YOURLS credentials.
Operation: Choose stats.
shortUrl field:
Click into the field and switch to Expression mode.
Use the expression that reads the shorturl value from the previous node, for example:
= {{$node["Yourls"].json["shorturl"]}}
If your first node is named differently, adjust the node name in the expression.
Now run the entire workflow from the Manual Trigger. When it completes, open the Yourls1 node output and inspect the returned statistics. Depending on your YOURLS installation and plugins, you may see:
Total hits or clicks
Referrers
Browsers and platforms
Top countries or locations
Dates and time-based metrics
Common ways to use this template
Once you understand the basic pattern, you can plug this workflow into many different systems. Here are a few practical ideas:
CMS or Airtable integration:
Automatically create short URLs for new records or posts.
Write the short URL and stats back to the original record.
Marketing campaign tracking:
Generate short links for each campaign or channel.
Push click metrics to Google Sheets, BigQuery, or a BI tool via extra n8n nodes.
Notifications and alerts:
Send a Slack or email notification when a link reaches a specific number of hits.
Alert the team if a link suddenly gets unusual traffic.
Ideas for enhancements and next steps
The basic template is a starting point. Here are some concrete ways to extend it inside n8n:
Persist data:
Add Airtable or Google Sheets nodes to store:
The original long URL
The generated short URL
Key stats like total hits or last access date
Schedule recurring stats updates:
Replace the Manual Trigger with a Cron node.
Run the workflow hourly, daily, or weekly to refresh stats for multiple links.
Bulk reporting:
Use SplitInBatches to loop over a list of short URLs and call the stats operation for each one.
Aggregate the results and send a periodic report.
Real-time alerts:
Connect Slack or Microsoft Teams nodes.
Trigger alerts when a link crosses thresholds or shows suspicious activity.
Making the workflow robust: error handling and troubleshooting
To move from a simple demo to a production-ready automation, it helps to add some error handling and logging.
Validate credentials early:
Before building complex flows, run a single create request and a single stats request manually.
Confirm that your YOURLS API credentials are correct and the host URL is reachable.
Use IF and Error Trigger nodes:
Add an IF node to check for unexpected responses or missing fields.
Use the Error Trigger node to catch workflow failures and:
Retry operations
Send notifications to an operator
Log responses:
Store YOURLS API responses in a database, file, or spreadsheet.
This makes it easier to debug issues like malformed URLs or changes in the YOURLS response format.
Security best practices
Because this workflow uses API credentials and may run in production, keep the following security tips in mind:
Use n8n’s credential manager:
Store YOURLS credentials in n8n’s built-in manager.
Avoid hardcoding tokens, signatures, or passwords directly into workflow fields.
Protect your YOURLS instance:
Restrict access to your YOURLS installation.
Ensure HTTPS is enabled so that API traffic is encrypted.
Secure webhooks:
If you expose an n8n webhook that accepts URLs and creates short links, add verification.
Use an API key, HMAC signature, or similar mechanism to prevent abuse.
Testing checklist
Use this quick checklist to confirm that everything is working correctly:
Check that the long URL you plan to shorten resolves correctly in a browser.
Run the Yourls create node:
Verify that it returns a shorturl field in the JSON output.
Run the Yourls stats node with the expression:
Confirm that stats are returned for the short URL.
Inspect fields such as hits, referrers, and dates.
Test error paths:
Try an invalid URL or temporarily break the API connection.
Check that your workflow handles these issues gracefully, especially if you added IF or Error Trigger nodes.
Recap: what you have built
By following this guide, you have:
Imported and understood a simple n8n workflow template that integrates with YOURLS
Configured YOURLS credentials securely inside n8n
Created a short URL via the Yourls node
Used an n8n expression to pass the generated short URL into a stats node
Fetched analytics data like hits and referrers from YOURLS
Explored options for extending the workflow with storage, scheduling, alerts, and bulk reporting
Using n8n with YOURLS gives you flexible, automated control over link shortening and reporting. The template you imported is lightweight but powerful. Once you are comfortable with it, you can swap the manual trigger for a webhook, schedule, or external data source, then send the results to any destination supported by n8n.
FAQ: common questions about n8n + YOURLS
Can I use a different trigger instead of Manual Trigger?
Yes. Replace the Manual Trigger with any n8n trigger node, such as a Webhook, Cron (schedule), or triggers from tools like Airtable or Google Sheets. The rest of the workflow can stay the same, as long as you still provide a long URL to the Yourls create node.
What if my YOURLS response structure is different?
Some YOURLS setups or plugins may slightly change the response format. After running the create node, inspect the JSON output. If the short URL is stored under a different key, update your expression in the stats node to reference the correct field.
Can I fetch stats for multiple URLs at once?
Yes. Use nodes like SplitInBatches or loops in n8n to iterate over a list of short URLs. For each one, call the stats operation and collect the results. This is useful for periodic reports or dashboards.
This article explains how to implement a robust n8n workflow that creates, updates, and retrieves users in Iterable using a reusable automation pattern. It walks through the core use case, key nodes, configuration details, and recommended practices for building secure and reliable integrations between n8n and the Iterable API.
The workflow is designed for automation professionals who want to standardize Iterable user management, validate profile state, and power downstream personalization or decision logic.
Why use n8n to manage Iterable users?
Iterable is a sophisticated marketing automation platform that depends on high quality, up-to-date user profiles. n8n, as an open-source workflow automation tool, enables you to orchestrate those user operations across multiple systems without custom code.
By combining n8n with Iterable you can:
Automatically create or update (upsert) users when events occur in other systems such as forms, CRMs, or product analytics.
Retrieve user records on demand to drive personalization, segmentation, or conditional routing in workflows.
Minimize manual intervention and reduce inconsistencies between Iterable and other data sources.
Workflow pattern at a glance
The template implements a simple but powerful sequence that can be adapted to many production use cases:
Start the workflow via a trigger (manual for testing, or automated in production).
Upsert a user into Iterable using an email identifier.
Optionally enrich the user with additional data fields through a second upsert.
Retrieve the user record by email to confirm the final state and use the returned data downstream.
This upsert-then-get pattern provides both write and verification steps, which is particularly useful when building reliable integrations and debugging data flows.
Key n8n nodes and their role
The template uses a small set of nodes that illustrate the core integration concepts between n8n and Iterable.
1. Manual Trigger
Node:Manual Trigger
The workflow starts with a Manual Trigger, which is ideal for initial development and testing. You execute the workflow on demand from the n8n editor. In a production environment, this node is typically replaced with a more suitable trigger such as:
A Webhook receiving form submissions or application events.
A Cron or Schedule node for periodic syncs.
A trigger from another system or workflow inside n8n.
2. Iterable Upsert (basic profile)
Node:Iterable (Upsert)
This node performs the core user upsert operation. Iterable uses an identifier to determine whether to create a new user or update an existing one. For this template, the identifier is the email address.
Key configuration parameters:
Identifier: Set to email. This instructs Iterable to match or create users based on their email address.
Value / Email: The email address of the user to upsert. During testing you can provide a static email; in production you typically reference data from a prior node such as a webhook payload or CRM event.
3. Iterable Upsert with additional fields
Node:Iterable1 (Upsert with Data Fields)
The second Iterable node demonstrates how to enrich a user profile with additional attributes. This is useful if your workflow progressively builds a profile from multiple sources or stages.
Important configuration area:
Additional Fields / dataFieldsUi: Use this section to map custom profile fields such as Name, plan, or signup_date. Each entry is a key/value pair that will be persisted on the Iterable user record.
Although this second upsert is optional, it illustrates a pattern where you can chain multiple updates as new data becomes available.
4. Iterable Get User
Node:Iterable2 (Get User)
The final node retrieves the user from Iterable using the same email identifier. This serves two primary purposes:
Validation that the upsert operations succeeded and the user profile reflects the expected data.
Providing a complete user payload to downstream nodes for segmentation, routing, or personalization.
Key parameter:
Operation: Set to get. Supply the email value used in the upsert node, typically via an expression that references the earlier node configuration.
Configuring the Iterable nodes
To ensure consistent behavior, configure the Iterable nodes carefully in n8n.
Credentials and connection
Create an Iterable API key with appropriate permissions in your Iterable workspace.
In n8n, define an Iterable credential and store the API key securely. Use this credential for all Iterable nodes in the workflow.
Core parameters for upsert operations
For each upsert node:
Identifier:email.
Value / Email: The user email. For example, pull from a previous node using an expression instead of hard-coding it.
Additional Fields / dataFieldsUi: Add any custom attributes you want to persist on the profile, such as:
Name
Plan
signup_date
Core parameters for the get operation
For the final Iterable get node:
Operation:get.
Email: Reference the same email used in the upsert node. You can reuse the parameter via an expression.
Step-by-step: building the workflow in n8n
Add the trigger
Insert a Manual Trigger node to start. This is ideal for development and debugging.
Plan to replace this with a production trigger later, such as a Webhook or scheduled trigger.
Add the first Iterable Upsert node
Select your Iterable credential in the node configuration.
Set identifier to email.
Set value to the target email address. You can either:
Enter a fixed test email for development, or
Use an expression that pulls the email from an earlier node such as {{$json["email"]}} from a webhook.
Optionally, leave dataFieldsUi empty in this first node if you plan to enrich later.
Optionally chain another Iterable Upsert node
Add a second Iterable node (e.g. Iterable1) connected after the first upsert.
Use the same email identifier configuration.
In Additional Fields, open dataFieldsUi and define key/value pairs such as:
Name: user display name
Plan: subscription tier
This pattern lets you progressively enrich the profile as more data becomes available.
Configure the Iterable Get User node
Add an Iterable node (e.g. Iterable2) and set Operation to get.
For the email value, reuse the parameter from the first Iterable node via an expression. For example:
{{$node["Iterable"].parameter["value"]}}
This ensures the get operation targets the same user that was just upserted.
Execute and validate
Click Execute Workflow from the Manual Trigger.
Inspect the output of the final Iterable get node (Iterable2) to confirm that:
The user exists in Iterable.
All expected fields and values are present, including any custom attributes.
Expression example: passing email between nodes
To avoid duplicating configuration and to keep workflows maintainable, reference values from one node in another using n8n expressions. For example, to pass the email from the first Iterable upsert node into the get node:
{{$node["Iterable"].parameter["value"]}}
This expression reads the value parameter from the Iterable node and provides it as the email for the subsequent get operation.
Testing and debugging strategies
Reliable Iterable integrations depend on careful testing and observability. Consider the following practices:
Use controlled test data: Work with a test email address that you own to avoid unintended changes to production users.
Inspect execution details: In each node execution view, review the request and response payloads to confirm that:
The correct fields are being sent to Iterable.
The API responses indicate success or provide actionable error messages.
Validate credentials and configuration: If upserts fail, verify:
Iterable API credentials in n8n.
Workspace and project settings in Iterable.
Any required fields or constraints in your Iterable configuration.
Generate test payloads: Use a Set node to construct synthetic user data, or connect a Webhook to test the full path from external systems into Iterable.
Error handling and reliability patterns
Production-grade workflows must handle transient issues, invalid data, and external system failures gracefully. In n8n, you can improve resilience with the following patterns:
Error workflows: Configure a global or workflow-specific error workflow to:
Capture failed executions and log relevant payloads.
Send notifications to a Slack channel, email, or incident management tool.
Retry logic: For intermittent network or API issues, implement retry mechanisms using:
A Wait node combined with a loop to reattempt failed calls.
n8n’s built-in retry options where appropriate.
Input validation: Validate email formats and required fields before calling Iterable to avoid unnecessary API errors. This can be done using:
Conditional checks in n8n.
Custom validation logic in Function or Code nodes if needed.
Security considerations for Iterable integrations
Handling user and credential data securely is critical when integrating with Iterable.
Use n8n credentials storage: Store Iterable API keys as n8n credentials instead of embedding them directly in node parameters or expressions.
Apply least privilege: Where Iterable supports it, use API keys scoped only to the required operations to reduce risk if credentials are compromised.
Sanitize inbound data: When accepting external input (for example via webhooks), sanitize and validate fields before mapping them into Iterable profiles. This reduces the risk of injecting unexpected or malformed data.
Common use cases for this template
The create-update-get pattern is broadly applicable across customer lifecycle and marketing operations. Typical scenarios include:
New signup synchronization: Capture signups from web forms or product registration flows, upsert them into Iterable, then retrieve the profile to trigger a welcome journey or onboarding sequence.
Behavior-based attribute updates: Update user attributes in Iterable when purchases, upgrades, or key events occur, then fetch the profile to evaluate eligibility for campaigns or promotions.
Profile enrichment: Enrich Iterable profiles using CRM or data warehouse attributes. After enrichment, run a get operation to validate that all fields are correctly written and ready for downstream segmentation.
Best practices for Iterable user workflows in n8n
To maintain scalable and maintainable automations, follow these guidelines:
Minimize payload size: Send only the fields you need in each upsert to reduce API usage and lower the risk of conflicting updates.
Standardize identifiers: Choose a consistent identifier strategy such as email or userId across all systems to avoid duplicate profiles and ambiguous mappings.
Document field mappings: Maintain documentation for your data model, including:
Custom Iterable fields and naming conventions.
Source systems for each attribute.
Transformation logic applied in n8n.
Conclusion
Automating create, update, and retrieval operations for Iterable users with n8n is both straightforward and highly effective. The upsert-then-get pattern described here provides a reliable way to write data into Iterable, confirm the resulting profile state, and pass that information to subsequent steps for personalization or decision-making.
With proper credential management, error handling, and validation in place, this template can be safely adapted for production workloads and extended to support more complex user lifecycle scenarios.
Next steps
To implement this integration in your environment:
Import the n8n template linked below.
Configure your Iterable credentials and replace the test email with a real data source such as a webhook or CRM event.
Execute the workflow, validate the Iterable get response, and iterate on the data fields as needed.
If you require support with credential setup, advanced error handling, or integrating additional nodes such as webhooks, Slack, or database connectors, consult the n8n and Iterable documentation or reach out to your internal automation team.
Need a ready-to-use n8n template or guidance on tailoring this workflow to your specific stack and data model? Reply to this post or visit our documentation to get started.
A detailed, production-ready walkthrough for designing an n8n workflow that creates or upserts, updates, and retrieves users in Iterable using the native Iterable node, n8n expressions, and automation best practices.
Strategic value of integrating n8n with Iterable
Iterable is a leading customer engagement platform used to orchestrate targeted communications and manage rich user profiles. n8n is an extensible, open-source automation platform that connects APIs, services, and data pipelines through visual workflows.
Combining n8n with Iterable enables you to operationalize user lifecycle management across systems. Typical use cases include:
Automating user creation and updates across multiple data sources
Keeping Iterable profiles synchronized with CRM, product, or billing systems
Fetching Iterable user data for downstream workflows such as analytics, personalization, or reporting
The workflow described below provides a minimal yet robust pattern for user upsert and verification, which you can extend into more complex customer data pipelines.
Architecture of the example n8n workflow
The reference workflow is intentionally linear to simplify testing and validation. It consists of:
Manual Trigger node for interactive execution during development
Iterable node to upsert a user using an email identifier
Iterable1 node to perform a second upsert that enriches the profile with data fields such as Name
Iterable2 node to retrieve the user and verify the final state
This pattern is ideal for proving your user sync logic before replacing the Manual Trigger with a production trigger such as a Webhook, Schedule Trigger, or event-based input.
Preparing n8n and Iterable for integration
Configuring Iterable credentials in n8n
Before building the workflow, configure secure access to Iterable:
Navigate to Credentials in n8n
Create new credentials for Iterable using your Iterable API key
Store the key only in the credentials manager so it is not exposed in node parameters or expressions
Centralizing credentials in n8n allows multiple workflows and nodes to reuse them securely and simplifies rotation and management.
Using the Manual Trigger during development
Start with a Manual Trigger node as the entry point. This lets you execute the workflow on demand while iterating on node configuration and data mappings. Once the logic is stable, you can swap this trigger for a Webhook, Schedule Trigger, or another event source suitable for your production scenario.
Implementing the Iterable user lifecycle workflow
1. First Iterable node – core user upsert
The first Iterable node is responsible for creating or updating the user based on a primary identifier:
Operation: upsert (or create depending on your node options and preference)
Identifier: email
Value: the email address of the user to create or update
The value parameter can be set to a static email for testing or, in a real integration, to an expression that reads from upstream data such as a webhook payload or a database query result.
2. Second Iterable node – enriching data fields
The second Iterable node extends the profile with additional attributes. It is configured similarly to the first node but uses the additionalFields.dataFieldsUi structure to populate custom fields:
Reuse the same email identifier and value
Under additionalFields, configure dataFieldsUi with key-value pairs
In the provided template, this node sets a Name field under dataFields. You can expand this pattern to include properties such as plan, location, lifecycle stage, or product usage metrics.
3. Third Iterable node – retrieving the user for verification
The final Iterable node uses the get operation to retrieve the user by email. This serves multiple purposes:
Validate that the upsert completed successfully
Inspect the resulting profile fields and dataFields
Expose user data to downstream nodes for logging, notifications, or further processing
By retrieving the user at the end of the workflow, you can assert expected behavior and quickly diagnose configuration issues during development.
Using n8n expressions to link Iterable nodes
n8n expressions are central to building dynamic, maintainable workflows. In this template, the second and third Iterable nodes reuse the email address configured in the first Iterable node by referencing its parameter via an expression.
The key expression is:
= {{$node["Iterable"].parameter["value"]}}
This expression reads the value parameter from the node named Iterable and injects it into subsequent nodes. This approach ensures that changes to the email source only need to be made in one place and reduces the risk of configuration drift.
You can apply the same pattern for other dynamic values such as user IDs, timestamps, or payload attributes. Referencing upstream nodes through expressions is a core best practice when designing n8n workflows at scale.
Managing custom profile attributes with dataFields
Iterable stores custom user attributes under the dataFields object. In n8n, these can be configured directly in the Iterable node through the dataFieldsUi interface under additionalFields.
Key considerations when working with dataFields:
Field keys must align exactly with the configuration in your Iterable project
Keys are case-sensitive, so Name and name are treated as different fields
Values can be static or built with expressions from previous nodes
In this example, the Name field is composed from firstName and lastName attributes provided by an upstream node such as a webhook or database query.
Error handling, validation, and resilience
Any integration with an external API such as Iterable must be designed with failure modes in mind. To increase reliability and observability, consider integrating the following patterns into your n8n workflows:
Input validation Validate email addresses before calling Iterable, for example with a Function node or a regular expression check.
Conditional branching Use an IF node to verify that required fields such as email are present. If data is incomplete, skip API calls or route to a remediation path.
Error workflows Use n8n’s error workflow capability or an Execute Workflow node in a try or catch pattern to centralize error handling.
Logging and monitoring Persist API responses and errors to a database, logging service, or monitoring channel so failed operations can be inspected and replayed.
Rate limit management Respect Iterable’s rate limits by introducing small delays, queues, or batch processing when handling high-volume syncs.
Building these practices into your initial design significantly reduces operational overhead once the workflow is promoted to production.
Alternative implementation using the HTTP Request node
While the native Iterable node covers common operations, some teams prefer direct control over the HTTP layer. In such cases, you can use the HTTP Request node to call Iterable’s REST API endpoints directly.
Relevant endpoints include:
Upsert user: POST https://api.iterable.com/api/users/update
Get user by email: POST https://api.iterable.com/api/users/getByEmail
When using the HTTP Request node, ensure that:
The x-api-key header is set to your Iterable API key
The request body conforms to Iterable’s API specification
This approach is useful if you require access to newer API capabilities, advanced options not yet exposed in the native node, or highly customized request behavior.
Best practices for Iterable user workflows in n8n
Prefer upsert for idempotency Use the upsert operation to ensure that repeated calls with the same identifier are safe and deterministic.
Centralize and protect credentials Store API keys in n8n credentials, not directly in node parameters or expressions.
Normalize and sanitize inputs Trim whitespace, normalize email case, and standardize formats before sending data to Iterable.
Use descriptive node names and annotations Name nodes meaningfully and add notes where logic is non-obvious to simplify future maintenance.
Develop with Manual Trigger, then move to production triggers Iterate quickly using the Manual Trigger, then replace it with a Webhook, Schedule Trigger, or other event source once the workflow is stable.
Troubleshooting common Iterable integration issues
If the workflow does not behave as expected, use the following checklist to narrow down the root cause:
401 / 403 responses Confirm that the API key is valid, correctly configured in n8n credentials, and has the necessary permissions in Iterable.
400 responses Inspect the request payload structure and required fields. Ensure that types and field names match Iterable’s API specification.
Empty response from get operation Verify that the email used in the get call exactly matches the email stored in Iterable, including case and any whitespace.
Rate limit or throttling errors Introduce retries with backoff, delays between requests, or batch processing strategies to reduce API pressure.
Working with the provided n8n template
The shared JSON template is structured around three Iterable nodes that operate on a common email identifier. To adapt it to your environment:
Set the value parameter of the first Iterable node to the target email address, either statically or via expression from upstream data.
Allow the second Iterable1 node to copy the email using the expression = {{$node["Iterable"].parameter["value"]}} and configure the Name data field or any other attributes you need.
Use the Iterable2 node, which relies on the same expression, to fetch the user by email and confirm that the profile reflects the intended updates.
Once you are satisfied with the behavior in a test environment, replace the Manual Trigger with your production trigger, such as a Webhook that listens to user events or a schedule that processes batch updates. From there, you can connect additional downstream steps such as sending Slack notifications, writing audit records to a database, or triggering follow-up workflows.
Automate travel planning with a production-ready n8n workflow template that combines webhooks, text splitting, vector embeddings, a Supabase vector store, LangChain agent orchestration, and Google Sheets logging. This reference explains the architecture of the Travel Itinerary Builder template, how each node participates in the data flow, and how to configure and extend it for advanced use cases.
1. Workflow Overview
The Travel Itinerary Builder is an n8n workflow that transforms a structured travel request into a personalized, day-by-day itinerary. It is designed for travel startups, agencies, and technical hobbyists who want to:
Collect user preferences programmatically via an HTTP endpoint
Persist contextual travel content in a Supabase vector store
Use Cohere embeddings and an OpenAI-backed LangChain agent to generate itineraries
Log all requests and responses in Google Sheets for analytics and review
The workflow is fully event-driven. A POST request to an n8n Webhook node initiates a sequence that includes text splitting, embedding, vector storage, retrieval, agent reasoning, and final logging.
2. Architecture & Data Flow
At a high level, the workflow coordinates the following components:
Webhook node – Ingests incoming JSON payloads with travel preferences
Text Splitter node – Segments long text into overlapping chunks for embedding
Cohere Embeddings node – Encodes text chunks into high-dimensional vectors
Supabase Insert node – Writes embeddings and metadata to a vector-enabled table
Supabase Query + Tool nodes – Expose the vector store as a retriever tool to LangChain
Memory node – Maintains short-term conversational context for the agent
Chat (OpenAI) node – Provides the core large language model for itinerary generation
Agent (LangChain) node – Orchestrates tools, memory, and the LLM with a tailored prompt
Google Sheets node – Appends each request and generated itinerary to a logging sheet
The end-to-end flow is:
Client sends POST request to /travel_itinerary_builder
Workflow parses the payload and prepares any text content for embedding
Text is split, embedded with Cohere, and stored in Supabase under the index travel_itinerary_builder
When generating, the agent queries Supabase via a Tool node for relevant chunks
Agent uses retrieved context, memory, and business rules to construct a structured itinerary
Result plus metadata is appended to Google Sheets and returned to the client
3. Node-by-Node Breakdown
3.1 Webhook Node – Inbound Request Handling
Purpose: Entry point for external clients to trigger itinerary generation.
Make sure the Webhook URL is reachable from your client (use a tunnel like ngrok for local development).
Validate that Content-Type: application/json is set by the caller.
Edge cases & error handling:
If required fields are missing or malformed, handle validation either in the Webhook node or a subsequent Function node before proceeding to embeddings.
Consider returning explicit HTTP error codes (4xx) when validation fails.
3.2 Text Splitter Node
Purpose: Segment long text inputs into smaller chunks suitable for embedding and retrieval.
Typical input sources:
Extended notes from the user (e.g. special constraints or detailed preferences)
Pre-loaded travel guides or descriptions associated with the destination
Key parameters:
chunkSize: 400
chunkOverlap: 40
Behavior:
Splits long text into chunks of approximately 400 characters.
Overlaps consecutive chunks by 40 characters to preserve continuity and local context.
Configuration tips:
Increase chunkSize if context feels too fragmented or the LLM is missing cross-sentence relationships.
Decrease chunkSize if you hit embedding size limits or latency becomes an issue.
Adjust chunkOverlap to balance redundancy against storage and query cost.
3.3 Cohere Embeddings Node
Purpose: Convert each text chunk into a dense vector representation suitable for similarity search.
Input: Chunked text from the Text Splitter node.
Output: An array of numeric vectors, one per chunk.
Configuration:
Credentials: Cohere API key configured in n8n credentials.
Model: Any Cohere embedding model that supports your language and cost constraints.
Performance tips:
Select an embedding model that balances cost and accuracy for typical travel content.
Batch multiple chunks in a single request when possible to reduce overhead and latency.
Debugging:
Inspect the shape and length of the returned vectors if you encounter Supabase insertion errors.
Review Cohere error messages for rate limits or invalid credentials.
3.4 Supabase Vector Store – Insert Node
Purpose: Persist embeddings and their associated metadata in a Supabase vector-enabled table.
Index name:travel_itinerary_builder
Input:
Embedding vectors from the Cohere node
Metadata such as chunk text, user ID, destination, and timestamps
Configuration:
Credentials: Supabase project URL and API key configured as n8n credentials.
Vector extension: Ensure the Supabase project has the vector extension enabled.
Table or index: Point the Insert node to the table used as your vector store, aligned with the index name travel_itinerary_builder.
Recommended metadata fields:
user_id – For traceability and personalization
destination – To filter or shard by location
source – E.g. “user_input” or “guide_document”
created_at – Timestamp for lifecycle management
Operational notes:
Monitor table size and query performance as the index grows.
Implement cleanup or archiving strategies if the vector store becomes very large.
3.5 Supabase Query & Tool Node (Retriever)
Purpose: Retrieve the most relevant chunks from Supabase to inform itinerary generation, and expose this retrieval as a LangChain tool.
Behavior:
At generation time, the agent issues a query that is translated into a vector similarity search against the travel_itinerary_builder index.
The Tool node wraps this query capability so the LangChain agent can call it dynamically during reasoning.
Configuration notes:
Set the number of results to retrieve according to how much context the LLM can handle without becoming overwhelmed.
Optionally filter by destination, user ID, or other metadata to narrow down relevant documents.
Debugging tips:
Test the Supabase query in isolation to confirm that you get sensible matches for a given destination.
Inspect tool output in the agent logs to ensure the retriever is returning the expected chunks.
3.6 Memory Node
Purpose: Provide short-term conversational memory for the LangChain agent.
Usage in this template:
Stores the recent conversation or input context so the agent can reference prior steps within the same workflow run.
Helps the agent maintain consistency about user preferences, constraints, and previous tool calls.
Configuration considerations:
Configure memory window size so it captures relevant context without exceeding token limits.
Ensure memory is scoped to a single request to avoid cross-user data leakage.
3.7 Chat (OpenAI) Node
Purpose: Provide the core LLM that generates natural language itinerary content.
Input:
Prompt content constructed by the Agent node
Retrieved context from the Supabase Tool
Memory state with recent exchanges
Configuration:
Credentials: OpenAI API key (or an alternative supported LLM provider configured in n8n).
Model: Choose a chat-optimized model suitable for multi-step reasoning and structured output.
Behavior:
Generates the final itinerary text, including a day-by-day breakdown that respects user preferences and constraints.
Cost control:
Use smaller or cheaper models for prototyping and scale up only if quality is insufficient.
Limit maximum tokens per response to control usage.
3.8 Agent (LangChain) Node
Purpose: Orchestrate the LLM, memory, and tools (including the Supabase retriever) to build a coherent itinerary under explicit business rules.
Core responsibilities:
Define the system prompt and instructions for how to use retrieved context.
Instruct the LLM to respect user constraints such as budget, accessibility, and trip pace.
Structure the output in a predictable format, typically day-by-day.
Prompt design recommendations:
Explicitly instruct the agent to:
Use retrieved chunks as factual context.
Respect budget levels and avoid suggesting activities that conflict with constraints.
Balance different interest categories across days (e.g. food, historical sites, beaches).
Specify a clear output schema, for example:
Day 1: Morning, Afternoon, Evening
Day 2: …
Debugging:
Log intermediate tool calls and the memory state to verify that the agent is using the retriever correctly.
Iterate on the prompt template if the agent ignores constraints or produces inconsistent structure.
3.9 Google Sheets Node – Logging
Purpose: Persist each itinerary generation event for analytics, auditing, and manual review.
Configuration:
Credentials: Google Sheets API credentials configured in n8n.
Sheet ID: Target spreadsheet identifier.
Tab name: Log
Operation: Append row
Typical logged fields:
User ID
Destination and dates
Interests and budget
Generated itinerary text
Timestamps and any internal run identifiers
Operational tip: Maintain separate sheets for development and production to avoid mixing test data with real analytics.
4. Configuration Checklist
Before enabling the workflow in n8n, verify the following prerequisites:
An active n8n instance (self-hosted or n8n cloud) with access to the internet.
A Supabase project:
Vector extension enabled.
Table configured as a vector store with an index name travel_itinerary_builder.
API keys created and stored as n8n credentials.
A Cohere account:
API key configured in n8n for the Embeddings node.
An OpenAI API key (or another supported LLM provider) for the Chat node.
A Google account with:
Sheets API credentials configured in n8n.
Target Sheet ID and a tab named Log.
A reachable Webhook URL:
For local development, use a tunneling solution like ngrok to expose the Webhook endpoint.
5. Node-Specific Guidance & Tuning
5.1 Text Splitter Node
Increase chunkSize if the LLM needs more context per chunk.
Decrease chunkSize if embedding calls become too large or slow.
Adjust chunkOverlap to reduce duplicated information while still preserving continuity between chunks.
5.2 Cohere Embeddings Node
Select a model optimized for semantic similarity tasks over descriptive travel content.
Use batching when embedding many chunks in one run to reduce network overhead.
5.3 Supabase Vector Store
Keep the index name consistent (travel_itinerary_builder) across Insert and Query operations.
Persist rich metadata:
Chunk source (user input vs. guide)
User ID
Destination and language
Timestamps
Monitor storage and query costs as the dataset grows and adjust retention policies if required.