Automate Notion Sign-Ups & Semesters with n8n

Automate Notion Sign-Ups & Semester Enrollment with n8n

Automating the flow from sign-up form submission to structured Notion records eliminates repetitive work and improves data quality. This guide presents a production-ready n8n workflow template that receives user sign-ups via webhook, checks Notion for existing records, creates new users when needed, and automatically links each user to the current semester through a Notion relation field.

The result is a robust, API-driven integration without having to write or maintain a custom client. The workflow is fully configurable and can be extended with additional automation steps such as email notifications, analytics, or approvals.

Use Case: Automated Notion User Onboarding

Many organizations use Notion as a lightweight CRM, student roster, or membership database. When sign-ups are handled manually, teams face several issues:

  • Time-consuming data entry and updates
  • Inconsistent records across semesters or cohorts
  • Higher likelihood of typos and duplicate entries

By combining n8n with the Notion API, you can implement a no-code, maintainable pipeline that:

  • Captures incoming sign-ups via HTTP POST
  • Normalizes and validates user data
  • Prevents duplicate user records based on email
  • Keeps user-to-semester relations in sync automatically

This pattern is especially useful for academic programs, training cohorts, and membership organizations that track participation across multiple semesters or periods.

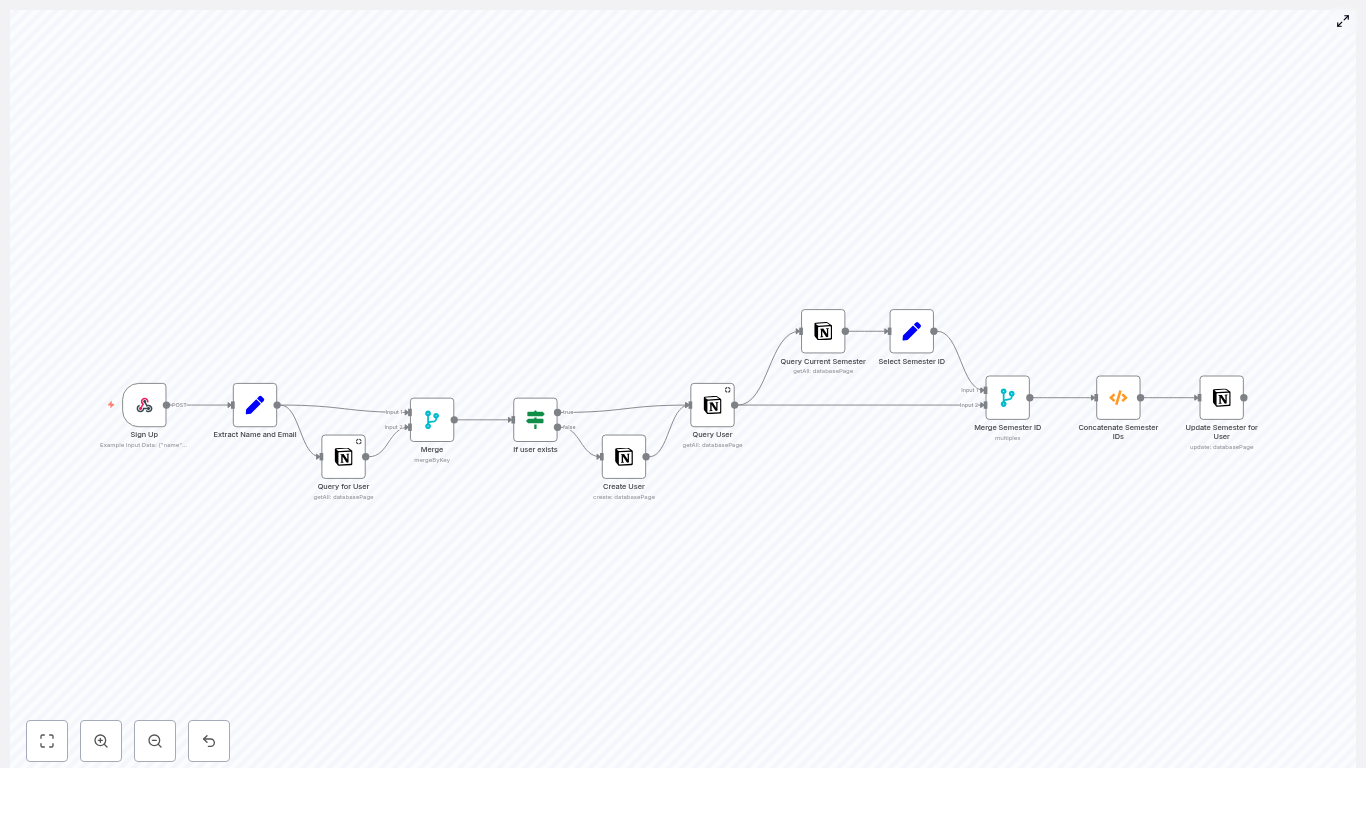
High-Level Workflow Architecture

The workflow orchestrates several key steps:

  1. Receive sign-up data via a secure webhook
  2. Extract and standardize the name and email fields
  3. Query Notion to determine whether the user already exists
  4. Create a new Notion user record if no match is found
  5. Retrieve the full user page including existing semester relations
  6. Identify the current semester in a dedicated Notion database
  7. Merge the current semester with the user’s existing semester relations
  8. Update the user page in Notion with the final semester relation list

Sample Request Payload

The workflow expects a JSON payload similar to the following:

{  "name": "John Doe",  "email": "doe.j@northeastern.edu"
}

These fields are mapped to Notion properties and used as the primary identifiers for user records.

Core Nodes and Integrations

The workflow is composed of a sequence of n8n nodes that each perform a specific task. Below is a structured breakdown of the main components and how they interact.

1. Sign-Up Ingestion – Webhook Node

The entry point is a Webhook node configured to receive POST requests:

  • HTTP Method: POST
  • Path: /sign-up
  • Authentication: Basic Auth or another supported method

The webhook node captures the body of the incoming request and forwards it to subsequent nodes. It is recommended to secure the endpoint with authentication to prevent unauthorized or malicious submissions.

2. Data Normalization – Set Node

Next, a Set node extracts and maps the relevant fields from the incoming payload. For example, it reads body.name and body.email and exposes them as:

  • Name
  • Email

These standardized fields are referenced throughout the flow, which simplifies configuration and reduces the risk of mapping errors later in the pipeline.

3. User Lookup in Notion – Notion getAll

The workflow then uses a Notion node with the getAll operation to query the users database. The query filters for a page where the Email property matches the incoming email.

Important configuration details:

  • The Notion database must include an Email property of type email.
  • The query should be constrained to a single database that represents your user roster.

This step determines whether the user already exists in Notion, which drives the conditional logic that follows.

4. Data Consolidation – Merge (mergeByKey)

A Merge node configured with mergeByKey combines the output from the Set node and the Notion query. The merge key is the Email field.

The resulting item contains both:

  • The original sign-up data (name, email)
  • Any matched Notion user record data

This consolidated structure ensures that downstream nodes have access to both the raw request payload and any existing Notion information for the same user.

5. Existence Check – If Node

An If node evaluates whether the Notion query returned a user page. Typically, this is done by checking for the presence of an id field, which represents the Notion page ID.

  • If true: The user already exists. The workflow proceeds to fetch full details and update semester relations.
  • If false: The user does not exist. The workflow branches to create a new user record.

6. Conditional Creation – Notion create

In the branch where no existing user is found, a Notion node with the create operation is used to insert a new page into the users database. The node maps the standardized Name and Email fields to the corresponding Notion properties.

This ensures that every sign-up results in a canonical user record in Notion, even if it is the first time that email address appears.

7. Retrieve Full User Record – Notion getAll

After user creation, or when a user already exists, the workflow needs the full Notion page including any existing semester relations. Another Notion getAll operation is used to retrieve the complete user record.

This step guarantees that the workflow has both:

  • The Notion page id required for updates
  • The current list of related semesters from the Semesters relation property

8. Identify the Current Semester – Notion getAll

The next stage targets the Semesters database. A dedicated Notion getAll node queries for the semester where the boolean property Is Current? is set to true.

Recommended configuration:

  • Filter: Is Current? equals true
  • Sort: by created time, descending
  • Limit: 1 record

This ensures that a single, clearly defined “current semester” is selected, even if multiple entries have been created historically.

9. Extract Semester Identifier – Set Node

A subsequent Set node reads the id of the current semester page and stores it as currentSemesterID. This value will later be merged with the user’s existing semester relations.

10. Merge User and Semester Data & Build Relation Array

To combine user and semester information, the workflow uses a merge operation (for example, multiplex merge) so that each item contains both the user record and the currentSemesterID field.

A Function node then constructs the final list of semester IDs that should be related to the user. The pseudocode used in this node is as follows:

// Pseudocode used in the Function node
for (item of items) {  const currentSemesterID = item.json["currentSemesterID"]  let allSemesterIDs = [currentSemesterID];  if (item.json["Semesters"]?.length > 0) {  allSemesterIDs = allSemesterIDs.concat(  item.json["Semesters"].filter(  semesterID => semesterID !== currentSemesterID  )  );  }  item.json["allSemesterIDs"] = allSemesterIDs
}
return items;

This logic enforces two important rules:

  • The current semester is always included and listed first.
  • Duplicate semester IDs are avoided by filtering out any existing occurrence of the current semester.

11. Persist Semester Relation – Notion update

Finally, a Notion node with the update operation writes the allSemesterIDs array back to the user’s Semesters relation property.

This update step ensures that:

  • The user is related to the current semester in Notion.
  • All previously related semesters are preserved, except for duplicates.

Data Flow Summary

At a high level, the workflow operates as follows:

  1. A client sends a POST request with name and email to the n8n webhook.
  2. The workflow normalizes the payload and queries Notion for an existing user by email.
  3. If no user is found, a new user page is created in the Notion users database.
  4. The full user page is retrieved, including existing Semesters relations.
  5. The Semesters database is queried to identify the current semester.
  6. The current semester ID is merged with the user’s existing semester IDs, ensuring no duplicates.
  7. The user page is updated so that its Semesters relation reflects the final list of semester IDs.

Testing and Debugging the Workflow

To validate and troubleshoot the automation, consider the following practices:

  • Enable responseData on the Webhook node to quickly inspect responses during local or staging tests.
  • Use the n8n execution log to trace each node’s input and output payloads when diagnosing issues.
  • Test edge cases, such as users who already have multiple semesters, missing or empty email fields, and invalid email formats.
  • Add logging or temporary debug fields inside the Function node to verify how the allSemesterIDs array is built and filtered.

Security Considerations and Best Practices

When exposing a webhook and integrating with Notion in a production environment, security and reliability are critical. Recommended practices include:

  • Protect the webhook endpoint using Basic Auth, API keys, IP allowlists, or a combination of these controls.
  • Validate the incoming payload structure before executing Notion operations, and reject malformed or incomplete requests early.
  • Use a dedicated Notion integration with the minimum required scopes and limit database access to only what the workflow needs.
  • Implement rate limiting and retry logic to handle transient Notion API errors gracefully.
  • Normalize email addresses (for example, lowercase and trim whitespace) to reduce the risk of duplicate user records.

Extending the Template for Advanced Use Cases

The template provides a solid foundation that can be adapted to a wide range of automation scenarios. Common extensions include:

  • Sending confirmation emails through SMTP or a transactional email provider after user creation or update.
  • Emitting analytics events to platforms like Segment or Google Analytics for marketing attribution and funnel analysis.
  • Processing CSV bulk imports by iterating over each row and applying the same user and semester logic.
  • Triggering Slack or other chat notifications when new users are added or when specific conditions are met.
  • Capturing consent or opt-out flags in Notion for compliance and preference management.

Conclusion

This n8n workflow template delivers a reliable and extensible pattern for transforming sign-up form submissions into structured Notion user records, while automatically maintaining accurate semester relations. It minimizes manual effort, enforces consistent data relationships, and provides a clear path for further automation around onboarding and lifecycle management.

To implement this in your environment, import the template into your n8n instance, connect your Notion integration, and test the webhook with a sample POST request. From there, you can iterate on the workflow by adding notifications, advanced error handling, or custom business rules.

Call to action: Import the template into your n8n instance, connect your Notion credentials, and run a test sign-up to validate the full end-to-end flow.

Translate Telegram Voice Messages with AI (n8n)

Transform Telegram voice notes into translated text and audio responses with a fully automated n8n workflow. This production-ready template uses OpenAI speech-to-text and chat models to detect the spoken language, translate between two configured languages, and reply in both text and synthesized audio. It is ideal for building multilingual Telegram bots for travel, language learning, international teams, or customer support operations.

Use case: A Telegram voice translator powered by n8n

Voice-based translation significantly improves accessibility and user experience. Instead of typing, users simply speak in their preferred language and receive an accurate translation as a Telegram message and, optionally, as an audio reply. By combining n8n with OpenAI, you gain access to high-quality speech recognition and natural language understanding without managing complex infrastructure or bespoke machine learning pipelines.

This workflow encapsulates best practices for automation professionals: clear separation of configuration, resilient handling of non-voice inputs, and modular OpenAI integration for transcription, translation, and text-to-speech.

Key capabilities of the workflow

  • Listens for Telegram updates and filters for voice messages.
  • Downloads the voice file from Telegram using the message payload.
  • Transcribes the audio to text with OpenAI speech-to-text.
  • Automatically detects the source language and translates between a configured language pair using an OpenAI chat model.
  • Sends the translated text back to the user as a Telegram message.
  • Optionally generates and returns a TTS audio reply of the translated text using OpenAI audio generation.

Prerequisites and environment requirements

  • An n8n instance (cloud-hosted or self-hosted).
  • A Telegram bot token to configure the Telegram Trigger and Telegram nodes.
  • An OpenAI API key with access to speech-to-text, chat, and audio generation endpoints.
  • Basic familiarity with n8n nodes, credentials management, and workflow deployment.

Architecture overview

The template is organized as a left-to-right n8n workflow that starts with a Telegram Trigger and then moves through configuration, input handling, transcription, translation, and response delivery. Each node has a clearly defined responsibility, which makes the flow easy to customize and extend.

1. Entry point: Telegram Trigger

Node: Telegram Trigger

This node receives all updates from your Telegram bot. For each incoming update, it inspects the payload and forwards events that contain a voice message. The trigger exposes the Telegram file_id and chat metadata required for subsequent processing.

2. Global language configuration

Node: Settings (Set node)

The Settings node acts as a central configuration point. It defines two key string fields:

  • language_native – the primary language of your users (for example, english).
  • language_translate – the target language for translation (for example, french).

These values are referenced later by the translation prompt to determine whether the input should be translated from native to target or in the opposite direction.

3. Input normalization and error handling

Node: Input Error Handling (Set node)

Not every incoming update will be a voice message. This helper node extracts and normalizes the message.text field where present and is used to avoid workflow failures when users send non-voice messages. It provides a simple safety layer that ensures the rest of the pipeline only processes valid voice inputs or handles exceptions gracefully.

4. Audio retrieval from Telegram

Node: Telegram (file)

Once a valid voice message is detected, this node downloads the corresponding audio file from Telegram. It uses the file_id contained in the trigger payload to fetch the audio data as a binary file, which is then passed to OpenAI for transcription.

5. Speech-to-text transcription with OpenAI

Node: OpenAI Transcribe (OpenAI node)

This node connects to OpenAI’s speech-to-text API and converts the downloaded audio into text. It represents the core transcription step, turning user speech into structured input that can be processed by the translation logic. The node output includes the recognized text and the language inferred by the model.

6. Language detection and translation logic

Node: OpenAI Chat Model (Auto-detect and translate)

A lightweight OpenAI chat model is used to both identify the language of the transcribed text and perform the translation between your defined language pair. The prompt is designed to:

  • Determine whether the text is written in language_native or language_translate.
  • Translate in the appropriate direction between these two languages.
  • Return only the translated text, without extra commentary or formatting beyond what is required.

The Settings node values are injected into the prompt, so you can easily change the language pair without modifying the rest of the workflow logic.

7. Returning translated text to Telegram

Node: Telegram Text reply

After translation, this node sends the translated text back to the user as a Telegram message. Markdown formatting is enabled, which allows you to style responses or add additional context if you customize the prompt or message body.

8. Optional TTS response: Generate and send audio

Nodes: OpenAI (Generate Audio) + Telegram Audio reply

For an enhanced user experience, the workflow can also convert the translated text into speech using OpenAI’s text-to-speech capabilities. The generated audio file is then sent back to the user as a Telegram voice or audio message.

This dual output (text plus audio) improves accessibility for users who prefer listening or have visual impairments, and it supports language learners who benefit from hearing pronunciation.

Step-by-step deployment guide

  1. Import the workflow template
    Download or copy the JSON for this template and import it into your n8n instance via the workflow import function.
  2. Configure credentials
    In n8n, set up:
    • Telegram credentials using your bot token for the Telegram Trigger and Telegram nodes.
    • OpenAI credentials using your OpenAI API key for the transcription, chat, and audio generation nodes.
  3. Set translation languages
    Open the Settings (Set) node and define:
    • language_native (for example, english)
    • language_translate (for example, french)

    You can adjust these values at any time to switch the language pair without changing the rest of the workflow.

  4. Deploy and run initial tests
    Activate the workflow, then send a voice message to your Telegram bot. The expected behavior is:
    • Telegram Trigger fires on the voice message.
    • The audio is downloaded, transcribed, and processed by the OpenAI chat model.
    • The bot replies with the translated text, and if the audio generation path is enabled, with a translated audio response as well.
  5. Refine prompts and behavior
    If you need domain-specific terminology or a particular tone, edit the prompt in the Auto-detect and translate node. You can enforce formality, use a specific register, or inject custom vocabulary relevant to your industry.

Best practices for accuracy and user experience

  • Introduce confirmation flows
    For critical use cases, consider adding a simple user confirmation step when the translation is ambiguous or when you suspect low confidence. For example, ask the user to confirm or correct the translation before taking further automated actions.
  • Use specialized prompts or models
    For technical, medical, or legal content, extend the chat prompt with a glossary or examples, or select a more capable OpenAI model to handle domain-specific language.
  • Control audio duration and cost
    Limit maximum recording length or implement chunking for long audio to avoid timeouts and manage API costs. Shorter segments also reduce latency and improve responsiveness.
  • Leverage caching for repeated phrases
    For common phrases or templates, implement a caching strategy within n8n (for instance via a database or key-value store) to reuse recent translations, reduce OpenAI calls, and improve performance.

Privacy, compliance, and cost management

Every transcription and audio generation request to OpenAI incurs usage-based charges. Monitor your n8n logs and OpenAI dashboard to estimate cost per message, and consider implementing rate limits or quotas for high-volume bots.

From a privacy perspective, voice data is particularly sensitive. Before sending user audio to OpenAI or any third-party provider, ensure that your consent, data processing agreements, and retention policies comply with relevant regulations. For strict data residency or compliance requirements, evaluate self-hosted or on-premise alternatives where appropriate.

Troubleshooting common issues

  • No transcription output
    Confirm that the Telegram (file) node successfully downloads the audio and that the OpenAI API key is configured correctly. Check for errors in both nodes within n8n.
  • Incorrect language detection or translation direction
    Refine the prompt in the Auto-detect and translate node. Make the instructions explicit about the two languages and include examples of when to translate from native to target and when to reverse the direction.
  • Audio reply not playing correctly
    Ensure that the OpenAI audio generation node outputs a format supported by Telegram, such as MP3 or OGG. If necessary, add a conversion step or adjust node settings so the audio is compatible with Telegram clients.

Advanced enhancements for production deployments

  • Per-user language preferences
    Store user-specific language pairs in a database and look them up at runtime. This allows each user or chat to have its own native and target languages instead of relying on a single global setting.
  • Inline language selection
    Add Telegram inline keyboards to let users select or change the target language on demand, which is especially useful for multilingual communities.
  • Configurable voices and TTS quality
    Extend the Settings node to include preferred voice type or quality level. Use these values when calling the OpenAI audio generation endpoint to offer multiple voice options.
  • Monitoring and analytics
    Integrate logging and metrics collection to track translation latency, error rates, and usage volumes. This data helps you optimize prompts, scale infrastructure, and manage cost.

FAQ

Which languages can this workflow handle?

OpenAI’s speech-to-text models support more than 55 languages. The n8n workflow itself is language agnostic. As long as the languages are supported by the OpenAI models, you can configure any pair in the Settings node using language_native and language_translate.

Can the bot translate in both directions automatically?

Yes. The Auto-detect and translate node is designed to check whether the transcribed text is in the native language or the target language, then translate in the appropriate direction. You do not need separate workflows for each direction.

Conclusion and next steps

This n8n workflow template provides a robust foundation for a Telegram voice translation bot. With minimal configuration, you can deploy a multilingual assistant that listens to voice messages, transcribes them, detects the language, translates between your chosen language pair, and responds with both text and audio.

Get started now: import the template into your n8n instance, configure your Telegram and OpenAI credentials, set your language pair, and send a test voice note to your bot. Within minutes, you will have an operational voice translator running on top of n8n.

If you require advanced customization, such as complex prompts, user-specific preferences, or integration with additional systems, feel free to reach out for guidance or a tailored implementation.

Call to action: Deploy this workflow in your n8n environment today and validate it with a few sample voice messages. If you need support with configuration, scaling, or integration into your existing automation stack, contact us for a walkthrough or custom setup.

TSMC’s $1T Moment: How AI Fueled the Rise

TSMC’s $1T Moment: How AI Fueled the Rise

Imagine waking up, checking the markets, and realizing that the quiet contract manufacturer that used to sit in the background of every tech story has casually strolled into the $1 trillion club. No flashy consumer brand, no social network drama, just pure silicon and serious scale. That, in a nutshell, is TSMC.

While most of us are still trying to remember how many tabs we left open, Taiwan Semiconductor Manufacturing Company has become the backbone of the AI revolution. This isn’t hype for hype’s sake. The combination of AI demand, wafer-level scale, and relentlessly advanced chip manufacturing has turned TSMC into one of the most strategically important companies on the planet.

In this article, we will unpack how AI helped push TSMC toward a $1 trillion valuation, why its foundry model matters so much, what opportunities and risks lie ahead, and what all of this means for investors and the broader tech ecosystem.

TSMC: The Quiet Powerhouse Behind Modern AI

TSMC is not the company that designs the chips in your favorite AI tool, smartphone, or cloud service. It is the company that actually builds them. As the dominant pure-play semiconductor foundry, TSMC manufactures chips for customers across the world, from hyperscalers to AI startups to consumer giants.

In the AI era, that role has become uniquely important. Modern AI workloads need custom silicon with extreme performance and energy efficiency. Training and running large language models or generative AI systems is not something you can do efficiently on generic, off-the-shelf hardware anymore. So companies design their own AI accelerators and then turn to TSMC to bring those designs to life.

Process leadership at the cutting edge

TSMC’s strength rests on two main pillars: advanced process technology and production scale.

  • Advanced nodes: Leading-edge process technologies like 5 nm, 4 nm, and beyond pack more transistors into each chip and improve power efficiency. For AI accelerators, that means more compute in the same footprint and less wasted energy, which is critical for both performance and operating costs.
  • Scale at volume: It is one thing to build a few prototype chips on a fancy node. It is another to manufacture them by the millions with high yields and consistent quality. TSMC’s ability to run high-volume production on advanced nodes gives it an edge in serving both cloud giants and fast-moving AI startups at the cost and scale they need.

An ecosystem built on trust

TSMC is more than a factory. It sits at the center of a large ecosystem that includes:

  • EDA (electronic design automation) vendors that provide the tools to design complex chips
  • Material suppliers that enable advanced process and packaging technologies
  • Major chip designers that push the limits of what is possible with system-on-chip (SoC) architectures

This tight collaboration helps customers move from design to mass production faster, with fewer surprises. Over time, that has built a deep trust network. For companies betting billions on new AI hardware, TSMC has effectively become the default partner for dependable yields and rapid ramp-up.

How AI Supercharged Chip Demand

The AI boom did not just increase chip demand a little bit, it changed its nature entirely. Instead of running relatively simple, generic workloads, data centers now spend a growing share of their power and compute budget on AI training and inference.

Two major shifts are at work here: intensity and specialization.

  • Intensity: Large language models and generative AI require huge amounts of compute. That translates to many more chips per data center compared with legacy workloads.
  • Specialization: AI workloads run best on accelerators and specialized silicon, not on generic CPUs. Each new generation of AI chip raises the bar on performance and efficiency, which keeps pushing the need for advanced nodes.

Hyperscalers and data centers as AI fuel tanks

Cloud providers and hyperscalers are spending heavily to build AI infrastructure. They order custom chips designed for training and inference, often tailored to their own platforms and software stacks. Those designs then end up on TSMC’s production lines as wafers.

The result is straightforward: more wafers, higher utilization, and more revenue flowing to TSMC. As AI infrastructure spending grows, so does TSMC’s role in the global compute supply chain, which in turn feeds into its valuation.

Nodes are not enough: advanced packaging steps in

To meet AI performance goals, you cannot rely on process nodes alone. Packaging has become just as important.

Technologies like chiplet architectures and advanced interposers allow multiple dies to be combined into one package, improving bandwidth, latency, and power characteristics. TSMC has invested heavily in these advanced packaging capabilities, which:

  • Broaden its addressable market beyond simple wafer fabrication
  • Deepen customer lock-in, since customers rely on TSMC for both the chip and how it is assembled
  • Create new opportunities for higher-margin services

Building a Trillion-Dollar Valuation

Reaching a $1 trillion market capitalization is not just about a hot narrative. Markets look at fundamentals like revenue growth, margins, capital efficiency, and long-term cash flow potential. In TSMC’s case, several forces have come together to support that kind of valuation.

  • AI-driven revenue surge: As demand for AI accelerators climbs, TSMC enjoys higher wafer utilization and can command premium pricing for its most advanced nodes.
  • Operational excellence: Strong yields and manufacturing efficiency help protect gross margins, even as process complexity and R&D requirements increase.
  • Smart capital allocation: TSMC directs massive capex into expanding capacity at advanced nodes and in advanced packaging. That positions it to meet long-term demand instead of scrambling to catch up.
  • Customer concentration: A handful of large customers, particularly hyperscalers and major chip designers, account for a significant share of revenue. This concentration amplifies growth but also introduces strategic risk that investors watch closely.

Investor sentiment and the macro AI story

Valuations are as much about the future as the present. AI is widely viewed as a multi-decade growth engine that will reshape industries and infrastructure. Companies that control critical parts of the AI supply chain have been rewarded with premium valuations.

TSMC sits at a foundational layer of that chain. It does not own the end-user relationship or the software stack, but it controls the manufacturing capacity that everyone else needs. That strategic position means investors are not just valuing current earnings, they are pricing in TSMC’s long-term optionality and influence in the AI economy.

Opportunities on the Road Ahead

TSMC’s path toward and beyond $1 trillion is full of opportunity, but it is not without obstacles. On the positive side, several trends could support continued growth.

Key opportunities for TSMC

  • AI beyond the data center: As AI moves into edge devices, cars, and industrial systems, demand for specialized silicon will spread beyond cloud data centers. That opens new markets for TSMC in areas like automotive, IoT, and industrial automation.
  • Advanced packaging leadership: The rise of chiplet ecosystems and 3D packaging creates additional value pools. TSMC’s leadership in these technologies can translate into higher-margin business and deeper integration with customer roadmaps.
  • Long-term customer commitments: Multi-year supply agreements and capacity reservation models provide more predictable revenue and better visibility into future demand. For a capital-intensive business, that stability is extremely valuable.

Risks That Could Bend the Trajectory

No trillion-dollar story comes without a risk section, and TSMC is no exception. Several structural and geopolitical factors could influence how its journey plays out.

Major risks to watch

  • Geopolitical uncertainty: TSMC sits at the center of cross-strait tensions and global technology competition. Export controls, trade restrictions, or geopolitical shocks could disrupt supply chains or limit access to certain technologies and markets.
  • Capital intensity: Advanced-node fabs are staggeringly expensive and require ongoing investment. If demand suddenly cools or a cyclical downturn hits, the pressure on free cash flow could rise quickly.
  • Technological competition: Rival foundries are investing heavily to close the gap, and some large cloud providers are exploring more in-house manufacturing options. While TSMC still leads, the competitive landscape is far from static.

What It Means for Investors and Industry Players

TSMC’s rise signals a broader shift in how value is captured in the tech stack. For years, much of the attention was on software and services. Now, control of manufacturing capacity and process technology is being recognized as a strategic moat in its own right.

For investors, that has a few implications:

Strategies for investors

  • Look across the semiconductor value chain: Exposure does not have to stop at foundries. Equipment makers, materials suppliers, and packaging specialists all participate in the same growth story and may offer different risk-reward profiles.
  • Track capex and capacity guidance: TSMC’s capital expenditure and capacity plans offer valuable signals about expected supply-demand balance in advanced nodes and packaging.
  • Monitor geopolitics and regulation: Policy shifts, export controls, and regional tensions can directly affect cross-border trade and technology flows. Staying informed is not optional here.

Beyond $1T: What Keeps TSMC in the Lead?

Assuming TSMC reaches or sustains a $1 trillion valuation, the natural question becomes: what keeps it there? The answer revolves around continued innovation, execution, and partnership.

To maintain leadership, TSMC will need to:

  • Keep investing heavily in R&D for future process nodes and packaging technologies
  • Protect its reputation for manufacturing excellence and high yields
  • Deepen strategic relationships with key customers across AI, cloud, automotive, and edge computing

At the same time, the rest of the semiconductor ecosystem – from materials to tools to packaging – must scale in step to support the AI revolution. TSMC cannot carry that load alone, even if it sits at the center.

Innovation through collaboration

The next wave of chip breakthroughs will not be created in isolation. Designers, foundries, EDA vendors, and cloud providers will increasingly co-develop solutions to squeeze more performance out of physical limits.

TSMC’s role as a central manufacturing partner gives it influence over how those collaborations take shape. It also gives it a responsibility to enable progress across the industry, not just for a handful of flagship customers.

Conclusion: The Physical Layer of the AI Economy

TSMC’s ascent toward a $1 trillion valuation, powered in large part by AI demand, marks a milestone for both the semiconductor industry and global tech markets. It highlights how crucial manufacturing scale, process leadership, and strategic investment are in capturing the value created by AI.

For businesses and investors, the lesson is clear: control of the physical layer of computing – the chips, the wafers, the fabs – can translate into outsized economic value. In a world where software keeps demanding more from hardware, the companies that can reliably deliver that hardware sit in a very powerful position.

Call to action: Want deeper analysis and weekly briefings on the semiconductor market and AI infrastructure? Subscribe to our newsletter for expert insights, sector updates, and investment research.

Note: This analysis synthesizes market dynamics and technical trends to explain valuation drivers. Always consult a financial advisor before making investment decisions.

Bitrix24 Open Channel RAG Chatbot Guide

Bitrix24 Open Channel RAG Chatbot Guide

This guide describes how to implement a Retrieval-Augmented Generation (RAG) chatbot for Bitrix24 Open Channels using an n8n workflow and a webhook-based integration. It explains the complete data flow and component interactions, including webhook handling, event routing, document ingestion, embeddings with Ollama, vector storage in Qdrant, and the retriever plus LLM chain that produces accurate, context-aware responses.

1. Solution Overview

The RAG chatbot architecture combines Bitrix24 Open Channels with an n8n workflow that orchestrates:

  • Incoming Bitrix24 webhook events (message, join, install, delete)
  • Credential extraction and token validation
  • Message processing and routing to a Question & Answer retrieval chain
  • Document ingestion, text splitting, embeddings generation, and vector storage in Qdrant
  • LLM-based response generation grounded in retrieved documents
  • Reply delivery back to Bitrix24 via imbot.message.add

The result is a Bitrix24 chatbot that can answer user questions using your internal knowledge base, with reduced hallucinations and better traceability of where answers come from.

2. Why RAG for Bitrix24 Open Channels

Retrieval-Augmented Generation combines an LLM with an external knowledge source. For Bitrix24 Open Channels (chat, social integrations, or support queues), this provides:

  • Grounded answers: Responses are based on your company documentation, not only on the LLM’s pretraining.
  • Lower hallucination risk: The LLM is constrained by retrieved context, which can be logged and audited.
  • Operational efficiency: Agents and end users get instant access to relevant documents without manually searching.

3. High-level Architecture & Data Flow

At a high level, the n8n workflow processes Bitrix24 events and delegates message content to a RAG pipeline:

  1. Bitrix24 sends a webhook event to the n8n Webhook node (Bitrix24 Handler).
  2. The workflow extracts credentials and validates tokens.
  3. A Switch node routes events by type (message, join, install, delete).
  4. For message events, the user message is sent to a QA retrieval chain.
  5. The retriever queries Qdrant with embeddings generated by Ollama to obtain relevant document chunks.
  6. An LLM (for example Google Gemini) uses this context to generate a grounded answer.
  7. The workflow formats the response and calls imbot.message.add to post back to Bitrix24.

A separate subworkflow handles document ingestion and vectorization. It periodically fetches files from Bitrix24 storage, converts them into embeddings, and stores them in Qdrant.

4. Node-by-node Breakdown

4.1 Webhook Node: Bitrix24 Handler

The entry point for all Bitrix24 events is an n8n Webhook node configured as follows:

  • HTTP Method: POST
  • Path: bitrix24/openchannel-rag-bothandler.php
  • Response format: JSON payload

Bitrix24 is configured to send Open Channel and app events to this URL. The node passes the raw request body to downstream nodes where event type, tokens, and payload data are parsed.

4.2 Credentials & Token Validation

After the webhook, a combination of a Set node and an If node handles credential extraction and token validation:

  • The Set node stores:
    • CLIENT_ID
    • CLIENT_SECRET
    • Access and application tokens from the incoming Bitrix24 payload
  • The If node compares the incoming application token against the expected value. This is used to:
    • Reject unauthorized or malformed calls
    • Prevent abuse of the public webhook URL

On token validation failure, the workflow routes to an Error Response node that returns an HTTP 401 JSON response. This early exit avoids unnecessary calls to the vector store or LLM and protects your infrastructure from unauthorized access.

4.3 Event Routing with Switch Node

Once the request is validated, a Switch node inspects body.event in the incoming payload. Typical values include:

  • ONIMBOTMESSAGEADD – user sent a message to the bot
  • ONIMBOTJOINCHAT – bot was added to a chat
  • ONAPPINSTALL – application was installed
  • ONIMBOTDELETE – bot was removed or deleted

The Switch node routes each event type to a dedicated processing branch, for example:

  • Process Message for ONIMBOTMESSAGEADD
  • Process Join for ONIMBOTJOINCHAT
  • Process Install for ONAPPINSTALL
  • Optional cleanup logic for ONIMBOTDELETE

This separation keeps the workflow maintainable and makes it easier to extend behavior for specific event types.

4.4 Process Message: RAG Retrieval & QA Chain

The Process Message branch is responsible for extracting message metadata, running the RAG pipeline, and sending the final answer back to Bitrix24.

A typical implementation includes:

  • A Function or Set node that extracts from the payload:
    • DIALOG_ID
    • SESSION_ID
    • BOT_ID
    • USER_ID
    • The original user message, often stored as MESSAGE_ORI
  • Passing MESSAGE_ORI, along with authentication and domain parameters, into a Question and Answer Chain implemented via n8n nodes that connect to:
    • A vector store retriever backed by Qdrant
    • An LLM (for example Google Gemini) that uses retrieved context

The data flow in this branch is:

  1. Take the user message from MESSAGE_ORI.
  2. Call the vector store retriever to fetch top-K relevant document chunks from Qdrant.
  3. Inject the retrieved context and user question into the LLM chain.
  4. Receive a structured JSON response from the LLM that includes DIALOG_ID, AUTH, DOMAIN, and MESSAGE.
  5. Use those fields to call imbot.message.add and send the answer back to Bitrix24.

4.5 Embeddings & Vector Store (Qdrant + Ollama)

The RAG pipeline relies on embeddings and a vector database to retrieve relevant context. The example setup uses:

  • A document loader (for example a PDF loader) to read files and extract text.
  • A Recursive Character Text Splitter to break long documents into overlapping chunks. The overlap is tuned so that each chunk preserves enough context without becoming too large.
  • An embeddings model provided by Ollama, using nomic-embed-text to convert each text chunk into a vector representation.
  • A Qdrant collection (for example bitrix-docs) as the vector store that persists these embeddings along with metadata.

At query time, the retriever node uses the same embeddings model to embed the user query and then performs a similarity search against the Qdrant collection to find top-K relevant chunks.

5. Subworkflow: Document Ingestion & Vectorization

Document ingestion is handled as a separate subworkflow, which can be scheduled or triggered on demand. This subworkflow performs the following tasks:

  • List storages: Uses disk.storage.getlist to enumerate available Bitrix24 storages.
  • Locate target folder: Finds the specific folder where source documents are stored and then lists its child items.
  • Download files: Retrieves each file and passes it to the Default Data Loader (for example a PDF loader) to extract raw text.
  • Split text: Applies the Recursive Character Text Splitter to create overlapping text chunks suitable for retrieval.
  • Create embeddings: Calls the Ollama embeddings model (nomic-embed-text) for each chunk.
  • Store vectors: Inserts the resulting embeddings into the configured Qdrant collection, attaching metadata such as document identifiers or file paths.
  • Move processed files: Moves successfully processed files to a dedicated vector-storage folder to avoid double-processing on subsequent runs.

This separation of concerns makes it easier to manage ingestion independently from the real-time chatbot workflow and simplifies debugging of indexing issues.

6. Prompt Design, Output Format & Safety

The LLM in the RAG chain must produce a response that the workflow can parse reliably. To achieve this, the system prompt is designed to:

  • Constrain the LLM to use only retrieved context for answers.
  • Instruct the model not to fabricate information when the answer is unknown.
  • Enforce a strict JSON output structure.

The workflow expects a JSON object with the following keys:

  • DIALOG_ID
  • AUTH
  • DOMAIN
  • MESSAGE

This strict output format is critical. Downstream nodes assume this schema when constructing the imbot.message.add request. If the LLM returns additional text, comments, or a different structure, parsing may fail and the message will not be delivered correctly.

7. Security Considerations & Best Practices

When deploying an n8n-based Bitrix24 RAG chatbot in production, pay particular attention to security and operational safeguards:

  • Token validation: Always validate the application token and any access tokens before processing events. Reject requests that do not match expected values.
  • Secure secret storage: Store CLIENT_SECRET, application tokens, and other sensitive values in n8n credentials or a secrets manager instead of plain Set nodes.
  • Rate limiting: Limit the rate of calls to your embeddings model and Qdrant instance to avoid performance degradation or unexpected costs.
  • Data protection: Avoid ingesting or storing personally identifiable information (PII) in the vector store unless you have appropriate compliance and retention controls in place.

8. Deployment Checklist

Use the following checklist when moving this workflow into a stable environment:

  1. n8n hosting: Run n8n on a reliable platform such as Docker or n8n Cloud. Ensure HTTPS is configured for webhook endpoints.
  2. Webhook registration: Expose the webhook path externally and configure it in your Bitrix24 app installation routine. The Process Install branch typically calls imbot.register to register the bot and its webhook.
  3. Vector infrastructure: Provision Qdrant and Ollama (or another embeddings provider) and configure their connection parameters via environment variables or n8n credentials.
  4. Initial seeding: Use the ingestion subworkflow to index your company documents into Qdrant and verify that retrieval returns expected results.

9. Testing & Troubleshooting

9.1 Webhook and Message Flow Testing

Before going live, validate the workflow end-to-end using tools like Postman or curl:

  • Send a sample ONIMBOTMESSAGEADD event to the webhook URL. Confirm that:
    • The token validation step returns the correct HTTP status (200 for valid, 401 for invalid).
    • The Process Message branch receives MESSAGE_ORI and returns a JSON payload with a populated MESSAGE field.
    • The node responsible for sending responses successfully calls imbot.message.add and the reply appears in Bitrix24.

9.2 Common Issues & How to Address Them

  • 401 Invalid token:
    • Verify that the application token in Bitrix24 matches the one stored in n8n.
    • Check that the workflow maps the incoming token from the payload correctly before comparison.
  • No documents returned by retriever:
    • Confirm that your Qdrant collection contains vectors for the relevant documents.
    • Increase the topK value in the retriever node to broaden the search.
  • Hallucinations or off-topic answers:
    • Strengthen the system prompt to emphasize using only provided context.
    • Increase context size or adjust chunking parameters to provide more relevant text per query.
    • Optionally include source snippets or citations in the MESSAGE field to make grounding more visible to users.

10. Optimization & Advanced Configuration

Once the basic workflow is stable, several parameters can be tuned for better performance and answer quality.

  • Chunk size and overlap: Adjust the Recursive Character Splitter configuration to balance:
    • Context completeness (larger chunks, more overlap)
    • Noise and retrieval efficiency (smaller chunks, less overlap)
  • topK setting: Tune the number of retrieved chunks (

n8n + OpenAI: Automate Image Edits from Drive

n8n + OpenAI: Automate Image Edits from Google Drive

Learning goals

By the end of this guide, you will be able to:

  • Understand how n8n, Google Drive, and the OpenAI Images API work together in a single workflow
  • Build an n8n workflow that automatically generates and edits images using prompts
  • Handle base64 image data, convert it to files, and send multipart/form-data requests
  • Troubleshoot common issues like missing binaries, authorization errors, and Drive access problems

What this workflow does

This n8n workflow template shows how to automate image editing using the OpenAI Images API (gpt-image-1) with reference images stored in Google Drive. The workflow:

  1. Calls the OpenAI Images API to generate an image from a text prompt
  2. Converts the base64 response into a binary file that n8n can handle as an image
  3. Downloads reference images from Google Drive as additional inputs
  4. Merges all images into a single item with multiple binaries attached
  5. Sends a multipart/form-data /images/edits request to OpenAI, including multiple image[] fields
  6. Converts the edited image response back into a file for saving or further processing

Why automate image edits with n8n and OpenAI?

Manual image editing is slow and inconsistent, especially when you need many variations or frequent updates. By automating image edits with n8n, OpenAI, and Google Drive you can:

  • Centralize and manage all reference assets in Google Drive
  • Programmatically generate or edit images using prompts and templates
  • Batch-process multiple images for marketing, e-commerce, or creative work
  • Automatically store results or trigger follow-up workflows, such as publishing or notifications

Prerequisites

Before you start building the workflow, make sure you have:

  • An n8n instance (cloud or self-hosted)
  • An OpenAI API key with access to the Images API
  • Google Drive credentials configured in n8n
  • One or more reference images already uploaded to Google Drive (you will need their file IDs)

Key concepts before you build

1. OpenAI Images API basics

The workflow uses the OpenAI Images API with the gpt-image-1 model. You will interact with two main endpoints via HTTP Request nodes in n8n:

  • POST https://api.openai.com/v1/images/generations for creating a new image from a text prompt
  • POST https://api.openai.com/v1/images/edits for editing images using prompts and reference files

Both endpoints return image data in base64 format, usually in the field data[0].b64_json. This must be converted into a binary file in n8n so it can be treated as an image.

2. Base64 vs binary files in n8n

OpenAI responds with base64-encoded image data, which is text. n8n needs binary data for file uploads, downloads, and attachments. A dedicated conversion node in n8n transforms a base64 string into a binary file object that other nodes, such as Google Drive or HTTP Request (multipart/form-data), can use.

3. Handling multiple images in one request

To send multiple images to the OpenAI /images/edits endpoint, you must:

  • Combine the different binary files into a single item using Merge and Aggregate nodes
  • Send them as multiple image[] fields in a multipart/form-data request

This structure is important so OpenAI receives all reference images and the generated image together in one edit request.


Step-by-step: building the n8n workflow

Step 1 – Generate a base image with HTTP Request

The first step is to generate or request an image from OpenAI. In n8n, add an HTTP Request node and configure it as follows:

  • Method: POST
  • URL: https://api.openai.com/v1/images/generations (or /edits if you are starting from an existing image)
  • Headers:
    • Authorization: Bearer <YOUR_API_KEY>
    • Content-Type: application/json
  • Body: JSON with model, prompt, and size

Example JSON body for generating an image:

{  "model": "gpt-image-1",  "prompt": "A childrens book drawing of a veterinarian using a stethoscope to listen to the heartbeat of a baby otter.",  "size": "1024x1024"
}

When this node runs, the response will contain a field like data[0].b64_json holding the base64-encoded image.

Step 2 – Convert base64 to a binary image file

Next, you need to turn the base64 string into a binary file that n8n can send as a real image. Add a Convert Base64 String to Binary File node (or the equivalent conversion node in your n8n instance) after the HTTP Request.

Configure it to:

  • Read the base64 string from data[0].b64_json in the previous node’s output
  • Write the resulting binary data into a named binary property (for example, data)

After this step, you will have a binary image created by OpenAI that can be included with other files.

Step 3 – Download reference images from Google Drive

The edits endpoint can use multiple images as references. In this example, two Google Drive images are used. Add two Google Drive nodes (or more if you want more references):

  • Set each node to Download mode
  • Provide the File ID for each reference image
  • Ensure the node outputs the file as a binary property (for example, data, data_1, etc.)

Each of these nodes will output a binary file. These files will later be merged with the generated image file.

Step 4 – Merge and aggregate all image binaries

At this point, you have multiple sources of binary image data:

  • The generated image from the OpenAI generation call
  • One or more reference images from Google Drive

To send them together in a single request, you need to:

  1. Add a Merge node and configure it to Append or combine multiple input streams (for example, the two Drive nodes).
  2. Then add an Aggregate node and enable an option like includeBinaries so that all binary properties from the merged items are collected onto a single item.

After the Aggregate node, you should have one item that contains all binary images as separate binary properties. This is what the next HTTP Request node will use.

Step 5 – Send a multipart/form-data edit request to OpenAI

Now you are ready to call the /images/edits endpoint with multiple images. Add another HTTP Request node and configure it as follows:

  • Method: POST
  • URL: https://api.openai.com/v1/images/edits
  • Headers:
    • Authorization: Bearer <YOUR_API_KEY>
  • Content Type: multipart-form-data (as set in the node options)

In the body configuration, you will add:

  • Form fields (text):
    • model = gpt-image-1
    • prompt = Generate a photorealistic image of a gift basket labeled "Relax & Unwind"
  • Form binary data:
    • Each entry should use the field name image[]
    • Point each image[] field to one of the binary properties from the Aggregate node, such as:
      • image[] = binary property data (first Drive file)
      • image[] = binary property data_1 (second Drive file)
      • Optionally, another image[] for the generated image binary

When this node runs, OpenAI will receive a multipart/form-data request containing the model, prompt, and all images needed for the edit.

Step 6 – Convert the edited image back to a file

The /images/edits response will again contain base64-encoded image data, typically in data[0].b64_json. To store or use the edited image, add another Convert Base64 String to Binary File node after the edits HTTP Request.

Configure it to:

  • Read the base64 string from the OpenAI edits response
  • Write the binary output to a named property (for example, edited_image)

From here, you can:

  • Upload the edited image back to Google Drive
  • Send it in an email or Slack message
  • Trigger additional workflows, such as publishing to a CMS or e-commerce platform

Best practices for a reliable workflow

Credentials and security

  • Store your OpenAI API key and Google Drive credentials in n8n’s Credentials Manager. Avoid hardcoding secrets directly in node parameters.
  • Restrict Google Drive access with appropriate OAuth scopes or Service Account permissions so the workflow only sees what it needs.

Handling file sizes and image dimensions

  • Check OpenAI’s file size limits before uploading large images. Compress or resize reference images when necessary.
  • Use image sizes like 512x512 or 1024x1024 depending on the balance you want between quality and speed.

Managing rate limits and retries

  • OpenAI APIs have rate limits. Configure retry logic for transient errors, ideally with exponential backoff.
  • Use n8n features such as Execute Workflow on Failure or Wait nodes to control retry timing and error handling.

Debugging and validation tips

  • Inspect the raw responses of your HTTP Request nodes to confirm that data[0].b64_json is present and correctly formatted.
  • Temporarily save intermediate binary files to Google Drive to verify that conversions from base64 to binary are working.
  • Check that the Content-Type is correctly set to multipart/form-data when sending edit requests with files.

Use case examples

Marketing assets

Use curated product shots stored in Google Drive, then apply consistent prompts to generate seasonal or themed product images. This keeps brand styling uniform across many SKUs, while significantly reducing manual design work.

Creative prototyping

Combine rough sketches from Drive with photorealistic references. Automatically generate multiple variations of concept art, helping creative teams iterate faster without manually editing each version.


Common issues and quick fixes

  • Problem: Missing binary data on form submission
    Fix: Ensure the Aggregate node is configured to include binaries and that each formBinaryData field in the HTTP Request node points to the correct binary property name.
  • Problem: Authorization errors from OpenAI
    Fix: Verify the Authorization header is set to Bearer <API_KEY> in every HTTP Request node that calls OpenAI.
  • Problem: Google Drive access denied or file not found
    Fix: Double check file IDs, confirm that your Drive credentials are correct, and make sure the Service Account or OAuth user has permission to access those files.

Prompt ideas to get started

  • Photorealistic product scene:
    “Generate a photorealistic image of a gift basket on a white background labeled ‘Relax & Unwind’ with a ribbon and handwriting-like font.”
  • Children’s illustration:
    “A children’s book drawing of a veterinarian using a stethoscope to listen to the heartbeat of a baby otter.”

Recap

This workflow template shows how to:

  • Use n8n to call the OpenAI Images API and generate images from prompts
  • Convert base64 image data to binary files and back again
  • Download reference images from Google Drive and combine them with generated images
  • Send a multipart/form-data /images/edits request with multiple image[] fields
  • Store or reuse the edited image in downstream automation

By combining n8n, Google Drive, and OpenAI, you can build scalable, repeatable image-generation and editing pipelines that integrate directly into your existing processes.

FAQ

Can I add more than two reference images?

Yes. Add more Google Drive download nodes, merge their outputs, and include each binary as an additional image[] field in the multipart/form-data request.

Do I have to generate an image first, or can I only use Drive files?

You can do either. The template shows how to generate an image and then combine it with Drive references, but you can also skip the generation step and only send Drive images to the /images/edits endpoint.

Where should I store the final edited images?

A common pattern is to upload them back to Google Drive, but you can also send them to any other n8n integration, such as S3, a CMS, or a messaging platform.


Next steps

To try this out in your own environment:

  1. Import the n8n template linked below into your n8n instance
  2. Configure your OpenAI and Google Drive credentials in the Credentials Manager
  3. Update the Google Drive file IDs to match your own reference images
  4. Start with a simple prompt, run the workflow, and inspect each node’s output
  5. Adapt prompts, image sizes, and file handling to match your brand and use case

Need a custom workflow or implementation help? Reach out for support or subscribe to our newsletter to receive more templates, troubleshooting guides, and advanced n8n + OpenAI automation examples.

Automate WordPress Posts with n8n + OpenAI

Automate WordPress Posts with n8n + OpenAI

Publishing consistent, SEO-friendly blog posts takes time and focus. With an n8n workflow that connects OpenAI, DALL·E, and the WordPress REST API, you can turn a few keywords into a complete draft article with a featured image, ready for editorial review.

This guide walks you through how the workflow template works, what each node does, and how to adapt it for your own WordPress site.

What you will learn

By the end of this tutorial, you will understand how to:

  • Collect article requirements through a simple form in n8n
  • Use OpenAI to generate a title, outline, chapters, and conclusions
  • Optionally verify facts with a Wikipedia tool to reduce hallucinations
  • Assemble all content into clean HTML for WordPress
  • Automatically create a WordPress draft via the REST API
  • Generate a featured image with DALL·E and attach it to the post
  • Handle errors, costs, and security in a production-ready workflow

Key concepts before you start

n8n as the automation backbone

n8n is an open-source automation platform that lets you connect services using nodes and workflows. In this template, n8n:

  • Receives user input from a form trigger
  • Calls OpenAI and DALL·E through dedicated nodes
  • Communicates with the WordPress REST API
  • Performs validation, branching, and error handling

OpenAI for text generation

OpenAI is used twice in this workflow:

  • First call: Create the article structure (title, subtitle, introduction, chapter prompts, conclusions, and an image prompt) in JSON format.
  • Second call: Generate fully written HTML content for each chapter based on its prompt.

DALL·E for visual content

DALL·E (or a similar image generation model) creates a photographic featured image for the article. The image is based on an imagePrompt that OpenAI generates alongside the article outline.

WordPress REST API

The WordPress REST API lets n8n:

  • Create new posts with HTML content
  • Upload media (the generated image)
  • Set the uploaded media as the featured image

How the workflow template is structured

The workflow is built from a series of nodes, each handling a clear, isolated task. At a high level, the flow looks like this:

  • Form trigger – captures keywords, number of chapters, and target word count.
  • Settings node – stores user input and the WordPress URL.
  • OpenAI (outline) – generates title, subtitle, introduction, chapter prompts, conclusions, and an image prompt in JSON.
  • Wikipedia tool (optional) – checks or enriches factual content.
  • Validation node – confirms that all required JSON fields are present.
  • Split chapters – iterates through each chapter prompt.
  • OpenAI (chapter text) – writes HTML content for each chapter.
  • Merge content – combines introduction, chapters, and conclusions into one HTML article body.
  • WordPress node – creates a draft post with the generated content.
  • DALL·E node – generates the featured image.
  • Media upload + featured image – uploads the image and sets it as the featured image on the post.
  • Notification node – returns success or error to the form UI.

Step-by-step: building and understanding the workflow

Step 1 – Capture article requirements with a form trigger

The workflow begins with a Form Trigger node. This is where the user defines what kind of article they want. The form typically includes:

  • Keywords – a comma-separated list, for example: email marketing, automation, segmentation.
  • Number of chapters – often a dropdown, such as 3, 5, or 7 chapters.
  • Maximum word count – a numeric field that sets the approximate length of the article.

These values are passed along as input data for the rest of the workflow and define the scope and structure of the generated post.

Step 2 – Store settings and connect to WordPress

Next, a Settings node collects and standardizes the incoming values. It usually stores:

  • User-provided keywords
  • Selected number of chapters
  • Maximum word count
  • The base URL of your WordPress site

At this stage, you also configure the WordPress credentials used by the REST API node. Use n8n’s secure credential store instead of hard-coding API keys or passwords. These credentials must have permission to create posts and upload media.

Step 3 – Ask OpenAI for the article outline and image prompt

The first OpenAI node generates a complete article blueprint in JSON format. The prompt you send to OpenAI should request a structured response that includes:

  • title
  • subtitle
  • introduction (around 60 words)
  • conclusions (around 60 words)
  • imagePrompt for DALL·E
  • chapters – an array where each item has:
    • title
    • prompt (guiding what to write in that chapter)

The workflow template uses a strict JSON format so that later nodes can reliably parse the output. This is crucial for automation, because malformed JSON will break downstream processing.

Step 4 – Optionally enrich or verify with Wikipedia

For topics where factual accuracy matters, the workflow can call a Wikipedia tool after the outline is generated. This tool can:

  • Look up key terms or concepts from the outline
  • Return summaries or references that you can feed back into prompts

This step helps reduce hallucinations and ensures that the article is anchored in real, verifiable information. You can choose to use this enrichment to refine chapter prompts or to add citations in the final draft.

Step 5 – Validate the OpenAI JSON output

Before generating full chapters, a validation node checks that the OpenAI response is complete. It should confirm the presence of:

  • title
  • subtitle
  • introduction
  • conclusions
  • imagePrompt
  • chapters (with at least one chapter object)

If any required field is missing, the workflow:

  • Stops the flow before creating a WordPress post
  • Sends an error message back to the user through the form UI, for example:
    • “The AI response was incomplete. Please try different keywords.”

This prevents the creation of empty or malformed posts and improves reliability.

Step 6 – Split chapters and generate chapter content

Once the outline is validated, a Split (or similar) node iterates over the chapters array. Each chapter item contains:

  • A chapter title
  • A chapter prompt describing what should be covered

For each chapter, the workflow calls a second OpenAI node configured to:

  • Generate the chapter body in HTML format
  • Use limited formatting such as <strong>, <em>, lists, and simple headings
  • Ensure the chapter flows logically from previous sections
  • Avoid repeating concepts that were already covered

This per-chapter approach is especially useful for longer posts, because it:

  • Reduces the risk of responses being cut off due to token limits
  • Makes it easier to retry a single chapter if one call fails

Step 7 – Merge all content and prepare final HTML

After all chapters are generated, a merge node assembles:

  • The introduction
  • Each chapter title and body
  • The conclusions

The result is a single HTML string that will be sent to WordPress as the post content. A simple structure might look like this:

<h2>Introduction</h2>
<p>...</p>

<h2>Chapter Title</h2>
<p>...</p>

<h2>Conclusions</h2>
<p>...</p>

When building your own template, keep heading levels consistent and avoid overly complex HTML. WordPress will render this HTML directly in the post editor.

Step 8 – Create a WordPress draft post

Now that your HTML content is ready, the workflow uses a WordPress node to create a new post via the REST API. Typical settings include:

  • Status: set to draft so editors can review before publishing
  • Title: the generated article title
  • Content: the merged HTML string

Saving as a draft keeps humans in the loop. Editors can adjust tone, add internal links, or fact-check before publishing.

Step 9 – Generate a featured image with DALL·E

With the post draft created, the workflow turns to visual content. The DALL·E (or similar) node is called with the previously generated imagePrompt. This prompt should describe the desired image in enough detail to produce a relevant, high quality visual, for example:

“A modern, high resolution photograph of a person working on a laptop, representing marketing automation, soft natural lighting.”

The image generation node returns a binary image file, which is then ready to be uploaded to WordPress.

Step 10 – Upload media and set the featured image

Next, the workflow:

  1. Uses the WordPress media endpoint to upload the generated image.
  2. Receives a media ID in response.
  3. Updates the previously created post so that this media ID is set as the featured image.

After this step, your WordPress draft has both the full article content and a featured image attached, ready for final review.

Step 11 – Notify the user of success or errors

The final node sends a response back to the form UI. Depending on the workflow outcome, it can:

  • Confirm that the draft was created successfully, possibly with a link to the post
  • Return an error message if validation failed or an API call did not succeed

Clear feedback helps users adjust inputs, such as reducing the number of chapters or changing keywords.

Best practices for reliable n8n + OpenAI workflows

Write precise prompts

Prompt quality directly affects output quality. When calling OpenAI:

  • Specify that the response must be valid JSON with exact field names.
  • Include target lengths, such as “introduction of around 60 words”.
  • Describe the writing style and formatting rules, for example “use HTML paragraphs and headings, no inline CSS”.

Limit hallucinations with verification

For topics that require accuracy, integrate verification steps:

  • Use Wikipedia or other data sources to confirm key facts.
  • Optionally feed verified facts back into prompts to guide the AI.
  • Encourage the model to avoid making up statistics or dates without references.

Partition long articles into smaller tasks

Generating long posts in a single AI call can lead to truncated responses or inconsistent structure. This template solves that by:

  • Generating only the outline in the first call
  • Creating each chapter in a separate request
  • Merging all parts at the end

This approach improves stability and makes the workflow easier to debug.

Handle errors gracefully

Build safeguards into your workflow:

  • Validate JSON after each OpenAI call.
  • Check that the chapters array is not empty.
  • Return helpful error messages such as:
    • “Please reduce the number of chapters.”
    • “Try different or more specific keywords.”

Graceful failure prevents incomplete or broken posts from being created in WordPress.

Security, rate limits, and cost

  • API keys: Store OpenAI and WordPress credentials securely in n8n. Avoid exposing keys in plain text or in shared screenshots.
  • Rate limits: Be aware of OpenAI and image generation rate limits, especially if you plan to generate many posts in a short time.
  • Costs: Each text and image generation call consumes tokens or credits. Monitor your usage and:
    • Set sensible defaults for word counts and number of chapters.
    • Limit the number of retries for failed calls.

Example use cases

This n8n workflow template is useful for many teams, including:

  • Marketing teams that need topic-based blog drafts at scale.
  • Agencies creating first-pass content for clients before human editing.
  • Publishers who want consistent, SEO-optimized structure across large content libraries.

Quick recap

  • You start with a form in n8n that collects keywords, chapter count, and word limit.
  • OpenAI generates a structured outline and image prompt in JSON.
  • Optional Wikipedia checks help keep content factual.
  • Each chapter is written separately, then merged into a clean HTML article.
  • n8n creates a WordPress draft, generates a DALL·E image, uploads it, and sets it as the featured image.
  • Validation and error handling ensure that only complete, usable drafts are created.

FAQ

Can I change the writing style of the generated posts?

Yes. Adjust the prompts in the OpenAI nodes to describe your brand voice, such as “friendly and educational” or “formal and technical”. You can also specify target audiences, like “for beginner marketers” or “for software engineers”.

What if I need multilingual posts?

You can instruct OpenAI to write in a specific language by including it in the prompt, or duplicate parts of the workflow to generate multiple language versions. The same WordPress node can create separate posts per language if your site supports it.

Is it safe to give n8n access to my WordPress site?

Yes, as long as you follow security best practices. Use dedicated API credentials with only the permissions you need, store them in n8n’s credential manager, and avoid sharing them outside your automation environment.

How much manual editing is still required?

The workflow is

n8n + LangChain: YouTube Trending Workflow

Build an Automated YouTube Trending Detector with n8n + LangChain

This guide documents a complete n8n workflow that integrates LangChain/OpenAI with the YouTube Data API to automatically identify trending YouTube videos from the last 48 hours, normalize their metadata, and generate actionable content ideas. The focus is on a technical, node-level breakdown so you can adapt and extend the workflow for your own automation stack.

1. Workflow Overview

The automation is designed for creators and technical teams who need fast, repeatable detection of YouTube trends in a specific niche. Instead of manually scanning search results, the workflow uses:

  • n8n as the orchestration and data-processing layer
  • LangChain-style AI Agent backed by OpenAI to plan searches, call tools, and synthesize insights
  • YouTube Data API (via n8n’s YouTube node and HTTP Request node) to fetch recent videos and statistics
  • n8n workflow static data as a lightweight in-memory store for aggregating sanitized video metadata

The workflow is triggered by a chat-style request or an API call that specifies a niche (for example, fitness, digital marketing, tech reviews). The LangChain agent validates and refines this niche, generates up to three search queries, invokes a reusable youtube_search sub-workflow as a tool, then analyzes the consolidated results to produce trend insights and content recommendations.

2. High-Level Architecture & Data Flow

2.1 End-to-end process

  1. Trigger: A chat message or API request starts the n8n workflow and provides a niche or asks for help choosing one.
  2. Agent planning: The LangChain-style AI Agent confirms the niche, generates up to three distinct search terms, and calls a youtube_search tool for each query.
  3. Sub-workflow execution: The youtube_search sub-workflow:
    • Searches YouTube for videos published within the last 48 hours
    • Fetches detailed video metadata and statistics
    • Sanitizes text fields and appends each video’s data to n8n workflow static data using a fixed delimiter
  4. Aggregation & analysis: Once all tool calls complete, the agent receives a single consolidated payload, identifies patterns in titles, tags, and performance metrics, and returns structured recommendations plus direct YouTube links.

2.2 Key components

  • Trigger node: Starts the workflow when a chat message is received or an API endpoint is hit.
  • AI Agent node: Implements a LangChain-style agent with a system prompt that defines tools and analysis rules.
  • youtube_search sub-workflow: Encapsulates YouTube search, detailed video lookup, sanitization, and memory persistence.
  • Static data store: Uses workflow.staticData within n8n to accumulate video records as a single string for downstream LLM analysis.

3. Node-by-Node Breakdown

3.1 Trigger: chat_message_received

Purpose: Start the workflow when a user asks for trending topics in a niche.

Typical configuration:

  • Type: Chat trigger or Webhook / custom trigger (depending on your n8n setup)
  • Input: Text message that either:
    • Explicitly specifies a niche (for example, “Show me what’s trending in tech reviews”), or
    • Asks for help choosing a niche without specifying one

Behavior:

  • Extracts the raw user message as the initial context for the AI Agent.
  • If the niche is not clearly specified, the downstream agent is instructed to prompt the user with example niches such as:
    • Fitness
    • Digital marketing
    • Tech reviews
    • Food
    • DIY

Edge case: If your front end cannot support follow-up questions, you can pre-validate the niche in this node and fallback to a default niche or return an error if none is provided.

3.2 AI Agent Node (LangChain-style Agent)

Purpose: Coordinate the entire workflow using a language model. The agent validates the niche, generates search queries, calls the YouTube search tool, and synthesizes final insights.

Core responsibilities:

  • Confirm or infer the user’s niche based on the incoming message.
  • Generate up to 3 distinct YouTube search queries targeting that niche.
  • Call the youtube_search tool for each query.
  • Receive the aggregated, sanitized video data from static memory and produce a concise, high-signal analysis.

System prompt guidelines (conceptual, not literal):

  • Require the agent to explicitly confirm the niche with the user if it is ambiguous.
  • Instruct the agent to explore multiple angles, for example:
    • news + <niche>
    • how-to + <niche>
    • challenge + <niche>
  • Specify that the agent must:
    • Call the youtube_search tool up to three times, once per query.
    • Focus on overall patterns in titles, tags, and performance rather than single viral outliers.
    • Return structured recommendations and representative links.

Tool integration:

  • The youtube_search sub-workflow is exposed to the agent as a callable tool (for example, via n8n’s “Execute Workflow” node configured as a tool).
  • Each tool call receives a query string and any additional parameters (such as region or max results) as input.
  • The sub-workflow writes results into static data; the agent later reads a consolidated JSON-like string from that static store for analysis.

3.3 Sub-workflow: youtube_search

Purpose: Encapsulate YouTube search and video detail retrieval logic in a reusable, testable workflow that can be called as a tool by the AI Agent.

Responsibilities:

  • Execute a YouTube search scoped to:
    • regionCode = US
    • publishedAfter = now - 48 hours
    • Ordering by relevance
    • Limiting to a small number of results per query (for example, top 3)
  • Fetch detailed metadata for each video:
    • snippet
    • contentDetails
    • statistics
  • Sanitize and normalize text fields to support pattern detection.
  • Append each sanitized video record to the workflow’s static data store, separated by a fixed delimiter:
    • ### NEXT VIDEO FOUND: ###

3.3.1 YouTube Search Node

Node type: n8n YouTube node

Typical configuration:

  • Operation: Search
  • Resource: Video
  • Region code: US
  • Published after: current time minus 48 hours
  • Order: relevance
  • Max results: a small integer, for example 3, to limit API usage and keep analysis focused

Credentials:

  • Use n8n’s YouTube credentials configured with a Google API key or OAuth client that has access to the YouTube Data API v3.

3.3.2 Detailed Video Lookup (HTTP Request Node)

Node type: HTTP Request

Endpoint:

https://www.googleapis.com/youtube/v3/videos

Key parameters:

  • part=snippet,contentDetails,statistics
  • id=<comma-separated video IDs from search results>
  • key=<Google API key, if not using OAuth>

Behavior:

  • Batch video IDs to reduce the number of HTTP calls when possible.
  • Return a payload that includes:
    • snippet.title, snippet.description, snippet.tags
    • contentDetails.duration
    • statistics.viewCount, statistics.likeCount, statistics.commentCount

3.3.3 Duration-based Branching

Logic:

  • Inspect contentDetails.duration (ISO 8601 format, for example PT3M30S).
  • If the duration exceeds roughly 3 minutes 30 seconds, branch the flow to optionally fetch or enrich with additional metadata.

This branching is optional, but in the example workflow longer videos trigger extra processing. You can extend this branch to apply different scoring, exclude long-form content, or collect more contextual fields.

3.3.4 Sanitization & Static Data Storage

Goal: Normalize text fields so the language model can more easily detect patterns across titles, descriptions, and tags.

Typical operations:

  • Remove emojis from titles and descriptions.
  • Strip URLs from descriptions.
  • Normalize whitespace to single spaces and trim leading/trailing spaces.
  • Concatenate tags into a single string field.

Conceptual sanitization logic:

// remove emojis
text = text.replace(/\p{Emoji}/gu, '');
// remove urls
text = text.replace(/https?:\/\/\S+/g, '');
// normalize whitespace
text = text.replace(/\s+/g, ' ').trim();

Static data aggregation:

  • For each video, create a serialized representation containing:
    • Sanitized title
    • Sanitized description
    • Concatenated tags
    • Statistics (views, likes, comments)
    • Channel and video IDs
  • Append this string to workflow.staticData, separated by:
    • ### NEXT VIDEO FOUND: ###
  • This ensures the agent receives a single consolidated string containing all videos across all queries.

Error handling considerations:

  • If the YouTube API returns an error or empty results, you can:
    • Skip appending anything to static data for that query, and
    • Optionally return a status object to the agent so it can adjust its analysis.
  • For missing fields (for example, no tags), default to empty strings to avoid JSON parsing issues later.

4. Prompt Design & Query Strategy

4.1 Agent Prompt Design

Prompt engineering is critical for reliable automation. The system prompt provided to the AI Agent should:

  • Enforce niche confirmation:
    • If the user’s message does not clearly specify a niche, the agent must ask for clarification and suggest examples.
  • Limit search calls:
    • Instruct the agent to generate up to 3 distinct search queries per request.
    • Each query should cover a different angle or format within the niche.
  • Define tool usage:
    • The agent must call the youtube_search tool once per query.
    • After all tool calls, the agent should read and analyze the aggregated data.
  • Emphasize pattern detection:
    • Prioritize recurring hooks, topics, and tags over isolated one-off videos.
    • Encourage identification of common title structures and high-performing formats.

4.2 Example Search-Term Strategy

For a niche like tech reviews, the agent might generate queries such as:

  • latest smartphone review
  • budget vs flagship phone comparison
  • unboxing [brand] 2025

You can adapt this pattern to any niche by combining:

  • “latest” or “new” + product or topic
  • “how to” or “tutorial” + core skill in the niche
  • “challenge”, “vs”, or “comparison” + common entities in the niche

5. Result Analysis & Recommendation Generation

5.1 Analysis Focus Areas

Once the agent has access to the consolidated video metadata, it should focus on:

  • Title patterns:
    • Common keywords and hooks such as “vs”, “review”, “first look”.
    • Repeated phrasing patterns (for example, “X you need to know before…”, “I tried X so you don’t have to”).
  • Tag clusters:
    • Frequently co-occurring tags that indicate subtopics or content clusters.
    • Tags that consistently appear in higher-view videos.
  • Engagement metrics:
    • viewCount, likeCount, commentCount.
    • When possible, translate counts into rates, such as views per hour since upload, to better approximate “trending” status.
  • Content gaps & opportunities:
    • Identify topics that are emerging but not yet saturated.
    • Suggest complementary formats like short explainers, debunk videos, or reactions to trending uploads.

5.2 Link Formatting

The agent’s final output should include clickable YouTube links in a consistent format:

  • Video URL:
    https://www.youtube.com/watch?v={video_id}
  • Channel URL:
    https://www.youtube.com/channel/{channel_id}

This makes it easy for creators or downstream tools to jump directly to representative videos and channels.

5.3 Recommended Output Structure

A robust final response from the agent typically includes:

  • Trend summary:

n8n + LangChain: YouTube Trending Finder

n8n + LangChain: YouTube Trending Finder (Technical Workflow Guide)

This guide explains, in a technical and implementation-focused way, how to build and run a YouTube trending-finder workflow using n8n, a LangChain-based AI Agent, and the YouTube Data API. The workflow automatically searches for highly relevant videos published in the last 48 hours, normalizes and aggregates metadata, and exposes structured information back to the AI Agent for trend analysis.

The content below is organized as reference-style documentation so you can understand the architecture, node configuration, data flow, and customization options without losing any of the original implementation details.


1. Workflow Overview

The workflow is designed for creators, social media managers, and growth teams that need a systematic way to detect what is gaining traction on YouTube in near real time. Instead of manually browsing search results, the workflow:

  • Receives a niche or topic via chat or webhook.
  • Uses an AI Agent (LangChain) to plan up to three tailored YouTube searches.
  • Delegates execution of those searches to a youtube_search sub-workflow.
  • Collects and cleans video metadata, including statistics and content details.
  • Stores results in global static memory as a single aggregated text payload.
  • Returns that payload to the AI Agent, which then extracts patterns, trends, and recommendations.

The core building blocks are:

  • Trigger: chat_message_received
  • AI Agent (LangChain): main orchestrator and analyst
  • Sub-workflow: youtube_search for YouTube queries
  • YouTube node: get_videos1 for initial search
  • Looping node: loop_over_items1 (Split in Batches)
  • HTTP Request node: find_video_data1 for videos.list
  • If node: if_longer_than_3_ for duration-based routing
  • Data processing & memory nodes: group_data1, save_data_to_memory1, retrieve_data_from_memory1, response1

2. High-Level Architecture

2.1 Control Flow

  1. chat_message_received listens for incoming user input (for example from a chat UI or webhook).
  2. The input is passed to the AI Agent (LangChain), which:
    • Validates that a niche is present, or requests one if missing.
    • Plans up to three YouTube searches with niche-specific query terms.
    • Invokes the youtube_search sub-workflow as a tool.
  3. youtube_search executes the actual YouTube Data API calls using the get_videos1 node and, optionally, find_video_data1 for enriched metadata.
  4. Results are looped, cleaned, normalized, and appended into global static memory with a fixed separator token.
  5. The aggregated payload is returned to the AI Agent through retrieve_data_from_memory1 and response1.
  6. The AI Agent analyzes patterns in titles, tags, and engagement metrics, then outputs recommendations for the creator.

2.2 Separation of Concerns

  • AI Agent (LangChain): Handles strategy, search term selection, and interpretation of trends.
  • youtube_search sub-workflow: Handles concrete API interaction, filtering, and normalization.

This separation keeps the LangChain logic focused on reasoning, while n8n nodes manage API details, pagination, and structured data handling.


3. Node-by-Node Breakdown

3.1 Trigger: chat_message_received

Purpose: Entry point for the workflow. It receives a message that typically includes the user’s niche or topic of interest.

  • Type: Trigger node (chat or webhook based, depending on your environment).
  • Output: Text payload (e.g., message or content) passed to the AI Agent.

Edge cases:

  • If the message does not contain a niche, the AI Agent is responsible for asking the user to specify one. The trigger itself does not enforce validation.

3.2 AI Agent (LangChain)

Purpose: Acts as the “brain” of the workflow. It interprets user intent, plans search strategies, and performs the final trend analysis.

3.2.1 System Prompt Responsibilities

The system prompt for the AI Agent should instruct it to:

  • Verify that the user has specified a niche or topic. If not, ask the user to provide one.
  • Call the youtube_search tool up to three times, each time with different but related search terms tailored to the user’s niche.
  • Expect the sub-workflow to return results as a single aggregated text payload where each video is separated by:
    ### NEXT VIDEO FOUND: ###
  • Focus on patterns and trends across videos instead of evaluating any single video in isolation.

3.2.2 Tool Integration: youtube_search

  • Type: Sub-workflow exposed as a tool to LangChain.
  • Usage: The Agent passes a search query and optional parameters (e.g., niche-related keywords) to youtube_search.
  • Execution limit: Up to three calls per Agent run, as suggested by the system prompt, to balance coverage and API quota usage.

3.3 Sub-workflow: youtube_search

Purpose: Encapsulates all YouTube Data API interactions and result normalization. It returns a memory-style aggregated payload back to the AI Agent.

The sub-workflow typically contains the following nodes:

  • YouTube Search node: get_videos1
  • Batch processing node: loop_over_items1 (SplitInBatches)
  • HTTP Request node: find_video_data1 for videos.list
  • If node: if_longer_than_3_ for duration-based filtering
  • Data aggregation nodes: group_data1 and save_data_to_memory1
  • Memory retrieval and response nodes: retrieve_data_from_memory1, response1

4. YouTube Data Integration

4.1 Node: get_videos1 (YouTube Search)

Purpose: Fetches videos from YouTube that match the search query and are published within the last 48 hours, ordered by relevance.

4.1.1 Key Parameters

  • API: YouTube Data API (via n8n’s YouTube node).
  • Filter: publishedAfter set to “now minus 2 days” in ISO 8601 format.
  • Ordering: order = relevance to prioritize high-relevance results.

Expression for publishedAfter in n8n:

new Date(Date.now() - 2 * 24 * 60 * 60 * 1000).toISOString()

This expression ensures that only videos from the last 48 hours are returned.

4.1.2 Credentials

  • Use n8n’s Credentials feature for your Google / YouTube API key or OAuth configuration.
  • Avoid hardcoding keys directly in node parameters. Prefer environment variables where possible.

4.1.3 Edge Cases

  • If regionCode or other filters are set too narrowly, you may receive no results.
  • publishedAfter date is misconfigured (for example, future date), the API may return an empty list.

4.2 Node: loop_over_items1 (SplitInBatches)

Purpose: Iterates over the list of videos returned by get_videos1 and optionally fetches more detailed data for each video.

  • Type: SplitInBatches node in n8n.
  • Usage: Processes each video item in sequence or in manageable batches, which is useful for quota control and error isolation.

Error Handling:

  • If a single video fails in a downstream node, you can configure the workflow to continue processing the remaining items, depending on your n8n error settings.

4.3 Node: find_video_data1 (HTTP Request)

Purpose: Enriches each video with detailed metadata that is not available in the initial search response, such as duration and statistics.

4.3.1 API Endpoint

The node calls the YouTube Data API videos.list endpoint:

GET https://www.googleapis.com/youtube/v3/videos  ?key=YOUR_API_KEY  &id={videoId}  &part=contentDetails,snippet,statistics

4.3.2 Data Retrieved

The response includes, among other fields:

  • Statistics: viewCount, likeCount, commentCount
  • Content details: duration in ISO 8601 format (for example, PT6M30S)
  • Snippet: title, description, tags, channelId

4.3.3 Common Pitfalls

  • Empty stats: If statistics fields are missing or empty, verify that:
    • The correct videoId is passed from loop_over_items1.
    • The part parameter includes statistics and contentDetails as required.
  • Quota usage: Each videos.list call consumes quota. Consider limiting the number of items or skipping details for low-priority results if needed.

4.4 Node: if_longer_than_3_ (If)

Purpose: Filters or routes videos based on their duration, specifically to identify content longer than approximately 3 minutes and 30 seconds.

4.4.1 Duration Conversion

Since YouTube returns duration in ISO 8601 format, a helper function in a Code node or expression is used to convert it to seconds. The If node then checks if the duration is greater than 210 seconds (3 minutes 30 seconds).

Behavior:

  • Videos longer than 3m30s can be routed through one branch (for example, “keep” or “prioritize”).
  • Shorter videos can be excluded or handled differently, which is useful when you want to filter out very short clips for certain niches.

4.5 Nodes: group_data1 and save_data_to_memory1

Purpose: Normalize, clean, and persist video data into n8n’s global static memory for later retrieval by the AI Agent.

4.5.1 Normalization & Cleaning

A Code node (often part of or preceding group_data1) typically performs:

  • Description cleaning: Remove URLs, emojis, and unnecessary characters from description.
  • Whitespace trimming: Normalize spacing in titles and descriptions.
  • JSON stringification: Convert each normalized item into a JSON string for consistent storage.

4.5.2 Memory Storage

Each JSON-stringified video record is appended to global static memory with a fixed separator:

" ### NEXT VIDEO FOUND: ### "

This design allows the AI Agent to receive a single text payload that can be easily split on the separator token, while still being readable as a long-form text block.

Best practices:

  • Sanitize text to avoid storing external URLs or personally identifiable information (PII) in memory.
  • Consider truncating very long descriptions to control memory size.

4.6 Nodes: retrieve_data_from_memory1 and response1

Purpose: Read the aggregated data from global static memory and return it to the AI Agent as a single payload.

  • retrieve_data_from_memory1: Fetches the stored concatenated JSON strings from static memory.
  • response1: Sends the aggregated payload back to the AI Agent in the expected format.

The AI Agent then uses this payload to detect patterns in tags, titles, and engagement metrics.


5. Agent-Side Analysis Logic

5.1 Trend Detection Strategy

Once the AI Agent receives the aggregated memory payload, it should:

  • Identify repeated tag clusters across many videos, such as:
    • "how-to", "review", "vs", or other niche-specific trending keywords.
  • Observe recurring title patterns, for example:
    • Listicles
    • Question-based titles
    • "X vs Y" comparisons
    • "new feature" or "reacts to" formats
  • Compare engagement signals:
    • Views, likes, and comments within the 48-hour window.
    • Emphasis on fast-rising engagement rather than absolute numbers.
  • Produce actionable recommendations, including:
    • Effective hooks and title styles.
    • Ideal video length for the niche.
    • Additional search terms or angles to test next.

6. Example Output for Creators

The Agent should focus on surfacing patterns instead of pointing to a single “best” video. Typical insights might look like:

  • Short explainers with “Why” in

Automate LinkedIn Lead Enrichment with n8n

Automate LinkedIn Lead Enrichment with n8n

Looking to turn raw LinkedIn profiles into fully enriched, outreach-ready leads without manual research? This guide walks you through a complete, production-ready n8n workflow that connects Apollo.io, Google Sheets, RapidAPI or Apify, and OpenAI into a single automated pipeline.

By the end, you will understand each stage of the workflow, how the n8n nodes fit together, and how to adapt the template to your own stack.


What you will learn

In this tutorial-style walkthrough, you will learn how to:

  • Generate targeted leads from Apollo.io using n8n
  • Clean and extract LinkedIn usernames from profile URLs
  • Track lead enrichment progress using Google Sheets status columns
  • Reveal and validate email addresses before outreach
  • Scrape LinkedIn profiles and posts using RapidAPI or Apify
  • Summarize profiles and posts with OpenAI for personalized messaging
  • Append fully enriched contacts to a final database for sales and marketing
  • Handle errors, rate limits, and retries in a robust way

Why automate LinkedIn lead enrichment with n8n?

Manual lead research is slow, inconsistent, and difficult to scale. An automated n8n workflow solves several common problems:

  • Faster lead generation at scale – Run searches and enrichment around the clock without manual work.
  • Consistent enrichment and tracking – Every lead passes through the same steps with clear status markers.
  • Clean, validated contact data – Emails are verified before they ever reach your outreach tools.
  • Automatic summarization – Profiles and posts are turned into short summaries for personalized messages.

n8n is ideal for this because it lets you visually chain APIs, add conditions, and maintain state using tools like Google Sheets, all without heavy custom code.


How the n8n workflow is structured

The template is organized into logical stages. In n8n, these often appear as color-coded node groups so you can see the pipeline at a glance. The main stages are:

  • Lead generation from Apollo.io
  • LinkedIn username extraction
  • Lead storage and status tracking in Google Sheets
  • Email reveal and validation
  • LinkedIn profile and posts scraping (RapidAPI primary, Apify fallback)
  • AI-based summarization and enrichment with OpenAI
  • Appending fully enriched leads to a final database
  • Scheduled retries and status resets for failed items

Next, we will walk through these stages step by step so you can see exactly how the template works and how to adapt it.


Step-by-step guide to the LinkedIn enrichment workflow

Step 1 – Generate leads from Apollo.io

The workflow begins by calling the Apollo API to search for leads that match your criteria. In n8n, this is usually done with an HTTP Request node configured with your Apollo credentials.

Typical Apollo search filters include:

  • Job title or seniority
  • Location or region
  • Industry or company size
  • per_page to control how many leads are returned per request

The response from Apollo typically includes fields such as:

  • id
  • name
  • linkedin_url
  • title

In n8n, you then use a combination of nodes to prepare this data:

  • HTTP Request (Apollo) – Executes the search and retrieves the leads.
  • Split Out – Splits the array of results into individual items so each lead can be processed separately.
  • Set – Cleans and reshapes fields, for example keeping only the fields you need.
  • Google Sheets (append) – Appends each lead as a new row in a central sheet.

At the end of this step, you have a structured list of leads in Google Sheets, ready for enrichment.


Step 2 – Extract and clean LinkedIn usernames

Most LinkedIn URLs contain a standard prefix and sometimes query parameters. For scraping APIs, you usually need just the username portion.

Typical URLs look like:

https://www.linkedin.com/in/jane-doe-123456/
https://www.linkedin.com/in/john-doe?trk=public_profile

The workflow uses either:

  • An OpenAI node with a simple prompt to extract the username, or
  • A lightweight Code node (JavaScript) to strip the prefix and remove trailing parameters

The goal is to convert the full URL into a clean username, for example:

  • https://www.linkedin.com/in/jane-doe-123456/jane-doe-123456

This cleaned username is then stored back in Google Sheets and used later when calling the LinkedIn scraping APIs.


Step 3 – Store leads in Google Sheets with status tracking

To make the workflow resilient and easy to monitor, each lead is written to a central Google Sheet that includes several status columns. These columns act like a simple state machine for each contact.

Common status columns include:

  • contacts_scrape_status (for example pending, finished, invalid_email)
  • extract_username_status (for example pending, finished)
  • profile_summary_scrape (for example pending, completed, failed)
  • posts_scrape_status (for example unscraped, scraped, failed)

By updating these fields at each stage, you can:

  • Resume the workflow after interruptions
  • Identify where leads are getting stuck
  • Trigger retries for specific failure states

In n8n, Google Sheets nodes are used to read, update, and append rows as the lead moves through the pipeline.


Step 4 – Reveal and validate email addresses

Once leads are stored, the next goal is to obtain valid email addresses. The workflow checks for rows where contacts_scrape_status = "pending" and processes only those leads.

The typical sequence is:

  1. Call Apollo person match endpoint using an HTTP Request node to reveal the lead’s email address, where allowed by your Apollo plan and permissions.
  2. Validate the email using an email validation API such as mails.so or another provider of your choice.
  3. Check validation result with an If node in n8n to branch based on deliverability.

Based on the validation:

  • If the email is deliverable, the Google Sheet is updated with the email and contacts_scrape_status = "finished".
  • If the email is invalid or risky, the row is updated with contacts_scrape_status = "invalid_email".

Marking invalid emails explicitly allows you to schedule retries, use alternate verification services, or send those leads for manual review later.


Step 5 – Fetch LinkedIn profile data and recent posts

With valid emails and usernames in place, the workflow moves on to enrich each contact with LinkedIn profile content and recent posts. This step uses a two-layer approach for scraping.

Primary: RapidAPI LinkedIn data API

The main path uses a LinkedIn data API available through RapidAPI. A typical configuration includes:

  • Passing the cleaned LinkedIn username
  • Requesting profile details such as headline, summary, experience, and education
  • Retrieving recent posts or activities

The response is normalized with n8n nodes so that fields are consistent across leads.

Fallback: Apify-based scraper

If you cannot use RapidAPI or you hit limits, the template includes an alternate path that uses Apify. This path:

  • Triggers an Apify actor or task to scrape profile content and posts
  • Waits for the run to complete and fetches the results
  • Normalizes the payload to match the structure expected by the rest of the workflow

Error handling and retry logic

Scraping can fail for many reasons, such as rate limits or temporary network issues. To handle this cleanly:

  • When a scrape fails, the workflow sets profile_summary_scrape = "failed" or posts_scrape_status = "failed" in Google Sheets.
  • Scheduled triggers in n8n periodically scan for failed rows and reset them to "pending" so they can be retried.

This pattern ensures the workflow can run continuously without manual intervention, even if some calls fail on the first attempt.


Step 6 – Summarize and enrich with OpenAI

Raw profile text and post content is often too long or unstructured for sales outreach. The template uses OpenAI to turn this information into concise, personalized summaries.

Two OpenAI nodes are typically used:

  • Profile Summarizer Takes structured profile data (headline, about section, experience) and produces a short summary designed for cold outreach. Example outcome: a 2 to 3 sentence description of the person’s role, background, and interests.
  • Posts Summarizer Takes recent LinkedIn posts and summarizes key themes, tone, and topics in a brief paragraph.

The outputs from these nodes are then written back to Google Sheets, for example:

  • about_linkedin_profile – the profile summary
  • recent_posts_summary – the posts summary

At the same time, the status columns are updated, for example:

  • profile_summary_scrape = "completed"
  • posts_scrape_status = "scraped"

These summaries are now ready to be used in personalized email copy or outreach sequences.


Step 7 – Append fully enriched leads to a final database

Once a lead has:

  • A validated email address
  • A LinkedIn profile summary
  • A recent posts summary

the workflow treats it as fully enriched and moves it into a dedicated “Enriched Leads” database.

In the template, this final database is another Google Sheet, but you can later swap this out for a CRM or data warehouse.

Typical logic at this stage:

  • Use a Google Sheets node to append or update the lead in the Enriched Leads sheet.
  • Match records by email address to avoid duplicates.
  • Optionally, mark the original row as archived or synced.

This gives your sales or marketing team a single, clean source of truth for outreach-ready contacts.


Operational tips and best practices

Managing API keys, rate limits, and quotas

  • Store all API keys (Apollo, RapidAPI, Apify, OpenAI, email validation) in n8n credentials, not in plain text fields.
  • Rotate keys periodically and restrict them to the minimum permissions required.
  • Implement rate limit handling and backoff strategies, especially for scraping and AI APIs.
  • Request only the fields you need from each API to reduce payload size and costs.

Building resilience and observability

  • Rely on status columns in Google Sheets to track the state of each lead and make the process resumable.
  • Use executeOnce and scheduled triggers to control how often different parts of the pipeline run.
  • Log failures in a dedicated sheet or monitoring tool so you can spot patterns and fix root causes.
  • Send alerts (for example via email or Slack) when error rates spike or you hit quota limits.

Privacy, compliance, and terms of service

  • Review and comply with the Terms of Service for LinkedIn, Apollo, RapidAPI, Apify, and any other providers you use.
  • Ensure you have a lawful basis for storing and processing personal data under regulations like GDPR or CCPA.
  • Mask, encrypt, or tokenize sensitive data at rest if required by your internal policies.

Common pitfalls and how to troubleshoot them

  • Missing or malformed LinkedIn URLs Add validation steps before username extraction. For example, check that the URL contains "linkedin.com/in/" and normalize trailing slashes or parameters.
  • High rate of undeliverable emails Use a robust email validation provider and consider a fallback service. You can also route invalid emails to a separate sheet for manual review.
  • Rate-limited scraping endpoints Introduce queues or delays between requests, run scraping batches on a schedule, and use status columns to spread the load over time.

Scaling your LinkedIn enrichment system

As your volume grows, you may want to extend the template beyond Google Sheets and a single n8n instance.

  • Move to a database Store enriched leads in a database such as Postgres, BigQuery, or another data warehouse for better performance and analytics.
  • Distribute workload If a single n8n instance becomes a bottleneck, consider distributed workers or a message queue such as RabbitMQ or AWS SQS to spread tasks.
  • Add analytics Track metrics like enrichment success rate, email deliverability, and conversion rate from enriched leads to opportunities.

Recap and next steps

This n8n workflow template gives you a complete, end-to-end LinkedIn lead enrichment system powered by Apollo.io, Google Sheets, RapidAPI or Apify, and OpenAI. It is designed to be:

  • Resumable – Status columns and retries keep the pipeline running even when individual steps fail.
  • Observable – You can see exactly where each lead is in the process.
  • Extensible – You can plug in new enrichment sources, scoring logic, or CRM sync steps as you grow.

To get started:

  1. Provision and configure API keys for Apollo, scraping providers, OpenAI, and email validation.
  2. Import the n8n template and connect your credentials.
  3. Run the workflow on a small batch of leads to test each stage.
  4. Monitor errors, adjust rate limits, and refine prompts or filters as needed.

Call to action: If you want a ready-to-import n8n workflow or help adapting this pipeline to your stack (CRM integration, outreach tools, or data warehousing), reach out for a tailored implementation plan.

Automate LinkedIn Lead Enrichment with n8n

Automate LinkedIn Lead Enrichment with n8n

High quality, well-enriched leads are essential for any modern revenue operation. Yet manually sourcing contacts, checking email validity, and researching LinkedIn profiles for personalization is slow, inconsistent, and difficult to scale.

This article presents a production-grade n8n workflow template that automates LinkedIn-focused lead enrichment end to end. It uses Apollo.io for lead generation and email discovery, external LinkedIn scraping services for profile and post data, OpenAI for AI-driven summarization, and Google Sheets as the operational database and final lead repository.

The result is a repeatable, resilient pipeline that turns raw prospect lists into fully enriched, outreach-ready records.

Use case and value of automating LinkedIn lead enrichment

For sales, marketing, and growth teams, LinkedIn is often the primary source for B2B prospecting. However, manual workflows do not scale beyond a few dozen contacts per day and are prone to errors or inconsistent research depth.

Automating LinkedIn lead enrichment in n8n enables you to:

  • Programmatically generate prospect lists from Apollo.io based on job title, seniority, company size, geography, or other filters
  • Extract LinkedIn usernames from profile URLs to standardize scraping inputs
  • Reveal and validate business or personal emails before they enter your CRM or outreach tool
  • Collect profile data and recent posts, then summarize them with OpenAI for targeted, personalized messaging
  • Coordinate parallel enrichment steps with explicit status flags and structured retry logic

For automation professionals, this workflow illustrates how to design a modular enrichment pipeline with clear separation between data sourcing, enrichment, AI transformation, and storage.

Architecture overview of the n8n workflow

The workflow is intentionally modular so that each stage can be monitored, tuned, or replaced without affecting the entire system. At a high level, the pipeline covers:

  • Lead generation – Apollo.io API returns prospects that match defined search criteria.
  • Staging and normalization – Key fields are extracted and written into a staging Google Sheet with status columns.
  • LinkedIn username extraction – LinkedIn URLs are cleaned to produce canonical usernames for scraping.
  • Email enrichment and validation – Apollo.io and an email validation API are used to reveal and verify email addresses.
  • LinkedIn profile and posts scraping – External services fetch the “About” section and recent posts.
  • AI summarization – OpenAI generates concise profile and post summaries suitable for outreach templates.
  • Final aggregation – Fully enriched rows are appended to an “Enriched Leads Database” sheet.

Each stage is orchestrated by n8n using scheduled triggers, Google Sheets lookups, and robust error handling to avoid duplicate processing or stalled records.

Core components and integrations

The workflow relies on several key services, each handled through n8n nodes or HTTP requests:

  • n8n – Acts as the central orchestration engine, handles triggers, branching, retries, and error management.
  • Apollo.io API – Provides person search and email reveal endpoints used for initial prospecting and contact enrichment.
  • Google Sheets – Serves as both the operational staging area with status columns and the final “Enriched Leads Database” for downstream tools.
  • RapidAPI / LinkedIn Data API – Primary provider to scrape LinkedIn profile details and recent posts.
  • Apify – Alternative scraping provider for environments where RapidAPI is not available or desired.
  • OpenAI (GPT) – Consumes structured profile and post data to generate short, actionable summaries for personalization.
  • Email validation API – Verifies email deliverability, checks MX records, and flags invalid or risky addresses.

All credentials are configured via n8n’s credential system or environment variables to maintain security and facilitate deployment across environments.

Designing the Google Sheets data model

Google Sheets is used as the central data store and control plane. Proper column design is critical to coordinate asynchronous tasks, avoid race conditions, and implement reliable retries.

Essential identifier and data columns

  • apollo_id – The unique identifier from Apollo.io, used for deduplication and updates.
  • linkedin_url – The raw LinkedIn profile URL retrieved from Apollo.io or other sources.
  • linkedin_username – The cleaned username extracted from the URL, used as input for scraping services.

Status and workflow control columns

Each enrichment step is managed via explicit status columns. Typical examples include:

  • extract_username_status – Tracks LinkedIn username extraction, values such as pending or finished.
  • contacts_scrape_status – Reflects email enrichment and validation, for example pending, finished, or invalid_email.
  • profile_summary_scrape – Indicates whether profile scraping and summarization are pending, completed, or failed.
  • posts_scrape_status – Manages post scraping, values such as unscraped, scraped, or failed.

These status fields enable targeted queries such as “fetch the first row where profile_summary_scrape = pending” and support scheduled retry logic that periodically resets failed rows back to pending.

Detailed flow: from raw lead to enriched record

The following sequence describes how a single lead progresses through the system. In practice, n8n processes many rows concurrently within the constraints of API rate limits and your infrastructure.

1. Lead generation and initial staging

  1. A form submission, cron schedule, or manual trigger in n8n initiates an Apollo.io person search based on predefined filters such as role, geography, or industry.
  2. The Apollo.io response is normalized and key attributes are extracted (name, company, LinkedIn URL, Apollo ID, role, location, etc.).
  3. These records are appended to a staging Google Sheet. Newly created rows are marked with appropriate initial statuses, for example extract_username_status = pending and contacts_scrape_status = pending.

2. LinkedIn username extraction

  1. An n8n workflow periodically queries the staging sheet for the first row where extract_username_status = pending.
  2. The workflow parses the linkedin_url to remove URL prefixes and query parameters, leaving a clean linkedin_username.
  3. The cleaned username is written back to the sheet and extract_username_status is set to finished.

This normalization step creates a consistent identifier for downstream scraping services, which often expect only the username rather than the full URL.

3. Email enrichment and validation

  1. A separate n8n workflow looks for rows where contacts_scrape_status = pending.
  2. Using the Apollo.io match or email reveal endpoint, the workflow requests available personal and business emails associated with that contact.
  3. Any returned email addresses are sent to an email validation API, which checks syntax, domain configuration, and deliverability.
  4. If a valid email is identified, contacts_scrape_status is updated to finished. If all discovered emails are flagged as invalid, the status is set to invalid_email.

By centralizing validation in this step, only high quality email addresses proceed to your downstream CRM or outreach platform.

4. LinkedIn profile and posts scraping

  1. Another scheduled workflow picks up rows where profile_summary_scrape = pending or posts_scrape_status = unscraped, depending on how you structure the jobs.
  2. The workflow calls a LinkedIn scraping provider, typically via RapidAPI’s LinkedIn Data API as the primary option.
  3. If the primary scraping call fails or is unavailable, an Apify actor is used as a fallback to retrieve similar profile information.
  4. The returned data usually includes the profile headline, “About” section, and a list of recent posts. This raw content is stored in intermediate fields or passed directly to the AI summarization step.
  5. On success, the relevant status columns are updated, for example profile_summary_scrape = completed and posts_scrape_status = scraped. Errors set the status to failed so that scheduled retries can handle them.

5. AI-driven summarization with OpenAI

Once profile and post data are available, the workflow sends structured content to OpenAI. The prompts are designed for concise, outreach-ready outputs rather than verbose biographies.

  • The profile headline and “About” text are summarized into 2 to 3 short sentences that highlight key professional themes and potential outreach hooks.
  • Recent posts are analyzed to extract recurring topics, tone, and interests, then combined into two short paragraphs that capture what the person frequently talks about.

These summaries are written back to the Google Sheet, where they can be referenced directly by your email or LinkedIn messaging templates.

6. Final aggregation into the Enriched Leads Database

Once all enrichment steps are complete for a row, a final n8n workflow checks for records that meet the following criteria:

  • contacts_scrape_status = finished
  • profile_summary_scrape = completed
  • posts_scrape_status = scraped (or another success state depending on your design)

Records that satisfy these conditions are appended to the “Enriched Leads Database” sheet. This final dataset is clean, validated, and enriched with AI-generated personalization fields, ready for syncing into CRMs, sales engagement platforms, or marketing automation tools.

Error handling, retries, and resilience patterns

To ensure reliability in production, the workflow incorporates several best practices around error handling and idempotency.

  • Execute-once patterns – Each enrichment step selects a single row at a time using “return first match” queries in Google Sheets. This reduces the risk of concurrent workflows processing the same row.
  • Retry strategies – HTTP requests to external services such as RapidAPI or email validation APIs are configured with retry logic and a maximum number of attempts. Optional fields use “continue on error” so that a partial failure does not block the entire lead.
  • Scheduled reset of failed rows – Cron-based workflows periodically search for rows with statuses like failed or invalid_email and, where appropriate, reset them to pending after a cooldown period. This creates a safe, automated retry loop without manual intervention.
  • Status-driven orchestration – By centralizing state in Google Sheets, each workflow can be stateless and idempotent. The sheet becomes the single source of truth for the lead’s journey.

This design makes the automation robust against transient API failures and rate limit issues, which are common in scraping and enrichment workloads.

AI summarization strategy and best practices

AI is used in a focused way, with clear constraints on length and structure to maintain consistency and control costs.

  • Prompts instruct OpenAI to produce short, high-signal summaries rather than long narratives.
  • Outputs are structured into specific fields, for example “Profile summary” and “Recent posts summary”, which can be inserted directly into outreach templates.
  • Token usage is controlled by keeping prompts lean and limiting the amount of raw text passed from LinkedIn scraping to only what is necessary.

For sales teams, this approach yields concise talking points tailored to each prospect’s profile and content, without requiring manual research.

Privacy, security, and compliance considerations

Scraping and enriching personal data requires careful attention to legal and ethical standards. Before deploying this workflow, ensure that:

  • You review LinkedIn’s terms of service and confirm that your usage complies with their policies.
  • You understand and adhere to applicable data protection regulations such as GDPR, CCPA, or local equivalents.
  • You minimize the collection and storage of sensitive personal data, and only use the data for legitimate, permitted business purposes.
  • All API keys and credentials are stored securely using n8n credentials or environment variables, never hard-coded into nodes or committed to public repositories.

These practices help maintain trust and reduce regulatory risk while benefiting from automation.

Operational tips for running the workflow at scale

To operate this automation reliably in production, consider the following recommendations:

  • Start with small batches – Use low per_page values and limited search scopes in Apollo.io when first deploying. This helps validate the end-to-end flow and surface bottlenecks before scaling up.
  • Monitor rate limits and costs – Apollo.io, RapidAPI, OpenAI, and email validation providers typically have quotas and usage-based pricing. Track consumption and set alerts where possible.
  • Use the staging sheet as a control center – Add operational columns such as last_attempt_at and last_error to aid debugging and performance tuning.
  • Iterate on prompts – Refine OpenAI prompts to balance personalization quality, tone, and token usage. Compact, structured prompts generally perform best.

End-to-end example: lifecycle of a single lead

To summarize, a typical lead progresses through the system as follows:

  1. A scheduled n8n job triggers an Apollo.io search and appends new prospects to the staging sheet, marking extract_username_status = pending.
  2. A username extraction workflow converts linkedin_url to linkedin_username and sets extract_username_status = finished.
  3. A contacts enrichment workflow uses Apollo.io to reveal emails, validates them, and sets contacts_scrape_status to either finished or invalid_email.
  4. A profile scraping workflow processes rows where profile_summary_scrape = pending, retrieves LinkedIn profile and posts data, calls OpenAI for summaries, and updates profile_summary_scrape and posts_scrape_status to success or failure states.
  5. Once all required statuses indicate success, the lead is appended to the “Enriched Leads Database” sheet as a fully enriched, validated record.

Conclusion and next steps

This n8n-based workflow provides a scalable, modular framework for LinkedIn lead enrichment. It accelerates research, improves data quality, and equips sales teams with personalized, context-aware insights at the moment of outreach.

Because each stage is decoupled, you can easily swap providers, fine-tune prompts, or adjust retry policies without redesigning the entire pipeline. For example, you might replace the email validation service, experiment with different scraping providers, or add new enrichment steps such as company-level technographic data.

If you would like the exported JSON of this workflow for direct import into n8n, or a deployment checklist that covers environment variables, credential mapping, and recommended rate limits, a step-by-step setup guide can be prepared to match your specific stack and providers.

Call to action: If you are ready to operationalize automated lead enrichment, decide on your preferred scraping provider (RapidAPI or Apify), then request a tailored deployment checklist that outlines required credentials, recommended schedules, and configuration details.