Generate Google Meet Links Directly From Slack

Generate Google Meet Links Directly From Slack

Picture This: “Can Someone Drop a Meet Link?”… Again

You are in a busy Slack channel, the discussion is heating up, and someone says the classic line: “Let’s just jump on a quick call.” Then the chaos begins.

Who creates the Google Meet? Who has the right calendar? Why is everyone waiting for that one person who always “just needs a second” to find the Meet button?

If you are tired of playing “who has the meeting link,” this n8n workflow template is your new favorite coworker. With a simple Slack slash command, you can instantly generate a Google Meet link, drop it in the channel, and move on with your life.

What This n8n Workflow Template Actually Does

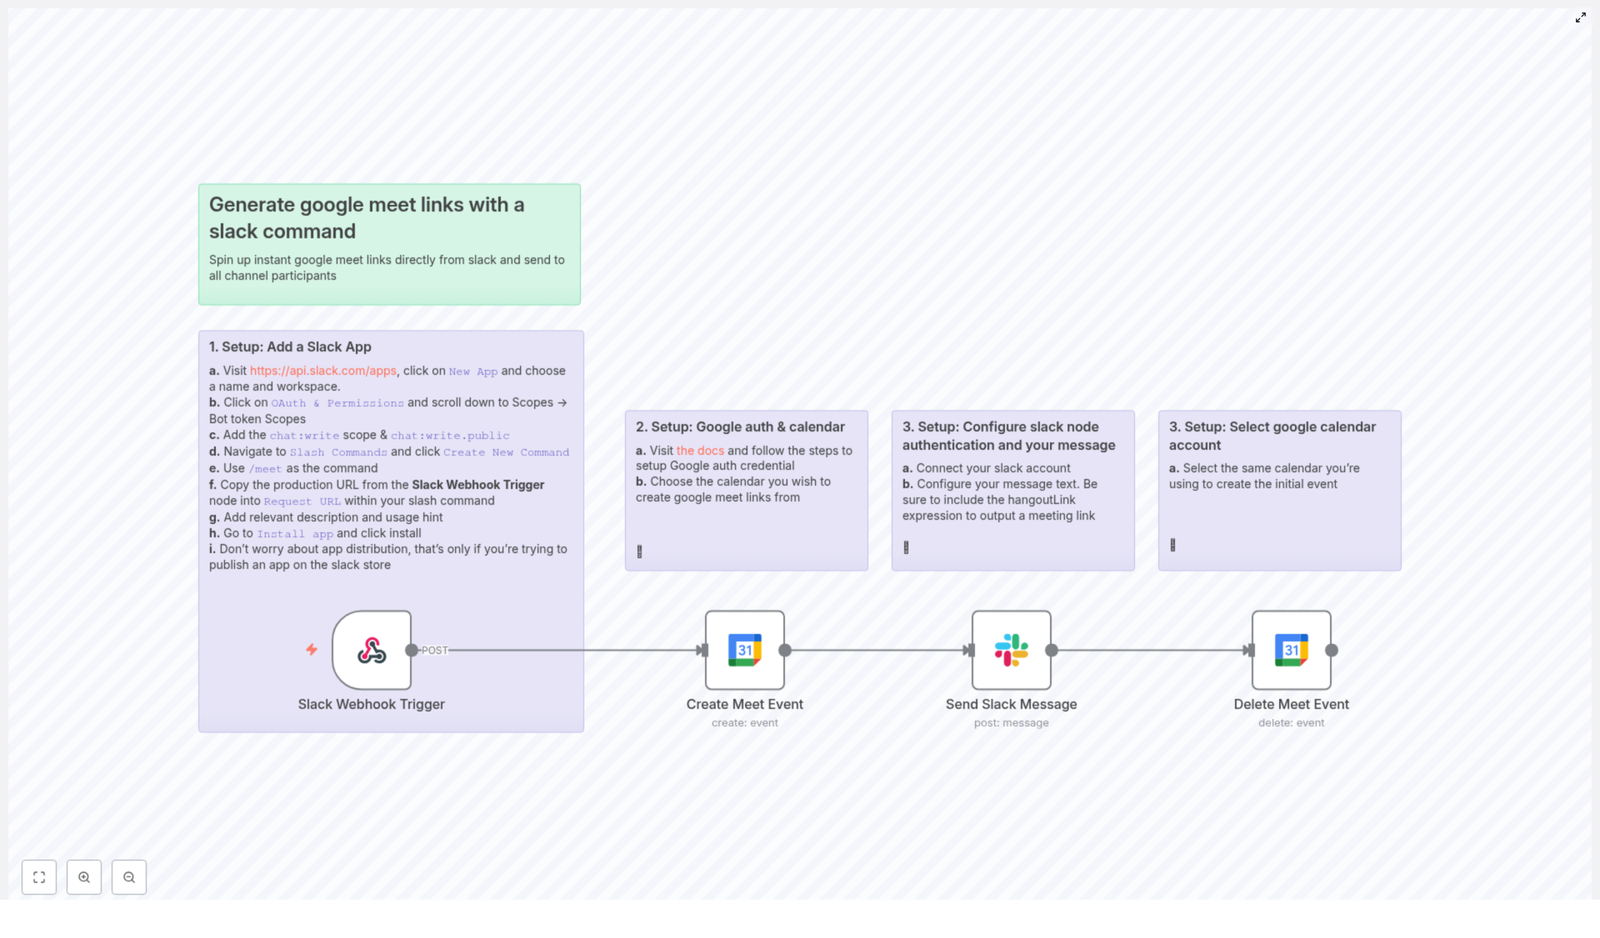
This template connects Slack and Google Calendar so you can create Google Meet links directly from Slack using a slash command. No tab switching, no manual event creation, no copy-paste juggling.

Here is the magic in plain terms:

  • You type /meet in Slack.
  • n8n listens for that command, creates a short Google Calendar event with a Meet link, and grabs the hangoutLink.
  • It posts that Google Meet link right back into the same Slack channel.
  • Then, to keep your calendar from looking like a graveyard of 15-minute “Quick chat” events, the workflow deletes the event again.

Result: instant Google Meet links in Slack, with zero manual work.

Why Automate Google Meet Links in Slack?

Manually creating and sharing meeting links is one of those tiny tasks that does not feel like a big deal… until you do it 20 times a day. Then it becomes a full-time job you never applied for.

Automating Google Meet link generation with n8n and Slack helps you:

  • Save time – No more jumping between Slack and Google Calendar.
  • Avoid mistakes – No wrong links, no forgotten invites, no “which Meet is this?” confusion.
  • Keep everyone aligned – The link is shared right in the channel where the conversation started.
  • Keep your calendar clean – The event is deleted after the link is shared, so your calendar is not cluttered with temporary calls.

In short, you get smoother meetings, less friction, and fewer “wait, where is the link?” messages.

How the n8n Workflow Works Behind the Scenes

Here is what happens each time someone uses the slash command in Slack:

  • The Slack Webhook Trigger node listens for the /meet command in your Slack workspace.
  • When the command comes in, the workflow uses the Google Calendar node to create a Google Meet event that:
    • Starts immediately
    • Lasts 15 minutes
    • Includes a Google Meet hangoutLink
  • The workflow then sends a Slack message back to the originating channel with the newly created Meet link.
  • Finally, the Google Calendar event is deleted so your calendar stays tidy while the Meet link lives on in Slack.

All of this happens automatically in the background. You just see a Meet link appear like it was always meant to be there.

Quick Setup Overview

To get this workflow running, you will set up three main things:

  1. A Slack app with a slash command.
  2. Google authentication and calendar access in n8n.
  3. Slack messaging configuration that posts the Meet link back to your channel.

Below is the detailed guide, step by step, so you can get everything connected without guesswork.

Step 1 – Create and Configure Your Slack App

This is where you teach Slack how to talk to your n8n workflow.

  1. Go to the Slack API Apps page and create a new app.
    • Pick a name that makes sense (for example, “Meet Bot” or “Instant Meet”).
    • Select the workspace where you want to use the /meet command.
  2. In your app settings, navigate to OAuth & Permissions.
  3. Under Bot Token Scopes, add these scopes:
    • chat:write
    • chat:write.public

    This gives your bot permission to post messages in channels.

  4. Next, set up a Slash Command:
    • Create a new command named /meet.
    • Copy the webhook URL from your Slack Webhook Trigger node in n8n.
    • Paste that URL as the Request URL for the slash command.
    • Add a short description and usage hint so your teammates know what it does, for example:
      • Description: “Create an instant Google Meet link.”
      • Usage hint: “Type /meet to generate a meeting link.”
  5. Finally, click Install App to add your new Slack app to your workspace.

Once this is done, Slack knows how to send the /meet command to your n8n workflow.

Step 2 – Connect Google with n8n and Choose Your Calendar

Now you need to let n8n talk to Google Calendar so it can create the Meet links for you.

Follow the official n8n Google OAuth documentation to configure your Google credentials. This ensures secure access to your Google account and calendar.

After your credentials are set up, choose the Google Calendar where you want these Google Meet links to be created. This is the calendar that will briefly host the 15-minute events used to generate the Meet URLs.

Step 3 – Configure the Slack Message in n8n

With Slack and Google both connected, you can now define what gets posted back into the channel.

In your Slack node inside the workflow:

  • Connect your Slack account so the node can send messages as your bot.
  • Set the message text to include the Google Meet link by using the hangoutLink expression.

The hangoutLink expression dynamically inserts the meeting URL created by the Google Calendar node, so each time you run the workflow, a fresh link is sent to Slack.

Step 4 – Make Sure the Right Google Calendar Account Is Used

To avoid any surprise “wrong account” issues, double check that the Google Calendar node is using the same calendar account you used for the initial Google Meet event configuration.

This keeps everything consistent and ensures that the event is created and deleted correctly in the right calendar.

Benefits You Get From This n8n Template

Once you have everything wired up, you get a surprisingly big payoff for a small setup:

  • Instant meeting links in Slack – Just type /meet and the link appears.
  • Google Calendar automation – Events are created automatically to generate Meet links.
  • Cleaner calendars – Temporary events are deleted after the link is posted, so your calendar is not flooded with “test” or “quick chat” entries.
  • Better team productivity – Less time chasing links, more time actually talking.

It is the small automation that quietly saves you from a lot of repetitive clicks.

Next Steps: Try the Template and Stop Manually Creating Meet Links

If your team lives in Slack and uses Google Meet, this workflow is a simple quality-of-life upgrade. No more asking “who has the link” or digging through calendar invites.

Set up the Slack app, connect your Google Calendar, configure the Slack message, and you are ready to generate instant meeting links with a single slash command.

Ready to plug this into your n8n instance and let it do the boring part for you?

Automated Book Recommendations with n8n & Open Library

Automated Book Recommendations with n8n & Open Library

Why automate your book recommendations?

Imagine this: every Friday at 11:00 AM, a fresh book recommendation quietly lands in your inbox. No scrolling through endless lists, no decision fatigue, just a new title waiting for you. Sounds nice, right?

That is exactly what this n8n workflow template does. It connects to Open Library, grabs a random book from a subject you choose (by default, juvenile_literature), and emails you the details. You set it up once, then let the automation do the rest.

What this n8n workflow actually does

At a high level, the workflow:

  • Runs on a schedule (every Friday at 11:00 AM) or whenever you trigger it manually
  • Looks up how many books exist in a specific Open Library subject
  • Checks if that subject has any books available
  • Picks one random book from the list
  • Collects both basic and detailed info about that book
  • Formats the authors as clickable links to their Open Library profiles
  • Sends you a nicely formatted HTML email with the full recommendation

So instead of hunting for something new to read, you just open your inbox and let the workflow surprise you.

When is this template useful?

This workflow is great if you:

  • Love reading but hate deciding what to read next
  • Want a fun, low-effort way to discover new titles
  • Are building a reading habit and like getting a weekly “nudge”
  • Curate books for kids or young readers and want random juvenile literature picks
  • Enjoy experimenting with n8n and want a practical, easy-to-customize example

And yes, you can absolutely switch the subject to something else. The workflow is built so you can tweak the topic in seconds.

How the workflow flows: step-by-step overview

Let’s walk through the journey from “nothing running” to “book in your inbox”.

  1. The workflow is triggered (either manually or by a weekly schedule).
  2. The subject is set to juvenile_literature by default.
  3. An HTTP request asks Open Library how many works exist for that subject.
  4. An IF check confirms that at least one book is available.
  5. If there are no books, you get an email saying nothing is available for that subject.
  6. If there are books, a random index is generated within the available range.
  7. Another HTTP request fetches basic info for the randomly selected book.
  8. A follow-up request retrieves detailed data like the description.
  9. The workflow merges and cleans up the data, including building the Open Library URL.
  10. A small function formats author names into HTML links.
  11. An HTML email is generated and sent to your configured email address.

Diving into the n8n nodes

1. Trigger nodes: manual and scheduled

The workflow starts with two trigger options:

  • Manual Trigger – Lets you run the workflow instantly from n8n whenever you want a recommendation on demand.
  • Cron Trigger – Schedules the workflow to run automatically every Friday at 11:00 AM. You can change the day and time to whatever fits your routine.

Use both if you like: automatic weekly picks plus the ability to grab an extra book whenever you feel like it.

2. Set Subject: choose what you want to read about

This node sets the subject that Open Library will use. In the template, it is statically set to juvenile_literature. That is perfect for children’s or young readers’ books.

If you want a different genre or topic, you simply replace that value with another Open Library subject key. The rest of the workflow keeps working the same way.

3. Retrieve Book Count from Open Library

Next, an HTTP Request node asks Open Library how many works exist for the chosen subject. It calls:

http://openlibrary.org/subjects/juvenile_literature.json?limit=0

The important part here is the metadata in the response, especially the work_count field. That tells n8n how many books it can randomly choose from.

4. Check Book Count: make sure there is something to recommend

An IF node checks whether work_count is greater than zero. There are two possible paths from here:

  • If work_count is 0 – No books are available for that subject. The workflow sends you a quick email letting you know there are no titles to recommend.
  • If work_count is greater than 0 – The workflow continues and picks a random book.

5. Select Random Book: pick a surprise

A Function node now comes into play. It generates a random index between 0 and the total number of works minus 1. That index is then used as an offset in the next HTTP request so that the workflow retrieves just one specific, random book from the subject list.

6. Retrieve Basic Book Info

Using the random offset, another HTTP Request node calls Open Library again to get the basic data for that one selected work. From this response, you get fields like:

  • Book title
  • Author keys
  • Book key

This information is the foundation for the next, more detailed lookup.

7. Retrieve Detailed Book Info

Now that you have the book’s key, the workflow sends another HTTP request to Open Library to fetch more detailed information. This typically includes:

  • Book description
  • Additional metadata about the work

At this point, you have both the basic and detailed data needed to build a rich recommendation email.

8. Filtered Book Info: combine and clean up the data

This node merges the key details from the previous responses and prepares them for the email. It pulls together information like:

  • Title
  • Description
  • Author data
  • A direct URL to the book’s page on Open Library

The result is a clean, structured set of fields that are easy to drop into an HTML email template.

9. Create Author String: clickable author links

Here, a Function node takes the author data and turns each author into a clickable HTML anchor tag. Each name links to the author’s profile page on Open Library.

The output is a nicely formatted string of authors that looks good in the email and invites you to explore more of their work.

10. Send Book Email: your recommendation arrives

Finally, an Email node sends everything to your inbox. It uses HTML formatting to include:

  • The book title
  • Linked author names
  • The book description
  • A clickable link to view the book on Open Library

You can customize the subject line, body text, and recipient email address to match your style or share recommendations with others.

Why this n8n workflow makes life easier

  • Save time – No more endless browsing. A curated random pick just appears in your inbox.
  • Discover more variety – Because the book is chosen at random, you are more likely to stumble across titles you would never have searched for.
  • Easy customization – Change a single subject parameter to switch genres or topics. The automation logic stays the same.
  • Flexible scheduling – Run it weekly, daily, or only when you feel like it. Just adjust the Cron trigger or use the manual trigger.

What you need to get started

To run this template, you only need a few basics in place:

  • An active n8n instance
  • SMTP credentials configured in n8n so emails can be sent
  • Your email address set in the Send Email node

Once that is done, you can import the template, update the subject if you want a different genre, tweak the schedule, and you are ready to go.

Wrapping up

This workflow is a simple but powerful example of what you can do when you combine n8n’s automation with Open Library’s huge catalog. With just a few nodes, you turn a small weekly task into something that runs quietly in the background and keeps your reading list fresh.

Once you are comfortable with it, you can:

  • Swap in different subjects to explore new genres
  • Send recommendations to friends or family
  • Use the same pattern to automate discovery for other types of content

Try it out and make it your own

Give this workflow a spin and see how it fits into your reading routine. Start with the default juvenile_literature subject, then experiment with others. Adjust the schedule, refine the email design, or plug it into a broader content discovery system.

If you enjoy this kind of automation, keep an eye on our blog for more n8n workflow ideas and templates. And once you have customized it, share what you built so others can get inspired too.

How to Verify Phone Numbers Using n8n Workflow

How to Verify Phone Numbers Using an n8n Workflow Template

Why Phone Number Validation Matters

Accurate phone numbers are essential for user verification, transactional messaging, and reliable customer communication. Invalid or poorly formatted numbers can lead to failed SMS deliveries, security issues, and unnecessary operational cost. For teams that manage large volumes of contact data, manual checks are not sustainable.

n8n, an extensible open-source workflow automation platform, enables you to automate phone validation at scale. By combining native nodes with external APIs, you can centralize data quality checks in a repeatable, auditable workflow.

Use Case Overview

This workflow template demonstrates how to validate a phone number in n8n using the getPhoneParsed tool from uproc. The logic is intentionally simple so it can be embedded into larger automations such as user onboarding, CRM enrichment, or lead qualification pipelines.

The workflow executes the following core steps:

  • Trigger the validation process on demand or from another event
  • Provide a phone number as input
  • Send the number to uproc’s getPhoneParsed tool for parsing and validation
  • Evaluate the result and branch the flow based on whether the number is valid

Workflow Architecture

The template is composed of four primary nodes connected in sequence:

  1. Manual Trigger – Starts the workflow execution
  2. Create Phone Item – Prepares the phone number to validate
  3. Parse and Validate Phone – Calls uproc’s getPhoneParsed endpoint
  4. Phone is Valid? – Uses conditional logic to branch based on the validation result

Although minimal, this structure follows automation best practices: a clear trigger, a deterministic input, a dedicated validation step, and explicit branching logic.

Node-by-Node Breakdown

1. Triggering the Workflow

Node type: Manual Trigger

The workflow starts with a Manual Trigger node. This is ideal for testing, debugging, and demonstration purposes because it lets you execute the workflow directly from the n8n editor.

In production scenarios, automation professionals typically replace this node with more suitable triggers, for example:

  • Webhook Trigger to validate numbers from external applications or web forms
  • Cron Trigger to run scheduled bulk validations
  • App-specific Triggers (such as CRM or database events) for real-time data quality checks

The rest of the workflow remains compatible with these alternative triggers, which makes the template easy to adapt and reuse.

2. Preparing the Phone Number Input

Node type: functionItem (Create Phone Item)

This node creates the data structure that will be passed to the validation service. It sets a phone property on the current item. In the template, the phone number is hardcoded for demonstration:

item.phone = "+34605281220";
return item;

For real-world usage, you would typically replace this hardcoded value with dynamic input, for example:

  • Values coming from a previous node such as a Webhook, database query, or form submission
  • Numbers read from a CSV or spreadsheet in batch processing workflows

Maintaining a consistent field name, such as item.phone, helps standardize downstream logic and simplifies workflow maintenance.

3. Parsing and Validating the Phone Number

Node type: uproc (Parse and Validate Phone)

The core validation step is handled by the uproc node, which integrates with the getPhoneParsed tool. This node sends the phone number to uproc, which then:

  • Parses the phone number
  • Checks its structure and format
  • Determines whether the number is valid
  • Returns a response that includes a valid flag and other metadata

To use this node, you must configure valid uproc API credentials in n8n. These credentials ensure secure communication with the uproc service and are managed centrally in n8n’s credential store.

From an automation best practice perspective, keep credentials separate from workflow logic and avoid hardcoding secrets directly in nodes. This approach improves security and simplifies environment-specific configuration.

4. Conditional Logic: Is the Phone Valid?

Node type: if (Phone is Valid?)

The final node evaluates the response from uproc. It checks whether the field message.valid is equal to true. Based on this condition, the workflow branches into two paths:

  • True branch for valid phone numbers
  • False branch for invalid phone numbers

This conditional structure allows you to implement differentiated handling, such as:

  • Accepting valid numbers and storing them in a CRM or marketing platform
  • Flagging or rejecting invalid entries and notifying users or administrators
  • Triggering remediation workflows, such as asking users to update their contact information

Explicit branching like this keeps the workflow transparent and easier to troubleshoot.

Implementing the Template in Your n8n Instance

To start using this phone validation workflow template, follow these steps:

  1. Import the workflow JSON into your n8n instance using the Import from file or clipboard option.
  2. Configure uproc credentials in the n8n Credentials section and link them to the uproc node that uses the getPhoneParsed tool.
  3. Adjust the input phone number in the Create Phone Item node:
    • For testing, you may keep or change the hardcoded number.
    • For production, map this field from the data source that provides user phone numbers.
  4. Execute the workflow manually using the Manual Trigger to verify that your credentials, input, and logic are working as expected.
  5. Extend the valid and invalid branches with your own business logic, such as database updates, notifications, or error handling.

Best Practices for Phone Validation Workflows in n8n

  • Centralize validation in a reusable sub-workflow or template so multiple processes can share the same logic.
  • Log validation outcomes for observability and auditing. Consider writing results to a log store, monitoring system, or data warehouse.
  • Handle edge cases gracefully, including network errors, API timeouts, or unexpected response formats from uproc.
  • Normalize phone formats after validation, for example by storing numbers in a consistent international format for downstream systems.
  • Secure API credentials using n8n’s credential management rather than embedding secrets in node parameters.

Advantages of Using n8n for Automated Phone Validation

  • Full automation – Replace manual checks with a repeatable workflow that validates every number as it enters your systems.
  • Rich integration capabilities – Combine the uproc getPhoneParsed tool with other APIs and services to build complete data quality pipelines.
  • Scalable design – Extend the template to support bulk validation jobs or integrate it into high-throughput event-driven architectures.
  • Flexible customization – Tailor conditional logic, error handling, and downstream actions to align with your specific business rules and compliance requirements.

Conclusion

This n8n workflow template provides a concise and effective pattern for programmatic phone number verification using the uproc getPhoneParsed tool. By understanding the role of each node and how they interact, you can confidently embed phone validation into your existing automation landscape, improve contact data quality, and reduce operational friction.

Next Steps

If you are ready to enhance the reliability of your contact data, integrate this template into your n8n setup and adapt it to your own triggers and systems.

Import the workflow, connect your uproc account, and start validating phone numbers automatically.

How to Verify Phone Numbers in n8n Workflows

How to Verify Phone Numbers in n8n Workflows

Phone number verification is a critical part of many production workflows. Whether you are validating user signups, cleaning CRM records, or preparing contact lists for marketing campaigns, you need a robust way to parse and verify phone numbers before they reach downstream systems.

This guide explains, in a technical and reference-style format, how an n8n workflow template validates phone numbers using a combination of core nodes and an external API integration. The focus is on how data flows between nodes, how expressions are used, and how to extend the workflow safely for real-world automation.

Workflow Overview

This n8n phone verification workflow performs a simple but complete validation cycle:

  • Manual execution of the workflow via a Manual Trigger node.
  • Creation of a data item that contains a phone number to verify.
  • Parsing and validation of the phone number using the uproc integration and the getPhoneParsed tool.
  • Conditional branching based on the validation result using an If node.

The template is intentionally minimal so it can be reused as a building block inside larger n8n automations, or adapted for batch processing, user-facing forms, and external systems.

Workflow Architecture and Data Flow

The workflow consists of four primary nodes executed in sequence:

  1. Manual Trigger – controls when the workflow starts.
  2. Create Phone Item (Function or Function Item node) – initializes the payload with a phone number.
  3. Parse and Validate Phone (uproc node) – calls the getPhoneParsed tool to analyze and validate the number.
  4. Phone Is Valid? (If node) – evaluates the response and routes items based on validity.

At a high level, the JSON item flows through the workflow as follows:

{  // After "Create Phone Item"  "phone": "+34605281220"
}

This phone property is then passed as an input parameter to the getPhoneParsed tool. The response from the uproc integration contains a message object that includes a valid field, along with other metadata such as country code and formatted versions of the number. The If node reads message.valid and compares it to the string "true" to determine the next path.

Node-by-Node Breakdown

1. Manual Trigger Node

Node type: Manual Trigger

The workflow is initiated manually from the n8n editor by clicking Execute Workflow. This trigger is ideal for:

  • Interactive testing during development.
  • Ad-hoc verification runs.
  • Demonstrating or debugging the template without external dependencies.

Because the trigger is manual, this template is safe to modify and experiment with. In production, you can replace this node with other triggers such as Webhook, Cron, or integration-specific triggers to automate verification.

2. Create Phone Item Node

Node type: typically a Function or Function Item node

This node is responsible for creating the data structure that will be passed into the validation step. It sets a single property, phone, on the item:

item.phone = "+34605281220";
return item;

Key characteristics:

  • Hardcoded test value: The phone number +34605281220 is used as an example. It is stored on the item as item.phone.
  • Simple data model: Only one field is required for the workflow to function, which keeps the template easy to extend.

In a real workflow, you can replace this hardcoded value with:

  • Form submissions received via a Webhook node.
  • Records fetched from a database (e.g., PostgreSQL, MySQL, or Airtable nodes).
  • Data pulled from external services via HTTP Request or native n8n integrations.

When adapting the template, ensure that the property name phone is preserved or adjust downstream expressions accordingly.

3. Parse and Validate Phone Node

Node type: uproc node using the getPhoneParsed tool

This node integrates with the uproc service to parse and validate the phone number according to international and country-specific rules. The phone number is passed dynamically using an n8n expression that references the output of the previous node.

Input Parameter Configuration

The phone number parameter is populated with this expression:

= {{$node["Create Phone Item"].json["phone"]}}

Details of this expression:

  • $node["Create Phone Item"] selects the previous node by its name.
  • .json["phone"] reads the phone field from the node’s JSON output.
  • The leading = tells n8n to interpret the field as an expression rather than a static string.

This ensures that whatever value is set as item.phone in the Create Phone Item node is used as the input to the uproc API.

Validation Output

The getPhoneParsed tool analyzes the phone number and returns a structured response that typically includes:

  • Validity status (e.g., a valid field indicating whether the number is recognized as valid).
  • Country code associated with the number.
  • Formatted versions of the phone number, often in standardized international format.
  • Carrier information, when available, such as the provider or network.

In the workflow, the validation result is accessed under the message object of the response JSON. The exact structure is important for the subsequent If node, which reads message.valid.

4. Phone Is Valid? Node

Node type: If node

This node performs a conditional check to determine whether the phone number is valid based on the uproc response.

Condition Configuration

The condition uses an expression that reads the valid field from the previous node’s JSON and converts it to a string:

= {{$node["Parse and Validate Phone"].json["message"]["valid"] + ""}}

Key aspects of this expression:

  • $node["Parse and Validate Phone"] references the uproc node by name.
  • .json["message"]["valid"] accesses the valid field inside the message object.
  • + "" coerces the value into a string, which simplifies comparison in the If node configuration.

The If node then compares this string value to "true". If the value equals "true", the item is routed to the true branch. Otherwise, it follows the false branch.

Branch Semantics

  • True branch: Executed when the phone number is valid. This is where you typically place downstream processing such as database writes, notifications, or further enrichment.
  • False branch: Executed when the number is not valid. You can use this path to log invalid numbers, send alerts, or trigger corrective actions.

This conditional routing is the core decision point of the workflow and can be extended with additional nodes depending on your use case.

Configuration Notes and Practical Considerations

Credentials and Integration Setup

To use the uproc integration in the Parse and Validate Phone node, you must configure valid uproc credentials in n8n. Ensure that:

  • The correct credential type is selected in the node configuration.
  • API keys or tokens are stored securely in n8n credentials, not hardcoded into expressions.
  • The getPhoneParsed tool is selected as the operation within the uproc node.

If credentials are missing or invalid, the node will fail and the workflow execution will stop at that point. Use n8n’s error view to inspect such failures.

Data Types and Expression Behavior

The workflow relies on string comparison for the validity check. The + "" coercion in the If node expression is important because:

  • It normalizes values like true or false (boolean) into "true" or "false" (string).
  • It avoids mismatches when the API returns booleans that need to be compared to string literals in the If node configuration.

If you modify the workflow and change the data structure or field types, review the expressions and conditions to ensure they still match the expected format.

Handling Errors and Edge Cases

While the template focuses on the happy path, consider the following edge cases when adapting it:

  • Missing or empty phone field: If item.phone is empty or undefined, the uproc node may return an error or an invalid result. You can add a preliminary If node to check for a non-empty phone value before calling uproc.
  • API failures: Network issues or rate limits from uproc can cause node errors. In production, consider using n8n’s Error Workflow feature or wrap the uproc call with retry logic and error handling patterns.
  • Unexpected response shape: If the uproc API response changes or if certain fields are missing, the expression .json["message"]["valid"] may be undefined. You can guard against this by adding checks or default values in a Function node before the If node.

Extending and Customizing the Workflow

The template is intentionally minimal so it can act as a base for more complex automations. Below are common extension patterns you can implement on top of this phone verification workflow.

Persisting Verified Phone Numbers

On the true branch of the Phone Is Valid? node, you can add database or storage nodes to persist verified numbers, for example:

  • Insert or update records in a relational database using MySQL, Postgres, or SQLite nodes.
  • Sync verified contacts to CRM tools or marketing platforms supported by n8n.
  • Write structured logs to a storage service or file system for auditing.

Handling Invalid Numbers

On the false branch, you can implement remediation or notification logic, such as:

  • Sending an email or chat message to a support team to review the invalid number.
  • Returning validation feedback to the user if the workflow is triggered via a Webhook.
  • Flagging or removing invalid records from your contact lists.

Bulk Phone Number Processing

To process multiple phone numbers in one execution:

  • Replace the Manual Trigger and Create Phone Item nodes with a node that outputs multiple items, such as a database query or CSV file reader.
  • Ensure the node that generates items sets a phone field for each item.
  • Keep the same Parse and Validate Phone and Phone Is Valid? nodes. n8n will iterate over each item automatically.

This pattern lets you validate entire lists of phone numbers using the same logic.

Enriching with Carrier or Region Details

The uproc response can include additional metadata such as carrier and region. After the Parse and Validate Phone node, you can:

  • Use a Set or Function node to extract and normalize carrier or region fields.
  • Store these attributes in your database or pass them to downstream systems for segmentation.

Summary

This n8n workflow template demonstrates a complete, modular pattern for phone number verification:

  • A Manual Trigger node for controlled execution.
  • A Create Phone Item node to define the phone field.
  • A Parse and Validate Phone node using the uproc getPhoneParsed tool.
  • A Phone Is Valid? If node that branches logic based on message.valid.

By combining n8n’s expression system, external API integrations, and conditional routing, you can reliably validate phone numbers and integrate the results into your broader automation landscape.

Next Steps

To start using this pattern in your own automations, import the template into your n8n instance, adjust the phone input source, and extend the true and false branches to match your business requirements.

Create a URL Shortener with n8n & Airtable

Create a URL Shortener with n8n & Airtable

1. Technical Overview

This guide documents an n8n workflow template that implements a simple URL shortener backed by Airtable. The workflow exposes three HTTP endpoints via Webhook nodes:

  • /sh – Creates or returns a shortened URL for a given long URL.
  • /go – Resolves a short URL ID to its original URL and tracks clicks.
  • /dashboard – Renders a basic HTML dashboard with aggregate statistics.

The solution uses:

  • n8n as the automation engine and HTTP interface.
  • Airtable as the persistent data store for URLs and click counts.
  • SHA256 hashing to generate deterministic short IDs.
  • JavaScript Function nodes for data aggregation and HTML rendering.

The goal is to provide a reproducible, extensible template suitable for users already familiar with n8n concepts such as nodes, triggers, credentials, and execution data.

2. Architecture & Data Flow

2.1 High-Level Request Flow

  • Shortening endpoint (/sh)
    • Accepts a GET request with a url query parameter.
    • Validates input, hashes the URL, and creates a short ID.
    • Checks Airtable for an existing record by that ID.
    • Returns an existing or newly created short URL.
  • Redirect endpoint (/go)
    • Accepts a GET request with an id query parameter.
    • Looks up the corresponding record in Airtable.
    • Increments the click counter for that record.
    • Performs an HTTP redirect to the original long URL.
  • Dashboard endpoint (/dashboard)
    • Fetches all URL records from Airtable.
    • Aggregates total links, total clicks, and total unique host domains.
    • Returns an HTML page with a simple, responsive dashboard layout.

2.2 Airtable Data Model

The workflow assumes a single Airtable base and table that stores URL metadata. While field names may vary by implementation, the logic relies on the following conceptual fields:

  • ID – Short identifier (first 6 characters of SHA256 hash).
  • Original URL – The full, long URL provided by the user.
  • Short URL – The complete short link (typically base URL + /go?id=<ID>).
  • Clicks – Integer counter of how many times the short URL was used.

The dashboard logic additionally derives the host (domain) from the stored original URL to compute unique hosts.

3. Node-by-Node Breakdown

3.1 Webhook: URL Shortening Endpoint (/sh)

Purpose

Accepts a long URL and returns a short URL ID, either by reusing an existing record or by creating a new one in Airtable.

Trigger & Method

  • Node type: Webhook
  • Path: /sh
  • HTTP method: GET

Input Parameters

  • url (query parameter)
    • Required for normal operation.
    • Represents the full URL to be shortened.

Validation Logic

The workflow first checks if the url parameter is present in the incoming query string:

  • If url is missing, the workflow returns an error response with the message url parameter missing. No Airtable operations are performed.
  • If url is present, the value is extracted and passed to the hashing step.

Typical validation is minimal in this template. In a production environment you may also want to verify that the URL is syntactically valid and uses an allowed scheme (such as http or https).

Hashing & ID Generation

To generate a deterministic short ID, the workflow uses SHA256 hashing:

  1. Take the input URL string.
  2. Compute the SHA256 hash of the string.
  3. Extract the first 6 characters of the resulting hex-encoded hash.

The 6-character substring is used as the short identifier. This approach reduces the chance of collisions while keeping the ID short. The template does not implement explicit collision resolution logic beyond reusing an existing record if the same ID exists for the same URL.

Airtable Lookup: Detect Existing Record

Next, an Airtable node searches the URL table for a record whose ID matches the generated short ID.

  • Node type: Airtable (Search / List Records)
  • Filter: ID field equals the generated 6-character hash fragment.

Behavior:

  • If a record is found:
    • The stored short URL is returned to the client.
    • No new record is created.
  • If no record is found:
    • The workflow proceeds to create a new Airtable record.

Airtable Create: Insert New Short URL

If the short ID is not already present in Airtable, a second Airtable node appends a new record:

  • Fields populated:
    • ID – The generated 6-character ID.
    • Original URL – The URL from the url query parameter.
    • Short URL – Constructed short link, typically combining your public base URL with the /go endpoint and the ID parameter.
    • Clicks – Usually initialized to 0.

The workflow then returns the newly created short URL as the response to the /sh request.

3.2 Webhook: Redirect Endpoint (/go)

Purpose

Resolves a short ID to its original URL, increments the click counter, and redirects the client to the target URL.

Trigger & Method

  • Node type: Webhook
  • Path: /go
  • HTTP method: GET

Input Parameters

  • id (query parameter)
    • Required for successful redirection.
    • Represents the short ID generated by the /sh endpoint.

Validation Logic

  • If the id parameter is missing:
    • The workflow returns a response with the message id parameter missing.
    • No Airtable lookup or redirect is attempted.
  • If id is present:
    • The value is extracted and passed to an Airtable lookup node.

Airtable Lookup: Resolve ID

An Airtable node searches for a record whose ID field matches the provided id value:

  • If a record is found:
    • The workflow extracts the original URL from the record.
    • The click count is incremented and written back to Airtable.
    • The Webhook node (or a dedicated HTTP Response node) sends an HTTP redirect to the original URL.
  • If no record is found:
    • The workflow responds with Short URL not found.
    • No redirect is executed.

Click Counting & Update

When a record is successfully matched:

  1. The current Clicks value is read from the Airtable record.
  2. The value is incremented by 1.
  3. An Airtable Update node writes the new click count back to the same record.

The increment operation is straightforward and assumes that concurrent updates are rare. For very high-traffic deployments, you would need to consider potential race conditions, but the template targets typical small to medium workloads where basic increments are sufficient.

Redirection Behavior

After updating the click count, the workflow issues an HTTP redirect to the original URL. In n8n, this is typically configured by setting the response headers and status code (for example, 301 or 302) in the Webhook or an HTTP Response node. The template uses the record’s stored original URL as the redirect target.

3.3 Webhook: Dashboard Endpoint (/dashboard)

Purpose

Provides a simple analytics dashboard summarizing usage of all short links stored in Airtable.

Trigger & Method

  • Node type: Webhook
  • Path: /dashboard
  • HTTP method: GET

Data Retrieval

An Airtable node retrieves all URL records from the configured table. The workflow then passes this dataset to a JavaScript Function node for aggregation.

  • Node type: Airtable (List Records)
  • Scope: All records (pagination or maximum record limits depend on your Airtable node configuration).

Aggregation Logic (Function Node)

The Function node processes the full set of records to compute three key metrics:

  • Total Links
    • Computed as the count of all fetched records.
  • Total Clicks
    • Computed as the sum of the Clicks field across all records.
  • Total Hosts
    • Computed as the number of unique host domains derived from each record’s original URL.
    • The Function node parses URLs, extracts the host part, and collects unique values.

Potential edge cases include malformed URLs or missing fields. The template assumes valid data and does not implement extensive error handling inside the aggregation logic, but you can extend the Function node to skip invalid entries or log issues.

Dashboard Rendering

After computing the metrics, the workflow generates an HTML response that includes:

  • A clean, responsive layout using basic HTML and CSS.
  • Clearly labeled boxes or cards displaying:
    • Total Links
    • Total Clicks
    • Total Hosts

The HTML is returned directly from the Webhook or HTTP Response node, so accessing /dashboard in a browser displays the analytics view without additional front-end components.

4. Configuration & Setup Notes

4.1 n8n Webhook Configuration

  • Ensure that all three Webhook nodes (/sh, /go, /dashboard) are set to the correct HTTP method (GET) and that the paths are unique.
  • When deploying n8n behind a reverse proxy, make sure the external URLs for these webhooks are correctly exposed and reachable.
  • Use the production webhook URLs when generating your short URLs so that they work outside of the n8n editor environment.

4.2 Airtable Credentials

  • Create or use an existing Airtable API key / personal access token and configure it in n8n as Airtable credentials.
  • Set the correct Base ID and Table name in each Airtable node used for:
    • Searching by ID in /sh.
    • Creating new records in /sh.
    • Searching and updating records in /go.
    • Listing all records in /dashboard.

4.3 Field Mapping in Airtable

Match your Airtable table fields to the workflow logic:

  • ID – Short code generated from SHA256 hash (text field).
  • Original URL – Full URL string (URL or text field).
  • Short URL – Generated short link (URL or text field).
  • Clicks – Integer field, initialized to 0.

If your field names differ, adjust the field mappings in each Airtable node accordingly.

4.4 Error Handling Considerations

The template includes basic validation:

  • /sh returns url parameter missing if the url query parameter is absent.
  • /go returns id parameter missing. if the id query parameter is absent.
  • /go returns Short URL not found if there is no matching record in Airtable.

For more robust deployments you may want to:

  • Add explicit HTTP status codes (for example, 400 for missing parameters, 404 for unknown IDs).
  • Validate URL format in /sh and optionally restrict to specific domains.
  • Implement logging nodes or error workflows for Airtable API failures or network issues.

5. Advanced Customization Ideas

The provided n8n template is intentionally minimal and easy to understand, but it can be extended in multiple ways without changing the core logic described above.

5.1 Custom Aliases & Vanity URLs

  • Accept an optional alias parameter in the /sh endpoint.
  • Use the alias as the ID if it passes validation and is not already used in Airtable.
  • Fallback to the SHA256-based ID generation when no alias is provided.

5.2 Expiration & Lifecycle Management

  • Add an Expiration Date field in Airtable.
  • Adjust the /go logic to check whether the link has expired before redirecting.
  • Return an appropriate message or redirect to a custom landing page when a link is expired.

5.3 Extended Analytics & External Tools

  • Log additional metadata such as user agent, referrer, or IP in separate Airtable tables.
  • Forward events to external analytics tools or data warehouses for deeper analysis.
  • Enhance the /dashboard Function node to compute more metrics like top hosts or most-clicked links.

6. Benefits of Using n8n & Airtable for URL Shortening

How to Build a URL Shortener with n8n and Airtable

How to Build a URL Shortener with n8n and Airtable

Introduction

URL shortening is a common requirement in modern applications, particularly for marketing, analytics, and user experience optimization. In this guide, we walk through how to implement a production-ready URL shortener using n8n as the orchestration layer and Airtable as the backing datastore.

The n8n workflow template described here provides a complete solution. It generates shortened URLs, persists and retrieves records from Airtable, tracks click counts, and exposes a simple analytics dashboard. The design follows automation best practices such as clear separation of concerns, idempotent operations where possible, and the use of deterministic IDs for predictable behavior.

Architecture Overview

The workflow is divided into three independent HTTP-facing components, each implemented as a dedicated Webhook in n8n:

  1. Shortening API endpoint – Receives a long URL, creates a short identifier, validates uniqueness, and stores the mapping in Airtable.
  2. Redirect endpoint – Accepts a short ID, resolves it to the original URL, increments a click counter, and returns an HTML-based redirect response.
  3. Dashboard endpoint – Aggregates data from Airtable and renders an HTML dashboard with key metrics such as total links, total clicks, and unique hosts.

This separation allows you to scale, secure, and evolve each capability independently, while keeping the underlying data model consistent in Airtable.

Core Components and Integrations

Key n8n Nodes

  • Webhook nodes to expose HTTP endpoints for shortening, redirect, and dashboard views.
  • Crypto node configured with SHA256 hashing to derive deterministic short IDs from long URLs.
  • Set nodes to construct structured payloads, including IDs, short URLs, and HTML responses.
  • If / Conditional nodes to implement validation logic, existence checks, and error handling.
  • Airtable nodes for querying, inserting, and updating URL records.

Airtable as the Data Layer

Airtable is used as the central database for the URL shortener. Each record typically contains:

  • Short ID
  • Original long URL
  • Shortened URL
  • Host (domain extracted from the long URL)
  • Click count

Using Airtable provides a flexible schema, straightforward CRUD operations, and powerful filtering that integrates cleanly with n8n’s native Airtable node.

Implementing the URL Shortening Endpoint

The first part of the workflow exposes an API-style endpoint that accepts a long URL and returns a shortened URL. The logic is deterministic: the same input URL always generates the same short ID, and the workflow checks Airtable to avoid duplicate records.

Request Handling and Validation

  • Webhook Node
    Configured to listen for HTTP GET requests. It expects a query parameter named url that contains the long URL to shorten.
  • Check URL Node
    A conditional node that validates the presence of the url parameter. If the parameter is missing, the workflow immediately returns an error response, preventing unnecessary processing and database calls.
  • Extract URL Node
    Extracts the value of the url query parameter and normalizes it for further processing. This ensures that downstream nodes operate on a clean, predictable field.

Generating and Managing Short IDs

  • Crypto Node (SHA256)
    The Crypto node computes a SHA256 hash of the long URL. Using a hash function ensures that identical URLs consistently produce the same hash, which keeps the shortener idempotent for repeated requests with the same URL.
  • Set ID, shortUrl, longUrl Node
    From the generated hash, the workflow takes the first 6 characters to form the short ID. It then constructs the full short URL by combining the base domain of your shortener service with this ID. The node also standardizes the long URL field for insertion into Airtable.

Persistence and De-duplication in Airtable

  • Find by ID Node
    Queries Airtable to determine whether a record with the generated short ID already exists. This step is critical to avoid collisions and to reuse the existing short URL for the same long URL when applicable.
  • Conditional Node – Already exists?
    If the short ID is found, the workflow returns the existing record’s short URL, avoiding duplicate entries. If it does not exist, the workflow proceeds to create a new Airtable record.
  • Airtable Append Operation
    Inserts a new record into the Airtable table with:
    • The generated short ID
    • The original long URL
    • The full short URL
    • The host extracted from the long URL
    • An initial click count, typically set to zero

    This structure supports both efficient lookups and downstream analytics.

  • Set Output Node
    Builds the HTTP response that returns the short URL to the caller. This can be a simple JSON payload or any format appropriate for your integration.

Implementing Redirects and Click Tracking

The second part of the workflow is responsible for resolving a short URL to its original long URL and tracking usage. It is exposed as a separate Webhook endpoint that users hit when they access a short link.

Short ID Resolution

  • Webhook1 Node
    Listens for GET requests that include a query parameter id, which represents the short URL identifier.
  • Check Id Node
    Validates that the id parameter is present. If it is missing, the workflow responds with an appropriate error, such as a 400 Bad Request.
  • Extract Id Node
    Extracts the short ID from the request for use in the lookup step.
  • Find by ID1 Node
    Queries Airtable for a record that matches the provided short ID. This is the core resolution step that maps the short URL back to the original long URL.

Error Handling and Click Increment

  • Already exists?1 Node
    A conditional node that checks whether the Airtable query returned a record. If no record is found, the workflow returns a 404-style response, indicating that the short URL is invalid or no longer available. If the record exists, the workflow continues to click tracking.
  • Prepare clicks count Node
    Reads the current click count from the record, increments it by one, and prepares the updated value for persistence. This node ensures that the click counter is always advanced atomically within the workflow execution.
  • Update clicks Node
    Updates the Airtable record with the new click count. This step closes the loop on tracking and enables accurate reporting in the dashboard.

Redirect Response

  • Set Output2 Node
    Constructs an HTML response that automatically redirects the user to the original long URL. This is typically implemented with a simple HTML page that contains a meta refresh tag or JavaScript-based redirect. Using an HTML intermediary allows you to customize the user experience, for example by adding branding or a brief message.

Building the Analytics Dashboard

The third part of the workflow provides an at-a-glance dashboard that aggregates statistics from Airtable. It is designed as another Webhook endpoint that returns a styled HTML page.

Data Retrieval and Aggregation

  • Webhook2 Node
    Exposes an endpoint that, when accessed, triggers the generation of the analytics dashboard. This can be secured or left open depending on your use case and authentication strategy.
  • Find by ID2 Node
    Fetches all URL records from Airtable. The complete dataset is required to compute aggregate metrics such as total links and total clicks.
  • Extract stats Node
    Processes the retrieved data to derive:
    • Total shortened links – The number of records in the table.
    • Total clicks – The sum of the click count field across all records.
    • Total unique hosts – The count of distinct host values, giving a sense of domain diversity.

    This node can also be extended with additional calculations as your reporting needs evolve.

Dashboard Rendering

  • Set dashboard Node
    Generates an HTML page that presents the calculated metrics in a readable, styled format. This can include basic styling or be integrated into a more sophisticated front-end. The result is returned directly as the HTTP response from the Webhook, providing a lightweight analytics interface without additional infrastructure.

Why Combine n8n and Airtable for URL Shortening?

n8n provides a flexible, visual automation platform that is particularly well suited to building API-centric workflows. It supports real-time Webhook triggers, conditional routing, data transformation, and native integrations with a broad range of services. For automation professionals, this means rapid prototyping and production deployment without extensive custom code.

Airtable functions as an accessible yet powerful backend database. Its spreadsheet-like interface simplifies schema management and manual inspection of data, while the API and n8n integration enable robust automation. Features such as filtering and sorting are leveraged by the workflow to perform efficient lookups and updates for URL records.

Together, n8n and Airtable provide a low-friction stack that is ideal for building and maintaining a URL shortener, particularly in environments where agility and visibility are priorities.

Extending and Hardening the Workflow

The described implementation forms a solid baseline that can be evolved into a more advanced link management system. Potential enhancements include:

  • Custom aliases – Allow users to specify their own short IDs instead of always relying on hashed values.
  • Advanced analytics – Integrate additional data sources or services to capture geolocation, device type, or referrer information for each click.
  • Expiration and lifecycle management – Add fields and logic for expiration dates, soft deletion, or archival of inactive links.
  • Authentication and access control – Protect the shortening and dashboard endpoints with authentication, and restrict access to creation, modification, or viewing of statistics.

Because the workflow is built on n8n, these extensions can typically be implemented by adding or adjusting nodes rather than rewriting large portions of code.

Next Steps

Implement this URL shortener workflow in your own n8n instance and connect it to your Airtable base to see it in action. Once the core functionality is working, iterate on it to align with your organization’s branding, security requirements, and analytics needs.

For additional automation patterns, best practices, and workflow templates, continue exploring our tutorials and resources.

Automate AI Video Creation & Multi-Platform Publishing

Automate AI Video Creation & Multi-Platform Publishing with n8n

Overview

This reference guide describes an n8n workflow template that automates the complete lifecycle of short-form video content: from AI-based video generation to multi-platform publishing across nine social networks. The automation integrates Telegram, Blotato, Piapi, GPT-4, Cloudinary, and Google Sheets to create, enrich, store, and distribute videos with minimal manual intervention.

The workflow is organized into five major stages:

  1. AI video generation from text or image input
  2. Automatic music and voice-over creation
  3. Caption overlay and video enhancement
  4. Metadata storage and Telegram notification
  5. Automated publishing to nine social platforms

This documentation-style rewrite focuses on the technical behavior of the template, including data flow, node responsibilities, and configuration considerations for advanced users of n8n and API-based automation.

Architecture & Data Flow

At a high level, the workflow is triggered by a Telegram interaction and then branches based on whether the user submits text or an image. Both branches ultimately converge into a unified video asset that is enriched with audio, captions, and metadata, then published to multiple social channels.

Core Integrations

  • Telegram – Input channel for prompts or images and final notification endpoint.
  • Blotato API – AI video generation from text prompts and multi-platform publishing orchestration.
  • Piapi API – Image-to-video conversion and text-to-audio generation.
  • GPT-4 – Script generation, caption text creation, and SEO-friendly titles.
  • Cloudinary – Media storage for uploaded images used in video generation.
  • Google Sheets – Persistent storage of video metadata for tracking and analytics.

Execution Stages

  1. Input & Video Generation – Accepts either text or image from Telegram, then generates an AI video via Blotato or Piapi.
  2. Audio & Music Creation – Uses GPT-4 to generate a voice-over style script and Piapi to render it as audio.
  3. Caption & Overlay Processing – Combines video and audio, applies a caption style template, and adds hook/payoff text overlays.
  4. Storage & Notification – Writes metadata to Google Sheets and returns the final video and details to Telegram.
  5. Multi-Platform Publishing – Distributes the final video and caption to nine social platforms via Blotato.

Stage 1 – AI Video Creation from Text or Image

Trigger & Input Handling

The workflow begins when a user interacts via Telegram. The trigger node (for example, a Telegram Trigger node) receives either:

  • A text prompt describing the desired video, or
  • An image uploaded to the chat, optionally with a caption.

A conditional node (such as an IF or Switch node) typically evaluates the Telegram payload to determine whether the incoming message contains text, an image, or both. Based on this evaluation, the workflow follows one of two paths.

Path A – Text-Based Video Generation with Blotato

When the user sends a text prompt, the workflow uses Blotato’s video generation API to produce a cinematic-style AI video.

Key Behavior

  • The text prompt from Telegram is passed as the main input parameter to Blotato.
  • A predefined cinematic style template is used to standardize the visual look and feel of generated videos.
  • The Blotato node (typically an HTTP Request or dedicated Blotato node if available) sends the prompt and template identifier to the API.
  • The API responds with a video asset reference, such as a rendered video URL or an ID that can be used to fetch the final video.

The result is a video object that will be merged later with other media and metadata in downstream nodes.

Path B – Image-to-Video Conversion with Piapi & Cloudinary

If the user provides an image, the workflow follows a separate branch that converts the image into a short AI-generated video.

Image Retrieval from Telegram

  • The Telegram message payload is inspected to obtain the file ID or URL of the uploaded image.
  • A follow-up call to Telegram’s API downloads the original image file.

Upload to Cloudinary

  • The downloaded image is uploaded to Cloudinary using a configured Cloudinary node or HTTP Request node.
  • Cloudinary returns a public image URL that is stable and accessible to external services.

Image-to-Video Generation with Piapi

  • The Cloudinary image URL is passed to Piapi’s image-to-video endpoint.
  • Piapi generates a short AI-based video using the image as the primary visual input.
  • Once rendering is complete, the workflow retrieves the rendered video URL from Piapi’s response.

The output of this branch is a video asset derived from the original image, which is aligned with the text-based video output format so both branches can be merged consistently.

Convergence of Video Data

After the text and image branches complete, a merge node (for example, a Merge node in “Pass-through” or “Wait” mode) unifies the execution paths:

  • Both branches are normalized to produce a standard structure containing at least a videoUrl or equivalent identifier.
  • Any additional metadata, like the source type (text or image) or original prompt, can be preserved for logging or analytics.

From this point onward, the workflow processes a single video object regardless of the initial input type.


Stage 2 – Music & Voice-Over Creation

Script Generation with GPT-4

To create an engaging audio track, the workflow first generates a short-form voice-over script using GPT-4. The script is based on the video topic, original prompt, or caption idea.

Typical Parameters

  • Input context – The original text prompt, Telegram caption, or derived topic description.
  • Style constraints – Short-form, social-media-ready, concise, and optimized for spoken delivery.
  • Output format – A single script string suitable for text-to-audio conversion.

The GPT-4 node returns a script that will be used as the text input for audio generation.

Text-to-Audio Conversion with Piapi

The generated script is then passed to Piapi’s text-to-audio capability to produce music or a voice-over track.

Node Behavior

  • The Piapi node receives the script text and any required configuration, such as voice type or language, as parameters.
  • Piapi starts rendering the audio file and returns either the final URL or a task identifier.
  • The workflow waits until the audio rendering is complete before proceeding.

Waiting for Rendering Completion

Depending on Piapi’s API design, the workflow may:

  • Use a direct response if the API returns the final audio URL immediately, or
  • Implement a polling loop or delay if the API returns a job ID, checking periodically until the status indicates completion.

At the end of this stage, the workflow has a stable music or audio file URL that will be merged with the video in the next stage.


Stage 3 – Caption Overlay & Video Enhancement

Caption Strategy & Text Generation

To improve engagement and accessibility, the workflow overlays captions onto the video using a predefined styling template. GPT-4 is used again, this time to generate structured overlay text.

Hook and Payoff Lines

  • The GPT-4 node is prompted to produce two distinct text segments:
    • A hook line that captures attention at the beginning of the video.
    • A payoff line that delivers the main value or conclusion.
  • The output is formatted so that the hook and payoff can be mapped to specific caption regions or timestamps in the video.

Video & Audio Fusion with Captions

The workflow then merges the previously generated video and the audio track, and applies the caption overlay.

Processing Steps

  • Inputs:
    • Video asset from Stage 1.
    • Audio file URL from Stage 2.
    • Hook and payoff text from GPT-4.
  • A caption or styling template is selected to ensure consistent typography, positioning, and effects.
  • The fusion process combines:
    • The base video,
    • The audio track as background music or voice-over, and
    • Overlay text with the defined style.

Waiting for Final Video Rendering

The workflow waits for the video processing to complete. Similar to the audio step, this can involve:

  • Using the final video URL directly if returned synchronously, or
  • Polling for job completion if the processing is asynchronous.

Once completed, the workflow stores the final processed video URL, which now includes music and professional-looking captions.


Stage 4 – Metadata Storage & Telegram Notification

Title & Caption Generation with GPT-4

Before storing and distributing the video, the workflow generates optimized metadata for social media.

SEO-Friendly Title

  • GPT-4 is prompted to create a concise, descriptive video title.
  • The title is designed to be both SEO-friendly and suitable for platforms like YouTube and Pinterest.

Engaging Social Caption

  • A separate or combined GPT-4 call generates an engaging social media caption.
  • The caption is tailored for short-form platforms and can incorporate hooks, CTAs, and relevant keywords.

Persisting Video Metadata in Google Sheets

To track published content and support analytics, the workflow writes video metadata to a configured Google Sheet.

Typical Columns

  • Video URL – Final processed video link from Stage 3.
  • Title – SEO-optimized title from GPT-4.
  • Caption – Social media caption text.
  • Source – Optional field indicating whether the content originated from text or image input.
  • Timestamp – Execution or creation date for tracking.

A Google Sheets node (such as “Append” mode) inserts a new row for each generated video, ensuring a persistent log of all content processed by the workflow.

Telegram Notification to the Originating Chat

After saving the metadata, the workflow sends the final result back to the Telegram chat that initiated the request.

Notification Content

  • The final video (as a direct video file or a link, depending on Telegram configuration).
  • The generated title and caption.
  • Any additional contextual information, such as confirmation that the video is ready for publishing or reuse.

By maintaining this feedback loop, users can quickly validate the output, reuse captions, or share the content manually if needed.


Stage 5 – Automated Publishing to 9 Social Platforms

Blotato-Powered Multi-Platform Distribution

The final stage of the workflow automates publishing to multiple social networks using Blotato’s distribution capabilities. The same video asset and caption are syndicated across:

  • Instagram
  • YouTube
  • TikTok
  • Facebook
  • Threads
  • Twitter (X)
  • LinkedIn
  • Bluesky
  • Pinterest

Platform-Specific Account Mapping

Blotato’s API is configured with platform-specific account IDs so the same workflow can publish to multiple destinations without additional manual setup in n8n.

Typical Parameters Sent to Blotato

  • Video URL – The final processed video from Stage 3.
  • Caption – The social media caption text generated in Stage 4.
  • Account IDs – Identifiers for specific profiles or pages on each platform.

The Blotato node handles the complexity of each platform’s API, while n8n focuses on orchestrating the overall process and passing the correct data payload.


Configuration Notes & Practical Considerations

Credentials & Authentication

  • Telegram – Requires a bot token and proper webhook or polling configuration for the trigger node.
  • Blotato – Needs an API key or token with permissions for video generation and publishing.
  • Piapi – Requires credentials for both image-to-video and text-to-audio endpoints.
  • Cloudinary – Needs API key, secret, and cloud name for authenticated uploads.
  • Google Sheets – Uses OAuth or service account credentials to read/write the target spreadsheet.
  • GPT-4 – Requires OpenAI-compatible credentials or equivalent provider access.

Error Handling & Edge Cases

When customizing this template, consider adding explicit error handling around:

  • Missing or invalid Telegram input – For example, when neither a text prompt nor an image is provided.
  • Failed uploads to Cloudinary or failed downloads from Telegram.
  • Timeouts or failed renders from Piapi or Blotato during video or audio generation.
  • Rate limits or quota issues for GPT-4 and external APIs.
  • Google Sheets write failures due to permission changes or sheet structure modifications.

In n8n, this can be addressed with Error Workflow configurations, IF nodes checking response status codes, or Try/Catch-style sub-workflows where supported.

Performance & Latency

  • Video and audio rendering are typically the slowest steps. Consider using delays or polling intervals that balance responsiveness with API rate limits.
  • For high throughput, you may want to limit concurrent executions or implement queuing logic within n8n.

Advanced Customization Ideas

Template & Style Variations

  • Expose the cinematic style template as a variable so users can select between multiple visual styles.
  • Allow different caption styles (font, color, position) by passing

How to Restore Data Using itemMatching() in n8n

How to Restore Data Using itemMatching() in n8n

In complex n8n automations, it is common to trim payloads for performance or clarity, then later need to reattach fields that were previously removed. The itemMatching(itemIndex: number) helper makes this pattern straightforward by allowing you to reference related items from earlier nodes in the workflow.

This guide documents a concrete workflow template that restores email addresses after the data has been reduced to only customer names. It focuses on how itemMatching() works inside a Code node, how the data flows between nodes, and what to watch out for when using this pattern in production n8n workflows.

Workflow overview

This n8n workflow demonstrates a common pattern:

  1. Load a full dataset from a data source.
  2. Reduce the payload to only the fields needed for intermediate processing.
  3. Later, restore specific fields (in this case, email addresses) from the original dataset using itemMatching() in a Code node.

The example uses the Customer Datastore (n8n training) node as the source of customer records. The workflow then trims the data to only customer names, and finally restores the corresponding email addresses using itemMatching(itemIndex). This lets you maintain minimal payloads between nodes while still having access to the original data when required.

Workflow architecture

The workflow consists of three main stages:

  • Trigger stage A manual trigger node labeled When clicking “Execute Workflow” starts the workflow execution for testing and demonstration.
  • Data retrieval stage The Customer Datastore (n8n training) node fetches all customer records using the getAllPeople operation. This node outputs full customer objects, including fields such as name and email.
  • Data reduction and restoration stage The Edit Fields node reduces the payload to only the name field. A subsequent Code node then uses itemMatching() to reattach the matching email values from the original dataset.

The key architectural idea is that the reduced items maintain positional alignment with the original items. The itemMatching(itemIndex) function leverages this index alignment to retrieve the correct source item from the earlier node output.

Node-by-node breakdown

1. Manual Trigger: “When clicking "Execute Workflow"”

Node type: Trigger Purpose: Start the workflow on demand from the n8n editor.

This node has no special configuration for this example. It simply provides a manual entry point so you can execute the workflow from the UI while testing the itemMatching() behavior.

2. Customer Datastore (n8n training)

Node type: Data source / custom training node Operation: getAllPeople

This node retrieves an example dataset of customers. Each item typically includes several attributes such as:

  • name
  • email
  • Other customer-related fields depending on the training datastore

The important point for this template is that the output contains both name and email, and that all items are returned in a deterministic order. This order will later be relied upon when using itemMatching(itemIndex) to restore emails.

3. Edit Fields node (data reduction)

Node type: Edit Fields / Set-style node Purpose: Reduce the payload to only the customer names.

The output of the Customer Datastore (n8n training) node is passed into an Edit Fields node. This node is configured to keep only the name field and remove all other properties from each item.

After this step:

  • Each item still represents a customer.
  • The name field is preserved.
  • The email field and any other attributes are intentionally removed.

The reduced items remain in the same order as the original items from the datastore node. This index preservation is critical for itemMatching() to work correctly in the next step.

4. Code node (data restoration with itemMatching())

Node type: Code Language: Python (in this example) Purpose: Reattach the email field from the original dataset using itemMatching().

The reduced items from the Edit Fields node are passed into a Code node. Inside this node, the script iterates over all current items and uses itemMatching() to access the corresponding original item from the Customer Datastore (n8n training) node.

The core logic is:

for i,item in enumerate(_input.all()):  _input.all()[i].json.restoreEmail = _('Customer Datastore (n8n training)').itemMatching(i).json.email

return _input.all();

This code:

  1. Loops over all items currently available to the Code node.
  2. For each index i, calls itemMatching(i) on the Customer Datastore (n8n training) node reference.
  3. Reads the email field from the matched original item.
  4. Writes that value into a new property named restoreEmail on the current reduced item.
  5. Returns the modified items array as the node output.

After execution, each item in the Code node output contains:

  • The original name (kept by the Edit Fields node).
  • A new restoreEmail property holding the email retrieved from the original dataset.

How itemMatching() works in this template

itemMatching(itemIndex: number) is an n8n helper function that lets you access the item from another node that corresponds to the same logical item in the current execution.

In this workflow:

  • _('Customer Datastore (n8n training)') references the output of the node named Customer Datastore (n8n training).
  • .itemMatching(i) retrieves the item from that node that matches the current index i.
  • .json.email reads the email field from that matched item.

The Python snippet is equivalent in intent to a JavaScript loop that would use the same itemMatching() helper when run inside a JavaScript-based Code node. The key is that the index i is used consistently across both the reduced items and the original items.

Configuration and setup notes

Node naming and references

The Code node uses the expression _('Customer Datastore (n8n training)'). This means:

  • The node name in the workflow canvas must exactly match Customer Datastore (n8n training).
  • If you rename the node, you must update this reference in the Code node accordingly.

Item order and index alignment

For itemMatching(itemIndex) to return the expected item, the following must hold:

  • The number of items from the datastore node and the number of items reaching the Code node must match, or at least the indices you access must exist in both.
  • The order of items must be preserved across intermediate nodes such as Edit Fields. Nodes that filter, split, or reorder items can break the index alignment.

If the order or count changes between the source node and the Code node, itemMatching() may return unexpected matches or cause index-related issues.

Supported languages in the Code node

The example is written in Python, but the same concept applies when using JavaScript in the Code node. You can:

  • Use Python, as shown, if your n8n instance supports Python in the Code node.
  • Use JavaScript and call itemMatching() in a similar way from JavaScript code.

In both languages, the itemMatching() behavior and semantics are the same. Only the syntax for loops and assignments differs.

Edge cases and error handling considerations

While the template is straightforward, there are a few practical considerations when adapting it to more complex workflows:

  • Missing items or mismatched indices If the number of items changes between the original node and the Code node, accessing itemMatching(i) for an out-of-range index will not produce the intended mapping. Ensure that intermediate nodes do not filter out items unless you also adjust the logic accordingly.
  • Removed or renamed fields The example assumes that email exists on the original items. If the field name changes, or if some items do not have an email, you should account for that in your Code node logic to avoid null or undefined values being assigned.
  • Node rename issues If the Customer Datastore (n8n training) node is renamed, the reference inside the Code node must be updated. Otherwise, the helper _() will not be able to resolve the node output correctly.

In more advanced implementations, you can add conditional checks in the Code node to gracefully handle missing emails or unexpected data structures before assigning values to restoreEmail.

Advanced customization ideas

Once you understand the basic pattern used in this template, you can extend it to more advanced n8n workflows:

  • Restoring multiple fields Instead of restoring only email, you can restore multiple properties from the original dataset, for example phone, address, or internal IDs.
  • Selective restoration based on conditions In the Code node, you can add logic to restore emails only for certain customers, such as those matching a particular filter or status.
  • Combining with other transformation nodes Use itemMatching() in combination with other transformation nodes, such as IF, Merge, or additional Code nodes, to build complex pipelines while still keeping earlier full datasets available when needed.

The underlying pattern remains the same: keep your working payloads lean, and reattach data from earlier in the workflow using itemMatching() when required.

Why use itemMatching() in n8n?

Using itemMatching() in your n8n workflows provides several benefits:

  • Maintain data integrity You can safely reduce the payload to only the fields you need for intermediate processing, while preserving the ability to restore key attributes later. This helps avoid repeated queries to external systems or duplicating heavy data structures.
  • Optimized workflows Smaller payloads reduce memory usage and can simplify debugging and visualization in the n8n UI. itemMatching() lets you keep workflows efficient without losing access to the original data context.
  • Flexible automation design This pattern is ideal when you need to display or manipulate only a subset of fields temporarily, but still need to reattach complete records before sending final outputs to another system or storage.

Implementation checklist for your own workflow

To implement a similar pattern in your own n8n project:

  1. Start with a data source node (for example, a database, API, or the Customer Datastore) that outputs full records including the fields you plan to restore later.
  2. Add a Set or Edit Fields node to reduce the payload to only the fields required for intermediate processing.
  3. Ensure that the reduced items preserve the same order and count as the original dataset.
  4. Add a Code node and reference the original node using _('Node Name').itemMatching(index) inside your loop.
  5. For each item, read the fields you want to restore (such as email) from the matched original item and write them to the current item.
  6. Return the modified items from the Code node and continue your workflow with the enriched data.

Additional tips and resources

  • Always verify that item order is preserved between nodes when relying on itemMatching(itemIndex). Avoid nodes that re-sort or filter items without adjusting your logic.
  • You can implement the same pattern using either JavaScript or Python in the Code node, depending on your preference and environment support.
  • For more detailed reference material and examples, see the official n8n documentation on itemMatching().

Using itemMatching() is a powerful way to keep your n8n workflows both efficient and context-aware. By separating data reduction from data restoration, you can design automations that are easier to maintain, scale, and debug.

Complete Guide to Managing Webflow Items with n8n

Complete Guide to Managing Webflow Items with n8n

Why Automate Webflow With n8n?

If you have ever added or updated items in a Webflow collection by hand, you know how repetitive it can get. Copy, paste, tweak a field, double-check the slug, repeat. It is fine for a few items, but once you start doing this regularly, it becomes a time sink and a source of mistakes.

That is where this n8n workflow template steps in. It connects directly to your Webflow collection and handles three key actions for you:

  • Creating a new item
  • Updating that item with more data
  • Fetching the final version so you can verify or reuse it elsewhere

Think of it as a small but mighty automation that keeps your Webflow content clean, consistent, and easy to manage, without you clicking through the Webflow UI every time.

What This n8n – Webflow Workflow Actually Does

This template is built around a simple linear sequence of four nodes. Each one plays a specific role in managing items in a Webflow collection:

  • Manual Trigger Node – lets you start the workflow whenever you want.
  • Webflow – Create Item Node – creates a brand new item in a chosen Webflow collection.
  • Webflow – Update Item Node – updates that freshly created item with more fields.
  • Webflow – Get Item Node – pulls back the final item so you can confirm everything worked or pass it to the next step in your automation.

It is a straightforward pattern, but it is powerful because you can easily adapt it to your own site, collections, and use cases.

When Should You Use This Template?

You will find this workflow especially useful if you:

  • Regularly add or update items in a Webflow CMS collection.
  • Want to connect Webflow to other tools using n8n, for example a form tool, CRM, or internal database.
  • Need a reliable process to create items, then enrich them with more data, then confirm the final result.
  • Are testing Webflow automations and want a clear, step-by-step example to build on.

It is a great starting point if you are new to n8n and Webflow automation, but it is also flexible enough for more advanced setups like bulk imports or multi-step content workflows.

Step-by-Step: How the Workflow Runs

1. Start With the Manual Trigger

The first node is a Manual Trigger. This does not connect to any external app, it simply lets you kick off the workflow by clicking Execute inside n8n.

Why is this useful? It is perfect for:

  • Testing your setup before going live.
  • Running the workflow on demand, for example when you are experimenting with new Webflow fields.

Later, you can always swap this out for a different trigger, like a webhook or schedule, but the manual trigger keeps things simple while you are getting started.

2. Create an Item in Your Webflow Collection

Next, the workflow moves into the Webflow – Create Item node. This is where n8n talks to the Webflow API using your credentials and creates a new CMS item.

In this template, the node is configured to use a specific collection:

collectionId: "601788ab33a62ac6a2a0284c"

You will replace this with your own collection ID, but the idea is the same. The node sends these fields to Webflow:

  • name: “n8n”
  • slug: “n8n”
  • _archived: false
  • _draft: false

So the workflow creates a published, non-archived item with a specific name and slug. Once Webflow accepts this request, it returns details about the new item, including its itemId. That ID is crucial for the next steps.

3. Update the Newly Created Item

After the item is created, the workflow passes its data to the Webflow – Update Item node. This node uses the itemId from the previous response to update that exact item.

Here is what gets updated:

  • avatar is set to https://n8n.io/n8n-logo.png.
  • name, slug, _archived, and _draft are reaffirmed from the JSON data to keep everything consistent.

Why split this into create then update? This pattern is handy when you want to:

  • Create a basic item first, then enrich it later with more fields.
  • Depend on the itemId from the creation step for further logic.

In a real project, you might pull the avatar URL or other fields from another system, a form submission, or a previous node instead of hardcoding them.

4. Retrieve the Final Item From Webflow

The last step is the Webflow – Get Item node. Using the same itemId, it fetches the fully updated item from your collection.

This gives you the final, authoritative version of the item as stored in Webflow. From here, you can:

  • Verify that the update worked as expected.
  • Send the item data to another app, like Slack, email, or a database.
  • Use it as input for additional n8n nodes in a larger automation chain.

Why This Workflow Makes Your Life Easier

So what is the real benefit of putting all this into n8n instead of doing it manually in Webflow?

  • Automation – No more repetitive data entry. Once it is set up, you can run it in seconds.
  • Better data integrity – Every new item is created and updated with the right fields in a consistent way.
  • Built-in verification – The final Get Item step confirms that everything worked, which is great for debugging and peace of mind.
  • Scalability – The same pattern can grow with you. You can loop over multiple items, connect to other services, or add logic for different scenarios.

In short, you are turning a manual, error-prone process into a repeatable, reliable automation that you can adapt as your content needs evolve.

How to Customize This n8n – Webflow Template

The template works out of the box as an example, but you will almost always want to tweak it for your own Webflow project. Here is how to do that.

1. Plug In Your Own Webflow Site and Collection

First, replace the placeholder IDs with your real ones:

  • siteId – your Webflow site identifier.
  • collectionId – the ID of the collection you want to manage.

You can find these in your Webflow project settings or via the Webflow API. Once they are set, the workflow will operate directly on your own content.

2. Match the Fields to Your Collection Schema

Next, adjust the fields in the fieldsUi configuration so they match your collection setup. Every Webflow collection has its own schema, so you might have fields like title, description, image, category, or anything custom you have created.

In practical terms, that means:

  • Editing field names so they correspond to your Webflow collection fields.
  • Updating values so they come from your own data, not just the example values.
  • Adding or removing fields depending on what your collection expects.

This is where the workflow really becomes your automation instead of just a demo.

3. Extend the Workflow With Extra Logic

Once the basics are working, you can start layering on more functionality. Some ideas:

  • Add error handling nodes to catch and log failed API calls.
  • Insert a logging step that writes details to a database or a Google Sheet.
  • Trigger notifications in Slack or email whenever a new Webflow item is created.
  • Connect this workflow to other n8n templates to build a full content pipeline.

The template is intentionally simple so you can treat it as a building block and expand from there.

Getting Started With the Template

Ready to try it out? Here is a quick checklist:

  1. Open the template in n8n.
  2. Set up your Webflow credentials in n8n if you have not already.
  3. Replace the siteId and collectionId with your own.
  4. Adjust the fieldsUi to match your collection fields and desired values.
  5. Run the workflow using the Manual Trigger and check the created item in Webflow.

Once you see it working end to end, you can confidently start integrating it into larger automations.

Wrap-Up: Bring Webflow Into Your Automation Stack

This n8n workflow template gives you a clear, step-by-step example of how to manage Webflow collection items programmatically. You create an item, update it with additional data, then retrieve it for verification or further processing, all inside a single, easy-to-understand automation.

It is a small workflow, but it opens the door to much bigger possibilities, like syncing content across tools, building editorial pipelines, or running bulk updates without touching the Webflow UI.

Give it a try and see how much time you save once Webflow content management becomes just another smooth part of your n8n automation stack.

Complete Guide to Setting Up and Generating TOTP Codes in n8n 🔐

Complete Guide to Setting Up and Generating TOTP Codes in n8n 🔐

Imagine This: Your Workflow Wants a Password Every 30 Seconds

You finally sit down with your coffee, ready to get things done, and what happens? Another login, another code, another “open authenticator app, copy code, paste code, repeat until your soul leaves your body” moment.

Now imagine your automations quietly handling those Time-based One-Time Passwords (TOTP) for you. No more copy-paste marathons, no more “where did I put my phone” panic. That is exactly what this n8n TOTP workflow template helps you do.

In this guide, you will learn how to generate TOTP codes inside n8n using the TOTP node, how to hook it into your workflows, and how to keep everything secure and in sync. Same strong security, far fewer sighs.

Quick Refresher: What Is TOTP, Really?

TOTP stands for Time-based One-Time Password. It is a short-lived passcode that is generated using:

  • The current time
  • A secret key that both the client and server know

The result is a code that usually changes every 30 seconds and can be used as a second factor in authentication. So even if someone gets your password, they still need that tiny, fast-expiring code to get in.

That is why TOTP is a core building block for two-factor authentication (2FA) and why it is so handy to generate it directly inside your n8n automations.

Why Use TOTP in n8n Workflows?

n8n is all about automating the boring stuff, and “typing codes again and again” definitely qualifies as boring. With the TOTP node, n8n can generate valid authentication codes on its own, in sync with your authentication server.

Here is what the TOTP node brings to your automation life:

  • Automatic TOTP generation using a stored secret key
  • Fresh codes every 30 seconds that match what your authenticator app would show
  • Easy integration into any workflow that needs 2FA or temporary codes

So instead of you juggling codes in real time, your workflow can quietly fetch the TOTP and pass it along where needed.

Where This Actually Helps in Real Life

Once you have TOTP inside n8n, you can use it in all sorts of security-sensitive automations, for example:

  • Automated login flows that require 2FA codes
  • Secure API authentication where an extra TOTP step is needed
  • CI/CD pipeline verification, for example when a deployment step needs a one-time code

Anywhere you would normally grab your phone to read a TOTP code, your workflow can do the job instead.

How the n8n TOTP Template Works (High-Level)

The template uses a simple combination of nodes:

  • A Manual Trigger node so you can test things whenever you like
  • The TOTP node, which uses stored credentials to generate the current TOTP code

You click “Test workflow”, n8n runs the TOTP node, and you instantly get a fresh code generated from your secret key. From there, you can plug that code into any other part of your automation.

Step-by-Step: Setting Up TOTP in n8n

Let us walk through the setup. It is short, painless, and involves zero copy-pasting from your phone.

1. Start With a Manual Trigger

First, add a Manual Trigger node to your workflow. This node is perfect for testing because you can run the workflow on demand by clicking “Test workflow” in the n8n editor.

2. Add the TOTP Node

Next, drag the TOTP node into your workflow and connect it to the Manual Trigger node.

This node is where the TOTP magic happens. It will generate a time-based one-time password every time the workflow runs.

3. Set Up TOTP Credentials

Inside the TOTP node, find the credentials section. Here you will:

  • Select an existing TOTP account credential, or
  • Create a new TOTP credential and store your secret key

This secret key is the same one that would normally be used in an authenticator app. n8n uses it to generate the exact same codes that app would show.

4. Configure Node Parameters

Good news, this part is usually light on effort. The TOTP node often needs only minimal configuration. Just make sure that:

  • The secret key is correct
  • The settings match your authentication server requirements, such as the time step (often 30 seconds)

Once those are aligned, n8n will produce valid TOTP codes in sync with your server.

5. Test Your Workflow

Now for the fun part. Click “Test workflow” in n8n.

The workflow runs, the TOTP node generates a fresh code, and you can see the output directly in the execution data. That code can then be used wherever your automation needs it, such as in a login step or API call.

Security & Reliability Tips for TOTP in n8n

Automating TOTP is powerful, but with great power comes the responsibility to not leave your secret keys lying around like sticky notes on a monitor.

1. Protect Your Secret Keys

Always store your TOTP secret keys securely. Do not expose them in logs, screenshots, or public repositories.

Use n8n credentials to keep the secret key safe inside your workflow configuration instead of hardcoding it in nodes or expressions.

2. Keep Clocks in Sync

TOTP is all about time. If your server time and n8n time do not agree, your codes will not either.

  • Ensure your server clock is accurate
  • Confirm that the client or authentication service also uses the correct time

A tiny time drift can mean a lot of “invalid code” messages, which is not the kind of automation excitement anyone wants.

3. Maintain Your Workflows

Security is not a “set it and forget it” thing. Make a habit of:

  • Reviewing your workflows periodically
  • Updating them if your security policies change
  • Adapting to any new requirements from your authentication provider

This keeps your TOTP setup reliable and aligned with best practices over time.

Wrapping Up: Less Repetition, More Security

With the n8n TOTP node, you can bring strong two-factor authentication into your workflows without constantly playing “find the code” on your phone.

By using a Manual Trigger for testing, connecting the TOTP node, storing your secret key in credentials, and aligning settings with your authentication server, you get a secure, fully automated way to generate TOTP codes on demand.

Ready to stop typing the same codes over and over? Set up TOTP in n8n, plug it into your automations, and enjoy the peace of mind that comes with robust, hands-off authentication.