AI Overview Optimizer Workflow Explained (Without Losing Your Sanity To SEO)
Picture This…
You just finished writing a beautiful, heartfelt, 2,000-word masterpiece. You hit publish, sit back, and wait for the traffic to roll in.
Google: “Cute. Anyway, here is what our AI Overview thinks is actually useful.”
If you have ever felt the soul-crushing pain of tweaking titles, meta descriptions, and headings over and over again, only to still guess what Google really wants, this n8n workflow template is here to rescue you from that loop.
Meet the AI Overview Optimizer workflow, your new SEO sidekick that reads Google’s AI Overview, compares it with your article, and tells you exactly how to fix your content instead of making you play keyword roulette.
What This n8n Workflow Actually Does
In simple terms, this workflow uses AI to study what Google’s AI Overview is showing for a specific search query, then audits your article against that benchmark and gives you a detailed SEO improvement plan.
It is like having an SEO strategist, content editor, and slightly obsessive note-taker all rolled into one automated flow.
Main Goals Of The AI Overview Optimizer
- Analyze Google’s AI Overview for your target query, country, and language.
- Scrape your article content from a URL you provide.
- Compare your content with what Google’s AI seems to favor.
- Generate a structured SEO Improvement Report with specific, actionable steps.
Under The Hood: Workflow Components
This n8n template is made up of several key pieces that work together quietly while you enjoy not doing all this by hand.
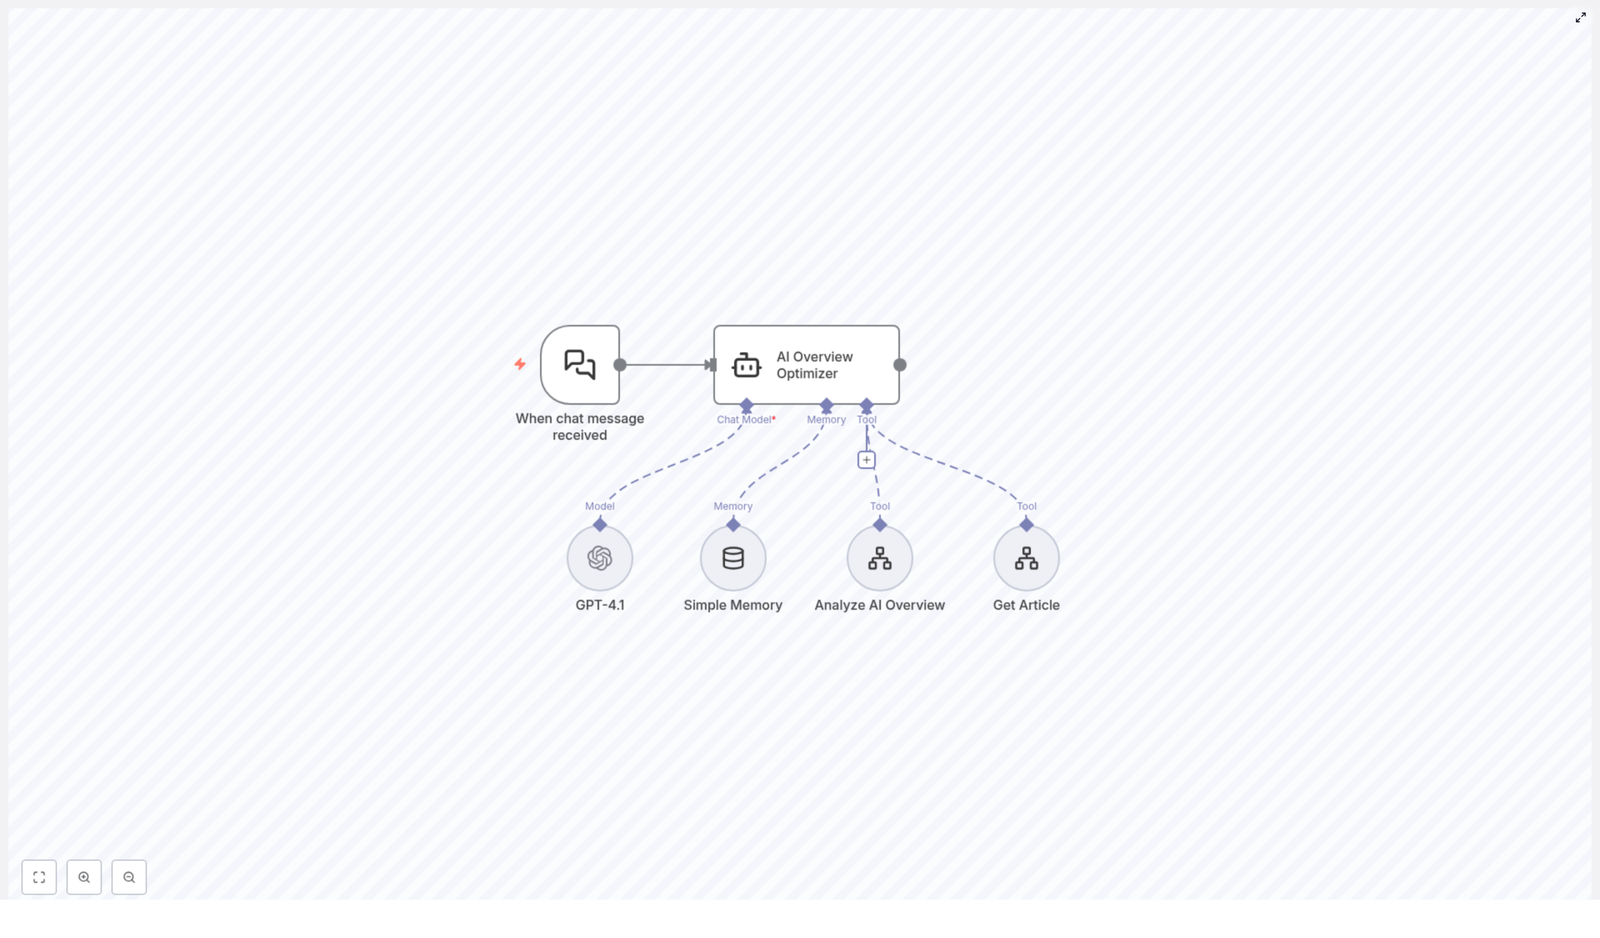
- When chat message received
This is the trigger node. Whenever a new user message comes in (typically with a search query and article URL), the workflow wakes up and gets to work. - AI Overview Optimizer
This is the main agent, powered by GPT-4.1. Think of it as your AI SEO strategist. It coordinates the tools, processes the data, and produces the final recommendations. - GPT-4.1
The large language model that understands your inputs and generates human-like, detailed outputs. It is responsible for turning raw data into a clear, structured SEO improvement report. - Simple Memory
A memory component that keeps track of the conversation context. This helps with multi-turn chats so the optimizer does not forget what you just said two messages ago. - Analyze AI Overview Tool
This tool fetches and analyzes Google’s AI Overview results for the query, country, and language you specify. It essentially figures out what kind of content structure, topics, and semantics Google’s AI is rewarding for that search. - Get Article Tool
This one scrapes the article from the URL you provide. It extracts the key content elements so the workflow can see what is already on your page and what might be missing.
How The Workflow Runs (Without You Lifting A Finger)
Step 1 – The Conversation Starts
You send a message through the chat interface. Typically, this includes:
- Your target search query.
- The URL of the article you want to optimize.
The When chat message received node triggers the workflow and passes this information to the AI Overview Optimizer agent.
Step 2 – Studying Google’s AI Overview
The agent first calls the Analyze AI Overview Tool. This tool:
- Looks up Google’s AI Overview for your query.
- Uses the specified country and language to localize the results.
- Extracts what the AI Overview is highlighting, including structure, topics, and key entities.
This gives the workflow a benchmark of what “ideal” content looks like in the eyes of Google’s AI for that specific query.
Step 3 – Auditing Your Article
Next, the agent uses the Get Article Tool to scrape your article content from the URL you provided. It retrieves the main sections and key elements of your page so the workflow can understand:
- How your article is structured.
- What topics you cover.
- What might be missing or underdeveloped.
Step 4 – GPT-4.1 Puts It All Together
Now the fun part. The AI Overview Optimizer agent feeds both data sets into GPT-4.1, with Simple Memory keeping the conversation context intact.
GPT-4.1 compares:
- The AI Overview benchmark from Google’s AI.
- Your current article content.
From there, it generates a detailed SEO Improvement Report that includes:
- Suggested improvements for your title and meta description.
- Missing content categories, topics, and entities to add.
- Recommendations for deepening your content where it is too shallow.
- Guidance on aligning your structure and semantics with what AI Overview favors.
Why This Workflow Is Worth Using
Key Benefits Of The AI Overview Optimizer
- Data-driven SEO
Recommendations are based on insights from Google’s AI Overview, not just guesswork or generic best practices. - Automated analysis
No more manually comparing SERPs, AI Overviews, and your article line by line. The workflow does the heavy lifting for you. - Better ranking potential
By aligning your content with the structure and topics Google’s AI is already surfacing, you increase your chances of ranking higher and faster. - Clear, actionable steps
You get a structured report with concrete actions instead of vague advice like “write better content.”
In other words, this workflow is built to remove the guesswork and repetitive grind from SEO content optimization, while still keeping you in control of the final edits.
Quick Setup & Usage Guide
1. Open The Template
Start by loading the AI Overview Optimizer workflow template in n8n.
2. Configure Any Required Credentials
Make sure your environment is set up to use GPT-4.1 and the tools in the workflow. Check that any needed API keys or integrations are correctly configured in n8n so the AI Overview Optimizer agent can call:
- GPT-4.1
- Analyze AI Overview Tool
- Get Article Tool
3. Trigger The Workflow Via Chat
Use the chat interface connected to this workflow. In your message, include:
- The search query you are targeting.
- The URL of the article you want to optimize.
Once the When chat message received node picks up your message, the full optimization flow starts automatically.
4. Review Your SEO Improvement Report
When the workflow finishes, you receive a comprehensive SEO Improvement Report generated by GPT-4.1. This report will outline:
- What your content is doing well.
- Where it falls short compared to the AI Overview benchmark.
- Specific edits and expansions you should make.
From there, you can update your article with confidence instead of just hoping your tweaks are enough.
Tips, Next Steps, And How To Get The Most Out Of It
Use It As A Regular SEO Checkup
Run this workflow whenever you publish a new article or significantly update an existing one. Search expectations change, and AI Overview results evolve, so regular checkups help keep your content aligned.
Combine With Your Own Expertise
The workflow gives you a data-backed roadmap, but you still bring the brand voice, nuance, and real-world experience. Use the recommendations as a strong starting point, then tailor them to match your audience and style.
Iterate On High-Value Pages First
Start by optimizing pages that matter most, like revenue-driving posts, landing pages, or cornerstone articles. The improvements suggested by the workflow can have a bigger impact there.
Wrapping Up
The AI Overview Optimizer workflow is a smart, automated way to align your content with what Google’s AI Overview is already prioritizing. By benchmarking against AI Overview, then auditing your article with GPT-4.1 and contextual memory, it delivers a targeted SEO improvement plan that helps your pages rank faster and perform better.
Instead of endlessly tweaking headings and hoping for the best, you can let this n8n template handle the analysis while you focus on writing content worth reading.
Ready to try it? Feed your query and article URL into the chat interface and let the workflow generate a detailed SEO improvement report for you.