N8N Discord Workflow Setup & Management Guide

N8N Discord Workflow Template – Turn Your Server Into An Automated Powerhouse

Imagine your Discord server running smoothly in the background, messages handled, questions answered, and updates shared, while you stay focused on the work that really moves you or your business forward. That is the promise of automation with n8n and a well designed Discord workflow.

This guide walks you through that journey. You will start from the common pain points of manual Discord management, shift into a more empowered automation mindset, then use a practical n8n Discord workflow template to build your own AI powered assistant. Along the way, you will see how each step lays the foundation for more time, more clarity, and more space to grow.

From Manual Discord Management To Scalable Automation

Running an active Discord community can be incredibly rewarding, but it also demands constant attention. Repetitive questions, routine announcements, and basic support can quickly eat up your time and energy. It is easy to feel like you are always reacting instead of leading.

Automation with n8n changes that dynamic. By connecting your Discord server, a custom bot, and OpenAI, you can:

  • Respond to messages consistently, even when you are offline
  • Automate recurring updates and announcements
  • Centralize AI powered assistance inside your existing channels
  • Scale your community without scaling your workload

The n8n Discord workflow template you are about to set up is not just a technical tool. It is a starting point for a more focused, intentional way of managing your community and your time.

Adopting An Automation Mindset With n8n

Before you dive into the setup, it helps to approach this template with the right mindset. Think of n8n as your flexible automation studio. Each workflow you build is a small system that saves you time, reduces errors, and frees your attention for higher value work.

This Discord workflow template is your first step toward:

  • Delegating repetitive tasks to an AI agent
  • Designing clear processes instead of improvising every day
  • Experimenting with automation, then refining as you learn

You do not need to build everything at once. Start with a simple, working setup. Then gradually customize the AI behavior, expand to more channels, and introduce smarter logic. Each improvement compounds, and your Discord server becomes more self managing over time.

What You Need Before You Start

To turn this template into a working Discord AI assistant, make sure you have these essentials ready:

Prerequisites

  • n8n account to host and run your workflow
  • Discord bot created in the Discord Developer Portal
  • OpenAI API key to power the AI responses
  • Discord server access with permission to add and configure bots

Once you have these in place, you are ready to build a system that works alongside you, not against your time.

Step 1 – Create And Configure Your Discord Bot

Your Discord bot is the visible face of your automation. It is how your community interacts with the AI powered workflows you define in n8n. Setting it up is straightforward, and once done, you rarely need to touch it again.

Create The Bot In Discord

  • Open the Discord Developer Portal
  • Create a new application for your bot
  • Generate a bot token that n8n will use to connect
  • Add the bot to your server using the OAuth2 URL

Set The Right Permissions

To function correctly, your bot needs access to specific Discord permissions. At minimum, enable:

  • Send Messages
  • Read Message History
  • View Channels

These give your workflow the ability to read incoming messages, generate AI responses, and post them back into the correct channels.

Gather Key IDs For Your Workflow

n8n will need to know exactly where to listen and respond inside your server. Make sure you have:

  • Guild (Server) ID
  • Channel IDs such as:
    • AI tools or assistant channel
    • Free guides or resources channel

With your bot ready, you can now connect Discord and OpenAI directly into your n8n environment.

Step 2 – Connect Your Credentials In n8n

Credentials are the secure bridge between n8n and your external services. Setting them up correctly ensures your workflow runs reliably and safely.

Discord Bot Credentials

  • In n8n, go to the Credentials section
  • Create a new credential of type “Discord Bot API”
  • Paste in your Discord bot token
  • Give it a clear name, for example “Motion Assistant”

This tells n8n which bot to use when sending or reading messages from your server.

OpenAI API Credentials

  • In the same Credentials area, create a new “OpenAI API” credential
  • Enter your OpenAI API key
  • Name it something recognizable, such as “OpenAI Account”

With both credentials configured, your workflow can now act as a bridge between Discord and OpenAI, turning raw messages into helpful, AI powered responses.

Step 3 – Shape Your AI Agent Inside The Workflow

This is where your automation starts to feel personal. You are not just wiring tools together, you are designing the behavior of your Discord AI assistant.

AI Agent Configuration

  • Customize the system message to match your Discord management style. You can instruct the AI to behave like a helpful moderator, a friendly tutor, or a concise assistant.
  • Define character limits so responses stay readable inside Discord. A typical setting is a maximum of 1800 characters per message.
  • Specify text formatting that fits Discord, such as code blocks, bold, italics, or structured bullet points, so answers look clean and professional.

These small choices add up. They help your bot feel aligned with your brand, your tone, and your community values.

Step 4 – Choose How Your Workflow Gets Triggered

The same n8n Discord workflow template can support different ways of working, depending on how you want to interact with it. You can trigger it from other workflows, or directly from chat messages.

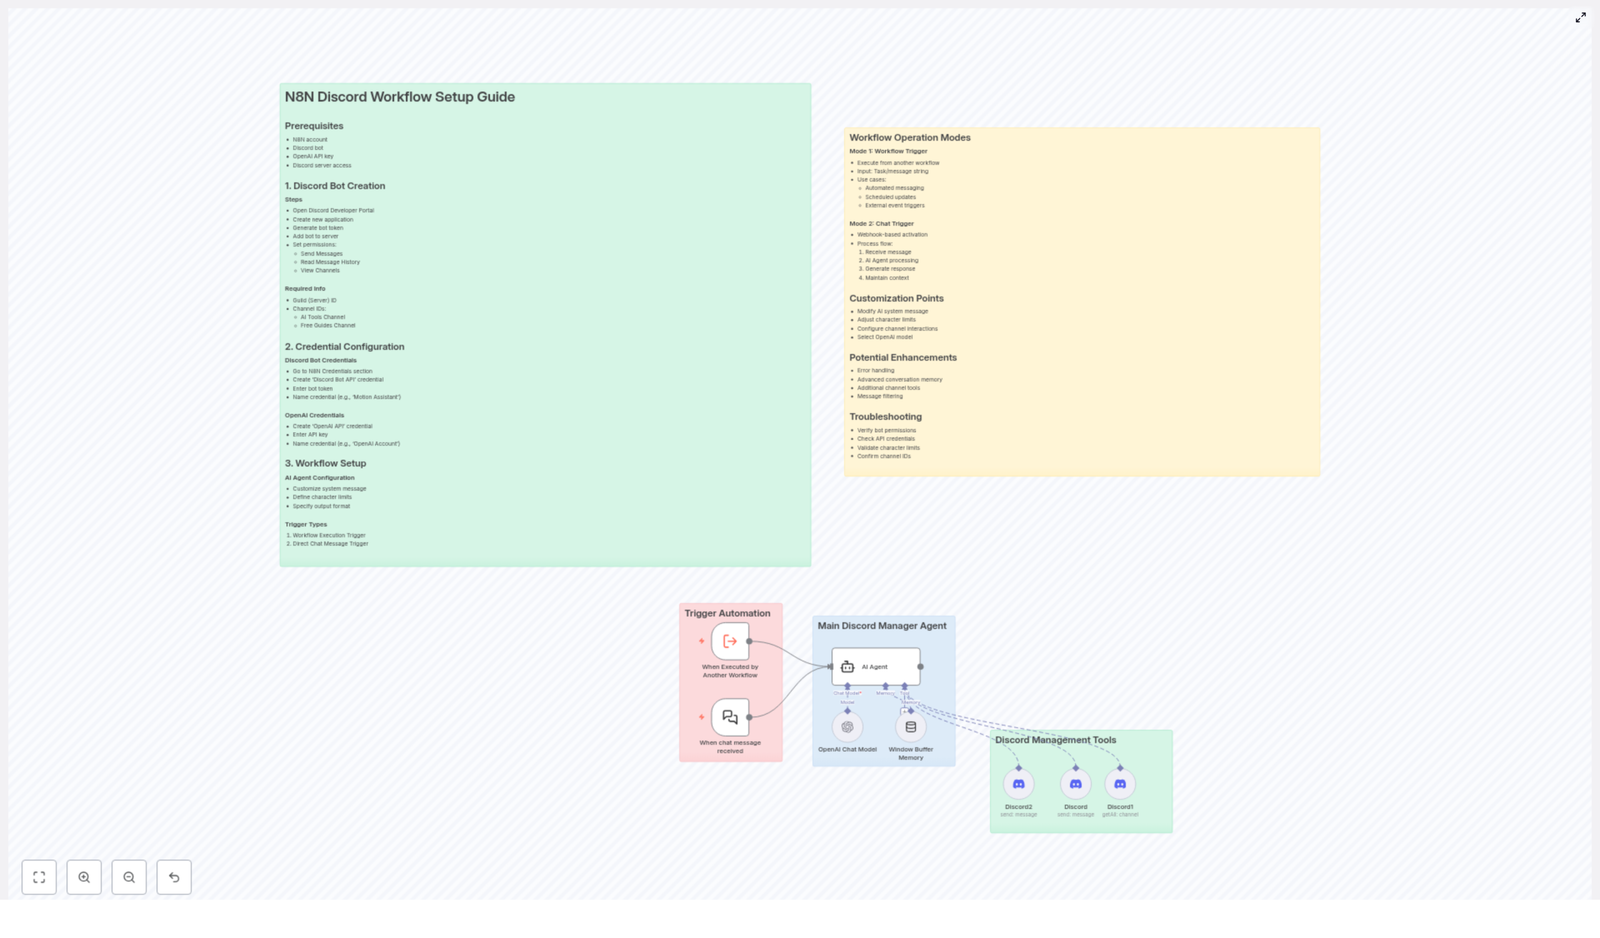
Main Trigger Types In The Template

  1. Workflow Execution Trigger
    Use this when you want to call the Discord AI workflow from another n8n workflow. You pass in a task or message string, and the template handles the AI processing and Discord response.
  2. Chat Message Trigger
    Use this when you want users to interact with the bot directly in Discord. A webhook receives the incoming chat message, then sends it into the workflow for AI processing.

Both modes unlock different possibilities. One supports behind the scenes automation, the other supports live, conversational interaction in your server.

How The Workflow Operates In Practice

Once your triggers are in place, the workflow can run in two primary modes. Each mode serves a different style of automation and can be expanded as your needs grow.

Mode 1 – Workflow Trigger For Automated Tasks

  • Another n8n workflow executes this Discord workflow and sends it a task or message string.
  • The AI agent processes the input, generates a response, and posts it to the relevant Discord channel.
  • This is ideal for:
    • Automated messaging and announcements
    • Scheduled updates or reminders
    • Notifications triggered by external events or tools

In this mode, your Discord bot becomes part of a larger automation system, reacting to events across your entire stack.

Mode 2 – Chat Trigger For Direct Conversations

  • A webhook receives an incoming message from your Discord channel.
  • The AI agent analyzes the message and generates a tailored response.
  • The workflow uses buffer memory to maintain conversational context, so replies feel like part of an ongoing dialog, not isolated answers.

This mode turns your Discord bot into a live AI assistant inside your community, available at any time and able to remember context across multiple turns.

Customize The Template To Match Your Vision

The real power of n8n is that nothing is fixed. This template is a starting point, and you are encouraged to adapt it so it fits your unique use case, audience, and growth plans.

Key Customization Options

  • AI system message Adjust the tone, role, and priorities of your assistant so it reflects how you want your community managed.
  • Message length limits Fine tune the maximum character count per message to match your channel style and keep conversations concise.
  • Multi channel behavior Configure how the workflow interacts with multiple Discord channels, for example one for tools, one for guides, and others for support or announcements.
  • OpenAI model choice Select the OpenAI model that best fits your needs, such as a suitable GPT 4 variant for higher quality responses.

Each adjustment brings your automation closer to the ideal assistant you have in mind.

Grow Your Automation With Enhancements

Once your basic workflow is running, you can gradually enhance it to handle more complex scenarios. Think of this as leveling up your automation skills over time.

Potential Enhancements To Explore

  • Error handling Add nodes that detect and manage failures gracefully, so your community experience stays smooth even if an external API has issues.
  • Richer conversation memory Extend the buffer memory logic to support longer, multi turn dialogs, especially for deeper support or mentoring conversations.
  • More channel specific tools Create specialized flows for different Discord channels, such as FAQ handling, content recommendations, or onboarding guidance.
  • Filtering and moderation Introduce message filters or moderation steps to maintain quality, safety, and alignment with your community guidelines.

Each enhancement you add increases the value of your automation and reduces the manual work you need to do every day.

Troubleshooting So Your Workflow Stays Reliable

As you experiment and iterate, you may run into small issues. A quick checklist can help you diagnose most problems fast and keep your automation dependable.

  • Check bot permissions Confirm your Discord bot has the correct permissions to view channels, read message history, and send messages.
  • Verify API credentials Make sure your Discord and OpenAI credentials in n8n are accurate and still active.
  • Validate character limits If messages appear cut off, review your configured character limits to avoid unintended truncation.
  • Confirm IDs Double check that all channel IDs and the guild (server) ID used in the workflow match your actual Discord setup.

With these checks in place, your workflow can run smoothly in the background while you focus on strategy, creation, and connection.

Your Next Step – Turn This Template Into Your Own Automation System

You now have a clear path from manual Discord management to a more automated, scalable, and focused way of running your community. The n8n Discord workflow template is your practical tool for making that shift real.

Start simple. Set up your bot, connect your credentials, choose your trigger mode, and let the AI handle a small part of your workload. Then iterate. Refine the system message, expand to more channels, and explore new automations that support your goals.

Each improvement gives you back time and mental space, and each workflow you build with n8n becomes another building block in a more intentional, automated workday.

Ready to experience intelligent Discord automation in your own server?

Set up the template, experiment boldly, and keep evolving your automation. Your future workflows – and your future time freedom – start here.

Automate Slack to Linear Bug Reporting Workflow

Automate a Slack to Linear Bug Reporting Workflow with n8n

Why Automate Bug Reporting Between Slack and Linear

For engineering teams that rely on Slack for day-to-day communication and Linear for issue tracking, manually copying bug reports from one system to the other is inefficient and prone to mistakes. Important details are often lost, formatting is inconsistent, and developers spend time on administrative work instead of resolving issues.

This article explains how to implement a robust n8n workflow that converts a simple Slack slash command into a fully structured Linear issue. The workflow also sends automated reminders in Slack so reporters can enrich the ticket with key diagnostic information.

Workflow Architecture at a Glance

The solution uses n8n as the automation layer between Slack and Linear. At a high level, the workflow performs the following actions:

  • Slack Slash Command – Team members submit a bug using /bug followed by a short description.
  • Webhook Node – n8n receives the HTTP POST payload from Slack and parses the bug text and metadata.
  • Issue Defaults Node – The workflow enriches the incoming data with required Linear attributes such as team ID and label IDs.
  • Linear Issue Creator Node – n8n calls the Linear API to create a new issue with a standardized, templated description.
  • Slack Reminder Node – After the issue is created, the workflow posts a follow-up message in Slack that tags the reporter and prompts them to add more detailed information.
  • Helper Nodes – Additional nodes assist with discovering Linear team and label IDs during initial configuration.

This architecture keeps the user interaction in Slack extremely lightweight while ensuring that issues in Linear are created with consistent structure and metadata.

Step 1 – Configure the Slack App and Slash Command

Begin by creating and configuring a Slack app that will power the /bug command. This app authorizes n8n to receive commands and send messages back to users.

  1. Navigate to https://api.slack.com/apps, click New App, then choose an appropriate name and the target workspace.
  2. In the app configuration, open OAuth & Permissions. Under Scopes in the Bot Token Scopes section, add the chat:write permission so the app can post messages in Slack.
  3. Go to the Slash Commands section and create a new command named /bug. This is the entry point for users to submit bug reports.
  4. In the command configuration, set the Request URL to the test URL provided by the n8n Webhook node that will receive the Slack payload.
  5. Add a clear description and usage hint so users understand how to use the command, for example, “Report a bug to Linear, usage: /bug <short description>.”
  6. Install the app into your Slack workspace so the command becomes available to your team.

Once configured, every invocation of /bug will trigger an HTTP request to your n8n workflow.

Step 2 – Prepare Linear Configuration with Helper Nodes

Linear requires specific identifiers for teams and labels when creating issues via the API. To simplify setup, the workflow includes helper nodes that query these values directly from Linear.

  • List Linear Teams – This node uses the Linear API to retrieve all teams associated with your account. Review the output to identify the team where new bug reports should be created.
  • Set Team – Once you select the correct team, this node stores the chosen team ID so it can be reused consistently across the workflow.
  • List Linear Labels – After the team is set, this node queries the labels available for that team. You can then select the appropriate label IDs to tag bug reports (for example, “Bug,” “Regression,” or “High Priority”).

By using these helper nodes during initial configuration, you avoid manual lookups and ensure that your Linear team and label references are accurate.

Step 3 – Main Workflow Execution Flow

With Slack and Linear configured, the main n8n workflow handles the end-to-end process of converting a Slack command into a well-structured Linear issue.

1. Capture the Slack Slash Command

When a user types /bug <description> in Slack, Slack sends an HTTP POST request to the n8n Issue Webhook node. This node:

  • Receives the full payload from Slack, including the text after the command, user information, and channel details.
  • Parses the bug description that will be used as the Linear issue title or part of the issue content.

2. Apply Default Issue Metadata

The Issue Defaults node enriches the raw Slack data with the necessary Linear configuration. It typically:

  • Assigns the predefined Linear team ID obtained from the helper nodes.
  • Applies one or more label IDs to categorize the issue as a bug or according to your internal taxonomy.
  • Prepares a payload structure that is compatible with the Linear GraphQL API.

This step ensures every issue created from Slack adheres to your team’s standards for project, team, and labeling.

3. Create the Issue in Linear via API

The Linear Issue Creator node performs the actual issue creation. Using the enriched data from the previous step, it sends a GraphQL mutation to Linear. The node typically:

  • Sets the issue title based on the initial Slack description or a processed variant.
  • Applies the configured team and label IDs.
  • Builds a templated description that includes structured sections, for example:
    • Expected behavior
    • Actual behavior
    • Steps to reproduce
    • Version or environment information

This template encourages reporters and developers to collect consistent diagnostic data for every bug, which improves triage and resolution times.

4. Notify the Reporter in Slack

After Linear confirms that the issue has been created, the Slack Reminder node sends a follow-up message back to the original reporter. This message typically:

  • Mentions the user who submitted the bug via Slack.
  • Includes the URL of the newly created Linear issue.
  • Prompts the user to add or refine details such as reproduction steps, expected versus actual behavior, and any relevant version or environment notes.

This automated feedback loop keeps the conversation in Slack while ensuring that the canonical record of the bug in Linear is fully documented.

Best Practices for Using This Automation

  • Standardize your templates – Adjust the Linear issue description template so it matches your team’s debugging workflow. Clear sections reduce back-and-forth questions.
  • Refine labels and teams – Use the helper nodes periodically to review and update team and label assignments as your Linear configuration evolves.
  • Educate your team – Provide short internal documentation on how to use the /bug command and what information is expected in follow-up comments.
  • Monitor usage – Track how often the workflow is triggered and whether additional fields or validations would improve data quality.

Get Started With the Slack to Linear Bug Reporter Template

Connecting Slack, n8n, and Linear transforms an ad hoc bug reporting process into a disciplined, low-friction workflow. Your team can capture issues directly from conversations, while n8n handles the structured creation of Linear issues and automated reminders for complete documentation.

Customize the template by adjusting team IDs, labels, and message copy to fit your environment and governance standards. Once deployed, this automation reduces manual overhead and aligns communication channels with your issue tracking system.

If you would like further guidance or a walkthrough of the setup, reach out and explore how to scale your development workflow with n8n-driven automation.

Automated Crypto News & Sentiment Analysis Bot

Automated Crypto News & Sentiment Analysis Bot – A Story Of One Overwhelmed Trader

When The Crypto Firehose Became Too Much

By the time the New York trading session opened, Alex already had twelve tabs of crypto news open.

Cointelegraph on one screen, Coindesk on another, Telegram groups buzzing, Twitter feeds flying past, and still, Alex could not answer a simple question with confidence:

“What is the actual market sentiment around Bitcoin today?”

Every headline seemed urgent, every article claimed to be critical. Some were bullish, some were bearish, and some were pure noise. Alex was a serious crypto trader, not a casual hobbyist, and missing the real mood of the market meant missing trades or taking on unnecessary risk.

What Alex wanted was simple:

  • One place to ask about a coin or topic
  • A quick, clear summary of the latest news
  • A trustworthy sentiment analysis based on multiple sources
  • No more drowning in clickbait headlines

Scrolling through Twitter one evening, Alex stumbled on something that sounded almost too good to be true: an n8n workflow template for an automated Crypto News & Sentiment Analysis Bot that runs directly inside Telegram.

Curious and slightly desperate, Alex decided to give it a try.

The Discovery: Turning Telegram Into A Crypto Intelligence Hub

Alex already used Telegram constantly to follow signals and communities, so the idea of getting curated crypto news and sentiment analysis right inside a Telegram chat felt natural.

The description of the n8n template was straightforward. It promised to:

  • Aggregate news from major crypto outlets
  • Use AI to extract the right keyword from any question
  • Filter and summarize only the relevant articles
  • Analyze market sentiment using GPT-4o
  • Deliver everything back to Telegram in a concise format

If it worked, Alex could stop juggling multiple sites and start asking one simple question at a time, such as “Bitcoin” or “NFT regulation”, and get a solid overview in seconds.

Setting Up The Bot: The Calm Before The Turning Point

On a quiet Saturday morning, Alex sat down with coffee and opened n8n.

Step 1 – Meeting @BotFather

The first task was to create a Telegram bot. Alex opened Telegram, searched for @BotFather, and followed the usual steps to create a new bot. Within minutes, a fresh bot token was ready.

Back in n8n, Alex connected this token to the Telegram node in the template. This would allow the workflow to listen to incoming messages and capture the chat id for each conversation, which is crucial for session management and keeping the context of the conversation intact.

Step 2 – Plugging In The AI Brain

Next, Alex provided OpenAI credentials so the workflow could use the GPT-4o model. This model would later handle the summarization and sentiment analysis part of the process.

With Telegram and OpenAI connected, the skeleton of the bot was ready. What remained was the content pipeline that would feed it fresh crypto news.

Step 3 – Choosing The News Sources

The template came preconfigured with a strong selection of crypto news outlets. Alex recognized many of them immediately:

  • Cointelegraph
  • Bitcoin Magazine
  • Coindesk
  • Bitcoinist
  • Newsbtc
  • Cryptopotato
  • 99Bitcoins
  • Crypto Briefing
  • Crypto.news

Alex liked that this list could be customized easily. More feeds could be added later, or some removed, depending on preference. For now, the default selection already covered a wide spectrum of perspectives, from breaking news to educational content.

Rising Action: Watching The Workflow Come To Life

With the setup complete, Alex opened Telegram and stared at the new bot. It was time for the first real test.

Telegram Integration In Action

Alex typed a simple message to the bot:

“Bitcoin”

Behind the scenes, the n8n workflow woke up. The Telegram integration captured the message, stored Alex’s chat id for session continuity, and passed the query into the next stage of the flow.

AI Keyword Extraction: Finding The Signal

Instead of trying to process the entire raw message, the workflow used an AI-powered agent to extract the core keyword. For a short message like “Bitcoin” this was trivial, but Alex knew that sometimes queries get more complex, such as:

“What is the current sentiment around Ethereum ETFs?”

In those cases, the AI keyword extraction would identify the most precise term, like “Ethereum ETF”, and use that to filter relevant news more effectively. It was a small detail, but it meant the system could stay focused even when the human input got messy.

Comprehensive News Aggregation

With the keyword in hand, the workflow moved on to news aggregation. It pulled the latest articles from all the configured sources, including Cointelegraph, Coindesk, Bitcoin Magazine, and the rest of the list.

Alex imagined this like a team of researchers fanning out across the internet, grabbing every recent article that might matter, and dropping them into a shared inbox.

Filtering The Noise

Of course, not everything was relevant. Some articles were general market overviews, some were about unrelated tokens, and some just mentioned the keyword in passing.

The workflow handled this by filtering the collected articles. It checked whether the extracted keyword appeared in the:

  • Title
  • Snippet or preview text
  • Full content

Only the articles that truly matched the topic moved forward in the pipeline. For Alex, this was the crucial shift from chaos to clarity. Instead of reading twenty tabs, the workflow would pay attention only to the pieces that actually mattered for the question at hand.

The Turning Point: GPT-4o Delivers The Verdict

Now came the part Alex was most curious about: could an AI model really summarize all this news and give a meaningful sentiment overview?

AI-Powered Summarization And Sentiment Analysis

The filtered articles were combined into a structured prompt and sent to the GPT-4o model. The instructions were clear:

  • Produce a concise summary of the current news landscape for the keyword
  • Analyze the overall market sentiment, based on the aggregated articles
  • Include reference links to the original news sources

Within moments, Telegram lit up.

The bot responded with a short, well-structured message:

  • A clear summary of what had happened recently around Bitcoin
  • A balanced sentiment analysis, highlighting whether the tone was bullish, bearish, or mixed
  • A list of links to the original articles, in case Alex wanted to dig deeper

Instead of twenty tabs and conflicting opinions, Alex now had a single, AI-curated snapshot of the market mood, backed by multiple reputable sources.

The Resolution: From Overwhelm To Confident Decisions

Over the next few days, Alex kept using the bot for different queries:

  • “Ethereum”
  • “NFT”
  • “Solana outage”
  • “Bitcoin halving”

Each time, the same pattern repeated. The bot:

  1. Listened to the Telegram message and captured the chat id
  2. Extracted a precise keyword with AI
  3. Aggregated news from top crypto outlets
  4. Filtered only the relevant articles
  5. Used GPT-4o to summarize the news and analyze sentiment
  6. Returned everything as a compact message with links

Real Benefits In Daily Trading

As the workflow became part of Alex’s routine, the advantages became obvious.

  • Time-saving – No more hopping between Cointelegraph, Coindesk, Bitcoin Magazine, and others. The bot delivered curated summaries straight into Telegram.
  • Accurate sentiment insight – Instead of guessing from a few loud headlines, Alex got a consolidated market mood analysis based on multiple articles.
  • Instant updates – Whenever something felt uncertain, a quick query to the bot brought back a fresh overview.
  • Customizable coverage – Alex could add or remove RSS feeds in n8n to tailor the sources to personal preferences or new niches.

For a trader, investor, or even a curious crypto enthusiast, this was more than a neat automation. It was a way to regain control over information overload.

How You Can Follow The Same Path

If you find yourself in Alex’s position, juggling countless news sites and chats just to understand what is going on, you can set up the same n8n Crypto News & Sentiment Analysis Bot in a few steps.

Quick Start Guide

  1. Create a Telegram bot with @BotFather and grab the bot token.
  2. Open n8n and import the Crypto News & Sentiment Analysis Bot template.
  3. Connect the Telegram node using your bot token so the workflow can receive messages and manage chat sessions.
  4. Provide your OpenAI credentials so the GPT-4o model can perform summarization and sentiment analysis.
  5. Review and customize the RSS feeds from sources like Cointelegraph, Coindesk, Bitcoin Magazine, and others. Add or remove feeds to match your preferred coverage.
  6. Activate the workflow, open Telegram, and send a query such as “Bitcoin” or “NFT”.

Within seconds, you will receive a concise summary of the latest news, an overview of the current sentiment, and direct links to the original articles, all in a single Telegram message.

Why This n8n Template Matters In The Crypto Space

The crypto market moves quickly, and missing a key shift in sentiment can be costly. This automated n8n workflow combines:

  • Trusted crypto news sources
  • AI-powered keyword extraction
  • Smart article filtering
  • GPT-4o summarization and sentiment analysis
  • Instant delivery through Telegram

The result is a practical, real-world tool that turns scattered information into actionable insight. Instead of spending your energy collecting data, you can focus on making better crypto decisions.

Take The Next Step

If you are ready to stop drowning in tabs and start getting clear, AI-driven crypto insights directly in your Telegram chat, you can use the same template that changed Alex’s workflow.

Set up your own Automated Crypto News & Sentiment Analysis Bot, connect it to Telegram, and let n8n handle the heavy lifting of news aggregation and sentiment analysis. Whether you trade daily or simply want to stay ahead as an investor or enthusiast, this workflow helps you stay informed, focused, and one step ahead in the crypto market.

How to Build a Crypto News & Sentiment Analysis Bot

How to Build a Crypto News & Sentiment Analysis Bot in n8n

Overview

This guide explains how to implement a crypto news and sentiment analysis bot in n8n using a workflow template. The automation collects cryptocurrency news from multiple RSS feeds, uses OpenAI to extract a relevant keyword and generate a summary with sentiment, then delivers the result to users via a Telegram bot.

The documentation-style breakdown below is aimed at technical users who are already familiar with n8n concepts such as triggers, nodes, credentials, and data mapping.

Workflow Architecture

The workflow is designed as an event-driven Telegram bot that processes each user message as an independent execution, while still maintaining user context through a session identifier. At a high level, the data flow is:

  1. Telegram Trigger receives a user message.
  2. Session handling captures the user’s chat ID as a sessionId.
  3. OpenAI node analyzes the message and extracts a single keyword.
  4. Multiple RSS Feed nodes fetch the latest crypto news from several sources.
  5. Merge / Code node combines all articles into one list and filters by the keyword.
  6. Prompt construction builds a structured input for the summarization model.
  7. OpenAI GPT-4o node generates a news summary and sentiment analysis.
  8. Telegram Send node formats and returns the response to the correct user chat.

Node-by-Node Breakdown

1. Telegram Bot Setup & Trigger

Purpose: Receive crypto-related queries from Telegram users and initiate the n8n workflow.

  • External prerequisite: Create a Telegram bot using @BotFather.
    • Run /newbot in Telegram with @BotFather.
    • Follow the prompts to define the bot name and username.
    • Copy the bot token provided at the end. This token is required as n8n credentials.
  • n8n node type: Telegram Trigger (or equivalent Telegram node configured as a webhook listener).
  • Credentials: Configure a Telegram credential in n8n using the bot token from @BotFather.
  • Core parameters:
    • Update type: typically Message, so the workflow runs when a user sends a text message.
    • Webhook URL: automatically set by n8n if using the Telegram Trigger node.

The trigger node exposes the incoming Telegram payload, including the chat.id and text fields. These are used in later nodes for session tracking and keyword extraction.

2. Session Initialization

Purpose: Maintain per-user context so that each response is routed back to the correct Telegram chat and can be treated as an individual session.

  • Data used: chat.id from the Telegram Trigger output.
  • Session identifier: Store the user’s chat.id as sessionId.

This can be done using a Set node or a Code node:

  • Set node approach:
    • Create a new field, for example sessionId.
    • Map it to the expression {{$json["message"]["chat"]["id"]}} (exact path may vary depending on the Telegram node output).

The sessionId is later referenced when sending the reply so that the response is always delivered to the same user who initiated the request. This pattern allows the workflow to handle multiple concurrent users safely, since each execution carries its own sessionId value.

3. Keyword Extraction with OpenAI

Purpose: Interpret the user’s natural language query and derive a single, relevant keyword that will be used to filter news articles.

  • Node type: OpenAI (Chat or Completion model, depending on your n8n version).
  • Model: OpenAI GPT model configured for keyword extraction (for example, a GPT-4 or GPT-3.5 variant, according to your account).
  • Credentials: OpenAI API key added as an n8n credential.

Input: The user message text from Telegram, for example via an expression like {{$json["message"]["text"]}}.

Prompt design: The node should instruct the model to return exactly one keyword, such as a cryptocurrency symbol or topic, that will serve as the filter for news articles. For instance, if the user writes “What is happening with Bitcoin and ETFs today?”, the model should return a single keyword like Bitcoin.

This constraint is important, since the downstream filtering logic expects a single term, not a list. If the user sends a vague query with no obvious crypto-related term, you may want to handle that case by returning a generic keyword, but the template focuses on the core path where a meaningful crypto keyword is identified.

4. RSS Feed Aggregation

Purpose: Collect the latest news articles from multiple cryptocurrency news outlets to ensure broad and diverse coverage.

  • Node type: One or more RSS Feed Read nodes (or equivalent HTTP Request nodes configured for RSS URLs).
  • Sources: The template uses multiple leading crypto news sites, for example:
    • Cointelegraph
    • Bitcoin Magazine
    • Coindesk
    • Bitcoinist
    • NewsBTC
    • Cryptopotato
    • 99Bitcoins
    • Cryptobriefing
    • Crypto.news

Each RSS node typically outputs fields such as title, link, and content or snippet, depending on the feed structure. The template assumes that at least the title and link are available for all sources.

5. Merging & Filtering Articles

Purpose: Combine all fetched articles into a single list, then keep only those that are relevant to the extracted keyword.

5.1 Merge Articles

  • Node type: Merge node or a Code node, depending on how the template is structured.
  • Operation: Join items from multiple RSS nodes into one unified collection.

After this step, the workflow has a consolidated array of articles from all configured news feeds.

5.2 Filter by Keyword

  • Node type: Commonly a Code node using JavaScript, or a combination of IF nodes and expressions.
  • Input:
    • The merged list of articles.
    • The extracted keyword from the OpenAI keyword-extraction node.

Filtering logic: For each article, check if the keyword is present in one or more of the following fields:

  • title
  • snippet or description (if provided by the RSS feed)
  • content or any full-text field if available

Only articles that contain the keyword in at least one of these fields are kept. The result is a subset of the overall news feed focused on the topic requested by the user.

If no articles match the keyword, the filtered list may be empty. The base template focuses on the main success path, but in production you may want to handle this edge case by returning a fallback message to the user indicating that no recent articles were found for that topic.

6. Prompt Construction for Summarization

Purpose: Build a structured prompt that provides the AI summarization model with all relevant articles and clear instructions on how to respond.

  • Node type: Set node or Code node to assemble the prompt string.
  • Input: The filtered list of articles, including at least their titles and links.

The prompt should include:

  • The extracted keyword or topic.
  • A list of article titles with their URLs.
  • Instructions for the model to:
    • Provide a concise summary of the latest news related to the keyword.
    • Analyze the overall market sentiment (for example, bullish, bearish, neutral) based on the articles.
    • Return or reference the links to the original articles.

The template specifically instructs the AI to output:

  • A summary of the news.
  • Market sentiment analysis.
  • Links to reference news articles.

This structured prompt ensures that the summarization model has enough context to generate usable, actionable insights from the filtered news data.

7. Summarization & Sentiment Analysis with GPT-4o

Purpose: Convert the filtered raw news articles into a human-readable summary with sentiment analysis tailored to the user’s keyword.

  • Node type: OpenAI node configured for chat completion or text completion.
  • Model: GPT-4o, used to generate a concise, coherent output.
  • Credentials: Same OpenAI API key used earlier, or another valid OpenAI credential.

Input: The constructed prompt string that includes article titles and links, plus the instructions for summary and sentiment.

Output: A single AI-generated text block that typically includes:

  • A short overview of what is happening around the requested crypto topic.
  • A sentiment assessment, for example indicating if the tone of recent news is mostly positive, negative, or mixed.
  • References to the main articles, often with inline or listed URLs.

This step is where the workflow transforms scattered news items into a condensed, user-friendly report.

8. Formatting & Telegram Response

Purpose: Prepare the AI output in a Telegram-friendly format and send it back to the correct user chat.

8.1 Extract and Format the AI Response

  • Node type: Set or Code node to shape the final message string.
  • Input: The text output from the GPT-4o node.

Typical formatting steps include:

  • Extracting the main response text from the OpenAI node output.
  • Optionally adding basic formatting such as line breaks or bullet points that display well in Telegram.

8.2 Send Message to the User

  • Node type: Telegram node (Send Message operation).
  • Credentials: Same Telegram bot credential used in the trigger.
  • Key parameters:
    • Chat ID: Use the sessionId captured earlier, for example {{$json["sessionId"]}} or the equivalent path.
    • Text: The formatted summary and sentiment analysis from the previous node.

It is important to replace any placeholder chat ID in the template with the actual sessionId value, otherwise the message will not be routed to the correct user. Once configured, the bot will send the summarized crypto news and sentiment analysis directly into the user’s Telegram chat as a standard message.

Configuration Notes

Telegram Bot Integration

  • Create your bot via @BotFather and store the token safely.
  • In n8n, create a Telegram credential using that token.
  • Attach this credential to both the Telegram Trigger node and the Telegram Send node.

OpenAI Credentials & Models

  • Add your OpenAI API key in n8n as an OpenAI credential.
  • Use this credential for:
    • The keyword extraction node.
    • The GPT-4o summarization node.
  • Select an appropriate model for each step. The template uses GPT-4o for summarization, while the keyword extraction can also run on a lighter GPT model if desired.

RSS Feeds Customization

  • The template comes with a predefined set of crypto RSS feeds, including:
    • Cointelegraph
    • Bitcoin Magazine
    • Coindesk
    • Bitcoinist
    • NewsBTC
    • Cryptopotato
    • 99Bitcoins
    • Cryptobriefing
    • Crypto.news
  • You can:
    • Add more RSS nodes to broaden coverage.
    • Remove sources that are not relevant to your audience.
    • Adjust polling or fetch logic depending on how you want to handle frequency and volume.

Usage & Testing

  • Deploy the workflow in n8n and ensure the Telegram webhook is active.
  • Open your Telegram client and search for your bot by its username.
  • Send crypto-related queries such as:
    • Bitcoin
    • ETH
    • NFT
    • Solana news today
  • Observe the response, which should contain:
    • A concise news summary.
    • A sentiment overview.
    • Links to the original articles.

Advanced Customization

Prompt Tuning & Output Control

You can refine the behavior of the summarization and sentiment analysis by adjusting the prompt text used for GPT-4o:

  • Change how detailed the summary should be.
  • Request more granular sentiment descriptions.
  • Specify a maximum length or structure for the response.

Keyword Extraction Behavior

The keyword extraction step currently focuses on returning a single keyword. Depending on your use case, you might:

  • Allow multiple keywords and adjust the filtering logic accordingly.
  • Introduce validation to handle queries that are not clearly crypto-related.
  • Add a fallback keyword or generic “crypto market” summary when no specific coin is detected.

Filtering & Relevance Logic

The article filtering can be extended by:

  • Applying case-insensitive matching or simple normalization of the keyword.
  • Prioritizing newer articles or limiting the number of items sent to the summarization model.
  • Adding additional conditions, such as only including articles from specific domains or categories.

Error Handling Considerations

Automate Expenses Extraction to Google Sheets

How One Founder Stopped Copy-Pasting Receipts And Let n8n Handle It

The Late-Night Spreadsheet Problem

On a Thursday night, long after her team had logged off, Maya was still staring at a Google Sheet.

She was the founder of a small but fast-growing agency, and like many founders, she wore too many hats. One of them was “unofficial bookkeeper.” Every week she dug through her inbox, opened dozens of receipt emails, and copied amounts, dates, and descriptions into a spreadsheet.

Some receipts were PDFs, others were blurry images. A few had confusing subjects like “Your order is on the way” or “Thanks for your purchase.” She tried to be careful, but every so often she would transpose digits, miss a receipt, or forget to categorize an expense. Her accountant would then ping her at the end of the month with questions she did not have time to answer.

That night, after pasting yet another receipt into her Google Sheet, she caught herself thinking: “There has to be a better way to track expenses from email to spreadsheet.”

The Search For An Automation That Actually Works

Maya had experimented with automation tools before, but most of them felt fragile. They worked until an email format changed or a receipt came in as an attachment instead of in the body of the message.

What she really wanted was simple:

  • Read new emails from her inbox
  • Detect which ones were receipts or expense related
  • Extract key data like date, amount, currency, and category
  • Send everything neatly into specific columns in Google Sheets

While browsing for “expense automation to Google Sheets,” she discovered an n8n workflow template that claimed to do exactly this. It promised to automate expense extraction from emails to Google Sheets using a combination of email filters, AI-based OCR, and a ready-made integration with Google Sheets.

Curious and slightly skeptical, she opened the template.

Meeting The n8n Expense Extraction Template

The template description read like a checklist of her pain points. It explained that the workflow would:

  • Continuously check for new emails in her inbox
  • Set up variables with keywords like “expenses” or “receipt” to identify relevant messages
  • Filter email subjects using regex to catch only the right emails
  • Read receipts from attachments with an AI-powered OCR tool
  • Format the data into columns such as Date, Description, Category, Currency, and Amount
  • Append everything straight into a Google Sheet

It was exactly the flow she had been trying to cobble together with manual copy-paste. The difference was that this template already had the logic built in, and it used tools designed for accuracy instead of relying on her tired eyes at 11 p.m.

Rising Action: Turning Chaos Into A Workflow

Step 1 – Letting n8n Watch The Inbox

The first step in the template was simple but powerful. An email node, configured with IMAP credentials, would monitor her inbox for new emails. For Maya, that meant connecting her Gmail account securely so n8n could scan incoming messages without her ever opening them.

Instead of her scrolling through a cluttered inbox, the workflow would quietly check for new messages in the background, ready to act whenever a receipt arrived.

Step 2 – Teaching The Workflow What “Expense” Means

Next, the template introduced a variables setup step. Here, Maya defined the keywords that typically appeared in her receipt emails, such as “expenses” and “receipt.”

These variables became the foundation for how the workflow would recognize relevant emails. She realized she could expand this list later with other patterns like “invoice” or “payment confirmation” if needed.

Step 3 – Filtering Subjects With Regex

The real turning point came with the subject check node. Instead of scanning every email, the workflow used regular expression (regex) pattern matching on the subject line.

If the subject contained any of the defined keywords, the email passed the filter and moved on to the next step. If not, the workflow simply ignored it.

This one check meant her personal emails, newsletters, and random notifications would never clutter her expense sheet again.

Step 4 – Reading Receipts With AI

Of course, recognizing a receipt email was only half the battle. The real challenge was extracting structured data from attachments.

That was where the template’s receipt reading step came in. It used Mindee’s AI-powered OCR to process attachments like PDFs or images. The tool extracted key information automatically, including:

  • Date of the expense
  • Total amount
  • Currency
  • Category-related details from the receipt

Maya no longer had to squint at pixelated receipts or retype numbers. The workflow handled recognition for her with an accuracy that quickly outperformed her late-night manual work.

Step 5 – Shaping Data For Google Sheets

Once the receipt data was extracted, the workflow moved into a data formatting step. Here, the template transformed the raw output into a structure that matched her Google Sheet.

It set specific fields, including:

  • Date – taken from the receipt
  • Description – often derived from the email subject so she could recognize the expense later
  • Category – based on the receipt data
  • Currency – captured directly from the receipt
  • Amount – the total cost of the transaction

Everything was lined up to match the columns she was already using. No extra mapping in her head, no guessing which number belonged where.

Step 6 – The Moment It Hits Google Sheets

The final step was where the magic became visible. Using Google Sheets integration with OAuth2 API authentication, the workflow securely connected to her chosen spreadsheet.

Every time a relevant email arrived, the workflow would append a new row to the Google Sheet with all the formatted data. Maya watched as, in real time, her sheet updated itself without her touching a single cell.

The Turning Point: From Dread To “Done”

A week later, Maya noticed something strange. Her weekly “expense admin” session had quietly disappeared from her calendar. There was simply no need for it anymore.

Instead of digging through her inbox, she opened her Google Sheet and saw a clean, chronological list of expenses, each with date, description, category, currency, and amount already filled in. Receipts from different vendors and currencies were captured without her intervention.

For the first time in months, she handed her accountant a complete, accurate report without spending hours the night before.

What Changed For Maya With This n8n Template

Time Saved Every Single Week

The most obvious change was time. The workflow had automated manual data entry across all her expense emails. What used to take an hour or more each week now happened continuously in the background.

Accuracy Without Extra Effort

By relying on AI-based receipt recognition rather than manual typing, the number of mistakes dropped dramatically. No more missing receipts, mis-typed amounts, or forgotten currencies.

Better Organization In Google Sheets

Her expense data was now neatly stored in Google Sheets, ready for filtering, reporting, or sharing. She could quickly slice expenses by category or date, and everything was already in the correct columns.

Room To Grow And Scale

As her agency expanded, Maya realized she could easily adapt the workflow. She could connect additional email accounts, add more keywords, or even incorporate other data sources into the same expense tracking system. The template was not just a quick fix, it was a scalable backbone for her financial tracking.

Resolution: From Manual Chore To Reliable Automation

What began as a late-night frustration with spreadsheets turned into a reliable automation that quietly handled one of Maya’s most annoying recurring tasks. She no longer dreaded the end-of-month expense review. Instead, she trusted that her n8n workflow template was catching new receipts, extracting the data, and logging everything into Google Sheets with minimal oversight.

Her inbox was still busy, but her spreadsheet was always up to date.

Set Up The Same Workflow For Your Expenses

If you recognize yourself in Maya’s story, you do not need to rebuild her solution from scratch. You can use the same n8n automation template to:

  • Connect your email inbox and check for new messages automatically
  • Define variables and keywords like “expenses” or “receipt” to detect relevant emails
  • Filter subjects with regex so only real receipts are processed
  • Use AI-based OCR to read receipt attachments and extract structured data
  • Format that data into columns for Date, Description, Category, Currency, and Amount
  • Append each expense as a new row in your Google Sheet using secure OAuth2 authentication

Set it up once, then watch your expense tracking run itself while you focus on actual work instead of copy-pasting numbers.

Automate Expense Tracking from Emails to Google Sheets

Automate Expense Tracking from Emails to Google Sheets

From Inbox Chaos to Clear Financial Overview

Your inbox is probably full of receipts, invoices, and payment confirmations. Each one represents money spent, yet tracking them often turns into a stressful, manual task. You open an email, download the attachment, copy amounts, dates, and descriptions into a spreadsheet, and repeat this over and over.

It is easy to postpone this work, and even easier to make mistakes when you finally sit down to do it. The result: scattered information, delayed reporting, and a constant feeling that your finances are never quite up to date.

Now imagine a different reality. Every time a receipt lands in your inbox, it is automatically read, understood, and added to a clean Google Sheet. No more copy-paste, no more digging through emails, no more late-night reconciliation sessions. Just a living ledger that quietly updates itself in the background while you focus on work that actually grows your business.

This is exactly what this n8n workflow template helps you achieve. With n8n, Mindee Receipt API, and Google Sheets, you can turn a tedious chore into a reliable automated system that supports smarter decisions and long-term growth.

Adopting an Automation Mindset

Automation is not just about saving a few minutes. It is about reclaiming mental space, reducing friction, and building systems that work for you around the clock. When you automate something as routine as expense tracking, you free up capacity for planning, strategy, and creativity.

This workflow template is a practical starting point. You do not need to be a developer to use it, and you do not have to automate everything at once. Think of it as your first building block toward a more streamlined, focused way of working. Once you experience what it feels like to have expenses handled automatically, you will start seeing other areas you can optimize too.

The Tools Behind the Transformation

To bring this automation to life, the workflow connects three powerful tools:

  • n8n – The automation platform that orchestrates the entire workflow and connects all services.
  • IMAP Email – Used to watch your inbox for new messages and pull in relevant emails and attachments.
  • Mindee Receipt API – An OCR and document parsing service that reads receipts and extracts key expense details.
  • Google Sheets – Your always-available, cloud-based expense ledger that stores and organizes the extracted data.

Each part plays a specific role, and n8n ties them together into a clear, repeatable process that runs whenever a new receipt email arrives.

How the n8n Expense Workflow Actually Works

Let us walk through what happens step by step, so you can see how your messy inbox turns into structured financial data.

1. Watching Your Inbox for New Expense Emails

The journey starts in your email inbox. The workflow uses IMAP to monitor incoming messages. Whenever a new email appears, n8n pulls in the message details, including:

  • Subject line
  • Metadata
  • Attachments (such as receipt PDFs or images)

This gives the workflow everything it needs to decide whether an email is relevant for expense tracking.

2. Defining Smart Filters With Subject Patterns

Not every email in your inbox is an expense, so the workflow sets up a helpful filter. It defines a variable called subjectPatterns that contains keywords such as "expenses" and "reciept". The misspelling is intentional so that common typos are also captured.

These patterns are used as a regular expression to identify which emails are likely related to expenses or receipts. This is where you start teaching your automation how to think about your inbox.

3. Passing Only Relevant Emails Forward

Next, the workflow checks each email subject against the subjectPatterns regular expression. If the subject line matches one of the patterns, the email is treated as an expense-related message and moves forward in the process.

Emails that do not match are ignored for this workflow, which keeps your automation focused and efficient.

4. Extracting Receipt Data With Mindee Receipt API

For emails that include receipt attachments, the workflow calls the Mindee Receipt API. This is where the magic of OCR and document parsing comes into play.

Mindee reads the attached receipt image or PDF and extracts key financial details, such as:

  • Date of the transaction
  • Category of the expense
  • Currency used
  • Total amount paid

Instead of you squinting at a receipt and typing numbers into a spreadsheet, the API does this work automatically, consistently, and at scale.

5. Structuring the Data for Google Sheets

Once Mindee has extracted the information, n8n prepares it for your spreadsheet. The workflow maps the parsed fields into a clear structure with columns such as:

  • Date
  • Description (parsed from the email subject)
  • Category
  • Currency
  • Amount

This step is about turning raw data into something that is easy to scan, filter, and analyze. Your Google Sheet becomes a simple, reliable overview of your expenses, line by line.

6. Appending a New Row to Google Sheets

Finally, the workflow appends the structured data as a new row in your chosen Google Sheet. Each time an expense email is processed, your ledger grows automatically, no manual input required.

Over time, this creates a complete, continuously updated record of your expenses, directly sourced from your inbox.

Why This Workflow Is a Game Changer

Automating expense tracking is more than a convenience. It can reshape the way you relate to your finances and your time.

  • Save hours of manual work No more copying values from emails into spreadsheets. The workflow does it for you, every single time.
  • Improve accuracy Automated extraction reduces the risk of typos, missed entries, and inconsistent formatting.
  • Scale without extra effort Whether you receive a handful of receipts or dozens per day, the workflow handles them at the same pace.
  • Stay cloud-first and connected Email, OCR, and Google Sheets all work together through n8n, so your data is available wherever you are.

Most importantly, this system frees you from repetitive admin work so you can focus on clients, strategy, and growth.

Making the Template Your Own

This workflow template is ready to use, but it is also meant to be customized. As your processes evolve, your automation can evolve with them.

Adjusting Email Subject Filters

You can modify the subjectPatterns variable to better match the way your vendors, tools, or team label expense emails. Add or change keywords to capture different subjects, such as "invoice", "payment receipt", or your company-specific terms.

Connecting Your Own Google Sheet

The workflow uses a Google Sheets integration that you can point to any spreadsheet you own. To adapt it:

  • Update the Google Sheet ID to target your own document.
  • Make sure the connected Google account has permission to access and edit that sheet.
  • Confirm the column order so that the data maps correctly to Date, Description, Category, Currency, and Amount.

With OAuth2 access properly configured, the workflow can safely write new rows whenever it processes an email.

Adding Extra Data Processing Steps

If you want to go further, you can extend the workflow by:

  • Including more fields from the Mindee Receipt API, such as vendor name or tax amount.
  • Triggering notifications when expenses above a certain amount are detected.
  • Splitting expenses into different sheets based on category or team.

This template is a solid foundation, and n8n makes it easy to experiment, iterate, and refine your automation as your needs grow.

Take the Next Step Toward a More Automated Workflow

Every powerful automation journey starts with one simple, useful workflow. By turning your email receipts into structured rows in Google Sheets, you are not just saving time. You are building a habit of designing systems that support you, instead of relying on constant manual effort.

Once this is in place, you will see new opportunities to connect tools, automate reports, and remove friction from your daily operations. This template is your invitation to start that journey.

Ready to automate your expense tracking, reduce busywork, and focus on what really matters? Start with this n8n workflow template and transform your email receipts into organized, actionable data.

Benefits of Multi Agent System Explained

Benefits of Multi Agent System

Multi agent systems (MAS) are a software architecture pattern in which multiple autonomous, intelligent agents cooperate or coordinate to achieve shared system objectives. Instead of relying on a single monolithic component, responsibility is distributed across specialized agents that communicate and collaborate. This pattern is increasingly used in AI automation, complex workflows, and large-scale intelligent applications because it improves modularity, scalability, and maintainability.

Overview of Multi Agent System Architecture

In a multi agent system, each agent is designed as an independent unit with a clearly defined role. Agents can process inputs, apply domain-specific logic or models, and produce outputs that other agents or external services consume. Collectively, they form a coordinated workflow that can handle complex tasks more flexibly than a single, tightly coupled system.

Key characteristics of a MAS include:

  • Autonomy – Each agent can operate independently within its own scope.
  • Specialization – Agents are optimized for specific sub-tasks or domains.
  • Interoperability – Agents communicate via well-defined interfaces or message structures.
  • Composability – Agents can be combined, reordered, or reused across different workflows.

This structure is particularly useful when building AI-driven systems that integrate multiple capabilities, such as email handling, scheduling, content generation, and contact management, in a single coordinated environment.

System Architecture and Core Advantages

1. Component Reusability and Modular Design

In a MAS, each agent is implemented as a self-contained component responsible for a specific task or role. Because the agent encapsulates its logic, data handling, and interaction patterns, it can be reused in multiple solutions with minimal changes.

Practical benefits include:

  • Reduced duplication – Common capabilities (for example, a calendar scheduling agent) can be shared across projects instead of being reimplemented.
  • Faster development cycles – Existing agents can be composed into new workflows, which shortens the time required to design and deploy new features.
  • Consistent behavior – Reusing the same agent logic across different contexts ensures uniform handling of similar tasks.

This modularity is especially valuable when scaling automation or when maintaining a library of agents that address recurring business needs.

2. Flexible Integration of Different Models per Agent

Multi agent systems support heterogeneous AI models, which means each agent can be backed by a different underlying model or algorithm tuned for its specific function. This avoids forcing a single model to handle all use cases, which can degrade performance or accuracy.

Typical patterns include:

  • Task-specific models – A natural language processing agent might use a language model optimized for text understanding, while a scheduling agent uses a model or rule set tailored to calendar logic.
  • Domain-specific optimization – Agents that work with structured data, such as contacts or events, can rely on specialized parsers or validation routines, while creative agents can use generative models.
  • Independent upgrades – You can update or swap the model behind one agent without affecting the rest of the system, as long as the agent maintains its external interface.

This per-agent model selection improves overall system effectiveness, because each capability uses tools that are well aligned with its task requirements.

3. Isolated Debugging and Maintainability

Because agents operate semi-independently, troubleshooting can focus on a single agent at a time rather than the entire system. Each agent has its own input, processing logic, and output, which makes it easier to pinpoint where an error originates.

Maintenance advantages include:

  • Targeted debugging – If output from a specific agent is incorrect, developers can inspect that agent’s logic, prompts, or configuration without disturbing other agents.
  • Lower risk during updates – Changes to one agent typically do not require refactoring the whole system, as long as the agent’s contract (inputs and outputs) remains stable.
  • Simplified regression testing – You can run focused tests on a single agent to verify fixes or optimizations before reintegrating it into the wider workflow.

This compartmentalization is important for complex AI applications, where a monolithic architecture can make debugging and maintenance costly and error-prone.

4. Clear Prompt Logic and Improved Testability

Assigning well-defined sub-tasks to distinct agents leads to clearer prompt logic and more structured reasoning flows. Instead of constructing a single, very complex prompt for all tasks, you can define smaller, focused prompts per agent that are easier to design, audit, and refine.

From a testing perspective:

  • Per-agent test scenarios – Each agent can be tested with specific input-output cases that reflect its role, which improves coverage and reliability.
  • Prompt-level validation – Developers can iterate on an individual agent’s prompt or configuration and immediately measure the impact, without interference from other parts of the system.
  • Incremental rollout – New or modified agents can be validated in isolation, then reintroduced into the full multi agent workflow after they pass their tests.

This structure yields more predictable and robust behavior, especially in AI workflows where prompt design and evaluation are critical.

5. Foundation for Multi-turn Agents and Agent Memory

A well-architected multi agent system provides a strong base for advanced capabilities, such as multi-turn interactions and persistent agent memory. By design, agents can maintain or access context related to past interactions, which is essential for building more intelligent and user-aware systems.

Typical use cases include:

  • Multi-turn conversations – Conversation-oriented agents can track previous user messages, decisions, or system states and use that history to inform subsequent responses.
  • Contextual memory – Agents responsible for tasks like email handling, calendar management, or contact updates can store and recall relevant details, so they do not need to recompute or re-ask for information each time.
  • Coordinated context sharing – Multiple agents can share or pass context where appropriate, enabling a coherent overall experience even when different agents handle different segments of a workflow.

This capability significantly enhances user experience, because the system behaves more like a cohesive assistant that remembers previous interactions, rather than a set of disconnected tools.

Practical Application Scenarios

Multi agent systems are particularly suited to AI applications that involve several specialized operations working in tandem. Common patterns include:

  • Email processing agents that classify, summarize, or respond to messages.
  • Calendar scheduling agents that interpret availability, manage events, and resolve conflicts.
  • Contact management agents that maintain and update user or customer records.
  • Content creation agents that draft, refine, or localize written material.

By designing each of these as separate agents and orchestrating them as a coordinated MAS, teams can build systems that are both powerful and easier to evolve over time.

Configuration Notes and Implementation Considerations

When implementing a multi agent system, consider the following technical aspects to fully leverage its benefits:

  • Agent boundaries – Define clear responsibilities and interfaces for each agent so that data flow and ownership are unambiguous.
  • Error isolation – Design agents to handle errors locally where possible, for example by validating inputs or handling model failures, then returning informative outputs or status codes to the rest of the system.
  • Communication patterns – Use structured messages or well-defined data formats for inter-agent communication to avoid ambiguity and to simplify debugging.
  • Versioning – When updating agents or underlying models, maintain version control to allow rollback if a change introduces unexpected behavior.

By paying attention to these details, you preserve the core advantages of MAS architecture, such as modularity and maintainability, while reducing integration issues.

Advanced Customization and Extension

After establishing a basic multi agent system, you can extend it in several advanced directions without disrupting the existing architecture:

  • Adding new agents – Introduce additional specialized agents, for example a reporting agent or a monitoring agent, and integrate them into the existing orchestration.
  • Optimizing models per agent – Swap or fine-tune models used by individual agents to improve accuracy, latency, or cost, while keeping the rest of the system unchanged.
  • Enhancing memory and context – Implement more sophisticated memory strategies, such as long-term storage of key events or user preferences, that agents can query when needed.
  • Scaling horizontally – Run multiple instances of high-load agents to handle increased traffic or more complex workloads.

Because each agent is modular, these enhancements can be implemented incrementally and tested independently before full deployment.

Conclusion

Adopting a multi agent system architecture delivers tangible benefits for AI and automation projects. By decomposing functionality into specialized agents, you gain reusable components, flexible model integration, simpler debugging, clearer prompt logic, and a robust basis for multi-turn interactions and agent memory.

This approach is particularly effective for complex applications that require collaboration among diverse capabilities, such as email handling, scheduling, contact management, and content generation. A well-designed MAS offers a structured yet adaptable framework that can evolve alongside your requirements.

Call to Action

If you are planning to build scalable, intelligent, AI-powered systems, consider structuring your solution as a multi agent system. Start by identifying discrete tasks, design modular agents around those tasks, and select specialized models for each agent. Over time, you can expand the system by adding new agents or refining existing ones, while keeping the overall architecture clean and maintainable.

Automated Phishing URL Analysis with URLScan.io & VirusTotal

Automated Phishing URL Analysis with URLScan.io & VirusTotal

Imagine never copy-pasting sketchy links again…

You open your inbox on a Monday morning and there it is:

  • An email from “Micros0ft Support” asking you to “reset your pasword now.”
  • A link that looks like it was generated by a keyboard smash.
  • Your internal voice saying, “I should probably check this… but also, I do not want to.”

Manually pulling out URLs, scanning them in different tools, waiting for results, and then writing up a report is the sort of repetitive task that slowly eats your soul. That is exactly what this n8n workflow template is here to fix.

This automated phishing URL analysis workflow takes incoming emails from Microsoft Outlook, extracts suspicious URLs, sends them to URLScan.io and VirusTotal, waits for the results, and then posts a clean, readable summary straight into Slack. You get the insights without the drudgery.

What this n8n workflow actually does

At a high level, this workflow automates phishing URL detection so your security team can focus on decisions, not copy-paste work. It connects Outlook, URLScan.io, VirusTotal, Python-based IoC detection, and Slack into a single, repeatable process.

Key capabilities

  • Email source: Pulls in unread emails from Microsoft Outlook that are candidates for phishing analysis.
  • Flexible automation: Can be triggered manually or scheduled to run at regular intervals for continuous monitoring.
  • IoC detection with Python: Uses a Python script with the ioc-finder library to extract URLs from email content as indicators of compromise.
  • Dual scanning: Sends every extracted URL to both URLScan.io and VirusTotal for deeper analysis.
  • Consolidated reporting: Merges results and posts a detailed alert in a Slack channel so your security team sees everything in one place.

In short, it acts like a very patient, very fast junior analyst who never forgets to check both tools and never complains about repetitive work.

How the workflow runs behind the scenes

1. Grab unread emails from Outlook

The workflow kicks off by using the Get all unread messages node to collect incoming emails from Microsoft Outlook. These are the messages that might contain suspicious URLs.

As each email is pulled in, it is immediately marked as read. That way, the workflow does not loop back and analyze the same message twice, which would be annoying for you and very confusing for your Slack channel.

2. Process emails one by one with IoC extraction

Next, the workflow uses the Split In Batches node to handle emails individually. This keeps things orderly and avoids mixing URLs from different messages.

For each email, a Python script powered by the ioc-finder library scans the content and extracts URLs. These URLs are treated as potential indicators of compromise (IoCs).

If an email does not contain any URLs, the workflow politely moves on to the next one. No URLs, no scans, no wasted API calls.

3. Scan URLs with URLScan.io

Every extracted URL is then sent to URLScan.io. This service performs a deep analysis of the website, looking at how it behaves and what it loads.

The workflow is smart enough to wait for URLScan.io to finish its work. It uses a two-step approach:

  • Submit the URL for scanning.
  • Wait for a defined period, then fetch the completed report.

This waiting period ensures that when you retrieve the report, you are not looking at a half-finished scan or stale data.

4. Run parallel analysis with VirusTotal

At the same time, the same URLs are sent to VirusTotal. VirusTotal aggregates results from multiple security vendors, which gives you a broad view of how different engines classify the URL.

Once VirusTotal finishes processing, the workflow retrieves the detailed report. That report is then paired with the URLScan.io findings so you can compare both perspectives side by side.

5. Merge the reports into a single view

To save you from flipping between browser tabs like it is 2009, the workflow merges the URLScan.io and VirusTotal results.

This combined view correlates findings from both tools, making it easier to understand whether a URL is harmless, suspicious, or outright malicious.

6. Send the final verdict to Slack

The last step is where the magic becomes visible to your team. Only URLs with completed analyses are forwarded to Slack using the sends slack message node.

Each Slack notification includes:

  • Email metadata such as subject, sender, and date.
  • Links to the URLScan.io report.
  • Links to the VirusTotal report.
  • A concise verdict that highlights suspicious or malicious detections.

Your security team gets a clean, actionable summary instead of a pile of raw data. No more digging through multiple tools just to confirm that, yes, that “invoice” link is bad news.

Why this automated phishing URL workflow is worth using

Less manual work, more actual security

  • Automation: The workflow automatically scans suspicious URLs in emails, so you are not stuck copying links into tools all day.
  • Comprehensive analysis: By combining URLScan.io and VirusTotal, you get a much clearer view of the threat landscape around each URL.
  • Actionable alerts: Slack notifications give your security team immediate insight into potential threats, right where they already communicate.
  • Scalability: The logic can be adapted to other mail providers or extended with additional threat intelligence tools as your needs grow.

The result is a more efficient, more consistent phishing detection process that does not rely on someone remembering to “check it later.”

Quick setup guide for the n8n workflow

You do not need to reinvent the wheel to get started. This template already wires everything together, you just plug in your own services and preferences.

Step 1 – Configure your email source

  • Set up the Get all unread messages node with your Microsoft Outlook credentials.
  • Define any filters you want, for example specific folders or conditions for emails that should be processed.
  • Confirm that emails are marked as read after processing to avoid duplicates.

Step 2 – Enable IoC extraction with Python

  • Ensure the Python node is configured and has access to the ioc-finder library.
  • Verify that the script is extracting URLs from the email body as indicators of compromise.
  • Check that emails without URLs are skipped cleanly so the workflow can move on to the next message.

Step 3 – Connect URLScan.io

  • Provide your URLScan.io API key in the relevant node or credentials section.
  • Confirm that each URL is being submitted for scanning.
  • Set an appropriate waiting period before the workflow fetches the scan report, so results are complete.

Step 4 – Connect VirusTotal

  • Configure the VirusTotal node with your API key.
  • Make sure URLs are sent correctly and that the workflow retrieves the detailed report afterward.
  • Validate that VirusTotal results are correctly aligned with their corresponding URLs.

Step 5 – Merge results and format output

  • Review the node that combines URLScan.io and VirusTotal reports.
  • Ensure the merged data includes all relevant fields you care about for threat assessment.
  • Adjust any formatting or mapping if you want specific data to be emphasized in the final output.

Step 6 – Set up Slack notifications

  • Connect the sends slack message node with your Slack workspace and target channel.
  • Customize the message layout to include email metadata, report links, and the verdict.
  • Test with a sample email to confirm that only completed analyses are posted and that the message is readable and useful.

Step 7 – Choose how and when it runs

  • Run the workflow manually at first to verify everything works as expected.
  • Once you are comfortable, set up a schedule so it checks for new emails at regular intervals.
  • Align the schedule and Slack notifications with your incident response process, so alerts arrive at the right time and place.

Tips, customization ideas, and next steps

This template gives you a strong baseline for automated phishing URL analysis, but you can easily adapt it to your environment.

Ideas to tailor the workflow

  • Different mail providers: Swap out the Outlook node for another email integration while keeping the IoC detection and scanning logic intact.
  • Additional tools: Extend the workflow with more threat intelligence services if you want more data points.
  • Custom Slack formatting: Highlight certain verdicts, tag specific users, or route alerts to different channels based on severity.
  • Scheduling tweaks: Run more frequently during business hours and less often overnight, depending on your response expectations.

By integrating email processing with automated URL scanning and streamlined reporting, this n8n workflow helps your organization strengthen its security posture and reduce the risk from phishing attacks, without burying your team in repetitive tasks.

Next move: Configure the nodes for your mail provider, plug in your URLScan.io and VirusTotal credentials, connect Slack, and deploy the workflow. Your future self, who is not manually pasting URLs into scanners, will be very grateful.

Translate Cocktail Instructions with DeepL & API

Translate Cocktail Instructions with DeepL & API (n8n Workflow Template)

Overview

This n8n workflow template demonstrates how to combine a public REST API with a translation service in a concise, production-ready flow. It performs two core tasks:

  • Fetch a random cocktail recipe from TheCocktailDB API.
  • Translate the cocktail preparation instructions into French using the DeepL node.

The result is an automated pipeline that retrieves recipe data in English and outputs French instructions, ready to be consumed by your application, frontend, or another workflow.

Workflow Architecture

The workflow is intentionally linear and minimal, which makes it easy to understand and extend. It consists of:

  • HTTP Request node – Calls TheCocktailDB random cocktail endpoint and returns the full cocktail object.
  • DeepL node – Receives the extracted instructions text and translates it into French.

Data flows from the HTTP Request node into the DeepL node as a single item containing the cocktail instructions. The workflow can be triggered manually or from any trigger node you choose to add, for example a Webhook or Cron trigger.

Prerequisites

  • n8n instance – Self-hosted or cloud, with permission to create and execute workflows.
  • DeepL API key – Required to configure the DeepL node and authenticate translation requests.

Node-by-Node Breakdown

1. HTTP Request Node – Fetch Random Cocktail

The first node queries TheCocktailDB to retrieve a random cocktail recipe. Configuration is straightforward:

  • HTTP Method: GET
  • URL: https://www.thecocktaildb.com/api/json/v1/1/random.php

This endpoint returns a JSON payload with a single cocktail object inside the drinks array. The response includes fields such as:

  • idDrink – Unique identifier of the cocktail.
  • strDrink – Cocktail name.
  • strInstructions – Preparation instructions in English.
  • Additional fields like ingredients, measures, and glass type.

Example JSON snippet returned by the endpoint:

{  "drinks": [  {  "idDrink": "11007",  "strDrink": "Margarita",  "strInstructions": "Rub the rim of the glass with the lime slice to make the salt stick to it. Take care to moisten only the outer edge of the glass. Dust the rim of the glass with salt. Shake the other ingredients with ice, then carefully pour into the glass."  }  ]
}

n8n will typically parse this JSON automatically and make the data available on the node output under items[0].json. The key field for the next step is strInstructions from the first element of the drinks array.

Key Output for Downstream Nodes

The DeepL node will need access to:

  • json.drinks[0].strInstructions – The English instructions to translate.

If you want to pass additional metadata such as strDrink (cocktail name) to later nodes, you can keep the entire object intact and only reference the specific field for translation in the DeepL node.

2. DeepL Node – Translate Instructions to French

The second node in the workflow is the DeepL translation node. It receives the instructions text from the HTTP Request node and sends it to the DeepL API for translation.

Core Configuration

  • Credentials: Configure and select your DeepL API credentials (API key).
  • Text to translate: Reference the instructions field from the previous node, for example:
    {{ $json["drinks"][0]["strInstructions"] }}
  • Target language: Set to FR to produce French output.

Once configured, the DeepL node will automatically:

  1. Send the English instructions to the DeepL API.
  2. Receive the translated French text.
  3. Expose the translated content on its output as part of the node result.

The translated text can then be used in subsequent nodes for storage, display, or further processing.

Data Flow and Execution Logic

The workflow operates as a simple, linear pipeline:

  1. HTTP Request node executes a GET request to TheCocktailDB random endpoint and returns a cocktail object.
  2. The node output contains a drinks array. The first item, drinks[0], is used as the source of the instructions field.
  3. DeepL node reads strInstructions from the first drink and sends it to DeepL for translation into French (FR).
  4. The workflow finishes with a translated version of the cocktail instructions available in the DeepL node output.

This architecture makes it easy to plug in additional nodes before or after the translation step, such as database storage, messaging integration, or rendering in a front-end application.

Configuration Notes & Edge Cases

DeepL Credentials

  • Ensure the DeepL API key is valid and has sufficient quota.
  • If authentication fails, the DeepL node will not return translated text and the workflow execution will stop at that node.

Handling Missing or Unexpected API Data

TheCocktailDB endpoint is expected to return a structure with a drinks array and at least one element. In rare cases or error scenarios, you might encounter:

  • drinks is null or missing.
  • drinks[0].strInstructions is empty or not present.

In such situations, the DeepL node will receive invalid or empty text, which may result in an error or an empty translation. For a production-grade setup, consider adding:

  • A check to validate that drinks exists and contains at least one item.
  • A conditional node that skips translation if instructions are missing.

Language and Encoding Considerations

  • The source text from TheCocktailDB is in English. The DeepL node is configured to translate to French (FR).
  • Special characters in instructions are handled by DeepL and should be preserved in the translated output.

Advanced Customization

Extend Language Support

To support more languages, you can:

  • Duplicate the DeepL node and set different target languages (for example DE, ES, IT).
  • Use workflow parameters or input fields to dynamically select the target language and pass it to the DeepL node.

Store or Display Translated Recipes

Once the translation is complete, common next steps include:

  • Persisting the translated instructions, along with the cocktail name and ID, in a database.
  • Sending the translated recipe to a front-end application or internal tool via Webhook or HTTP Request.
  • Integrating with messaging platforms or email services to share translated recipes with users.

Error Handling Strategies

To increase reliability, you can add:

  • Additional nodes that handle HTTP errors from TheCocktailDB (for example retry or fallback logic).
  • Error branches or conditional checks after the DeepL node to catch translation failures or empty responses.
  • Logging or notification nodes to alert you when an API call or translation step fails.

Summary

This n8n workflow template provides a concise, technical example of how to:

  • Fetch structured data from a public REST API (TheCocktailDB).
  • Extract a specific field, in this case strInstructions, from the API response.
  • Translate that field into French using the DeepL node and your DeepL API key.

It is a practical foundation for building multilingual recipe experiences, integrating translation into your applications, or exploring how n8n connects external APIs and language services in a single automated pipeline.

Try the Template

Deploy this workflow in your n8n instance, connect your DeepL credentials, and start generating French cocktail instructions automatically. From there you can expand the flow with storage, notifications, or multi-language support as needed.

Building a RAG Pipeline & Chatbot with n8n

Building a RAG Pipeline & Chatbot with n8n

What This n8n RAG Template Actually Does (In Plain English)

Imagine having a chatbot that actually knows your documents, policies, and FAQs, and can answer questions based on the latest files in your Google Drive. No more manually updating responses, no more copy-pasting information into prompts.

That is exactly what this n8n workflow template helps you build.

It uses a technique called Retrieval-Augmented Generation (RAG), which combines large language models with an external knowledge base. In this case:

  • Google Drive holds your documents
  • OpenAI turns those documents into vector embeddings
  • Pinecone stores and searches those vectors
  • OpenRouter (with Anthropic Claude 3.5 Sonnet) powers the chatbot responses
  • n8n ties everything together into a clean, automated workflow

The result is a chatbot that can retrieve the right pieces of information from your docs and use them to answer user questions in a smart, context-aware way.

When Should You Use This RAG & Chatbot Setup?

This template is perfect if you:

  • Have lots of internal documents, FAQs, or policies in Google Drive
  • Want a chatbot that can answer questions based on those specific documents
  • Need your knowledge base to update automatically when files change or new ones are added
  • Prefer a no-code / low-code approach with clear, modular steps in n8n

If you are tired of static FAQs or chatbots that “hallucinate” answers, a RAG pipeline like this is a big step up.

How the Overall RAG Pipeline Is Structured

The workflow is built around two main flows that work together:

  1. Document ingestion flow – gets your documents from Google Drive, prepares them, and stores them in Pinecone as vectors.
  2. Chatbot interaction flow – listens for user messages, pulls relevant info from Pinecone, and generates a response with the AI model.

High-Level Architecture

  • Document Ingestion: Google Drive Trigger → Download File → Text Splitting → Embeddings → Pinecone Vector Store
  • Chatbot Interaction: Chat Message Trigger → AI Agent with Language Model → Tool that queries the Vector Store

Let us walk through each part in a more conversational way.

Stage 1 – Document Ingestion Flow

This is the “feed the brain” part of the system. Whenever you drop a new document into a specific Google Drive folder, the workflow picks it up, processes it, and updates your knowledge base automatically.

Google Drive Trigger – Watching for New Files

First up, there is a Google Drive Trigger node. You point it at a particular folder in your Drive, and it keeps an eye on it for new files.

Whenever a new document is created in that folder, the trigger fires and kicks off the rest of the ingestion flow. No manual syncing, no button clicks. Just drop a file in and you are done.

Download File – Getting the Content Ready

Once the trigger detects a new file, the workflow uses a Download File node to actually fetch that document from Google Drive.

This is the raw material that will be transformed into searchable knowledge for your chatbot.

Splitting the Text into Chunks

Large documents are not very friendly for embeddings or vector search if you treat them as one giant block of text. That is why the next step uses a:

  • Recursive Character Text Splitter
  • Default Data Loader

The Recursive Character Text Splitter breaks the document into smaller chunks. These chunks are sized to be manageable for the embedding model while still keeping enough context to be useful.

The Default Data Loader then structures these chunks so they are ready for downstream processing. You can think of it as organizing the content into a format the rest of the pipeline can easily understand.

Embeddings with OpenAI

Now that your document is split into chunks, the Embeddings OpenAI node steps in.

This node uses an OpenAI embedding model to convert each text chunk into a vector representation. These vectors capture semantic meaning, so similar ideas end up close together in vector space, even if the exact words are different.

This is what makes “semantic search” possible, which is much smarter than simple keyword matching.

Storing Vectors in Pinecone

Once the embeddings are generated, they need to be stored somewhere that supports fast, scalable vector search. That is where the Pinecone Vector Store node comes in.

The workflow sends the vectors to a Pinecone index, typically organized under a specific namespace like FAQ. This namespace helps you separate different types of knowledge, for example FAQs vs policy documents.

Later, when a user asks a question, the chatbot will query this Pinecone index to find the most relevant chunks of text to use as context for its answer.

Stage 2 – Chatbot Interaction Flow

Once your documents are in Pinecone, the second part of the workflow handles real-time conversations. This is where the magic feels most visible to your users.

Chat Message Trigger – Listening for User Questions

The chatbot flow starts with a When chat message received trigger. Whenever a user sends a message, this trigger activates and passes the query into the workflow.

This is the entry point for every conversation. From here, the workflow hands the message to the AI agent.

AI Agent – The Conversational Core

The AI Agent node is the heart of the chatbot. It is configured with:

  • A language model via OpenRouter Chat Model, using Anthropic Claude 3.5 Sonnet in this setup
  • Optional memory management so the chatbot can remember previous turns in the conversation
  • Access to tools, including the vector store, so it can pull in relevant information from your documents

Instead of just answering from scratch, the agent is able to call a tool that queries Pinecone, get back the most relevant document chunks, and then generate a response that is grounded in your data.

Retrieving Knowledge from Pinecone

To make this work, the AI agent uses a tool that connects to your Pinecone Vector Store. Here is what happens under the hood:

  1. The user’s question is converted into a vector using the same embedding model.
  2. Pinecone performs a semantic similarity search against your FAQ or policy namespace.
  3. The most relevant chunks of text are returned as context.
  4. The AI agent uses that context to generate an informed, accurate answer.

This approach dramatically reduces hallucinations and ensures responses stay aligned with your actual documents.

Why This n8n RAG Architecture Makes Your Life Easier

You might be wondering, why go through all this trouble instead of just plugging a model into a chat interface? Here is why this architecture is worth it:

  • Automation you can trust: The Google Drive trigger keeps your knowledge base in sync. Add or update a document, and the pipeline handles the rest.
  • Smarter search: Vector-based search in Pinecone understands meaning, not just keywords. Users can ask natural questions and still get relevant answers.
  • Modular and flexible: Each step is an n8n node. You can tweak, extend, or replace parts without breaking the whole system.
  • Modern AI stack: OpenAI embeddings plus Anthropic Claude 3.5 Sonnet via OpenRouter give you a powerful combination of understanding and generation.

In short, you get a scalable, maintainable, and intelligent chatbot that actually knows your content.

How to Get Started with This Template in n8n

Ready to try it out yourself? Here is a simple setup checklist to get the pipeline running:

1. Prepare Your Google Drive Folder

Create or choose a folder in Google Drive where you will store all the documents you want the chatbot to use. This could include:

  • FAQ documents
  • Internal policies
  • Product guides or manuals

Point the Google Drive Trigger in n8n to this folder.

2. Set Up Your Pinecone Index

In Pinecone:

  • Create a new index suitable for your expected data size and embedding dimensions.
  • Configure a namespace, for example FAQ, to keep this knowledge set organized.

This is where all your document embeddings will be stored and searched.

3. Configure Your API Credentials in n8n

In your n8n instance, securely add credentials for:

  • Google Drive (for file access)
  • Pinecone (for vector storage and search)
  • OpenAI (for embeddings)
  • OpenRouter (for the Anthropic Claude 3.5 Sonnet chat model)

Make sure each node in the workflow is linked to the correct credential set.

4. Test the Full RAG & Chatbot Flow

Once everything is wired up, it is time to test:

  1. Upload a sample FAQ or policy document into your configured Google Drive folder.
  2. Wait for the Document Ingestion Flow to run and push embeddings to Pinecone.
  3. Send a question to the chatbot that should be answerable from that document.
  4. Check that the response is accurate and clearly grounded in your content.

If something looks off, you can inspect each n8n node to see where the data might need adjustment, for example chunk sizes, namespaces, or model settings.

Wrapping Up

By combining a RAG pipeline with a chatbot in n8n, you get a powerful, practical way to build a context-aware assistant that stays in sync with your internal documents.

With:

  • Automated document ingestion from Google Drive
  • Vector storage and semantic search in Pinecone
  • OpenAI embeddings
  • Anthropic Claude 3.5 Sonnet through OpenRouter
  • And n8n orchestrating the whole thing

you can create a scalable support or knowledge assistant without writing a full backend from scratch.

Try the Template and Build Your Own Chatbot

If you are ready to upgrade how your users access information, this template is a great starting point. You can customize it, expand it, or plug it into your existing systems, all within n8n.

Start building now and give your chatbot real, up-to-date knowledge.