Integre sua Clínica com Poli: Automação de Agendamento Inteligente

Integre sua Clínica com Poli: Automação de Agendamento Inteligente (e Fim das Tarefas Repetitivas)

Imagine esta cena…

Telefone tocando sem parar, WhatsApp explodindo de mensagens, paciente pedindo remarcação em cima da hora, outro perguntando o preço do procedimento, mais um querendo saber se “tem horário amanhã cedinho”. Enquanto isso, alguém na recepção tenta atualizar a agenda, responder com educação, não perder nenhum dado importante e ainda manter o sorriso no rosto.

Se isso parece a rotina da sua clínica, boa notícia: você não precisa mais viver nesse modo “super-herói sobrecarregado”. É aqui que entra o Poli, um agente virtual integrado ao n8n, que assume boa parte desse caos com automação inteligente e um toque bem humano.

O que é o Poli e por que ele é tão útil?

Poli é um agente virtual criado para ser o recepcionista digital da OdontoCompany, atendendo seus pacientes diretamente pelo WhatsApp. Ele não se cansa, não esquece informações e não se irrita quando alguém manda áudio de 3 minutos para remarcar um horário.

Usando um fluxo inteligente no n8n, o Poli cuida de:

  • Receber e entender mensagens dos pacientes
  • Identificar necessidades, como agendamento ou remarcação
  • Consultar e gerenciar a agenda da clínica no Google Calendar
  • Confirmar horários disponíveis e registrar consultas
  • Enviar mensagens e lembretes personalizados

Em resumo, ele funciona como uma recepção digital sempre disponível, com atendimento acolhedor, organizado e automatizado.

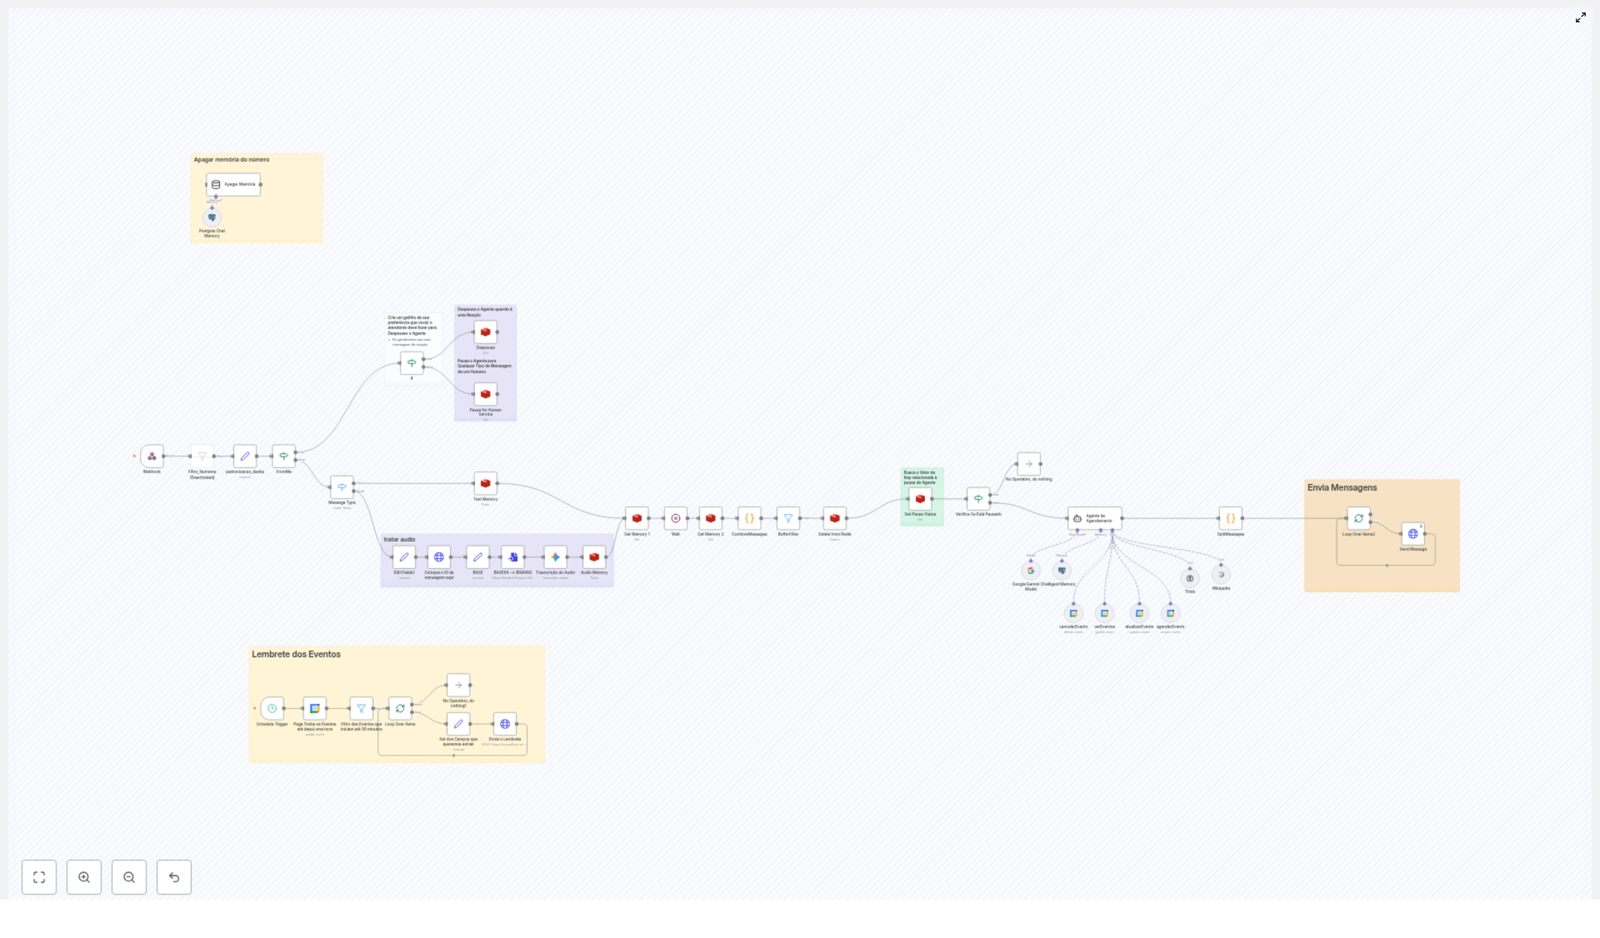
Como o fluxo de automação no n8n funciona por trás dos bastidores

Mesmo com uma pegada leve e amigável, o fluxo do Poli é bem sofisticado. Aqui está o que acontece nos bastidores, etapa por etapa.

1. Webhook: a porta de entrada das mensagens

Tudo começa quando o paciente manda uma mensagem pelo WhatsApp. Essa mensagem chega ao n8n por meio de um webhook, que é o ponto de entrada do fluxo.

Nessa etapa, o fluxo:

  • Recebe os dados da mensagem
  • Padroniza o número de telefone do paciente
  • Organiza o conteúdo da mensagem e outras informações essenciais

Isso garante que, independentemente de como o paciente escreve ou salva o número, o sistema consegue entender e tratar tudo de forma consistente.

2. Memória com Redis: o cérebro da conversa

Para que o Poli não pareça um robô sem memória, o fluxo usa o Redis para armazenar e recuperar dados da conversa em tempo real.

Com essa memória estruturada, o sistema consegue:

  • Manter o histórico do paciente
  • Controlar o estado atual da conversa
  • Continuar o atendimento de forma coerente, mesmo em interações longas ou pausadas

3. Trilha de mensagens: texto, áudio e tudo no meio do caminho

Nem todo mundo gosta de digitar. Alguns pacientes preferem mandar um áudio de “só um minutinho” que dura uma eternidade. O Poli está preparado para isso.

O fluxo é capaz de:

  • Diferenciar mensagens de texto e áudio
  • Transcrever automaticamente áudios em texto para facilitar o processamento

Assim, independentemente do formato, o conteúdo é entendido e tratado pelo agente de forma eficiente.

4. Controle de pausa: quando entra o atendimento humano

Nem tudo precisa ser 100% automatizado. Em alguns casos, é melhor que um humano assuma a conversa, por exemplo em situações mais sensíveis ou específicas.

Por isso, o fluxo conta com um controle inteligente de pausa:

  • Permite pausar o Poli quando necessário
  • Evita que conversas paralelas se misturem
  • Garante que o atendimento humano e o automático convivam sem bagunça

5. Agente de agendamento: o coração da automação

Esta é a parte que faz os olhos da equipe brilharem. O agente de agendamento usa Language Models (modelos de linguagem) para interpretar o que o paciente quer e agir em cima disso.

Ele é responsável por:

  • Entender comandos de forma natural, como “quero marcar uma limpeza” ou “posso remarcar meu horário de amanhã?”
  • Coletar dados importantes como nome, preferência de horário e tipo de procedimento
  • Consultar o Google Calendar em busca de horários disponíveis
  • Aplicar regras rígidas para evitar erros de agendamento
  • Executar agendamentos e remarcações automaticamente

Em outras palavras, o Poli entende o que o paciente quer, verifica a agenda e já resolve, sem precisar interromper ninguém da equipe.

6. Envio de mensagens: comunicação clara e acolhedora

Depois de processar tudo, o Poli responde o paciente pelo próprio WhatsApp, com mensagens:

  • Personalizadas de acordo com o contexto
  • Escritas em um tom caloroso, empático e natural
  • Claras sobre horários, confirmações e próximos passos

Assim, o atendimento continua humano e próximo, mesmo sendo automatizado.

7. Lembretes automáticos: adeus, esquecimento de consulta

Para reduzir faltas, o fluxo conta com um subfluxo de lembretes automáticos.

Ele:

  • Verifica no Google Calendar os eventos que vão acontecer nos próximos minutos
  • Envia mensagens pró-ativas lembrando o paciente do compromisso

É como ter alguém na recepção ligando para cada paciente, só que sem ocupar o tempo de ninguém.

Principais benefícios da automação com Poli e n8n

Além de acabar com boa parte das tarefas repetitivas, o fluxo com Poli traz resultados bem práticos para a clínica.

Atendimento realmente humanizado, mesmo sendo digital

  • Uso de um tom caloroso e empático nas mensagens
  • Comunicação natural, sem parecer um robô engessado
  • Possibilidade de personalizar interações de acordo com o perfil do paciente

Gestão de agenda inteligente e confiável

  • Antes de confirmar qualquer horário, o sistema checa conflitos para evitar sobreposições
  • Os compromissos são criados com descrições claras, facilitando o entendimento da equipe
  • O fluxo segue regras rígidas para manter a agenda organizada

Flexibilidade em múltiplos canais e formatos

  • Captação de mensagens em diferentes formatos, como texto e áudio
  • Adaptação da resposta conforme o canal de comunicação
  • Transcrição de áudios para garantir que nada importante se perca

Histórico e padronização dos atendimentos

  • Registro detalhado de histórico de conversas e agendamentos
  • Facilidade para consultar informações em futuras remarcações
  • Padronização dos dados do paciente, o que evita confusão com nomes, telefones e horários

Operação automatizada, escalável e menos cansativa

  • Atende vários pacientes ao mesmo tempo sem perder o controle
  • Permite pausar e retomar o agente quando a equipe humana precisar intervir
  • Libera a recepção para focar em atendimentos mais complexos e presenciais

Como começar a usar o template do Poli no n8n

Se você já está imaginando a paz na recepção, o próximo passo é colocar esse fluxo para rodar. O melhor de tudo é que você não precisa montar tudo do zero, já existe um template pronto no n8n que representa esse fluxo visualmente.

Passo a passo simplificado

  1. Acesse o template do Poli no n8n usando o link disponível abaixo.
  2. Importe o fluxo para o seu ambiente n8n.
  3. Configure:
    • O webhook que recebe as mensagens do WhatsApp
    • A conexão com o Redis para a memória da conversa
    • A integração com o Google Calendar para os agendamentos
    • As chaves e credenciais necessárias para os serviços envolvidos
  4. Ajuste as mensagens, o tom de voz e as regras de agendamento conforme a realidade da sua clínica.
  5. Teste o fluxo com alguns números de WhatsApp antes de liberar para os pacientes.

Depois disso, é só deixar o Poli trabalhar e acompanhar os resultados.

Conclusão: menos tarefa repetitiva, mais foco no paciente

Integrar o Poli com o n8n transforma o jeito como a OdontoCompany lida com agendamentos, remarcações e comunicação com pacientes. Você ganha um fluxo de trabalho automatizado, visualmente claro dentro do n8n, que combina:

  • Inteligência para interpretar pedidos e gerenciar horários
  • Empatia na forma de se comunicar com o paciente
  • Regras robustas para manter a agenda organizada e confiável

O resultado é uma clínica mais produtiva, pacientes melhor atendidos e uma recepção que finalmente pode respirar.

Quer implementar essa solução na sua clínica ou negócio?

Se você quer reduzir tarefas manuais, organizar melhor os agendamentos e oferecer uma experiência moderna para os pacientes, vale ver o fluxo do Poli em ação.

Entre em contato conosco para uma demonstração personalizada e descubra como levar o atendimento da sua clínica para o próximo nível com n8n e automação inteligente.

Automate AI Voice Calls with Airtable & telli Integration

Automate AI Voice Calls with Airtable & telli Integration: A Story of One Marketer’s Breakthrough

The Day Emma Realized Her Calls Were Holding Her Back

By Tuesday afternoon, Emma’s coffee was cold and her call list was still only half done.

As the marketing manager at a fast-growing service company, her days were packed with lead follow-ups, appointment reminders, and customer feedback calls. Airtable kept her contacts organized, but the real problem was the time spent dialing numbers, leaving voicemails, and updating notes after each conversation.

Leads slipped through the cracks when she could not call fast enough. Clients missed appointments because reminder calls went out late. Feedback surveys were often forgotten when the team got busy. Emma knew automation could help, but she did not want to lose the human touch or rewrite her entire tech stack.

That changed the day she discovered an n8n workflow template that connected Airtable with telli, an AI voice-agent platform. It promised to automate AI voice calls directly from her CRM, using smart, conversational agents instead of manual dialing.

Discovering a Smarter Way to Call

Emma’s search started with a simple question: “How can I automate voice calls from Airtable?”

She came across an n8n template designed exactly for that. It integrated Airtable contacts with telli’s AI voice agents, allowing her to schedule and manage calls without lifting a phone. The idea was simple but powerful: every time a new contact appeared in Airtable, a workflow would automatically send that contact to telli, then schedule an AI-powered call.

Before she could try it, Emma made a checklist of what she needed.

What Emma Set Up Before Building Her Workflow

  • A telli account with API access so she could use the AI voice-agent platform and its HTTP API endpoints.
  • An Airtable base that already contained her leads and customers, with fields like name, phone number, email, and other useful details.
  • n8n automation platform where she would import and customize the workflow template that connected Airtable and telli.

With those pieces ready, she opened n8n and started turning her manual phone routine into an automated, AI-driven voice system.

Building the Workflow: From Contact in Airtable to AI Voice Call

Emma’s goal was clear: whenever a new lead or contact appeared in Airtable, an AI voice agent from telli should call them, either to qualify them, remind them of an appointment, or collect feedback.

Instead of a dry checklist, the workflow became part of her story of reclaiming time and improving her customer communication.

1. The Trigger That Changed Everything

Emma started with the first key piece in n8n: an Airtable Trigger node.

She configured this node to watch her Airtable base for new or updated records. Any time a new contact was added, or an existing one changed in a way that signaled “ready for a call,” the Airtable Trigger node would fire. That event became the starting point of the whole automation.

Instead of manually checking Airtable every morning, the workflow now listened in real time.

2. Sending Contacts to telli With an HTTP Request

Once the trigger fired, Emma needed to get that contact into telli. For this, she added an HTTP Request node in n8n, configured to call telli’s /add-contact API endpoint.

She set the method to POST, added the correct headers, and mapped fields from Airtable into the JSON body.

telli Add Contact Endpoint Details

  • URL: https://api.telli.com/v1/add-contact
  • Method: POST
  • Headers:
    • Authorization: YOUR-API-KEY
    • Content-Type: application/json
  • Payload Example:
{  "external_contact_id": "string",  "salutation": "string",  "first_name": "string",  "last_name": "string",  "phone_number": "string",  "email": "jsmith@example.com",  "contact_details": {},  "timezone": "string"
}

In her workflow, Emma mapped Airtable fields like first_name, last_name, phone_number, and email into this payload. She used her telli API key in the Authorization header to authenticate the request.

Each time the node ran, a new contact appeared in telli, ready to be called by an AI voice agent.

3. The Moment the AI Agent Started Calling

Creating contacts in telli was only half the story. Emma also needed to schedule actual calls. So she added a second HTTP Request node in n8n, this time pointing to telli’s /schedule-call endpoint.

telli Schedule Call Endpoint Details

  • URL: https://api.telli.com/v1/schedule-call
  • Method: POST
  • Headers:
    • Authorization: YOUR-API-KEY
    • Content-Type: application/json
  • Payload Example:
{  "contact_id": TELLI-CONTACT-ID,  "agent_id": "string",  "max_retry_days": 123,  "call_details": {  "message": "Hello, this is your friendly reminder!",  "questions": [  {  "fieldName": "email",  "neededInformation": "email of the customer",  "exampleQuestion": "What is your email address?",  "responseFormat": "email string"  }  ]  },  "override_from_number": "string"
}

In n8n, Emma took the contact_id returned by the previous /add-contact call and used it in the schedule-call payload. She chose an agent_id that matched the AI agent she had configured in telli, and customized the message and questions to fit each use case.

Now, when a new contact landed in Airtable, the workflow automatically:

  • Created that contact in telli through the /add-contact endpoint.
  • Scheduled an AI voice call through the /schedule-call endpoint.

For Emma, this was the turning point. The calls started happening in the background while she focused on strategy instead of spreadsheets and dial pads.

Where the AI Voice Workflow Really Shined

Once the n8n workflow was live, Emma began to see how flexible the Airtable and telli integration could be. She used the same structure for several key scenarios, just by adjusting the Airtable views, call messages, and agent configurations.

Lead Qualification on Autopilot

New leads used to sit in her CRM for hours or even days before someone had time to call. With the n8n template, Emma set up a dedicated Airtable view for “New Leads” and connected that to her workflow trigger.

As soon as a lead landed in that view, telli’s AI voice agent would call to:

  • Welcome the lead.
  • Ask a few qualification questions.
  • Capture key details like email, company size, or service interest.

The responses were logged, and Emma could prioritize high-intent leads without spending time on basic screening calls.

Appointment Reminders Without Manual Dialing

Missed appointments were a constant headache. Emma created another Airtable view for upcoming appointments. Her workflow used that view to trigger reminder calls through telli.

The AI agent would say something like, “Hello, this is your friendly reminder about your appointment tomorrow,” and could even ask the customer to confirm or reschedule if needed, depending on the agent setup in telli.

Customer Feedback Calls That Actually Got Done

Post-service feedback used to be the first task to get dropped when the team got busy. With the integration in place, Emma created a simple rule: any completed service in Airtable would trigger a follow-up call through telli.

The AI agent would:

  • Thank the customer for their business.
  • Ask a few feedback questions.
  • Capture responses in a structured way that could be reviewed later.

For Emma, this meant higher response rates and better insights, without adding work to her team’s day.

Scaling Up: Handling Many Contacts at Once

As the company grew, Emma’s workflows had to keep up. Processing one contact at a time was fine at first, but soon she needed to handle larger batches efficiently.

She explored two approaches inside n8n and telli to scale her automation.

Option 1 – Looping Through Contacts in n8n

For moderate volumes, Emma used an n8n Loop node to iterate through multiple contacts sequentially.

  1. The Airtable node fetched a list of contacts that matched her criteria.
  2. The Loop node processed each contact one by one.
  3. For each item, the workflow:
    • Called the /add-contact endpoint.
    • Then called the /schedule-call endpoint using the returned contact_id.

This approach gave her fine control over each contact and made it easy to add conditions or custom logic per lead.

Option 2 – Using telli Batch Endpoints

When Emma needed to handle larger lists, she turned to telli’s batch APIs to speed things up.

Instead of sending contacts one by one, she could:

  1. Use /add-contacts-batch to add multiple contacts to telli in a single request.
  2. Use /schedule-calls-batch to schedule many calls at once.

In n8n, she built arrays of contacts and call configurations, then posted them to the batch endpoints. This reduced API overhead and made it easier to run large campaigns, such as seasonal promotions or mass feedback initiatives.

The Resolution: From Overwhelmed to Orchestrated

A few weeks after setting up the Airtable and telli integration with n8n, Emma’s workday looked completely different.

Her outbound calling was no longer a pile of to-dos. Instead, it was a coordinated system of AI voice calls that:

  • Automatically reached out to new leads.
  • Reminded clients about their appointments on time.
  • Collected feedback after each service.

Errors from manual data entry dropped, and she gained back hours each week. Most importantly, her team could focus on higher-value conversations, while the AI handled routine but essential touchpoints.

The workflow did not just automate calls, it upgraded the entire customer contact strategy.

Where You Can Go From Here

If you are managing contacts in Airtable and want to automate AI voice calls with minimal friction, this n8n workflow template offers a direct path forward. By linking Airtable with telli through n8n, you can:

  • Automate outbound calling with AI voice agents.
  • Reduce manual work and human error.
  • Customize call scripts, questions, and retry logic to match your customer journey.

You can extend the setup by exploring more of telli’s API features, refining your AI agent scripts, or adding conditions in n8n to route different contacts to different agents or call flows.

Ready to build your own story like Emma’s? Set up your n8n workflow today and streamline your communications with powerful AI voice calls powered by telli.

Simple Google Indexing API Workflow Explained

Simple Google Indexing API Workflow, Explained Like We’re Chatting Over Coffee

If you’ve ever hit “publish” on a new page and then sat there wondering when Google will finally notice it, you’re not alone. Waiting for Google to crawl and index your content can feel slow and unpredictable.

That’s where the Google Indexing API comes in. And with an n8n workflow built around it, you can turn that whole process into a simple, hands-off automation that quietly does the work for you in the background.

In this guide, we’ll walk through what this n8n template does, when you should use it, and exactly how it works under the hood. We’ll keep things friendly and practical, so you can follow along even if you’re not a hardcore developer.

What This Google Indexing API Workflow Actually Does

At a high level, this n8n workflow grabs all the URLs from your XML sitemap, then feeds them to the Google Indexing API in a controlled, automated way. It takes care of:

  • Fetching your sitemap file, for example https://bushidogym.fr/sitemap.xml
  • Converting that XML into a format that is easy to work with
  • Extracting all the URLs from the sitemap
  • Sending each URL to Google as an indexing request
  • Respecting your API quota so you do not get blocked
  • Pausing between requests to keep everything running smoothly

The end result: new or updated pages get submitted to Google automatically, without you having to paste URLs into tools or wait around hoping for a crawl.

When Should You Use This Workflow?

This workflow is especially useful if you:

  • Publish new content regularly and want Google to see it quickly
  • Update existing pages and need Google to re-crawl them
  • Manage a site where manual URL submissions are becoming a time sink
  • Care about SEO and want more control over how fast your pages get discovered

In short, if you have a sitemap and you are using n8n, this template is a very easy win for your automation stack.

How the Workflow Flows, Step by Step

Let’s break down how everything fits together inside n8n. Think of it as a small assembly line where each node has a specific job.

1. Starting the Workflow: Manual or Automatic

You get two ways to kick things off:

  • Manual trigger: The “When clicking ‘Execute Workflow’” node lets you run everything on demand. Perfect for testing or occasional use.
  • Scheduled trigger: The “Schedule Trigger” node can be set to run daily or at whatever interval you prefer. This is what turns your indexing into true “set it and forget it” automation.

2. Fetching Your Sitemap

Next up, the workflow needs to know where your sitemap lives.

The sitemap_set node is responsible for that. Here you simply provide your sitemap URL, such as:

https://bushidogym.fr/sitemap.xml

The node then passes that URL to the part of the workflow that actually fetches the file.

3. Converting XML to JSON for Easier Handling

Sitemaps are usually in XML format, which is not the most convenient to work with inside automations. That is why the workflow uses the sitemap_convert node.

This node converts the XML sitemap into JSON. Once it is in JSON, n8n can easily loop through the data, pick out specific fields, and pass them along to other nodes.

4. Parsing and Preparing the URLs

Now that the sitemap is in JSON, it is time to pull out the actual URLs.

  • sitemap_parse node: This node digs into the JSON and extracts the list of URLs from the sitemap entries.
  • url_set node: Each URL is then set individually so the workflow can treat them one by one. This makes it easy to handle batch processing and apply logic per URL.

5. Looping Through URLs in Batches

Instead of firing all URLs at Google at once, the workflow uses a loop to process them in a controlled way.

The loop node goes through each URL, one at a time. This is important for:

  • Staying within your Google Indexing API quota
  • Preventing sudden spikes in requests
  • Making it easier to debug if something goes wrong

6. Sending URLs to the Google Indexing API

Here is where the magic happens.

The url_index node sends a POST request to the Google Indexing API for each URL. It includes:

  • The URL that needs to be indexed or updated
  • The type URL_UPDATED, which tells Google that the page is new or has changed and should be re-crawled

This node uses your configured Google API credentials, so authentication is handled securely and automatically once you set it up.

7. Checking Quota and Handling Limits

Google’s Indexing API has usage limits, so it is smart to keep an eye on those.

The index_check node looks at the response from Google and checks two things:

  • Did the request succeed?
  • Has the API quota been reached?

If everything looks good, the workflow can move on. If not, it knows when to stop.

8. Waiting or Stopping the Workflow

To avoid hammering the API, the workflow includes a small pause between each request.

  • wait node: If the quota has not been exceeded, this node waits for a short time, usually about 2 seconds, before moving on to the next URL.
  • “Stop and Error” node: If the quota limit is hit, this node ends the workflow and returns an error message instead of continuing blindly.

This combination keeps your automation polite and API friendly.

How To Set Up And Use This Workflow In n8n

Getting this running is easier than it might sound. Here is a simple checklist to follow.

Step 1: Point To Your Own Sitemap

In the sitemap_set node, replace the example URL with your actual sitemap URL. For example:

https://yourdomain.com/sitemap.xml

Step 2: Configure Google API Credentials

In the url_index node, make sure your Google API credentials are set up correctly. This is what lets n8n authenticate with the Google Indexing API and send valid requests.

Step 3: Schedule the Workflow

Use the “Schedule Trigger” node to decide when this automation should run. Many people like to:

  • Run it daily during off-peak hours
  • Schedule it after regular content publishing times

Once that is in place, you do not need to manually trigger indexing every time you publish or update content.

Step 4: Fine Tune For Your Quota

Keep an eye on your API usage at first. If you notice that you are getting close to your quota, you can:

  • Increase the delay in the wait node
  • Adjust how many URLs you process per run

This gives you a good balance between fast indexing and safe API usage.

Why This Automation Makes Your Life Easier

So what do you actually gain from all this? Quite a bit:

  • Time savings: No more manually submitting URLs whenever you publish or update pages.
  • Better SEO hygiene: Google gets notified about new or updated content faster, which helps with timely crawling and indexing.
  • Quota friendly: The workflow respects API limits and avoids unnecessary failures.
  • More control and visibility: You can see exactly which URLs are being sent and how the API responds.

Instead of hoping Google finds your pages quickly, you are actively giving it a nudge in a structured, automated way.

Ready To Try The Google Indexing API Workflow?

If you are looking to level up your SEO automation with n8n, this template is a great place to start. It is simple, practical, and once it is configured, it quietly keeps your sitemap and Google in sync.

Set it up, let it run on a schedule, and enjoy knowing your URLs are being submitted without you lifting a finger each time.

If you want to explore even more automation ideas or need help tailoring this workflow for your specific SEO strategy, do not hesitate to reach out.

How to Automate Website Indexing with Google Indexing API

How to Automate Website Indexing with Google Indexing API in n8n

1. Technical Overview

This n8n workflow automates the submission of website URLs to the Google Indexing API. It reads a sitemap, extracts each URL, and sends an update notification request to Google. The workflow is designed for reliable, repeatable execution, with support for both manual and scheduled triggers, basic rate limiting, and daily quota checks.

The reference implementation uses the sitemap at https://bushidogym.fr/sitemap.xml, but the structure can be adapted to any standard XML sitemap. The Google Indexing API is accessed via authenticated HTTP POST requests and is used to notify Google that a URL has been created or updated.

2. Workflow Architecture

At a high level, the workflow executes the following sequence:

  1. Start the workflow via a manual or scheduled trigger.
  2. Fetch the sitemap XML from a specified URL using an HTTP Request node.
  3. Convert the XML response to JSON for easier parsing in n8n.
  4. Parse and split the list of URLs into individual items.
  5. Prepare each URL for submission to the Google Indexing API.
  6. Loop through URLs one by one (batch size 1) to respect rate limits.
  7. Send a POST request to the Google Indexing API for each URL.
  8. Inspect the response and validate that the URL was accepted for indexing.
  9. Handle quota errors and enforce a delay between requests.

The workflow is composed of standard n8n nodes: triggers, HTTP Request nodes, data transformation nodes, and simple control logic that checks API responses and stops execution when the daily quota is reached.

3. Node-by-Node Breakdown

3.1 Trigger Nodes

3.1.1 Manual Trigger

The Manual Trigger node allows you to run the workflow on demand from the n8n editor or from any manual execution context. It is typically used during:

  • Initial setup and testing of the Google Indexing workflow.
  • Ad-hoc reindexing after major site updates.

No additional configuration is required on this node. It simply starts the flow and passes control to the next node without data.

3.1.2 Schedule Trigger

The Schedule Trigger node automates recurring execution. In the referenced workflow, it is configured to:

  • Run daily at 1:00 AM server time.

This ensures that new or updated URLs in the sitemap are regularly submitted to Google without manual intervention. You can adjust the schedule according to your preferred indexing cadence or server load considerations.

3.2 Sitemap Retrieval and Conversion

3.2.1 HTTP Request: Fetch Sitemap

The workflow uses an HTTP Request node to retrieve the sitemap:

  • Method: GET
  • URL: https://bushidogym.fr/sitemap.xml
  • Response Format: XML (as returned by the server)

This node downloads the XML sitemap file that contains all publicly available URLs intended for indexing. The same pattern applies if you replace the URL with your own sitemap location.

3.2.2 XML to JSON Conversion

Once the XML is retrieved, it is converted into JSON format within the workflow. In n8n, this is typically done using:

  • Either the built-in XML to JSON option on the HTTP Request node (if enabled), or
  • A dedicated transformation node (for example, a Function or a specific XML parsing node) that takes the XML string and outputs JSON.

The goal is to obtain a JSON structure that exposes the sitemap entries (usually under tags like <urlset> and <url>) as a list or array. This structure is easier to iterate over in subsequent nodes.

3.3 URL Extraction and Preparation

3.3.1 Parsing URL Entries

The converted JSON sitemap contains a collection of URL entries. These are typically represented as an array of objects, each containing a location field (for example, loc) that holds the actual page URL.

The workflow parses this JSON and splits the collection into individual items:

  • Each item corresponds to a single URL from the sitemap.
  • This split enables item-by-item processing within n8n, which is crucial for clean looping and error handling.

3.3.2 Set Node: Extract URL String

A Set node is used to normalize and expose the URL in a dedicated field that will be used by the Google Indexing API request. This node:

  • Reads the URL value from the parsed sitemap data (for example, from json.url.loc or similar paths, depending on the sitemap structure).
  • Writes it to a clearly named field such as url.

This step ensures that the downstream HTTP Request node can reference a consistent property regardless of the exact JSON structure of the original sitemap.

3.4 URL Looping and Rate Control

3.4.1 Batch Processing (1 URL per Batch)

The workflow processes URLs one at a time. This is typically implemented using a node that:

  • Iterates over all items passed from the previous step.
  • Enforces a batch size of 1, so each Google Indexing API call handles a single URL.

Single-item batches provide:

  • Fine-grained control over rate limiting.
  • Easier error detection and handling for individual URLs.

3.4.2 Delay Between Requests

To stay within Google’s general usage guidelines and avoid unnecessary throttling, the workflow introduces a delay between consecutive indexing requests:

  • Delay duration: 2 seconds between each URL submission.

This delay is applied after a successful API call and before moving to the next URL in the loop. It is a basic but effective way to reduce the risk of hitting short-term rate limits.

3.5 Google Indexing API Integration

3.5.1 HTTP Request: Publish URL Notification

For each URL, the workflow uses another HTTP Request node to call the Google Indexing API:

  • Method: POST
  • Endpoint: https://indexing.googleapis.com/v3/urlNotifications:publish
  • Authentication: Google service account credentials configured in n8n (via a Google-related credential type or generic OAuth2 / service account setup, depending on your n8n version).

The request body specifies:

  • url: The URL extracted from the sitemap and prepared in the Set node.
  • type: URL_UPDATED to indicate that the URL has been updated or created and should be (re)indexed.

This is the core interaction with the Google Indexing API. If authentication and permissions are correctly configured in your Google Cloud project, Google will accept the notification and schedule the URL for indexing or reindexing.

3.5.2 Response Validation

After each POST request, the workflow evaluates the response from Google. The key aspects checked are:

  • Notification type: The response should indicate URL_UPDATED, confirming that the update request was accepted.
  • Error fields: If the response contains an error object, the workflow uses this information to decide whether to stop or continue.

When the response type is URL_UPDATED, the workflow considers the operation successful and proceeds to the next URL after the 2-second delay.

3.6 Quota and Error Handling

3.6.1 Daily Quota Check

The Google Indexing API enforces a daily quota, which is typically:

  • Default limit: 200 requests per day per project (subject to Google’s current policy).

If the API returns an error that indicates the daily quota has been reached, the workflow:

  • Stops further processing of URLs.
  • Outputs an error message to indicate that the daily limit has been exceeded.

This prevents unnecessary retries and avoids additional errors or potential penalties.

3.6.2 Handling Rate Limit Errors

In addition to daily quotas, the workflow is designed with basic rate control through the per-request delay. If you encounter rate limit responses or similar HTTP errors:

  • The existing delay helps reduce the likelihood of repeated rate limit errors.
  • You can increase the delay duration if rate limit errors persist.

The original template focuses on halting when the daily quota is exceeded and does not implement complex retry logic, so any advanced error handling would need to be added as a customization.

4. Configuration Notes

4.1 Prerequisites

To deploy this workflow, you need:

  • An n8n instance (self-hosted or cloud) with access to the internet.
  • A Google Cloud project with the Indexing API enabled.
  • A configured Google service account with appropriate permissions.
  • Service account credentials connected to n8n via a suitable credential type.

4.2 Google Service Account & Credentials

The workflow authenticates to the Google Indexing API using a service account. In practice, you will:

  • Create or use an existing service account in your Google Cloud project.
  • Enable the Indexing API for that project.
  • Generate and securely store the service account credentials (for example, JSON key file).
  • Configure these credentials in n8n under Credentials, then select them in the HTTP Request node that calls the Indexing API.

Ensure that the service account is authorized to use the Indexing API for the domain you are indexing, according to Google’s documentation.

4.3 Sitemap URL Configuration

The example workflow uses:

  • https://bushidogym.fr/sitemap.xml

In your own setup, replace this with the URL of your sitemap. The sitemap should:

  • Be publicly accessible via HTTP or HTTPS.
  • Use a standard sitemap XML structure so that the URL entries can be parsed correctly.

4.4 Trigger Scheduling

The Schedule Trigger is set to 1 AM daily in the template. You can modify this to:

  • Run multiple times per day if you update content frequently.
  • Run less frequently if your content changes rarely.

Adjust the cron expression or schedule settings directly in the Schedule Trigger node to match your indexing strategy.

5. Advanced Customization Options

5.1 Filtering URLs

You may not want to submit every URL in the sitemap to the Indexing API. To customize:

  • Add a filter or Function node after the JSON parsing step.
  • Implement conditions to include or exclude certain URLs (for example, based on path, query parameters, or change frequency if present in the sitemap).

This lets you prioritize high-value or frequently updated content.

5.2 Adjusting Rate Limits

If you notice rate limit errors or if your quota usage is too high:

  • Increase the inter-request delay beyond 2 seconds.
  • Reduce the frequency of the Schedule Trigger.

These changes help keep the workflow stable under higher load or stricter quotas.

5.3 Error Logging and Notifications

The base workflow stops when the daily quota is exceeded and returns an error. For improved observability, you can extend it to:

  • Log failed URLs into a database or a spreadsheet.
  • Send notifications (for example, email or chat message) when quota errors or unexpected responses occur.

These additions make it easier to monitor indexing health over time.

6. Benefits of the n8n Google Indexing Workflow

  • Full automation: Once configured, the workflow runs on a schedule or on demand, eliminating manual URL submissions.
  • Faster indexing: Direct integration with the Google Indexing API helps new and updated URLs appear in search results more quickly.
  • Quota-aware execution: Built-in checks prevent exceeding the daily request limit, reducing errors and avoiding wasted API calls.
  • Flexible triggering: Supports both manual and scheduled runs, so you can combine regular indexing with ad-hoc reindexing when needed.

7. Getting Started

To implement this workflow in your own environment:

  1. Set up an n8n instance and ensure it can reach the internet.
  2. Create a Google Cloud project, enable the Indexing API, and configure a service account.
  3. Add your service account credentials in n8n and connect them to the Google Indexing HTTP Request node.
  4. Update the sitemap URL in the HTTP Request node that fetches the sitemap.
  5. Test the workflow with the Manual Trigger to verify indexing responses.
  6. Enable and tune the Schedule Trigger to match your desired indexing frequency.

8. Conclusion

This n8n workflow provides a structured, reliable way to automate website indexing with the Google Indexing API. By reading your sitemap, processing each URL individually, and respecting daily quotas and basic rate limits, it helps keep your site fresh in Google search results with minimal ongoing effort.

If you rely on organic traffic and regularly update your content, integrating this automated indexing pipeline into your deployment or publishing process can significantly streamline your SEO operations.

Ready to automate your website indexing? Configure the Google Indexing API, connect your service account in n8n, and use this workflow to keep your URLs consistently submitted to Google.

Automate Lead Scoring and Notifications with n8n Workflow

Automate Lead Scoring and Notifications with n8n Workflow

From Overwhelmed Inbox to Focused Pipeline

If you have ever felt buried under a pile of unqualified leads, you are not alone. Many teams spend hours every week sifting through forms, checking emails by hand, and guessing which prospects are worth a follow up. It is tiring, it is repetitive, and it pulls your focus away from the work that actually grows your business.

Automation gives you a different path. Instead of reacting to every new lead manually, you can design a system that does the heavy lifting for you. With the right workflow, your tools can verify emails, score leads, and notify your team about the best opportunities, all while you focus on strategy and meaningful conversations.

This is where n8n comes in. In this article, you will walk through a practical n8n workflow template that connects a form, Hunter.io, MadKudu, and Telegram. By the end, you will see how this single workflow can become a stepping stone to a more automated, calm, and high impact sales process.

Shifting Your Mindset: Let Automation Do the First Pass

Before we dive into the technical steps, it helps to reframe how you think about leads. Your job is not to touch every single contact. Your job is to focus on the right ones. Automation is not here to replace your judgment, it is here to protect it, by filtering out noise and highlighting the leads that deserve your attention.

With n8n, you can:

  • Turn a simple form into a smart entry point for your pipeline
  • Automatically validate email addresses so you stop chasing dead ends
  • Score leads based on quality and fit, not gut feeling alone
  • Receive instant Telegram alerts when a hot lead appears

Think of this workflow as your always on assistant that never forgets a step and never gets tired of repetitive checks.

The Big Picture: What This n8n Workflow Does

This n8n lead scoring template is designed to automate lead capture and qualification from the moment someone submits a form to the moment your team gets notified about a high value prospect. At a high level, it:

  • Collects lead information through a form trigger
  • Verifies the email address with Hunter.io
  • Scores the lead with MadKudu based on quality and fit
  • Sends a Telegram notification when the lead is promising enough

Everything happens in the background, so by the time a new lead reaches your sales team, it has already been cleaned, checked, and scored.

Step 1: Turn Your Form Into a Smart Entry Point

Every great automation starts with a clear, simple trigger. In this workflow, that trigger is a form where new leads submit their details.

You can:

  • Use n8n’s built in form trigger
  • Or plug in your existing tools, such as Typeform, Google Forms, or SurveyMonkey

The key is to collect the business email address. This email is the foundation for everything that follows, from validation to lead scoring. Once the form is submitted, the workflow automatically picks up the data and moves to the next step, without any manual copy and paste.

Step 2: Automatically Verify Emails With Hunter.io

Next, the workflow protects your time by checking whether the email is actually usable. It sends the collected email address to Hunter’s email verification API.

Hunter analyzes several factors, such as:

  • SMTP validation
  • Disposable email detection
  • Other signals that indicate if the email is deliverable and legitimate

Inside the n8n workflow, a condition node evaluates Hunter’s response and checks if the email status is valid. If the email fails this check, the lead is ignored and quietly filtered out. You and your team never have to waste time on unreachable or fake addresses.

Step 3: Score Qualified Leads With MadKudu

Once an email passes verification, the workflow sends it to MadKudu for lead scoring. This is where your automation starts to feel truly intelligent.

MadKudu’s scoring API enriches the lead data and returns a customer fit score. This score reflects how well the lead matches your ideal customer profile based on fit and behavior signals. Instead of treating all leads the same, you now have a clear, data driven way to prioritize your outreach.

In the n8n workflow, this score becomes a key decision point. It tells your system which leads are worth immediate attention and which ones can be archived or nurtured later.

Step 4: Trigger Telegram Notifications for Hot Leads

Here is where the workflow starts to directly impact your day. When MadKudu returns a customer fit score, the automation compares it against a threshold, for example 60.

  • If the score is higher than the threshold, the workflow sends a Telegram notification to your sales team.
  • If the score is lower, the lead is marked as not interesting enough and archived silently.

The Telegram message includes the lead’s email and relevant signals, so your team can immediately understand why this prospect stands out. No more refreshing dashboards or digging through spreadsheets. Your best opportunities simply arrive in your Telegram chat, ready for action.

Why This n8n Automation Is a Growth Lever

This workflow is more than a convenience. It can reshape how your team spends its time and energy.

  • Increased efficiency – Manual lead filtering disappears. Your workflow handles verification and scoring, so your team can focus on conversations and closing deals.
  • Improved lead quality – You automatically prioritize validated, high fit prospects. Your pipeline becomes cleaner, sharper, and easier to manage.
  • Real time alerts – Telegram notifications ensure hot leads never sit unnoticed in a database. You respond faster, which often means better conversion rates.
  • Flexible integration – You can easily swap the form trigger or change the notification method to fit your existing stack, while keeping the same core logic.

Most importantly, this workflow gives you a repeatable system. Every new lead goes through the same reliable process, which creates consistency and confidence in your sales operations.

Getting Started: Your First Version Is Just the Beginning

Setting up this template in n8n is straightforward, and you can improve it over time as you learn what works best for your business. To get started:

  1. Add your MadKudu, Hunter.io, and Telegram credentials inside n8n.
  2. Configure your Telegram chat ID to receive notifications in the right channel or group.
  3. Connect your form trigger and make sure it sends the lead’s business email to the workflow.
  4. Test the entire flow by submitting a sample email and confirming that the Telegram alert arrives when the score is above your chosen threshold.
  5. Once everything looks good, activate the workflow and let it start qualifying leads in the background.

From there, you can experiment. Adjust the score threshold, add more fields, enrich leads with additional tools, or route different scores to different follow up paths. n8n gives you the freedom to evolve your automation as your strategy grows.

Take the Next Step Toward a More Automated Workflow

Every time you remove a manual step, you reclaim a bit of focus. This n8n workflow template is a simple but powerful way to do that. It validates emails, scores leads, and alerts your team about the most promising prospects through Telegram, so you can spend less time sorting and more time selling.

You do not need to automate everything at once. Start here, see the impact, then keep building. Over time, these small improvements add up to a smoother, more scalable sales process.

Ready to transform how you handle leads? Use this n8n workflow as your starting point, customize it to your needs, and let automation support your growth every day.

Automate Lead Scoring and Notifications with n8n Workflow

Automate Lead Scoring and Notifications with n8n Workflow

What You Will Learn

In this tutorial-style guide, you will learn how to use an n8n workflow template to:

  • Capture leads using an n8n form trigger or any external form tool
  • Validate email addresses automatically with Hunter
  • Score and enrich leads using the MadKudu API
  • Filter leads based on a customer fit score threshold
  • Send instant Telegram notifications for high-potential leads
  • Configure credentials and activate the workflow in n8n

By the end, you will understand each part of the workflow and how they work together to automate lead qualification and real-time sales alerts.

Concept Overview: How the Workflow Fits Into Your Sales Funnel

This n8n workflow is designed to streamline lead validation, scoring, and notification. It connects several tools and checks into one automated pipeline:

  • Input: A form where a potential lead submits a business email
  • Validation: Hunter verifies if the email is real and deliverable
  • Scoring: MadKudu evaluates how good the lead is based on multiple attributes
  • Filtering: Only leads above a certain score are considered high potential
  • Notification: Telegram sends instant alerts to your sales or growth team

This approach helps you focus your attention on the leads most likely to convert while automatically dropping invalid or low-quality contacts.

Key Components Used in n8n

Form Trigger

The workflow begins with an n8n Form Trigger. This node creates a simple web form that collects at least one field: the lead’s business email. The form trigger URL can be embedded into your website or landing page.

You can also replace this form trigger with other tools such as:

  • Typeform
  • Google Forms
  • SurveyMonkey

In those cases, you would use the appropriate n8n node or webhook from your form provider instead of the native form trigger, but the rest of the workflow logic remains the same.

Hunter Email Verifier

After a lead submits an email, the workflow uses the Hunter Email Verifier node to check that email address. Hunter returns information about whether the email is:

  • Valid
  • Invalid
  • Risky or undeliverable

This step helps prevent sending follow-ups to fake or mistyped emails, which reduces bounce rates and keeps your list clean.

If Nodes for Decision Making

The workflow uses If nodes to make decisions based on the data returned by other nodes. There are two key decision points:

  1. Checking if the email is valid, based on Hunter’s verification result
  2. Checking if the MadKudu customer fit score is above a chosen threshold

These If nodes route leads down different paths, for example toward notification or toward a no-operation node where the workflow ends.

MadKudu API for Lead Scoring

Leads that pass the email validation step are sent to the MadKudu API node. MadKudu analyzes the lead using multiple attributes such as:

  • Company revenue
  • Industry
  • Location
  • Other behavioral or firmographic data (depending on your MadKudu setup)

MadKudu then returns a customer fit score. This score indicates how likely the lead is to convert, which helps you prioritize your outreach.

Telegram Node for Real-Time Alerts

High-scoring leads are sent to a Telegram node. This node sends an automated message to a specific Telegram chat ID, for example:

  • A private chat with a sales manager
  • A group chat for the sales team

This real-time notification ensures that hot leads are noticed quickly and followed up with in a timely manner.

No-Operation Nodes for Stopping the Flow

When a lead does not meet certain criteria, the workflow routes them to a no-operation (NoOp) node. These nodes are used to clearly mark where the workflow ends for:

  • Invalid emails
  • Leads that are “not interesting enough” based on their score

NoOp nodes do not perform any action, they simply act as clear endpoints for those branches.

Step-by-Step: How the n8n Workflow Runs

Step 1: A Lead Submits the Form

1. A visitor lands on your website or landing page and fills in a form that asks for their business email.

2. The form is powered by the n8n Form Trigger node (or a different form tool integrated into n8n). When the user submits the form, n8n receives the email data and starts the workflow.

Step 2: Validate the Email with Hunter

3. The email is passed to the Hunter Email Verifier node.

4. Hunter checks whether the email is legitimate and deliverable. It returns a status that indicates if the email is valid or not.

Example outcome:

  • Valid: The email appears real and can receive mail
  • Invalid: The email is fake, mistyped, or undeliverable

Step 3: Use an If Node to Filter Invalid Emails

5. The workflow now uses an If node to evaluate the result from Hunter.

  • If the verification status is valid, the lead continues to the scoring step.
  • If the email is not valid, the workflow routes the lead to a NoOp node, and the process ends for that input.

This makes sure that only legitimate contacts are processed further.

Step 4: Score the Lead with MadKudu

6. For valid emails, the workflow calls the MadKudu API node.

7. MadKudu enriches the lead and calculates a customer fit score using attributes like company revenue, industry, and location, among others.

8. This score is returned to n8n and attached to the lead’s data inside the workflow.

Step 5: Evaluate the Customer Fit Score

9. Another If node checks the customer fit score value from MadKudu.

10. The template uses a threshold of 60 as an example. The logic is:

  • If the score is above 60, the lead is considered “interesting” or high potential.
  • If the score is 60 or below, the lead is treated as not interesting enough for immediate follow-up.

Step 6: Send a Telegram Notification for High-Scoring Leads

11. Leads that pass the score threshold are sent to the Telegram node.

12. The Telegram node sends a message to a pre-configured chat ID. This could include details like:

  • The lead’s email
  • Their MadKudu fit score
  • Any other useful context you choose to include in the message template

13. Your sales or growth team receives this notification in real time and can act on the lead quickly.

Step 7: End the Flow for Non-Qualified Leads

14. Leads that do not meet the scoring threshold are routed to a NoOp node labeled “Not interesting enough”.

15. No further actions are taken for these leads, which keeps your team’s focus on the most promising prospects.

How to Set Up the Workflow in n8n

To start using this template in your own n8n instance, follow these setup steps.

1. Add Required Credentials

In your n8n account, add credentials for each external service used in the workflow:

  • MadKudu – for lead scoring and enrichment
  • Hunter – for email verification
  • Telegram – for sending notifications

Make sure your API keys or tokens are correct and active. These credentials will be linked to the corresponding nodes inside the template.

2. Configure the Telegram Chat ID

Next, set the Telegram chat ID in the Telegram node:

  • Decide whether you want messages in a private chat or a group
  • Retrieve the chat ID and paste it into the Telegram node configuration

This ensures that every high-scoring lead will trigger a notification in the right place.

3. Test the Workflow

Before going live, use the Test Workflow feature in n8n:

  1. Open the workflow in the n8n editor
  2. Click on the Test or Execute Workflow button
  3. Submit a sample email through the form trigger
  4. Check that:
    • Hunter validates the email
    • MadKudu returns a score
    • Telegram sends a notification for high-scoring leads

If any part fails, review the node configuration and credentials, then test again.

4. Activate and Connect to Your Live Form

Once testing is successful:

  • Activate the workflow in n8n
  • Copy the Form Trigger URL from n8n
  • Replace the form action or link in your public-facing form (or embed the n8n form directly)

From this point onward, new leads that submit their email will automatically be validated, scored, and, if qualified, will trigger Telegram alerts.

Benefits of Using This n8n Lead Scoring Template

  • Higher Lead Quality: Invalid or undeliverable emails are filtered out early, so your team focuses on real prospects.
  • Prioritized Outreach: MadKudu scoring highlights leads with the best customer fit, letting you allocate time and resources where they matter most.
  • Real-Time Alerting: Telegram notifications keep your team informed instantly when a high-potential lead appears.
  • Flexible Integrations: You can easily swap the input form provider or change the notification channel while keeping the same n8n logic.

Quick FAQ

Can I use a different form tool instead of the n8n Form Trigger?

Yes. You can replace the n8n Form Trigger with tools like Typeform, Google Forms, or SurveyMonkey. Use the appropriate integration or webhook in n8n, and connect it to the same validation and scoring steps.

Can I change the MadKudu score threshold?

Absolutely. The example uses a customer fit score of 60 as the threshold, but you can adjust this value in the corresponding If node to match your own lead qualification criteria.

What happens to low-scoring leads?

Leads that do not reach the chosen score are sent to a NoOp node labeled “Not interesting enough”. The workflow stops for those leads, which helps you avoid cluttering your notification channels with low-priority contacts.

Is this workflow suitable for B2B leads?

Yes. This setup is particularly useful for B2B lead generation where business email validity and firmographic scoring are critical for effective sales outreach.

Get Started With This n8n Workflow Template

If you want to automate your lead qualification process and make sure no high-potential lead slips through the cracks, this n8n workflow template is a powerful starting point. It combines email verification, lead scoring, and instant notifications into a single, easy-to-manage automation.

Set it up in your n8n instance, connect your tools, and start scoring leads automatically to boost your sales efficiency and conversion rates. If you need support with integration or customization, you can contact the n8n support team for expert help.

Automate LinkedIn Job Data Scraping to Google Sheets

Automate LinkedIn Job Data Scraping to Google Sheets with n8n and Bright Data

Overview

This n8n workflow template automates the full pipeline of collecting live LinkedIn job postings, transforming the data, and persisting it into Google Sheets. It uses Bright Data’s Dataset API to extract active job listings based on user-defined filters, then cleans and normalizes the response before appending structured records into a Google Sheets template.

The automation is suitable for technical users, recruiters, sales teams, and growth professionals who need a repeatable, parameterized way to query LinkedIn jobs by location, keyword, and other filters, then work with the results in a spreadsheet for analysis or outreach.

Workflow Architecture

At a high level, the workflow follows this sequence:

  1. Form Trigger collects search parameters from the user.
  2. HTTP Request node sends those parameters to Bright Data to initiate a LinkedIn jobs snapshot.
  3. Wait and If nodes implement a polling loop until the snapshot is ready.
  4. HTTP Request node retrieves the completed dataset from Bright Data.
  5. Code node cleans, flattens, and normalizes the job records.
  6. Google Sheets node appends the cleaned data to a predefined spreadsheet template.

Primary Components

  • n8n Nodes: Form Trigger, HTTP Request, Wait, If, Code, Google Sheets
  • External Services:
    • Bright Data Dataset API for LinkedIn job snapshots
    • Google Sheets Template for structured storage and analysis

Node-by-Node Breakdown

1. Form Trigger – Collecting User Input

The workflow begins with a Form Trigger node. This node exposes a web form where users define the parameters of the LinkedIn job search. The form acts as the primary input layer for the automation and controls what Bright Data will scrape.

Required Form Fields

  • Location: City or region to target (for example, “Berlin”, “San Francisco Bay Area”).
  • Keyword: Search term such as job title or core skill (for example, “Data Engineer”, “Salesforce”).
  • Country Code: ISO format country code (for example, “US”, “DE”, “GB”).

Optional Filters

The form can also expose optional inputs that map directly to Bright Data’s LinkedIn jobs filters:

  • Time range (for example, “Past 24 hours”, “Last 7 days”) to restrict results to recently posted jobs.
  • Job type (for example, full-time, part-time, contract, internship).
  • Experience level (for example, entry-level, mid-senior, director).
  • Remote flag to distinguish between on-site, hybrid, and remote roles.
  • Company name to focus the search on specific employers.

If optional fields are left blank, the workflow passes more general search criteria to Bright Data, resulting in a broader dataset.

2. HTTP Request – Triggering a Bright Data Snapshot

The next step is an HTTP Request node configured with a POST method. This node sends the form inputs to the Bright Data Dataset API to start a LinkedIn jobs snapshot.

Key Configuration Points

  • Method: POST
  • URL: Bright Data Dataset API endpoint for LinkedIn jobs snapshots.
  • Authentication: Bright Data API credentials configured in n8n (API key or token).
  • Body:
    • Includes fields such as location, keyword, country, and any optional filters provided by the user.
    • Maps form fields to the Bright Data LinkedIn jobs schema.

The Bright Data API responds with metadata for the snapshot request. Most importantly, it returns an identifier or reference that is later used to poll for completion and retrieve the dataset once it is ready.

3. Wait & If – Polling for Snapshot Completion

Bright Data does not return the final dataset immediately. Instead, it creates a snapshot job that typically completes in 1 to 3 minutes. To handle this asynchronous process, the workflow uses a combination of:

  • Wait node to pause execution for a defined interval.
  • If node to check whether the snapshot is ready.

Polling Logic

  1. The workflow waits for a short time window (for example, 30 to 60 seconds) using the Wait node.
  2. After the wait period, an HTTP Request node (configured with GET) checks the snapshot status using the identifier returned in step 2.
  3. An If node evaluates the status field in the response:
    • If status indicates completed, the workflow proceeds to data retrieval.
    • If status indicates pending or processing, execution loops back through another Wait period and status check.

Edge Cases & Practical Notes

  • In normal conditions, the snapshot completes within 1 to 3 minutes. If Bright Data takes longer, the polling loop continues until the completion condition is met.
  • You can adjust the Wait interval and maximum number of polling attempts in n8n to balance responsiveness with API usage.
  • If the API returns an error status, the workflow can be configured to fail, send a notification, or branch into a custom error-handling path (for example, logging or alerting), depending on your n8n setup.

4. HTTP Request – Retrieving and Cleaning the Dataset

Once the snapshot is marked as complete, another HTTP Request node is used to fetch the actual job data.

Data Retrieval

  • Method: GET
  • URL: Bright Data dataset URL for the completed snapshot.
  • Authentication: Same Bright Data credentials as the initial POST request.

The response contains the raw LinkedIn job postings, often with nested structures and HTML content that are not directly suitable for spreadsheet usage.

Code Node – Data Cleaning & Normalization

A Code node processes the retrieved records and prepares them for Google Sheets. The logic typically includes:

  • Flattening nested properties so that multi-level JSON fields become simple key-value pairs.
  • Removing HTML tags from job descriptions and other text fields to improve readability.
  • Normalizing field names and formats so that each job record matches the Google Sheets column structure.

Common transformations might include:

  • Extracting text-only job descriptions from HTML content.
  • Converting nested company or location objects into simple strings.
  • Ensuring that URLs, salary information, and application links are in consistent formats.

The output of the Code node is a clean, uniform array of job records, each ready to be appended as a row in the spreadsheet.

5. Google Sheets Node – Persisting Data

The final step uses the Google Sheets node to append the cleaned job data to a pre-configured spreadsheet template.

Google Sheets Configuration

  • Authentication: Google Sheets credentials set up in n8n.
  • Mode: Append mode to add new rows at the bottom of the sheet.
  • Spreadsheet: The provided Google Sheets template (see link below) or a custom sheet with the same column structure.
  • Columns (typical fields):
    • Job title
    • Company
    • Location
    • Salary (if available)
    • Application link
    • Additional metadata from Bright Data, as mapped in the Code node

Each cleaned job listing becomes a single row in the sheet. Over time, the sheet accumulates a structured history of LinkedIn job postings that match your search criteria.

LinkedIn Jobs API Field Reference (via Bright Data)

The workflow relies on Bright Data’s LinkedIn jobs dataset, which supports several key filter parameters. These are mapped from the form input to the API request body.

Core Filter Fields

  • location – City or region where the job is based.
  • keyword – Primary search term, typically a job title or skill.
  • country – ISO format country code (for example, US, DE).

Additional Filter Fields

  • time_range – Time window for when jobs were posted (for example, “Past 24 hours”, “Last 7 days”).
  • job_type – Nature of employment (for example, full-time, part-time, contract).
  • experience_level – Seniority level (for example, entry-level, associate, mid-senior).
  • remote – Remote work setting, depending on Bright Data’s schema (for example, remote only vs on-site).
  • company – Specific company name to narrow the results.

By combining these filters, you can tightly tailor the dataset to your use case, whether that is focused job hunting, competitive intelligence, or identifying hiring signals for sales outreach.

Use Cases & Benefits

  • Real-time hiring insights – Continuously capture fresh job postings that match your criteria.
  • Prospecting lists – Identify companies that are actively hiring and build targeted lead lists.
  • Outreach personalization – Use job details such as role, location, and requirements to craft highly relevant cold emails or LinkedIn messages.
  • Automated lead generation – Convert hiring activity into sales signals without manual research.

Configuration Tips & Best Practices

Filtering Strategy

  • Use time filters like “Past 24 hours” or “Last 7 days” to keep the dataset focused on the most recent opportunities.
  • Leave optional filters blank if you want to run broader discovery queries and then refine later in Google Sheets.
  • Combine keyword with location and country for more relevant and geographically consistent results.

Data Quality & Outreach

  • Leverage the cleaned job descriptions and company fields to segment your sheet by industry, seniority, or tech stack.
  • Personalize outreach messages using specific role requirements and responsibilities extracted from the job data.

Operational Considerations

  • Monitor Bright Data API usage and rate limits when running the workflow frequently or at scale.
  • Consider scheduling the workflow in n8n (for example, daily or hourly) around your prospecting or job search cadence.
  • Handle potential API errors or timeouts by configuring n8n error workflows or notifications, especially in production scenarios.

Getting Started

To implement this automated LinkedIn job scraping pipeline:

  1. Import the n8n workflow template linked below.
  2. Configure your Bright Data credentials in the HTTP Request nodes.
  3. Set up your Google Sheets credentials and connect the Google Sheets node to the provided template or your own copy.
  4. Adjust the form fields, filters, and Code node mappings as needed for your specific use case.

Use this Google Sheets template as a starting point and adapt the columns to your data model:

Get the Google Sheets Template

Advanced Customization

More advanced users can extend or adapt the workflow in several ways:

  • Additional processing nodes – Insert extra Code or Function nodes to enrich data, categorize roles, or score leads.
  • Multi-destination outputs – In addition to Google Sheets, send the cleaned data to CRMs, databases, or messaging tools.
  • Conditional branching – Use If nodes to route different job types or seniority levels into separate sheets or pipelines.
  • Notification hooks – Add email, Slack, or other notification nodes to alert you when new high-priority roles appear.

Support & Further Learning

If you need help configuring or extending this n8n workflow, you can reach out directly:

Email: Yaron@nofluff.online
Tutorials and walkthroughs: YouTube | LinkedIn

Template Access

Load the ready-made n8n template to accelerate setup and adapt it to your environment:

Summary

This n8n workflow, powered by Bright Data’s LinkedIn jobs dataset and integrated with Google Sheets, delivers a continuous, filterable stream of live job postings. By automating scraping, cleaning, and storage, it reduces manual research and provides a reliable foundation for job search, recruiting, and sales prospecting workflows with minimal ongoing effort.

How to Sync Bubble Objects with n8n Automation

From Manual Busywork to Confident Automation

If you are building on Bubble.io, you already know how quickly small tasks can pile up. Creating records, updating fields, checking that everything is in sync – it all adds up. Every manual step steals a bit of focus from what really matters: growing your product, serving your users, and shipping features that move the needle.

Automation with n8n gives you a different path. Instead of reacting to tasks one by one, you can design a system that does the work for you. The workflow template in this article is a simple example, yet it represents something bigger: a repeatable way to sync Bubble objects automatically, so you can reclaim time, reduce errors, and build a more scalable foundation for your app.

We will walk through how to sync Bubble objects with n8n, not just as a technical tutorial, but as a small but powerful step toward a more automated, focused way of working.

Imagining a Better Workflow with n8n and Bubble

Imagine this: a new request comes into your system. Instead of logging into Bubble, manually creating an object, updating it, then checking if everything is correct, an automated workflow quietly handles it all in the background. Your Bubble app stays in sync, your data stays consistent, and you stay focused on the bigger picture.

That is exactly what this n8n workflow template helps you do. It connects Bubble.io with n8n using webhooks and Bubble’s API so that objects are created, updated, and retrieved automatically. You can start simple, then expand and customize it as your needs grow.

This is not just a one-off trick. It is a reusable pattern you can copy, adapt, and build on to automate more and more of your Bubble operations.

What This n8n – Bubble Workflow Does

The template is built around a clear and practical flow for synchronizing Bubble objects of type Doc. It consists of four core nodes that work together to handle the full lifecycle of a single object:

  • Webhook Trigger – Listens for an incoming HTTP POST request and starts the workflow.
  • Create Object – Creates a new Bubble object of type Doc with an initial property.
  • Update Object – Updates the Name field of the object that was just created.
  • Retrieve Object – Fetches the updated object from Bubble so you can verify and use the final data.

On the surface, it is a simple create-update-retrieve sequence. In practice, it is a template you can extend to handle more complex logic, additional fields, and other object types as your automation skills grow.

The Journey: From Trigger to Synced Bubble Object

1. Starting the Flow with a Webhook Trigger

Every great automation needs a clear starting point. In this template, that starting point is an n8n Webhook node. It is configured to listen for a POST request at the path /bubble-webhook.

Whenever your system, another app, or even a testing tool sends data to this URL, n8n wakes up and runs the workflow. That means you can connect this trigger to forms, external services, internal tools, or any part of your stack that can send an HTTP request.

This is the moment where you move from manual action to automated response. Instead of you reacting, your workflow reacts for you.

2. Creating a Bubble Object of Type Doc

Once the webhook fires, the next step is to create a Bubble object. The workflow uses the Bubble node in n8n to send a request to Bubble’s API and create a new record in the Doc data type.

In this template, the Name property is initially set to "Bubble". This is just a starting value, but it shows how you can pass structured data into Bubble automatically, without opening the Bubble editor or clicking through the UI.

As soon as this node runs, Bubble returns an object ID. That ID is critical, because it becomes the link between the object you just created and the updates you will apply next.

3. Updating the Newly Created Bubble Object

Automation really starts to shine when steps build on each other. Immediately after the object is created, the workflow uses the returned object ID to update the same record.

The Update Object step modifies the Name property from "Bubble" to "Bubble node". This demonstrates a powerful pattern you can reuse:

  • Create a Bubble object.
  • Capture the ID in n8n.
  • Use that ID to apply further changes or logic.

You can extend this idea to update multiple fields, apply conditional logic, or sync data from other services, all driven by the same object ID.

4. Retrieving the Updated Object for Verification and Use

The final step in this journey is to make sure everything worked as expected. The workflow uses another Bubble node to retrieve the updated object using the same ID.

This retrieval confirms that the Name field was successfully updated and gives you access to the final version of the data. From here, you can:

  • Log the result for debugging or analytics.
  • Send the data to another app or database.
  • Trigger additional workflows based on the updated object.

With this final step, you close the loop. A single POST request leads to a fully automated create-update-retrieve cycle in Bubble, all handled by n8n.

Why This Integration Matters for Your Growth

At first glance, this workflow might look small. Yet, it represents a powerful shift in how you build and operate your Bubble app. By automating object sync with n8n, you unlock several key benefits:

  • Automation – Bubble and n8n work together to handle object creation, updates, and retrieval without manual intervention. Your app becomes more responsive and more reliable.
  • Efficiency – Chaining actions in a single workflow reduces repetitive tasks and minimizes human error. You save time and mental energy that can be invested in strategy and innovation.
  • Scalability – The same pattern can be adapted to different Bubble data types, more properties, and more complex logic as your app grows. You are building a foundation that can scale with your business.

Every automated workflow like this frees up a little more space for creative work, better user experiences, and faster iteration.

Using the Template: A Practical Starting Point

This n8n workflow template is designed to be easy to adopt, even if you are just beginning your automation journey. Here is how to start using it in your own environment:

  1. Import the JSON workflow into your n8n instance. This gives you the complete sequence of nodes that handle the webhook, object creation, update, and retrieval.
  2. Configure your Bubble API credentials in n8n so that the Bubble nodes can connect to your Bubble application securely. Make sure your API keys and app URL are correct.
  3. Deploy the webhook and send a test POST request to /bubble-webhook. You can use tools like Postman, curl, or another app to trigger the workflow.
  4. Monitor the execution inside n8n to verify each step. Confirm that the object is created in Bubble, the Name property is updated from "Bubble" to "Bubble node", and the final retrieval returns the updated object.

Once everything runs smoothly, you have a working automation that you can trust. From there, you can start iterating and improving.

Taking It Further: Experiment, Adapt, and Grow

This template is not the finish line, it is the starting point. Here are a few ideas for how you can expand on it:

  • Add more fields to the Doc object and map them from your webhook payload.
  • Apply conditional logic in n8n to decide when to create, update, or skip an object.
  • Connect additional services so that Bubble objects sync with CRMs, email tools, or analytics platforms.
  • Reuse the same pattern for other Bubble data types, turning this into a standard way you sync data across your stack.

Each small improvement compounds over time. As you experiment with templates like this, you build confidence, speed, and a more automated business or product.

Start Your Next Automation Step Today

If you are ready to move beyond manual Bubble operations, this workflow template is a simple, practical step forward. It shows how n8n and Bubble can work together to keep your objects in sync, reduce repetitive tasks, and give you more time to focus on what matters most.

Import the template, connect your Bubble app, and watch your first fully automated object sync come to life. Then, keep going. Use this as a foundation to design more workflows, automate more processes, and build a more powerful, scalable system around your Bubble application.

Maritime Vessel Tracking with AIS API & Automated Alerts

Maritime Vessel Tracking with AIS API & Automated Alerts

From Constant Monitoring To Calm Control

If you are responsible for vessels, cargo, or maritime operations, you already know how much energy goes into simply keeping an eye on what is happening at sea. Refreshing dashboards, checking speeds, watching for anomalies, and making sure the right people hear about issues in time can quietly consume hours of focus every week.

Now imagine a different reality. Instead of chasing data, you receive clear, timely alerts. Instead of manually checking vessel status, you rely on a workflow that does it for you every minute, without fail. Your time is freed up for higher level decisions, planning, and growth.

This is where an automated n8n workflow built around AIS vessel tracking, AWS SQS, and Slack alerts becomes more than just a technical setup. It becomes a foundation for a calmer, more focused way of working.

Shifting Your Mindset: Let Automation Watch The Water

Modern AIS APIs give you real-time access to vessel positions, speeds, and courses. The data is already there, updating constantly. The real opportunity is in how you choose to use it.

Instead of treating vessel tracking as a task you must constantly perform, you can treat it as a process that runs on its own. Your role then becomes designing the rules, deciding what matters, and letting automation handle the repetitive work.

The n8n workflow template described here is a practical example of this mindset. It checks vessel data every minute, evaluates conditions like abnormal speed, and routes information to the right place automatically. Once it is running, you gain a reliable digital assistant that never gets tired, never forgets, and never misses a minute.

What This n8n AIS Workflow Helps You Achieve

This workflow is designed to:

  • Continuously poll AIS vessel data in real time
  • Detect abnormal speed (over 25 knots) automatically
  • Send alerts to Slack when something looks off
  • Route data into AWS SQS queues for scalable processing and logging

It is a simple, focused setup, yet it opens the door to much more. Once you have this running, you can extend it with additional checks, analytics, or integrations. It becomes a stepping stone to a more automated maritime operations stack.

The Journey Of The Workflow: From Data To Decision

Let us walk through the path your data takes in this n8n automation. Understanding this flow will help you adapt, customize, and build on top of it with confidence.

1. A Cron Trigger That Never Sleeps

The workflow begins with a Cron node configured to run every minute. This is your heartbeat. It ensures your system is always up to date with the latest vessel positions and conditions.

Instead of relying on manual refreshes or occasional checks, you gain a predictable, continuous rhythm of data collection. Every minute, the workflow wakes up and moves to the next step.

2. Fetching AIS Data With HTTP Request

Next, an HTTP Request node calls the AIS API endpoint:

https://api.aisstream.io/v0/vessels/367123450

Your API key is passed securely in the request headers for authentication, and the response is returned in JSON format. This response contains detailed AIS information about the vessel, including position and movement data.

At this stage, you have raw power: rich AIS data arriving automatically every minute, ready to be shaped into something meaningful.

3. Mapping Vessel Fields For Clarity

Raw JSON is useful, but not always easy to act on. To turn this data into something clean and focused, the workflow uses a Set node to map and extract only the fields that matter most.

Typical fields you will map include:

  • MMSI
  • Vessel name
  • Latitude
  • Longitude
  • Speed
  • Course
  • Timestamp

This step simplifies downstream logic. Instead of working with a complex response, your workflow now handles a clean, structured set of vessel details that are easy to evaluate, store, and send to other systems.

4. Evaluating Vessel Speed With An If Node

With the key fields mapped, the next step is to check for unusual behavior. An If node evaluates the vessel’s speed. The condition is simple and powerful:

  • If the speed is greater than 25 knots, the vessel is flagged as having abnormal speed.
  • If the speed is 25 knots or below, it is treated as normal movement.

This is where your expertise can grow the workflow. You can keep this threshold as is, or later adjust it based on your own risk tolerance, vessel type, or route conditions. The template gives you a solid starting rule that you can evolve over time.

5. Intelligent Routing: AWS SQS & Slack Alerts

Once the speed check is complete, the workflow branches into two clear paths, each designed to support a different operational need.

Abnormal Speed: Alert & Escalate

If the If node condition is true (speed over 25 knots), the workflow treats this as a potential issue that requires attention:

  • The vessel data is sent to a dedicated AWS SQS queue for abnormal speed events. This lets you process, analyze, or archive these events in a scalable, reliable way.
  • At the same time, the workflow posts a detailed alert message to a Slack channel. Your operations team sees the alert where they already work and communicate, which speeds up awareness and response.

Instead of hoping someone notices an issue in time, you build a system that proactively tells your team when something does not look right.

Normal Speed: Log & Learn

If the condition is false (speed at or below 25 knots), the workflow still treats the data as valuable:

  • The vessel information is sent to a separate AWS SQS queue for regular position logging or any other downstream processing you choose.

Over time, this steady stream of normal data becomes a rich resource for historical analysis, performance tracking, or feeding into other automated workflows and dashboards.

Why This Approach Elevates Your Operations

This n8n AIS automation template is more than just a technical example. It gives you a repeatable pattern for turning raw data into actionable signals.

  • Real-time monitoring – Continuous polling every minute keeps your vessel information fresh and reliable.
  • Automated alerts – High speed or abnormal conditions are detected and surfaced automatically, so you can respond faster.
  • Scalable messaging with AWS SQS – Queues handle both normal and abnormal events, making it easier to scale processing, integrate other systems, or store data long term.
  • Seamless Slack integration – Alerts arrive where your team already collaborates, which keeps everyone aligned without adding extra tools to check.

Most importantly, you gain back time and mental bandwidth. The workflow quietly looks after the repetitive work, while you focus on strategy, safety, and growth.

What You Need To Build Your Own Setup

You can start using this automation with a few core components in place. Each one is straightforward to configure, and together they create a powerful tracking and alerting system.

  • AIS API access with a valid API key from your provider.
  • AWS account with SQS queues configured for:
    • Abnormal speed events
    • Normal position logging or general vessel data
  • Slack workspace with:
    • A dedicated channel for alerts
    • Slack OAuth2 credentials so n8n can post messages on your behalf
  • n8n as your automation platform, where you will:
    • Set up the Cron, HTTP Request, Set, If, AWS SQS, and Slack nodes
    • Configure the AIS API URL and headers
    • Define your speed thresholds and alert text

Once these pieces are in place, the template gives you a ready made workflow that you can import, adapt, and extend.

Using The Template As A Launchpad For Further Automation

Think of this AIS tracking workflow as a starting point, not a finished product. It solves a clear problem: monitoring vessel speed and routing alerts automatically. From here, you can grow it in many directions.

Ideas for next steps include:

  • Adding more conditions, such as geofencing or route deviations
  • Forwarding processed data into dashboards or BI tools
  • Triggering follow up workflows for incident management or reporting
  • Integrating with other maritime systems or internal APIs

Each improvement you make compounds the value of your automation. Over time, you move from single workflows to a connected ecosystem that supports your entire maritime operation.

Start Your Automation Journey Today

Automating maritime vessel tracking with AIS APIs, AWS SQS, and Slack alerts is not just about technology. It is about reclaiming time, reducing stress, and building a more resilient way of working.

Whether you focus on logistics, fleet management, or maritime safety, this n8n workflow template gives you a practical, ready to use path toward smarter monitoring and faster response. From here, every new automation you add becomes easier.

If you are ready to shift from constant checking to confident oversight, start with this AIS API automation workflow and make it your own.

Automate Twitter Sentiment Analysis with n8n Workflow

Automate Twitter Sentiment Analysis with n8n Workflow

Why Bother With Twitter Sentiment In The First Place?

If your brand, product, or project lives on the internet, people are probably talking about it on Twitter. Some of those conversations are glowing, some are not so flattering, and some are pure gold for insights. The tricky part is keeping up without spending hours scrolling your feed.

That is where a Twitter Sentiment ETL workflow in n8n comes in. It quietly runs in the background, pulls in tweets, analyzes how people feel about them, saves everything neatly in your databases, and pings you when something important pops up. No manual checking, no copy-pasting, no “I’ll do it later”.

In this guide, we will walk through a ready-made n8n workflow template that automates Twitter sentiment analysis using MongoDB, PostgreSQL, Google Cloud Natural Language, Slack, and email. We will look at what it does, when to use it, and how each step works so you can confidently tweak it for your own needs.

What This n8n Twitter Sentiment Workflow Actually Does

Let us start with the big picture. Once you plug in your credentials and turn it on, this workflow will:

  • Run automatically every morning at a scheduled time.
  • Search Twitter for recent tweets containing the hashtag #OnThisDay.
  • Archive raw tweets in MongoDB for historical reference.
  • Analyze tweet sentiment using Google Cloud Natural Language API.
  • Prepare clean, structured data ready for reporting and dashboards.
  • Store processed sentiment data in PostgreSQL for querying and analysis.
  • Check if the sentiment passes a threshold so you only get alerted when it matters.
  • Send alerts to Slack and email for tweets with notable sentiment.
  • Quietly exit if nothing meets the criteria, so you are not spammed with noise.

In short, it is a neat little ETL pipeline: Extract tweets, Transform them with sentiment analysis, and Load them into databases, with smart notifications on top.

When Should You Use This Workflow?

This template is handy anytime you care about how people feel about something on Twitter and you do not want to monitor it manually. Some great use cases include:

  • Brand reputation monitoring – Keep an eye on how people talk about your company or product.
  • Event sentiment tracking – Track reactions to conferences, campaigns, or special days using a consistent hashtag.
  • Market research – Understand public opinion around topics, competitors, or trends.
  • Real-time alerts for PR teams – Get notified quickly when sentiment spikes up or down so you can respond.

Even though the template uses the #OnThisDay hashtag by default, you can easily adapt it to your own brand or campaign hashtags.

Why Use n8n For Twitter Sentiment Analysis?

You could cobble this together with separate scripts, cron jobs, and custom code, but n8n gives you a few big advantages:

  • Fully automated and scheduled – Once set up, it runs by itself at the time you choose.
  • Visual workflow builder – You can see every step, change nodes, and debug without digging through code.
  • Multiple storage options – Use MongoDB for raw archives and PostgreSQL for structured analytics.
  • Real-time sentiment insights – Google Cloud Natural Language gives you precise sentiment scores and magnitudes.
  • Multi-channel alerts – Notify your team in Slack and via email so no one misses important tweets.
  • Easy to extend – Want to add dashboards, other APIs, or extra filters? Just drop in more nodes.

Step-by-Step: How The Workflow Runs

Let us walk through each node in the workflow so you know exactly what is happening under the hood.

1. Schedule Trigger – Start The Day Automatically

The workflow kicks off with a Schedule Trigger node. It is configured to run every day at 6 AM. That means:

  • No manual start required.
  • Fresh sentiment data every morning.
  • A predictable routine you can plan reporting around.

You can easily adjust the time or frequency in the node settings if you prefer a different schedule.

2. Tweet Search Node – Pull In Relevant Tweets

Next up is the Tweet Search node. Using your Twitter OAuth credentials, it searches for tweets that match a specific query. In this template, it looks for tweets containing the hashtag #OnThisDay.

By default, the node:

  • Fetches up to 3 recent tweets.
  • Filters based on the hashtag #OnThisDay.

That small limit keeps the workflow lightweight and fast, which is perfect for a daily sentiment sample. If you want more coverage, you can simply bump up the limit in the node configuration.

3. Save Mongo – Archive Raw Tweets In MongoDB

Once the tweets are fetched, the workflow passes them into a MongoDB node, often labeled something like Save Mongo.

Here is what this step does:

  • Saves the raw tweet data into a MongoDB collection.
  • Creates a historical archive you can go back to later.
  • Makes debugging easier if you ever want to see the unprocessed tweets.

Think of MongoDB as your long-term, flexible “just in case” storage for the original tweet payloads.

4. Sentiment Analysis – Use Google Cloud Natural Language

Now comes the fun part. A Google Cloud Natural Language node runs sentiment analysis on each tweet text stored in MongoDB.

This node returns two key metrics for each tweet:

  • score – A value between -1.0 and 1.0 that shows how negative or positive the text is.
  • magnitude – A value that reflects how strong or intense the sentiment is, regardless of being positive or negative.

So, for example, a tweet with a high positive score and high magnitude is very enthusiastic, while a negative score with high magnitude might signal a serious complaint or frustration.

5. Prepare Fields – Clean Up Data For Storage

After the sentiment analysis is done, the workflow uses a Set node (often named something like Prepare Fields) to organize the data.

This step:

  • Extracts the sentiment score and magnitude.
  • Grabs the original tweet text.
  • Formats everything into a clean structure that is ready to be stored in a relational database.

It is basically the “tidy up” step, making sure the data is consistent and easy to work with later.

6. Save Postgres – Store Processed Data In PostgreSQL

Next, the workflow inserts the prepared data into a PostgreSQL table, typically named tweets.

This table stores at least:

  • The tweet text.
  • The sentiment score.
  • The sentiment magnitude.

Why PostgreSQL? Because it is great for:

  • Running advanced SQL queries.
  • Building reports and dashboards.
  • Joining sentiment data with other business data you might already have in Postgres.

7. Sentiment Check – Decide If An Alert Is Needed

With everything stored, the workflow uses an If node to decide what happens next. This is your simple but powerful filter.

The node checks whether the sentiment score is greater than 0, which means:

  • Score > 0 – The tweet is considered positive or at least more positive than negative.
  • Score ≤ 0 – The tweet is neutral or negative.

You can adjust this threshold if you want to only alert on strongly positive tweets or even flip the logic to focus on negative sentiment instead.

8. Notify Slack & Email – Alert The Right People

If the sentiment passes the threshold (score > 0 in this template), the workflow branches into two notification paths:

  • Slack Notification
    • A Slack node posts a message to a channel named tweets.
    • The message includes the tweet text and its sentiment score.
    • Your team can see positive mentions right in Slack without checking any dashboards.
  • Email Notification
    • An Email node sends an alert to alerts@example.com.
    • The email contains the tweet details plus the sentiment metrics.
    • Perfect for people who prefer email over Slack or for archiving alerts.

9. No Operation – Quietly Finish When Nothing Matches

If the sentiment score does not meet the threshold, the workflow reaches a No Operation node. This node simply ends the run without doing anything else.

The benefit is simple: you are not flooded with alerts for every neutral or negative tweet. Only the tweets that match your criteria trigger Slack or email notifications.

Putting It All Together: A Simple, Powerful ETL Pipeline

So to recap, here is what this n8n Twitter Sentiment ETL workflow gives you out of the box:

  • Automated daily schedule so you never forget to check Twitter.
  • Integration with Twitter, MongoDB, PostgreSQL, Google Cloud NLP, Slack, and email.
  • Raw data archive in MongoDB for historical and debugging purposes.
  • Structured sentiment dataset in PostgreSQL for analysis, reporting, and dashboards.
  • Smart alerts only when sentiment crosses your defined threshold.
  • Flexibility to customize hashtags, thresholds, channels, and schedule as your needs evolve.

Ready To Try It Yourself?

If you have been thinking about automating your social media monitoring, this workflow template is a great place to start. You get a complete, working pipeline that you can adapt to your own hashtags, brands, or events without writing everything from scratch.

Want to see it in action? Load the template in n8n, plug in your credentials, and let it handle the daily sentiment checks for you.