Groundhogg Address Verification with n8n & Lob

Groundhogg Address Verification with n8n & Lob

If you send physical mail, you already know the pain of bad addresses: returned envelopes, wasted postage, annoyed customers, and confused ops teams. The good news is that you can automate a lot of that headache away.

In this guide, we’ll walk through an n8n workflow template that connects Groundhogg and Lob so every new or updated contact gets an automatic address check. The workflow verifies mailing addresses as soon as they land in your CRM, tags contacts based on deliverability, and can even ping your team in Slack when something looks off.

Think of it as a quiet little assistant that sits between Groundhogg and your mail campaigns, catching typos and invalid addresses before they cost you money.

What this n8n template actually does

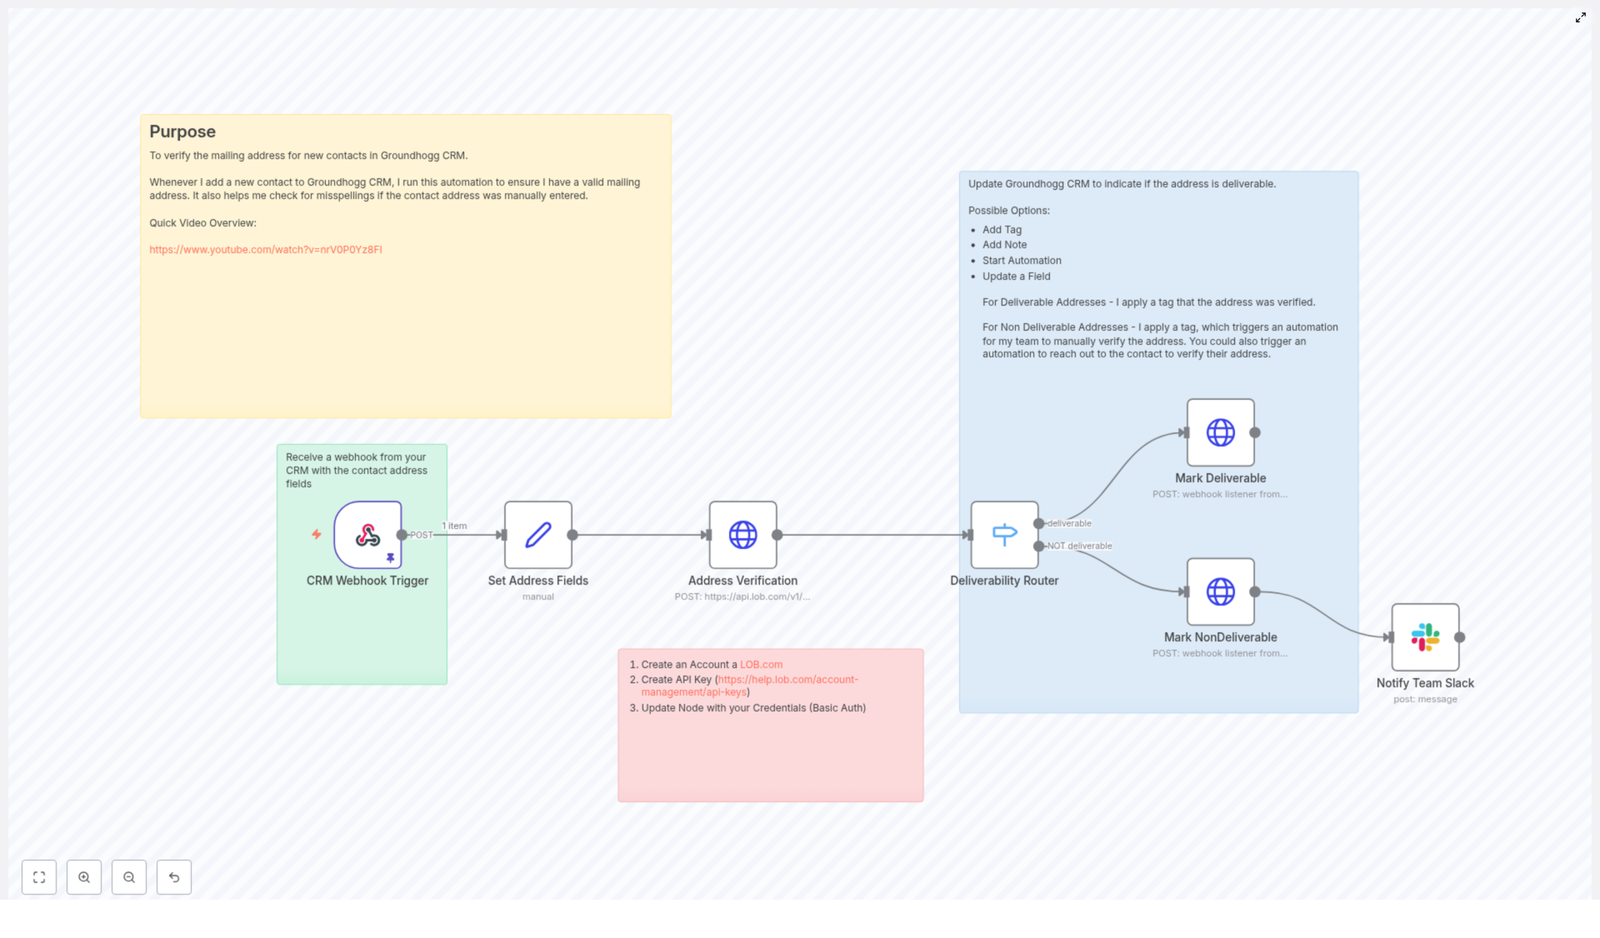
Let’s start with the big picture. This n8n workflow listens for new or updated contacts coming from Groundhogg, sends their address to Lob’s US address verification API, reads the result, and then updates your CRM and team accordingly.

Here’s the workflow in plain language:

  • Groundhogg sends a webhook to n8n whenever a contact is created or updated.
  • n8n maps the incoming address fields into a clean, standard format.
  • The workflow calls Lob’s /v1/us_verifications endpoint to verify the address.
  • Based on Lob’s deliverability result, n8n:
    • Adds a Mailing Address Deliverable tag in Groundhogg when everything looks good.
    • Adds a Mailing Address NOT Deliverable tag when there’s a problem.
    • Optionally sends a message to a Slack channel, like #ops, so someone can manually review the address.

The end result: your CRM stays clean, your mail gets where it’s supposed to go, and your team doesn’t have to manually double-check every address.

When should you use this automation?

This template is a great fit if you:

  • Run physical mail campaigns (letters, postcards, welcome kits, swag, etc.).
  • Rely on accurate addresses for billing, shipping, or compliance.
  • Are tired of returned mail and want to protect your campaign ROI.
  • Want a simple way to tag and segment contacts based on address quality.

If you’re already using Groundhogg as your CRM and n8n for automation, plugging Lob into the mix gives you a powerful, low-maintenance address verification layer.

Why verifying addresses in Groundhogg matters

It might be tempting to skip verification and “deal with problems later”, but that usually shows up as wasted time and money. Automated address verification helps you:

  • Improve deliverability for physical mail campaigns so your letters and packages actually arrive.
  • Cut down on returned mail and the postage you pay for pieces that never reach their destination.
  • Catch manual-entry errors early, such as typos, missing apartment numbers, or invalid ZIP codes.
  • Maintain high-quality customer data in Groundhogg, which also improves reporting and segmentation.

In other words, a small bit of automation upfront saves your team from chasing bad addresses later.

What you need before you start

Before you plug in this template, make sure you have the basics in place:

  • An n8n instance with web access (self-hosted or n8n.cloud).
  • A Groundhogg CRM account with the ability to send webhooks from funnels or automations.
  • A Lob account and API key so you can use the US address verification endpoint.
  • A Slack webhook or Slack app if you want notifications in a channel (optional but handy for ops teams).

How the workflow is structured in n8n

Let’s break down the main nodes so you know exactly what each part is responsible for and where you might want to customize things.

1. CRM Webhook Trigger

This is where the workflow starts. The Webhook Trigger node in n8n listens for POST requests from Groundhogg.

In Groundhogg, you configure your funnel or automation to send a webhook to the n8n URL and include the contact’s address details. Typical fields you’ll want in the payload:

  • id (the Groundhogg contact ID)
  • address
  • address2
  • city
  • state
  • zip_code
  • email or phone (optional, but often useful for context)

A sample webhook payload from Groundhogg might look like this:

{  "id": "5551212",  "email": "mr.president@gmail.com",  "phone": "877-555-1212",  "address": "1600 Pennsylvania Avenue NW",  "address2": "",  "city": "Washington",  "state": "DC",  "zip_code": "20500"
}

2. Set Address Fields

Once n8n receives the webhook, the next step is to standardize and map the incoming fields. The Set node is used to make sure the data going into Lob’s API is in the format it expects.

For example, you might map the payload into a simple object like:

{  "address": "1600 Pennsylvania Avenue NW",  "address2": "",  "city": "Washington",  "state": "DC",  "zip_code": "20500"
}

This keeps things consistent and makes it easier to debug if something doesn’t look right later.

3. Address Verification (Lob)

Now comes the actual verification step. The workflow uses an HTTP Request node to call Lob’s US verification endpoint:

https://api.lob.com/v1/us_verifications

It sends the mapped address fields and Lob responds with:

  • Standardized address components like primary_line, city, state, and zip_code.
  • A deliverability value that tells you whether the address is valid and deliverable.

Typical deliverability values include:

  • deliverable
  • not deliverable
  • unknown

Here’s an example cURL request that mirrors what n8n is doing behind the scenes, which you can use to test your Lob setup:

curl -u YOUR_LOB_API_KEY: \  -X POST https://api.lob.com/v1/us_verifications \  -d primary_line='1600 Pennsylvania Avenue NW' \  -d city='Washington' \  -d state='DC' \  -d zip_code='20500'

Setting up Lob in n8n

To get Lob working with this workflow, you’ll need to configure authentication properly.

  1. Create an account at Lob.com.
  2. Generate an API key (see Lob’s docs: API keys guide).
  3. In n8n, edit the Address Verification HTTP Request node:
    • Use Basic Auth as the authentication method.
    • Set your Lob API key as the username.
    • Leave the password field blank.

Once that’s done, your n8n workflow can securely talk to Lob and verify addresses on demand.

Routing based on deliverability

After Lob responds, the workflow needs to decide what to do next. This is where the Deliverability Router (a Switch node) comes in.

4. Deliverability Router

The Switch node checks $json.deliverability from the Lob response and sends the workflow down different paths based on that value.

  • If deliverability is deliverable, the contact follows the “success” path.
  • If it is not deliverable or another unexpected value, the workflow takes an alternate route.

This branching is what lets you treat good addresses, bad addresses, and “not sure” addresses differently.

5. Mark Deliverable / Mark NonDeliverable

On each branch, HTTP Request nodes talk back to Groundhogg to update the contact. These nodes can hit a Groundhogg webhook listener or the Groundhogg API directly.

Common actions include:

  • For valid addresses:
    • Add the tag Mailing Address Deliverable.
    • Optionally write a note or update a custom field.
    • Continue onboarding or campaign automations as usual.
  • For invalid addresses:
    • Add the tag Mailing Address NOT Deliverable.
    • Trigger a manual verification automation in Groundhogg.
    • Optionally pause certain mail-related funnels until the address is fixed.

The key is that Groundhogg always stays in sync with what Lob has verified.

6. Notify Team in Slack (optional but useful)

If an address comes back as non-deliverable, you probably want a human to take a quick look. The workflow can send a Slack notification to a channel like #ops whenever this happens.

The Slack node uses either a webhook URL or a Slack app to post a message that might include:

  • The contact’s ID or email.
  • The address Lob flagged as problematic.
  • A short note like “Address verification failed, please review.”

This makes it easy for your team to jump in and fix issues before they affect your campaigns.

How to handle different deliverability results

Once you’ve got the basic workflow running, you can decide exactly how your system should behave for each outcome.

  • Deliverable:
    • Add a positive verification tag (for example, Mailing Address Deliverable).
  • Not deliverable:
    • Add a non-deliverable tag.
    • Notify your ops team in Slack for manual review.
    • Optionally send an automated email or SMS asking the contact to confirm or correct their address.
  • Unknown or partial:
    • Route these to a “needs human review” path.
    • Consider a follow-up workflow that asks the contact for more details (like apartment number or suite).

Security and privacy best practices

Since you’re working with personal data, it’s worth taking a moment to lock things down properly.

  • Protect your Lob API key by using n8n’s credential storage or environment variables instead of hard-coding keys in HTTP nodes.
  • Keep webhook URLs private and avoid exposing them publicly. If possible, validate incoming requests.
  • Use HTTPS end to end and only store the personal information you actually need to run your business.
  • Stay compliant with applicable data protection laws by handling PII responsibly.

Testing and debugging your workflow

Before you roll this out to your entire list, it’s smart to run a few test contacts through the pipeline.

  1. Use pinData or a manual trigger in n8n to simulate sample payloads from Groundhogg.
  2. Inspect the output of the Address Verification node to see exactly what Lob is returning in the JSON.
  3. If your Switch node is not behaving as expected, check the deliverability value and update your conditions to match Lob’s exact string.
  4. Log failures and add retry logic in case of temporary HTTP errors or timeouts.

Troubleshooting common issues

If something’s not working, here are a few quick checks that usually help:

  • 401 from Lob:
    • Double-check your API key.
    • Confirm Basic Auth is configured correctly, with the key as the username and an empty password.
  • Unexpected deliverability values:
    • Log or print the full Lob response JSON.
    • Update your Switch node rules to match the actual values Lob is sending.
  • Groundhogg not updating:
    • Verify the HTTP Request node is pointing at the correct Groundhogg listener or API URL.
    • Confirm the payload includes the correct id for the contact.

Ideas to extend this workflow

Once you’ve got the basic template running smoothly, you can easily build on it. Some popular enhancements include:

  • Write back standardized addresses from Lob into Groundhogg so your records are always normalized.
  • Add a retry loop for addresses that come back as unknown, maybe after you collect more details from the contact.
  • Trigger a two-way verification flow via email or SMS asking the contact to confirm or correct their address.
  • Create a dashboard or report that tracks verification rates, error counts, and trends over time for ongoing data quality monitoring.

Costs and rate limits to keep in mind

Lob charges per verification request, so it’s worth keeping an eye on your usage. Check the pricing for your Lob plan and consider strategies like:

  • Verifying addresses only when they are first created or changed.
  • Batching or sampling if you handle very high volumes.

That way, you keep your data clean without any surprise bills.

Wrapping up

By connecting Groundhogg and Lob through n8n, you get a simple but powerful automation that:

  • Reduces manual address checking.
  • Improves mail deliverability and campaign performance.
  • Keeps your CRM data accurate and actionable.

The template includes everything you need to get started quickly: a webhook trigger, field

Groundhogg Address Verification with n8n & Lob

Groundhogg Address Verification with n8n & Lob

Sending physical mail to your contacts, but not totally sure the address is right? That can get expensive pretty fast. With this n8n workflow template, you can automatically verify mailing addresses for new contacts in Groundhogg CRM using Lob’s address verification API. It quietly checks every new address in the background, catches typos, and helps you avoid printing and mailing to places that don’t exist.

In this guide, we will walk through what the workflow does, when it makes sense to use it, and how to set it up step by step in n8n, Groundhogg, and Lob. Think of it as a friendly co-pilot for your direct mail and address data.

What this n8n template actually does

Here is the big picture. Whenever a new contact lands in Groundhogg or an address changes, this automation kicks in:

  1. Groundhogg sends a webhook with the contact’s address to n8n.
  2. n8n cleans up and standardizes the address fields.
  3. Lob’s US address verification API checks if the address is deliverable.
  4. Based on Lob’s response, n8n updates the contact in Groundhogg as deliverable or not deliverable.
  5. If the address is not deliverable, your ops team gets a notification, for example in Slack, so they can review it manually.

The result is a Groundhogg CRM that stays tidy, with clear tags or fields telling you which contacts you can safely mail and which ones need attention.

Why you should verify addresses in Groundhogg

Let’s be honest, nobody wants to pay for postage that ends up in the trash or bounced back to your office. Invalid or badly formatted addresses can cause:

  • Returned mail that wastes printing, envelopes, and postage
  • Failed deliveries that hurt your campaign performance
  • Messy data that makes segmentation and personalization harder

By verifying mailing addresses as soon as a contact is added or updated in Groundhogg, you keep your database clean and ready for action. Some practical benefits:

  • Less returned mail and fewer wasted campaigns
  • More reliable deliverability for direct mail and fulfillment
  • Better targeting, since you can filter by verified addresses
  • Built-in workflows for manual review when something looks off

If you send physical mail, postcards, welcome kits, or any kind of printed material, this kind of automation pays for itself quickly.

When this workflow is a great fit

You will get the most value from this n8n template if any of these sound familiar:

  • You send regular direct mail or swag to Groundhogg contacts.
  • Your team spends time cleaning up addresses or chasing down customers for corrections.
  • You want a clear “deliverable” flag or tag on contacts for segmentation.
  • You are already using n8n or want a low-code way to orchestrate automations across tools.

Even if you are not mailing yet, putting this in place early means your CRM grows with clean, verified address data from day one.

How the n8n workflow is structured

Let’s walk through the key nodes in the workflow so you know what each piece does. You can customize the details, but the core pattern looks like this:

1) CRM Webhook Trigger (Groundhogg → n8n)

The workflow starts with a Webhook node in n8n. Groundhogg calls this webhook whenever a new contact is created or an address changes.

The webhook should send at least these fields:

  • address
  • address2
  • city
  • state
  • zip_code
  • id (the Groundhogg contact ID)

2) Set Address Fields (normalize the data)

Next, a Set node in n8n takes the incoming JSON from Groundhogg and maps it to the field names that Lob expects. This is where you standardize the structure so you can easily plug in other CRMs later if you want.

For example, you might map:

{  "primary_line": "1600 Pennsylvania Avenue NW",  "secondary_line": "",  "city": "Washington",  "state": "DC",  "zip_code": "20500"
}  

This mapping step keeps your workflow flexible. If you ever switch CRMs, you only need to update this node instead of rebuilding the entire integration.

3) Address Verification (HTTP Request to Lob)

After the address is normalized, an HTTP Request node sends a POST request to Lob’s US verifications endpoint:

https://api.lob.com/v1/us_verifications

The request body includes the address fields you just mapped. Lob then responds with a JSON object that contains a deliverability field. That field is your decision point. It tells you whether the address is:

  • deliverable
  • or not deliverable (or otherwise problematic)

You will use that value in the next node to decide what happens to the contact in Groundhogg.

4) Deliverability Router (Switch node)

A Switch node in n8n checks the value of $json.deliverability from Lob’s response. This is where the workflow branches:

  • If deliverability === "deliverable", the contact is marked as verified in Groundhogg.
  • Otherwise, the contact is flagged as not deliverable and sent down a manual review path.

This routing step keeps your team focused on the addresses that actually need attention instead of reviewing everything manually.

5) Mark Deliverable / Mark NonDeliverable (update Groundhogg and notify)

Each branch uses HTTP Request nodes to talk back to Groundhogg. You can:

  • Add or remove tags
  • Update custom fields like “Address Status”
  • Add notes to the contact record
  • Trigger Groundhogg funnels or automations

For non-deliverable addresses, you can go a step further and:

  • Send a Slack message to your ops or support channel
  • Create a task for someone to follow up with the contact
  • Kick off a manual verification workflow

This is where the workflow becomes really powerful. You are not just labeling contacts, you are actually guiding your team on what to do next.

Step-by-step setup guide

Let’s go through the actual setup so you can get this running with your own Groundhogg account and Lob API key.

Step 1 – Create your Lob account and API key

First, sign up at Lob.com. Once you are in your account, navigate to Account > API Keys and generate an API key.

In n8n, configure your HTTP Request node for Lob with one of these options:

  • Basic Auth – Use your Lob API key as the username and leave the password empty.
  • Authorization header – Pass the key as described in the Lob documentation.

Either way works, just make sure the credentials are stored securely using n8n’s credentials or environment variables.

Step 2 – Configure the Groundhogg webhook

Next, you want Groundhogg to notify n8n whenever a new contact is added or an address changes.

  1. In Groundhogg, create an automation or funnel that triggers on:
    • New contact created, and / or
    • Mailing address updated
  2. Add a webhook step that posts to your n8n webhook URL (the one from the Webhook Trigger node).

Make sure the webhook includes the contact’s address fields and ID. A typical payload might look like this:

{  "id": "5551212",  "email": "mr.president@example.com",  "address": "1600 Pennsylvania Avenue NW",  "address2": "",  "city": "Washington",  "state": "DC",  "zip_code": "20500",  "phone": "877-555-1212"
}  

Once this is working, every new or updated address will automatically flow into your n8n workflow.

Step 3 – Map fields in the Set node

Back in n8n, open your Set node that follows the webhook. This is where you map Groundhogg’s field names to the ones Lob expects.

For example, you might configure the Set node to output something like:

{  "primary_line": $json["address"],  "secondary_line": $json["address2"],  "city": $json["city"],  "state": $json["state"],  "zip_code": $json["zip_code"]
}  

You can also use this step to trim whitespace or clean up weird formatting before sending anything to Lob.

Step 4 – Call Lob’s US verification endpoint

Now configure your HTTP Request node to talk to Lob:

  • Method: POST
  • URL: https://api.lob.com/v1/us_verifications
  • Auth: Use the Lob API key you set up earlier
  • Body: The normalized address fields from the Set node

Lob will respond with JSON that includes a deliverability field. That field is what you will check in the Switch node.

Step 5 – Route the result and update Groundhogg

In the Switch node, set the expression to $json.deliverability and define your conditions. For example:

  • Case 1: deliverable – Add a tag like Mailing Address Deliverable, update a custom field, or kick off a follow-up funnel in Groundhogg.
  • Case 2: anything else – Add a tag like Mailing Address NOT Deliverable, start a manual verification automation, and notify your team in Slack.

Use HTTP Request nodes to POST back to Groundhogg or trigger Groundhogg funnel webhooks. This keeps all the final status and activity visible right inside your CRM.

Best practices for this address verification workflow

To keep the automation reliable and scalable, here are a few tips:

  • Respect Lob’s quotas – Add rate limiting or queueing if you expect large bursts of new contacts.
  • Store verification status – Save both the verification result and, if needed, the raw Lob response on the contact record for auditing and debugging.
  • Use tags for downstream automations – Tags like “Deliverable” or “NOT Deliverable” can trigger additional Groundhogg automations for outreach or cleanup.
  • Sanitize address fields – Trim whitespace, remove obvious junk characters, and normalize casing before sending to Lob to improve match quality.
  • Centralize error logging – Log errors or unexpected responses to Slack, email, or an error queue so you do not silently lose verifications.

Troubleshooting and testing

Common issues to watch for

If the workflow is not behaving as expected, here are a few things to check:

  • Confirm the address fields in the Set node map correctly to Lob’s expected field names.
  • Verify you are using the right Lob API key and that Basic Auth or headers are configured properly.
  • If the response from Lob does not contain deliverability, log the full JSON response to see what is going on.

How to safely test the flow

n8n’s pinData feature is your friend here. You can pin a sample webhook payload to the Webhook node and run tests without having to repeatedly trigger Groundhogg.

Try testing with:

  • A clearly valid address, to confirm the “deliverable” branch works.
  • An obviously bad or incomplete address, to make sure the “not deliverable” branch triggers correctly and sends notifications.

Once both branches behave as expected, you can connect it to your live Groundhogg automation with confidence.

Security and compliance tips

Since you are working with API keys and personal address data, it is worth being a bit careful:

  • Never hard-code API keys into shared workflows or public repositories.
  • Use n8n’s credentials store or environment variables to keep secrets safe.
  • If you store address and verification data, make sure you comply with privacy regulations and your organization’s data retention policies.

Wrapping it up

By plugging Lob’s address verification into your Groundhogg CRM via n8n, you are essentially adding a smart filter in front of all your mailing efforts. You catch typos, avoid sending to undeliverable addresses, and keep your database clean without a lot of manual work.

The nice part is that this pattern is flexible. You can:

  • Swap Lob for another verification provider if your needs change.
  • Extend the workflow to handle international addresses.
  • Add more logic for special cases or high-value contacts.

Next steps

Ready to try it?

  • Download or import the n8n workflow template.
  • Create your Lob API key and plug it into the HTTP Request node.
  • Connect your Groundhogg webhook to the n8n Webhook Trigger.

From there, you can tweak tags, fields, and notifications to match your existing processes. If you want help adapting this for international verification or more complex automations, reach out to your team, your automation partner, or keep an eye out for more n8n workflow templates and tutorials.

Related resources: Lob API docs, n8n documentation, Groundhogg webhook guide.

AI Image Processing & Telegram Workflow with n8n

AI Image Processing & Telegram Workflow with n8n

This guide walks you through an n8n workflow template that turns Telegram text prompts into AI-generated images and sends them straight back to the user. You will learn how each node works, how to configure credentials, and how to handle prompts, errors, and costs in a practical way.

What you will learn

By the end of this tutorial-style article, you will be able to:

  • Explain how an AI image generation workflow in n8n connects Telegram and OpenAI
  • Set up and configure each node in the template step by step
  • Use prompt engineering basics to improve image quality
  • Add security, moderation, and observability to your automation
  • Troubleshoot common issues with chat IDs, binaries, and rate limits

Why build an AI image workflow with Telegram and n8n?

Combining Telegram with AI image generation gives users a fast, conversational way to request and receive visuals. Instead of visiting a web app or dashboard, they simply send a message to a bot, wait a few seconds, and receive a generated image directly in chat.

Typical use cases

  • Marketing and creative teams – Quickly mock up social posts, ads, or thumbnails.
  • Customer support – Share visual explanations or diagrams on demand.
  • Community and hobby bots – Let users create custom artwork for fun.
  • Product and UX teams – Rapidly prototype visuals and concepts.

Key benefits of this n8n workflow template

  • Instant image delivery through Telegram using a simple chat interface.
  • No-code orchestration in n8n, so you can iterate quickly without heavy coding.
  • Centralized error handling using merge and aggregation nodes for clean data flow.
  • Flexible prompt handling to route, clean, and enrich user input before sending it to OpenAI.

Concept overview: How the workflow fits together

Before configuring anything, it helps to understand the overall flow. At a high level, the template:

  1. Listens for messages sent to your Telegram bot.
  2. Uses the message text as a prompt for an AI image generator (OpenAI).
  3. Merges the generated image with the original message metadata.
  4. Aggregates all required data and binaries into a single payload.
  5. Sends the image back to the user in Telegram via sendPhoto.
  6. (Optional) Notifies another channel like Slack for logging or analytics.

The main n8n nodes involved

In this template, you will work with the following core nodes:

  • Telegram Trigger – Starts the workflow when a user sends a message.
  • OpenAI Image Generation node – Creates an image from the user prompt.
  • Merge node – Joins message metadata and AI output.
  • Aggregate node – Assembles JSON and binary data for sending.
  • Telegram Sender node – Sends the final image back via sendPhoto.
  • Status / Notification node (optional) – Posts status updates to Slack or another channel.

Step-by-step setup in n8n

In this section you will configure the workflow from credentials to final delivery. Follow the steps in order, and test as you go.

Step 1 – Configure your credentials

First, connect n8n to Telegram and OpenAI.

  • Telegram Bot API Key
    • Open Telegram and start a chat with BotFather.
    • Create a new bot and copy the API token that BotFather gives you.
    • In n8n, go to Credentials and create a new Telegram credential.
    • Paste the bot token and save.
  • OpenAI API Key
    • Generate an API key in your OpenAI account.
    • In n8n, create an OpenAI credential and paste the key.
    • Keep this key secret and plan to rotate it periodically for security.

Step 2 – Set up the Telegram Message Trigger

The Telegram Trigger node listens for updates from your bot and starts the workflow whenever a message arrives.

  • Choose the Telegram Trigger node in your workflow.
  • Attach your Telegram credentials.
  • Configure it to listen for message updates.
  • If needed, filter by:
    • Commands like /generate to only respond to specific prompts.
    • User IDs to limit access to certain users or groups.

As an example, the JSON from Telegram often includes a path like message.text for the prompt and message.from.id for the user ID you will reply to.

Step 3 – Configure the AI Image Generator (OpenAI node)

Next, connect the incoming Telegram text to the AI image generator.

  • Add an OpenAI node after the Telegram Trigger.
  • Select the correct resource type, for example Image.
  • Map the prompt field to the incoming message text, for example:
    {{ $json.message.text }}
  • Optionally define a base prompt template or default style to keep outputs consistent.

You can think of this node as the “creative engine” of the workflow. The better and clearer the prompt, the better the resulting image will be.

Step 4 – Merge metadata and AI output

Once OpenAI returns an image, you usually want to keep track of who requested it, when it was requested, and any other context.

  • Add a Merge node after the OpenAI node.
  • Connect the original Telegram Trigger output and the OpenAI node output into this Merge node.
  • Configure the merge mode (for example, merge by index if both streams produce one item each).

This step lets you combine:

  • Chat metadata like chat.id, from.id, username, and timestamp.
  • The generated image data and any associated metadata from OpenAI.

Step 5 – Aggregate data and binaries

The Telegram Sender node expects a complete payload that includes both JSON fields and binary image data. The Aggregate node helps you assemble this.

  • Add an Aggregate node after the Merge node.
  • Configure it to include:
    • All necessary JSON fields (for example, the final chatId path).
    • The binary data property that holds the generated image.

This step is important to avoid issues where the image is generated correctly but not attached when sending via Telegram.

Step 6 – Send the image back via Telegram

Now you can reply to the user with the generated image using the Telegram Sender node.

  • Add a Telegram node configured as a sender.
  • Set the operation to sendPhoto.
  • Map the chatId field to the originating user. For example, based on your merged data structure:
    {{ $json.data[1].message.from.id }}

    Adjust this expression to match the actual path in your workflow after the Merge and Aggregate nodes.

  • Attach the binary image data from the Aggregate node to the photo or equivalent binary field.

Once configured, test by sending a prompt to your Telegram bot. If everything is correct, you should receive the AI-generated image as a photo message.

Optional Step 7 – Add status notifications

For logging or analytics, you may want a separate notification whenever an image is processed.

  • Add a node such as Slack, Webhook, or another messaging node.
  • Configure it to run after the Telegram Sender node.
  • Send a simple summary, for example:
    • User ID, prompt, timestamp
    • Generation status (success or error)

Prompt engineering tips for better AI images

The quality of your images depends heavily on the quality of your prompts. Here are some practical guidelines you can share with your users.

  • Be specific
    Instead of a vague prompt like “a city”, use something like: “a vibrant flat-style illustration of a city skyline at sunset, warm colors, minimalistic design”.
  • Add style references
    Mention artists, art styles, or photography types to guide the look and feel.
  • Reduce ambiguity
    Avoid pronouns like “it” or “they”. Clearly describe the subject, background, and main focus.
  • Use progressive refinement
    Start with a base prompt, then allow follow-up prompts to refine details such as lighting, angle, or mood.

Security, moderation, and access control

When you allow users to send free-form prompts, you need to think about safety, abuse prevention, and cost control.

Content safety and moderation

  • Sanitize user input to strip out unsafe words or patterns.
  • Integrate a content moderation API, or use OpenAI moderation endpoints, to block disallowed prompts before image generation.
  • Log or flag suspicious prompts for manual review if needed.

API key and access security

  • Store API keys as environment variables, not directly in workflow code.
  • Restrict credential access in n8n so only admin users can view or modify them.
  • Rotate keys periodically and revoke them immediately if you suspect leakage.

Usage limits and abuse prevention

  • Monitor usage per user to detect unusual spikes or abuse.
  • Set rate limits or quotas, such as a maximum number of images per day per user.
  • Consider requiring authentication or whitelisting for production bots.

Observability and metrics for your workflow

Treat this workflow like a small production service. Track key metrics so you can detect problems early.

  • Requests per day and per user to understand load and adoption.
  • Average image generation latency to see how long users wait.
  • API error rates and retries to spot reliability issues.
  • Telegram delivery success and failures to ensure users actually receive images.

You can use the optional Status Notification node to post summary events to Slack or a monitoring system every time an image is processed and sent.

Cost management and pricing ideas

AI image generation is usually billed per request and sometimes per resolution. A few configuration choices can keep your costs under control.

  • Offer a limited number of free generations per user, then require a subscription or manual approval for heavy usage.
  • Use smaller default image sizes to reduce cost, and only allow high-resolution images on demand.
  • Queue or batch requests during peak periods to avoid cost spikes and API throttling.

Troubleshooting: common issues and fixes

If the workflow does not behave as expected, start with these frequent problem areas.

1. Missing or invalid credentials

If nodes fail to connect to Telegram or OpenAI:

  • Open the relevant credential in n8n and re-enter the API key or token.
  • Run a connection test in each node if available.
  • Make sure you are using the correct bot token and OpenAI key.

2. Chat ID mapping errors

If the bot fails to send photos back to the user, the chatId expression is often the culprit.

  • Inspect the output of the Merge or Aggregate node to see the exact JSON structure.
  • Update the chatId expression in the Telegram Sender node to match the correct path, for example:
    {{ $json.data[1].message.from.id }}
  • Test with a simple text message first to confirm the mapping.

3. Binary data not attached

If Telegram responds with errors about files or the image does not appear:

  • Confirm that the Aggregate node is including the binary property from the OpenAI node.
  • Check that the binary field name in the Telegram Sender node matches the actual binary key.
  • Remember that sendPhoto expects the image as a binary file, not just a URL or JSON field.

4. API rate limits and timeouts

Errors like HTTP 429 or timeouts usually mean the API is overloaded or throttling your requests.

  • Implement retries with exponential backoff in your workflow.
  • Add a queue or delay node to smooth out spikes in traffic.
  • Monitor error rates and adjust usage or quotas accordingly.

Scaling the workflow and next steps

Once the basic template is working, you can evolve it into a more robust service.

  • Deploy n8n in a production-ready environment such as managed cloud, Docker with autoscaling, or Kubernetes.
  • Add a database or storage layer for user preferences and history, so users can revisit previous generations.
  • Introduce multi-model support and let users choose between different image engines or styles.
  • Build an admin dashboard to review prompts, handle flagged content, and track usage metrics.

Example prompt template you can use

Here is a simple template you can apply inside your workflow or share with users:

Generate a high-resolution, photorealistic image of: "{{ user_prompt }}" - bright daylight, shallow depth of field, warm tones, 16:9 aspect ratio

AI Image Processing & Telegram Automation with n8n

AI Image Processing & Telegram Automation with n8n

This article presents a production-ready n8n workflow template that connects Telegram, OpenAI image generation, and downstream processing into a single, automated pipeline. The workflow listens for user messages in Telegram, transforms those messages into AI image prompts, generates images with OpenAI, aggregates the results, and sends the final image back to the originating chat. Throughout, it follows automation best practices for security, reliability, and cost management.

Use Case and Value Proposition

Integrating n8n, OpenAI, and Telegram creates a powerful channel for interactive, AI-driven visual experiences. Typical applications include:

  • On-demand marketing image generation for campaigns or social content
  • User-requested artwork and creative visual responses
  • Automated visual replies for support or FAQ scenarios
  • Scheduled or triggered content delivery to Telegram audiences

By orchestrating these components in n8n, automation professionals can centralize control, enforce governance, and scale usage without custom backend code.

Architecture Overview of the n8n Workflow

The template is structured around a clear event flow from Telegram to OpenAI and back. Key nodes and their responsibilities are:

  • Telegram Message Trigger – Captures incoming Telegram messages that initiate the workflow.
  • AI Image Generator (OpenAI) – Uses the message text as a prompt to generate an image.
  • Response Merger – Joins metadata from the trigger with the AI output for downstream use.
  • Data Aggregator – Aggregates item data and binary image content into a single payload.
  • Telegram Sender – Sends the generated image back to the original chat via sendPhoto.
  • Status Notification (optional) – Posts completion or error notifications to Slack or another monitoring channel.

This modular design allows you to extend the workflow with additional steps such as moderation, logging, or personalization without disrupting the core logic.

Preparing the Environment and Credentials

1. Create and Secure API Credentials

Before configuring nodes, ensure that all external integrations are provisioned and securely stored.

  • OpenAI
    Generate an API key in the OpenAI dashboard. Where possible, restrict its usage to image generation endpoints and apply organization-level policies for rate limits and cost control.
  • Telegram
    Use BotFather to create a Telegram bot and obtain the bot token. Set up webhook or polling access according to your n8n deployment model.
  • n8n Credentials
    Store all secrets in the n8n Credentials store. Apply role-based access controls so that only authorized users and workflows can access production credentials.

Centralized credential management is crucial to maintain security, simplify rotation, and support compliance requirements.

Configuring the Workflow in n8n

2. Telegram Message Trigger Configuration

The Telegram Trigger node is the entry point of the workflow. Configure it to capture the right events and sanitize user input.

  • Set the trigger to watch for updates of type message.
  • Optionally filter for specific commands, for example /generate, or enforce message format rules.
  • Extract the message text that will be used as the AI image prompt, for example via {{$json["message"]["text"]}} or the relevant path in your Telegram payload.
  • Sanitize the incoming text to mitigate prompt injection, abuse, or malicious content.

At this stage, you should also confirm that chat and user identifiers are available, as they are required later when sending the image back to the correct conversation.

3. AI Image Generator (OpenAI) Node

Next, configure the OpenAI node to transform user prompts into images.

  • Map the prompt parameter to the Telegram message text, for example:
    ={{ $json["message"]["text"] }} or the equivalent expression based on your trigger output.
  • Select the appropriate image generation model, size, and quality settings. Use conservative defaults initially to manage cost and latency.
  • Consider setting explicit limits on the number of images per request and applying standard defaults for style or aspect ratio.

Careful parameter selection here helps balance user experience with performance and cost.

4. Merging Metadata and Aggregating Data

Once the image is generated, the workflow must merge context from the trigger with the AI output and prepare a single payload for Telegram.

  • Merge Node
    Combine the original Telegram message metadata (such as chatId and userId) with the OpenAI node output that contains the binary image data.
  • Aggregate Node
    Aggregate items to build a unified structure that includes both JSON fields and binary data. Ensure that the node is configured to include binaries, not only JSON properties.

This aggregation step ensures that the Telegram Sender node receives both the correct target identifiers and the image payload in a single, consistent item.

5. Telegram Sender Node

Finally, configure the Telegram Sender node to return the generated image to the user.

  • Set the operation to sendPhoto.
  • Map the chatId dynamically from the trigger output. A common pattern is:
    ={{ $json["data"][1].message.from.id }}
    Adjust the index or path based on your actual merged structure.
  • Reference the binary property that contains the image data, for example data, ensuring that the property name matches what is produced by the OpenAI node and preserved by the Aggregator.

At this point, the core loop from Telegram prompt to AI image to Telegram response is complete.

Prompt Engineering and User Experience

Designing Effective Prompts

Prompt quality has a direct impact on image output. To improve consistency and usability:

  • Encourage concise, descriptive prompts for users.
  • Provide example prompts in bot responses or help commands.
  • Use template prompts that incorporate user input, such as:
    "Create a high-resolution, colorful illustration of a sunrise over a city skyline in a modern flat style", and allow users to vary specific attributes.

Standardizing prompt structure helps maintain brand consistency and reduces the need for manual tuning.

Error Handling, Reliability, and Cost Management

Error Handling and Retry Logic

Robust automation requires explicit handling of failure scenarios. In n8n, consider:

  • Using error handling nodes or separate error workflows to capture exceptions from the OpenAI or Telegram nodes.
  • Implementing exponential backoff for OpenAI rate limit or timeout errors.
  • Notifying users when generation fails and optionally providing a retry mechanism or fallback response.
  • Logging errors to Slack, a database, or another monitoring system for later analysis.

These patterns reduce user frustration and simplify operational debugging.

Cost and Rate Limit Considerations

AI image generation can be resource intensive. To maintain budget control:

  • Define per-user or per-chat quotas and enforce them in the workflow logic.
  • Default to lower-resolution images and offer high-resolution output as a premium or restricted option.
  • Cache responses for repeated prompts where business logic allows, in order to avoid unnecessary regeneration.
  • Batch requests where possible, especially for scheduled or bulk operations.

Combining these techniques with metrics and alerts helps keep usage within acceptable limits.

Security and Compliance

Security should be integrated into the workflow design from the start.

  • Sanitize prompts to prevent injection of harmful content and avoid including sensitive personal data in prompt text.
  • Use n8n credential storage rather than hardcoding secrets in nodes or environment variables.
  • Restrict access to production workflows and credentials using role-based permissions.
  • If you persist generated images, ensure that storage, retention, and access policies align with your privacy and compliance requirements.

These practices are particularly important for public-facing bots and regulated environments.

Testing, Validation, and Deployment

Before promoting the workflow to production, conduct structured testing:

  • Validate with a wide range of prompts to confirm mapping correctness and image quality.
  • Simulate network failures and OpenAI errors to verify retry and error handling behavior.
  • Enable detailed logging for early-stage deployments to identify edge cases and performance bottlenecks.
  • Run a pilot with a limited user group to measure engagement, latency, and cost per image.

This iterative approach ensures that the automation behaves predictably under real-world usage patterns.

Advanced Extensions and Enhancements

Personalization

For recurring users, personalization can significantly improve experience:

  • Persist user preferences such as style, aspect ratio, or color palette in a database or key-value store.
  • Automatically apply these preferences to subsequent prompts so users receive consistent results without repeating configuration details.

Interactive Telegram Flows

Enhance interactivity by leveraging Telegram features:

  • Use inline keyboards to let users choose styles, resolutions, or categories.
  • Offer a "re-roll" option that regenerates an image based on the same or slightly modified prompt without requiring a new text message.

These patterns create a more conversational and engaging AI experience.

Moderation Pipeline

For public or large-scale deployments, add a moderation layer:

  • Integrate automated content moderation (for prompts and outputs) before sending images to users.
  • Optionally route flagged content to a manual review queue or a dedicated Slack channel.

Moderation is critical to reduce risk and maintain compliance with platform and organizational policies.

Key n8n Expression References

Below are some commonly used expressions in this template that you can adapt to your own payload structure:

  • Map incoming text to the OpenAI prompt
    ={{ $json["message"]["text"] }}
  • Dynamic chat ID for Telegram Sender
    ={{ $json.data[1].message.from.id }}
    Adjust the index and path to align with your merged output.
  • Binary data reference for image sending
    Ensure that the binary property, for example data, exists on the aggregated item and is selected in the Telegram Sender node.

Monitoring and Observability

To operate this workflow reliably at scale, implement observability from day one:

  • Send Slack or email notifications for both successful sends and failures, depending on your monitoring strategy.
  • Track usage metrics such as requests per day, images per user, and cost per image.
  • Configure alerts for budget thresholds or abnormal error rates.
  • Store logs and representative prompts for ongoing quality review and prompt optimization.

Continuous monitoring enables proactive tuning of both technical and business parameters.

Quick Troubleshooting Checklist

  • Images are not delivered
    Confirm that the binary image data is present, correctly named, and passed into the Telegram Sender node.
  • OpenAI node returns errors
    Verify that the API key is valid, usage limits have not been exceeded, and the correct endpoint/model is configured.
  • Chat or user IDs are missing
    Inspect the raw output of the Telegram Trigger node and adjust mapping expressions such as $json["message"]["chat"]["id"] or $json.data[1].message.from.id as required.

Conclusion and Next Steps

By combining n8n, OpenAI image generation, and Telegram, you can build an automated, interactive image delivery pipeline that is both flexible and production ready. With secure credential management, well-designed prompts, robust error handling, and clear monitoring, this workflow can serve as a foundation for a wide range of AI-driven user experiences.

To get started, import the template into your n8n instance, connect your OpenAI and Telegram credentials, and run a series of test prompts. Iterate based on real user feedback, cost metrics, and performance data to refine the solution for your environment.

Start now: Import the template, configure credentials, execute a test run, and then enhance the workflow with personalization, moderation, and advanced reporting as your use case matures.

If you need a tailored walkthrough, help with cost optimization, or integration into a broader automation stack, our team can support you in designing and deploying a robust AI image processing pipeline on Telegram.

n8n YouTube Description Updater

n8n YouTube Description Updater – Technical Reference & Configuration Guide

The n8n YouTube Description Updater template automates bulk maintenance of YouTube video descriptions. It reads existing descriptions via the YouTube Data API, isolates the video-specific portion using a configurable delimiter, appends or replaces a standardized footer, updates only those videos where the description has changed, and optionally notifies a Slack channel after each successful update.

This guide is written for users already familiar with n8n concepts such as nodes, credentials, expressions, and workflow execution. It focuses on the architecture of the template, node-by-node behavior, configuration details, and safe rollout strategies.


1. Workflow Overview

The workflow implements a linear, deterministic pipeline for description updates:

  1. Trigger the workflow (manual or scheduled).
  2. Load configuration for the splitter and standardized footer.
  3. Retrieve a set of videos from a YouTube channel.
  4. Generate a new description for each video using an n8n expression.
  5. Compare the new description with the existing one.
  6. Update the video on YouTube only when a change is detected.
  7. Notify a Slack channel about successful updates.

The core pattern is a splitter-based description rewrite: the workflow preserves all content before a unique delimiter and redefines everything after it as a shared footer. This ensures per-video content remains intact while maintaining a consistent call-to-action and link section across your entire channel.


2. Architecture & Data Flow

2.1 High-level node sequence

  • Manual Trigger – initiates the workflow run.
  • Config – stores the delimiter (splitter) and standardized footer (description).
  • List Videos – uses the YouTube API to fetch video metadata, including existing descriptions.
  • Generate Description – computes the new description string using an n8n expression.
  • Description Changed (If) – evaluates whether the generated description differs from the original.
  • Update Video Description – calls the YouTube videos.update endpoint to persist the new description.
  • Notify Slack – sends a message to a Slack channel summarizing the update.

2.2 Data propagation

The typical data path for each item (video) is:

  1. List Videos outputs
  2. snippet.description and id for each video.
  3. Generate Description reads:
    • Existing description from $json.snippet.description.
    • Splitter and standardized footer from the Config node via $('Config').
  4. Description Changed (If) compares:
    • Original description from List Videos.
    • New description generated in the previous node.
  5. Update Video Description consumes:
    • videoId from List Videos.
    • New description from Generate Description.
  6. Notify Slack receives:
    • Metadata about the updated video (for example title, ID, URL) to construct a human-readable message.

Each node operates on items in sequence, so the workflow scales to handle multiple videos in a single run while preserving item-level context.


3. Core Expression for Description Generation

3.1 Expression logic

The Generate Description node uses an n8n expression to reconstruct the description based on a splitter and a standardized footer. The expression in the template is:

= {{ $json.snippet.description.split($('Config').item.json.splitter)[0] }}{{ $('Config').item.json.splitter }}

{{ $('Config').item.json["description"] }}

3.2 Behavior breakdown

  • Splitting the existing description $json.snippet.description.split($('Config').item.json.splitter)[0]
    • Reads the current description from the YouTube snippet.description field.
    • Splits the string using the configured splitter from the Config node.
    • Takes the first element of the resulting array ([0]), which corresponds to all text before the splitter.
  • Reinserting the splitter {{ $('Config').item.json.splitter }}
    • Appends the same splitter string back into the description after the preserved video-specific content.
  • Appending the standardized footer {{ $('Config').item.json["description"] }}
    • Appends the standardized footer text defined in the Config node.
    • This footer typically includes global CTAs, links, social profiles, and other shared information.

3.3 Edge cases to consider

  • No splitter present in the original description If the splitter is not found, split() returns an array with the full description as the first element. The workflow then treats the entire existing description as the “pre-splitter” section and appends the splitter and footer. This is usually acceptable for first-time runs but is worth verifying on test videos.
  • Multiple occurrences of the splitter Only the text before the first occurrence is preserved. Any content after the first splitter is discarded and replaced by the standardized footer. Use a unique delimiter to avoid accidental matches inside normal text.
  • Empty or missing description If a video has an empty description, the pre-splitter part is an empty string. The workflow will then produce a description that consists of the splitter followed by the standardized footer.

4. Setup & Configuration Steps

4.1 Configure YouTube credentials

The workflow authenticates with the YouTube Data API using a YouTube OAuth2 credential in n8n. This credential is required for both reading and updating video metadata via videos.get and videos.update.

  1. Create a Google OAuth client in the Google Cloud Console with appropriate YouTube scopes.
  2. In n8n, add a new credential of type Google OAuth2 following the official documentation: n8n Google credential docs.
  3. Assign this credential to the YouTube nodes in the template (for example the List Videos and Update Video Description nodes).

Note: Use the smallest set of OAuth scopes needed to modify YouTube videos and ensure only trusted users can access or modify this credential in n8n.

4.2 Configure the Config node

The Config node centralizes the two key parameters used across the workflow:

  • splitter A unique delimiter that separates per-video content from the standardized footer.
    • Example: --- n8ninja ---
    • Choose a string that is highly unlikely to appear in normal text to avoid unintended splits.
  • description The standardized footer that will be appended to every processed video.
    • Typical contents: CTAs, website link, “Try n8n for free” link, social handles, template credits, or legal notes.

Adjust these values directly in the node so that other nodes can reference them through the $('Config') expression.

4.3 Initial testing with Manual Trigger

The template ships with a Manual Trigger node. Use it for controlled testing:

  1. Open the workflow in n8n and leave the trigger as Manual.
  2. Run the workflow on a small sample of videos, ideally:
    • A single unlisted video, or
    • A small subset filtered via the List Videos node.
  3. Inspect the output of the Generate Description node to confirm that:
    • The pre-splitter content is preserved correctly.
    • The splitter and footer are appended as expected.
  4. Verify that the YouTube video description is updated exactly as intended.

4.4 Scheduling or running on demand

Once you are satisfied with the behavior:

  • Replace the Manual Trigger node with a Cron node if you want periodic execution, for example:
    • After policy changes.
    • When starting or ending a campaign.
    • On a weekly or monthly maintenance schedule.
  • Alternatively, keep the Manual Trigger and run it on demand for ad hoc updates.

5. Node-by-Node Breakdown

5.1 Manual Trigger

Purpose: Start the workflow only when explicitly invoked from the n8n UI or via an API call.

  • Used primarily during development, staging, or one-off update runs.
  • Can be replaced later by a Cron or other trigger (for example Webhook) when automation is stable.

5.2 Config

Type: Typically a Set node or similar configuration node.

Fields:

  • splitter – custom delimiter string.
  • description – standardized footer text.

Usage:

  • Other nodes access these values using $('Config').item.json.splitter and $('Config').item.json["description"].
  • Centralizing configuration here simplifies maintenance when you need to update the footer or change the delimiter.

5.3 List Videos

Purpose: Retrieve a list of videos from your YouTube channel using the YouTube Data API.

Key behaviors:

  • Uses the configured YouTube OAuth2 credential.
  • Returns video metadata, including:
    • id (videoId).
    • snippet.title.
    • snippet.description.

Filtering options (recommended):

  • Limit results by:
    • Date range.
    • Playlist ID.
    • Search query or keywords.
  • Restricting the scope of this node helps:
    • Control which videos are updated.
    • Manage API quota usage.
    • Reduce risk during initial deployment.

5.4 Generate Description

Purpose: Construct the new description for each video using the splitter pattern and standardized footer.

Implementation details:

  • Uses the expression described in section 3.
  • Preserves content before the splitter from the existing description.
  • Re-inserts the splitter and appends the standardized footer from Config.

Outcome:

  • Produces a new description string that will be compared against the original and potentially sent to the YouTube API.

5.5 Description Changed (If)

Type: If node.

Purpose: Prevent unnecessary updates and conserve API quota by only proceeding when the description has actually changed.

Behavior:

  • Compares:
    • Original description from List Videos (for example $json.snippet.description).
    • New description generated in Generate Description.
  • If the two values differ, the item follows the “true” branch and continues to the update node.
  • If they are identical, the item is filtered out and no update call is made.

Benefits:

  • Reduces API calls to videos.update.
  • Prevents redundant writes and keeps version history cleaner.

5.6 Update Video Description

Purpose: Persist the new description to YouTube using the videos.update endpoint.

Key configuration aspects:

  • Uses videoId from List Videos as the target video.
  • Writes the new description computed by Generate Description into the snippet.description field.
  • The template also includes categoryId and regionCode:
    • These values are set in the node configuration.
    • Review and adjust them if your channel uses different categories or regions.

Error handling considerations:

  • Failures at this node can result from:
    • Insufficient OAuth scopes or revoked access.
    • Quota limits or API errors.
    • Invalid or missing videoId.
  • Monitor node execution logs in n8n to detect and resolve such issues.

5.7 Notify Slack

Purpose: Inform your team whenever a video description is successfully updated.

Behavior:

  • Runs only for items that passed the Description Changed check and were successfully updated.
  • Posts a message to a specified Slack channel using a configured Slack credential.
  • The message can include:
    • Video title.
    • Video URL or ID.
    • Timestamp or other metadata.

Customization:

  • Adjust the Slack message format to:
    • Tag specific team members.
    • Include links to internal documentation.
    • Provide a summary of what changed.

6. Best Practices & Operational Tips

  • Use a highly unique splitter Choose a delimiter that does not occur naturally in your descriptions to avoid truncating legitimate content.
  • Start with a small test set Run the workflow on a single unlisted video or a small subset before applying it to your full library.
  • Respect YouTube API quotas Process videos in batches and schedule runs during off-peak hours when possible.
  • Maintain backups Before updating, consider writing the

Automate YouTube Descriptions with n8n

Automate YouTube Descriptions with n8n: A Story From Chaos To Clarity

The marketer who dreaded “Update day”

Every quarter, Lena blocked off an entire afternoon for what her team jokingly called “Update day.” She was the marketing lead for a growing YouTube channel with more than 300 videos, and each time they changed a call-to-action, swapped an affiliate link, or added a new resource, she had to open video after video in YouTube Studio and manually edit descriptions.

It always started the same way. A new partnership, a fresh lead magnet, or a rebrand would require updating the footer in every video description. By the third hour, Lena’s eyes blurred, and her notes turned into a maze of half-checked links and “did I already update this one?” questions. She worried about broken CTAs, inconsistent branding, and the very real possibility of missing a video that still pointed to an outdated offer.

One afternoon, after yet another spreadsheet of URLs and half-finished edits, she decided she could not do it again. She needed a way to automate YouTube description updates, keep everything consistent, and stop wasting entire days on tedious work.

Discovering n8n and the YouTube Description Updater

A developer friend listened to her rant and simply asked, “Why are you doing this by hand? Just use n8n with the YouTube API.” He sent her a link to a workflow template called the YouTube Description Updater.

Lena was not a developer, but she understood processes. As she read through the template description, something clicked. Instead of manually editing every description, she could use an n8n workflow to append or replace a templated footer on all of her videos. The idea was simple:

  • Use n8n to pull all videos from her channel through the YouTube API
  • Automatically rebuild each description with a consistent footer
  • Only update the videos that actually needed changes

Automation, consistency, and auditability in one place. The pain of “Update day” suddenly looked optional.

Rising tension: what if automation breaks everything?

Of course, Lena had another fear. “What if this workflow overwrites all my descriptions and I lose everything?” She had spent years crafting intros, timestamps, and copy that performed well. She could not afford for a bad script to wipe them out.

So she decided to walk through the workflow step by step, understand what each node did, and test it on a single video before going all in.

The workflow Lena adopted

The n8n template she imported followed a clear, linear structure. Once she understood it, the whole thing felt surprisingly approachable.

  • Manual Trigger – so she could decide exactly when to run updates
  • Config node – where she defined a special delimiter and the footer text she wanted on every video
  • List Videos – which fetched all videos from her channel via the YouTube API
  • Generate Description – which combined the existing description with her new footer
  • Description Changed (IF) – which checked if the new description was actually different
  • Update Video Description – which called the YouTube API only when a change was needed
  • Notify Slack (optional) – which could ping her team after each update

This was not a mysterious black box. It was a clear pipeline she could read and control.

First step: connecting YouTube to n8n

Lena started with the most technical part: giving n8n permission to update her channel.

Adding YouTube credentials

Inside n8n, she created a new Google/YouTube OAuth2 credential. She made sure the OAuth client had the right YouTube Data API scopes so it could update video metadata, including descriptions.

That single step established the bridge between n8n and her YouTube channel. From this point on, any node configured with that credential could safely talk to the YouTube API.

The Config node that changed everything

The next piece was the Config node. This was where Lena would define how the workflow treated the existing descriptions and what it would add to them.

Choosing a unique delimiter

She learned that the workflow relied on a special string, called a splitter, to separate the main body of the description from the footer. The idea was simple but powerful:

  • Everything before the splitter would be her editable description content
  • Everything after (and including) the splitter would be the standardized footer

In the Config node, she set:

  • splitter – a unique text marker, for example --- n8ninja ---, that would not appear in normal descriptions
  • description – the footer template she wanted on every video, including CTAs, links, and social accounts

From now on, she knew that if she ever needed to change her footer, she could just adjust this one Config node and re-run the workflow.

The turning point: understanding the Generate Description magic

The heart of the workflow was the Generate Description node. This was where Lena needed to be absolutely sure her original descriptions would not be destroyed.

Inside, she found a key expression:

=\{\{ $json.snippet.description.split($('Config').item.json.splitter)[0] }\}\{\{ $('Config').item.json.splitter }\}\n\n\{\{ $('Config').item.json["description"] }\}

She broke it down line by line:

  • $json.snippet.description – this was the current description text for the video, coming from the List Videos node.
  • .split($('Config').item.json.splitter)[0] – this split the description at her chosen delimiter and kept everything before it. If the delimiter was not found, it simply used the entire description as-is.
  • Then it reinserted the same splitter, added two newlines, and finally appended the footer from $('Config').item.json["description"].

In other words, the workflow:

  • Preserved her original description body
  • Replaced or added a consistent footer block below her delimiter

That was the reassurance she needed. Her carefully written intros, timestamps, and SEO text would remain untouched. Only the footer would be standardized.

Protecting her channel: only update when needed

There was one more safeguard that made Lena comfortable enough to run this on her entire channel: the IF node named “Description Changed.”

This node compared the newly generated description with the one already on YouTube. If they were identical, the workflow did nothing. If they differed, it passed the item to the Update Video Description node, which then called the YouTube API to apply the change.

This meant:

  • No unnecessary API calls
  • Less risk of hitting YouTube API quotas
  • A clear, auditable record of which videos were actually updated

Her cautious first run: a single video test

Before trusting automation with hundreds of videos, Lena decided to run a small experiment.

  1. She imported the workflow JSON into her n8n instance.
  2. She attached her YouTube OAuth2 credential to the relevant nodes.
  3. In the Config node, she set a test splitter and a simple footer with one CTA and a couple of links.
  4. In the List Videos node, she limited the results so it would only fetch one video from her channel.
  5. She ran the Manual Trigger and watched the execution preview closely.

Using n8n’s execution preview, she inspected the output of the Generate Description node and confirmed that the new description looked exactly as she expected: original body, her splitter, then the new footer.

Only then did she let the Update Video Description node run. She refreshed the video in YouTube Studio and saw her new footer in place. Nothing else had changed.

Scaling up: from one video to the entire channel

Once the test passed, Lena gradually removed the limit in the List Videos node and let the workflow process more videos at a time. She monitored the execution, watched for any errors, and kept an eye on Slack notifications where each successful update could be reported.

Her quarterly “Update day” was starting to look more like “Update minute.”

How she customized the template for her channel

As Lena became more comfortable with n8n, she started tweaking the workflow to fit her strategy even better.

Dynamic fields in the footer

She realized she could personalize each footer using n8n expressions. For example, she could include the video title:

{{ $json.snippet.title }}

And with a bit of additional configuration, she could also insert a direct link to the video itself, using its videoId from the List Videos node.

Conditional footers

Some videos were tutorials, others were product launches, and some were live streams. Using extra logic in n8n, she experimented with:

  • Different footers based on playlists or tags
  • Alternate CTAs for specific series

Scheduling automatic runs

Once she trusted the system, she replaced the Manual Trigger with a Cron node so the workflow could run weekly or monthly. That way, any new video she published would automatically receive the correct footer without her even thinking about it.

Keeping a backup for peace of mind

For extra safety, Lena added a step that saved the original descriptions to a Google Sheet before any updates were made. This created a simple audit trail and gave her a way to roll back if she ever needed to.

Best practices Lena learned along the way

By the time her workflow was fully in place, Lena had collected a set of rules she wished she had known earlier:

  • Always choose a clear, unique delimiter that will never appear in normal text, to avoid accidentally cutting important content.
  • Test on a small subset of videos before doing bulk updates.
  • Respect YouTube API quotas and rate limits. If needed, batch updates or add small delays.
  • Keep a history of changes, for example by saving original descriptions to a Google Sheet or database.
  • Limit the OAuth token scope to only what is necessary to update video metadata.

When things went wrong (and how she fixed them)

Not everything went smoothly on the first try. A few common issues popped up, but n8n made them easy to debug.

Common problems she hit

  • Authentication errors – sometimes the Google credential would expire or lose permissions. Re-authorizing the OAuth2 credential with the correct YouTube channel fixed it.
  • Rate limit or quota issues – when she tried to update too many videos at once, the YouTube API sometimes complained. Adding delays, processing fewer videos per run, or scheduling updates with a Cron node helped.
  • Delimiter not found – in older videos that never had the splitter, the workflow treated the entire description as the body. She double-checked this behavior and confirmed she was comfortable with it before bulk updates.

Debugging with n8n

  • She used the execution preview to inspect the output of each node, especially the Generate Description node, to verify formatting.
  • She temporarily disabled the Update Video Description node and instead logged the new descriptions to a Google Sheet. Once she was happy with the results, she re-enabled the update step.

Advanced dynamic templating in action

As her confidence grew, Lena refined her footer using n8n expressions that pulled in data from each video.

Inside the Config node, she experimented with a simple but powerful template like this:

⭐️ Try n8n for free: https://n8n.io
📌 Watch this video: https://youtu.be/{{ $json.id.videoId }}
Follow me on X: https://twitter.com/yourhandle

Depending on how she structured the Generate Description node, she sometimes needed to reference fields from the List Videos node or use additional Set nodes to pass the videoId into the template context. Once configured, every footer automatically referenced the correct video link and title.

The resolution: no more “Update day”

Several months later, a new affiliate partner came on board. Previously, this would have triggered another dreaded “Update day.” Instead, Lena opened n8n, updated the footer text in the Config node, and ran the workflow.

Within minutes, every relevant video on her channel had the new CTA, correct affiliate links, and updated resources. No spreadsheets, no manual edits, no second-guessing.

Her YouTube descriptions were now:

  • Consistent across hundreds of videos
  • Up to date with the latest offers and links
  • Auditable with backups and clear logic
  • Automated so new videos got the right footer without extra work

Your next step: turn your own “Update day” into a one-click workflow

If you recognize yourself in Lena’s story, you do not have to keep suffering through manual updates.

Here is how you can follow her path:

  1. Import the YouTube Description Updater workflow JSON into your n8n instance.
  2. Add your YouTube OAuth2 credential with the right scopes to update video metadata.
  3. Configure the Config node with a unique splitter and your footer template, including CTAs, links, and social handles.
  4. Test on a single video using the List Videos node limit and the execution preview.
  5. Run the workflow with the Manual Trigger, then scale up, schedule it with a Cron node, or add conditional logic as needed.

If you want to extend the workflow with dynamic fields, playlist-based footers, or recurring schedules, the same structure Lena used will support it. You can add Set nodes, IF nodes, and additional logic without rewriting the core idea.

Pro tip: Pair this workflow with a simple monitoring routine that periodically checks your descriptions for broken links or outdated affiliate codes. That way, you are not just updating at scale, you are maintaining quality at scale.

Ready to experience the same transformation? Try this workflow in your own n8n instance and stop wasting hours on repetitive YouTube description edits.

Analyze Screenshots with AI: n8n Workflow

Analyze Screenshots with AI using n8n, URLbox and OpenAI

Automating website screenshot capture and analysis can save hours of manual work. With the right n8n workflow, you can monitor UI changes, extract visual content, and send AI-powered insights directly to Slack or other tools.

This tutorial walks you step by step through an n8n workflow template that:

  • Accepts a website URL and name via webhook
  • Captures a full-page screenshot with URLbox
  • Analyzes the screenshot with OpenAI image tools
  • Merges AI insights with website metadata
  • Sends a clear summary to Slack

Learning goals

By the end of this guide, you will be able to:

  • Explain why automated screenshot analysis is useful for product, QA, and marketing teams
  • Understand how n8n, URLbox, and OpenAI work together in a single workflow
  • Rebuild or customize the provided n8n workflow template
  • Design prompts that extract structured information from screenshots
  • Apply basic security, error handling, and scaling best practices

Concepts and tools you will use

Why automate screenshot analysis?

Capturing and checking screenshots by hand is slow and difficult to scale. Automation helps you:

  • Monitor visual changes for regressions, broken layouts, or unexpected UI updates
  • Extract content such as headlines, CTAs, and key messages from landing pages
  • Track competitors by regularly capturing and analyzing their public pages
  • Generate reports that summarize what is visible on a set of URLs

With n8n, you can connect multiple services using low-code nodes and add AI image analysis to interpret what is on the page instead of just storing the image.

n8n as the automation backbone

n8n is the platform that orchestrates the entire workflow. In this template it is responsible for:

  • Receiving incoming data through a Webhook
  • Preparing and transforming data with nodes like Set and Merge
  • Calling external APIs such as URLbox and OpenAI using HTTP Request or dedicated nodes
  • Sending notifications to Slack

URLbox for screenshot capture

URLbox provides a Screenshot API that renders web pages as images. In this workflow, URLbox:

  • Takes the provided URL
  • Renders the page
  • Returns a screenshot image (for example as a PNG or JPG)

Key capabilities you will use:

  • Full-page capture so you see everything, not only the fold
  • Viewport configuration to simulate different screen sizes
  • Format selection such as jpg or png

You will need a URLbox API key, which is passed in the Authorization header of the HTTP request.

OpenAI image analysis

The OpenAI Image Analysis (Vision) model can interpret screenshots and return:

  • Natural language descriptions of what is on the page
  • Extracted text content using OCR
  • Structured insights, for example:
    • Main hero headline
    • CTA button text
    • Brand or logo mentions

By carefully designing your prompt, you can get compact, structured JSON that is easy to use in downstream nodes and notifications.


How the n8n workflow fits together

Before we build it step by step, here is the high-level flow of the template:

  1. Webhook Trigger – Receives a JSON payload with website_name and url.
  2. Set (Setup) Node – Normalizes and prepares these values for the rest of the workflow.
  3. HTTP Request to URLbox – Captures a full-page screenshot of the URL.
  4. OpenAI Image Analysis – Analyzes the screenshot and extracts descriptions and key text.
  5. Merge Node – Combines the website metadata with the AI analysis results.
  6. Slack Node – Posts a summary and optionally the screenshot to a Slack channel.

Next, you will walk through each step in detail so you can recreate or modify the workflow in your own n8n instance.


Step-by-step: Building the screenshot analysis workflow in n8n

Step 1 – Create the Webhook trigger

Start by adding a Webhook node in n8n. This is how external tools or scripts will trigger the workflow.

  • HTTP Method: POST
  • Path example: /screenshot-webhook

The webhook expects a JSON body with at least two fields:

{  "website_name": "n8n",  "url": "https://n8n.io/"
}

You can test this using tools like curl, Postman, or any service that can send POST requests.

Step 2 – Prepare and store the payload

Next, add a Set node after the Webhook. This node helps you:

  • Map incoming data from the webhook to well-defined fields
  • Provide default values for testing
  • Ensure consistent field names for later nodes

In the Set node, define fields such as:

  • website_name
  • url

You can either hard-code values for debugging or map them from the Webhook node using n8n expressions.

Step 3 – Capture a screenshot with URLbox

Now you will call URLbox to generate the screenshot. Add an HTTP Request node and configure it as follows:

  • HTTP Method: POST
  • URL: https://api.urlbox.io/v1/render/sync (or the relevant URLbox endpoint)

In the request body, include the URL and any desired options. Typical body parameters include:

  • url: the website URL from the Set node
  • full_page: true to capture the entire page
  • viewport: width and height if you want a specific viewport size
  • format: jpg or png

For authentication, set the Authorization header to your URLbox API key. In n8n, store this in a credential and reference it in the node instead of hard-coding it.

Important URLbox options to consider:

  • full_page: true – captures the entire scrollable page
  • viewport – simulate desktop or mobile by adjusting width and height
  • format – choose between jpg or png depending on quality and size needs

The response from URLbox will typically include a URL to the generated screenshot or binary image data, which you will pass to OpenAI.

Step 4 – Analyze the screenshot with OpenAI

Once you have the screenshot, add an OpenAI Image Analysis node (or use the LangChain/OpenAI integration if that is your preferred setup).

Configure the node so that it receives either:

  • The screenshot URL returned by URLbox, or
  • The binary image data if you are passing the file directly

Next, craft a prompt that clearly explains what you want the model to do. For example:

“Your input is a screenshot of a website. Describe the content in one sentence and extract the main headline and any visible CTA text.”

To make the output easier to process downstream, you can ask for structured JSON:

  • Request specific keys, such as headline, cta_text, and detected_logos.
  • Mention that if a value is missing, it should be null rather than omitted.
  • Ask the model to be concise and avoid extra commentary.

Prompt design tips for robust extraction:

  • Ask for structured JSON output, for example:
    • {"description": "...", "headline": "...", "cta_text": "...", "detected_logos": [...]}
  • If you expect text from the page, explicitly request OCR style extraction.
  • Limit verbosity so the response is short and machine friendly.

Step 5 – Merge website metadata with AI results

Now you have two sets of data:

  • Website metadata from the Set node (website_name, url)
  • Analysis output from the OpenAI node (description, headline, CTA text, etc.)

Add a Merge node to combine these into a single JSON object. Depending on how your nodes are connected, you can:

  • Merge by position if there is a one-to-one relationship between items
  • Merge by key if you have a specific field to match on

The final merged item might look something like:

{  "website_name": "n8n",  "url": "https://n8n.io/",  "description": "Automation platform homepage with workflow builder visuals.",  "headline": "Automate your workflows",  "cta_text": "Get started"
}

This object is now ready to be turned into a Slack message or stored in a database.

Step 6 – Send a summary to Slack

To complete the workflow, add a Slack node that posts a message to your chosen channel.

Construct a compact summary using data from the Merge node. For example:

Website: n8n
URL: https://n8n.io/
Analysis: Hero headline: "Automate your workflows" - CTA: "Get started"

Depending on your Slack integration, you can:

  • Include the screenshot URL in the message
  • Attach the image directly as a file
  • Add emojis or formatting to highlight changes or alerts

Security, reliability, and best practices

Protecting your API keys

  • Store your URLbox and OpenAI keys in n8n credentials, not directly in node fields.
  • Limit who can view or modify credentials in your n8n instance.

Managing rate limits and costs

  • Be aware of rate limits on URLbox and OpenAI APIs.
  • Use n8n’s retry and backoff settings on HTTP Request nodes.
  • Capture only the pages you truly need and avoid unnecessary full-page renders.

Validating AI output

  • Check that the AI response is valid JSON before using it.
  • Sanitize or truncate text before posting to Slack.
  • Handle cases where the model returns incomplete or unexpected data.

Error handling and retries

To make the workflow production ready, add some basic resilience:

  • HTTP Request retries: Configure the URLbox HTTP node to retry on network errors or 5xx responses.
  • OpenAI error branches: Add conditional logic to detect:
    • Empty or malformed AI responses
    • Errors returned by the OpenAI API
  • Fallback alerts: If analysis fails or the image is missing, send a Slack message to an admin or error channel instead of the main channel.

This ensures that when something goes wrong, you are notified and can investigate, instead of silently losing data.


Advanced ideas to extend the workflow

Once the basic template is running, you can expand it with more advanced automation patterns:

  • Batch processing: Loop over a list of URLs from a Google Sheet, database, or CSV file and run the same screenshot-analysis pipeline for each entry.
  • Visual regression monitoring: Store previous screenshots and use an image diff tool to compare new captures. Alert only when the visual difference exceeds a certain threshold.
  • Structured data extraction: Ask the AI model to return JSON fields such as headline, promo, price, and form_fields, then write the results to a database or analytics system.
  • Multi-model pipelines: First run OCR to extract all text, then use a classification model to detect logos, primary colors, layout type, or page category.

Sample prompt for consistent JSON output

To get reliable, machine-friendly responses from OpenAI, use a prompt that enforces a strict JSON format. For example:

"Analyze this website screenshot. Return JSON with keys: 'description', 'headline', 'cta_text', 'detected_text'. If a key is not present, return null."

This makes it much easier to parse the response in n8n and reduces the chance of errors in downstream nodes.


Recap

In this guide you learned how to build an n8n workflow that:

  • Receives a website URL and name via a webhook
  • Captures a full-page screenshot with URLbox
  • Analyzes the screenshot with OpenAI’s image analysis capabilities
  • Merges AI insights with website metadata
  • Sends a clear summary to Slack

With this foundation, you can adapt the workflow for monitoring, reporting, competitor tracking, or any other use case that benefits from automated visual analysis.


FAQ

Can I trigger this workflow without a webhook?

Yes. Instead of a Webhook node, you can start the workflow from a Schedule Trigger, a manual execution, or another source such as a Google Sheets or database node that feeds URLs into the pipeline.

Do I have to use full-page screenshots?

No. You can disable full_page or adjust the viewport options in URLbox if you only care about the visible area or a specific resolution.

What if the page has very little text?

The AI model will still return a description of the visual layout. For text fields like headline or cta_text, you can expect null or empty values if nothing is clearly visible.

Is it possible to store the results instead of sending them to Slack?

Yes. Replace or supplement the Slack node with a database, Google Sheets, Notion, or any other storage node in n8n to keep a history of analyses.

Connect WordPress Forms to Mautic with n8n

How to Connect WordPress Forms to Mautic Using n8n (Step-by-Step)

Build a robust automation pipeline that captures WordPress form submissions, standardizes and validates the data, then creates or updates contacts in Mautic using an n8n workflow. This guide explains the use case, architecture, and implementation details of the n8n template so you can deploy it confidently in production environments.

Why integrate WordPress forms with Mautic via n8n?

For teams that rely on WordPress for lead generation and Mautic for marketing automation, manual export and import of form data is inefficient and error-prone. An automated n8n workflow between WordPress and Mautic ensures that:

  • Leads are captured in real time, directly into your Mautic instance
  • Data is normalized and validated before contact creation
  • Invalid or suspicious email addresses are filtered out or flagged
  • Stakeholders are notified when manual review is required

This approach improves lead quality, accelerates follow-up, and protects your CRM from polluted or incomplete data.

Solution architecture and workflow design

The n8n template implements a controlled data pipeline from WordPress to Mautic. It uses a webhook trigger, transformation logic, contact creation, and conditional handling for invalid emails.

Core workflow stages

  1. Inbound webhook from WordPress A Webhook node in n8n receives POST requests from your WordPress form plugin.
  2. Lead normalization A Set node (NormalizeLead) standardizes key fields such as name, email, mobile, and form identifier.
  3. Contact creation in Mautic A Mautic node creates or updates a contact using the normalized data.
  4. Email validation decision An If node evaluates whether the email address satisfies basic validation criteria.
  5. Invalid email handling If the email is invalid, the workflow sends a notification and marks the contact in Mautic as Do Not Contact or tags it for cleanup.
  6. Workflow termination The flow ends after successful processing or after handling invalid data.

This structure separates responsibilities: intake, transformation, validation, persistence, and exception handling. It also makes the workflow easy to extend with additional validation or enrichment steps.

Configuring the n8n workflow step by step

1. Configure the WordPress webhook trigger

Start by exposing an HTTP endpoint in n8n that your WordPress form can call.

  • Create a Webhook node in n8n and set the HTTP method to POST.
  • Choose the appropriate Content-Type according to your form plugin:
    • application/x-www-form-urlencoded for many classic WordPress form plugins
    • application/json if your plugin supports JSON payloads
  • Copy the generated webhook URL.
  • In your WordPress form plugin (such as Contact Form 7, Gravity Forms, WPForms, and others), configure a webhook or integration endpoint and paste the n8n webhook URL there.
  • Ensure the form is configured to send data using the POST method.

2. Normalize and clean incoming lead data

Once the webhook receives data, the next priority is to standardize the payload into a reliable internal schema.

Use a Set node in n8n, often named NormalizeLead, to:

  • Map raw form fields to canonical names
  • Apply formatting and basic validation logic
  • Preserve metadata such as form identifiers for segmentation

Typical mappings might include:

  • name: convert to title case
  • email: convert to lower case and run a simple syntax check
  • mobile: remove formatting or country prefixes according to your conventions
  • form: keep the original form_id or form name for later segmentation in Mautic

Example n8n expressions for the Set node:

name = {{$json.body.Nome.toTitleCase()}}
email = {{$json.body['E-mail'].toLowerCase()}}

Adapting these expressions to your actual field names from WordPress is essential. Keep naming consistent across WordPress, n8n, and Mautic to reduce mapping issues.

3. Create or update the contact in Mautic

With normalized data available, you can safely interact with Mautic.

  • Add a Mautic node and configure it with your Mautic API credentials (OAuth or API key, depending on your setup).
  • Map the normalized fields to Mautic contact fields:
    • email → primary email field in Mautic (required)
    • namefirstName or an equivalent field
    • mobile → mobile or phone field, often via additionalFields
    • form or form_id → a custom field for attribution or segmentation

At minimum, ensure that email and firstName are mapped. Additional fields such as mobile are valuable for SMS or WhatsApp follow-up flows in Mautic.

4. Validate email addresses and branch the workflow

To prevent invalid data from entering Mautic, the template uses a conditional step based on email validity.

  • Insert an If node after normalization or after initial validation logic.
  • Evaluate a boolean flag such as $json.email_valid or a similar expression that represents your validation result.
  • Configure two paths:
    • Valid path: continue normal processing or simply end the workflow.
    • Invalid path: trigger notifications and mark the contact as Do Not Contact or tag it appropriately in Mautic.

On the invalid path, the workflow typically performs two actions:

  • Notification: send a Slack message, email, or internal alert so a human can review or correct the record.
  • Mautic flagging: use a Mautic node to add the contact to a Do Not Contact list or assign a tag indicating an invalid email.

5. Final validation and testing

Before moving to production, thoroughly test the integration.

  • Submit sample forms from your WordPress site with:
    • Valid data
    • Intentionally malformed emails
    • Edge cases such as missing fields
  • Inspect n8n execution logs to confirm:
    • Incoming payloads are parsed correctly
    • Normalized fields match your expectations
    • Contacts appear in Mautic with correct field mappings
    • Invalid emails follow the correct branch and trigger notifications

Security, data quality, and reliability best practices

Secure the webhook endpoint

Webhook endpoints are potential attack surfaces. Protect them with multiple layers where possible:

  • Add a secret token as a query parameter or header and validate it in n8n.
  • Restrict access by IP address if your infrastructure allows it.
  • Serve n8n behind HTTPS and, ideally, behind an authenticated proxy or gateway.

Strengthen email verification

Basic regex or syntax validation is useful, but for production-grade lead management consider augmenting the workflow with more advanced checks:

  • Call an external email verification API (for example ZeroBounce or Kickbox).
  • Perform MX record lookups to identify invalid or non-existent domains.
  • Maintain a list or heuristic rules for disposable email providers and treat them differently.

These enhancements can be integrated into the n8n workflow as additional nodes before the If condition.

Map extended fields for richer Mautic profiles

To improve segmentation, attribution, and reporting in Mautic, consider mapping more than just name and email:

  • UTM parameters such as utm_source, utm_medium, and utm_campaign
  • Landing page URL or referrer
  • Form identifier or form type (for example, demo request, newsletter, webinar)

Ensure that corresponding custom fields exist in Mautic and that naming is consistent across WordPress, n8n, and Mautic.

Handle rate limits and transient errors

Mautic or third-party services may impose rate limits or experience temporary downtime. To increase reliability:

  • Monitor Mautic API rate limits and adjust request frequency accordingly.
  • Use n8n retry settings on nodes that call external APIs.
  • Consider queueing mechanisms, such as n8n’s Execute Workflow node or external message queues, to buffer requests during high load or outages.

Troubleshooting and operational monitoring

Common configuration issues

  • No data received in n8n Verify that:
    • The webhook URL in WordPress exactly matches the one in n8n.
    • The form is configured to use the POST method.
    • There are no firewall or proxy rules blocking outbound requests from WordPress.
  • Malformed or unexpected JSON If payloads are not parsed correctly:
    • Check the Content-Type header sent by the form plugin.
    • Switch the webhook configuration between application/json and application/x-www-form-urlencoded to match what the plugin sends.
  • Mautic authentication failures If the Mautic node fails to authenticate:
    • Revalidate OAuth or API key credentials.
    • Check token expiration and refresh flows.
    • Confirm that the Mautic API is enabled and accessible from the n8n environment.

Logging, alerts, and observability

For production automations, visibility into failures is essential.

  • Enable detailed logging in n8n to capture request payloads, errors, and node-level details.
  • Configure Slack or email notifications for failed executions or error branches.
  • Maintain a lightweight dashboard or report to track webhook success and failure rates, which helps identify systemic issues or plugin changes on the WordPress side.

Extending the n8n template for advanced use cases

The base workflow is intentionally simple so it can serve as a foundation for more sophisticated automations. Common extensions include:

  • Contact enrichment Integrate services such as Clearbit or FullContact to append company, role, or social data to contacts before they reach Mautic.
  • Automated onboarding sequences Trigger specific Mautic campaigns or email sequences based on the form type, form_id, or UTM parameters.
  • Real-time lead scoring and routing Implement scoring logic in n8n or Mautic and route high-value leads to sales channels, such as Slack alerts, CRM tasks, or direct notifications.

Because the workflow already centralizes intake and normalization, adding new branches and integrations is straightforward.

Start automating your WordPress to Mautic pipeline

This n8n workflow template offers a reliable, extensible way to sync WordPress form submissions into Mautic while maintaining strict data quality standards. By combining webhook intake, field normalization, email validation, and structured exception handling, you can trust that only clean, actionable leads populate your marketing database.

Next steps:

  • Deploy the template into your n8n instance.
  • Connect it to your WordPress forms and run end-to-end tests.
  • Enhance email verification with external providers if needed.

If you require tailored mappings, integration with additional verification services, or enhanced security controls on the webhook, expert support can help you customize the workflow for your specific environment.

Need help? Reach out for custom automation consulting or refer to the official n8n documentation for advanced node configuration options and best practices.

Automate Transcription with n8n, OpenAI & Notion

Automate Transcription with n8n, OpenAI & Notion

Convert raw audio into structured, searchable knowledge with a fully automated n8n workflow. This reference guide documents a complete transcription pipeline that uses Google Drive for ingestion, OpenAI for transcription and summarization, Notion for knowledge management, and Slack for notifications.

The data flow is:

Google Drive TriggerGoogle Drive DownloadOpenAI Audio TranscriptionGPT JSON SummaryNotion Page CreationSlack Notification

1. Workflow Overview & Use Cases

1.1 Purpose of the Automation

Manual transcription is slow, inconsistent, and difficult to scale across teams. By using n8n to orchestrate transcription and summarization, you can:

  • Reduce manual work for meeting notes, call summaries, and content production.
  • Standardize how summaries, action items, and follow-ups are captured.
  • Centralize knowledge in Notion so it can be searched, tagged, and shared.
  • Ensure every recording automatically produces usable outputs.

1.2 Typical Scenarios

This n8n template is particularly useful for:

  • Podcast production – generate episode summaries, notes, and timestamps-ready content.
  • Product and engineering teams – document design reviews, architecture discussions, and decisions with action items.
  • Customer success and sales – archive customer calls in Notion and track follow-ups from conversations.

2. Architecture & Data Flow

2.1 High-level Architecture

The workflow is built around n8n as the orchestration layer:

  • Input: Audio files uploaded to a specific Google Drive folder.
  • Processing:
    • File download into n8n as binary data.
    • Transcription via OpenAI audio API (Whisper-style transcription).
    • Summarization via a GPT model with a structured system prompt.
  • Output:
    • Notion page populated with title, summary, and structured fields.
    • Slack message to notify stakeholders that the transcript and summary are ready.

2.2 Node Sequence

  1. Google Drive Trigger – watches a folder for new audio files.
  2. Google Drive (Download) – retrieves the file as binary data.
  3. OpenAI Audio Transcription – converts audio to text.
  4. GPT Summarizer – transforms raw transcript into structured JSON.
  5. Notion Page – creates a page or database entry.
  6. Slack Notification – sends a status update with a link to the Notion page.

3. Node-by-Node Breakdown

3.1 Google Drive Trigger Node

Role: Entry point. Detects when a new audio file is added to a specific Google Drive folder and starts an n8n execution.

3.1.1 Configuration

  • Resource: Typically “File” (depending on the node version).
  • Event: fileCreated so that each new file triggers the workflow.
  • Folder: Set to the target folder ID where audio files are uploaded.
  • Polling frequency: For near real-time, a 1-minute interval is common. Adjust based on API limits and latency requirements.
  • Credentials: Google Drive credentials with at least read access to the folder.

3.1.2 Behavior & Edge Cases

  • Only files created after the workflow is activated are typically detected.
  • Ensure the authenticated account or service account can access the folder, otherwise no events will be received.
  • Unsupported file formats will still trigger the workflow, so you may want to filter by extension (e.g., .mp3, .wav, .m4a) in later nodes.

3.2 Google Drive Node (Download)

Role: Converts the reference from the trigger into actual binary content for downstream nodes.

3.2.1 Configuration

  • Operation: download (or equivalent “Download file”).
  • File ID: Mapped from the trigger node output (e.g., {{$json["id"]}}).
  • Binary property: Set to a property name such as data. This property will contain the binary audio.

3.2.2 Behavior & Edge Cases

  • If the file is large, download time may be noticeable. Monitor execution time and consider n8n’s timeout limits.
  • Ensure the binary property name is consistent with what the OpenAI node expects.
  • If the file is missing or permissions change between trigger and download, the node will fail. Add error handling if this is likely.

3.3 OpenAI Audio Transcription Node

Role: Converts the binary audio into a text transcript using OpenAI’s audio transcription endpoint (Whisper-style models).

3.3.1 Configuration

  • Node type: OpenAI or LangChain/OpenAI node configured for audio transcription.
  • Operation / Resource: audio/transcriptions or “Transcribe” depending on node version.
  • Binary property: Reference the same property used in the Google Drive node (e.g., data).
  • Model: Use an appropriate audio model. Whisper-style models or the OpenAI audio transcription endpoint are suitable for most use cases.
  • Language (optional): If you know the primary language of the recording, set the language parameter to improve accuracy and reduce misdetections.

3.3.2 Behavior & Edge Cases

  • Noise and audio quality: Noisy or low-quality audio may reduce accuracy. Consider pre-processing outside n8n if needed.
  • Multilingual recordings: If language is unknown, let the model auto-detect. For consistent output, prefer setting the language explicitly when possible.
  • File size limits: Very long recordings may approach API limits. For extremely long audio, consider splitting before upload or implementing a chunking strategy.
  • Rate limits: Handle rate limit errors with retries in n8n (see the error handling section).

3.4 GPT Summarizer Node

Role: Converts the raw transcript into a structured JSON summary that can be stored and queried easily.

3.4.1 Configuration

  • Node type: OpenAI (Chat) or LangChain/OpenAI configured for chat completion.
  • Model: The example uses gpt-4-turbo-preview. You can substitute with a different GPT model depending on cost and quality trade-offs.
  • Input:
    • Map the transcript text from the previous node as the user content.
    • Provide a detailed system prompt that instructs the model to output only JSON.

3.4.2 JSON Output Structure

The system prompt should instruct the model to return a JSON object with the following fields:

  • title
  • summary
  • main_points
  • action_items (date-tagged if relative dates are mentioned)
  • follow_up
  • stories, references, arguments, related_topics
  • sentiment

For consistency, instruct the model to:

  • Return JSON-only with no additional commentary.
  • Use ISO 8601 format for absolute dates (for example, 2025-10-24).
  • Apply a clear rule for converting relative phrases such as “next Monday” into absolute dates, if your use case requires it.
  • Follow a provided example JSON schema in the prompt.

3.4.3 Handling the Response

  • The model’s output may be returned as a string. In that case, parse it to JSON in a subsequent node before mapping to Notion.
  • Validation is important. Use a validation or code node to confirm that the response is valid JSON and contains all required keys.
  • For very long transcripts, consider chunking the transcript and summarizing each chunk before combining summaries into a final pass to avoid token limits.

3.5 Notion Page Node

Role: Persists the structured summary as a Notion page or database item, making transcripts searchable and organized.

3.5.1 Configuration

  • Node type: Notion.
  • Operation: Typically “Create Page” or “Create Database Entry”, depending on your workspace setup.
  • Credentials: Notion integration with permissions to create pages in the chosen workspace or database.
  • Mapping:
    • Title: Map from the title field in the GPT JSON output.
    • Summary content: Use the summary field as the main text block.
    • Database properties (optional): Map fields such as tags, meeting date, and participants from the JSON structure to Notion properties.

3.5.2 Behavior & Edge Cases

  • If the JSON parsing fails or a required field is missing, the Notion node will likely error. Validate JSON before this step.
  • Ensure that property types in Notion (e.g., date, multi-select, people) match the data you are sending.
  • Notion rate limits are usually forgiving for this use case, but heavy usage may require backoff or batching.

3.6 Slack Notification Node

Role: Notifies stakeholders that processing has completed and provides a direct link to the Notion page.

3.6.1 Configuration

  • Node type: Slack.
  • Operation: Typically “Post Message”.
  • Channel: A team channel or a dedicated notifications channel.
  • Message content:
    • Include a short one-line summary.
    • Include the URL of the newly created Notion page.
  • Credentials: Slack app or bot token with permission to post in the chosen channel.

3.6.2 Behavior & Edge Cases

  • If Slack is temporarily unavailable, the node can fail. Consider retries or a fallback email notification.
  • Check that the bot is invited to the channel where you want to post.

4. Prompt Engineering & Reliability

4.1 Prompt Design Best Practices

  • Be explicit: Instruct the model to output only valid JSON, with no extra text.
  • Provide an example: Include a complete example JSON object in the system prompt to enforce structure.
  • Define constraints: Specify required keys, acceptable value formats, and how to handle missing information.
  • Clarify date handling: If you need date-tagged action items, clearly define how to convert relative dates to ISO 8601.

4.2 JSON Validation in n8n

  • Use a Code node or dedicated validation node to:
    • Parse the string response into JSON.
    • Check for required fields like title, summary, and action_items.
  • If validation fails, send an internal alert or store the raw response for manual inspection instead of writing to Notion.

4.3 Handling Long Transcripts

  • Long audio files can produce transcripts that approach model token limits.
  • Mitigation strategies:
    • Chunk the transcript and summarize each segment separately.
    • Combine partial summaries in a final summarization pass.
    • Restrict the level of detail requested if only high-level notes are needed.

4.4 Noise and Language Considerations

  • For noisy or multilingual recordings:
    • Use the language parameter when you know the main language.
    • Consider preprocessing audio externally if noise is severe.

5. Security & Access Control

5.1 Credential Management

  • Store API keys and OAuth tokens in n8n’s credential storage. Do not hard-code sensitive values directly in nodes.
  • Use separate credentials for development, staging, and production environments.

5.2 Principle of Least Privilege

  • Google Drive: Limit the integration scope to the folders and files required for the workflow.
  • Notion: Restrict the integration to only the databases or pages that need to be created or updated.
  • Service accounts: For Google Drive watchers, consider a dedicated service account that centralizes file access rather than relying on individual user accounts.

6. Monitoring, Error Handling & Retries

6.1 Basic Error Handling Patterns

  • Transcription retries:
    • Configure the OpenAI audio node or a surrounding wrapper to retry on rate limit or transient network errors.
  • Administrative alerts:
    • If a file fails repeatedly, send a Slack message to an internal admin channel with the file ID and error details.
  • Backup logging:
    • Optionally log transcripts and summaries to

Automate Marketing Campaign Documentation

Automate Marketing Campaign Documentation with n8n + OpenAI

Turn raw campaign JSON into clear, concise marketing documentation automatically. Save time, reduce manual errors, and keep every stakeholder aligned on what a campaign does and how it should perform.

What you will learn in this guide

This tutorial walks you through an n8n workflow template that uses OpenAI to convert a campaign JSON into a structured marketing brief. By the end, you will know how to:

  • Understand the overall automation flow between n8n and OpenAI
  • Configure the n8n nodes used in the template
  • Feed campaign JSON into the workflow using a form
  • Generate documentation that covers audience, goals, triggers, flows, and more
  • Set up credentials and test the workflow safely in your own n8n instance

Why automate campaign documentation?

Most teams still write campaign briefs manually. This usually leads to:

  • Slow turnaround times for new campaigns
  • Inconsistent documentation formats across teams
  • Outdated or incomplete briefs as campaigns evolve
  • Extra meetings just to clarify how a campaign works

By using an automation pipeline that converts a campaign JSON (from n8n, Zapier, Make, or any other automation tool) into a clear marketing brief, you can:

  • Onboard new team members faster
  • Run experiments with confidence, backed by documented goals and triggers
  • Hand off work to stakeholders without repeated explanations
  • Keep a consistent, up to date record of how each campaign is designed

How the n8n + OpenAI workflow works

This template uses n8n as the automation engine and OpenAI (GPT) as the content generator. At a high level, the workflow does the following:

  1. A marketer submits a campaign JSON and some metadata through a form.
  2. n8n constructs a controlled prompt and sends the JSON to OpenAI.
  3. OpenAI returns a concise HTML marketing document based on the JSON.
  4. n8n shows a preview in the webhook response and emails the final documentation to the campaign owner.

Node-by-node overview

Here is how each n8n node in the template contributes to the automation:

  • n8n Form Trigger – Collects:
    • Campaign Title
    • Campaign JSON
    • Campaign Owner Email

    This is the main entry point where marketers submit campaign details.

  • Set (build-marketing-prompt) – Builds a strict instruction prompt that:
    • Defines the sections the document should include
    • Controls tone and formatting
    • Guides OpenAI to produce structured, repeatable outputs
  • Set (create-openai-input) – Injects the campaign title and raw JSON into the prompt payload, so the model has both context and data.
  • OpenAI (generate-campaign-doc) – Sends the final prompt to a GPT model and gets back HTML documentation that is ready for review or distribution.
  • Set (prepare-email-content) – Wraps the generated HTML into a simple email layout and prepares the subject line for the outgoing message.
  • Respond to Webhook – Displays a styled HTML preview in the browser right after form submission, so the marketer can see the generated brief instantly.
  • Email Send – Sends the final documentation to the campaign owner using your configured email provider.

What the generated campaign documentation includes

The automation is designed to turn your JSON into a complete, human friendly marketing brief. Below are the main sections you can expect, and how they relate to the data you provide.

1. Campaign target audience

This section explains who the campaign is meant to reach. The generated document typically covers:

  • Primary audience – For example:
    • Current customers
    • New trial users
    • Cart abandoners
  • Audience segments and personas – Such as:
    • Demographic details
    • Behavioral triggers
    • Product fit or usage patterns
  • Recommended filters – Practical filters you can apply, like:
    • Last purchase date
    • Engagement score
    • Tags or properties from your CRM

2. Campaign goals and KPIs

The brief outlines what success looks like and how to measure it. It usually includes:

  • Primary objectives:
    • Acquisition
    • Activation
    • Retention
    • Upsell or cross-sell
  • Key metrics, such as:
    • Conversion rate
    • Open rate and click-through rate (CTR)
    • Return on investment (ROI)
    • Engagement metrics
    • Revenue per user or per campaign
  • Benchmarks – Baseline performance and target lift, for example:
    • Increase CTR by 15 percent
    • Reach a 3 percent conversion rate

3. Trigger conditions and entry points

This part documents when and how users enter the campaign, which helps both marketers and engineers understand the logic. It can describe:

  • Event triggers:
    • Form submission
    • Purchase completion
    • Trial expiry
    • Time-based schedules
  • Entry criteria:
    • Audience segments
    • Minimum inactivity period
    • Product usage thresholds
  • Scheduling details:
    • Send windows and quiet hours
    • Time zone handling
    • Throttling rules and retry logic

4. Message sequence and flow

The documentation includes a channel-by-channel plan that maps to your JSON definition:

  • Channel breakdown:
    • Email
    • SMS
    • Push notifications
    • Social ads
    • In-app messaging
  • Message cadence:
    • Initial touch
    • Follow-ups and reminders
    • Escalation messages
    • Final attempt or exit
  • Content themes and CTAs:
    • Subject line guidance or examples
    • Primary call to action
    • Landing page URLs
    • Personalization fields or tokens

5. Required integrations and credentials

The brief also helps you or your operations team understand what systems are involved. It typically lists:

  • OpenAI API key – Used by the generate-campaign-doc node to call the GPT model.
  • Email provider credentials – SMTP or transactional email service credentials used by the send-email-notification node.
  • CRM and marketing platform connectors – For example:
    • HubSpot
    • Segment
    • Mailchimp

    These may require API tokens if the campaign syncs segments or events.

  • Webhook URLs and OAuth details – Any webhook endpoints, client IDs, or client secrets needed for third-party API access.

Security tip: Always store keys in n8n credentials. Do not paste secrets directly into prompts, Set nodes, or logs.

6. A/B testing and customization guide

The generated documentation can also suggest how to experiment and optimize the campaign. It often covers:

  • Test variables:
    • Subject lines and preheaders
    • CTA wording and button labels
    • Send times and days of week
    • Imagery or layout variations
  • Segmentation strategies:
    • Random audience splits (for example 50/50 or 30/70)
    • Geo-based splits
    • Behavior or cohort based splits
  • How to modify variants in JSON:
    • Use a clear naming convention such as campaign-v1, campaign-v2
    • Store each variant as a separate JSON object
    • Pass these variant JSON objects into the automation for documentation
  • Optimization guidance:
    • Run tests long enough to reach statistical significance, usually 3 to 14 days depending on traffic
    • Measure lift on the primary KPIs defined earlier

Step-by-step: setting up the workflow in n8n

In this section, you will configure the template in your own n8n instance and run your first test.

Step 1: Install and import the workflow

  1. Make sure you have an n8n instance running (self-hosted or cloud).
  2. Import the provided workflow JSON into n8n.
  3. Open the workflow editor and confirm that all nodes appear correctly.

Step 2: Configure the Form Trigger node

  1. Open the Form Trigger node.
  2. Set a clear path for the webhook URL (for example /campaign-doc).
  3. Define the form fields that marketers will fill:
    • Campaign Title – A human readable name for the campaign.
    • Campaign JSON – The raw JSON that describes the campaign logic.
    • Campaign Owner Email – The address that receives the generated documentation.
  4. Share the form URL with your team once you have tested it.

Step 3: Add OpenAI credentials

  1. In n8n, go to Credentials.
  2. Create a new credential for OpenAI.
  3. Generate an API key in your OpenAI account and paste it into the credential.
  4. Return to the OpenAI (generate-campaign-doc) node and select the new credential.

Step 4: Configure email sending

  1. Decide which email provider you will use:
    • SMTP server
    • Transactional provider like SendGrid, Postmark, etc.
  2. In n8n, create the appropriate email credentials:
  • SMTP credentials:
    • User and password
    • Host and port
    • From address, for example campaigns@yourcompany.com
  • Alternative email providers – Follow the provider specific setup in n8n if you prefer not to use raw SMTP.
  1. Attach these credentials to the Email Send (or send-email-notification) node in your workflow.

Step 5: Tailor the prompt and brand voice

  1. Open the Set (build-marketing-prompt) node.
  2. Review the instruction text that controls:
    • Document sections
    • Tone and writing style
    • Formatting rules (for example HTML headings and lists)
  3. Adjust the instructions to match your brand voice or add any required corporate sections, such as:
    • Legal disclaimers
    • Compliance notes
    • Internal review steps
  4. Save your changes and consider versioning the prompt text so you can track updates over time.

Credential summary

  • OpenAI:
    • Generate an API key in your OpenAI account.
    • Save it securely in n8n credentials.
  • SMTP or email provider:
    • User, password, host, port
    • From address such as campaigns@yourcompany.com
  • Optional analytics or CRM keys:
    • Use these if you want to track UTM parameters or sync audience status with tools like HubSpot, Segment, or Mailchimp.

Testing your campaign documentation workflow

Before rolling this out to your whole team, run a few tests to confirm everything works as expected.

Testing checklist

  • Submit a sample form entry with a small, representative campaign JSON.
  • Verify that the OpenAI node returns valid HTML content.
  • Check that the Respond to Webhook node displays a readable HTML preview in your browser.
  • Confirm that the email is delivered to the campaign owner and renders correctly in:
    • Gmail
    • Outlook
    • Mobile email apps
  • Inspect logs to ensure credentials and secrets are not logged in plain text.
  • Rotate any keys if you suspect they were exposed during early testing.

Example: minimal campaign JSON

Here is a simple JSON payload you can use to test the workflow. It describes a basic winback email campaign.

{  "title": "Winback - 90 Day Inactive",  "audience": "customers_inactive_90_days",  "channels