Comprehensive Setup Guide for Marketing Team Automation
A Marketer, A Telegram Bot, And Too Many Tabs
On a rainy Tuesday afternoon, Lara, a growth marketer at a small SaaS startup, stared at her browser. Nineteen tabs were open.
One for LinkedIn scheduling, one for a blog draft, three for stock images, two for AI tools, another for video generation, and a lonely Google Sheet where she tried to track what had gone live. Her founder had just Slacked her:
“Can we start pushing more short videos and LinkedIn posts this week? Also, can we log everything we publish? Would love more visibility.”
Lara sighed. She knew the answer was technically yes, but only if she worked late every night.
That was when she remembered a template someone had mentioned in a community call: a complete n8n marketing automation setup built around a Marketing Team Agent that could orchestrate everything through Telegram.
One Telegram bot, one workflow, and all her tools talking to each other. It sounded almost too good to be true.
Discovering The Marketing Team Agent
That evening, Lara opened n8n and the template link. Instead of another scattered how-to, she found a full architecture for a unified marketing assistant:
- A single Telegram entry point where she could send text or voice requests
- A Marketing Team Agent that would interpret what she wanted
- Dedicated workflows for:
- Video generation and processing
- LinkedIn post creation
- Blog post creation
- Image creation and editing
- Image search and retrieval
- Automatic Google Sheets logging so nothing was lost
The promise was simple: Lara could type a message into Telegram like, “Create a LinkedIn post about our new feature and a matching hero image”, and the Marketing Team Agent would decide which workflows to run, call the right APIs, and bring everything back to her in the chat.
She decided to set it up in one sitting.
The Architecture Behind Lara’s New Assistant
Before she touched any nodes, Lara wanted to understand how this thing actually worked. The high-level architecture looked like a relay race:
- Entry channel – A Telegram Trigger node waited for her messages.
- Processing layer – Optional nodes could turn voice into text or normalize messy input.
- Orchestration brain – The Marketing Team Agent, powered by OpenRouter, decided what tools to use.
- Specialist workflows – Separate child workflows handled:
- Video
- LinkedIn Post
- Blog Post
- Create Image
- Edit Image
- Search Images
- External services – The workflows talked to:
- Telegram API
- OpenRouter for AI models
- Tavily for research
- PiAPI, Runway, and ElevenLabs for video and voice
- Creatomate for image templates
- Google Sheets for logging
- Response channel – Final outputs returned to her in Telegram as text, links, or media.
In other words, the Marketing Team Agent would act like a team lead. It would listen to her request, pick the right specialist workflow, send the work out, gather the results, and report back to her in chat.
Rising Action: Importing The “Team” Into n8n
Lara started by importing the core workflows. The template bundle came with a set of n8n workflows that each acted like a separate tool the agent could call.
Bringing The Core Workflows Online
She imported them one by one into her n8n instance:
- Video workflow
- LinkedIn Post workflow
- Blog Post workflow
- Create Image workflow
- Edit Image workflow
- Search Images workflow
Together, they covered all the tasks that used to live in separate tabs: video generation, long-form content, social posts, and image handling from scratch or by editing existing assets.
Each one would later be registered as a tool inside the Marketing Team Agent configuration.
The Telegram Entrance: Where Lara Would Talk To Her Agent
The story of every request would start in the same place: the Telegram Trigger node.
Lara created a Telegram bot and connected it using the Telegram Credential. Inside n8n, that credential powered both the trigger and any send-message nodes.
From there, the flow looked like this:
- A user (usually Lara) sends a text or voice message to the Telegram bot.
- The Telegram Trigger node receives it.
- Optional nodes convert voice to text or clean up the input.
- The normalized text is passed into the Marketing Team Agent.
- The agent calls the right workflows and gathers results.
- A Telegram send node replies with content or status updates.
For Lara, this meant that her entire marketing engine would be reachable from her phone, on the same app where she already talked to colleagues and friends.
The Turning Point: Teaching The Agent What Tools It Can Use
The real magic, and the real tension, sat inside the Marketing Team Agent configuration. If she mislinked even one workflow, her “team” would not know how to do its job.
Configuring The Marketing Team Agent Node
Inside n8n, Lara opened the agent node and began wiring in the tools:
- She added each imported workflow as a tool:
- Video
- LinkedIn Post
- Blog Post
- Create Image
- Edit Image
- Search Images
- She attached her OpenRouter Credential so the agent could:
- Interpret natural language requests
- Decide which workflow to call
- Generate content where needed
One detail almost tripped her up. The agent expected workflows to be referenced by specific internal names or IDs. She liked to rename things for clarity, but if she changed any titles, she had to update the tool references inside the agent node as well.
It felt a bit like teaching a new hire where everyone sits in the office. Once that was clear, everything else could flow.
Deep In The Weeds: How Each Workflow Helped Lara
With the high-level setup in place, Lara walked through each specialist workflow to make sure its credentials and APIs were correctly set. This was where most hidden errors usually lurked.
Video Workflow: From Script To Final Clip
Lara had been putting off video content for months, because stitching tools together manually was painful. The Video workflow in this template changed that.
It relied on three key API keys, each for a different part of the pipeline:
- PiAPI API Key – for the core video generation.
- Runway API Key – for video processing, enhancements, or transformations.
- ElevenLabs API Key – for generating voiceovers and integrating audio into the video.
Inside the workflow, she checked that:
- All PiAPI nodes referenced the correct PiAPI credential or environment variable.
- Runway-related nodes used the Runway API Key.
- Voice generation nodes pointed to the ElevenLabs API Key.
Once those were in place, a simple Telegram request like “Create a 30-second video explaining our new pricing page” could trigger a full pipeline behind the scenes.
LinkedIn Post Workflow: Research-Backed Posts In Minutes
Lara’s next pain point was LinkedIn. She wanted posts that sounded smart, not generic. The LinkedIn Post workflow was designed exactly for that.
It used:
- Tavily API Key via a Tavily Credential for research queries.
In practice, this meant:
- Research nodes called Tavily using the shared credential to gather context, statistics, or references.
- AI generation nodes could use OpenRouter through the same OpenRouter Credential that powered the agent.
Now, if she messaged, “Write a LinkedIn post about the impact of AI on small marketing teams, include one recent stat”, the workflow could actually go out, research, and then write something grounded in real data.
Blog Post Workflow: Long-Form Content Without The Blank Page
Next was the Blog Post workflow, Lara’s new antidote to blank-page syndrome. It mirrored the LinkedIn workflow in structure, but for longer-form content.
It also depended on:
- Tavily API Key for external research.
Inside the workflow:
- Research steps used the Tavily Credential to gather background material.
- AI content generation used the shared OpenRouter Credential for model access.
Instead of starting from scratch, Lara could say, “Draft a 1,200 word blog post about how we automated our marketing with n8n, include a short introduction and clear headings”, and get a solid first draft back in Telegram.
Image Workflows: Creating, Editing, And Finding Visuals
Visuals had always been a bottleneck. The template split image work into three dedicated workflows, all coordinated by the Marketing Team Agent.
Create Image Workflow
The Create Image workflow generated new images based on prompts or structured parameters that came from the agent.
Key aspects Lara checked:
- It used a Creatomate Image Template so new images followed consistent branding and layout.
- It could plug into external image generation APIs, depending on her implementation.
Edit Image Workflow
The Edit Image workflow handled tweaks to existing assets, like adding overlays, text, or style changes.
Important details:
- It also relied on the same Creatomate Image Template to keep everything visually aligned.
- It accepted image references or parameters passed in from the agent or other workflows.
Search Images Workflow
Finally, the Search Images workflow helped Lara find suitable assets when she did not want to generate from scratch.
Its role was simple but crucial:
- It queried an image database or external service based on prompts or keywords.
- It returned image URLs or metadata, which could either be sent directly to Lara or fed into the Create/Edit workflows.
Logging Everything To Google Sheets
Lara knew her founder would eventually ask, “What did we publish this week?” She wanted the answer to be one click away.
The template included a Google Sheets node connected to a Google Sheets Log Template. This log captured:
- Timestamp
- Content type (video, blog, LinkedIn, image)
- Request metadata (prompt, user ID)
- Output URLs or IDs
To make it work, she:
- Authorized the Google Sheets node with the correct Google account.
- Referenced the log template by spreadsheet ID and worksheet name.
From then on, every new piece of content created by the workflows could be recorded automatically, giving her a simple analytics and tracking layer without extra effort.
Credentials: The Hidden Gatekeepers
By this point, Lara’s n8n canvas looked impressive. But she knew from experience that misconfigured credentials could break everything silently.
Core Credentials To Configure
She opened the Credentials section in n8n and double-checked the essentials:
- Telegram Credential
- Used by the Telegram Trigger and all send-message nodes.
- Responsible for all inbound and outbound Telegram messaging.
- OpenRouter Credential
- Used by the Marketing Team Agent and any AI nodes that talk directly to OpenRouter.
- Handled AI model requests for interpreting prompts and generating content.
- Tavily Credential
- Used inside the LinkedIn Post and Blog Post workflows.
- Powered all research queries through the Tavily API.
API Keys By Workflow
Then she mapped each API key to the right place.
Video Workflow API Keys
- PiAPI API Key – for video generation.
- Runway API Key – for video processing and enhancements.
- ElevenLabs API Key – for voice generation in videos.
She stored them either as n8n credentials or environment variables and made sure each relevant node referenced the right one.
LinkedIn Post And Blog Post API Keys
- Tavily API Key – for research steps in both workflows.
All Tavily nodes were configured to use the same Tavily Credential, which wrapped this key.
Templates And External Assets: Branding And Tracking
Two templates tied the whole system together visually and operationally.
Creatomate Image Template
Lara downloaded the Creatomate Image Template from the Free Skool Community as recommended in the documentation.
She then:
- Linked this template inside the Create Image and Edit Image workflows.
- Verified that all image operations referenced it where required.
The result was consistent branding across generated and edited images, without manually policing fonts, colors, and layouts.
Google Sheets Log Template
The Google Sheets Log Template became her single source of truth for outputs.
- She connected the sheet to the Google Sheets node in n8n.
- Configured each workflow to log its outputs:
- Video links
- Blog URLs or drafts
- LinkedIn post content
- Image URLs
Instead of chasing down content across tools, she could open one spreadsheet and see what had been created, when, and for whom.
Tension Peaks: The Pre-Run Checklist
Everything looked ready. But Lara had been burned before by rushing to activate workflows without a final review. This time, she walked through a mental checklist.
Her Pre-Run Checklist
- Core workflows imported:
- Video
- LinkedIn Post
- Blog Post
-
Manage Webflow Form Submissions in Discord
Manage Webflow Form Submissions in Discord
Imagine this for a second: you launch a new Webflow form, people start filling it out, and suddenly your inbox looks like it went through a glitter explosion. You are copying form data into Discord, creating channels manually, tagging teammates, pasting messages, and doing the same routine over and over.
At some point you probably think, “Surely I do not have to be the copy-paste person forever, right?”
Good news, you really do not. With a ready-made n8n workflow template, you can hook Webflow to Discord so that:
- Discord channels are created automatically from your Webflow form names
- Every new submission lands in the right channel
- Your team can see and discuss everything in one place
Let us walk through what this template actually does, when you would want to use it, and how to get it running without turning setup into a whole side project.
What This n8n Workflow Template Does For You
At its core, this workflow connects Webflow forms with your Discord server so each form has its own dedicated space for conversations. Instead of emails and scattered screenshots, everything flows into Discord automatically.
Here is the big-picture flow of the automation:
- Listens for Webflow form submissions with a Webflow trigger node
- Checks your Discord server for a channel that matches the form name
- Creates a new Discord channel if one does not exist yet
- Notifies your #general channel whenever a new form channel is created
- Formats the submission as markdown so the message is clean and readable
- Sends the formatted submission into the correct Discord channel
The end result is simple and really useful: every Webflow form gets its own “home” in Discord, and every submission is posted where your team can actually see it, talk about it, and follow up.
Why Connect Webflow Forms To Discord With n8n?
If Webflow is where you collect information and Discord is where your team hangs out, connecting them is kind of a no-brainer. This workflow helps you go from “we will organize this later” to “wow, this actually runs itself.”
Here is what you gain by automating the connection:
- Centralized information
No more hunting through inboxes, random DMs, or half-forgotten spreadsheets. Everything is in Discord, in clearly named channels. - Faster responses
Submissions show up in real time in channels your team already watches, so it is easier to reply quickly. - Better organization
Each Webflow form gets its own Discord channel, which makes it simple to track conversations and decisions related to that specific form. - Clear records
Instead of submissions getting buried in email archives, they are logged in a dedicated channel that anyone on the team can revisit.
In short, you get a lightweight system that keeps things tidy without you needing to babysit every form submission.
How The Workflow Actually Works (Step By Step)
Let us peek under the hood and follow what happens from the moment someone hits “Submit” on your Webflow form to the moment your team sees the message in Discord.
1. Webflow Trigger Listens For New Form Submissions
The workflow starts with a Webflow trigger node. This node listens for new submissions on your Webflow site and grabs two key pieces of information:
- The form name, which is later used to decide which Discord channel to use or create
- The form data, which includes all the field values you want to send to Discord
As soon as someone submits a form, the workflow kicks into motion automatically.
2. n8n Pulls a List of All Discord Channels
Next, the workflow talks to the Discord API to list all channels in your chosen guild (server). This gives n8n a full list of existing channels so it can check if there is already one that matches the form.
Think of it like asking Discord, “What channels do we already have to work with?”
3. JavaScript Code Cleans Up The Form Name
Now a JavaScript code node steps in to transform the Webflow form name into a Discord-friendly channel name. It:
- Converts the form name to lowercase
- Replaces spaces with hyphens
- Compares this cleaned-up name to the list of channels from your server
For example, a form called “Contact Us” becomes
contact-us. If a channel with that name already exists, great. If not, the workflow gets ready to create one.4. IF Node Checks If The Channel Already Exists
An IF node then decides which path the workflow should follow based on the previous step:
- If the channel exists: The workflow skips channel creation and jumps straight to formatting and posting the submission.
- If the channel does not exist: It creates a new channel, sends a notification to #general, and then posts the submission in that new channel.
This check is what keeps your server from ending up with duplicate channels that differ only by a space or underscore.
5. Creating a New Discord Channel From the Form Name
When there is no matching channel, the workflow uses the Discord API to create a new text channel with a clean, consistent naming style:
- All lowercase
- Spaces replaced with hyphens
So you do not end up with a mix like “Contact Us”, “contact-us”, and “contact_us_but_different”. Everything follows the same pattern, which makes your channel list much easier to scan.
6. Notifying The #general Channel About New Channels
Whenever a new channel is created, the workflow posts a notification message in #general. That message includes a direct link to the new channel so your team can jump in quickly.
This is especially useful when you roll out a brand new form and want everyone to know where those submissions will be discussed.
7. Formatting Submission Data as Markdown
Before sending anything to Discord, another JavaScript code node takes the raw form data and turns it into a nicely formatted markdown message. That way, what shows up in Discord is easy to read at a glance.
For example, instead of raw JSON, you get something like:
**New Webflow Form Submission**
- Name: Jane Doe
- Email: jane@example.com
- Message: I would love to learn more!
Much nicer than a messy blob of data, right?
8. Posting The Submission To The Correct Discord Channel
Finally, the workflow sends that markdown message to the right place. Depending on the earlier IF check, the message will be posted to:
- An existing channel that already matches the form name, or
- The newly created channel that was just set up for this form
Either way, every submission ends up in a consistent, predictable location that your team can rely on.
Benefits of Automating Webflow To Discord With n8n
Once this workflow is live, you get a bunch of quality-of-life upgrades without really thinking about it.
- Automation: No more manual channel creation or copy-paste routines for every single submission.
- Organization: Each Webflow form has its own dedicated Discord channel, so discussions stay focused and easy to follow.
- Real-time notifications: Submissions appear in Discord as they happen, not whenever someone remembers to check email.
- Flexibility: Because this runs in n8n, you can extend it later to ping other tools, trigger additional bots, or add more logic.
In other words, you trade repetitive admin work for an automation that quietly does its job in the background.
What You Need Before You Start
Before this template can do its magic, you will need a couple of credentials ready to plug into n8n. Here is a quick checklist.
- Create Webflow API credentials (V1 Token)
Open your Webflow project settings and generate a V1 API token. You will use this token to authenticate the Webflow nodes in n8n so they can listen for form submissions. - Set up Discord Bot API credentials
Go to the Discord Developer Portal, create or select an application, and configure a bot. This gives you the bot token and related credentials that n8n uses to:- List channels in your server
- Create new channels
- Send messages into those channels
- Connect your credentials inside n8n
In your n8n instance, open the workflow template and link:- Your Webflow API token to the Webflow trigger node
- Your Discord bot credentials to the Discord nodes that:
- List channels
- Create channels
- Send messages
- Activate and test the workflow
Turn the workflow on, then submit a test form on your Webflow site. You should see:- A new Discord channel created if one did not already exist for that form
- A notification in #general when the new channel is created
- The nicely formatted submission message in the channel that matches the form
Tips To Get The Most Out Of This Template
A tiny bit of planning makes this setup even smoother and more useful long term. Here are a few practical tweaks you can make.
- Use meaningful Webflow form names
Since channel names are generated from form names, choose names that are clear and unique. For example,job-applicationis much more helpful thanform-1. - Keep channel names descriptive
As your server grows, descriptive names make it easier for your team to quickly understand what each channel is for. - Customize the #general notification message
Adjust the text that gets posted in #general so it matches your team’s style, whether you prefer playful, formal, or something in between. - Test with different forms and edge cases
Try multiple forms, unusual field values, and different naming patterns. Make sure the channel naming and markdown formatting behave the way you expect before rolling it out widely.
Next Steps: Let The Automation Handle The Boring Stuff
If you are tired of babysitting form submissions and juggling copy-paste tasks, this n8n workflow template is a simple way to reclaim some time and keep your team in sync.
Set it up once, connect your Webflow and Discord credentials, and from then on your forms and channels stay aligned with almost no effort on your part.
Want a deeper walkthrough with more detail and a video demo? Check out the full guide with video.
When you are ready to plug this into your own n8n instance, grab the template below and start automating your way out of repetitive work.
Automate Monthly Event Newsletters with n8n
Automate Monthly Event Newsletters with n8n
Overview: From Manual Compilation to Fully Automated Event Newsletters
Compiling a monthly event newsletter looks straightforward until you break down the actual work involved. Every cycle you often need to:
- Open the same event website for a specific location
- Navigate through multiple paginated listings
- Manually copy dates, artists, venues, and links
- Rebuild a readable email layout from scratch
For anyone managing a recurring newsletter, this quickly becomes repetitive and error prone.
The n8n workflow template described here eliminates that manual overhead. Once configured, it runs on a monthly schedule, scrapes an events site for a chosen location, consolidates all event data, generates a structured HTML email, and delivers it via Gmail. You configure it once and let n8n handle the operational routine.
Primary Use Cases for This n8n Workflow
This automation template is particularly valuable if you:
- Operate a community, venue, or fan newsletter that regularly promotes upcoming events
- Track events in a specific city, region, or venue and want a consistent monthly summary
- Spend time every month collecting and formatting event data manually
- Need a reusable foundation that you can adapt to different event sources or email layouts
In short, it is designed for anyone who wants predictable, high quality event roundups without recurring manual work.
What the n8n Event Newsletter Template Automates
At a high level, this n8n workflow:
- Runs on a configurable monthly schedule
- Scrapes an events website based on a specified location URL
- Handles pagination across multiple event pages
- Extracts structured data such as date, main artist, support acts, location, and event link
- Generates a HTML email with a clean, tabular layout of all events
- Sends the compiled newsletter via Gmail to a defined recipient
Once active, the workflow runs autonomously each month and delivers a complete, up to date event overview.
Architecture and Key Components of the Workflow
The workflow is built around a clear sequence of nodes that handle scheduling, configuration, scraping, transformation, and email delivery. Below is a breakdown of the main components and how they interact.
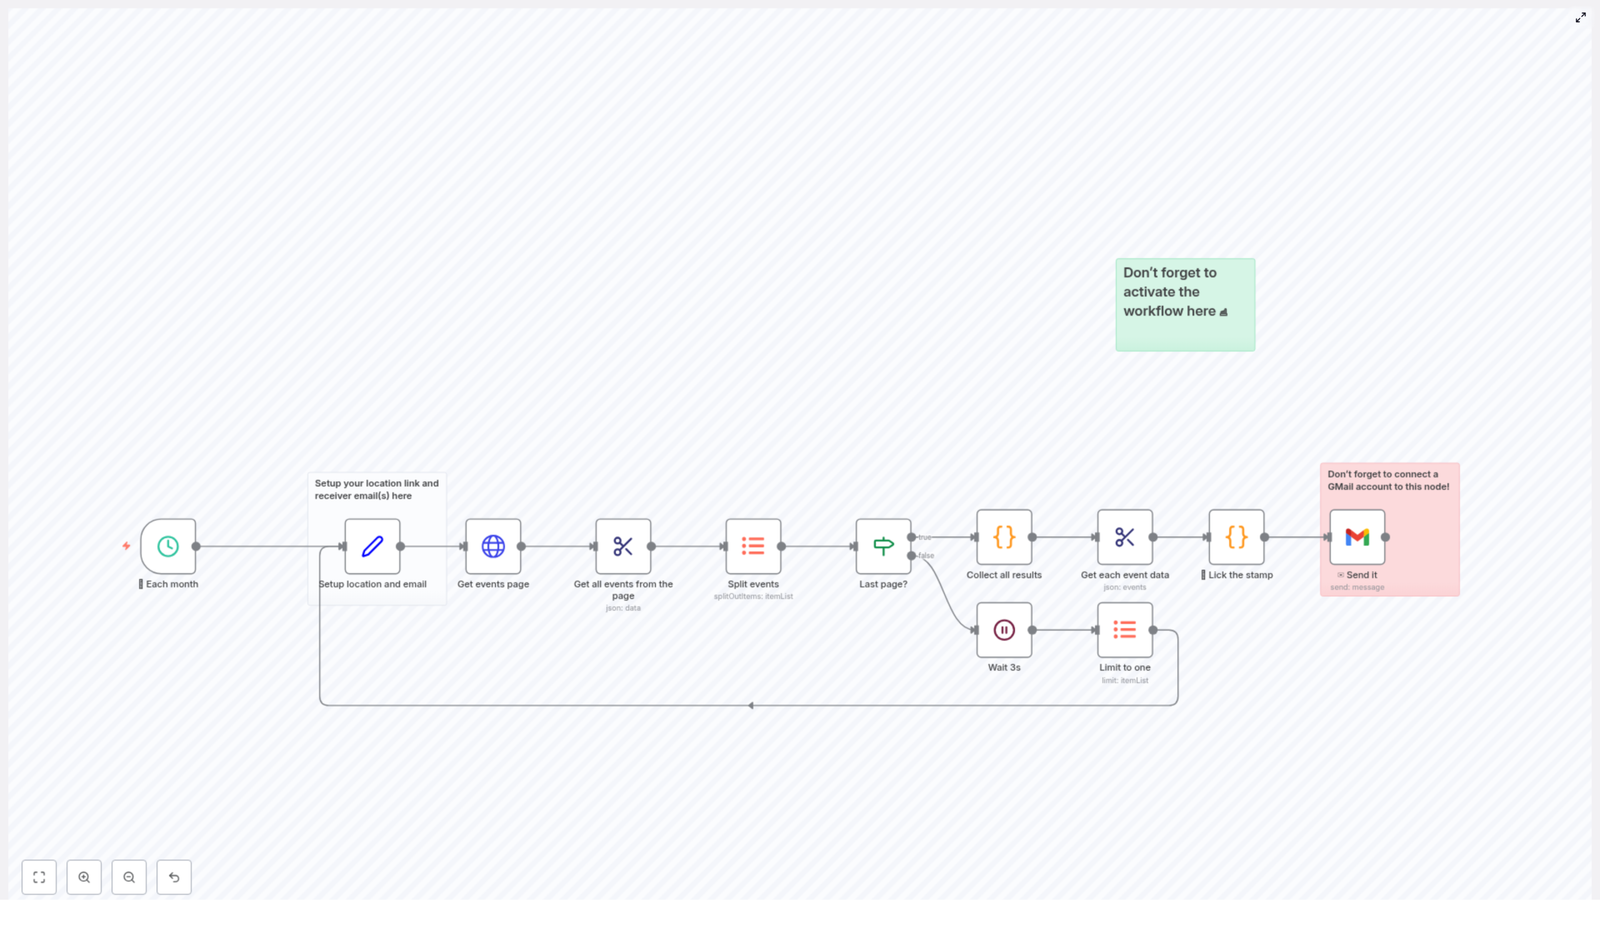
1. Monthly Schedule Trigger
The automation begins with a schedule-based trigger configured to run once per month. This replaces the need for manual reminders or calendar tasks. When the trigger fires, n8n initiates the entire pipeline to collect and distribute the latest event data.
2. Configuration: Location URL and Recipient
Early in the workflow, a configuration step defines two critical parameters:
- Location URL – the base URL of the events page to scrape for your chosen city, region, or venue
- Recipient email address – the inbox that should receive the generated newsletter
This separation of configuration from logic follows automation best practices. It allows you to repoint the workflow to a different event source or update recipients without modifying the core scraping or email logic.
3. Paginated Fetch of Event Pages
Most event platforms display results across multiple pages rather than a single long listing. The workflow accounts for this by implementing pagination logic:
- Starts from the initial page of events for the configured location
- Requests the current page and inspects the number of events returned
- Tracks the page index and proceeds to the next page when necessary
The automation continues requesting subsequent pages until it detects that it has reached the end of the listing. It uses a simple rule to determine the final page: when a page returns fewer than 50 events, the workflow assumes there are no further pages to load.
4. Intelligent Pagination Control and Rate Limiting
To avoid overloading the target site and to ensure that no events are skipped, the workflow applies a basic but effective control strategy:
- If a page returns exactly 50 events, the workflow assumes additional pages are available
- Before requesting the next page, it waits approximately 3 seconds
This short delay serves as a simple rate limiting mechanism. It helps maintain stability, reduces the likelihood of throttling, and keeps the scraping behavior respectful toward the source system.
5. Parsing and Structuring Event Data
Once a page is retrieved, the workflow parses the HTML response and identifies individual event entries. For each event, it extracts a consistent set of attributes, including:
- Date of the event
- Main artist
- Supporting act where available
- Location or venue
- Event link so readers can access detailed information
This transformation step converts raw HTML into structured, machine readable data. That structured data is then ready to be aggregated and formatted for email distribution.
6. Consolidation of Events Across All Pages
After iterating through all relevant pages, the workflow merges the individual page results into a single consolidated dataset. Instead of handling fragmented lists per page, you end up with one unified collection of events for the entire period.
This consolidated list is used as the single source of truth for generating the HTML newsletter and for calculating the total number of events for the subject line.
7. HTML Email Generation with Custom JavaScript
With the final event list ready, the workflow moves into presentation. Using custom JavaScript within n8n, it programmatically builds a HTML table that displays each event in a clear and scannable format. Typical columns include:
- Date
- Main artist
- Support acts if present
- Location
This table based layout is chosen for compatibility with common email clients and for readability. Recipients can quickly review the list, compare dates, and identify the events that are most relevant to them.
8. Email Delivery via Gmail Integration
The final step is handled by n8n’s Gmail integration. The workflow:
- Injects the generated HTML table into the email body
- Builds a subject line that includes the total count of events found for that month
- Sends the message to the configured recipient using your authenticated Gmail account
From the recipient’s perspective, this looks like a standard, well formatted newsletter. From your perspective, it is a fully automated output that requires no monthly intervention once configured.
Configuration and Setup Considerations
Before activating the workflow in production, ensure the following configuration steps are completed.
Connect Gmail to the Email Node
The workflow relies on Gmail for outbound email. In your n8n instance:
- Authenticate a Gmail account that will be used as the sender
- Associate that credential with the email node in the workflow
Without this integration, the final email delivery step will not execute.
Update the Events Location URL
In the configuration node, replace the placeholder location URL with the actual events listing you want to monitor. This can be a city level page, a venue specific calendar, or any compatible event index that follows the expected structure.
Set the Recipient Email Address
Specify the email address that should receive the monthly newsletter. This might be:
- Your personal inbox, for monitoring or curation
- A shared team address for internal visibility
- A mailing list that distributes the newsletter to a broader audience
Activate the Workflow
After validating your configuration, activate the workflow in n8n. If the workflow is not active, the monthly trigger will not fire and no emails will be sent. For testing purposes, you may temporarily adjust the schedule to run more frequently, then revert to a monthly cadence once validated.
Operational Benefits and Automation Best Practices
Implementing this n8n event newsletter workflow delivers several tangible advantages.
Consistent Time Savings
All recurring low value tasks such as copying event details, reformatting content, and building emails are handled automatically. Your time can be redirected to higher impact work like content strategy, audience growth, or partnership development.
Reliable and Predictable Communication
Because the workflow is schedule driven, your audience receives updates on a consistent cadence, regardless of your personal workload. This improves reliability and helps maintain engagement with your community or customer base.
Flexible Customization
The template is designed as a starting point. You can:
- Adapt the scraping logic to different event sources
- Extend the HTML template with branding, additional columns, or calls to action
- Integrate further downstream actions, such as logging events to a database or CRM
- Change recipients or add conditional routing without redesigning the core workflow
Getting Started with the n8n Event Newsletter Template
If you have been postponing regular event updates because of the manual effort involved, this template provides a practical way to automate the entire process.
To implement it:
- Load the template into your n8n environment
- Configure the location URL and recipient email address
- Connect your Gmail account to the email node
- Activate the workflow on a monthly schedule
Once these steps are complete, your monthly event newsletter will run on autopilot, delivering structured and current event information with minimal ongoing maintenance.
If you find this approach useful, consider sharing it with colleagues or other automation professionals who manage event communications, and explore additional n8n templates to further streamline your operations.
Cloudflare KV API Integration: Manage Storage Efficiently
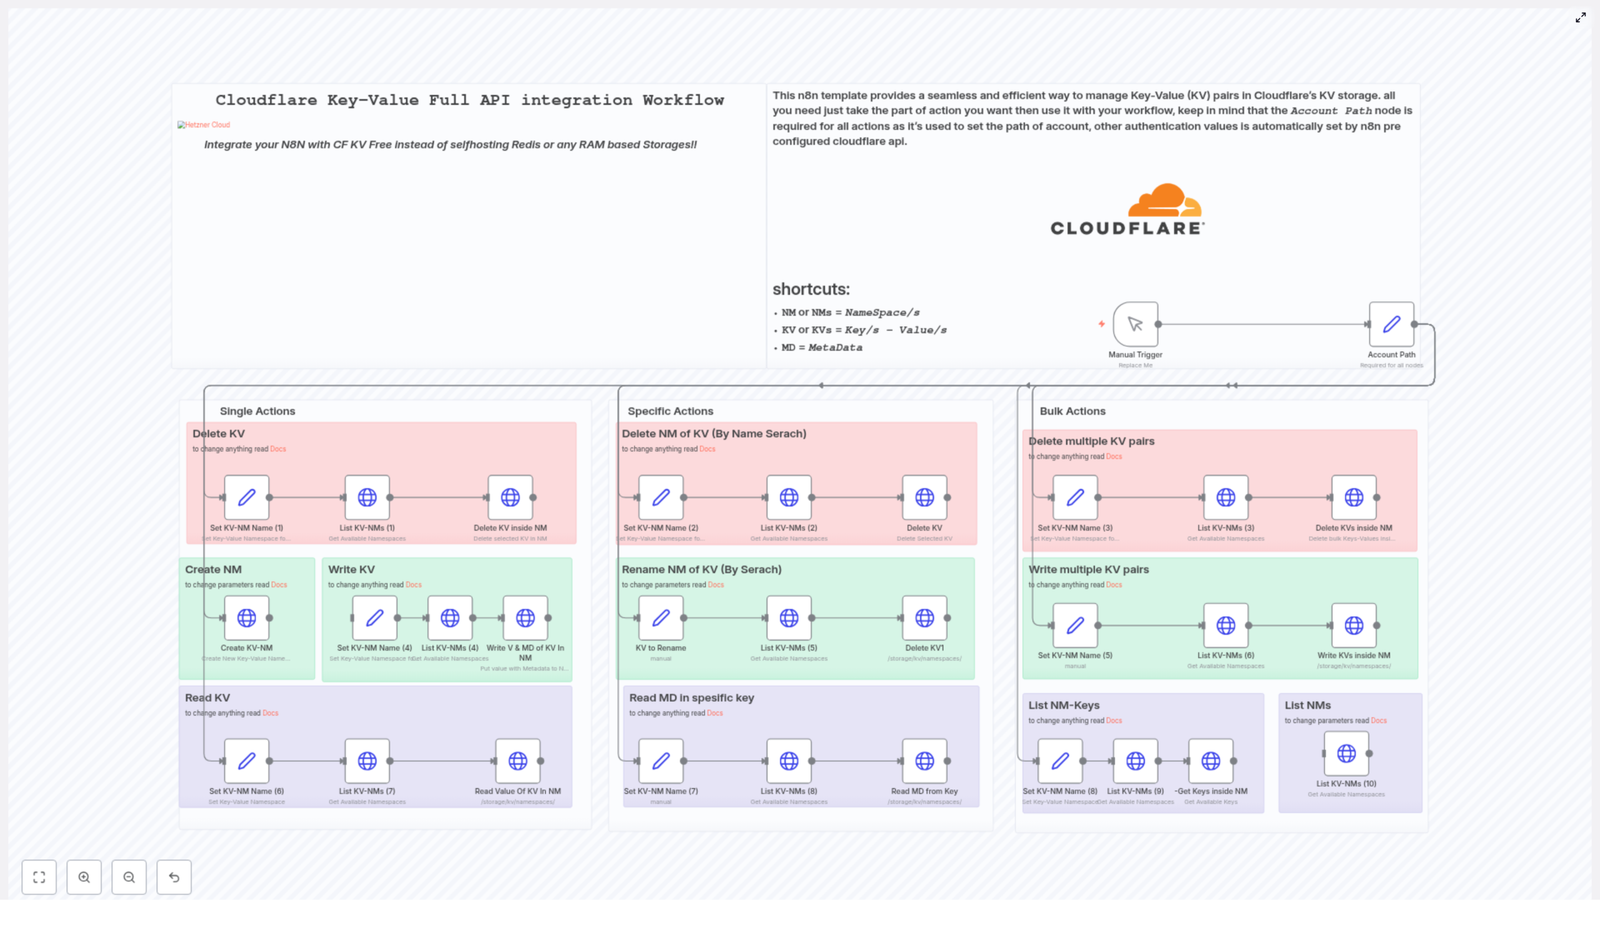
Cloudflare Key-Value (KV) Full API Integration Workflow
If you are tired of jumping between Cloudflare dashboards to rename namespaces, clean up keys, or seed data in multiple environments, this n8n workflow template is built for you. It connects directly to the official Cloudflare KV API so you can manage your storage from one automated workflow instead of manual clicks.
What You Will Learn
By the end of this guide, you will understand:
- What Cloudflare KV is and how this n8n workflow integrates with it
- How the central Account Path node controls all API calls
- How to run single, specific, and bulk KV actions from n8n
- How to set up and customize the workflow template for your own use cases
Core Concept: Cloudflare KV + n8n Integration
What is Cloudflare KV?
Cloudflare KV is a globally distributed, low-latency key-value store that runs at the edge. It is ideal for simple, fast reads and writes, such as configuration values, feature flags, or small data objects.
With this workflow, n8n talks directly to Cloudflare KV using the official Cloudflare KV API. That means you can:
- Avoid running your own Redis or in-memory cache
- Use n8n to orchestrate and automate all KV operations
What This Workflow Template Automates
The template provides a full API integration between n8n and Cloudflare KV so you can manage:
- Namespaces (NMs) – logical containers for your key-value data
- Key-value pairs (KVs) – the actual stored data
- Metadata (MD) – additional information attached to keys
These operations are organized into three main categories:
- Single actions – one-off operations on a single key or namespace
- Specific actions – more targeted namespace and metadata operations
- Bulk actions – batch operations on many keys or namespaces
The Central Piece: The Account Path Node
Every API call in this workflow starts from one required node: the Account Path node.
What the Account Path Node Does
This node stores your Cloudflare account identifier. It is used to build the correct API path for all subsequent KV requests and to ensure that:
- Requests are routed to the right Cloudflare account
- All operations are authenticated against your Cloudflare KV resources
Once the Account Path node is configured, the workflow branches out into multiple flows that each perform a different type of KV action. You can think of it as the main key to your account. After you unlock the door, the rest of the workflow lets you walk through all your namespaces and keys.
Feature Overview: What You Can Automate
1. Single Actions – Everyday Operations
Single actions are ideal when you want to work with one key or one namespace at a time. These are the basic operations you will likely use most often.
- Delete KV
Remove a specific key from a namespace by providing:- The namespace
- The key name
Use this when you want to clean up individual entries without affecting other keys.
- Create NM
Create a new namespace by specifying a title. This is useful when:- Spinning up a new environment (for example, staging or production)
- Grouping keys for a new feature or service
- Write KV
Store or update a value for a key in a specific namespace. You can write:- The main value
- Optional metadata (MD) to add more context
For example, you might store a configuration value as the main value and attach version or environment information as metadata.
- Read KV
Retrieve the value of a single key inside a namespace. This is helpful for:- Sanity checks while testing
- Passing the retrieved value into later n8n nodes in the same workflow
2. Specific Actions – Namespace and Metadata Management
Specific actions operate at a higher level or focus on metadata. They are useful for maintenance, refactoring, or cleanup tasks.
- Delete NM of KV (By Name Search)
Delete a namespace by searching for it by name. This action:- Finds a namespace using its title
- Removes the entire namespace when it is no longer required
Use this after experiments, temporary environments, or old deployments that you want to fully remove.
- Rename NM of KV
Rename an existing namespace to a new title using the API. This is helpful when:- You want clearer naming conventions
- You need to align namespace names across environments or teams
- Read Metadata (MD) in specific key
Fetch only the metadata attached to a particular key within a namespace, without reading or modifying the value itself. This is useful if:- You track extra attributes like version, owner, or tags in metadata
- You need to inspect context around a key without touching its content
3. Bulk Actions – Batch Operations at Scale
Bulk actions are designed to save time when dealing with many keys at once. They are especially valuable for migrations, cleanups, and seeding data.
- Delete multiple KV pairs
Remove multiple keys from a namespace in a single run. This is ideal for:- Clearing outdated or deprecated data
- Removing test keys after QA cycles
- Performing periodic maintenance
- Write multiple KV pairs
Insert or update a batch of key-value pairs in one namespace. Common use cases include:- Seeding initial data for a new environment
- Syncing configuration across regions or services
- Rolling out new features that depend on many KV entries
- List NM-Keys
List all keys in a given namespace. This is often the first step before running bulk operations, because it lets you:- See what data currently exists
- Decide which keys to update or delete
- List NMs
List all namespaces in your Cloudflare account. Use this for:- Auditing and reviewing your storage layout
- Discovering old or unused namespaces
- Understanding how past naming conventions evolved
Step-by-Step: How To Use the n8n Cloudflare KV Workflow Template
You do not need deep Cloudflare API knowledge to start. Follow these steps to get the template running in n8n.
Step 1 – Configure the Account Path Node
- Open the workflow template in n8n.
- Locate the Account Path node. This node is mandatory.
- Replace the placeholder value with your actual Cloudflare account identifier.
This step ensures that all subsequent API calls are correctly authenticated and routed to your account.
Step 2 – Select the Actions You Want to Run
The workflow is organized into separate branches that correspond to different operations, for example:
- Creating namespaces (NMs)
- Writing or reading single KV pairs
- Deleting one key or several keys
- Deleting or renaming namespaces
- Listing namespaces or listing keys in a namespace
In n8n, you can:
- Enable only the nodes or branches that match your current task
- Disable or ignore flows you do not need yet
Step 3 – Fill in Required Inputs for Each Node
Before running the workflow, configure the input fields of the nodes you plan to use. Typical inputs include:
- Namespace name or ID – to target the correct namespace
- Key names – for single or bulk key operations
- Values – the data you want to store in Cloudflare KV
- Metadata (optional) – extra information you want to attach to keys
Adjust these values for your environment, such as staging vs production, and for the specific task you are automating.
Step 4 – Run and Test the Workflow
There are two typical ways to execute the workflow:
- Manual execution inside n8n while you are testing or performing one-off operations.
- Automated triggers such as webhooks, schedules, or other events inside n8n for ongoing automation.
Once triggered, the workflow will call the Cloudflare KV API based on the nodes you configured, and handle the repetitive KV operations for you.
Why Automate Cloudflare KV Management With n8n?
Using this template gives you more than just convenience. It also provides:
- Direct official API integration
The workflow uses the official Cloudflare KV API endpoints, so you are not relying on workarounds or unofficial tools. - Modular and flexible design
Single, specific, and bulk actions can be combined or rearranged to match small tweaks, large migrations, or anything in between. - Metadata support
You can read and write metadata alongside key-value pairs, which allows you to store richer, structured information when required. - Efficient bulk operations
Batch writes and deletes can reduce API overhead, speed up maintenance, and lower latency for large sets of data. - No self-hosted cache layer
Instead of running your own cache, you can rely on Cloudflare’s global edge network for fast, distributed storage and let n8n orchestrate the workflows on top.
Practical Use Cases
Once configured, you can use this n8n + Cloudflare KV workflow to:
- Automate namespace creation across multiple environments
- Keep KV data synchronized between different systems or services
- Clean up old or unused keys without manually searching in the dashboard
- Run repeatable KV operations as part of your deployment or maintenance pipelines
Clone the template, plug in your Cloudflare account details, and adapt the flows to your own storage strategy so that n8n can handle the repetitive KV tasks for you.
Quick FAQ
Do I need to know the Cloudflare API in detail?
No. The workflow already uses the official Cloudflare KV API endpoints. You only need your account identifier and the relevant namespace, key, value, and metadata details for your operations.
Can I run only part of the workflow?
Yes. The workflow is modular. You can enable or execute only the branches you need, such as listing namespaces, writing a single key, or running a bulk delete.
Is metadata required for every key?
No. Metadata is optional. You can store keys with just a value, or add metadata when you need extra context.
Can this workflow be scheduled?
Yes. In n8n you can attach triggers like cron nodes, webhooks, or other event-based triggers to run these KV operations on a schedule or in response to other events.
Official Cloudflare KV API References
If you want to understand or extend the underlying API calls, these are the Cloudflare KV API docs used by this integration:
Complete Cloudflare KV API Integration Workflow
Complete Cloudflare KV API Integration Workflow
Learn How To Automate Cloudflare KV With n8n
This guide walks you through a ready-made n8n workflow template that fully integrates with the Cloudflare KV API. By the end, you will know how to:
- Connect n8n to your Cloudflare account using the Account Path node
- Run single key actions like creating, reading, or deleting a KV pair
- Manage namespaces, including renaming and deleting them
- Perform bulk operations on multiple keys at once
- Work with metadata stored alongside your KV values
The goal is to replace manual dashboard clicks and hand-written API requests with a clean, reusable automation inside n8n.
Why Automate Cloudflare KV With n8n?
Editing Cloudflare KV by hand can feel tedious. You log in to change one key, and suddenly you are deep in namespaces, keys, and metadata. This is exactly the kind of repetitive work that n8n is built to handle for you.
Cloudflare KV itself is a fast, globally distributed key-value store, ideal for:
- Feature flags and configuration values
- Session or token storage
- Content and settings that must be available worldwide
When you connect Cloudflare KV to n8n, you gain:
- Automation – no more manually crafting API calls or clicking through the Cloudflare dashboard for every change
- Scalability – bulk operations let you manage many keys in a single run
- Extensibility – you can plug this template into other systems, such as CRMs, databases, or webhooks, to build complete end-to-end workflows
What This n8n Workflow Template Includes
This template is a complete Cloudflare KV API integration for n8n. Once configured, you can manage both individual keys and entire namespaces without touching the Cloudflare UI.
Main Capabilities
- Single Actions for everyday tasks:
- Create, read, and delete individual KV pairs
- Create KV entries with optional metadata
- Specific Namespace Actions:
- Rename a KV namespace
- Delete a KV namespace by searching it by name
- Read metadata for a specific key
- Bulk Actions for larger operations:
- Write multiple KV pairs in a single request
- Delete multiple KV pairs at once
- List all keys in a namespace
- List all namespaces in your Cloudflare account
- Metadata Support:
- Attach metadata when writing keys
- Read metadata separately from the key value
The only required piece you must configure is the
Account Pathnode. It sets the Cloudflare account context so that all API requests know which account they belong to. After that, n8n uses your Cloudflare credentials to authenticate each operation.
How The Workflow Is Structured Inside n8n
To keep things clear and safe, the template is organized into three main groups of actions:
- Single Actions – small, focused operations on one key at a time
- Specific Actions – targeted changes to namespaces and key metadata
- Bulk Actions – powerful operations that affect many keys at once
In practice, you can choose which group to use based on your current task. Below is a detailed look at each category.
Single Actions: Simple, One-Key Operations
Use these when you want to change or inspect a single KV entry without touching anything else. They are ideal for testing your setup or making small adjustments.
Delete a Single KV Pair
This path lets you remove one key from a specific namespace.
- Select the namespace where the key lives.
- Specify the key you want to delete.
- (Optional) List namespaces first if you want to confirm you are working in the correct namespace.
- Execute the delete operation to remove that key from the namespace.
Create a KV Pair With Metadata
Use this when you want to store a value and also attach additional context.
- Choose the target namespace.
- Provide the key name and value.
- Optionally add metadata such as tags, version information, or flags that your application can later read.
- Run the node to write the new key-value pair plus metadata into Cloudflare KV.
Read a KV Value
This action retrieves the stored value for a specific key.
- Specify the namespace that contains the key.
- Enter the key name.
- Execute the read operation to fetch the value from Cloudflare KV.
Specific Actions: Namespace Management And Metadata
These actions operate at a slightly higher level. They help you manage entire namespaces and inspect metadata for individual keys.
Delete a Namespace (NM)
This is a powerful operation, so test carefully.
- Search for the namespace by name. The workflow helps you find the namespace you want to remove.
- Confirm the selection to avoid deleting the wrong namespace.
- Run the delete operation to remove the entire KV namespace from your Cloudflare account.
Rename a Namespace
Renaming namespaces can help keep your KV structure organized and readable.
- Locate the existing namespace you want to rename.
- Provide the new title that should replace the old one.
- Execute the rename operation so the namespace appears under the new name.
Read Metadata for a Key
Sometimes you only need the metadata and not the full value.
- Specify the namespace where the key is stored.
- Enter the key name.
- Run the metadata read to retrieve only the metadata associated with that key.
Bulk Actions: Work With Many Keys At Once
Bulk tools are where this template becomes a serious time saver. Use them when you want to apply the same type of operation to multiple keys in a single workflow run.
Delete Multiple KV Pairs
This action is useful when you need to clean up several keys at the same time.
- Select the namespace that contains the keys you want to remove.
- Prepare a list of keys to delete. This can be generated inside n8n or passed in from another part of your workflow.
- Execute the bulk delete to remove all listed keys in one operation.
Write Multiple KV Pairs
Use this to upload a batch of key-value pairs in a single request.
- Prepare a collection of key-value pairs that you want to store in a namespace.
- (Optional) Include expiration settings for each key if you want them to expire automatically after a certain time.
- Run the bulk write to upload the entire batch to Cloudflare KV.
List Keys in a Namespace
This helps you understand what is currently stored in a specific namespace.
- Choose the namespace you want to inspect.
- Run the list operation to retrieve all keys stored in that namespace.
List All Namespaces
Use this when you need an overview of your KV structure across the entire account.
- Execute the list namespaces action to fetch all KV namespaces associated with your Cloudflare account.
Step-by-Step: Setting Up The Workflow In n8n
Follow these steps to get the Complete Cloudflare KV API Integration workflow running from scratch.
Step 1: Import The Template
- Open your n8n instance.
- Import the Cloudflare KV workflow template.
- Have your Cloudflare credentials ready for configuration.
Step 2: Configure The Account Path Node
- Locate the
Account Pathnode in the workflow. - Enter your Cloudflare account identifier. This tells all subsequent API calls which account to use.
- Ensure that n8n is using the correct Cloudflare credentials for authentication.
Step 3: Choose The Type Of Action You Want To Run
Decide which group of operations fits your current task:
- Single Actions if you are working with one key at a time
- Specific Actions if you need to rename or delete a namespace, or read metadata
- Bulk Actions if you want to write or delete multiple keys, or list keys and namespaces
Step 4: Fill In The Required Parameters
Depending on the chosen action, you will need to provide different details:
- Namespace identifiers or names for where the keys live
- Key names for reads, writes, and deletes
- Values and optional metadata for write operations
- Lists of keys for bulk delete or bulk write actions
Step 5: Run And Integrate The Workflow
- Trigger the manual node in n8n to test the workflow with a small set of data.
- Once confirmed, connect this template into larger automations, for example:
- Syncing configuration data from a database or API
- Updating feature flags when your CI pipeline deploys
- Managing session-like or cache-like values from other systems
Best Practices And Next Steps
To get the most value from this Cloudflare KV n8n template, keep these tips in mind:
- Start small Begin with a single namespace and a few test keys. Confirm that reads, writes, and deletes behave as expected before running bulk operations on production data.
- Use metadata strategically Store extra information like version numbers, tags, or feature flags as metadata so your application logic can make smarter decisions without changing the main value.
- Automate with triggers Attach this workflow to scheduled triggers or webhooks so KV updates happen automatically whenever something changes in your app or infrastructure.
- Consult official documentation For detailed information on each API endpoint and parameter, review the Cloudflare KV API documentation and the operation guides referenced inside the workflow nodes.
FAQ: Cloudflare KV n8n Workflow Template
Do I have to configure anything besides the Account Path node?
The
Account Pathnode is the only mandatory configuration for the account context. You also need valid Cloudflare credentials set up in n8n. After that, each action node only requires the specific parameters for the operation you want to perform, such as namespaces, keys, values, or metadata.Is it safe to run bulk operations?
Bulk operations are powerful and can delete or overwrite many keys at once. Always:
- Test in a staging or non-production environment first
- Start with a small subset of keys
- Log or store the keys you are modifying so you can review changes
Can I combine this template with other workflows?
Yes. This template is designed to be part of larger n8n setups. You can connect it to CRMs, databases, CI pipelines, monitoring tools, or any other n8n-supported integration to trigger KV updates automatically.
What are some common use cases?
- Automatically updating feature flags when a new release is deployed
- Syncing application configuration from a central database into Cloudflare KV
- Cleaning up old session keys or cache entries on a schedule
Ready To Stop Editing Cloudflare KV By Hand?
If you are done with repetitive Cloudflare KV tasks, this n8n workflow template gives you a structured, automated alternative. Import it into your n8n instance, connect your Cloudflare credentials, configure the
Account Path, and adapt the actions to match your own KV management style.Once it is in place, bulk edits, namespace changes, and routine key updates become a quick workflow run instead of 20 manual clicks.
Note: Always secure your API credentials, and test this workflow in a staging or non-production environment before using it with live data.
AI Gmail Auto-Labeler Workflow Explained
AI Gmail Auto-Labeler Workflow Explained
A Marketer, an Inbox, and One Too Many Labels
By 9:15 a.m., Lina’s day was already off track.
As the marketing lead at a fast-growing SaaS startup, she lived in her Gmail inbox. Customer feedback, partner proposals, invoices, support escalations, internal approvals, product updates – everything passed through the same crowded place. She had done what every productivity blog suggested. She created labels. Lots of them.
Work, Personal, Finance, Support, Paid Campaigns, Product Feedback, High Priority and a dozen more. In theory, her inbox should have been a beautifully organized command center. In reality, it was a maze.
Some mornings she would spend 30 minutes just dragging emails into the right labels. Other times she would give up and let everything pile up in the Inbox label, promising herself she would “sort it later.” She never did.
One afternoon, after missing an important partner email that had been buried between newsletters, Lina decided something had to change. Manual sorting was no longer an option. She needed automation, not another color-coded system that depended on her willpower.
Discovering an AI-Powered Shortcut in n8n
Lina already used n8n for a few marketing automations, like syncing leads and sending notifications. While browsing templates, a title caught her eye:
AI Gmail Auto-Labeler
The description sounded exactly like what she wanted. An n8n workflow template that would:
- Watch her Gmail for new unread emails
- Send the content to Gemini AI for classification
- Automatically apply the right Gmail labels
No more manual dragging. No more inbox guilt. Just automatic, AI-powered labeling that respected the labels she already had.
What convinced her was the architecture. The workflow did not hardcode any labels. Instead, it dynamically pulled her existing Gmail labels, passed them to Gemini AI, and only allowed the AI to choose from that list. That meant the automation would adapt if she added, renamed, or removed labels.
It sounded promising, but Lina wanted to know how it actually worked. So she opened the template and started following the data trail.
Inside the Workflow: How the Story Flows
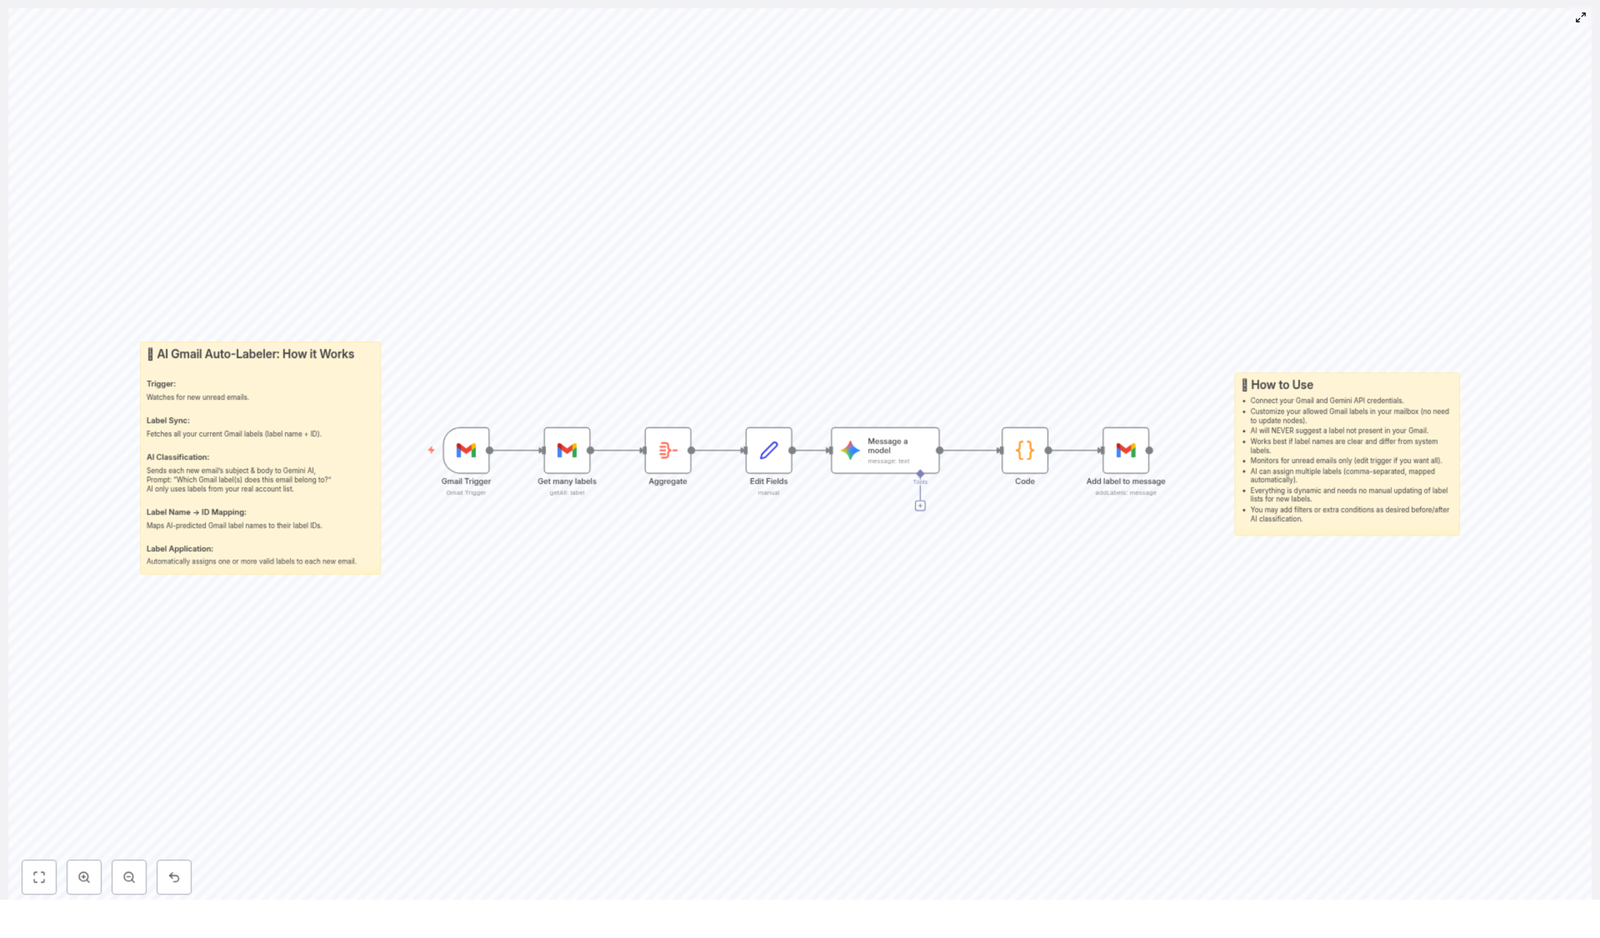
As Lina explored the workflow, she realized it followed a simple, linear path. Each n8n node took the output of the previous one, transformed it, and passed it on as structured JSON. The sequence looked like this:
- Gmail Trigger – Listens for new unread emails.
- Get Many Labels – Pulls all Gmail labels with names and IDs.
- Aggregate – Combines all label records into one array.
- Edit Fields – Turns label names into a comma-separated list.
- Message a Model – Sends email content and label list to Gemini AI.
- Code – Maps AI-chosen label names back to Gmail label IDs.
- Add Label to Message – Applies the chosen labels to the email.
It was technical, but it also felt surprisingly intuitive. The workflow was basically acting like a smart assistant: watch, understand, decide, then label.
Rising Tension: The Pain of Manual Labeling
Before setting it up, Lina thought about all the edge cases that had burned her in the past.
- What if she added a new label later? Would she have to edit the workflow?
- What if the AI invented labels that did not exist?
- What if an important email was misclassified?
The template documentation addressed each of these concerns. Labels were fetched dynamically, so the workflow always used her current Gmail label set. The AI was explicitly restricted to the labels provided to it. And if anything went wrong, the email would simply stay unlabeled, not broken or deleted.
That was enough to convince her to try. She started from the beginning of the workflow and walked through each node as if she were the email traveling through it.
Step Into the Story: An Email Enters the Workflow
The Moment the Email Arrives: Gmail Trigger
Lina imagined a new customer email landing in her inbox at 10:02 a.m.
The Gmail Trigger node was the first gatekeeper. It was configured to:
- Trigger type: New email
- Filter: Unread messages only
- Polling interval: 1 minute
Every minute, n8n checked for new unread emails. When it found one, it captured key details:
- Message ID
- Subject
- Snippet or preview text
- From and To fields
- Thread information
If no new unread emails appeared, nothing else ran. That meant no wasted API calls and no risk of reprocessing old messages she had already handled.
Learning the Language of Labels: Get Many Labels and Aggregate
Next, the workflow needed to understand Lina’s labeling system.
The Get Many Labels node connected to the Gmail API using her Gmail credentials and pulled the full list of labels from her account.
- Operation: Get Many Labels
- Output: An array of label objects, each with:
id– the Gmail label identifier used by the APIname– the human-readable label name in Gmail
Each label came out as its own item. To make life easier for the next nodes, the workflow used an Aggregate node.
- Input: Multiple items, one per label
- Operation: Combine items into a single array
- Output: One item containing an array of all label objects
Now the workflow had a single, tidy list of every label Lina had created. No hardcoding, no manual updates. If she ever added a new label like “Partnerships” or “VIP”, the workflow would automatically see it.
Preparing the AI’s Menu: Edit Fields
To make sure Gemini AI did not go off script, Lina needed to give it a clear menu of options.
The Edit Fields node took the aggregated label array and transformed it into a format the AI could easily consume.
- Input: Aggregated label array
- Transformation:
- Map each label object to its
name - Join those names into one comma-separated string
- Map each label object to its
- Output: A string like
"Work,Personal,Finance,Support"
This string was added to the item as a field. It would be passed along to the AI as part of the prompt. By limiting Gemini AI to that explicit list, Lina ensured it could not invent labels that did not exist in her Gmail account.
The Turning Point: AI Reads the Email
Gemini AI Enters the Scene: Message a Model
Now came the brain of the operation.
The Message a Model node connected n8n to the Gemini AI endpoint using her configured Gemini API credentials. It fed the AI two main inputs:
- The email subject and snippet from the Gmail Trigger node
- The comma-separated label list from the Edit Fields node
The system prompt was carefully crafted. It instructed Gemini AI to:
- Read the email subject and snippet
- Select the most appropriate Gmail label or labels
- Choose only from the provided label list
The node sent a structured request and expected a simple response: a text string containing one or more label names, separated by commas. For example:
Finance,ImportantLina liked that the workflow supported multi-label classification. A single email could be both “Finance” and “Important” or “Support” and “Product Feedback”. That matched the messy reality of her inbox better than strict one-label rules.
Bridging AI and Gmail: Code Node
There was one problem. Gmail did not care about label names. It only worked with label
idvalues.The Code node acted as the translator between AI output and Gmail requirements.
- Input:
- The AI response string with label names separated by commas
- The full Gmail label metadata (names and IDs) from earlier nodes
- Responsibilities:
- Split the AI response into individual label names
- Trim whitespace and normalize formatting
- Match each AI label name to the corresponding Gmail label object
- Extract the
idfor each matched label - Build the data structure expected by the Gmail API for label assignment
The result was a clean array of Gmail label IDs that exactly matched the names chosen by the AI.
If Gemini AI returned a label name that did not match any existing label, the Code node simply skipped it. No errors, no broken workflow. Only valid labels were passed onward. Lina appreciated that safety net, especially while she was still building trust in the system.
The Final Move: Add Label to Message
Everything came together in the last node.
The Add Label to Message node called the Gmail API and applied the selected labels to the actual email.
- Input:
- The Gmail message ID from the Gmail Trigger node
- The list of label IDs generated by the Code node
- Operation: Add Label to Message
- Effect: The email in Gmail was updated with the new labels
Once this node executed successfully, the message appeared in Lina’s Gmail with all AI-selected labels applied. The workflow then went quiet again, waiting for the next unread email to arrive.
Behind the Scenes: Configuring the Workflow Safely
Credentials and Security
Before Lina hit “Activate,” she checked the security details. The template required two sets of credentials:
- Gmail credentials for:
- The Gmail Trigger node
- All Gmail operation nodes, including Get Many Labels and Add Label to Message
- Gemini API credentials for:
- The Message a Model node
She made sure her Gmail OAuth scope allowed reading messages and modifying labels. In n8n, she stored both Gmail and Gemini credentials securely and avoided putting any secrets directly into Code nodes or environment variables unless properly managed.
Designing Labels That AI Can Understand
Lina realized that good automation depended on good label design.
- She defined her Gmail labels in advance, knowing the workflow would automatically read the full set.
- She kept in mind that the AI was restricted to her existing labels and would not invent new ones.
- She adjusted label names to be unique and descriptive, avoiding multiple labels with nearly identical meanings.
- She reviewed system labels like Inbox, Sent, and Drafts and decided how comfortable she was with the AI using or ignoring them.
With a clearer label taxonomy, she gave both herself and the AI a better chance at consistent classification.
Tuning the Trigger: What Gets Classified
Next, Lina refined which emails should go through AI classification.
- The default behavior was to monitor unread emails only, which she liked. It prevented reprocessing and kept things clean.
- She noted that she could change the Gmail Trigger if needed to:
- Include read messages
- Filter by sender, subject, or other conditions
- Target a specific label or folder
- She kept the polling interval at 1 minute to balance responsiveness and API usage.
For now, she stayed with the default configuration and planned to tighten filters later if needed.
What Happens When Things Go Wrong
Lina knew that no automation is perfect. She wanted to understand failure modes before trusting it with her whole inbox.
The data flow was mostly linear. Each node depended on the output of the previous one. That meant:
- If the Gemini API call failed, no labels would be applied. The email would remain unmodified in Gmail.
- If the AI returned an empty or malformed label list, the Code node would not find any matching label IDs, so the Add Label to Message node would have nothing to do.
- If she removed a label from Gmail, the workflow would simply stop using it because labels were fetched dynamically each time.
There were no destructive operations, no deletions, no risky moves. The worst-case scenario was that an email stayed unlabeled, which Lina could live with.
Leveling Up: How Lina Customized the Workflow
Pre-Classification Filters
Once the basic template was running, Lina started thinking about optimization. She did not want to send every single email to Gemini AI.
She experimented with adding nodes before the Message a Model step:
- A Filter node to skip emails from internal senders she already handled with other rules.
- A Function or Code node to build a richer prompt using more of the email body when available.
- Simple rule-based checks, such as:
- If the subject contained “invoice” or “receipt,” assign a “Finance” label directly without calling AI.
This hybrid approach let her reserve AI calls for the emails that were genuinely ambiguous or nuanced.
Post-Classification Actions
Once she trusted the AI Gmail Auto-Labeler, Lina started to see it as more than just an inbox organizer.
After the Add Label to Message node, she added optional branches to:
- Send a summary notification to Slack whenever high-priority labels were applied.
- Log classification results to a spreadsheet for later review and tuning.
- Trigger follow-up automations, such as:
- Creating tasks when certain labels appeared
- Forwarding specific categories to other teams
What started as a way to avoid manual labeling turned into a small, intelligent routing system for her entire communication flow.
The Payoff: Benefits Lina Actually Felt
After a few days, the impact was obvious.
- Dynamic labeling – When Lina added or renamed labels in Gmail, the workflow automatically adapted. She never had to touch the template.
- AI-driven accuracy – Gemini AI handled contextual classification surprisingly well and stayed consistent because it was limited to her existing labels.
- Multi-label support – Complex emails could carry multiple labels like “Finance” and “Important” or “Support” and “Product Feedback,” reflecting real-world nuance.
- Time-saving automation – Manual sorting dropped to nearly zero. Her inbox felt lighter and more structured, and she could finally focus on the messages that mattered.
Instead
Automate Gmail Labeling Using Gemini AI & n8n
Automate Gmail Labeling Using Gemini AI & n8n
Overview
This guide describes a production-ready n8n workflow template that automatically labels incoming Gmail messages using Google Gemini AI. The workflow connects Gmail, Gemini-2.5-Pro, and n8n to classify new emails and apply one or more existing Gmail labels based on the content of each message.
The goal is to replace static Gmail filters with a dynamic AI classification pipeline that:
- Monitors new unread emails in Gmail
- Retrieves all existing Gmail labels and their IDs
- Asks Gemini AI to select the most relevant label or labels
- Maps label names back to Gmail label IDs
- Applies the labels to the message automatically
The workflow is built as a reusable n8n template, so you can import it, connect your own credentials, and adapt the classification rules to your own labeling scheme.
Architecture & Data Flow
The automation is implemented as a linear n8n workflow with a Gmail trigger at the start and a Gmail labeling operation at the end. Between these two ends, the workflow orchestrates label retrieval, AI inference, and mapping logic.
High-level execution sequence
- Gmail Trigger node polls for new unread messages.
- Get Many Labels node fetches all Gmail labels and their IDs.
- Aggregate Labels node consolidates label data into a single collection.
- Edit Fields node builds a comma-separated list of label names for the AI.
- Gemini AI node (Gemini-2.5-Pro) receives the email subject and snippet plus the label list and returns a comma-separated list of label names to apply.
- Code node maps AI-selected label names to their corresponding Gmail label IDs.
- Gmail node applies the resolved label IDs to the specific email message.
Only newly received unread emails are processed, so existing mailbox content is not modified unless you deliberately adjust the trigger configuration.
Prerequisites & Setup
Required services
- n8n instance (self-hosted or cloud) with access to the n8n workflow template.
- Gmail account with labels already created and organized.
- Google Gemini API access with credentials that can call the Gemini-2.5-Pro model.
Credentials configuration in n8n
- Gmail credentials (OAuth2)
Configure OAuth2 credentials in n8n for Gmail with permissions that allow:- Reading messages (including subject and snippet)
- Listing labels
- Modifying message labels
- Gemini AI credentials
Add your Gemini API key or service credentials in n8n and configure the Gemini node to use the Gemini-2.5-Pro model for text classification.
Gmail label preparation
Before using the template, clean up and standardize your Gmail labels. The AI will only choose from labels that already exist in your account, so clear naming is important. Examples:
- Use descriptive labels such as Clients, Invoices, Campaign Reports, Personal, Client Support.
- Remove obsolete or redundant labels that you no longer want to use.
- Avoid multiple labels with very similar meanings unless you actually need that granularity.
Node-by-Node Breakdown
1. Gmail Trigger – Watch new unread messages
The workflow starts with a Gmail Trigger node configured to watch for new, unread emails. This node is responsible for:
- Polling Gmail at a defined interval.
- Emitting a new item in n8n each time a new unread email is detected.
- Passing message metadata such as:
- Message ID (used later to apply labels)
- Subject line
- Snippet (a short preview of the body)
By default, the trigger focuses on unread messages only. This keeps the automation from retroactively modifying older messages unless you explicitly change the trigger parameters.
2. Get Many Labels – Retrieve Gmail labels and IDs
Next, a Get Many Labels node queries the Gmail API to fetch all labels associated with the connected account. This includes:
- System labels (for example, INBOX, SENT, STARRED)
- Custom labels created by the user (for example, Clients, Invoices, Campaign Reports)
For each label, the node retrieves:
- Label name (human-readable)
- Label ID (API identifier used when applying labels)
This mapping is essential because Gmail operations that add labels to a message require label IDs, not just label names.
3. Aggregate Labels – Build a unified label collection
The Aggregate Labels node consolidates the label data into a single, structured collection that can be easily reused downstream. Instead of treating each label as a separate item, this node:
- Combines all label records into a single array or object field.
- Makes it straightforward for subsequent nodes to iterate or reference labels without repeatedly querying Gmail.
This collection is later used to both provide the AI with the list of possible label names and to map AI-selected names back to label IDs.
4. Edit Fields – Construct the AI label list
The Edit Fields node transforms the raw label data into a format that Gemini can consume. It typically:
- Extracts the name of each label from the aggregated collection.
- Builds a comma-separated string containing all label names, for example:
Clients, Invoices, Campaign Reports, Personal, Client Support - Stores this string in a field such as
labelListthat is passed into the Gemini node.
Effectively, you are instructing the AI: “These are the only valid labels. Choose from this list and do not invent new categories.”
5. Gemini AI Node – Classify emails using Gemini-2.5-Pro
The Gemini node forms the core AI classification step. For each email emitted by the Gmail Trigger, this node:
- Receives the email subject and snippet as input text.
- Receives the
labelListstring as the set of allowed labels. - Uses the Gemini-2.5-Pro model to infer which label or labels best describe the email.
The node is configured so that Gemini returns a comma-separated list of label names. Examples:
- A client brief might yield:
Clients, Campaign Reports - An invoice email might yield:
Invoices - A personal newsletter might yield:
Personal
Key behavior:
- Gemini is instructed to select only from the existing labels provided in
labelList. - The output uses label names, not IDs, so a mapping step is still required before calling the Gmail API.
6. Code Node – Map label names to Gmail label IDs
After Gemini returns label names, a Code node performs a deterministic mapping from those names to actual Gmail label IDs. This node typically:
- Parses the AI output string into an array of label names, splitting on commas and trimming whitespace.
- Iterates over the aggregated label collection retrieved earlier.
- For each AI-selected label name, finds the corresponding label object and reads its label ID.
- Builds an array of label IDs to be attached to the email.
This step is critical because the final Gmail operation cannot work with names alone. It must receive valid label IDs that exist in the connected Gmail account.
7. Gmail Node – Apply labels to the message
The final step uses a Gmail node configured with the appropriate operation to add labels to a message. It:
- Receives the target message ID from the Gmail Trigger node.
- Receives the array of label IDs from the Code node.
- Calls the Gmail API to apply these labels to the specified message.
As a result, within a short time after arrival, each email is automatically tagged with one or more labels such as “Clients,” “Invoices,” or “Campaign Reports” according to the AI’s classification.
Configuration Notes & Best Practices
Trigger configuration and performance
- Unread-only processing keeps the workflow focused on new messages and avoids reprocessing older content.
- Polling interval can be tuned to your needs:
- Shorter intervals approximate near real-time labeling.
- Longer intervals reduce API calls and resource usage.
Label quality and naming
- Use distinct and descriptive names so Gemini can clearly differentiate labels, for example:
- Client Support instead of a generic Support
- Billing – Invoices instead of just Billing
- Avoid overlapping labels where the difference is ambiguous unless you plan to fine tune the AI prompt for that nuance.
Prompt tuning in the Gemini node
To improve classification accuracy, you can refine the prompt within the Gemini node. Typical adjustments include:
- Clarifying which types of emails should map to each label.
- Specifying whether multiple labels are preferred when an email spans several topics.
- Reinforcing that the AI must only output labels from the provided
labelList.
Reviewing misclassified examples and updating the prompt accordingly can significantly improve results over time.
Multiple labels per message
The workflow supports assigning multiple labels to a single email. This is useful when messages are relevant to several categories, such as a client email that includes an invoice attachment, which might receive both Clients and Invoices.
Edge cases and behavior
During initial testing, you may encounter situations where the AI’s chosen label does not match your expectation. Common responses include:
- Renaming labels to be more explicit or less ambiguous.
- Updating the Gemini node prompt to clarify how to treat borderline messages.
- Adding conditional logic or extra nodes to handle specific cases before or after labeling, for example archiving certain categories once labeled.
Advanced Customization
Additional workflow steps
Once the core Gmail labeling is in place, you can extend the workflow to automate more of your email management. Examples of additional steps include:
- Auto-archiving certain labels after they are applied, such as newsletters or low-priority notifications.
- Filtering messages by sender or domain before AI classification, if you want to exclude specific sources from processing.
- Routing labeled messages into other systems, such as:
- Creating tasks in a project management tool for “Clients” or “Campaign Reports.”
- Forwarding “Invoices” to an accounting system or shared mailbox.
Adjusting trigger strategy
You can modify how and when emails are captured:
- Change the Gmail Trigger settings if you want to process messages based on additional criteria, such as specific folders or labels.
- Run the workflow on a schedule that suits your volume and latency requirements.
Iterative improvement workflow
To systematically improve accuracy over time:
- Periodically review a sample of labeled emails.
- Note where the chosen label is incorrect or incomplete.
- Refine:
- Label names in Gmail
- Prompt instructions in the Gemini node
- Any conditional logic or filters in the n8n workflow
Practical Outcomes
In a typical usage scenario, such as a marketing manager handling a high volume of mixed emails, this automation delivers several tangible benefits:
- Dynamic labeling aligned with your workflow
Since Gemini only selects from labels that already exist in your Gmail account, the resulting structure reflects your actual processes rather than arbitrary AI-generated categories. - Multi-dimensional retrieval
Messages that touch several topics can be found via multiple labels later, for example by searching under both “Clients” and “Campaign Reports.” - Reduced manual effort
You no longer need to maintain large sets of static Gmail filters or manually drag messages into folders. Labeling becomes a background process. - High customizability
Changes in your role or priorities can be reflected quickly by adding or renaming Gmail labels, updating the Gemini prompt, or inserting new nodes into the workflow.
Implementation Checklist
To replicate this AI-powered Gmail labeling setup in your own environment, follow this checklist:
- Connect your Gmail account in n8n using OAuth2 credentials with read and modify label permissions.
- Add your Gemini AI credentials and configure the model to Gemini-2.5-Pro.
- Prepare and clean your Gmail labels in advance, for example:
- Work
- Personal
- Invoices
- Clients
- Campaign Reports
- Import the n8n Gmail labeling template into your n8n instance.
- Configure the Gmail Trigger node to watch for unread emails at a suitable polling interval.
- Review and adjust the prompt in the Gemini node to match your labeling rules and preferences.
- Optionally add filters or follow-up actions, such as archiving or routing messages based on labels.
Next Steps
By combining n8n, Gmail, and Google Gemini AI, you can transform a disorganized inbox into a self-organizing system that classifies and labels emails in the background. This template provides a robust starting point that you can adapt to your own label structure and business workflows.
Experiment with your labels, refine the Gemini prompt as you observe results, and extend the workflow with additional automation steps as your needs evolve.
How to Convert CSV to Excel Automatically
How to Convert CSV to Excel Automatically Using n8n
Let me guess. You download a CSV file, open Excel, fiddle with the import settings, fix the delimiter, set the headers, save as
.xlsx, and then realize you have to do the exact same thing tomorrow. And the day after. And probably next week too.If that sounds painfully familiar, you are exactly the kind of person this n8n workflow template was made for. Instead of repeating the same clicks every day, you can let n8n handle the whole CSV to Excel conversion for you while you do literally anything else.
What This n8n Template Does For You
At its core, this n8n workflow is a simple but powerful automation that:
- Starts with a manual trigger so you can run it whenever you feel like it
- Downloads a CSV file directly from a URL on the web
- Imports that CSV and turns it into structured JSON data inside n8n
- Converts the JSON into a ready-to-use Excel (
.xlsx) file with your preferred settings
So instead of juggling files and menus in Excel, you just click one button in n8n and the whole process runs for you. It is like having your own tiny data assistant that never gets bored.
When Should You Use This CSV to Excel Workflow?
This template is a great fit if you:
- Regularly download CSV reports from a website or API
- Need Excel files for sharing with teammates, clients, or managers
- Spend too much time fixing delimiters and headers in spreadsheets
- Want a reliable, repeatable process that does not depend on you remembering every little step
Even if you only convert a few CSV files per week, automating the process saves mental energy, keeps your formatting consistent, and gives you a foundation you can extend later with more automation.
Why Automate CSV to Excel Conversions With n8n?
You might be thinking, “It is just a quick import, do I really need automation for this?” Here is why it is worth it.
- Time-saving: No more downloading, importing, tweaking, and saving the same type of file again and again.
- Fewer mistakes: When the workflow runs the same way every time, there is less chance of picking the wrong delimiter or forgetting to mark the first row as headers.
- Flexible setup: Change the CSV URL, delimiter, or header settings in a few clicks without rebuilding everything.
- Easy to extend: This conversion can be just the first step in a bigger automation, like sending the Excel file by email or uploading it to cloud storage.
Think of this as a small but mighty building block in your broader n8n automation toolkit.
How the Workflow Is Structured
The CSV to Excel workflow is made up of four main parts:
- Manual Trigger – you decide when to run it
- HTTP Request – grabs the CSV file from the web
- Spreadsheet File (Import) – reads the CSV and turns it into JSON
- Spreadsheet File (Export) – converts that JSON into an Excel file
Let us walk through each step so you can build or customize the workflow confidently inside n8n.
Step 1: Start With a Manual Trigger
Open your n8n editor and add a Manual Trigger node.
This node is exactly what it sounds like. It lets you run the workflow whenever you want by clicking “Execute workflow” in the editor. It is perfect for those moments when you just need to convert a file right now without waiting for a schedule or external event.
Later, if you want to automate it on a schedule, you can always swap the manual trigger for a Cron node or another type of trigger.
Step 2: Download the CSV File With HTTP Request
Next, connect an HTTP Request node to the Manual Trigger.
Configure the HTTP Request node like this:
- Method:
GET - URL: Set this to the CSV source you want to download
For testing, you can use this sample CSV URL from the Potsdam event locations open data source:
Now for the crucial part: set the response type to File.
By default, HTTP responses are usually treated as text. In this case, you want n8n to treat the response as a downloadable file instead, so the next node can process it as a proper CSV. Setting the response type to File tells n8n, “Hey, this is a file you should handle as such.”
Step 3: Import the CSV Using the Spreadsheet File Node
Once the CSV file is downloaded, you need to turn it into structured data that n8n can work with easily.
Add a Spreadsheet File node and connect it to the HTTP Request node. In this first Spreadsheet File node, you will configure it to import the CSV file.
Key settings to adjust:
- Operation: Set it to import a file
- File source: Use the file output from the HTTP Request node
- Delimiter: Specify the correct delimiter used in your CSV, for example a semicolon if that is how your file is structured
- Header row: Make sure the option to use the first row as header is enabled so your columns get proper names
This step converts your CSV into JSON data inside n8n. You can think of it as translating the raw CSV file into a clean, structured format that the next node can easily turn into an Excel spreadsheet.
Step 4: Convert JSON Data to an Excel (.xlsx) File
Now for the fun part: generating the Excel file.
Add another Spreadsheet File node and connect it to the previous one. This second Spreadsheet File node will take the JSON data and export it as an Excel file.
Configure this node to:
- Use the JSON data from the first Spreadsheet File node as input
- Output an Excel file in
.xlsxformat - Set some helpful options, such as:
- File name: Pick a clear, descriptive name for the generated file
- Sheet name: Choose a sheet name that makes sense for your data
- Use headers: Enable this so the Excel file uses the column names from your header row
Once this is configured, your workflow will:
- Fetch the CSV from the URL
- Import and parse it into JSON
- Export it as a nicely formatted Excel file
All you need to do is run the workflow manually in n8n. No more repeating the whole “download, open, import, save as, repeat” cycle.
Ideas to Customize and Extend the Template
After you have the basic CSV to Excel automation working, you can start tweaking it to match your real workflow. Here are a few easy ways to adapt it:
- Swap out the CSV URL: Point the HTTP Request node to any other CSV source without touching the rest of the workflow.
- Adjust to different CSV formats: Change the delimiter or header settings in the Spreadsheet File import node if the structure of your CSV changes.
- Add follow-up actions: Chain more nodes after the Excel export, for example:
- Upload the Excel file to Google Drive, Dropbox, or another cloud storage service
- Send the file by email or post it to Slack
- Store the data in a database or trigger additional processing workflows
Once you see it as a reusable building block, you can drop this conversion step into many different n8n workflows whenever you need CSV data turned into Excel automatically.
Why This Makes Your Life Easier
Beyond the obvious time savings, this n8n template gives you:
- Consistency: The same settings, every time, without relying on memory or manual clicks.
- Scalability: Whether you are converting one CSV or dozens, the effort is the same. Click, run, done.
- Less friction: When it is this easy, you are more likely to keep your data organized and up to date.
And honestly, it just feels good to take a repetitive task off your plate and let automation handle it.
Ready to Stop Converting Files by Hand?
If you are tired of the daily CSV to Excel grind, this n8n workflow is a simple way to reclaim some time and sanity. Start with the manual trigger version, get comfortable with it, and then expand as your automation ideas grow.
You can explore n8n on the official n8n website, then plug in this template to handle your CSV to Excel conversions automatically.
Got questions, creative ideas, or a cool use case to share? Feel free to reach out or leave a comment wherever you are using this template. It is always fun to see how people use automation to tame their everyday data tasks.
Convert CSV to Excel: Easy Workflow Guide
Convert CSV to Excel: Easy Workflow Guide
That One CSV You Open “Just For a Second”
You know the drill. You download a CSV, open it in Excel, resize a few columns, hit “Save As”, pick
.xlsx, and tell yourself, “This is fine, it only takes a minute.” Then you do it again tomorrow. And the next day. And suddenly your life is 30 percent “Save As” dialogs.If you have ever thought there must be a better way, you were absolutely right. There is. It is called n8n, and it is like having a tireless robot intern that never complains about repetitive file conversions.
With a simple n8n workflow template, you can grab CSV data from the web, convert it behind the scenes, and get a ready-to-use Excel file with a single click. No more click-click-save-repeat.
Meet Your New CSV to Excel Automation Sidekick
This n8n workflow template handles the full CSV to Excel journey for you so you can stop playing “manual converter” and start doing actual work:
- Downloads the latest CSV file from a specific URL
- Imports the CSV as JSON so n8n can work with it easily
- Transforms that JSON into a clean Excel file in
.xlsxformat - Lets you run everything with a single click inside n8n
In short, it turns a boring routine into a single, satisfying button press. Your future self will send you a thank you email. Automatically, of course.
How the n8n CSV to Excel Workflow Works (Without the Boring Bits)
Under the hood, this workflow is doing a few neat tricks. You do not have to be technical to use it, but it helps to know what is happening so you can customize it later if you want.
Step 1 – You Trigger the Workflow
You start the magic by clicking Execute Workflow in n8n. That one click kicks off the entire process. No “Upload file” dialogs, no digging through your Downloads folder, no guessing which version is the latest.
Step 2 – n8n Fetches the CSV from the Web
Next, the workflow automatically downloads the CSV from this URL:
veranstaltungsplaetze-potsdam CSV
That means every time you run the workflow, n8n pulls the most recent data directly from the source. No more wondering if you are still using last week’s file or if someone quietly updated the dataset while you were not looking.
Step 3 – CSV Gets Imported as JSON
Once the CSV is downloaded, n8n converts it into JSON behind the scenes. If “JSON” sounds like something only developers care about, here is why it is useful for you too:
- JSON is easier for n8n to process programmatically
- It keeps the data structured so it is ready for further automation
- It makes future upgrades simple, like adding filters or extra transformations
You never have to look at the JSON directly unless you want to. n8n handles the conversion quietly in the background while you enjoy not copying and pasting rows into spreadsheets.
Step 4 – JSON Becomes a Nice Clean Excel File
In the final step, the JSON data is turned into an Excel file in
.xlsxformat. The result is a tidy spreadsheet that is ready for:- Analysis
- Reporting
- Sharing with your team
No manual conversions, no weird encoding surprises, just a proper Excel file generated automatically every time you run the workflow.
Why Bother Automating CSV to Excel in n8n?
Aside from rescuing your sanity from endless “Save As” cycles, this CSV to Excel automation gives you some very practical advantages:
- Time-saving: Skip repetitive manual conversions and spend more time on work that actually needs your brain.
- Fewer mistakes: Reduce human error that can creep in when you handle files by hand.
- Always current: The workflow always fetches the latest CSV from the source URL, so your Excel file is never out of date.
- One-click operation: Run the whole process from inside n8n with a single click, no coding skills required.
It is the kind of small automation that adds up quickly, especially if you work with recurring reports or regularly updated datasets.
Quick Start: How to Use the CSV to Excel Workflow Template
Getting this running in n8n is much easier than doing your hundredth manual conversion. Here is the simple setup flow:
- Open the workflow template in n8n using the link in the template card below.
- Take a quick tour of the nodes to see how the CSV is downloaded, imported as JSON, and then converted to Excel.
- Click Execute Workflow to run it.
- Once it finishes, download your freshly generated
.xlsxfile and open it in Excel.
That is all you need. No scripts to write, no complex configuration, just a ready-made automation that slots neatly into your daily routine.
Level Up: Ideas for Customizing the Workflow
Once you have the basic CSV to Excel conversion working, you can start turning this simple workflow into a more powerful automation hub. For example, you could:
- Schedule the workflow to run at specific times so you always have up-to-date Excel files waiting for you
- Add filters or transformations to clean or reshape the data before exporting it
- Automatically send the Excel file by email or upload it to cloud storage after conversion
This template is a great starting point for learning how n8n handles CSV, JSON, and Excel in a fully automated process. Once you are comfortable with it, you can mix in other n8n nodes and build more advanced workflows on top.
Try the n8n CSV to Excel Template
This workflow is a practical example of how n8n can take an everyday data chore and quietly handle it in the background. Instead of converting CSV to Excel over and over, you set it up once and let the workflow do the repetitive part for you.
Ready to give your file conversions a permanent vacation and reclaim a few minutes from every report cycle?
Data Source
Source: https://data.europa.eu/data/datasets/veranstaltungsplaetze-potsdam-potsdam?locale=en
Start your automated CSV to Excel conversion workflow today and turn a tedious chore into a one-click habit.
Auto-Blogger for WordPress: AI-Powered SEO Blog Automation
Auto-Blogger for WordPress: AI-Powered SEO Blog Automation
Overview
The Auto-Blogger for WordPress is an n8n workflow template that automates the entire content pipeline for a WordPress site. It combines scheduled triggers, AI content generation, web research, human approvals, image generation, and WordPress publishing into a single orchestrated workflow.
This template is designed for users who already understand the basics of n8n, WordPress APIs, and AI providers such as Google Gemini or OpenAI. It focuses on reliably producing SEO-optimized articles on a defined cadence, while still allowing human supervision at key control points.
High-Level Capabilities
- Generate SEO-focused topics aligned with your niche using Google Gemini LLM.
- Collect fresh research via Tavily search and select the most relevant source article.
- Transform the selected article into a unique, HTML-formatted blog post with title, excerpt, keywords, and category.
- Create an AI-generated featured image for each post.
- Publish posts to WordPress via the REST API, including metadata, categories, tags, and author assignment.
- Maintain an audit trail in Google Sheets and send operational notifications through Telegram.
Architecture & Data Flow
The Auto-Blogger workflow can be viewed as a linear but supervised pipeline with several integration points:
- Trigger Layer – A schedule-based trigger initiates the workflow at defined intervals.
- Topic Ideation Layer – Google Gemini LLM generates topic ideas and Tavily-ready search queries.
- Research Layer – Tavily search returns a set of candidate articles for the chosen topic.
- Human Approval Layer – Telegram-based interaction lets you approve or reject candidate articles.
- Content Generation Layer – Gemini (or compatible LLM) rewrites the selected article into an SEO-optimized post.
- Media Generation Layer – An AI image generator creates a featured image based on the article context.
- Publishing Layer – WordPress API nodes create the post, assign metadata, upload the featured image, and set the author.
- Logging & Notification Layer – Google Sheets logs publishing metadata and Telegram sends status notifications.
All data flows between nodes are handled inside n8n, so there is no manual copy-paste. Once credentials and prompts are configured, the workflow can run unattended, with optional manual approvals via Telegram.
Node-by-Node Breakdown
1. Schedule Trigger
Purpose: Define when new posts are created and published.
Typical node:
CronorSchedule Triggerin n8n.- Configuration: Set the frequency (daily, weekly, or custom intervals) according to your publishing strategy.
- Behavior: On each trigger, the workflow starts a new run that attempts to generate and publish a single post.
Edge cases: If the trigger frequency is high but the approval step is delayed (via Telegram), multiple runs can wait for human input at the same time. Plan your schedule according to expected response times.
2. Topic Generation with Google Gemini LLM
Purpose: Generate strategic topics and structured search queries for Tavily.
Typical node:
Google Gemini(or compatible LLM node in n8n).- Inputs:
- Static prompt text describing your niche, target audience, and tone of voice.
- Optional variables such as current focus area or campaign theme.
- Outputs:
- One or more SEO-friendly blog topic ideas.
- At least one Tavily-compatible search query derived from the chosen topic.
Configuration notes:
- Adjust the prompt to reflect your agency services, brand positioning, and desired style (e.g. technical, beginner-friendly, etc.).
- Ensure the node returns both a human-readable topic and a machine-usable search query string for Tavily.
3. Research Retrieval with Tavily Search
Purpose: Fetch up-to-date research articles to serve as the factual base for the post.
Typical node:
Tavilysearch node.- Inputs: Search query generated by the Gemini node.
- Outputs: A list of 4 relevant article options, typically including titles, URLs, and short snippets or summaries.
Configuration notes:
- Set the node to return exactly 4 results, as the downstream Telegram step expects this number for selection.
- Use Tavily’s default freshness settings or adjust them if you need more recent content for time-sensitive niches.
Edge cases: If Tavily returns fewer than 4 articles or no results at all, you should consider adding a conditional check in n8n to handle this gracefully (e.g. send a Telegram message indicating insufficient research results). The template assumes that Tavily returns 4 valid options.
4. Human-in-the-Loop Supervision via Telegram
Purpose: Allow a human to select the best research article or reject all options.
Typical nodes:
Telegram(Send Message) and a corresponding interaction mechanism (e.g. callback via commands, buttons, or replies).- Inputs: The 4 Tavily article options (titles and URLs at minimum).
- Outputs: A single selected article URL or an indication that all options were rejected.
The workflow sends a message to a Telegram channel or chat that contains the 4 candidate articles. From there, you or your team can:
- Choose the article that best fits your audience and topic.
- Reject all 4 options if none meet your quality or relevance criteria.
Configuration notes:
- Configure your Telegram Bot credentials in n8n.
- Ensure that the receiving chat or channel is correctly linked to the bot and that the selection mechanism (buttons, commands, or a follow-up node) is implemented consistently.
Edge cases:
- If no response is received, the workflow may remain waiting at this step depending on how you design the interaction. The base template expects that a human will respond.
- If the user rejects all options, you may choose to terminate the run or loop back to topic generation. The template emphasizes the ability to reject, but does not enforce a specific retry strategy.
5. Content Generation with Gemini LLM
Purpose: Convert the chosen research article into a complete, SEO-optimized WordPress post.
Typical node:
Google Gemini(or compatible LLM node).- Inputs:
- The selected article URL or content from Tavily.
- A structured prompt instructing the model to produce a title, excerpt, keywords, category, and HTML body.
- Outputs:
- Compelling blog title.
- SEO-conscious excerpt.
- Relevant keywords for search optimization.
- A suggested category that fits your WordPress taxonomy.
- Full HTML-formatted body ready for direct insertion into WordPress.
Behavior: The AI does more than paraphrasing. It restructures content, improves readability, and integrates SEO elements while maintaining factual alignment with the source article.
Configuration notes:
- Customize tone, format, and depth in the prompt so output matches your brand voice.
- Ensure the model returns HTML-safe output, especially if your WordPress theme expects specific tag structures.
6. AI Featured Image Generation
Purpose: Generate a unique featured image for each post based on the article topic.
Typical node: An AI image generation node (for example, an image model integrated via HTTP Request or a dedicated provider node, depending on your setup).
- Inputs: A descriptive prompt derived from the article topic, keywords, or summary.
- Outputs: A single image file or image URL to be used as the WordPress featured image.
Configuration notes:
- The prompt should reflect your brand style and visual guidelines as much as possible.
- Make sure the output format (e.g. PNG or JPEG) is compatible with your WordPress installation.
Edge cases: If the image generation fails or returns an invalid URL, you may want to add fallback logic, such as using a default featured image. The base description assumes successful image generation.
7. Automated WordPress Publishing
Purpose: Create and publish the blog post in WordPress, including all metadata and media.
Typical node:
WordPressnode using the REST API.- Inputs:
- Title, excerpt, HTML body from the Gemini node.
- Category and keywords for taxonomy fields.
- Generated featured image file or URL.
- Outputs: A newly created WordPress post with a live URL.
Publishing actions handled by the workflow:
- Setting the post title and content.
- Adding the excerpt for theme previews and SEO plugins.
- Assigning categories and tags based on AI output.
- Uploading the featured image to the WordPress media library and linking it to the post.
Configuration notes:
- Configure WordPress API credentials (application passwords or OAuth, depending on your setup).
- Map AI-generated categories and tags to your existing taxonomy. The template supports dynamic category creation if needed.
- Decide whether posts should be created with status
publishordraftif you want a final manual review inside WordPress.
8. Consistent Author Assignment
Purpose: Ensure that all posts appear under the correct author identity.
Typical node: Part of the
WordPressnode configuration or an additional update call.- Inputs: Author ID or username configured in the workflow.
- Outputs: Posts consistently attributed to a specific author or brand account.
This step is important for maintaining a coherent blog identity, especially when multiple automated posts are created over time.
9. Logging and Notifications
Purpose: Provide transparency, traceability, and operational awareness.
Typical nodes:
Google SheetsandTelegram.Google Sheets Audit Log
- Inputs:
- Post title, URL, publication date.
- Topic, category, and possibly keywords.
- Outputs: A continuously updated spreadsheet that acts as an audit trail of all auto-published posts.
This log can be used for performance analysis, reporting, and content planning.
Telegram Notifications
- Inputs: Post metadata and status messages from the WordPress node.
- Outputs: Real-time Telegram messages confirming successful publishing or highlighting issues.
This allows you to stay informed without logging into WordPress or n8n for every run.
Required Integrations & Credentials
To run the Auto-Blogger workflow end-to-end, configure the following credentials in n8n:
- WordPress API credentials for post creation, taxonomy management, and media uploads.
- Gemini or OpenAI API keys for topic generation and article rewriting.
- Google Sheets credentials for logging and reporting.
- Telegram Bot token for supervision and notifications.
- Tavily API key for research and article retrieval.
Once these are set, the workflow can operate without manual data transfers between systems.
Configuration Guide
1. Connect and Test Credentials
In n8n, add and test each credential:
- Verify WordPress connection by creating a test draft post.
- Call the Gemini or OpenAI endpoint with a simple prompt to confirm access.
- Check Google Sheets access by reading and writing a sample row.
- Send a test message via your Telegram bot to the target chat or channel.
- Run a sample Tavily search to ensure valid responses.
Testing each integration in isolation reduces debugging complexity when you run the full workflow.
2. Customize AI Prompts and Content Scope
Adjust the prompts in the Gemini nodes so the Auto-Blogger outputs content that fits your brand and audience:
- Define your services or business focus (e.g. SaaS, marketing, development, design).
- Specify your ideal reader profile (e.g. technical leads, founders, marketers).
- Set the tone of voice (e.g. formal, conversational, highly technical, educational).
This ensures that topics, angles, and final posts are aligned with your SEO strategy and brand positioning.
3. Configure the Publishing Schedule
Use the Schedule Trigger (or Cron) node to define how often the workflow runs:
- Start conservatively, for example 1 post per week, while you validate quality and process.
- Increase to multiple posts per week or daily publishing once you are comfortable with the results.
You can always adjust the schedule based on performance, capacity, and approval bandwidth.
4. Set Up Telegram Review and Approval
Configure the Telegram-related nodes to support your supervision process:
- Ensure the bot is added to the correct chat or channel.
- Format the message to clearly list the 4 Tavily article options, including titles and URLs.
- Define how the user selects an article or rejects all options (e.g. reply with index, use inline buttons, or predefined commands).
Use this channel to:
- Review the 4 research options.
- Select the best one or reject all if they are off-topic.
- Receive notifications when posts are successfully published.
Advanced Customization
Dynamic Category Management
The template supports automatic creation or assignment of WordPress categories based on AI output:
- Map generated categories to existing slugs where possible.
- Optionally create new categories when a novel topic appears.
This helps keep your taxonomy aligned with evolving content themes while minimizing manual admin work.
Human Review Before Final Publish
If you prefer an additional quality gate, configure the WordPress node to create posts with status