Unlocking Productivity: Mastering MCP Tools for Google and Social Media

Unlocking Productivity: How One Marketer Mastered MCP Tools for Google and Social Media

The Day Everything Fell Apart

On a Tuesday morning that looked harmless enough, Maya stared at her laptop with a sinking feeling. She was a solo marketer at a fast-growing startup, juggling Google Calendar invites, Gmail follow-ups, LinkedIn posts, and Twitter (X) updates. Her day was supposed to be planned to the minute, yet somehow she had already missed a client call, forgotten to share a document, and left a draft campaign email unsent.

Her tabs told the story: Google Calendar, Google Drive, Gmail, LinkedIn, Twitter, a dozen docs, and a few random tools she was trying to stitch together on her own. Every task required another login, another click, another mental context switch. By noon, she felt less like a marketer and more like a human router, shuffling data between platforms.

That afternoon, after a particularly awkward message from a client asking, “Did we still have a meeting today?”, Maya decided she needed a different approach. Manual work was not just inefficient, it was risky. She could not afford to keep missing details.

That was the moment she discovered an n8n workflow template built around MCP tools, designed to connect Google services and social media through a single AI Agent. It did not just promise automation. It promised sanity.

The Hidden Engine Behind the Chaos

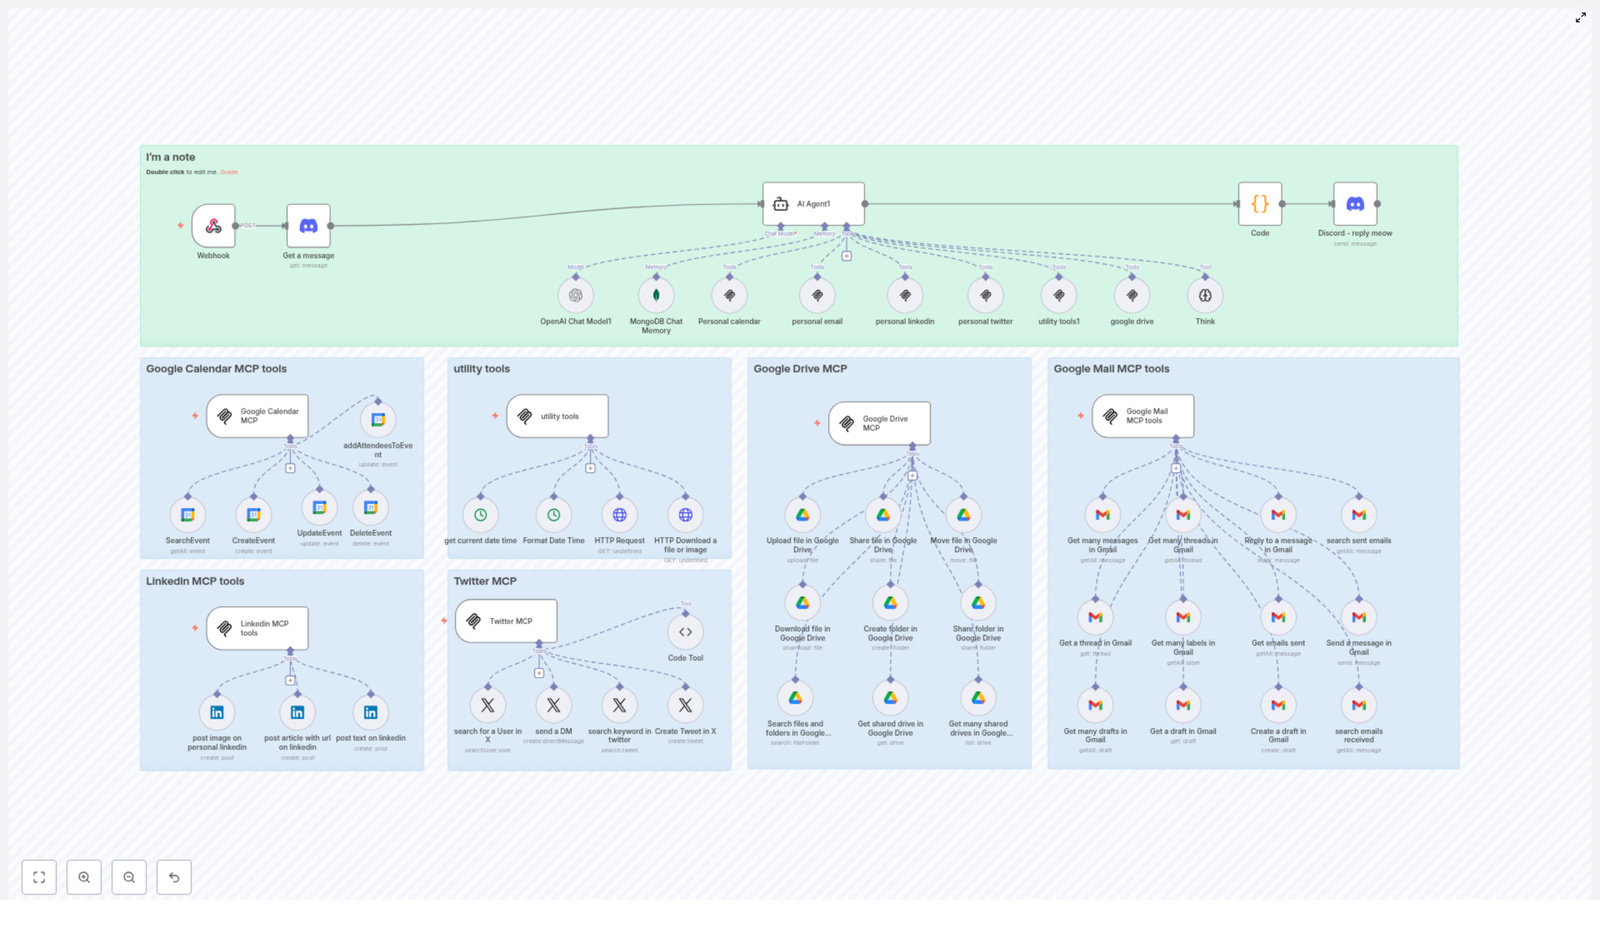
As Maya dug into the template documentation, she realized her problem was not just “too many apps”. It was the lack of a central brain coordinating them. The n8n template introduced her to something she had never used before: an MCP (Multi-Channel Platform) architecture powered by a central AI Agent.

At the core of this setup was a webhook interface. Every request from her different channels could be sent into this central AI Agent, which was wired into multiple APIs and tools. It used:

  • Discord for communication and quick interactions
  • MongoDB for memory, so it could remember context over time
  • Google Calendar, Google Drive, and Gmail for her daily operations
  • LinkedIn and Twitter tools for social media management

The AI Agent itself relied on powerful models like OpenAI GPT, enriched with memory storage and synchronized with her personal calendars, emails, and social accounts. Instead of Maya manually deciding what to do in each app, she could send one instruction and let the Agent route it to the correct workflow.

She imagined a future where she could simply say, “Schedule a follow-up with this client, attach the proposal, and share a quick LinkedIn update about it,” and the system would know exactly which tools to trigger.

Rising Pressure, Rising Complexity

The next week, things escalated. Maya’s CEO announced a new product webinar. She had to coordinate:

  • Calendar invites for internal and external stakeholders
  • A shared folder with all presentation assets
  • An email campaign for registrations
  • LinkedIn posts to promote the event
  • Twitter threads to build momentum

In the past, this would have meant late nights and endless copy-pasting. This time, she decided to fully commit to the MCP-driven n8n workflow template.

Turning Point: When the AI Agent Took Over

Maya started by wiring her accounts into the template. The webhook endpoint was already configured inside n8n, so once she connected her Google and social media accounts, the central AI Agent could finally “see” her digital universe.

Step 1: Taming the Calendar Chaos

First, she addressed the most painful part of her workflow: scheduling. The Google Calendar MCP tools in the template gave her a complete toolkit for event management, all driven by the AI Agent.

Behind the scenes, the Agent could call:

  • SearchEvent to retrieve events within a specific date range, so it never double-booked her
  • CreateEvent to schedule new events with detailed descriptions
  • UpdateEvent when a meeting time changed or details needed refinement
  • DeleteEvent to remove canceled events from her calendar
  • addAttendeesToEvent to add participants without her manually typing every email

For the webinar, she simply provided the date, time, and title to the Agent. The MCP workflow handled the rest, creating the event and inviting stakeholders. When the CEO later asked to move the time, Maya did not open Calendar. She updated it via the Agent, and the workflow automatically adjusted the event.

Step 2: Utility Tools That Quietly Held Everything Together

As she explored further, Maya realized that some of the most powerful pieces of the system were the quiet utility tools that made everything else reliable.

  • Get Current Date Time ensured every action used an accurate timestamp for scheduling and logging
  • Format Date Time converted her natural language inputs like “next Thursday at 3 PM” into standard ISO format that all tools understood
  • HTTP Request & Download allowed the workflow to fetch web resources or download files and images whenever needed

These utilities became the glue. Whenever she triggered a workflow, she knew dates would be correct, formats would be consistent, and external resources could be pulled in automatically.

Step 3: Organizing the Mess in Google Drive

The next bottleneck was file management. Before MCP, Maya would create folders manually, upload decks, and then forget who had access to what. The Google Drive MCP tools in the template changed that completely.

Through the AI Agent, she could now:

  • Upload File directly into a specific folder or the root directory
  • Share File/Folder with read-only permissions via email, so stakeholders saw the latest version without her worrying about edits
  • Move File to reorganize assets as the project evolved
  • Create Folder for each new campaign or event
  • Search Files and Folders by name when she could not remember where something lived
  • Retrieve Shared Drives to access and list shared drives across the team

For the webinar, the workflow automatically created a dedicated folder, uploaded the slides and promo images, and shared them with the team. Instead of hunting for links, Maya had a single source of truth that the Agent could reference whenever she needed to attach or share a file.

Step 4: Finally Getting Ahead of Email

Gmail was where Maya felt most overwhelmed. Important leads were buried under newsletters, and follow-ups slipped through the cracks. The Google Mail MCP tools in the n8n template gave her a way to bring structure back to her inbox.

The Agent could now:

  • Get Many Messages to fetch recent emails and surface what mattered
  • Get Many Threads to manage entire conversations instead of isolated messages
  • Reply to a Message directly within a thread, without her opening Gmail
  • Search Sent Emails using criteria like recipient or subject line
  • Create and Send Drafts so she could have the Agent prepare emails for approval before sending
  • Manage Labels and Drafts to organize her inbox and keep track of pending replies

For webinar registrations, the workflow automatically drafted thank-you emails and follow-up reminders. Maya reviewed and approved them, but she no longer had to copy and paste the same message dozens of times.

Step 5: Making Social Media Work While She Slept

With the operational chaos under control, Maya turned to what she actually enjoyed: building an audience. The MCP tools for LinkedIn and Twitter (X) were already wired into the same n8n template, ready for the AI Agent to command.

LinkedIn MCP Tools in Action

For LinkedIn, the workflow allowed her to:

  • Create text posts that announced the webinar and shared insights
  • Post images directly to her profile to increase engagement
  • Share articles with embedded URLs to drive traffic and visibility

She fed the Agent a short brief about the webinar topic. The workflow generated and scheduled a series of posts, each tailored to a different angle: thought leadership, product value, and behind-the-scenes preparation.

Twitter (X) MCP Tools for Real-Time Reach

On Twitter (X), the MCP toolkit helped her:

  • Search for users by username to identify relevant partners and influencers
  • Send Direct Messages to invite key contacts to the webinar
  • Search keywords across tweets to monitor conversations around her topic
  • Post tweets instantly to share updates and reminders

Instead of manually tweeting in between meetings, Maya let the workflow handle posting and monitoring. The AI Agent could search for relevant discussions and help her craft timely responses or follow-ups.

The Result: From Frantic Juggling to Focused Strategy

By the time the webinar went live, Maya noticed something she had not felt in months: calm. The calendar was accurate, everyone had the right link, assets were in one place, emails were queued, and social media was already seeding interest.

What changed was not just automation. It was the presence of a central AI Agent, orchestrating MCP tools across Google services and social platforms. Instead of her brain acting as the integration layer, the n8n workflow template did the work:

  • Webhook requests came in from various channels
  • The AI Agent interpreted her commands using GPT and stored context in MongoDB
  • Google Calendar, Drive, Gmail, LinkedIn, and Twitter tools executed the right actions
  • Utility tools ensured dates, formats, and external resources stayed consistent

Her productivity was no longer limited by how many tabs she could keep open. She could finally focus on strategy, creativity, and relationships, while the MCP-driven automation handled the repetitive coordination.

Where You Fit Into This Story

If you recognize yourself in Maya’s struggle, you do not need to rebuild this system from scratch. The n8n workflow template that transformed her day is designed to give you the same integrated MCP experience, connecting your Google tools and social media accounts through a single AI Agent.

With it, you can:

  • Centralize scheduling, file management, email, and social media
  • Automate repetitive tasks across Google Calendar, Drive, and Gmail
  • Maintain an active presence on LinkedIn and Twitter without constant manual posting
  • Rely on utility tools to keep your data clean, consistent, and reliable

The difference between barely keeping up and confidently scaling your work often comes down to how well your tools talk to each other. MCP tools inside n8n give you that unified layer, powered by an AI Agent that understands your intent and executes across platforms.

Start Your Own Automation Chapter

You do not have to wait for the next missed meeting or forgotten email to make a change. The same MCP-driven n8n template that helped Maya can be adapted to your workflow, your stack, and your priorities.

Explore the template, connect your accounts, and let the AI Agent become the central nervous system of your digital workday. Once you see your calendar, inbox, files, and social channels moving in sync, you will not want to go back.

Comprehensive Guide to MCP Tools Integration

Comprehensive Guide to MCP Tools Integration

What You Will Learn

In this guide, you will learn how a complete MCP (Multi-Channel Platform) tools integration works inside an automation workflow, such as in n8n. By the end, you should be able to:

  • Understand the role of the central AI Agent and how it connects to MCP tools
  • Follow the end-to-end flow from an incoming Discord message to automated actions
  • Recognize what each MCP tool can do for Google Calendar, Google Drive, Gmail, LinkedIn, Twitter, and utility operations
  • See how this type of integration can improve productivity and unify your automation stack

Concept Overview: What Is MCP Tools Integration?

MCP tools integration brings multiple online services into a single, AI-orchestrated workflow. Instead of handling Google Calendar, Google Drive, Gmail, LinkedIn, Twitter, and utility operations separately, you connect them to one central AI Agent.

In a typical n8n-style workflow, this integration lets you:

  • Receive messages from a channel like Discord
  • Send those messages to an AI Agent that understands context
  • Let the AI decide which MCP tools to call, for example creating events, sending emails, posting to social media, or managing files
  • Return the results back to the original channel in a clear, user-friendly way

Core Building Blocks of the Integration

1. Central AI Agent

The AI Agent is the decision-maker in this architecture. It is powered by OpenAI’s GPT-4 model and uses MongoDB-based chat memory to keep track of previous messages. This memory allows the AI to:

  • Retain context across multiple user messages
  • Understand follow-up questions and references to earlier parts of the conversation
  • Choose which MCP tool to use based on user intent

In practice, the AI Agent receives the text of an incoming message, analyzes what the user wants, and then calls the appropriate MCP tool or combination of tools. It can schedule meetings, send emails, manage files, or interact with social media directly from a single conversation.

2. Webhook and Message Capture

The automation flow starts with a webhook that listens for incoming POST requests from Discord. Whenever a user sends a message in the connected Discord channel, this happens:

  1. Discord sends a POST request to the webhook URL.
  2. A node, often called “Get a message,” retrieves the full message content and relevant metadata.
  3. The workflow passes this message to the AI Agent for analysis and decision-making.

This makes Discord the front-end interface for your automation. Users simply type natural language commands, and the workflow handles the rest in the background.

Understanding Each MCP Tool Group

The integration exposes several groups of MCP tools. Each group focuses on one platform or type of utility. Below is a breakdown of what each group can do inside your workflow.

3. Google Calendar MCP Tools

These tools let the AI Agent manage your calendar directly. Typical actions include:

  • Search Event: Find existing events within a specific date or time range. For example, “Show my meetings for tomorrow.”
  • Create Event: Add new events with start and end times, titles, and descriptions. For example, “Schedule a call with Alex at 3 PM on Friday.”
  • Update Event: Modify existing events, such as changing the time, summary, or description.
  • Delete Event: Remove events that are no longer needed.
  • Add Attendees: Add or update attendee email addresses on an event.

4. Google Drive MCP Tools

These tools help the workflow manage files and folders in Google Drive, including shared drives.

  • Upload File: Upload files to a specific folder or to the root drive.
  • Share File/Folder: Grant access to files or folders for specific email addresses.
  • Move File: Move a file into a different folder or drive for better organization.
  • Download File: Download a file when the AI Agent or user needs its contents.
  • Create Folder: Create new folders to organize content.
  • Get Shared Drives: List available shared drives and retrieve their details.
  • Search Files/Folders: Look up files or folders by name to quickly locate resources.

5. Google Mail MCP Tools

With these tools, the AI Agent can read, search, and send emails on your behalf. This is especially useful for email-heavy workflows.

  • Get Many Messages: Retrieve multiple emails using filters, for example by label, date range, or search query.
  • Get Many Threads: Access entire email conversations or threads.
  • Reply to Message: Send a reply to a specific email, preserving the conversation context.
  • Search Sent Emails: Find emails you have already sent.
  • Get Drafts and Create Drafts: Retrieve existing drafts or create new drafts for later review.
  • Send a Message: Compose and send a new email directly.
  • Get Labels: List and use labels to better organize and filter emails.

6. LinkedIn MCP Tools

These tools let the workflow post content to LinkedIn, which is useful for marketing, personal branding, or company announcements.

  • Post Image: Publish LinkedIn posts that include images.
  • Post Article with URL: Share articles or blog posts by posting a URL with supporting text.
  • Post Text: Create text-only LinkedIn updates.

7. Twitter MCP Tools

For Twitter (now X), these tools handle user discovery, messaging, and posting.

  • Search for User: Find Twitter users by their username.
  • Send a DM: Send direct messages to specific users.
  • Search Keyword: Look up tweets that contain specific keywords.
  • Create Tweet: Publish new tweets directly from the workflow.

8. Utility Tools

Utility tools support the main integrations by handling common tasks that are not tied to one platform.

  • Get Current Date Time: Retrieve the current date and time, useful for scheduling and logging.
  • Format Date Time: Convert dates into standardized string formats for consistent use across tools.
  • HTTP Request: Make generic HTTP calls, for example to access APIs, browse URLs, or get data from web services.
  • HTTP Download: Download files or images from specified URLs.

How the Integration Flow Works Step by Step

The following walkthrough shows how the full MCP integration functions in a typical n8n-style workflow, from input to response.

Step 1: Message Arrives from Discord

  • A user sends a message in a connected Discord channel, for example: “Schedule a meeting with Sarah next Tuesday at 10 AM and email her the invite.”
  • Discord sends this message as a POST request to the configured webhook URL.

Step 2: Webhook and Message Retrieval

  • The webhook node in the workflow receives the POST request.
  • A “Get a message” node fetches the full message content, including text and any relevant metadata.
  • The workflow passes this message to the AI Agent node.

Step 3: AI Agent Interprets the Request

  • The AI Agent, using GPT-4 and MongoDB chat memory, reads the message.
  • It uses conversation history to understand context, for example who “Sarah” is if that was mentioned earlier.
  • The AI determines which actions are needed, such as:
    • Create a Google Calendar event

Step 4: AI Calls the Appropriate MCP Tools

Based on the interpreted intent, the AI Agent triggers specific MCP tools:

  • For scheduling:
    • Use Create Event in Google Calendar with the correct date, time, title, and description.
    • Use Add Attendees to include Sarah’s email address.
  • For emailing:
    • Use Send a Message in Google Mail to send Sarah the event details.

If the user asks for social media actions, file operations, or other tasks, the AI Agent can similarly call LinkedIn, Twitter, Google Drive, or utility tools as needed.

Step 5: Handling Large Responses and Chunking

Sometimes the workflow needs to send back a lot of information, for example a list of many calendar events or search results. In these cases, the response is split into smaller chunks so that Discord can handle it and the user can read it more easily.

The AI Agent or the workflow logic manages this chunking, ensuring that each part of the response is clear and complete before sending the next segment.

Step 6: Replying Back in Discord

  • Once all actions are complete, the workflow compiles a response message.
  • This message summarizes what was done, for example:
    • “Your meeting with Sarah has been scheduled for Tuesday at 10 AM and the invite has been emailed.”
  • The workflow sends this reply back to Discord so the user can see the results directly in the chat.

Key Benefits of Using MCP Tools Integration

Integrating MCP tools into an AI-driven workflow provides several advantages:

  • Unified Automation: Control Google Workspace, LinkedIn, Twitter, and other services from a single interface, such as a Discord channel.
  • Context-Aware Interaction: MongoDB-based chat memory helps the AI understand ongoing conversations, which leads to more natural back-and-forth exchanges.
  • Extensive Platform Coverage: Support for Google Calendar, Google Drive, Gmail, LinkedIn, Twitter, and generic HTTP utilities covers a wide range of business needs.
  • Improved Efficiency: Automate repetitive tasks like scheduling, emailing, posting updates, and file management, which saves time and reduces manual work.

Quick Recap

  • The workflow begins with a Discord webhook that captures user messages.
  • The AI Agent, powered by GPT-4 and MongoDB chat memory, interprets each message.
  • Based on user intent, the AI calls MCP tools for Google Calendar, Google Drive, Gmail, LinkedIn, Twitter, or utility operations.
  • Results are formatted, chunked if necessary, and sent back to Discord as clear responses.
  • This creates a centralized, conversational automation hub that connects multiple platforms through one AI-driven workflow.

FAQ

Is this integration suitable for business use?

Yes. The MCP tools integration is designed to work with core business platforms like Google Workspace, LinkedIn, Twitter, and Discord. It is well suited for teams that want to centralize scheduling, communication, and content posting.

Do I need to know how each API works in detail?

No. The MCP tools abstract most of the low-level API details. You mainly configure credentials and basic parameters. The AI Agent and workflow handle which tools to call and how to combine them.

Can I extend this integration with more tools?

Yes. You can add more nodes or connectors to the workflow, for example additional HTTP requests to other services. Utility tools such as HTTP Request and HTTP Download make it easier to integrate extra APIs.

What role does AI play in this setup?

The AI Agent is central to the experience. It interprets natural language, keeps track of conversation context, and chooses which MCP tools to use. This lets non-technical users trigger complex automations simply by chatting.

Conclusion and Next Steps

This advanced MCP tools integration provides a powerful way to orchestrate workflows across multiple platforms from a single, AI-driven interface. With GPT-4, MongoDB chat memory, and a wide set of MCP tools, you can automate scheduling, email management, file operations, and social media posting with minimal friction.

If you are ready to streamline your operations, start exploring how this MCP integration template fits into your own n8n workflows or similar automation setups. Connect your accounts, configure your triggers, and let the AI Agent handle the rest.

Automate Customer Communication with n8n Workflow

Automate Customer Communication with n8n Workflow

What You Will Learn

In this tutorial-style guide, you will learn how to use an n8n workflow template to automate customer communication with minimal manual effort. By the end, you will understand how to:

  • Trigger an n8n workflow manually whenever you need to send updates
  • Retrieve customer data from a datastore and sort it for clean reporting
  • Enrich each customer with invoice line items, VAT, and totals
  • Generate one personalized text invoice per customer using templates
  • Send individual text emails that include each customer’s invoice
  • Create one HTML summary document for all customers in the last 24 hours
  • Send a single HTML summary email with an overview of new customers
  • Customize templates, line items, and email settings for your own use case

Why Automate Customer Communication with n8n?

In a fast-paced business environment, manually creating and sending emails to each new customer quickly becomes slow and error prone. Automation with n8n helps you:

  • Keep every new customer informed with consistent, timely messages
  • Generate accurate invoices that include itemized services and tax
  • Provide your team with a daily overview of new customers
  • Scale communication as your customer base grows, without extra manual work

The workflow template described here brings all of this together in a single, easy-to-trigger automation.


Concepts You Need Before You Start

What is this n8n workflow doing?

This workflow runs when you manually click Execute in n8n. Once started, it:

  1. Retrieves all customers from a datastore
  2. Sorts them into a clean, ordered list
  3. Adds invoice line items to each customer record
  4. Generates one invoice document per customer using a text template
  5. Sends one text email per customer with their invoice content
  6. Generates one HTML document that summarizes all new customers
  7. Sends one HTML summary email with that customer list

Key n8n nodes used in this template

  • Manual Trigger – lets you start the workflow on demand
  • Customer Datastore – fetches all customer records using the getAllPeople operation
  • Item Lists – sorts the retrieved customers by a specific field, such as name
  • Function (Add lines) – enriches each customer item with invoice line items, VAT, and totals
  • Document Generator (One item per template) – creates one text invoice per customer from a template
  • Document Generator (All items, one template) – builds a single HTML document for a list of customers
  • Email nodes – send the individual text emails and the HTML summary email

Step-by-Step: How the Workflow Runs in n8n

Step 1 – Start the workflow with a Manual Trigger

The workflow begins with a Manual Trigger node named On clicking 'execute'. This node does not run on a schedule. Instead, you or an operator open the workflow in n8n and click Execute when you want to:

  • Send invoices for new customers
  • Generate and send a daily summary of recent customers

This approach is useful when you want full control over when communication is sent, for example at the end of each workday.

Step 2 – Retrieve all customer data from the datastore

Next, the workflow uses the Customer Datastore node to pull customer information from your database. This node is configured to:

  • Use the getAllPeople operation
  • Return all customer records, not just a subset

The output of this node is a list of customer items, each containing fields such as name and contact details. These items will be used for both invoice generation and the summary email.

Step 3 – Sort customers using the Item Lists node

To keep emails and reports well organized, the workflow passes the retrieved customers into an Item Lists node. This node is configured to:

  • Sort the list of customers by the name field

Sorting has two main benefits:

  • Individual emails are sent in a consistent, predictable order
  • The summary HTML document presents customers in a tidy list

Step 4 – Add invoice line items and pricing details

Once the customers are sorted, each item is processed by a Function node often labeled Add lines. This node enriches each customer with invoice-related data, such as:

  • Line items that describe services or products
  • Costs for each service or product
  • VAT calculation based on your tax rules
  • Total invoice amount that includes VAT

At this stage, every customer item now includes all the data needed to build a complete invoice document.

Step 5 – Generate one invoice document per customer

With invoice data in place, the workflow uses the Document Generator node named One item per template. This node creates a separate text invoice for each customer by:

  • Taking one customer item at a time
  • Filling a predefined text template with that customer’s data

The resulting invoice typically includes:

  • The current date
  • Recipient details, such as the customer’s name and contact information
  • An itemized list of services or products
  • VAT and total amount due

Each generated document is structured so that it can be inserted directly into the body of an email.

Step 6 – Send one text email per customer with their invoice

After the invoices are generated, the workflow uses an email node named Send one TEXT email per item. This node loops through each generated invoice and sends an individual email. Typical configuration includes:

  • Subject line that includes the customer’s name, for example: “Your invoice, {{ $json.name }}”
  • Email body that contains the text invoice produced by the document generator
  • From address set to your business or billing email
  • To address pulled from each customer record

This step ensures every customer receives a personalized text email with their own invoice content.

Step 7 – Create one HTML summary of all new customers

While individual invoices are being sent, the workflow also prepares a summary for internal use. The sorted list of customers is passed to another Document Generator node, named All items, one template. This node:

  • Takes the complete list of customer items
  • Applies a single HTML template to generate a combined document

The result is one HTML document that lists all new customers in the last 24 hours. This could include:

  • Customer names
  • Contact details
  • Any other relevant fields you choose to include in the template

This HTML output is designed to be embedded directly into a summary email.

Step 8 – Send a single HTML summary email

Finally, the workflow uses the Send one HTML Email per list node to deliver the summary document. This node is configured to:

  • Use the HTML generated in the previous step as the email body
  • Send the email to a specific recipient, such as your sales or support team

The summary email provides a quick overview of all new customers in the last 24 hours, which helps your team stay informed without checking the database manually.


Benefits of Using This n8n Workflow

  • Automation – No more manual invoice creation or copy-pasting email content. The workflow handles everything once you click Execute.
  • Personalization – Each customer receives a customized invoice that includes their own services, VAT, and totals.
  • Efficient communication – Customers get detailed individual emails, while your team receives a single HTML summary with all new customers.
  • Scalability – The workflow processes all records returned by getAllPeople, so it can handle a handful of customers or hundreds at a time.

How to Customize the Workflow for Your Needs

Adjust invoice line items and pricing

To change the invoice content, open the Add lines Function node. Here you can:

  • Add or remove services and products
  • Change pricing logic
  • Modify how VAT and totals are calculated

This lets you adapt the invoice to match your real billing structure.

Modify document templates

Both Document Generator nodes use templates:

  • One item per template for individual text invoices
  • All items, one template for the HTML customer summary

You can update these templates to:

  • Change the wording and layout of invoices
  • Include or remove fields like address, phone number, or custom data
  • Adjust HTML styling in the summary document to match your brand

Update email recipients and SMTP settings

In the email nodes:

  • Set the From address to your main business email
  • Map the To address to the customer email field for individual invoices
  • Choose one or more recipients for the HTML summary email, such as a team mailing list

Make sure your SMTP credentials or email integration settings in n8n are configured correctly so that emails are delivered successfully.


Quick Recap

This workflow template in n8n helps you automate customer communication in a structured way:

  1. You manually trigger the workflow when you are ready.
  2. Customer data is retrieved from the datastore using getAllPeople.
  3. Customers are sorted by name for consistent processing.
  4. Invoice line items, VAT, and totals are added to each customer.
  5. One text invoice per customer is generated through a document template.
  6. Each customer receives an individual text email with their invoice.
  7. A single HTML document lists all new customers from the last 24 hours.
  8. Your team receives that HTML summary in one email.

With a few customizations, this template can match your exact invoicing and communication needs.


Frequently Asked Questions

Do I have to run this workflow manually?

In this template, the workflow starts with a Manual Trigger, so you run it by clicking Execute. If you prefer, you can replace the manual trigger with a scheduled trigger to run automatically, for example once per day. The core steps described here remain the same.

Can I change which customers are included?

Yes. The Customer Datastore node currently uses getAllPeople to fetch all customer records. You can adjust the query or add filters so that only specific customers, such as those created in the last 24 hours, are processed.

Is it possible to change the email content?

Absolutely. You can edit:

  • The subject and body in the individual text email node
  • The HTML template used by the summary Document Generator

This lets you match your brand voice and communication style.

What if my invoice structure is different?

Open the Add lines Function node and modify the logic that builds the invoice line items, VAT, and totals. You can adapt it to any pricing model as long as you keep the data structure consistent with what the document template expects.


Start Using the Template

This n8n workflow template is a practical example of how automation can simplify customer communication, reduce manual effort, and improve accuracy. By combining datastore queries, item processing, document generation, and email sending, you get a complete communication pipeline that is easy to maintain and scale.

Try building and running this workflow in your n8n instance today to experience streamlined customer communication.

Automate Customer Invoicing and Notifications with n8n

Automate Customer Invoicing and Notifications with n8n

Overview

This n8n workflow template automates two common customer communication tasks:

  • Sending individualized, text-based invoice emails to each customer.
  • Sending a consolidated HTML summary email listing all new customers.

The automation retrieves customer records from a datastore, enriches each item with invoice line items, generates documents from templates, and dispatches emails to both customers and internal recipients. The workflow is designed for manual execution, which is useful for controlled batch runs, testing, or on-demand invoicing.

Workflow Architecture

At a high level, the workflow follows this sequence:

  1. Manual trigger – Start the workflow only when explicitly executed.
  2. Customer data retrieval – Fetch all customer records using the datastore node with the getAllPeople operation.
  3. Sorting – Alphabetically sort the customer list by name for consistent output.
  4. Invoice enrichment – Use a Function Item node to attach invoice line items and metadata to each customer.
  5. Per-customer document generation – Generate one text-based invoice document per customer from a template.
  6. Per-customer email sending – Email each generated invoice to the corresponding customer.
  7. Consolidated document generation – Create a single HTML document listing all customers as a summary.
  8. Summary email sending – Send the HTML summary to an internal recipient, such as an admin or finance team.

Data Flow and Node Responsibilities

The workflow processes data as an item stream. Each customer record is treated as an individual item that is transformed and enriched as it moves through the nodes. In parallel, the same item list is also used to build an aggregated HTML output for internal reporting.

Node-by-Node Breakdown

1. Manual Trigger Node

Purpose: Start the workflow only when you explicitly click Execute in the n8n editor.

  • Node type: Manual Trigger
  • Trigger behavior: No schedule or external webhook. The workflow runs only on manual execution.

This is useful when:

  • You want full control over when invoices and notifications are sent.
  • You are testing or iterating on the workflow configuration.

2. Customer Datastore Node

Purpose: Retrieve all customer records from your configured datastore.

  • Node type: Datastore (or equivalent database integration used in the template).
  • Operation: getAllPeople

The node returns a list of customer items. Each item typically includes:

  • name – Customer full name.
  • email – Customer email address.
  • location or similar fields – Additional metadata used for personalization or internal reporting.

Configuration notes:

  • Ensure datastore credentials are configured in n8n before running the workflow.
  • Verify that the getAllPeople operation returns the fields referenced later in templates, especially name and email.

3. Item Lists Node (Sorting)

Purpose: Sort the list of customers alphabetically by name to produce consistent and predictable output.

  • Node type: Item Lists
  • Key action: Sort items by the name field in ascending order.

Sorting improves:

  • Readability of the summary email.
  • Traceability when comparing generated emails with the underlying customer list.

Edge case: If a customer record is missing the name field or has it set to null, n8n will still attempt to sort but the position of such items may be unexpected. For consistent behavior, ensure that all customers have a valid name value.

4. Function Item Node – Add Invoice Lines

Purpose: Enrich each customer item with invoice-specific data, including line items and invoice-level metadata.

  • Node type: Function Item
  • Scope: Processes one item at a time and returns the modified item.

Inside this node, a custom JavaScript function:

  • Adds example invoice line items, such as two predefined services.
  • Sets fields like:
    • description
    • quantity
    • amount
    • VAT
    • total per line item
  • Calculates and sets the overall invoice total for each customer.
  • Defines an invoiceDate or similar field that is later referenced in the document template.

Configuration notes:

  • Ensure property names used here match the placeholders in the document templates.
  • Adjust line items, VAT logic, and total calculations as needed for your billing model.

5. Document Generation Node – One Item Per Template

Purpose: Generate a personalized text invoice for each customer using a template.

  • Node type: Document Generation (or similar template node).
  • Mode: One item per template.
  • Output format: Text (plain text invoice body).

The template typically includes:

  • Invoice date and customer name.
  • Recipient details such as email or location, if included in the template.
  • A detailed list of service line items with description, quantity, price, VAT, and total.
  • A final invoice total derived from the Function Item node.

Each incoming item (customer) results in one generated text document. That document is then attached to the item and passed to the next node for email delivery.

6. Email Node – Send One TEXT Email Per Item

Purpose: Send the generated invoice text to each customer as a personalized email.

  • Node type: Email (e.g., SMTP or specific email integration).
  • Mode: One email per incoming item.

Typical configuration:

  • To: Expression referencing the customer’s email field.
  • Subject: Dynamic, often including the customer’s name or invoice date.
  • Body: The generated text document from the previous node.
  • Format: Plain text email body, suitable for simple invoice communication.

Error handling considerations:

  • If a customer item is missing an email address, the email node may fail for that item. Consider validating the email field upstream or adding conditional logic to skip incomplete records.
  • Ensure email credentials (SMTP or service-specific) are correctly configured and tested in n8n before running the workflow for production.

7. Document Generation Node – All Items, One Template

Purpose: Build a single HTML document that lists all customers in a consolidated format.

  • Node type: Document Generation (or similar template node).
  • Mode: All items, one template.
  • Output format: HTML.

This node receives the full list of customer items and produces one aggregated HTML output. The template typically:

  • Iterates over all customers.
  • Renders each customer as a list entry, usually with:
    • Name
    • Email address
  • Wraps the list in standard HTML markup, for example an unordered list.

The result is a clean, readable summary of all new or processed customers, suitable for internal reporting.

8. Email Node – Send One HTML Email Per List

Purpose: Send the consolidated HTML summary to a designated internal recipient.

  • Node type: Email.
  • Mode: One email for the entire list.

Typical configuration:

  • To: A fixed address, such as an admin, finance, or sales operations mailbox.
  • Subject: A static or partially dynamic subject such as “New Customers Summary”.
  • Body: The generated HTML summary from the previous node.
  • Format: HTML email, so the bullet list and formatting render correctly in email clients.

Configuration Notes and Prerequisites

Credentials and Integrations

  • Datastore credentials: Required for the getAllPeople operation. Confirm that the node can successfully read from your datastore.
  • Email credentials: Configure SMTP or your chosen email integration in n8n and test with a simple workflow before using this template in production.

Template Alignment

To avoid runtime issues, ensure the following:

  • Field names produced by the Function Item node (for example, invoiceLines, invoiceDate, total) exactly match the placeholders defined in the document templates.
  • The customer fields used in templates, such as name and email, exist in the output of the datastore node.

Handling Missing or Invalid Data

  • If some customers lack email addresses, you may want to:
    • Filter them out before the email node, or
    • Add validation logic in the Function Item node.
  • If names or other key fields are missing, consider default values or an upstream data quality check.

Use Cases and Benefits

Primary Use Cases

  • Personalized automated billing: Generate and send itemized invoices to each customer without manual formatting or copy-paste work.
  • New customer notifications: Keep internal teams informed about newly added or processed customers through a single consolidated summary email.

Key Benefits

  • Reduced manual effort: Replace repetitive email drafting with an automated, repeatable workflow.
  • Consistency and accuracy: Use the same templates and logic for every run, which reduces formatting errors and missing details.
  • Customizable templates: Adjust document generator templates to reflect your branding, tone, and invoice layout.
  • Scalable automation: Run the workflow daily, weekly, or on demand, depending on your billing and notification cycles.

Advanced Customization Ideas

Once the base template is working, you can extend or adapt it:

  • Scheduling: Replace the Manual Trigger with a Cron node if you want fully automated daily or weekly invoice runs.
  • Additional filters: Insert a Filter or IF node after data retrieval to send invoices only to specific customer segments.
  • Different invoice structures: Modify the Function Item logic to support discounts, multiple tax rates, or different currencies.
  • Alternative channels: Duplicate the email branch to send invoices through another integration (for example, a ticketing or CRM system) if supported by your n8n setup.

Getting Started

To start using this automation in your own n8n environment:

  1. Import or open the provided workflow template.
  2. Configure datastore and email credentials in n8n.
  3. Review and adjust the Function Item logic and document templates to match your invoice format and branding.
  4. Run the workflow manually using the Manual Trigger to validate behavior and outputs.
  5. Once tested, optionally add scheduling or additional logic based on your business requirements.

By connecting your data sources, defining clear templates, and automating email delivery, you can significantly streamline customer invoicing and internal notifications.

Call to Action


Ready to reduce manual invoicing work and improve consistency in customer communication? Start with this n8n workflow template, adapt it to your data and templates, and automate personalized invoices and summary notifications with confidence.

Automate Invoices & Reminders with Jotform & QuickBooks

Automate Invoices and Payment Reminders with Jotform, QuickBooks, and n8n

Consistent invoicing and structured payment follow-ups are essential for maintaining predictable cash flow and a professional client experience. This n8n workflow template connects Jotform and QuickBooks Online (QBO) to automate the full invoicing lifecycle, from order capture to reminder scheduling and reporting.

By orchestrating form submissions, customer management, invoice creation, and reminder sequences in a single workflow, you minimize manual data entry, reduce billing errors, and standardize your collections process.

End-to-End Workflow Overview

This n8n template is designed as a complete billing pipeline. It performs the following core functions:

  • Captures orders or service requests from Jotform submissions
  • Normalizes and formats incoming data for consistent processing
  • Creates or updates customer records in QuickBooks Online
  • Retrieves product or service items from QuickBooks
  • Generates and emails invoices directly from QuickBooks
  • Stores invoice metadata in a database for reminder tracking
  • Runs a scheduled reminder process each day at a fixed time
  • Sends payment reminders based on configurable logic and intervals
  • Provides a daily AI-generated summary of all reminders sent

The result is a repeatable, auditable workflow that aligns invoicing and collections activities with automation best practices.

Key Triggers, Nodes, and Integrations

1. Jotform as the Intake Trigger

The workflow begins with a Jotform trigger configured via webhook. When a customer submits a form for a product or service, the webhook sends the submission payload into n8n.

Typical captured fields include:

  • Customer name
  • Email address
  • Phone number
  • Selected product or service
  • Billing address and related details

This trigger ensures that every new order or service request enters the automated invoicing pipeline in real time.

2. Data Preparation and Normalization

After the initial trigger, one or more Code or Function nodes normalize the raw form data. This step typically includes:

  • Cleaning and validating customer contact information
  • Mapping Jotform field names to QuickBooks compatible fields
  • Structuring line item details and quantities

Well-structured data at this stage simplifies downstream API interactions with QuickBooks and reduces the risk of rejected requests or inconsistent records.

3. Customer Management in QuickBooks Online

Next, the workflow interacts with QuickBooks Online to manage customer records. Using the customer email as a unique identifier, n8n checks whether the customer already exists in QBO.

  • If the customer exists, the workflow updates the existing record with any new billing address or contact information.
  • If the customer does not exist, a new customer record is created in QuickBooks using the data from the Jotform submission.

This approach maintains a single source of truth for customer data and avoids duplicate records, which is a common issue in manual billing processes.

4. Product and Service Item Retrieval

Once the customer is resolved, the workflow identifies the correct product or service item in QuickBooks based on the selection in the Jotform submission.

A QuickBooks item lookup node retrieves the relevant item details, such as:

  • Item name or SKU
  • Price or rate
  • Currency and tax configurations

These details are then used to construct an accurate invoice line item.

5. Invoice Creation and Delivery

With both customer and item information in place, the workflow uses QuickBooks API nodes to:

  1. Create the invoice for the customer, including the selected products or services, quantities, and pricing.
  2. Email the invoice directly to the customer via QuickBooks built-in email functionality.

Sending invoices from QuickBooks ensures that all financial documents are stored and tracked within the accounting system, which simplifies reconciliation and reporting.

6. Persisting Invoice Data for Reminders

After the invoice is successfully created and sent, the workflow stores key invoice metadata in a dedicated database table. This table is used exclusively for reminder tracking and decision-making.

Required columns typically include:

  • invoiceId – the QuickBooks invoice identifier
  • remainingAmount – current outstanding balance
  • currency – currency code used on the invoice
  • remindersSent – count of reminders already sent
  • lastSentAt – timestamp of the last reminder email

This separation of invoice metadata supports flexible reminder logic without affecting the core accounting records.

Automated Reminder Engine

7. Scheduled Reminder Trigger

A scheduled trigger node runs the reminder sub-workflow every day at a fixed time, for example at 8:00 AM. This ensures reminders are processed consistently and at a predictable time for both internal teams and customers.

8. Reminder Logic and Decision Flow

During each scheduled run, the workflow executes the following steps:

  1. Fetch all tracked invoices from the database table.
  2. Iterate through each invoice using loop or item-based processing nodes.
  3. Check payment status in QuickBooks and compare it with stored data.
  4. Evaluate reminder history based on:
    • Number of reminders already sent
    • Time elapsed since the last reminder
    • Configured intervals, for example after 2, then 3, then 5 days
  5. Decide the next action:
    • Send a new reminder if the invoice is unpaid and within the allowed reminder count.
    • Skip sending if conditions are not met, for example if it is too soon since the last reminder.
    • Remove the invoice entry from the database if it is fully paid or if the maximum number of reminders has been reached.

Code or logic nodes handle this conditional decision-making, ensuring that customers are not over-contacted and that fully paid invoices are excluded from future runs.

9. Sending Reminder Emails

For invoices that qualify for follow-up, the workflow sends reminder emails using an email node configured with your SMTP or email server credentials.

The reminders typically include:

  • A professionally styled HTML email template
  • Invoice details such as amount due, currency, and due date
  • A link or reference to the original QuickBooks invoice

Each time a reminder is sent, the workflow updates the corresponding database record, incrementing remindersSent and setting a new lastSentAt timestamp. This ensures accurate tracking for future reminder decisions.

10. Daily AI-Generated Summary

As a final step, an AI agent node aggregates all reminders sent during the daily run and generates a concise summary report. This report is then emailed to the sales or finance team.

The summary typically includes:

  • Number of reminders sent
  • Key invoices or customers contacted
  • Any notable patterns or issues detected by the AI agent

This daily digest keeps stakeholders informed without requiring manual reporting or dashboard checks.

Implementation Requirements and Best Practices

To deploy this n8n template effectively, ensure the following prerequisites and configurations are in place:

  • Jotform account with a form configured and a webhook URL pointing to your n8n workflow.
  • QuickBooks Online account with OAuth2 API credentials correctly set up in n8n credentials.
  • Email server or SMTP credentials for sending reminder and summary emails.
  • Database table dedicated to invoice tracking, with at least:
    • invoiceId
    • remainingAmount
    • currency
    • remindersSent
    • lastSentAt
  • Configured reminder intervals, for example:
    • First reminder 2 days after invoice creation
    • Second reminder 3 days after the first
    • Third reminder 5 days after the second
  • Code and logic nodes to:
    • Format and validate incoming form data
    • Implement conditional flows for reminders
    • Handle API interactions and error cases gracefully

Following these best practices ensures a stable, maintainable automation that can scale with your transaction volume.

Business Impact and Advantages

  • Operational efficiency – Manual data entry, invoice creation, and follow-up tasks are automated, freeing your team to focus on higher value work.
  • Improved accuracy – Real-time integration with QuickBooks and consistent logic reduce errors in customer records, invoices, and reminder schedules.
  • Healthier cash flow – Structured, timely reminders support better payment behavior and reduce aging receivables.
  • Consistent customer experience – Customers receive standardized, professional invoices and courteous reminder communications.
  • Transparent reporting – AI-generated daily summaries provide ongoing visibility into reminder activity and collections performance.

Getting Started with the Template

This workflow is particularly suitable for freelancers, agencies, small businesses, and service providers that want to modernize their invoicing operations without building a system from scratch.

To implement it:

  1. Configure your Jotform to send submissions to n8n via webhook.
  2. Set up QuickBooks Online OAuth2 credentials in n8n and test connectivity.
  3. Prepare the database table for invoice tracking with the required columns.
  4. Define your reminder intervals and maximum number of reminders.
  5. Connect your email server credentials and customize the HTML email templates.

If you need assistance tailoring the workflow to your specific billing model or tech stack, consider engaging automation specialists or exploring the n8n community for implementation patterns and best practices.

Veo3 Instagram Reel Generator – AI-Powered Video Ads

Veo3 Instagram Reel Generator – AI-Powered Video Ads With n8n

What You Will Learn

In this guide, you will learn how to use the Veo3 Instagram Reel Generator workflow template in n8n to automatically create short Instagram video ads using AI. By the end, you will understand:

  • What the Veo3 Instagram Reel Generator workflow does in n8n
  • How OpenAI GPT and the Veo3 API work together to create video ads
  • How the workflow handles video generation, status checks, and captions
  • How results are stored and managed in Google Sheets
  • Who can benefit from this automation and what tools you need to use it

Overview: What This n8n Workflow Does

The Veo3 Instagram Reel Generator is a no-code n8n workflow template that automates the full process of creating short-form Instagram ad videos. It uses:

  • OpenAI GPT models to turn your idea into a structured video prompt and caption
  • Veo3 API via Wavespeed to generate 5 to 8-second vertical videos
  • Google Sheets to log each ad, including the video link, caption, and status

You start with a simple message, such as a product brief or trend idea, and the workflow handles everything else. This makes it ideal for marketers and creators who want to quickly produce and test multiple Instagram Reels without manual editing.

Core Concepts Before You Start

1. Chat-Based Trigger

The workflow is designed to start from a chat-style input. You send a short message describing the ad you want, and this message becomes the starting point for all later automation steps.

2. Prompt Engineering for Video

Instead of sending your raw message to the video generator, the workflow uses OpenAI GPT as a “prompt engineer.” It rewrites your idea into a compact, visually descriptive prompt that Veo3 can use to create a video.

3. Asynchronous Video Generation

Video rendering takes time. The workflow sends a request to the Veo3 API, then waits and repeatedly checks the status until the video is ready. This polling loop is important for handling asynchronous processes inside n8n.

4. Caption Generation

Once the video concept is defined, the workflow uses OpenAI again to write an engaging Instagram caption that matches the style and message of the video.

5. Centralized Content Management

Every generated ad is logged in a Google Sheet. This gives you a simple dashboard where you can review, schedule, and track all your AI-generated Instagram Reels.

Step-by-Step: How the Veo3 Instagram Reel Generator Works in n8n

Step 1 – Start With a Chat Trigger

The workflow begins with a chat-like message that describes the ad you want to create. For example:

“Create an ad for a minimalist perfume brand using the ‘quiet luxury’ trend.”

This message can come from a chat interface, a form, or any n8n-compatible trigger that passes text into the workflow. In n8n, this node is responsible for capturing the user input and passing it on to the next step.

Step 2 – Convert the Idea Into a Video Prompt (Prompt Engineer with ChatGPT)

Next, the workflow sends your input to an OpenAI GPT model. This node acts as a “prompt engineer” that transforms your free-form idea into a structured video description tailored for Veo3.

The model generates a concise video prompt that:

  • Describes the scene and setting
  • Defines the tone and mood of the ad
  • Specifies motion and visual dynamics
  • Includes the product or brand style
  • Highlights a clear marketing hook

To keep Veo3 generation efficient and focused, the prompt is kept within about 100 words. This prompt is then passed on to the video generation step.

Step 3 – Send a Veo3 Post Request and Wait

With the optimized prompt ready, the workflow calls the Veo3 API via Wavespeed. In this step, the n8n HTTP Request node sends a POST request that includes:

  • The AI-generated video prompt
  • Requested video duration, typically around 8 seconds
  • Requested aspect ratio, set to vertical 9:16 for Reels and TikTok

After sending this request, the workflow does not immediately receive a finished video. Instead, it waits for a set period, usually 30 seconds, to give Veo3 time to start and progress with video generation.

Step 4 – Poll the Veo3 API With a Get Request Loop

Because video generation is not instant, the workflow uses a loop that checks the status of the video until it is complete. This is handled in two parts:

  1. Initial Get Request: After the first 30-second wait, n8n sends a GET request to the Veo3 API using the job or video ID returned by the POST request. This checks whether the video is finished.
  2. Loop and Delay: If the response indicates that the video is still processing, the workflow waits another 30 seconds and then sends another GET request. This loop continues until the API reports that the video is ready.

Once the video has been successfully generated, the API response includes the video URL, which is then used in the following steps.

Step 5 – Generate an Instagram Caption With OpenAI

After the video is ready and the final video prompt is known, the workflow calls OpenAI again. This time, it is used as a caption generator.

The AI creates a caption that is:

  • Playful and engaging to capture attention
  • Impactful from a marketing perspective
  • Aligned with the visual concept and the original prompt

The result is a ready-to-use Instagram caption that complements the generated video, so you have both creative assets prepared automatically.

Step 6 – Log Everything in Google Sheets

The final step sends all important data to a Google Sheet, which acts as your content management hub. The n8n Google Sheets node appends a new row with:

  • The headline or main idea of the ad
  • The video URL returned by the Veo3 API
  • The AI-generated Instagram caption
  • A status field such as “Ready to Post”

This makes it easy to filter, schedule, and track all your AI-generated Instagram Reels in one place. You can also share the sheet with your team for approvals and planning.

Key Features and Benefits of This Workflow

Fully Automated From Idea to Ad

Once the workflow is set up in n8n, you can go from a simple chat message to a complete video ad and caption with no manual steps in between. This saves time and reduces repetitive work for marketers and creators.

Trend-Aware, Creative Video Prompts

Because the prompts are generated by OpenAI GPT models, they can incorporate current marketing trends, styles, and hooks. This helps you produce reels that feel fresh and relevant, based on the brief you provide.

Optimized for Short-Form Vertical Video

The workflow focuses on 5 to 8-second, 9:16 vertical videos, which are ideal for Instagram Reels and TikTok. This clear format focus helps you create content that fits platform best practices.

Built-In Caption Copywriting

You do not have to write captions manually. The workflow automatically generates playful, impactful captions that are designed to boost engagement and match the visual story of each video.

Simple Content Management With Google Sheets

Every ad is logged in Google Sheets, which gives you:

  • A running list of all generated videos
  • Easy access to video URLs and captions
  • Status tracking, such as “Ready to Post”

This makes it easy to plug the results into your scheduling tools or content calendar.

No-Code and Easy to Customize in n8n

The entire workflow runs inside the n8n automation platform and can be modified without writing code. You can:

  • Adjust wait times between Veo3 status checks
  • Tweak the prompt engineering instructions for different brands
  • Change how data is stored in Google Sheets
  • Connect additional tools or triggers as needed

Who This Workflow Is For: Practical Use Cases

  • Marketing teams and digital agencies: Quickly generate many short-form ads at scale for A/B testing and campaigns.
  • Social media managers: Rapidly experiment with UGC-style content and trend-based reels without manual editing.
  • Creators and brands: Capitalize on viral trends with minimal effort by turning ideas into ready-to-post video ads.
  • Startups and small businesses: Automate video ad creation to save time and reduce production costs.

Tools and Integrations Used in the Template

This n8n workflow template connects several powerful tools:

  • OpenAI GPT-4o and GPT-4.1 for:
    • Transforming user input into structured video prompts
    • Writing engaging Instagram captions
  • Veo3 API via Wavespeed for:
    • Generating AI-powered short-form videos
    • Ensuring the correct duration and 9:16 vertical aspect ratio
  • Google Sheets for:
    • Storing prompts, video URLs, captions, and statuses
    • Providing a simple content management view for your team
  • n8n Automation Platform for:
    • Orchestrating all steps from chat input to final logging
    • Handling delays, loops, and API calls with a no-code interface

Quick Recap

To summarize, the Veo3 Instagram Reel Generator workflow in n8n:

  1. Starts with a chat-style brief about the ad you want.
  2. Uses OpenAI GPT to turn that brief into a detailed, concise video prompt.
  3. Sends the prompt to the Veo3 API to generate an 8-second vertical video.
  4. Waits and repeatedly checks the Veo3 API until the video is ready.
  5. Generates a playful, impactful Instagram caption with OpenAI.
  6. Logs the headline, video URL, caption, and “Ready to Post” status in Google Sheets.

All of this happens automatically, with no manual intervention once the workflow is configured.

FAQ

How long are the videos this workflow creates?

The workflow is configured to request short videos of about 5 to 8 seconds, with a default of around 8 seconds, which is ideal for Instagram Reels and TikTok.

What aspect ratio do the videos use?

The Veo3 API is instructed to generate videos in a 9:16 vertical format, which matches Instagram Reels and other vertical-first platforms.

Can I customize the prompts or captions?

Yes. In n8n, you can edit the prompt engineering instructions for OpenAI, adjust the tone of the captions, or add brand guidelines so that the outputs better match your style.

Do I need to know how to code?

No. This is a no-code workflow. You can configure and customize it inside the n8n interface using nodes and fields, without writing code.

Where can I see all generated videos and captions?

All results are saved into a Google Sheet, where you can view the prompts, video URLs, captions, and statuses like “Ready to Post.”

Try the Veo3 Instagram Reel Generator Template

If you are a marketer, creator, or business owner who wants to streamline Instagram Reel ad production, this n8n workflow template gives you an end-to-end automated system. Turn simple ideas into AI-generated videos and captions, then manage everything from a single Google Sheet.

Start automating your short-form video ads and scale your content production with AI-powered efficiency.

Automate Stock Investment Reporting with n8n

Automate Stock Investment Reporting with n8n

Wish your portfolio could email you its status every morning?

Imagine this: you wake up, grab your coffee, open your inbox, and there it is – a fresh, tidy summary of your stock portfolio with current prices, gains, losses, and total value. No spreadsheets, no copy-pasting from broker sites, no mental math.

That is exactly what this n8n workflow template does for you.

Instead of manually tracking prices and calculating changes, this automation pulls your stock data from Baserow, fetches live prices from Tradegate, crunches the numbers, then sends you a clean HTML report by email. You set it up once, and it just keeps working in the background.

What this n8n workflow actually does

At a high level, the workflow:

  • Runs on a schedule (or whenever you feel like it)
  • Reads your stock portfolio from Baserow
  • Fetches up-to-date prices from Tradegate using each stock’s ISIN
  • Calculates current value, profit or loss, and percentage change
  • Builds a nice HTML table with all the details
  • Sends the report to you via email using SendGrid

So instead of logging into multiple platforms and doing the math yourself, you get a ready-made investment report delivered straight to your inbox.

When is this workflow useful?

This template is a great fit if you:

  • Track multiple stocks and are tired of manual updates
  • Already store your portfolio in Baserow (or are happy to start)
  • Want reliable, real-time-ish numbers based on Tradegate prices
  • Prefer email over dashboards for quick daily check-ins
  • Like the idea of automating boring, repetitive reporting tasks

If you are the kind of person who loves seeing daily or weekly performance at a glance, this workflow can easily become part of your routine.

Key building blocks of the workflow

Here is a friendly breakdown of the main n8n nodes involved and what each one contributes to the automation.

Triggers: Cron Trigger and Manual Trigger

  • Cron Trigger This is what keeps everything running on autopilot. The workflow is scheduled to run at 07:15 AM from Monday to Saturday. You can of course adjust the time or days to your own schedule.
  • Manual Trigger Want an instant report right now? The Manual Trigger lets you run the workflow on demand by clicking “execute” in n8n. Perfect for quick checks outside your usual schedule.

Baserow: your portfolio data source

Your starting point is a Baserow table that holds your portfolio details. The workflow uses the Baserow node to pull in:

  • ISIN for each stock
  • Purchase count (how many shares you own)
  • Purchase price per share

Because it reads directly from Baserow, any time you add, remove, or update a position in that table, the workflow automatically reflects it in the next report. No extra configuration needed.

HTTP Request: fetching Tradegate stock data

Once the portfolio is loaded, the workflow moves on to live pricing. For each stock, the HTTP Request node queries Tradegate’s order book page using the ISIN as a parameter.

This step grabs the raw HTML of the Tradegate page that contains the latest stock information. It is basically the workflow visiting the Tradegate site for you and collecting the data behind the scenes.

HTML Extract: pulling out the important details

The raw HTML on its own is not very helpful, so the HTML Extract node steps in next. It parses the Tradegate page and extracts key fields such as:

  • Bid price (current price used for valuation)
  • Currency
  • Stock name

These values are then combined with your purchase data from Baserow so that the workflow can calculate how each position is performing.

Set nodes: formatting and calculating changes

After the data is extracted, two Set nodes handle the heavy lifting for calculations and formatting:

  • Format Result Prepares and cleans up the fields so everything is nicely structured for the report. This might include formatting numbers and organizing the data for the next steps.
  • Calculate Change This node computes:
    • The current value of each stock (current bid price multiplied by share count)
    • Absolute profit or loss compared to the original purchase price
    • Percentage change from your purchase price

By the end of this stage, each item in your portfolio has all the metrics you would usually calculate by hand.

Function node: building the HTML report

Now for the part you actually see in your inbox. The Function node (Build HTML) takes all that structured data and turns it into a clear, readable HTML email.

It generates an HTML table that includes, for each investment:

  • Stock name
  • Number of shares
  • Current bid price
  • Purchase price
  • Current total value
  • Profit or loss (absolute and percent)

On top of that, it also calculates and displays:

  • The total portfolio value
  • A timestamp so you know when the data was fetched

The result is a compact report that is easy to skim but detailed enough for real decision-making.

SendGrid: delivering the email report

The final step is sending the report. The workflow uses the SendGrid node to email the HTML table to your chosen recipients.

You simply configure the node with your:

  • From address
  • To address (or multiple recipients if you like)
  • SendGrid credentials or API key

Once that is set up, every time the workflow runs, a fresh report lands in your inbox without you lifting a finger.

Why this n8n workflow makes life easier

There are several practical benefits to automating your stock reporting like this.

1. True automation

No more logging into broker accounts, copying prices, or updating spreadsheets. The workflow handles data collection, calculations, and reporting end to end.

2. Better accuracy

Since prices are fetched directly from Tradegate in real time, your portfolio valuation is always based on current market data. That reduces the risk of typos or outdated numbers sneaking into your tracking.

3. Flexible portfolio management

Your Baserow table becomes the single source of truth. Add a new stock, adjust your share count, or update a purchase price, and the workflow automatically adapts. No need to reconfigure the automation every time your portfolio changes.

4. Multiple ways to run it

Prefer a daily routine? Use the Cron Trigger. Need a one-off update before making a decision? Use the Manual Trigger. You are not locked into one mode.

How to customize this template for your setup

One of the nice things about n8n is how easy it is to tweak workflows. This template is a solid starting point, but you can adapt it quite a bit.

Use different data sources

If Baserow is not your thing, you can:

  • Swap in another database node
  • Use a spreadsheet tool like Google Sheets or Airtable
  • Connect to any other supported data source that holds your ISINs, counts, and purchase prices

The logic of the workflow stays the same. You just change where the portfolio data comes from.

Change the email provider

SendGrid works great, but it is not your only option. You can replace the SendGrid node with another email integration supported by n8n if you prefer a different provider. Just make sure it can send HTML emails so your report keeps its table layout.

Add more investment metrics

Want deeper analytics? You can enhance the workflow by adding more nodes to calculate things like:

  • Dividend income
  • Multiple currency support if you invest internationally
  • Custom KPIs that matter to your strategy

Because everything is modular, it is easy to extend the existing structure without starting from scratch.

Getting started with the template

Ready to try it out? Here is a simple way to get going:

  1. Import the ready-made workflow into your n8n instance.
  2. Connect your Baserow account and point the node to your portfolio table.
  3. Configure the HTTP Request and HTML Extract nodes if needed, so they correctly access and parse Tradegate data.
  4. Set up the SendGrid node with your API key and your desired “from” and “to” email addresses.
  5. Adjust the Cron Trigger schedule if you want different days or times.
  6. Run the workflow once using the Manual Trigger to confirm everything looks good.

After that, you can just let the automation run and enjoy regular, reliable investment reports.

Final thoughts

Automating your stock investment reporting with n8n is one of those small upgrades that pays off every single day. You get timely insights, less manual work, and more mental space for actual investing decisions instead of data wrangling.

Give it a try: import the template, connect your data, fine tune the email settings, and let your portfolio start reporting to you automatically.

Happy investing, and happy automating!

Automated SEO Meta Title & Description Generator Workflow

Automated SEO Meta Title & Description Generator Workflow

Overview

The Automated SEO Meta Title and Description Generator is an n8n workflow template that programmatically generates optimized meta titles and descriptions for web pages at scale. It reads URLs from a Google Sheet, crawls each page, performs AI-assisted content and keyword analysis, evaluates search competitors, then outputs SEO-friendly meta tags back into the sheet.

The workflow is designed for technical SEO specialists, growth teams, and automation engineers who want a repeatable pipeline for meta tag optimization that integrates:

  • Google Sheets as a control panel and data store
  • A smart scraping API for dynamic content retrieval
  • Google Gemini Chat Model for semantic and competitive analysis
  • SerpApi for Google SERP data
  • n8n Code nodes for filtering, validation, and control flow

High-Level Architecture

At a high level, the workflow follows this sequence:

  1. Trigger & Input – A Google Sheets Trigger monitors a “Control Panel” sheet for new URLs with status New.
  2. Item-by-item Processing – URLs are processed sequentially, and each row’s status is updated to indicate that meta generation is in progress.
  3. Page Analysis – The workflow scrapes the target URL, extracts existing meta data, and uses AI to derive primary and secondary keywords, search intent, audience, and content angle.
  4. Competitor Research – Using SerpApi, the workflow queries Google for the primary keyword, filters relevant competitors, and analyzes their titles and snippets with AI.
  5. Meta Generation – A “master” AI prompt combines page insights and competitor patterns to produce optimized meta titles and descriptions that respect SEO length constraints.
  6. Validation & Output – Code validation ensures the AI response is valid JSON and within character limits, then writes the final meta tags and completion status back to the original Google Sheet row.

Data Flow Summary

  • Input source: Google Sheet rows with URLs and a status column.
  • Intermediate data: Scraped HTML, extracted current meta tags, AI-generated semantic analysis, SERP results, competitor lists, and AI pattern analysis.
  • Output: Optimized meta title and description plus updated status in the same Google Sheet row.

Node-by-Node Breakdown

1. Google Sheets Trigger – Detect New URLs

The workflow begins with a Google Sheets Trigger node that monitors a designated “Control Panel” spreadsheet. It is configured to:

  • Poll the sheet at a regular interval (every minute).
  • Identify rows where the status column is set to New.

Only these “New” rows are passed forward as items in the workflow. This approach ensures:

  • Existing or previously processed URLs are not reprocessed.
  • New URLs can be added at any time without manual intervention.

2. Loop Control – Process URLs One at a Time

Once the trigger collects all rows marked New, the workflow loops through them sequentially. This can be implemented using standard n8n item-by-item processing or explicit loop constructs, depending on how the template is structured.

For each URL:

  • The workflow immediately updates the corresponding row’s status to Generating - wait for a few minutes.
  • This real-time status update helps prevent concurrent or duplicate processing of the same URL.
  • Team members viewing the sheet can see that the URL is currently in progress.

If the workflow is run with concurrency or multiple parallel executions, this status update acts as a simple coordination mechanism to avoid double work. The template assumes that status changes are respected and that only rows with status New are picked up by the trigger node.

3. Page Analysis Stage

The next group of nodes focuses on understanding the target page itself: its content, current meta tags, and semantic structure.

3.1 Scrape Website Content

A Scrape Website node (using a smart scraping API) retrieves the HTML content of the URL. The scraper is configured to:

  • Handle dynamic or JavaScript-rendered pages.
  • Return a fully rendered HTML document suitable for parsing.

Typical parameters include:

  • Target URL from the current Google Sheet row.
  • Any required headers or API keys (configured via credentials).

If the target page fails to load or returns an error, the workflow behavior depends on your n8n error handling settings (for example, “Continue on Fail”). The template assumes successful retrieval and does not define additional custom recovery logic in this description.

3.2 Extract Existing Metadata

After the HTML is available, a subsequent node (often a Code node or HTML extractor) parses the document and extracts:

  • The current <title> tag (meta title).
  • The <meta name="description"> content (meta description), if present.

These values are:

  • Stored as part of the item data for comparison.
  • Available for use in prompts to the AI model, if desired.

3.3 AI Semantic Analysis of the Page

A Google Gemini Chat Model node is used to analyze the scraped content in depth. The prompt instructs the model to read the page and return a structured JSON payload that contains:

  • Primary keyword that best represents the page’s main topic.
  • Semantic cluster of 5 to 7 related secondary keywords.
  • Search intent, for example:
    • Informational
    • Transactional
    • Other intent types, depending on the page
  • Target audience that the content is aimed at.
  • Content angle, such as:
    • How-to guide
    • Listicle
    • Other common content formats
  • One-sentence summary of the page content.

The node output is structured JSON, which downstream nodes can reference using n8n expressions. This semantic information is critical for both competitor analysis and meta tag generation.


4. Competitor Research Stage

Once the primary keyword is identified, the workflow evaluates competing pages on Google for that keyword.

4.1 Google SERP Query via SerpApi

A SerpApi node performs a Google search using the primary keyword returned by the Gemini analysis node. Configuration typically includes:

  • SerpApi API key (stored as credentials).
  • Search engine set to Google.
  • Query parameter bound to the primary keyword.

The node returns a structured set of SERP results, including:

  • Page titles
  • Snippets
  • URLs

4.2 Dynamic Filtering of Competitors

A Code node processes the raw SERP results to isolate genuine competitors. The logic typically:

  • Iterates over SERP items.
  • Checks whether each result’s title or snippet includes any of the secondary keywords from the semantic cluster.
  • Filters out pages that do not match any of these related terms.

The outcome is a “clean” list of competitor URLs, titles, and snippets that are:

  • Semantically aligned with the target page.
  • More likely to represent direct competition for the same search intent.

This node is also the right place to add optional guardrails, such as:

  • Excluding your own domain to avoid self-competition.
  • Limiting the number of competitors passed downstream.

The template description focuses on filtering based on semantic cluster keywords and does not introduce additional exclusions by default.

4.3 AI Analysis of Competitor Patterns

Another Google Gemini Chat Model node receives the filtered competitor titles and snippets. The prompt guides the model to:

  • Identify recurring SEO patterns in titles and descriptions.
  • Analyze tone and style (for example, formal vs. casual, benefit-driven vs. feature-driven).
  • Detect formatting trends among top-ranking pages, such as:
    • Use of brackets or parentheses
    • Inclusion of numbers or power words
    • Brand mentions

The AI output encapsulates these patterns in a structured format that the final meta generator can use to align your meta tags with what currently works in the SERPs, while still remaining unique to your page.


5. Meta Title & Description Generation

5.1 Master AI Meta Generator

A dedicated Google Gemini Chat Model node acts as the “master generator” for meta titles and descriptions. It aggregates:

  • Insights from your own page (primary keyword, secondary keywords, search intent, audience, angle, summary).
  • Competitor patterns derived from the previous AI analysis.
  • Optionally, the current meta title and description for context or comparison.

The prompt instructs the model to output:

  • An SEO-optimized meta title that:
    • Accurately reflects the page content.
    • Targets the primary keyword and relevant semantic terms.
    • Respects a hard limit of under 60 characters.
  • An SEO-optimized meta description that:
    • Supports the same keyword strategy and search intent.
    • Encourages clicks with a clear value proposition.
    • Stays under 160 characters.

The node is configured to return its response in valid JSON format, which simplifies downstream parsing and validation.

5.2 Code Validation & Constraint Enforcement

A Code node performs final validation of the AI output before writing anything back to the sheet. Its responsibilities include:

  • Parsing the AI response as JSON and handling parse errors.
  • Verifying that both the title and description fields exist.
  • Checking that:
    • Meta title length is less than 60 characters.
    • Meta description length is less than 160 characters.

If any of these checks fail, the node can:

  • Trim the strings to the required length, or
  • Flag the item as invalid, depending on how you configure the logic.

The template description emphasizes that this validation step prevents invalid or oversized meta tags from being used, giving you more reliable output without manual review for every row.


6. Final Write-back to Google Sheets

Once the meta tags are validated, a Google Sheets node updates the original row for the current URL. This node:

  • Writes the new meta title into the designated column.
  • Writes the new meta description into its corresponding column.
  • Updates the status column to Generated.

This creates a closed feedback loop:

  • Rows move from New to Generating - wait for a few minutes while they are in progress.
  • They end at Generated once the workflow completes for that URL.

The sheet now serves as a live dashboard for:

  • Tracking which URLs have been optimized.
  • Reviewing generated meta titles and descriptions.
  • Re-running or adjusting specific rows if needed by changing their status (subject to your own process rules).

Configuration & Integration Notes

Credentials & External Services

  • Google Sheets: Configure OAuth or service account credentials with read/write access to your “Control Panel” spreadsheet.
  • Scraping API: Set the API key or token in n8n credentials and reference it in the Scrape Website node.
  • SerpApi: Add your SerpApi API key via n8n credentials and configure the search parameters in the corresponding node.
  • Google Gemini Chat Model: Ensure the Gemini model is correctly configured and available in your n8n instance, with appropriate API credentials.

Sheet Structure Expectations

The workflow expects a Google Sheet with, at minimum:

  • A column containing the URL to analyze.
  • A status column with values like:
    • New – ready for processing.
    • Generating - wait for a few minutes – currently being processed.
    • Generated – successfully processed.
  • Columns for Meta Title and Meta Description where the workflow will write the final results.

Error Handling Considerations

The template description assumes a straightforward happy path. In practice, you may want to configure:

  • Continue on Fail for non-critical nodes (such as scraping or SERP queries) to avoid stopping the entire batch.
  • Optional status updates for error cases (for example, Error or Needs Review) if a node fails or the AI output is unusable.

These adjustments can be made directly within n8n without changing the core logic described here.


Advanced Customization Ideas

While the template already provides a full end-to-end pipeline, technical users can extend it in several ways:

  • Additional Filters in the competitor Code node, such as excluding specific domains or limiting to a certain number of SERP results.
  • Custom Prompts for Gemini to enforce stricter brand voice or compliance rules.
  • Multi-language support by adjusting prompts and SERP locale parameters (if your site targets multiple regions).
  • Versioning of meta tags in the sheet, for example by adding columns for “old” vs “new” titles and descriptions.

All of these can be implemented while preserving the core flow: sheet trigger, page analysis, competitor research, AI meta generation, validation, and write-back.


Conclusion

This n8n workflow template provides a robust, repeatable system for automated SEO meta title and description generation. By combining Google Sheets, web scraping, AI-driven content understanding, competitive SERP analysis, and strict validation, it helps you scale meta tag optimization without sacrificing quality or control.

If you want to improve search visibility and click-through rates across many URLs at once, this kind of automated pipeline offers a practical solution that still respects SEO best practices and technical constraints.

Ready to optimize your website meta titles and descriptions with AI automation? Start building your workflow now and watch your SEO performance grow.

WooCommerce to Slack: Notify on New Product Creation

WooCommerce to Slack: Automatic New Product Alerts (So You Can Stop Copy-Pasting)

Picture this: you just launched a shiny new product in WooCommerce, you are feeling great, and then you remember you still need to tell the team. Cue the ritual of copying the product link, opening Slack, picking the right channel, typing something vaguely enthusiastic, and hitting send. Every. Single. Time.

If that tiny but persistent annoyance sounds familiar, this n8n workflow template is going to feel like a small miracle. It automatically sends a Slack notification whenever a new product is created in your WooCommerce store, so your team gets the news in real time while you go do literally anything else.

What This n8n Workflow Actually Does

At its core, this is a simple no-code automation that connects WooCommerce to Slack using n8n. Once it is live, the workflow:

  • Listens for new product creation events in WooCommerce
  • Checks that the URL really is a product page (and not some random link)
  • Posts a nicely formatted message in a Slack channel called newproducts

The Slack notification includes all the good stuff your team needs:

  • Product name
  • Regular price and sale price
  • Direct link to the product page
  • Product creation date shown in the footer

The message uses Slack blocks and attachments, highlighted with a green color bar, so it pops out in the channel instead of getting lost between memes and random threads.

Why Bother Automating WooCommerce To Slack?

Manual Slack updates might not feel like a big deal at first, but they stack up quickly. This workflow helps you:

  • Get real-time updates – The moment a product goes live in WooCommerce, your team sees it in Slack.
  • Keep everyone aligned – Marketing, sales, support, and inventory teams can act fast, without waiting for someone to remember to post an update.
  • Cut down on repetitive tasks – No more copy-paste marathons or “Did anyone share this in Slack yet?” messages.

In short, you get smoother communication, faster reactions to product launches, and fewer chances for human forgetfulness to sneak in.

How the Workflow Is Structured in n8n

This template is built with three main nodes inside n8n. Here is how they work together behind the scenes.

1. WooCommerce Trigger – On Product Creation

The workflow starts with a WooCommerce trigger node that fires every time a new product is created. It captures key product data, including:

  • Product name
  • Product URL (permalink)
  • Price information
  • Creation date

This node is basically your automated scout, watching for new products so you do not have to.

2. Conditional Check – Only If URL Contains /product/

Next, the workflow runs a conditional check on the product permalink. It verifies that the URL starts with:

https://[add-your-url-here]/product/

This acts as a filter so only real product URLs trigger a Slack notification. No false alarms, no random pages pretending to be products.

3. Slack Notification – Send Message To newproducts

If the URL passes the condition, the workflow moves on to the Slack node. This is where the magic hits your team channel. The node sends a formatted message to the Slack channel named newproducts, including:

  • The product name as the main highlight
  • Regular price and any sale price
  • A clickable link straight to the product page
  • The product creation date in the footer for context

The message uses Slack blocks and attachments with a green color bar, so new products stand out visually in the channel feed.

Quick Setup Guide: From Zero To Automated Alerts

Getting this n8n workflow template running is much faster than writing yet another “New product just dropped!” Slack message. Here is what you need to do.

Step 1 – Update Your WooCommerce URL

In the workflow, replace the placeholder URL:

https://[add-your-url-here]/product/

with the actual base URL of your WooCommerce store. For example:

https://mystore.com/product/

This tells the workflow exactly what a valid product URL should look like.

Step 2 – Connect Your WooCommerce Account

In the WooCommerce trigger node, add your WooCommerce account credentials. This lets n8n securely listen for new product creation events in your store.

Step 3 – Add Slack API Credentials

Open the Slack node and configure your Slack API credentials. Once connected, choose the newproducts channel as the destination for your alerts. You can also rename the channel if your team prefers a different naming style.

Step 4 – Deploy And Activate The Workflow

After your credentials and URL are set, deploy the workflow in your n8n instance and activate it. From that point on, every new product that matches the product URL condition will trigger an automatic Slack notification.

Tips, Ideas, And Next Steps

Once you see how helpful this simple WooCommerce to Slack automation is, you might start wondering how you ever lived without it. A few suggestions to get even more value:

  • Use the Slack message content to add internal notes or instructions for your team, such as “Ready for social promotion” or “Check inventory before running ads.”
  • Combine this workflow with other n8n templates to create a full product launch pipeline, including notifications, backups, or marketing tasks.
  • Adjust the Slack formatting to match your brand voice or add more product fields if needed.

By turning this once-annoying manual step into a smooth, automated workflow, you free up time and reduce the chance of forgetting to keep your team in the loop.

Wrap Up: Let Automation Handle The Boring Bits

Connecting WooCommerce to Slack with this n8n workflow template is a simple way to streamline communication around new product launches. You get instant, consistent notifications in Slack, your team stays aligned, and you stop doing the same repetitive copy-paste routine over and over.

Ready to upgrade your WooCommerce workflow? Set up this automation today, let n8n handle the notifications, and enjoy the quiet satisfaction of one less manual task on your plate.

YouTube Video Transcription Automation Workflow Explained

YouTube Video Transcription Automation Workflow Explained

Imagine never manually transcribing a YouTube video again

You click on a promising YouTube video, realize it is 45 minutes long, and then remember you only needed one quote from minute 32. So you pause, rewind, type, rewind again, typo, sigh, repeat. If this sounds familiar, you are exactly the kind of person this n8n workflow template was built for.

The YouTube Video Transcription Automation Workflow automatically finds new videos from your favorite channels, grabs their metadata, pulls the transcript via an API, and stores everything neatly in a database. No more tab juggling, no more copy-pasting captions, and no more “I’ll transcribe this later” lies to yourself.

What this n8n workflow actually does

At a high level, the workflow behaves like a very organized assistant that:

  • Watches selected YouTube channels for new uploads
  • Skips anything too old or already processed
  • Calls the youtube-transcript.io API to get transcripts
  • Turns those transcripts into readable text
  • Saves everything into a Supabase table as a structured content queue

You end up with a searchable database of YouTube content, complete with titles, authors, publish dates, URLs, and full transcripts, ready for research, content repurposing, or feeding into other automations.

How the workflow is structured (without the headache)

Behind the scenes, the workflow is split into four logical parts. You do not have to be a developer to understand them, just mildly curious.

Part 1: Getting the latest videos from your chosen channels

The workflow starts by looking at a list of YouTube channel IDs that you want to track. You can store these IDs in a database or plug them directly into the workflow, depending on how fancy you feel.

Each channel ID is converted into a valid YouTube RSS feed URL. Those RSS feeds are then used to fetch the most recent videos for each channel. Once the videos are pulled in, the workflow filters them by age, using a configurable time window. By default, it only keeps videos that are not older than 60 days, so you are not accidentally processing content from the dinosaur era of your subscriptions.

Part 2: Filtering out videos you have already processed

Next, the workflow checks if each video is truly “new” or if you have already seen it before. It does this by comparing the video URL against existing records in a Supabase table (or a similar database setup).

If a video URL is already in the table, it is politely ignored. Only URLs that do not exist in the database move forward. This keeps you from wasting time and API calls on duplicates, which is always nice for both your sanity and your budget.

Part 3: Transcribing the video with an API

Once a video passes the “new and recent” tests, the workflow extracts a clean, validated YouTube video ID from its URL. That ID is then sent to the youtube-transcript.io API, which returns the official transcript or captions in JSON format.

If the API responds successfully, the workflow parses the raw JSON and stitches the segments together into one continuous text transcript. If the API fails, the captions are missing, or something else goes wrong, that particular video is skipped and the workflow moves on. No drama, just quiet failure handling.

There is also a handy filter to deal with YouTube Shorts. If a URL contains youtube.com/shorts, you can choose to exclude it from transcription. Prefer to transcribe Shorts too? Just disable that filter and they will be included with the rest.

Part 4: Saving everything into your database

After transcription, the workflow bundles up:

  • The transcript text
  • The video title
  • The channel or author name
  • The publish date
  • The video URL

This package is then saved as a new record in a Supabase table that acts as your content queue. From there, you can:

  • Index transcripts for search
  • Feed them into other n8n workflows
  • Use them for content curation, summaries, or analysis

Quick setup guide: how to make this your new transcription sidekick

Once you load the template into n8n, you only need to tweak a few settings. No heroic coding required.

1. Decide how far back to look for videos

In the “Max Days” node, set how many past days of videos you want to scan. The default is 60 days, but you can tighten it for fresh-only content or extend it if you are trying to build a larger archive.

2. Add the YouTube channels you want to monitor

In the “Channels To Track” node, list the YouTube channel IDs you care about. You can add, remove, or change these at any time to match your current research, niche, or obsession.

3. Plug in your transcription API key

In the “Get Transcript from API” node, enter your API key for youtube-transcript.io. This is what allows the workflow to actually request and retrieve the transcripts for each video.

4. Connect your database (Supabase)

To make the duplicate checks and content queue work, you need to add your database credentials:

  • In the “Check if URL Is In Database” node, insert your Supabase credentials so the workflow can see which videos you have already stored.
  • In the “Add to Content Queue Table” node, use the same Supabase credentials so new video records and transcripts can be saved properly.

5. Schedule how often the workflow should run

In the “Schedule Trigger” node, choose how frequently n8n should run this workflow. You can set it to check for new videos every hour, once a day, or any other interval that fits your use case. After that, it just quietly works in the background while you do literally anything else.

Why this workflow is worth your sanity

If you spend a lot of time researching, creating content, or analyzing YouTube videos, automating transcription is one of those upgrades you never want to undo.

  • Automatic discovery: New videos from your tracked channels are found for you, no manual searching needed.
  • No more manual transcription: The workflow handles the boring part so you can focus on using the content, not typing it.
  • Smart filtering: Old videos are ignored based on your chosen age limit, and duplicates are skipped using the database check.
  • Structured storage: Everything lands neatly in a Supabase table, ready for indexing, analysis, or downstream automations.
  • Flexible filters: Customize video age limits and decide whether to include or exclude YouTube Shorts.

Next steps: turn YouTube chaos into a tidy transcript library

If you want to build a searchable content library, speed up your research, or repurpose YouTube videos into blogs, newsletters, or social posts, this n8n workflow is a solid starting point. Just customize the channel list, plug in your API and database credentials, and let it quietly gather transcripts while you work on more interesting things.

Ready to stop manually transcribing videos and start automating like a sensible human?