Automate Daily Email Digest and Slack Summary

Automate a Daily Email Digest and Slack Summary With n8n

From Inbox Overload to Clarity Every Morning

Your inbox should be a source of clarity, not a source of stress. Yet for many professionals, dozens or even hundreds of emails arrive every day, scattering attention and hiding what really matters. Important messages get buried, follow-ups are forgotten, and you start each morning trying to catch up instead of moving forward.

It does not have to be that way. With a simple n8n workflow template, you can turn yesterday’s inbox chaos into a focused daily briefing that lands in Slack at the start of your day. No more manual sorting, no more scanning through threads, just a clear, AI-powered summary of what deserves your attention.

This article walks you through that journey: from the problem of email overload, to a new mindset about automation, and finally to a practical, ready-to-use daily email digest workflow in n8n that connects Gmail, AI analysis, and Slack.

Shifting Your Mindset: Automation as a Growth Tool

Automation is not just about saving clicks. It is about creating space for deeper work, strategic thinking, and growth. When repetitive tasks are handled automatically, you gain back mental energy and time that you can invest in your priorities.

This daily email digest template is a small but powerful example. It:

  • Transforms a noisy inbox into a structured, digestible summary
  • Helps you and your team see what is urgent at a glance
  • Builds a habit of reviewing key information in a focused way

Think of this workflow as a first stepping stone. Once you experience how it feels to have your email recap arrive in Slack every morning, you will start seeing other opportunities to automate and improve your workday with n8n.

What This n8n Workflow Does For You

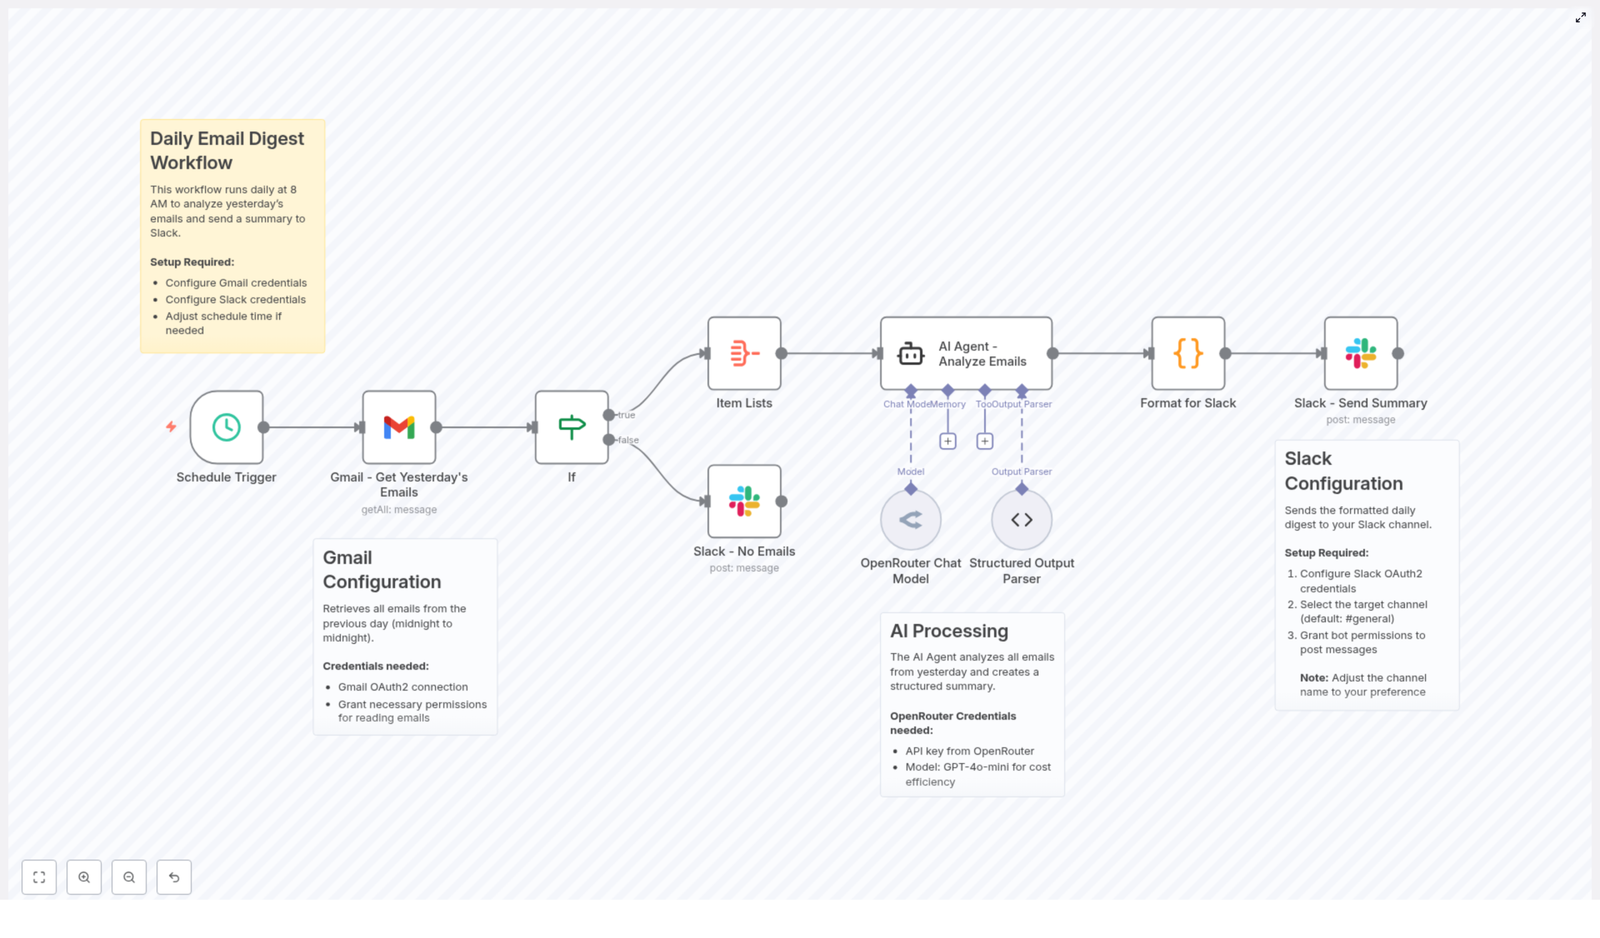
The template creates a daily email digest that summarizes the previous day’s Gmail activity and posts it straight to a Slack channel. Here is the high-level flow:

  • Every morning at 8 AM, a Schedule Trigger starts the workflow.
  • n8n uses the Gmail node to fetch all emails from the previous day.
  • If emails are found, they are combined and passed to an AI agent powered by the OpenRouter Chat Model with the GPT-4o-mini model.
  • The AI analyzes and summarizes the emails, highlighting key messages, urgent items, and action points.
  • A code node formats this summary for Slack markdown.
  • The formatted digest is posted to a selected Slack channel, such as #general.
  • If there are no emails, the workflow sends a simple Slack message saying there is nothing to report.

The result is a clean, focused daily briefing that helps you start your day with intention instead of inbox anxiety.

Inside the Workflow: Components That Power Your Daily Digest

1. Schedule Trigger – Your Consistent Morning Ritual

The journey begins with a Schedule Trigger node in n8n. It is configured to run every day at 8 AM, so your summary always reflects the previous day’s emails.

Once this is set, you no longer need to remember to run anything manually. Your n8n instance reliably prepares your briefing while you sleep, so you can start each morning with a clear view of what happened yesterday.

2. Gmail Integration – Gathering Yesterday’s Emails

Next, the workflow connects to your inbox using the Gmail – Get Yesterday’s Emails node. With OAuth2 credentials that grant read access to your mailbox, n8n pulls in all the messages that arrived during the previous calendar day.

The Gmail node is configured to:

  • Retrieve emails received after the start of the previous day (00:00)
  • Retrieve emails received before the start of the current day (00:00)
  • Fetch all emails that match this time window

This gives the AI agent a complete picture of your email activity for that period, which is essential for a reliable and meaningful digest.

3. Conditional Check – Handling Quiet Days Gracefully

Not every day is packed with messages, and that is a good thing. To keep your Slack channel honest and clutter free, the workflow includes an If node that checks whether any emails were actually found.

  • If emails exist, the workflow continues to the AI analysis step.
  • If no emails exist, a Slack message is sent to let you know there were no emails to report.

This small detail keeps your team in the loop without wasting anyone’s time. Even on quiet days, you get a clear signal instead of wondering if the automation failed.

4. AI Agent for Email Analysis – Turning Noise Into Insight

The most transformative part of this workflow is the AI-powered analysis.

Using the OpenRouter Chat Model with the GPT-4o-mini model, the AI agent receives the aggregated email content and produces a structured summary. It is guided to extract information such as:

  • Total number of emails received
  • Urgent or important emails that require attention
  • Key messages grouped by sender or topic
  • Action items that need follow-up
  • Main themes or topics discussed across the emails

An output parser then organizes these insights in a clear format. Instead of scrolling through chains of messages, you get a concise overview that highlights what matters most, so you can respond with confidence and speed.

5. Formatting and Slack Posting – Delivering a Clear Daily Briefing

Once the AI has done its work, a Code node takes the structured summary and formats it for Slack markdown. This step turns raw data into a readable, visually friendly message.

The formatted digest typically includes:

  • Total emails analyzed
  • Urgent items that may need immediate attention
  • Action items you or your team should follow up on
  • A general summary of key conversations and topics

Finally, the Slack – Send Summary node posts this message to your chosen Slack channel, such as #general. To enable this, you configure Slack OAuth2 credentials with bot permissions to post messages.

The result is a neat, daily snapshot of your inbox, delivered where your team already communicates. You can quickly review, delegate, or discuss items without leaving Slack.

Why This Workflow Matters: Benefits You Will Feel

Automating your daily email digest with n8n is not just a technical trick. It can genuinely change how you experience your workday.

  • Time-saving: Skip the tedious scanning of yesterday’s inbox. Let the workflow summarize everything so you can focus on decisions and actions.
  • Improved focus: See urgent and actionable emails immediately, instead of getting lost in low priority messages.
  • Team transparency: Share highlights in Slack so your team stays aligned on what is happening, without forwarding threads or writing manual recaps.
  • Customizable foundation: Adjust the schedule, Slack channel, AI prompts, or filters to match your specific workflow and priorities.

As you experience these benefits, you will likely spot other areas where n8n can help you reclaim time and build more resilient systems around your communication habits.

What You Need To Get Started

Setting up this n8n email digest template is straightforward. You will need:

  • An n8n instance up and running
  • Gmail OAuth2 credentials with permission to read emails
  • An OpenRouter API key and access to the GPT-4o-mini model
  • Slack OAuth2 credentials with bot permissions to post messages in your chosen channel

Once you have these in place, you can import the template into n8n, connect your credentials, and set the schedule. After that, the workflow can run automatically, turning your inbox into a daily source of clarity instead of noise.

Your Next Step: Start With This Template, Then Build Further

This daily email digest is a practical, real world example of how a small amount of automation can create meaningful change in your day. It is a starting point, not a limit.

After you set it up, consider experimenting:

  • Refine the AI prompt to match your role or industry
  • Change the Slack channel to share summaries with specific teams
  • Add filters to focus on certain senders, labels, or topics
  • Extend the workflow with follow up actions, such as creating tasks from action items

Each improvement moves you closer to a workflow that truly supports how you want to work, not the other way around.

Try the Template and Transform Your Mornings

Set up this daily email digest workflow in n8n and experience how it feels to start the day with clarity, not clutter. Use it as a foundation, customize it, and let it inspire you to automate more of the repetitive work that holds you back.

Once you have it running, share your experience, ideas, or customizations with others. Your version of this workflow might be exactly what someone else needs to take their next step into automation.

How to Build an Image Reader with Gemini OCR and Telegram

How to Build an Image Reader with Gemini OCR and Telegram

Optical Character Recognition (OCR) is a fundamental building block for many automation and AI workflows. With n8n, Google Gemini, and Telegram, you can implement a robust, chat-based image reader that extracts text from images in real time and returns it directly to end users.

This article explains how to assemble a production-ready Image Reader workflow in n8n using the Gemini OCR model and Telegram integration. It covers the overall architecture, node configuration, and recommended best practices for reliability, security, and maintainability.

Solution Architecture

The workflow connects Telegram as the user-facing interface with Gemini OCR as the AI text extraction engine. n8n orchestrates the process, from receiving an image to returning the recognized text.

The automation is built around the following core nodes:

  • Telegram Trigger – Listens for incoming Telegram messages and captures images.
  • Clean Input Data – Normalizes and extracts relevant fields from the Telegram payload, such as chat ID and file ID.
  • Get File – Downloads the actual image file from Telegram using the file ID.
  • Extract from File – Converts binary image data to a Base64 string suitable for Gemini OCR.
  • Gemini OCR (HTTP Request) – Sends the Base64-encoded image to the Gemini API and retrieves the extracted text.
  • Telegram – Returns the OCR result to the originating chat.

Once deployed, users simply send an image to the Telegram bot and receive the detected text as a reply, with no manual file handling or external tools required.

Configuring the Workflow in n8n

1. Telegram Trigger – Entry Point for Images

The Telegram Trigger node is the starting point of the workflow and is responsible for listening to new updates from Telegram.

Key configuration guidelines:

  • Update type: Set to message so the node reacts to standard chat messages.
  • File handling: Enable the option to download files. This ensures that when a user sends a photo, n8n receives the associated file metadata and can later download the image.

With this configuration, every photo sent to the bot will trigger the workflow and pass along the full message JSON, including photo metadata.

2. Clean Input Data – Extract Chat and Image Metadata

The next step is to simplify the raw Telegram payload and extract the information required for subsequent nodes. This is typically done with a function-like node or an equivalent transformation step that defines custom fields.

At a minimum, capture:

  • chatID – The unique Telegram chat identifier used to send the response back to the correct conversation.
  • Image – The file ID of the image that you want to process. For photos, Telegram usually provides multiple sizes. You should select the last element in the photo array, which corresponds to the highest resolution version.

By normalizing these fields early, you keep the workflow easier to maintain and reduce the complexity of downstream nodes.

3. Get File – Download the Image from Telegram

Once you have the file ID, use the Get File node (Telegram integration) to download the actual image content.

Configuration recommendations:

  • Map the node’s file ID parameter to the Image value produced in the previous step.
  • Ensure the node is set to return the file as binary data, which is required for the conversion step.

This node outputs the image in binary format, which is the raw data that will be transformed for Gemini OCR.

4. Extract from File – Convert Binary to Base64

Most modern OCR and vision APIs, including Gemini, expect image content as a Base64-encoded string rather than raw binary. The Extract from File node handles this conversion.

Typical configuration:

  • Select the binary property that contains the downloaded image.
  • Convert that binary data into a Base64 string and store it in a JSON field, for example data.

After this step, your workflow has a clean JSON object that includes a Base64 representation of the image, ready to be sent to Gemini OCR.

5. Gemini OCR – Call the Gemini API via HTTP Request

The core OCR logic is implemented through an HTTP Request node that calls the Gemini OCR API. This node sends the Base64-encoded image and receives the extracted text as a response.

Configure the HTTP Request node as follows:

  • URL: Use the Gemini content generation endpoint, for example:
    https://generativelanguage.googleapis.com/v1beta/models/gemini-2.0-flash:generateContent
  • Method: POST
  • Authentication:
    • Type: Generic Credential Type with Query Auth.
    • Create and store your API key credentials securely in n8n.
    • Obtain your Gemini API key from Google AI Studio.
  • Body format: JSON

Use a request body similar to the following, mapping the Base64 field from the previous node:

{  "contents": [  {  "role": "user",  "parts": [  {  "inlineData": {  "mimeType": "image/jpeg",  "data": "{{ $json.data }}"  }  },  {  "text": "Extract text"  }  ]  }  ]
}

In this structure:

  • mimeType should match the actual image type, such as image/jpeg. Adjust if your use case relies on other formats.
  • {{ $json.data }} references the Base64-encoded image generated in the Extract from File node.
  • The text part provides an instruction to the model, in this case asking it to “Extract text” from the image.

The node will return Gemini’s response payload, which includes the recognized text that you can parse and forward to the user.

6. Telegram Node – Return the OCR Result to the User

The final step is to send the extracted text back to the originating Telegram chat using the standard Telegram node.

Configuration points:

  • Map the chat ID field to the chatID value captured in the Clean Input Data step.
  • Set the message text to the OCR output from the Gemini node.
  • Disable automatic attribution or footers if you want a clean, minimal response message.

With this in place, the workflow completes the loop: the user sends a photo, the automation extracts the text using Gemini, and the result is returned directly in the same Telegram conversation.

Operational Best Practices

To ensure that this n8n workflow is robust and production-ready, consider the following recommendations.

Bot Permissions and User Experience

  • Verify that your Telegram bot is configured to receive photos and other media types required by your use case.
  • Optionally, send a short introductory message when users first interact with the bot, explaining that they can upload images for OCR.

Error Handling and Resilience

  • Add error handling branches or dedicated nodes to catch failures, such as invalid images, oversized files, or API timeouts.
  • Provide clear, user-friendly error messages in Telegram if text extraction fails, for example prompting the user to resend a clearer image.
  • Log errors or key metrics internally to monitor API usage and workflow performance.

Security and Credential Management

  • Store the Gemini API key exclusively in n8n credentials, not in plain text inside nodes or code.
  • Restrict access to your n8n instance and credentials to authorized users only.
  • Rotate API keys periodically according to your organization’s security policies.

Conclusion

By integrating Telegram, n8n, and Gemini OCR, you can deliver a powerful, real-time image reader that operates entirely within a familiar chat interface. The workflow outlined here captures images from Telegram, converts them into a Gemini-compatible format, extracts the text, and returns the result to the user with minimal latency.

For automation professionals, this pattern can be extended further, for example by forwarding extracted text to document management systems, databases, or downstream AI pipelines.

Next Steps

Implement this image reader workflow in your n8n environment to streamline image text extraction directly from Telegram. Use it as a foundation for more advanced document processing, compliance checks, or data entry automations.

If this guide was useful, consider sharing it with your engineering or automation team and explore additional n8n workflow templates to expand your automation capabilities.

Build a Smart AI Chat Assistant with GPT-4o Multimodal

Build a Smart AI Chat Assistant with GPT-4o Multimodal

Why this template is worth your time

Imagine having a chat assistant that does not just understand text, but can also look at images, read PDFs, and keep track of what you talked about earlier. That is exactly what this n8n workflow template helps you build, using OpenAI’s GPT-4o multimodal model.

Whether you want a customer support bot, a personal AI helper, or a chat widget embedded in your app, this template gives you a ready-made foundation that you can tweak to fit your own use case.

What this n8n workflow actually does

At a high level, the workflow connects a chat interface with OpenAI’s GPT-4o model and a set of memory nodes inside n8n. It can:

  • Receive user messages and file uploads like images or PDFs
  • Analyze those files with GPT-4o’s multimodal capabilities
  • Store and reuse conversation context with memory nodes
  • Generate smart, context-aware responses through an AI Agent node

The result is a multimodal AI chat assistant that feels more like a helpful human than a simple Q&A bot.

How the workflow starts: the chat trigger

Everything begins with a chat trigger node. This is where your users type their messages or upload files. From here, the workflow decides what to do next based on whether the user sent plain text, attached a file, or did both.

Once a message comes in, the workflow checks: is there a file attached that needs special handling, or is this a regular text-only interaction?

Smart file handling with GPT-4o multimodal

One of the coolest parts of this template is how it deals with uploaded files. If your users share an image or a PDF, the workflow does not just store it, it actually analyzes it.

Step 1 – Detecting uploads with the If node

The first decision point is an If node. Its job is simple but important:

  • It checks if the incoming message includes a file, such as an image or a PDF.
  • If no file is present, the workflow can continue as a normal text-only conversation.
  • If a file is present, the workflow branches into a more advanced analysis path.

Step 2 – Analyzing images and PDFs with GPT-4o

When a file is detected, it is handed off to an OpenAI node configured with the GPT-4o multimodal model. This is where the magic happens:

  • Images can be interpreted, described, or inspected for specific details.
  • PDFs can be read and summarized, or used as a source of information for later questions.

Instead of you manually parsing content, GPT-4o does the heavy lifting and returns a structured understanding of the file that the rest of the workflow can use.

Step 3 – Saving file insights to chat memory

After GPT-4o analyzes the file, the resulting content is stored in a memory node called chatmem. This is a dedicated memory store that keeps track of what was extracted from the uploaded file, so the assistant can refer back to it later in the conversation.

That way, if the user asks something like “What did that PDF say about pricing again?” the assistant can answer without having to reprocess the file.

Step 4 – Extra processing with a Basic LLM Chain

Before moving on, the analyzed content goes through a Basic LLM Chain using the OpenAI chat model. This step is useful when you want to:

  • Summarize or clean up the extracted content
  • Transform it into a more useful format for your use case
  • Run task-specific logic, such as classification or extraction

The Basic LLM Chain acts like a mini processing pipeline that prepares the content so the final AI response is more focused and helpful.

Keeping the conversation alive with memory

A good AI assistant should not feel like it forgets everything after each message. This template solves that with several memory nodes that track the state of the conversation and any analyzed files.

Simple Memory nodes for session context

The workflow uses multiple Simple Memory buffer nodes that store information based on the user’s session ID. These nodes help with:

  • Remembering previous messages in the same conversation
  • Maintaining context across multiple steps or branches
  • Handling different users without mixing up their data

This setup lets your assistant respond in a way that feels continuous and context-aware, instead of treating each message like a brand new interaction.

Retrieving earlier content with chatmem1

Once the file handling and any initial processing are complete, another memory node named chatmem1 comes into play. Its role is to:

  • Pull in content from earlier in the conversation
  • Include past file analyses and relevant context
  • Feed that combined history into the main AI Agent

In other words, chatmem1 helps the assistant “remember” what has already happened so it can respond naturally.

The AI Agent – your main conversational brain

At the center of the whole workflow is the AI Agent node. This node uses OpenAI’s GPT-4o chat model and takes into account:

  • The latest user input
  • Conversation history from the memory nodes
  • File analysis results and any LLM chain processing

With all of that context, the AI Agent generates a response that feels tailored to the user and their current situation, not just a generic answer.

When to use this n8n template

This workflow is a great fit if you want to build:

  • Customer support bots that can read attached screenshots or PDFs and help users faster
  • Personal AI assistants that remember what you upload and reference it later
  • Knowledge base helpers that can understand documents and answer detailed questions about them
  • Embedded chat widgets for your product that feel smart, interactive, and context-aware

If your users share files or need deeper, more continuous conversations, this template gives you a strong starting point.

How to customize and expand the template

The template comes with helpful sticky notes that highlight where you will probably want to make changes. Here is how you can adapt it to your own project.

1. Tailor the AI Agent prompt

The first thing most people customize is the prompt used by the AI Agent. This is where you define the assistant’s personality, tone, and role. For example, you can make it:

  • A friendly customer support bot that focuses on troubleshooting and FAQs
  • A proactive personal assistant that helps with planning, reminders, and summaries
  • A precise knowledge base helper that sticks closely to documentation and uploaded files

By tweaking the prompt, you can keep the same technical workflow but completely change how the assistant behaves.

2. Fine-tune memory for your conversation length

Next, look at the Simple Memory buffer nodes. You can adjust them to better match your app’s needs, for example:

  • Increase memory limits for longer conversations
  • Control how much history is passed to the AI Agent
  • Refine how session data is stored and retrieved

This helps you balance performance, cost, and conversational quality, especially if users tend to have long, detailed chats.

3. Extend file type and media handling

Out of the box, the workflow focuses on images and PDFs, but you are not limited to that. You can expand the file handling part to:

  • Support more document types
  • Add richer media analysis flows
  • Branch logic based on file type and user intent

If your users regularly upload different formats, this is a great place to customize and grow the template.

Why this template makes your life easier

Instead of wiring everything from scratch, this n8n workflow template gives you:

  • A prebuilt structure for chat triggers, memory, and AI responses
  • Working examples of GPT-4o multimodal analysis for images and PDFs
  • A clear path for customization so you can focus on your use case, not low-level wiring

You get a solid, production-ready starting point that you can adapt quickly, which means faster experiments and less time reinventing the wheel.

Try the GPT-4o multimodal assistant in your own stack

If you are ready to add smarter conversations to your app or workflow, this template gives you everything you need to get going. You can:

  • Spin up a multimodal AI assistant that understands text, images, and PDFs
  • Customize prompts, memory, and file handling to match your product
  • Iterate quickly as you learn how your users interact with the assistant

Explore the template, make it your own, and deploy a powerful AI chat experience that feels natural and genuinely helpful.

LinkedIn Post to Personalized Cold Email Opener

Turn LinkedIn Posts Into Cold Email Openers That Actually Get Replies

Most people do not struggle with finding prospects. They struggle with getting those prospects to care.

If you work in sales, business development, or partnerships, you already know the pattern. You open LinkedIn, find a promising profile, then stare at a blank email draft wondering how to start in a way that feels personal, relevant, and worth reading. You want to reference their latest post, their big milestone, their point of view. You know that is what sparks real conversations. Yet doing this manually for dozens or hundreds of prospects is exhausting.

This is exactly where automation can become a turning point in your workflow. Instead of spending your energy on repetitive tasks, you can let an n8n workflow handle the heavy lifting of turning LinkedIn posts into tailored, human-sounding cold email openers. The result is more time for strategy, better conversations, and a system that keeps working for you in the background.

From Manual Grind To Scalable Personalization

Think about how most cold outreach starts:

  • Generic openers like “great post” or “nice profile”
  • Little or no reference to what the person actually shared
  • Messages that feel copy-pasted and easy to ignore

Prospects see dozens of these every week. They are trained to skim, then delete. What cuts through is a message that proves you paid attention. When you reference a specific achievement, a company milestone, or a unique insight from a recent LinkedIn post, you show genuine interest. That builds instant credibility and trust, even before you make your ask.

The challenge is not knowing that personalization works. The challenge is doing it consistently, at scale, without burning out. This is where an n8n automation template becomes more than a tool. It becomes a mindset shift. You are not just sending emails. You are designing a repeatable system that turns LinkedIn content into meaningful first lines, automatically.

Shifting Your Mindset: Let Automation Do The Heavy Lifting

Automation is not about removing the human touch. It is about protecting it.

By letting an AI-powered n8n workflow read and interpret LinkedIn posts for you, you free yourself from repetitive drafting and editing. You still control the strategy, the offer, and the follow up. The workflow simply gives you a strong, context-rich opener that you can drop into your email and build on.

Think of this template as your starting point. Once it is in place, you can:

  • Scale up your outreach without sacrificing personalization
  • Experiment with different messaging approaches
  • Feed the outputs directly into your CRM or email tools
  • Iterate on the workflow as your process evolves

Instead of writing every opener from scratch, you design a system once and then refine it over time. That is how you move from reactive outreach to a predictable, growth-focused engine.

How The LinkedIn Post To Email Opener n8n Template Works

This n8n workflow template is designed to take real LinkedIn posts and convert them into cold email openers that sound like you did the research yourself. Here is the journey your data goes through:

  1. Start with simple inputs
    You fill out a form with key LinkedIn details:
    • The author’s name
    • The company name
    • The full LinkedIn post content

    This gives the workflow enough context to create a relevant and specific opener.

  2. Clean and validate the data
    The workflow processes the input to make sure it is usable:
    • Unnecessary characters or formatting are cleaned up
    • Fields are checked so personalization tokens are accurate

    This step improves the quality of what the AI can generate and helps avoid awkward or incorrect references.

  3. Generate a personalized opener with AI
    Using advanced language models, the workflow:
    • Reads the LinkedIn post like a human would
    • Picks out unique details, metrics, or milestones
    • Creates a natural, conversational first line for your email

    The goal is to sound like you actually engaged with the content, not like you copied a template.

  4. Return a formatted, ready-to-use output
    The workflow gives you:
    • A copy-ready cold email opener
    • Recommended next steps and best practices for the rest of the email

    You can paste this opener directly into your email client or route it into your CRM or outreach tool for fully automated campaigns.

See It In Action: A Real LinkedIn Post Example

To understand the impact, imagine you feed this LinkedIn post into the workflow:

“Just closed our Series B! 🚀
Honestly did not think we would get here 2 years ago when bootstrapping in my garage. Now we are scaling our AI workflow automation to help 10,000+ businesses.
Shoutout to the team who believed in the vision when it was just sketches on a whiteboard. This is just the beginning.”

The AI might return an opener like:

“Came across your post on LinkedIn – from garage sketches to Series B is incredible, and the 10,000+ businesses you are helping with AI automation shows the real impact.”

Notice what happens here:

  • It references specific details and numbers like “Series B” and “10,000+ businesses”
  • It sounds natural, not robotic or overly formal
  • It reflects genuine understanding of the story in the post
  • It builds credibility right away, before you even introduce your offer

This is the kind of opener that makes someone pause, read the rest of your message, and see you as a real person, not just another cold email.

Why This Automation Approach Works So Well

At its core, this n8n template combines three powerful elements:

  • Context – It pulls in real, recent content from your prospect’s LinkedIn activity.
  • Personalization – It highlights specific achievements, milestones, or insights that matter to them.
  • Consistency – It lets you do this again and again, without your quality dropping as your volume increases.

Instead of guessing what to say, you start from what your prospect has already chosen to share publicly. That naturally leads to more relevant conversations and higher response rates.

Who Can Benefit From This n8n Workflow Template

This template is built for anyone who relies on outreach and wants to scale it without losing the human touch, including:

  • Sales reps looking for warm, personalized introductions
  • Business development professionals who want to build real rapport
  • Agencies reaching out to potential clients with tailored messages
  • Partnership and alliances teams starting new conversations with key stakeholders

If your work depends on opening doors and starting relationships, this workflow can become a core part of your process.

Getting Started With The Template In n8n

Setting this up is straightforward, and you can be generating openers in minutes. Here is how to begin your automation journey:

  • Add your OpenAI API key to n8n, or use the free credits that are included
  • Load the LinkedIn Post to Personalized Cold Email Opener template
  • Test the workflow with a few example LinkedIn posts
  • Review the generated openers and tweak any prompt settings if needed

Once you are happy with the results, you can start feeding in real prospects and watch your outreach become more relevant and scalable at the same time.

Integrate It Into Your Broader Automation Stack

The workflow outputs structured JSON, which means it is ready to plug into the rest of your tools. You can:

  • Send the output to your CRM as a custom field
  • Log it in Google Sheets for tracking and review
  • Pipe it directly into your email sending tools or outreach platforms

This is where the real leverage appears. Instead of a single isolated automation, you start building a connected system where LinkedIn insights flow into n8n, AI generates personalized openers, and your outreach tools send them at scale.

Turning Openers Into Complete, High-Performing Emails

The opener is your hook, but your full message still matters. Once the workflow gives you a strong first line, you can follow a simple structure to complete your email:

  • Copy the personalized opener generated by the workflow.
  • Add a concise value proposition that explains how you can help in one or two sentences.
  • Include a clear call to action (CTA), such as proposing a quick call or asking a focused question.
  • Optimize your send time by aiming for Tuesday to Thursday, typically between 8 and 10 am in your prospect’s time zone.
  • Follow up in 3 to 5 days if you do not hear back, ideally with another personalized reference.
  • Personalize the subject line for better open rates, using a hint of the LinkedIn context when appropriate.

With this structure in place, the n8n template becomes the reliable engine behind your first impression, while you stay focused on the bigger picture of your outreach strategy.

Make This Template Your Starting Point, Not Your Finish Line

The real power of n8n is that you are never locked into a static workflow. You can:

  • Adjust prompts to match your brand voice and tone
  • Add extra steps to enrich data from other sources
  • Trigger the workflow from forms, CRMs, or other automations
  • Experiment with A/B tests for different opener styles

Each small improvement compounds. Over time, your outreach system becomes smarter, more aligned with your goals, and more effective at opening doors for you and your team.

Start Your Automation Journey Now

You do not need to overhaul your entire process to feel the benefits of automation. Sometimes, one well designed workflow is enough to change how your day feels. Fewer blank screens. More real conversations. A clearer focus on work that actually moves the needle.

If you are ready to turn LinkedIn insights into powerful cold email openers and reclaim time for higher value work, this n8n template is a simple yet impactful next step.

Set it up, try it with a handful of prospects, and then keep iterating. Treat it as your foundation for a more automated, focused outreach workflow.

Complete Guide to WA-SellFlow Booking Calendar Bot

Complete Guide to WA-SellFlow Booking Calendar Bot

1. Overview

The WA-SellFlow Booking Calendar bot is an n8n workflow template that automates appointment scheduling over WhatsApp. It combines WhatsApp message handling, database-driven state management, and Google Calendar integration to provide a guided booking experience for end users.

This guide explains the workflow in a technical, reference-style format, focusing on node behavior, control flow, and configuration details. It is intended for users who already understand n8n concepts such as triggers, nodes, credentials, and data mapping.

2. High-Level Architecture

At a high level, the WA-SellFlow Booking Calendar bot workflow consists of:

  • WhatsApp Trigger – Starts the workflow whenever a WhatsApp message is received.
  • Initialization & Status Management – Reads and writes the bot status in a database to track conversation state.
  • Flow Definition Logic – Determines the next path based on the current status and user input (booking vs other commands).
  • Booking Question Engine – Fetches booking questions from a database and validates user responses.
  • Date & Slot Handling – Validates dates, queries Google Calendar, applies work hours, and computes available slots.
  • Event Creation & Cleanup – Creates the final Google Calendar event, then clears temporary data and resets the bot status.
  • Messaging Layer – Multiple WhatsApp nodes for sending welcome, menu, question, error, and completion messages.

3. Trigger and Initial Flow

3.1 WhatsApp Trigger Node

The workflow begins with a WhatsApp Trigger node. This node listens for incoming WhatsApp messages and exposes the message payload to downstream nodes. Typical data includes:

  • Sender identifier (phone number or contact ID)
  • Message text content
  • Timestamp and metadata

The sender identifier is used as the conversation key for retrieving and updating the bot status in the database.

3.2 Initialization and Base Data

Immediately after the trigger, the workflow runs initialization logic. This typically includes:

  • Normalizing the incoming message text (for example trimming, lowercasing).
  • Extracting the user identifier to use as a primary key in database queries.
  • Preparing any default variables that will be used in later nodes (for example default status values or flags).

3.3 Bot Status Retrieval

The Get bot status node queries the database to retrieve the current conversation state associated with the user. This status is central to how the workflow decides which branch to follow.

The status might be stored in a dedicated table with fields such as:

  • User or chat ID
  • Current bot status (for example START, BOOKING, or other custom states)
  • Additional metadata (last question index, timestamps, etc., if implemented in your database schema)

3.4 New Session vs Existing Session

An Is First? conditional node evaluates the result from Get bot status to determine if the user is starting a new conversation or resuming an existing one:

  • New session – No existing status found for the user, or status indicates a fresh start.
  • Ongoing session – Status exists and indicates the user is mid-flow (for example in a booking conversation).

4. Session Handling and Status Updates

4.1 New Session Handling

If the Is First? node indicates a new session:

  • The workflow updates the bot status in the database to START.
  • A WhatsApp node sends a Welcome Message, introducing the bot and presenting initial options or instructions.

At this point, the user is presented with the main menu or command options that will be interpreted in subsequent messages.

4.2 Ongoing Session Handling

If the conversation is not new, the workflow does not reset the status to START. Instead, it:

  • Continues with the core dialogue logic based on the existing status.
  • May present a menu, a follow-up question, or other context-aware responses depending on how the template is configured.

This design allows the bot to continue a multi-step booking process across multiple messages.

5. Flow Definition and Command Routing

5.1 Define Flow Switch Node

The Define flow switch node evaluates the user input and current status to route execution to one of the main branches:

  • Booking Command Flow
  • Other Commands Flow

Typical criteria for the switch include:

  • Specific keywords or commands in the message, such as “book”, “appointment”, or menu options.
  • The existing bot status, for example if status is already BOOKING, the workflow continues the booking sequence even if the user does not repeat the booking keyword.

5.2 Booking Command Flow

When the user initiates or continues a booking:

  • The bot status is updated to BOOKING in the database.
  • The workflow transitions into the Booking Flow, which handles:
    • Fetching booking questions
    • Validating user responses
    • Calculating available time slots
    • Creating a calendar event

5.3 Other Commands Flow

For non-booking intents, the same Define flow switch node routes the execution to alternative branches. These branches can:

  • Send different menus or informational messages via WhatsApp nodes.
  • Return error responses if the command is not recognized.
  • Optionally reset or adjust the bot status depending on the template configuration.

This separation keeps the booking logic isolated from other conversational features.

6. Booking Flow Logic

6.1 Retrieving Booking Questions

The booking flow starts by querying the database for configured booking questions using a node typically named Get available question. This node:

  • Filters questions based on the current user, service, or bot configuration.
  • Returns a list of questions that the bot should ask to complete a booking.

6.2 Verifying Question Availability

The Is found? conditional node checks whether any booking questions were returned from the database:

  • Questions found – The workflow proceeds to the question-asking sequence.
  • No questions found – The workflow can send an error or fallback message, informing the user that booking is unavailable or misconfigured.

6.3 Iterative Question Handling

Once questions are available, the workflow:

  • Uses WhatsApp nodes to send each booking question to the user.
  • Receives the user’s response via subsequent WhatsApp Trigger invocations.
  • Stores each answer in the database through dedicated insert or update nodes.

A conditional node such as Is Questions available? is used to determine:

  • Whether there are still unanswered questions.
  • When to move from the question-collection phase to the date and slot validation phase.

6.4 Date Validation

For date-related questions, the workflow uses a conditional node often labeled Date? to validate the user’s input:

  • Checks that the input can be parsed as a valid date.
  • Ensures the date meets any basic criteria, such as not being in the past, if configured.

If the date is invalid, the workflow:

  • Can send an error or clarification message via a WhatsApp node.
  • Prompts the user to re-enter a valid date.

6.5 Working with Google Calendar

Once a valid date is confirmed, the workflow integrates with Google Calendar to identify free booking slots.

6.5.1 Fetching Day Events

A Google Calendar node is configured to fetch events for the selected day:

  • Uses authenticated Google Calendar credentials.
  • Reads all events for the requested date or date range.
  • Returns existing busy periods that must be excluded from booking slots.

6.5.2 Setting Work Hours

The workflow then applies predefined work hours. This usually involves:

  • Defining the start and end of the working day for bookings.
  • Optionally specifying slot duration (for example 30 minutes, 1 hour) if implemented in the template.

6.5.3 Computing Available Slots

Using the list of existing events and the configured work hours, the workflow:

  • Calculates time ranges that are not occupied by existing Google Calendar events.
  • Merges and formats these into user-friendly time slots.
  • Prepares the slots for presentation via WhatsApp messages.

These available slots are then sent to the user so they can choose a specific time for the appointment.

7. Completing the Booking

7.1 Final Data Assembly

After all required questions have been answered and a time slot is selected, the workflow consolidates the data:

  • Combines the chosen date and time into a single datetime value.
  • Retrieves the user’s name or other identifying details from previous answers.
  • Ensures that all mandatory fields for a calendar event are available.

7.2 Creating the Google Calendar Event

A Google Calendar node is then used to create a new event:

  • Uses the computed datetime for the event start and end times.
  • Sets the event title, description, and any other configured fields based on user responses.
  • Writes the event to the configured Google Calendar using the authenticated credentials.

If the event creation fails (for example due to credential issues or invalid data), the workflow can be extended to:

  • Send an error notification to the user via WhatsApp.
  • Log the error using an additional node or internal documentation.

7.3 Cleanup and Status Reset

After a successful event creation, the workflow performs cleanup tasks:

  • Deletes or clears temporary answers from the database to avoid stale data.
  • Resets the bot status to an appropriate value, for example back to START or an idle state, so the user can start a new booking later.
  • Sends a final WhatsApp message confirming the booking and summarizing the appointment details.

8. Messaging, Database, and Utility Nodes

8.1 WhatsApp Messaging Nodes

The workflow uses multiple WhatsApp nodes for different communication types:

  • Welcome messages – Sent at the beginning of a new session.
  • Menu messages – Present options such as booking or other commands.
  • Question messages – Ask for user details required for the booking process.
  • Error messages – Inform users about invalid input, unavailable slots, or unexpected issues.
  • Finish messages – Confirm successful booking and provide final details.

Each WhatsApp node is configured with:

  • The target phone number or chat ID from the trigger data.
  • Message templates or dynamic text built from workflow variables and database fields.

8.2 Database Operations

Database nodes handle all persistent state and user data:

  • Get bot status – Reads the current conversation status.
  • Update status – Sets the status to values like START or BOOKING.
  • Insert / update answers – Stores user responses to booking questions.
  • Delete / cleanup answers – Removes temporary data after booking completion.

Careful configuration of table names, fields, and query conditions is required so that each user’s data is isolated and correctly associated with their WhatsApp identifier.

8.3 Sticky Notes for Documentation

The template also includes Sticky notes within the n8n canvas. These are not executed as part of the workflow but are used to:

  • Document logic segments.
  • Explain decision points and data handling.
  • Provide implementation notes for future maintainers.

9. Configuration Notes

9.1 Credentials

  • WhatsApp – Ensure your WhatsApp provider or gateway is correctly configured in n8n so the WhatsApp Trigger and send-message nodes operate reliably.
  • Google Calendar – Configure Google credentials with permission to read events and create new events on the target calendar.
  • Database – Set up credentials for your database (for example MySQL, PostgreSQL, etc.), and verify that the tables used for statuses and answers exist and match the queries defined in the nodes.

9.2 Data Model Considerations

To avoid conflicts and maintain consistent state:

  • Use a unique key per user or chat (typically the WhatsApp phone number).
  • Ensure that status and answer records are either updated in place or versioned in a predictable way.
  • Validate that the date and time formats stored match what the Google Calendar node expects.

9.3 Error Handling Basics

Although the template focuses on the happy path, you can extend it to handle:

  • Missing or misconfigured database tables or queries.
  • Credential or network errors when calling Google Calendar.
  • Unexpected or malformed user input that cannot be parsed as a date or command.

In each case, an additional WhatsApp message node can be used to notify the user that something went wrong and optionally provide a way to restart the process.

10. Advanced Customization Ideas

The WA-SellFlow Booking Calendar bot template provides a solid base for WhatsApp booking automation. You can further customize it by:

  • Adding more granular booking questions in the database, such as service type or staff member.
  • Implementing different booking flows based on user type, language, or selected service.
  • Adjusting work hours or slot duration logic to match your business rules.
  • Enhancing logging and monitoring with additional nodes to track errors and usage.

11. Conclusion

The WA-SellFlow Booking Calendar bot shows how n8n can combine WhatsApp messaging, database-driven state, and Google Calendar APIs to deliver a complete, automated appointment scheduling experience. By using structured status management, conditional routing, and dynamic question handling, it keeps the booking flow clear and consistent for users.

If you are looking to improve customer interaction and reduce manual work around appointment scheduling, integrating this n8n workflow into your stack can significantly streamline your booking operations.

Ready to automate your appointment bookings?

Automate DingTalk Messages for Azure DevOps PRs

Automate DingTalk Notifications for Azure DevOps Pull Requests with n8n

Overview

For high-performing engineering teams, timely pull request (PR) reviews are essential to maintaining flow, quality, and predictable delivery. This workflow template for n8n connects Azure DevOps with DingTalk and uses a MySQL mapping table to route notifications to the correct people automatically.

Whenever a new PR is created in Azure DevOps, the workflow listens to the event, enriches it with user mapping data from MySQL, builds a structured DingTalk message with precise @mentions, and posts it into the appropriate DingTalk group via a robot webhook.

Use Case and Motivation

Why integrate Azure DevOps PRs with DingTalk?

Azure DevOps already offers built-in notifications, but in many organizations, especially in Asian markets, DingTalk is the primary collaboration hub. Relying solely on email or native Azure DevOps alerts often leads to:

  • Slow review turnaround times
  • Missed or overlooked PRs in busy inboxes
  • Fragmented communication across tools

By pushing PR notifications directly into DingTalk, you:

  • Ensure reviewers see PRs where they already work and communicate
  • Reduce manual messaging about code reviews
  • Increase transparency on who is responsible for each review
  • Standardize and centralize PR-related discussions in a single channel

Architecture at a Glance

The automation is built as an n8n workflow with four key nodes:

  • ReceiveTfsPullRequestCreatedMessage – Webhook trigger for Azure DevOps PR creation events
  • LoadDingTalkAccountMap – MySQL query node to load the Azure DevOps to DingTalk user mapping
  • BuildDingTalkWebHookData – Code node that transforms the Azure DevOps payload into a DingTalk-ready message
  • SendDingTalkMessageViaWebHook – HTTP Request node that posts the message to a DingTalk group via robot webhook

Data Model and User Mapping

A critical part of this integration is correctly mapping Azure DevOps accounts to DingTalk identities. This is handled through a simple MySQL table that the workflow queries at runtime.

MySQL mapping table structure

Create a table similar to the following schema:

| Name  | Type  | Length | Key |
|----------------|---------|--------|-----|
| TfsAccount  | varchar | 255  |  |
| UserName  | varchar | 255  |  |
| DingTalkMobile | varchar | 255  |  |

This table stores:

  • TfsAccount – Azure DevOps account identifier (for example the username or unique account name)
  • UserName – Human readable name that you want to display in notifications
  • DingTalkMobile – DingTalk mobile number used for @mentions in DingTalk messages

The LoadDingTalkAccountMap node will query this table so that the workflow can translate Azure DevOps user information into DingTalk-specific contact data when building the notification.

Key Workflow Components in n8n

1. Webhook trigger for Azure DevOps PR events

The ReceiveTfsPullRequestCreatedMessage node serves as the entry point for the workflow. It listens for Pull Request Created events from Azure DevOps via a service hook.

Configuration steps:

  • Assign a unique path to the node, for example pr-notify-template.
  • Copy the generated webhook URL from n8n.
  • In Azure DevOps, create or update a Service Hook for pull requests and configure it to send Created events to this webhook URL.

Once configured, every time a new PR is opened in the specified Azure DevOps repository or project, Azure DevOps will send a JSON payload to this n8n webhook node.

2. Loading the DingTalk account mapping from MySQL

The LoadDingTalkAccountMap node runs immediately after the webhook trigger and queries the MySQL database for user mappings. This ensures that by the time the message is constructed, all necessary mapping data is already available in the workflow context.

Best practices:

  • Use a read-only MySQL user for this node, with permissions limited to the mapping table.
  • Ensure that all relevant Azure DevOps accounts for PR creators and reviewers are present in the mapping table to avoid missing mentions.
  • Consider adding basic validation logic or fallbacks in the subsequent code node if mappings are incomplete.

3. Building the DingTalk webhook payload

The BuildDingTalkWebHookData node is a JavaScript code node that performs the core transformation logic. It:

  • Reads the Azure DevOps event payload received from ReceiveTfsPullRequestCreatedMessage.
  • Extracts key entities such as:
    • PR creator
    • Assigned reviewers
  • Matches these Azure DevOps users to DingTalk contacts using the MySQL mapping data loaded by LoadDingTalkAccountMap.
  • Builds a Markdown-formatted message body suitable for DingTalk robot webhooks.
  • Generates the list of mobile numbers to mention in DingTalk, or sets a flag to mention everyone.

Handling team reviewers and @all mentions

The node contains specific logic for team reviewers. If a reviewer entry represents a team (for example the display name contains the string “团队”), the code:

  • Sets an isAtAll flag to true.
  • Instructs DingTalk to mention all members of the group instead of individual users.

This allows you to support both individual and team review patterns without manual intervention.

Customizing the message format

You can modify the JavaScript in BuildDingTalkWebHookData to:

  • Change the Markdown layout or styling of the PR notification.
  • Include additional metadata from the Azure DevOps payload, such as:
    • Repository name
    • Target branch
    • Work item links
  • Adjust how user names are displayed, for example by using the UserName column from the MySQL table instead of the Azure DevOps display name.

4. Sending the message to DingTalk

The final step is handled by the SendDingTalkMessageViaWebHook node, which is an HTTP Request node configured to call the DingTalk robot webhook API.

Configuration details:

  • Set the request URL to your DingTalk group chat robot webhook URL.
  • Use the JSON payload generated by BuildDingTalkWebHookData as the body of the request.
  • Ensure that the request method and headers match DingTalk robot webhook requirements (typically POST with application/json).

The message is sent as Markdown, and the mobile numbers or isAtAll flag control how DingTalk renders @mentions in the group chat.

End-to-End Setup Guide

  1. Create the MySQL user mapping table
    Implement the table schema shown earlier and populate it with rows mapping each Azure DevOps account to the corresponding DingTalk mobile number and display name. This mapping is essential for accurate reviewer mentions.
  2. Configure the webhook listener in n8n
    In the ReceiveTfsPullRequestCreatedMessage node, set a unique path such as pr-notify-template. Use the resulting webhook URL in Azure DevOps Service Hooks to send Pull Request Created events to this path.
  3. Connect n8n to MySQL
    In the LoadDingTalkAccountMap node, configure your MySQL credentials and query the mapping table. This provides the data required to translate Azure DevOps users into DingTalk contacts.
  4. Customize the DingTalk message construction
    Open the BuildDingTalkWebHookData code node and tailor the JavaScript to your organization’s messaging style. The node:
    • Replaces Azure DevOps display names with the UserName values from MySQL, if desired.
    • Builds a Markdown message including PR details and reviewers.
    • Compiles the list of users to mention, or sets isAtAll when a team reviewer is detected.
  5. Configure the DingTalk robot webhook
    In the SendDingTalkMessageViaWebHook node, paste the DingTalk group robot webhook URL into the URL field. Ensure the node sends the JSON structure expected by DingTalk, including the message text and at configuration.
  6. Validate the full workflow
    Create a test pull request in your Azure DevOps repository. Confirm that:
    • The n8n workflow is triggered by the webhook.
    • The MySQL mapping is correctly applied.
    • The DingTalk group receives a message with the expected content and @mentions.

Technical Behavior of the Message Builder

The BuildDingTalkWebHookData node encapsulates the critical business logic for this integration. At a high level, the JavaScript in this node:

  • Parses the Azure DevOps PR event payload to identify:
    • PR creator
    • Assigned reviewers, including individual users and teams
  • Performs lookups against the MySQL data loaded earlier to:
    • Map Azure DevOps usernames to DingTalk mobile numbers
    • Retrieve preferred display names from the UserName column
  • Detects team reviewers whose names contain “团队” and sets an isAtAll flag to indicate that everyone in the DingTalk group should be mentioned.
  • Constructs a DingTalk robot payload in Markdown format, including:
    • Key PR details (for example title, link, creator)
    • Formatted list of reviewers
    • Appropriate @mentions using DingTalk mobile numbers or the isAtAll flag

Benefits for Engineering and DevOps Teams

  • Immediate visibility – PR notifications appear directly in the team’s primary DingTalk channels.
  • Reduced manual coordination – No need for developers to ping reviewers manually after opening a PR.
  • Consistent reviewer targeting – Automated mapping ensures the right individuals or teams are always notified.
  • Flexible customization – The message structure and content are fully adjustable in the code node.
  • Improved review throughput – Faster awareness often translates into quicker reviews and shorter cycle times.

Getting Started

To implement this pattern in your environment, set up the MySQL mapping table, configure the Azure DevOps service hook, and connect your DingTalk group robot webhook in n8n. With these components in place, you can operationalize PR notifications in a way that aligns with how your teams already communicate.

If you require deeper customization or want to extend this workflow to other Azure DevOps events, you can build on the same architecture and pattern used in this template.

Automate Job Cover Letters with n8n, Apify & OpenAI

Automate Your Job Application Cover Letters with n8n, Apify, and OpenAI

Sending out job applications can feel like a full-time job, right? Tweaking every single cover letter so it matches each posting, copying in your experience, trying to sound human but professional every time… it adds up.

What if you could keep that personal touch, but hand off most of the work to automation? That is exactly what this n8n workflow template does. It combines n8n, Apify’s Indeed Scraper, and OpenAI to automatically generate tailored cover letters for real job listings, based entirely on your own resume.

Let’s walk through what it does, when you’d use it, and how to set it up, step by step.

What This n8n Workflow Actually Does

At a high level, this workflow connects three things you already care about:

  • Live job postings from Indeed
  • Your resume
  • An AI writer that turns both into a custom cover letter

Here is the basic flow:

  1. Search for jobs on Indeed using Apify’s Indeed Scraper, based on your chosen keywords and location.
  2. Send the job description plus your resume to OpenAI through n8n.
  3. Get back a ready-to-use cover letter written as:
    • a short, focused paragraph, then
    • a set of bullet points

    all grounded strictly in the information from your resume.

The result: every job gets a customized cover letter that speaks to that specific posting, without you staring at a blank page over and over again.

When This Template Is Perfect For You

You will get the most value from this workflow if:

  • You are actively applying to multiple roles and want to move faster.
  • You already have a solid resume but hate rewriting the same cover letter.
  • You want each application to feel tailored, not generic or copy-pasted.
  • You are comfortable using n8n and APIs, or you are happy to follow a clear setup guide.

In short, if you are thinking, “I know I should customize my cover letters, but I just do not have the time,” this automation is made for you.

Why Automate Cover Letters With n8n, Apify, and OpenAI?

Let’s talk benefits before we dive into the tech details.

  • Save serious time by letting the workflow handle the repetitive writing part for every new job listing.
  • Stay personalized since each cover letter is generated for a specific job description using your actual resume.
  • Highlight what matters because OpenAI focuses the letter on skills and experience that match each role.
  • Keep it flexible with n8n, you can extend this workflow later, for example, to log applications in a spreadsheet or send them by email.

Instead of spending hours writing, you spend minutes reviewing and tweaking, if you want to, before sending.

How the Workflow Fits Together

Under the hood, the template is built from a few key n8n nodes that work together to pull jobs, write letters, and prepare the output.

  • Manual Trigger
    You start the workflow whenever you are ready by clicking Execute workflow in n8n. This keeps you in control of when new cover letters are generated.
  • Set Search Term
    This node lets you define:
    • your job search keyword, for example "n8n", "backend developer", or whatever role you are targeting
    • your resume content, usually pasted in as plain text

    Both of these values are passed along to the rest of the workflow.

  • Search Indeed (HTTP Request)
    Using Apify’s Indeed Scraper API, this node:
    • submits your search term and location to Apify
    • retrieves current job listings that match your criteria

    The result is a set of job descriptions that the workflow can feed into OpenAI.

  • Cover Letter Writer (OpenAI)
    This is where the AI magic happens. For each job description:
    • the job details and your resume text are sent to OpenAI
    • OpenAI analyzes the match between the role and your background
    • it generates a concise cover letter: one paragraph followed by bullet points

    The prompt is designed so the AI sticks to the information in your resume instead of inventing new details.

  • Structured Output Parser
    OpenAI returns its answer as JSON. This node parses that JSON into a clean structure so you can easily:
    • view the cover letter in n8n
    • pass it to other nodes, for example to email, store, or log it

Once this is in place, you have an end-to-end system: search jobs, generate letters, and get structured outputs you can use however you like.

Before You Start: What You Need

To get this workflow running, you will need accounts and API access for:

  • OpenAI to generate the cover letter content.
  • Apify with the Indeed Scraper installed to fetch job listings.
  • n8n where you will import and configure the workflow template.

Once those are ready, you can connect everything inside n8n with a few credentials.

Step 1 – Connect OpenAI to n8n

First, you will set up your OpenAI credentials so n8n can call the API.

  • Go to the OpenAI Platform and sign in to your account.
  • Visit the OpenAI Billing page and make sure you have funds added so API calls can run.
  • Create or copy your OpenAI API key.
  • In n8n, open your credentials page and add a new OpenAI credential, then paste in your API key.

Once that is done, the OpenAI node in the workflow will be able to generate your cover letters.

Step 2 – Connect Apify and the Indeed Scraper

Next, you will wire up Apify so the workflow can search Indeed for live job listings.

  • Log in or sign up at the Apify Console.
  • Go to your Apify API Keys section and generate an API token.
  • Install the Indeed Scraper in your Apify account so it is available for use.
  • In n8n, create a new credential of type HTTP Query Auth:
    • set the key to token
    • set the value to your Apify API key
  • Attach this HTTP Query Auth credential to the HTTP Request nodes that call the Indeed Scraper API.

With that in place, n8n can securely talk to Apify and pull in job data whenever you run the workflow.

Putting It All Together in n8n

Once your OpenAI and Apify credentials are configured, using the template is straightforward:

  1. Open the workflow template in n8n.
  2. Update the Set Search Term node with:
    • your preferred job keyword or title
    • your resume text
  3. Confirm that:
    • the HTTP Request node uses your Apify HTTP Query Auth credential
    • the OpenAI node uses your OpenAI credential
  4. Click Execute workflow to run it manually.

The workflow will search Indeed, send each job description plus your resume to OpenAI, then parse the results so you end up with structured, targeted cover letters you can copy into your applications or route elsewhere.

How This Makes Your Life Easier

Instead of writing from scratch for each role, your new routine can look like this:

  1. Adjust the search term or location if you are targeting a new type of role.
  2. Run the workflow.
  3. Review the generated cover letters, tweak any details if you like, and submit.

You stay in control of the final message, but automation does the heavy lifting: pulling jobs, matching your skills, and drafting the first version for you.

Ready To Try It?

If you want to speed up your job search and still send thoughtful, relevant cover letters, this n8n workflow is a great starting point. Connect your APIs once, set your preferences, and let the system handle the repetitive part of the process.

Want help installing or customizing the workflow for your specific situation? You do not have to figure it all out alone.

Contact

Start automating your cover letters today so you can apply smarter and faster, without sacrificing quality.

How to Build a Telegram AI Calendar Bot with Google Gemini

How a Stressed Founder Turned Telegram Into a Smart AI Calendar Assistant

The Problem: Too Many Meetings, Not Enough Brainspace

By Thursday afternoon, Lena’s week was already a blur.

As a startup founder, her days lived inside Telegram chats. Investors pinged her there, her team shared updates there, and even her closest customers preferred quick Telegram messages over email. But her calendar lived somewhere else entirely.

Every time someone wrote, “Can we meet tomorrow at 3?” Lena had to pause, open Google Calendar, check availability, create or update events, and then go back to Telegram with a reply. She missed a few calls, double booked herself once, and spent way too much time context switching between apps.

One evening, while scrolling through automation ideas, she stumbled on something that sounded almost too perfect: a Telegram AI calendar bot built with n8n, powered by Google Gemini and Google Calendar.

“What if my calendar just lived in Telegram,” she thought, “and I could talk to it like a human?”

The Discovery: An n8n Template That Spoke Her Language

Lena opened the template description and realized it did exactly what she needed. It promised that, with a single n8n workflow, she could:

  • Create, update, and delete Google Calendar events directly from Telegram
  • Ask for upcoming events in plain language and get answers instantly
  • Rely on an AI agent using Google Gemini to interpret natural language requests
  • Keep conversation context with Simple Memory so the bot “remembered” what they were talking about

Instead of typing event details into forms, she could simply write:

  • “Schedule a call with Alex tomorrow at 3 pm for 30 minutes”
  • “Move my 10 am meeting to 11”
  • “Delete my coffee chat with Sam on Friday”
  • “What is on my calendar this afternoon?”

The more she read, the more it clicked. The workflow was not just a random bot. It was a carefully designed automation that connected Telegram, Google Gemini, and Google Calendar into one intelligent assistant.

Rising Action: Wiring Telegram to an AI-Powered Calendar

Lena imported the template into n8n and started exploring how everything fit together. Instead of a dry list of nodes, she began to see it as the story of a conversation.

Step 1: The Telegram Trigger – Where the Conversation Begins

At the very front of the workflow sat the Telegram Trigger node. This was the gatekeeper. Every time Lena or anyone else sent a message to the Telegram bot, this node would listen and fire up the entire automation.

To Lena, it felt like giving her bot ears. The trigger captured messages in real time and passed them into the rest of the workflow for interpretation.

Step 2: Getting the Bot Ready – Variables and Initialization

Right after the trigger, the workflow moved into preparation mode. The Variables TG and Initialization set nodes quietly did their job in the background.

They:

  • Stored key information from Telegram, like chat IDs and message text
  • Set up internal variables to control how the flow would move from one step to another
  • Ensured each new message started with a clean, predictable state

It was like the bot taking a deep breath and getting organized before answering.

Step 3: The Welcome Moment – “Is start?” Check

Next came a crucial fork in the story: the Is start? node.

This IF node checked whether the message was the first interaction with the bot, for example a start command. If the condition was true, it would trigger a friendly welcome message flow. Lena customized this part to greet new users and briefly explain what the bot could do.

If it was not the start of a session, the workflow skipped the welcome and went straight into understanding what the user wanted.

Step 4: Understanding Intent – The “Define Type” Node

The next piece was where the bot started feeling smart. The Define Type node was a Switch node that categorized what the user was asking for.

Based on the content of the message, it would route the request into one of several intent types:

  • Get events
  • Create events
  • Update events
  • Delete events

For Lena, this meant the workflow could distinguish between “What is on my calendar tomorrow?” and “Create a meeting with Sarah at 4 pm” and send each one down the right path.

The Turning Point: Letting Google Gemini Take Over

The real magic happened when the workflow reached the heart of the system: the AI Agent node.

The AI Agent: Google Gemini With Tools and Memory

This node connected the conversation to the Google Gemini Chat Model, enhanced with Simple Memory and a set of calendar tools. Instead of rigid commands, Lena could talk naturally, and the AI would interpret her intent.

The AI Agent was configured to use specific tools that represented different Google Calendar operations:

  • Get Calendar Event
  • Create Calendar Event
  • Update Calendar Event
  • Delete Calendar Event

Simple Memory kept track of recent context, so if Lena wrote, “Move that meeting to 3 pm instead,” the AI could understand what “that meeting” referred to in the ongoing conversation.

Behind the scenes, the AI Agent would:

  1. Read the incoming Telegram message
  2. Use natural language processing to figure out the user’s intent
  3. Decide which calendar tool to call, and with what parameters
  4. Trigger the appropriate Google Calendar node to perform the action

Google Calendar Tool Nodes: Where Changes Really Happen

The AI Agent did the thinking, but the Google Calendar tool nodes did the doing.

Each node was responsible for a specific type of calendar operation:

  • Get events – Retrieve upcoming or specific events from a chosen calendar
  • Create events – Add new events with title, date, time, duration, and description
  • Update events – Modify existing entries, such as time, attendees, or notes
  • Delete events – Remove events that were no longer needed

These nodes communicated directly with the Google Calendar API, turning the AI’s decisions into real calendar changes.

Sending the Answer Back to Telegram

Once the AI Agent finished its work and the calendar nodes completed their tasks, the workflow reached its final step: the Send Answer node.

This node took the AI’s response, formatted it as a Telegram message, and sent it back to the user. In Lena’s chat, it looked like a helpful assistant replying in seconds:

  • “I have created your meeting with Alex tomorrow at 3 pm.”
  • “You are free at 11 am, would you like me to move the 10 am meeting there?”
  • “Here are your events for this afternoon…”

The Payoff: Life With a Telegram AI Calendar Bot

Within a day of connecting everything, Lena stopped opening Google Calendar directly. Instead, she simply talked to her bot inside Telegram.

Practical Benefits She Noticed Quickly

  • Seamless calendar management She could perform all key calendar operations directly from Telegram. No more switching between apps or losing track of conversations.
  • Natural language interactions Thanks to Google Gemini, she no longer had to remember strict commands. Plain English like “What is on my calendar after 4 pm?” just worked.
  • Context-aware replies With Simple Memory, the bot understood follow-up messages in context, which made the experience feel much more human.
  • Automated workflows Routine tasks like creating, updating, or deleting events became quick one-line messages instead of multi-step manual actions.

Customizing the Bot: Making It Truly Hers

Once the core workflow was running smoothly, Lena started to customize it.

She:

  • Adjusted the welcome message to match her brand voice and explain available commands
  • Improved intent recognition by refining how the Define Type node categorized requests
  • Considered extending the logic to connect with additional calendar services in the future

Because the whole solution lived inside n8n, she could visually tweak nodes, add new branches, or insert additional checks without rewriting everything from scratch.

Resolution: From Overwhelmed to Orchestrated

A week later, Lena realized something simple but powerful had changed. Her calendar had stopped being a separate tool she had to manage, and had become a quiet assistant that lived inside the chat app she already used all day.

No more missing events, no more constant context switching, and far fewer mental notes like “Remember to add that to the calendar later.”

All of it was powered by a single n8n workflow template that connected Telegram, Google Gemini, and Google Calendar into one AI-driven system.

Start Your Own Story: Build Your Telegram AI Calendar Bot

If you spend your day inside Telegram and juggle a busy schedule, you can follow the same path Lena did. Use this n8n workflow template as your blueprint, connect your Telegram bot, plug in Google Gemini and Google Calendar, and let automation take over the repetitive work.

Try this Telegram AI calendar bot template in n8n and transform how you manage your schedule.

Automate G2 Review Monitoring with n8n Workflow

Automate G2 Review Monitoring with n8n

Overview

Systematic monitoring of G2 reviews is critical for SaaS teams that want to protect brand reputation, track competitor perception, and act quickly on user feedback. Manual checking does not scale and often leads to delays or missed insights.

This article presents a production-ready n8n workflow template that automates G2 review monitoring using ScrapingBee for data extraction, Slack for real-time notifications, and Google Sheets for structured logging and analysis. The workflow is designed for automation professionals and can be easily adapted to different products or competitors.

Use Case and Workflow Behavior

The workflow performs a daily scan of G2 for new reviews related to a defined list of competitor products. For each new review it detects, it:

  • Scrapes the latest review content from G2 using ScrapingBee
  • Extracts structured data such as date, rating, user profile, review URL, and review text
  • Checks against an existing log in Google Sheets to avoid duplicates
  • Sends a formatted notification to a specified Slack channel
  • Appends the new review as a new row in Google Sheets for long-term tracking

The result is a reliable, low-maintenance monitoring system that ensures your team never misses an important G2 review.

Requirements and Setup Prerequisites

Before implementing the workflow in n8n, ensure you have the following:

  • Slack workspace and a dedicated channel for review alerts
  • Google Sheets account and a prepared spreadsheet to store review data
  • ScrapingBee account with API access: https://app.scrapingbee.com/
  • n8n instance (self-hosted or cloud) with access to create and run workflows

High-Level Architecture of the n8n Workflow

The workflow follows a clear, modular structure aligned with automation best practices:

  1. Trigger and configuration
    • Schedule Trigger node
    • Code node for competitor configuration
  2. Data acquisition from G2
    • HTTP Request node using ScrapingBee
    • HTML Extract nodes to isolate review elements
  3. Data transformation
    • Item Lists node to iterate over reviews
    • HTML to Markdown conversion for readable content
  4. De-duplication and persistence
    • Google Sheets integration to read existing records
    • Filtering logic to identify only new reviews
  5. Notification and logging
    • Slack node to send notifications
    • Google Sheets node to append new entries

Detailed Node-by-Node Breakdown

1. Schedule Trigger – Automated Daily Execution

The workflow starts with a Schedule Trigger node configured to run once per day, for example at 8:00 AM. This ensures consistent monitoring without manual intervention and provides a predictable cadence for review collection.

2. Code Node – Defining the Competitor List

A Code node stores a simple JavaScript array that lists the competitors you want to track on G2. Each entry typically corresponds to a G2 product identifier or URL fragment. To adjust the scope of monitoring, you only need to update this list in the Code node, which keeps configuration centralized and easy to maintain.

3. HTTP Request with ScrapingBee – Retrieving G2 Review Pages

For each competitor, the workflow uses an HTTP Request node to call the ScrapingBee API. The node is configured to:

  • Pass the G2 review page URL as a query parameter
  • Leverage ScrapingBee’s stealth proxies for more reliable scraping
  • Optionally set country parameters to control geo-specific content

ScrapingBee returns the HTML of the G2 page that contains the most recent reviews for each specified competitor.

4. HTML Extract – Isolating the Review Section

The first HTML Extract node processes the returned HTML and uses CSS selectors to target the section of the page that contains the list of reviews. It isolates each individual review as a separate HTML block, typically corresponding to a specific review container element on the G2 page.

5. Item Lists – Iterating Over Individual Reviews

Since each G2 page can include multiple reviews, an Item Lists node is used to iterate over the extracted review elements. This node ensures that each review is handled as a separate item in the workflow, which simplifies downstream processing and avoids mixing data between different reviews.

6. Second HTML Extract – Structuring Review Data

A second HTML Extract node operates on each review item and extracts structured fields, such as:

  • Review date
  • Rating
  • User profile link
  • Direct review URL
  • Raw review content in HTML format

This step converts unstructured HTML into clearly defined properties that can be used for analysis, notification formatting, and storage.

7. HTML to Markdown Conversion – Readable Output

The raw review body is then converted from HTML to Markdown. This makes the content more readable in Slack messages and ensures that text stored in Google Sheets is clean and easy to work with. Markdown formatting also improves legibility when reviews are referenced or shared internally.

8. Google Sheets Lookup – Identifying New Reviews

Before sending notifications, the workflow needs to ensure that only new reviews are processed. To achieve this, it:

  • Uses a Google Sheets node to retrieve all previously logged reviews from the target spreadsheet
  • Compares the current batch of reviews against these existing entries, typically using a unique field such as the review URL or a combination of date and user
  • Filters out any review that has already been stored

Only reviews that are not present in the spreadsheet move forward in the workflow, which prevents duplicate notifications and maintains data integrity.

9. Slack Notifications and Google Sheets Logging

For each new review identified, the workflow executes two parallel actions:

  • Slack notification A Slack node sends a well-formatted message to the chosen channel. The message typically includes:
    • Rating
    • Review date
    • User profile link
    • Direct link to the review on G2
    • The review content in Markdown format

    This ensures that product, marketing, and customer success teams receive timely, actionable information.

  • Google Sheets logging A Google Sheets node appends each new review as a new row in the spreadsheet. Typical columns include:
    • date
    • rating
    • review (Markdown content)
    • reviewUrl
    • user_profile

    This creates a historical dataset that can be used for trend analysis, reporting, or further automation.

Benefits and Best Practices

  • Operational efficiency Daily automated checks remove the need for manual G2 visits and ad hoc monitoring.
  • Immediate visibility Slack alerts provide near real-time awareness of new competitor or product reviews.
  • Audit-ready history Centralized logging in Google Sheets facilitates longitudinal analysis and reporting.
  • Configurable and scalable The JavaScript list in the Code node allows you to easily add or remove competitors as your monitoring strategy evolves.
  • Separation of concerns Each node has a clear responsibility, which aligns with automation best practices and simplifies maintenance and troubleshooting.

Implementation Steps

To deploy this G2 review monitoring workflow in your n8n environment, follow these steps:

  1. Create a ScrapingBee account at https://app.scrapingbee.com/ and obtain your API key.
  2. Prepare a Google Sheets document with the required columns, for example: date, rating, review, reviewUrl, user_profile.
  3. Set up or select a Slack channel that will receive G2 review notifications.
  4. Import or recreate the n8n workflow template, then:
    • Update the competitor list in the Code node with the G2 identifiers you want to track.
    • Add your ScrapingBee API key to the HTTP Request node configuration.
  5. Configure and connect your Google Sheets and Slack credentials within n8n.
  6. Set the desired schedule in the Schedule Trigger node and activate the workflow.

Conclusion

This n8n workflow provides a robust and extensible solution for automated G2 review monitoring. By combining ScrapingBee for data extraction, n8n for orchestration, Slack for alerting, and Google Sheets for persistent storage, you gain a reliable system that captures new reviews, surfaces them to your team, and maintains a complete historical record.

If you want to operationalize review tracking and ensure you never miss a new G2 review again, implement this workflow and integrate it into your daily monitoring stack.

For detailed configuration screenshots, advanced customization options, and troubleshooting tips, refer to the full guide.

Automate Website Leads to Voice Demo & Scheduling

Automate Website Leads to Voice Demo & Scheduling: A Founder’s Story

How Alex’s “Leaky Funnel” Turned Into an AI Booking Machine

Alex stared at the CRM again. Dozens of new leads had come in from the website over the weekend, but only two had actually booked a call. The rest were stuck in limbo, tagged as “New,” waiting for a human follow-up that never arrived on time.

Like many founders, Alex had a familiar problem. The website form worked. Ads were driving traffic. People were interested. Yet the manual process of qualifying leads, calling them, and scheduling demos was slow, inconsistent, and painfully human-dependent.

Some leads never picked up. Some got a rushed call with no context. Others slipped through the cracks entirely. Even worse, every update to the CRM had to be done by hand, which meant it rarely reflected reality.

Alex wanted something different: a system that would notice every new lead, understand their business, call them with a personalized pitch, and log everything automatically. No more “I’ll get to it later.” No more missed opportunities.

That is when Alex discovered an n8n workflow template that promised exactly that – an AI booking agent powered by n8n, Notion, OpenRouter, and Vapi.

The Vision: Turning a Website Form Into an AI Booking Agent

Instead of treating the website form as a passive inbox, Alex wanted it to act like a proactive AI sales assistant. The idea was simple but powerful:

  • Every time a visitor submitted a form, the system would create a new lead in Notion.
  • An n8n workflow would detect that lead, research the prospect’s website, and summarize their business using AI.
  • An AI voice assistant in Vapi would call the lead, speak intelligently about their business, and try to schedule a meeting.
  • Once the call ended, the system would store the outcome, notes, and recording back in Notion.

In other words, Alex wanted a fully automated AI booking agent that could qualify, call, and follow up with leads, all without a human touching the process.

Gathering the Tools: What Alex Needed to Get Started

Before anything could work, Alex had to assemble the stack. The template made it clear what was required, and it turned out to be surprisingly straightforward:

  • n8n account for automation, either cloud or self-hosted.
  • Notion account, even the Free plan, to act as the CRM and central lead database.
  • OpenRouter API key from openrouter.ai to power the AI text analysis with GPT-3.5.
  • Vapi account from vapi.ai to handle AI voice calls.

Inside Vapi, Alex created an AI assistant and assigned it a phone number. The system then generated three critical pieces of information:

  • Vapi API key
  • Assistant ID
  • Phone Number ID

Those credentials would later plug directly into the n8n workflow.

On the CRM side, Alex duplicated the provided Notion template into the workspace. That template came pre-structured with the fields the workflow needed, which meant fewer chances to misconfigure things.

The First Breakthrough: Seeing the Automation Flow in Action

Once the accounts were ready, Alex opened the n8n template. Instead of a simple one-step zap, this was a complete automation journey, from new lead to completed call.

Here is how Alex’s new AI booking agent would behave behind the scenes.

From Form Submission to AI Voice Call

  1. New Lead Detection
    Every time a visitor filled out the website form, a new record appeared in the Notion database with Status = “New”. Alex did not have to touch anything. That “New” label was the signal that a fresh lead had arrived.
  2. n8n Trigger on Notion
    In n8n, a Notion Trigger node checked for new leads every minute. When it spotted a record with Status set to “New,” the workflow kicked in.
  3. Website Content Fetch
    The workflow pulled in the lead’s website content from the URL they submitted. During testing, Alex used the built-in mock mode to simulate this step without hitting real sites, which made safe experimentation possible.
  4. AI Business Analysis with OpenRouter
    n8n then sent the website content to GPT-3.5 via the OpenRouter API. The AI analyzed the business, summarized what the company did, and even extracted an interesting fact. This was the magic ingredient that made calls feel tailored instead of generic.
  5. Update Notion with Insights
    That AI-generated summary was written back into the same Notion record, filling the “Business Analysis” field. Now each lead entry contained not just raw contact info, but a concise snapshot of their business.
  6. Vapi AI Call
    Using the Vapi API, the workflow instructed the AI assistant to call the lead’s phone number. The assistant used the business analysis to open the conversation in a relevant, human-sounding way, rather than with a canned script.
  7. Webhook on Call Completion
    When the call ended, Vapi sent a webhook back to n8n. That webhook was the trigger for the second part of the workflow, which handled the outcome.
  8. AI Call Summary
    The call’s content was passed again through AI to produce a clean summary and actionable notes. If the lead did not answer, the workflow could reuse an existing summary or log that outcome appropriately.
  9. Final Notion Update
    Finally, the Notion record was updated with:
    • Call summary
    • Recording link
    • Call outcome, such as “Meeting Scheduled” or “No Answer”

    What used to be a vague “New” entry was now a fully documented interaction.

Inside the Workflow: The Two Key Parts Alex Activated

As Alex explored the template, it became clear that the automation was divided into two cooperating workflows, each responsible for a different stage of the journey.

Part 1 – From New Notion Lead to AI Voice Call

The first workflow handled everything from detecting a new lead to making the call. In Alex’s words, it was like a virtual SDR that never slept.

  • It watched the Notion database for leads where Status was exactly “New”.
  • It fetched the lead’s website and cleaned up the content so the AI had something usable to analyze.
  • It sent that content to GPT-3.5 via OpenRouter to create a business summary and an interesting fact.
  • It stored the AI analysis back into the Notion record so the CRM was enriched automatically.
  • It triggered a Vapi AI voice call using the Phone Number ID and Assistant ID, passing along the analysis so the assistant could sound informed and relevant.

After setting this up, Alex realized that the hardest part of lead qualification was now handled by automation.

Part 2 – Webhook Handler for Call Results

The second workflow lived in the background, waiting for Vapi to report back after each call.

  • It received the webhook from Vapi whenever a call ended.
  • It used the Vapi API to fetch detailed call results, including transcript or summary data.
  • It generated an AI call summary if needed, or reused existing information when the call was not answered.
  • It updated the Notion record with:
    • Call outcome (for example, “Meeting Scheduled” or “No Answer”)
    • Summary and notes
    • Recording link

This was the moment Alex realized something important. The team would never again wonder, “Did we call this lead?” The history was always there, cleanly logged, a few seconds after each interaction.

The Setup Hurdle: Getting the Configuration Right

Of course, no automation story is complete without a bit of configuration tension. For Alex, that came in the form of environment variables and webhook URLs.

The template required several placeholders to be replaced before anything would run:

  • YOUR_VAPI_API_KEY
  • YOUR_VAPI_ASSISTANT_ID
  • YOUR_VAPI_PHONE_NUMBER_ID

Alex carefully swapped each placeholder with the actual values from the Vapi dashboard. A single typo here could break the flow, so this was double-checked.

Next, the Notion database needed the correct fields so n8n could read and write data reliably. The required structure looked like this:

  • Name – The lead’s name.
  • Phone – The number Vapi would call.
  • Website URL – Used to fetch and analyze the business site.
  • Status (select) – Values like “New,” “Meeting Scheduled,” or “No Answer.”
  • Business Analysis (rich text) – Where the AI summary would be stored.

Finally, Alex had to connect the dots between Vapi and n8n for the second workflow. In the Vapi assistant dashboard, the webhook URL from Part 2 of the n8n workflow was pasted into the correct field. That ensured every completed call would notify n8n automatically.

To avoid burning through real calls during testing, Alex enabled the mock data mode included in the template. This allowed full end-to-end checks of the logic without dialing actual phone numbers.

The Turning Point: From Missed Leads to Automated Conversations

With everything configured, Alex flipped the switch by activating the Part 1 workflow in n8n. The Notion Trigger started monitoring leads in the background.

Within minutes, a new test lead appeared in Notion with Status set to “New.” The workflow caught it, fetched the website, generated the analysis, and logged the insights. Then Vapi placed the call.

The AI assistant greeted the lead using their name, referenced their business correctly, and asked thoughtful questions. It did not sound like a cold script, it sounded like someone who had done their homework.

After the call, Alex refreshed Notion. The record now contained:

  • A clear call summary
  • Notes on what the lead cared about
  • The call outcome, including whether a meeting had been scheduled
  • A link to the recording for later review

The entire process, from form submission to follow-up and logging, had happened automatically.

The Resolution: What Changed for Alex’s Team

Over the next few weeks, the impact was obvious:

  • No new lead sat untouched in Notion. The AI booking agent reached out quickly and consistently.
  • Every call felt personalized, thanks to the AI business analysis powered by OpenRouter and GPT-3.5.
  • The sales team had clean, structured notes in Notion before they even joined a scheduled meeting.
  • Missed calls were no longer black boxes. They were logged with outcomes like “No Answer,” so follow-up strategies could be adjusted.

Most importantly, Alex stopped worrying about whether anyone had remembered to call that promising lead from Friday afternoon. The system handled it, every time.

Set Up Your Own AI Booking Agent With n8n

If Alex’s story feels familiar, you might be in the same place: plenty of leads, not enough time, and too much manual follow-up.

This n8n workflow template gives you a practical way to:

  • Automate lead qualification directly from your website form.
  • Use an AI voice assistant to call leads with personalized context.
  • Keep your Notion CRM updated with business insights, call summaries, and outcomes.
  • Test safely using mock data mode before going live with real calls.

The steps are clear:

  1. Create or log into your n8n, Notion, OpenRouter, and Vapi accounts.
  2. Set up your AI assistant and phone number in Vapi, then copy your API key, Assistant ID, and Phone Number ID.
  3. Duplicate the Notion template and ensure all required fields are in place.
  4. Import the n8n workflow template, replace the placeholders with your credentials, and configure the Vapi webhook URL for Part 2.
  5. Activate the Part 1 workflow to start monitoring and calling new leads.

Next Step: Try the Template

You do not have to rebuild Alex’s system from scratch. The template already connects n8n, Notion, OpenRouter, and Vapi into a ready-to-customize AI booking agent.

Set up your accounts, duplicate the Notion database, and plug in your credentials. If you want help tailoring the flow to your specific sales process, you can always reach out for integration and optimization support.