
n8n + OpenAI Image Workflow: Automate Image Creation
By the time the third campaign of the quarter rolled around, Maya was exhausted.
As the lead marketer for a fast-growing recipe blog that had just spun up an e-commerce line, she was responsible for everything visual. Ingredient spreads for blog posts, product photos for their new pantry items, seasonal ad creatives for social channels. Each new recipe or product meant another round of photo shoots, design briefs, and late-night editing sessions.
Her team loved the creative work, but not the endless repetition. Every time a new recipe went live, someone had to hunt down the right props, shoot top-down ingredient photos, tweak the lighting in post, then upload and organize everything in Google Drive. The same story repeated for product updates, colorways, and seasonal edits.
One Tuesday evening, staring at a spreadsheet full of upcoming recipes and products, Maya realized something had to change. There were already rows of structured data in Google Sheets: recipe names, ingredient lists, product metadata. Why were they still doing all the visual work by hand?
That question led her to n8n, the OpenAI Images API, and a workflow template that would quietly transform how her team created and managed images.
The problem: Great ideas, no time to execute
Maya’s content calendar was packed. Her challenges will sound familiar to many marketers and content teams:
- Every recipe needed consistent ingredient photos for blog posts and social media.
- New product variants required updated imagery at scale.
- Marketing campaigns demanded quick variations, such as different background colors or seasonal props.
Manual photo shoots and graphic design were not just slow, they were expensive and hard to keep consistent. A single delay in getting images ready could push back a campaign launch.
Maya needed a way to turn the structured data she already had into visuals, with as little manual work as possible. That is when she stumbled across an n8n template that combined Google Sheets, Google Drive, and the OpenAI Images API.
The discovery: An n8n image workflow hiding in plain sight
Late one night, while searching for “automate image generation with n8n,” Maya found a template titled almost exactly that: an n8n workflow that integrates the OpenAI Images API with Google Sheets and Google Drive to generate, edit, and store images automatically.
Reading through the description, she realized it did nearly everything she had been trying to piece together in her head:
- Read rows from a Google Sheets document, like recipes or product metadata.
- Send prompts to OpenAI Images to generate or edit visuals.
- Convert the base64 image data that OpenAI returns into actual files inside n8n.
- Upload the final images into neatly organized Google Drive folders.
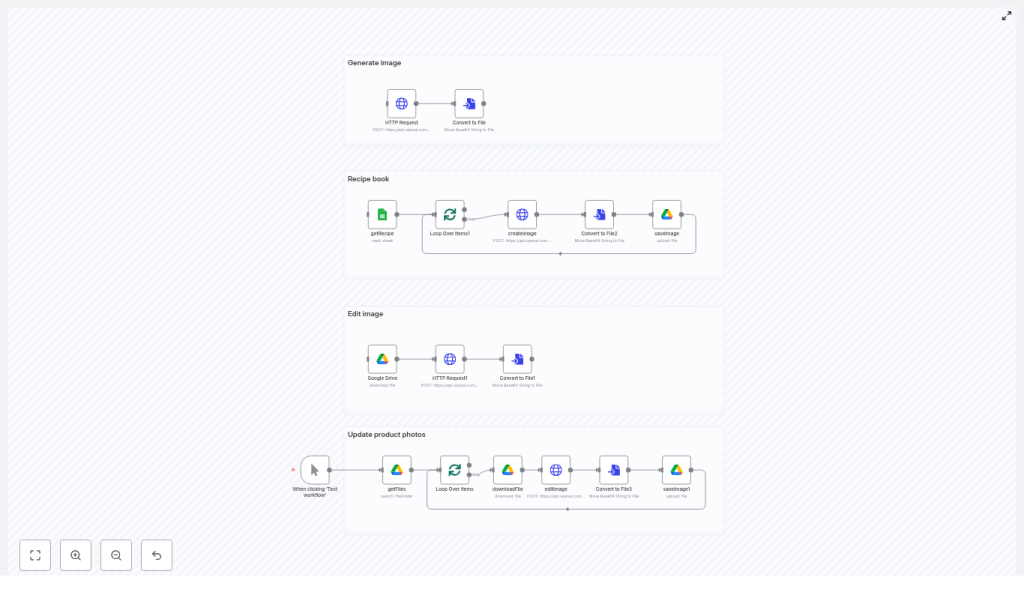
The workflow canvas was split into four main areas, which felt almost like chapters in her new process: Generate image, Recipe book, Edit image, and Update product photos. Each section mirrored a problem she already had.
For the first time, she could see a path to turning her Google Sheets into a visual content engine.
Setting the stage: Preparing the tools
Before Maya could run anything, she needed to set up the basics. The template came with a clear checklist, which she treated like a pre-flight routine:
- An n8n instance with internet access, running in the cloud so her team could collaborate.
- An OpenAI API key with quota for images, stored securely as a credential inside n8n.
- Google OAuth credentials connected in n8n for both Drive and Sheets.
- A Google Sheets file with columns such as Recipe name, Ingredients, and Image ID.
- Target Google Drive folders created for uploads and edited images.
Inside the HTTP Request node that talked to OpenAI, she set the header:
Authorization: Bearer <YOUR_OPENAI_KEY>She double checked that her Google credentials in n8n had permission to read from the right Sheet and write to the correct Drive folders. With the foundations in place, it was time to see if this workflow could really replace hours of manual work.
Rising action: Turning spreadsheet rows into images
Maya started with her biggest time sink: ingredient spreads for recipes. The bottom section of the template used a manual trigger node, labeled “When clicking ‘Test workflow'”. For a first run, that was perfect. She clicked “Test workflow” and watched the nodes light up, one by one.
Reading the source data from Google Sheets
The getRecipe node was the first character in this story to act. It pulled data from her Google Sheets document, where each row represented a recipe. The sheet already contained:
- Recipe name
- Ingredients
- Other metadata and an optional Image ID column
The template used the Ingredients field as a key part of the prompt. Each row in the sheet would become a unique image request to the OpenAI Images endpoint, with the ingredient list inserted directly into a carefully crafted prompt.
Generating images with OpenAI Images
Next, an HTTP Request node called the OpenAI image generation endpoint using the model gpt-image-1. Maya opened the node and examined the prompt. It was more detailed than she expected:
- It specified a top-down view of the ingredients.
- It asked for a neutral, light background.
- It described the overall style and lighting.
When the node ran, the OpenAI API returned base64-encoded image data. That was not something Maya could use directly, but the template had already accounted for this. A ConvertToFile node converted the base64 data into an actual image file inside n8n, ready for storage.
Saving the results into Google Drive
Once converted, the image file passed into the saveImage node. This node uploaded the generated image into a designated Google Drive folder, named by the recipe. For Maya, this solved a surprisingly painful problem: keeping assets organized.
Now, each recipe had its own folder in Drive, filled with automatically generated ingredient spreads that were consistent in style and composition. Her CMS could point to those folders, and her design team no longer had to dig through chaotic directories.
The turning point: From simple generation to powerful edits
The first run was a success. Maya now had dozens of ingredient images created in minutes. But her work was not just about new images. She also had a backlog of product photos that needed updates: seasonal backgrounds, new props, subtle retouching.
This is where the template’s second major capability came into play: image editing.
Editing existing product photos with OpenAI
The workflow included an edit pipeline specifically for cases like hers. It worked in a sequence:
- Download an existing file from Google Drive.
- Send that file to the OpenAI Images
/editsendpoint. - Provide a new instruction, such as “place fruit around the can and add water splashes”.
- Convert the returned base64 data into a new file.
- Save the edited image back to Drive, often into a separate folder for edited assets.
With this, Maya could take a single base product photo and generate multiple variants tailored to different campaigns. Summer version, holiday version, minimal version for the product page. Instead of booking another shoot, she let the automation handle the visual variations.
Behind the scenes: How the workflow fits together
As she grew more comfortable, Maya began to tweak the workflow to fit her team’s habits. The template’s structure made it easy to adapt:
- Trigger node Initially, she used the manual trigger to test. Later, she swapped it for a scheduled trigger so new recipes in the Sheet would generate images overnight. For future plans, she considered a webhook trigger so that when a new row was added, the workflow would run automatically.
- Recipe book and product sections The “Recipe book” section focused on image generation from ingredient lists. The “Update product photos” and “Edit image” sections focused on editing existing assets. Maya could enable or disable parts depending on the project.
What started as a static template turned into a flexible visual pipeline for her entire content operation.
Crafting the prompts: Where the magic really happens
Maya soon realized that the quality and consistency of the images depended heavily on how she wrote prompts. The template provided guidelines that she refined over time.
Prompt engineering tips Maya adopted
- Be explicit about composition For top-down ingredient shots, she used language like: “Top-down view, ingredients arranged neatly on a light neutral background.”
- Define style and lighting To keep her brand consistent, she added: “Natural lighting, soft color palette, minimal shadows.”
- Separate optional elements For extra flair, she wrote: “Optionally include small handwritten-style labels below each item.” Keeping optional parts as separate sentences helped avoid confusing the model.
- Keep variable insertion clean In Google Sheets, she stored ingredient lists in a single cell per recipe. This prevented malformed prompts where line breaks or stray characters could confuse the API.
By treating prompts as part of her brand guidelines, Maya achieved a consistent visual identity across hundreds of automatically generated images.
Debugging the bumps in the road
Of course, no automation journey is completely smooth. Maya hit a few predictable issues along the way, but the template had already mapped out how to handle them.
Common issues she encountered
- Authentication errors When a token expired, the workflow failed fast. She learned to double check the OpenAI API key in the HTTP Request header and refresh Google OAuth tokens in n8n regularly.
- Malformed prompts or data Occasionally, a strange character in the Sheets data would cause problems. Inspecting the data passed from Google Sheets and adding a Function node to sanitize strings solved this.
- Large payloads and timeouts Image generation is not instant. For large batches, she adjusted node timeouts and introduced batching to avoid overloading the API or hitting time limits.
- Drive upload failures When uploads failed, it usually came down to incorrect folder IDs or missing permissions. Verifying the folder IDs and ensuring Drive credentials had write access fixed these quickly.
Each time she solved an issue, she updated the workflow with small guards and checks, turning it into a robust part of her infrastructure.
Costs, rate limits, and staying in control
Maya was careful about cost from the beginning. Automated image generation and edits can add up, especially when running bulk jobs. Before she unleashed the workflow on her full catalog, she put a few guardrails in place:
- She estimated the cost per image and monitored usage in the OpenAI dashboard.
- She implemented batching so that images were generated in controlled groups, respecting rate limits and avoiding sudden spikes.
- She tested with lower resolution or sample images while fine tuning prompts, so she did not burn credits on images she might discard.
With these practices, the automation remained a cost-effective investment rather than a surprise line item.
Security, governance, and who gets to press “go”
As the workflow proved its value, other teams started asking to use it. Maya realized she needed some governance around such a powerful and potentially costly tool.
- She restricted who could trigger the workflow, especially the bulk jobs that touched hundreds of rows.
- She logged generated images and their prompts to an audit log, so any odd result could be traced back to its source.
- She set quota alerts in OpenAI to avoid unexpected spend if someone ran a large batch by accident.
With these policies in place, the automation became a trusted internal service instead of a risky experiment.
The payoff: Real-world wins across the team
Within a few weeks, the impact was obvious.
- Recipe publishing Ingredient spreads were auto generated from recipe rows in Google Sheets. New posts went live with on-brand visuals, even when the photo studio was fully booked.
- E-commerce updates Seasonal edits for product photos, such as new backgrounds or props, were created using the image editing pipeline. No reshoots, no extra coordination.
- Marketing campaigns The team produced rapid A/B image variants for ads, testing different compositions and colorways without burning out designers.
What started as a single marketer’s frustration turned into a reusable template that could help founders, developers, agencies, and content teams alike. Anyone with structured data in Google Sheets and a need for scalable visuals could adapt the same approach.
From manual grind to automated flow: What Maya would tell you now
If Maya could talk to her past self, the one drowning in photo shoot schedules, she would say this:
You already have the data. Let automation handle the visuals.
The n8n + OpenAI image workflow template gave her a way to:
- Turn spreadsheet rows into consistent, on-brand images.
- Edit existing assets programmatically for different campaigns or seasons.
- Store everything neatly in Google Drive, ready for CMS or design tools.
All without losing control over quality, cost, or governance.
Take your next step: Make the template your own
If you see yourself in Maya’s story, you can follow a similar path:
- Import the n8n template into your own workspace.
- Connect your OpenAI and Google credentials.
- Point the workflow at a small test Sheet and run a limited batch.
- Tweak the prompts to match your brand’s visual style.
- Once you are happy, add scheduled triggers or webhooks to scale up.
Need help customizing this template? You can bring in an automation expert to fine tune prompts, adjust batching logic, and integrate with your preferred storage, whether that is Google Drive, S3, or another system.
Try the template now and turn your image pipeline into a quiet, reliable automation that keeps your visuals consistent across every site, product page, and campaign.
