
Automate WordPress Posts with n8n + OpenAI
Publishing consistent, SEO-friendly blog posts takes time and focus. With an n8n workflow that connects OpenAI, DALL·E, and the WordPress REST API, you can turn a few keywords into a complete draft article with a featured image, ready for editorial review.
This guide walks you through how the workflow template works, what each node does, and how to adapt it for your own WordPress site.
What you will learn
By the end of this tutorial, you will understand how to:
- Collect article requirements through a simple form in n8n
- Use OpenAI to generate a title, outline, chapters, and conclusions
- Optionally verify facts with a Wikipedia tool to reduce hallucinations
- Assemble all content into clean HTML for WordPress
- Automatically create a WordPress draft via the REST API
- Generate a featured image with DALL·E and attach it to the post
- Handle errors, costs, and security in a production-ready workflow
Key concepts before you start
n8n as the automation backbone
n8n is an open-source automation platform that lets you connect services using nodes and workflows. In this template, n8n:
- Receives user input from a form trigger
- Calls OpenAI and DALL·E through dedicated nodes
- Communicates with the WordPress REST API
- Performs validation, branching, and error handling
OpenAI for text generation
OpenAI is used twice in this workflow:
- First call: Create the article structure (title, subtitle, introduction, chapter prompts, conclusions, and an image prompt) in JSON format.
- Second call: Generate fully written HTML content for each chapter based on its prompt.
DALL·E for visual content
DALL·E (or a similar image generation model) creates a photographic featured image for the article. The image is based on an imagePrompt that OpenAI generates alongside the article outline.
WordPress REST API
The WordPress REST API lets n8n:
- Create new posts with HTML content
- Upload media (the generated image)
- Set the uploaded media as the featured image
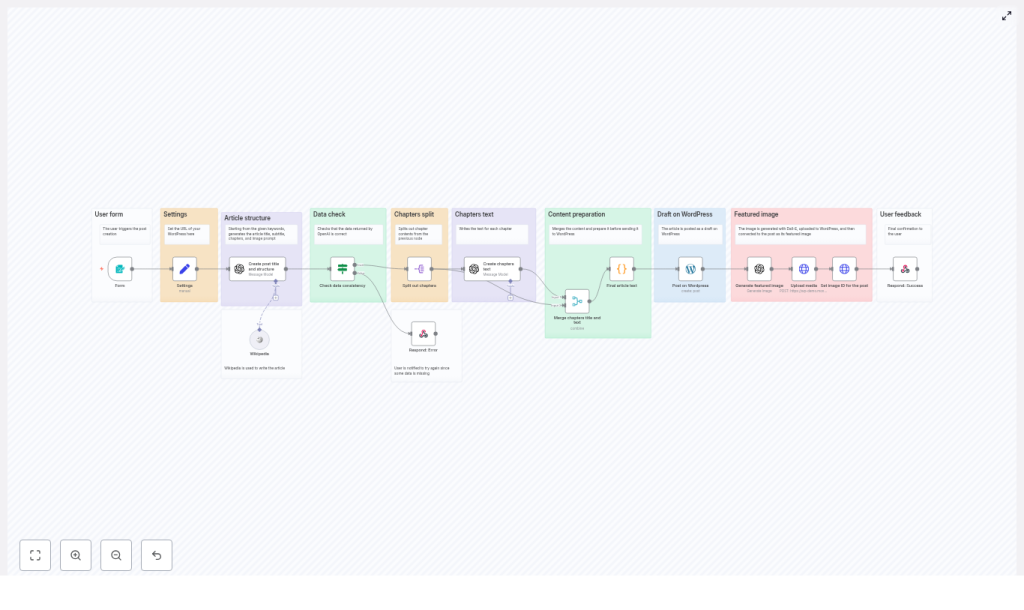
How the workflow template is structured
The workflow is built from a series of nodes, each handling a clear, isolated task. At a high level, the flow looks like this:
- Form trigger – captures keywords, number of chapters, and target word count.
- Settings node – stores user input and the WordPress URL.
- OpenAI (outline) – generates title, subtitle, introduction, chapter prompts, conclusions, and an image prompt in JSON.
- Wikipedia tool (optional) – checks or enriches factual content.
- Validation node – confirms that all required JSON fields are present.
- Split chapters – iterates through each chapter prompt.
- OpenAI (chapter text) – writes HTML content for each chapter.
- Merge content – combines introduction, chapters, and conclusions into one HTML article body.
- WordPress node – creates a draft post with the generated content.
- DALL·E node – generates the featured image.
- Media upload + featured image – uploads the image and sets it as the featured image on the post.
- Notification node – returns success or error to the form UI.
Step-by-step: building and understanding the workflow
Step 1 – Capture article requirements with a form trigger
The workflow begins with a Form Trigger node. This is where the user defines what kind of article they want. The form typically includes:
- Keywords – a comma-separated list, for example: email marketing, automation, segmentation.
- Number of chapters – often a dropdown, such as 3, 5, or 7 chapters.
- Maximum word count – a numeric field that sets the approximate length of the article.
These values are passed along as input data for the rest of the workflow and define the scope and structure of the generated post.
Step 2 – Store settings and connect to WordPress
Next, a Settings node collects and standardizes the incoming values. It usually stores:
- User-provided keywords
- Selected number of chapters
- Maximum word count
- The base URL of your WordPress site
At this stage, you also configure the WordPress credentials used by the REST API node. Use n8n’s secure credential store instead of hard-coding API keys or passwords. These credentials must have permission to create posts and upload media.
Step 3 – Ask OpenAI for the article outline and image prompt
The first OpenAI node generates a complete article blueprint in JSON format. The prompt you send to OpenAI should request a structured response that includes:
titlesubtitleintroduction(around 60 words)conclusions(around 60 words)imagePromptfor DALL·Echapters– an array where each item has:titleprompt(guiding what to write in that chapter)
The workflow template uses a strict JSON format so that later nodes can reliably parse the output. This is crucial for automation, because malformed JSON will break downstream processing.
Step 4 – Optionally enrich or verify with Wikipedia
For topics where factual accuracy matters, the workflow can call a Wikipedia tool after the outline is generated. This tool can:
- Look up key terms or concepts from the outline
- Return summaries or references that you can feed back into prompts
This step helps reduce hallucinations and ensures that the article is anchored in real, verifiable information. You can choose to use this enrichment to refine chapter prompts or to add citations in the final draft.
Step 5 – Validate the OpenAI JSON output
Before generating full chapters, a validation node checks that the OpenAI response is complete. It should confirm the presence of:
titlesubtitleintroductionconclusionsimagePromptchapters(with at least one chapter object)
If any required field is missing, the workflow:
- Stops the flow before creating a WordPress post
- Sends an error message back to the user through the form UI, for example:
- “The AI response was incomplete. Please try different keywords.”
This prevents the creation of empty or malformed posts and improves reliability.
Step 6 – Split chapters and generate chapter content
Once the outline is validated, a Split (or similar) node iterates over the chapters array. Each chapter item contains:
- A chapter
title - A chapter
promptdescribing what should be covered
For each chapter, the workflow calls a second OpenAI node configured to:
- Generate the chapter body in HTML format
- Use limited formatting such as
<strong>,<em>, lists, and simple headings - Ensure the chapter flows logically from previous sections
- Avoid repeating concepts that were already covered
This per-chapter approach is especially useful for longer posts, because it:
- Reduces the risk of responses being cut off due to token limits
- Makes it easier to retry a single chapter if one call fails
Step 7 – Merge all content and prepare final HTML
After all chapters are generated, a merge node assembles:
- The introduction
- Each chapter title and body
- The conclusions
The result is a single HTML string that will be sent to WordPress as the post content. A simple structure might look like this:
<h2>Introduction</h2>
<p>...</p>

<h2>Chapter Title</h2>
<p>...</p>

<h2>Conclusions</h2>
<p>...</p>
When building your own template, keep heading levels consistent and avoid overly complex HTML. WordPress will render this HTML directly in the post editor.
Step 8 – Create a WordPress draft post
Now that your HTML content is ready, the workflow uses a WordPress node to create a new post via the REST API. Typical settings include:
- Status: set to
draftso editors can review before publishing - Title: the generated article title
- Content: the merged HTML string
Saving as a draft keeps humans in the loop. Editors can adjust tone, add internal links, or fact-check before publishing.
Step 9 – Generate a featured image with DALL·E
With the post draft created, the workflow turns to visual content. The DALL·E (or similar) node is called with the previously generated imagePrompt. This prompt should describe the desired image in enough detail to produce a relevant, high quality visual, for example:
“A modern, high resolution photograph of a person working on a laptop, representing marketing automation, soft natural lighting.”
The image generation node returns a binary image file, which is then ready to be uploaded to WordPress.
Step 10 – Upload media and set the featured image
Next, the workflow:
- Uses the WordPress media endpoint to upload the generated image.
- Receives a media ID in response.
- Updates the previously created post so that this media ID is set as the featured image.
After this step, your WordPress draft has both the full article content and a featured image attached, ready for final review.
Step 11 – Notify the user of success or errors
The final node sends a response back to the form UI. Depending on the workflow outcome, it can:
- Confirm that the draft was created successfully, possibly with a link to the post
- Return an error message if validation failed or an API call did not succeed
Clear feedback helps users adjust inputs, such as reducing the number of chapters or changing keywords.
Best practices for reliable n8n + OpenAI workflows
Write precise prompts
Prompt quality directly affects output quality. When calling OpenAI:
- Specify that the response must be valid JSON with exact field names.
- Include target lengths, such as “introduction of around 60 words”.
- Describe the writing style and formatting rules, for example “use HTML paragraphs and headings, no inline CSS”.
Limit hallucinations with verification
For topics that require accuracy, integrate verification steps:
- Use Wikipedia or other data sources to confirm key facts.
- Optionally feed verified facts back into prompts to guide the AI.
- Encourage the model to avoid making up statistics or dates without references.
Partition long articles into smaller tasks
Generating long posts in a single AI call can lead to truncated responses or inconsistent structure. This template solves that by:
- Generating only the outline in the first call
- Creating each chapter in a separate request
- Merging all parts at the end
This approach improves stability and makes the workflow easier to debug.
Handle errors gracefully
Build safeguards into your workflow:
- Validate JSON after each OpenAI call.
- Check that the chapters array is not empty.
- Return helpful error messages such as:
- “Please reduce the number of chapters.”
- “Try different or more specific keywords.”
Graceful failure prevents incomplete or broken posts from being created in WordPress.
Security, rate limits, and cost
- API keys: Store OpenAI and WordPress credentials securely in n8n. Avoid exposing keys in plain text or in shared screenshots.
- Rate limits: Be aware of OpenAI and image generation rate limits, especially if you plan to generate many posts in a short time.
- Costs: Each text and image generation call consumes tokens or credits. Monitor your usage and:
- Set sensible defaults for word counts and number of chapters.
- Limit the number of retries for failed calls.
Example use cases
This n8n workflow template is useful for many teams, including:
- Marketing teams that need topic-based blog drafts at scale.
- Agencies creating first-pass content for clients before human editing.
- Publishers who want consistent, SEO-optimized structure across large content libraries.
Quick recap
- You start with a form in n8n that collects keywords, chapter count, and word limit.
- OpenAI generates a structured outline and image prompt in JSON.
- Optional Wikipedia checks help keep content factual.
- Each chapter is written separately, then merged into a clean HTML article.
- n8n creates a WordPress draft, generates a DALL·E image, uploads it, and sets it as the featured image.
- Validation and error handling ensure that only complete, usable drafts are created.
FAQ
Can I change the writing style of the generated posts?
Yes. Adjust the prompts in the OpenAI nodes to describe your brand voice, such as “friendly and educational” or “formal and technical”. You can also specify target audiences, like “for beginner marketers” or “for software engineers”.
What if I need multilingual posts?
You can instruct OpenAI to write in a specific language by including it in the prompt, or duplicate parts of the workflow to generate multiple language versions. The same WordPress node can create separate posts per language if your site supports it.
Is it safe to give n8n access to my WordPress site?
Yes, as long as you follow security best practices. Use dedicated API credentials with only the permissions you need, store them in n8n’s credential manager, and avoid sharing them outside your automation environment.
How much manual editing is still required?
The workflow is
