
Insert & Update Airtable Records with n8n (Without Losing Your Mind)
Imagine this: you carefully add a record to Airtable, then realize you immediately need to update it with extra info that only appears after it is created. So you copy the ID, paste it somewhere, update the record, try not to mix it up with 10 other IDs, and swear you will automate this “later”.
This workflow template is that “later”. It shows you how to use n8n to insert a record into Airtable, grab it back by a filter or by its ID, and then update it – all on autopilot. No more copy-paste Olympics, just a clean insert-and-update automation that runs reliably every time.
In this guide you will:
- See how the n8n + Airtable workflow is structured
- Learn how to insert, find, and update Airtable records with expressions
- Avoid common mistakes like broken IDs, bad filters, and field name typos
- Get a simple “upsert-style” pattern for Airtable using n8n
Why this n8n + Airtable pattern is so useful
Many real-world automations follow the same annoying pattern:
- You create (append) a new record in Airtable.
- Airtable generates an ID or a computed value only after creation.
- You then need to update that same record with more data.
Airtable only returns the record ID after the record is created through the API. That means if you want to update that same record, you must either:
- Carry the returned ID forward through your n8n workflow, or
- Re-query the table using a filter (for example with
filterByFormula) and then update the matching record.
This template shows both styles. You will see how to:
- Append a record
- Optionally list it again using a filter
- Pass the ID into an update step
Once this is set up, you can stop worrying about which record is which and let n8n handle the boring parts.
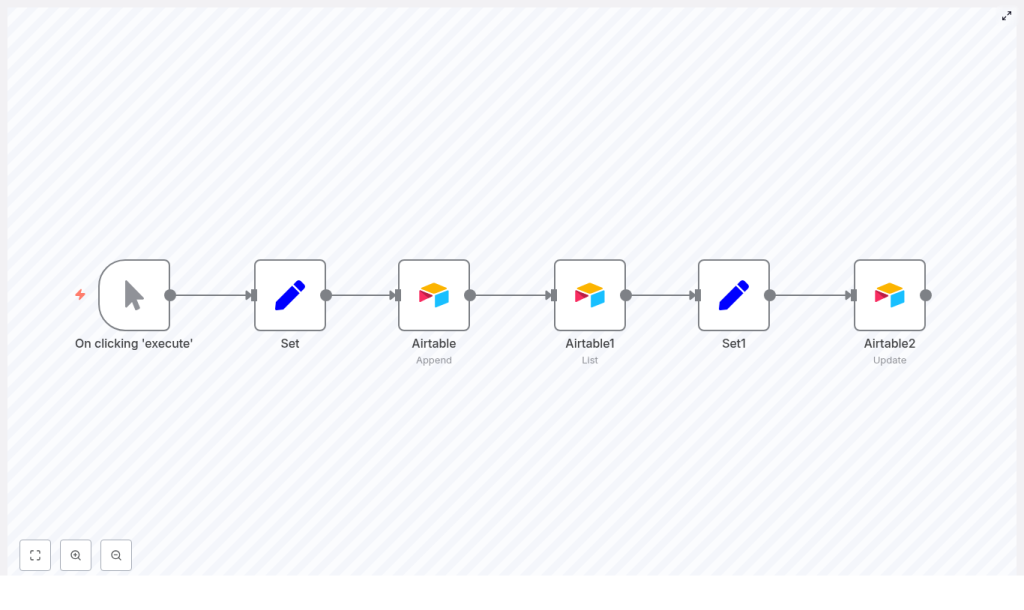
Quick tour of the workflow
The template workflow uses a small set of nodes that work together like a tiny assembly line:
- Manual Trigger – Lets you test everything by clicking “Execute”. Later you can replace this with a webhook, schedule, or any other trigger.
- Set – Builds the initial payload for the new Airtable record.
- Airtable (Append) – Creates the new record in your Airtable base.
- Airtable1 (List) – Optionally finds the created record using
filterByFormula. - Set1 – Prepares the updated values and carries the record ID forward.
- Airtable2 (Update) – Updates the existing record by its ID.
You can keep the List step if you need to search by a field, or skip it and use the ID directly from the Append response. Both approaches are covered below.
Step-by-step setup guide
1. Manual Trigger – for easy testing
Start with a Manual Trigger node. It is perfect for iterating on your workflow because you can just hit “Execute” and watch what happens at each step.
Once everything works, you can swap this node for:
- a Webhook (for incoming HTTP requests)
- a Schedule (for cron-style runs)
- or any other n8n trigger you like
2. Set – build the initial Airtable payload
Next, add a Set node. This is where you define the fields that will be sent to Airtable when creating the record. For example:
{  "ID": 3,  "Name": "n8n"
}
These keys should match the fields you plan to use in your Airtable table. In the Set node you can:
- Hard-code values for testing (like the example above)
- Or use expressions that come from previous nodes
Later, in the Append node, you will map these fields using expressions such as:
{{$node["Set"].json["Name"]}}
3. Airtable (Append) – create a new record
Now add an Airtable node and set its operation to Append. This is the node that actually creates the record in your Airtable table.
In the Fields section of the Airtable Append node:
- Add field names exactly as they exist in your Airtable base (case-sensitive).
- Map each field to a value from the Set node or another source.
For example:
Name = {{$node["Set"].json["Name"]}}
After the Append operation runs successfully, Airtable returns the created record in the node output, including its id. That output is pure gold for the rest of your workflow.
You have two options from here:
- Preferred – Use the Append response directly and pass the ID forward. Example expression to access the ID:
{{$node["Airtable"].json["id"]}}for a single item{{$node["Airtable"].json[0]["id"]}}if the node returns an array
- Alternative – Re-query the table with a List operation using
filterByFormula(useful when you must find the record by a non-unique field).
4. Airtable1 (List) – optionally find the created record
If you choose to re-query, add another Airtable node and set it to List. This node uses filterByFormula to find records that match your criteria.
Example formula:
filterByFormula: Name='n8n'
A few key details:
filterByFormulamust use field names exactly as they are in Airtable, including capitalization.- The formula must follow Airtable’s formula syntax rules.
- If the filter is not unique, the node may return multiple records in an array.
When multiple records are returned, you will typically work with the first one:
{{$node["Airtable1"].json[0]["id"]}}
If you want to be extra safe, you can add an If node after this to check whether any records were found before attempting an update.
5. Set1 – prepare your update fields and carry the record ID
Now add another Set node, called something like Set1. This node prepares all the values needed for the update step and, importantly, passes the record ID along.
In the template, Set1 originally only sets the Name field. To update a specific record correctly, you must also include the record ID.
Example Set1 configuration (with keepOnlySet set to true):
"recordId": {{$node["Airtable1"].json[0]["id"]}}
"Name": "nodemation"
Or, if you are using the ID from the Append node instead of List, you might use:
"recordId": {{$node["Airtable"].json[0]["id"]}}
"Name": "nodemation"
Later, in the update node, you will reference this ID with:
{{$node["Set1"].json["recordId"]}}
6. Airtable2 (Update) – update the record by ID
Finally, add another Airtable node and set its operation to Update. This node will modify the existing record using the ID passed from Set1.
Configure it like this:
id: {{$node["Set1"].json["recordId"]}}
fields:  Name: {{$node["Set1"].json["Name"]}}
You can add more fields here as needed. The crucial part is that the id field points to the correct record ID expression.
Common mistakes (and how to not fall into them)
Even with a simple flow, a few small gotchas can cause big headaches. Here are the usual suspects:
- Incorrect ID expression
In some templates, Airtable2 uses:{{$node["Airtable1"].json["id"]}}But when the List operation returns an array, you must reference an index:
{{$node["Airtable1"].json[0]["id"]}}A safer pattern is to capture the ID in Set1 and then use:
{{$node["Set1"].json["recordId"]}} - No record found during List
If your filter does not match anything, the List node returns zero items. Add an If node after Airtable1 to check the number of items and stop or handle the error gracefully.
Example condition: Number of items > 0. - Multiple records match the filter
If your filter is not unique, the List node returns an array of records. You can either:- Refine your filter so it matches exactly one record, or
- Explicitly choose which index to use, typically
[0].
- Field name mismatches
Airtable field names are case-sensitive and must match exactly in:- The Airtable nodes in n8n
- Your
filterByFormulaexpressions
A stray capital letter can silently break your filter.
Error handling & best practices for Airtable automations
To keep your n8n + Airtable integration solid, here are some simple best practices:
- Use If nodes for sanity checks Any node that might return zero items (like List) should usually be followed by an If node to check the output length and handle failures gracefully.
- Prefer using the Append response directly If you only need to update the record you just created, use the ID from the Append node instead of running a separate List. It is faster and avoids edge cases.
- Respect Airtable rate limits When inserting or updating many records, batch your operations and keep Airtable’s request limits in mind so you do not run into throttling.
- Use a unique key field Create a dedicated field like
externalIdorintegrationKeyin Airtable. This makes lookups and “upsert-style” flows much more reliable. - Log successes and failures Consider sending logs to Slack, another Airtable table, or a logging service. It makes debugging much easier when something inevitably goes sideways.
Minimal working expressions you can copy
Here are some ready-to-use expressions for your nodes:
- In Airtable Append node fields
Name = {{$node["Set"].json["Name"]}} - In Set1 to capture ID from Append
recordId = {{$node["Airtable"].json[0]["id"]}} - In Airtable2 (Update) to reference the ID
id = {{$node["Set1"].json["recordId"]}}
Advanced: how to fake an upsert in Airtable with n8n
Airtable does not offer a true “upsert” operation out of the box. That said, you can mimic it with n8n using one of these patterns:
- List then Update or Append
- Use a List node with a unique external ID (for example
externalId='123'). - If a record is found, run an Update.
- If no record is found, run an Append.
- Use a List node with a unique external ID (for example
- Append then immediate Update
- Append the record.
- Use the returned ID from the Append node.
- Run an Update right after, adding any extra fields or computed values.
Both approaches let you keep Airtable in sync with external systems without manually tracking which records already exist.
Testing checklist before you call it done
Before you declare victory over repetitive Airtable tasks, run through this quick checklist:
- Confirm the correct Airtable base and table are set in your credentials and nodes.
- Double-check your
filterByFormulain the List node. If in doubt, test it in the Airtable API playground first. - Inspect the node outputs during manual runs to see exactly where the
idlives in the JSON. - Use n8n’s Execute Node feature to test one node at a time and validate expressions before you connect the whole flow.
Quick fix summary for the template
To make the insert-and-update Airtable template work reliably, follow this short recipe:
- In Airtable (Append), map your fields from the Set node.
- Either:
- Use the Append node’s response directly to get the ID, or
- If you re-query with List, capture the ID in Set1 using something like:
{{$node["Airtable1"].json[0]["id"]}}
- In Airtable2 (Update), set the
idfield to:{{$node["Set1"].json["recordId"]}} - Add an If node after Airtable1 to make sure at least one record was found before trying to update it.
Next steps
Load this template into your n8n instance, tweak the field names to match your Airtable base, and run a few manual tests. Once it is stable, hook it up to your real trigger and let it quietly handle the boring work in the background.
If you want more help, you can share your updated workflow JSON or screenshots of the node outputs and expressions. With that, it is easy to spot exactly where an ID or field mapping is going wrong.
Happy automating, and may your days of copy-pasting Airtable IDs be officially over.
