
Create, Update & Get MailerLite Subscribers with n8n (So You Never Manually Copy Emails Again)
Picture this: you are copying a new subscriber’s email from one tool, pasting it into MailerLite, updating their city, double checking you did not misspell “Berlin”, and then repeating that for the next person. And the next. And the next. At some point your brain quietly leaves the chat.
Good news: n8n can do all of that for you, without complaining, getting bored, or mis-typing someone’s email. In this guide, you will learn how to use an n8n workflow template that:
- Creates a MailerLite subscriber
- Updates a custom field for that subscriber (like their city)
- Retrieves the subscriber again so you can confirm everything looks perfect
All in one neat, repeatable automation. No more copy-paste marathons.
Why bother automating MailerLite with n8n?
MailerLite is a solid email marketing platform. n8n is a low-code workflow automation tool that connects your apps together so they talk nicely and do the boring stuff for you.
Put them together and you get a powerful combo for:
- Onboarding flows – automatically add new users to MailerLite when they sign up
- CRM enrichment – keep subscriber data in sync with your CRM or other tools
- Data synchronization – make sure your email list is always up to date
The workflow in this template follows a simple pattern that you will use a lot in automation:
create -> update -> get
Once you understand this pattern, you can reuse it across many other integrations, not just MailerLite.
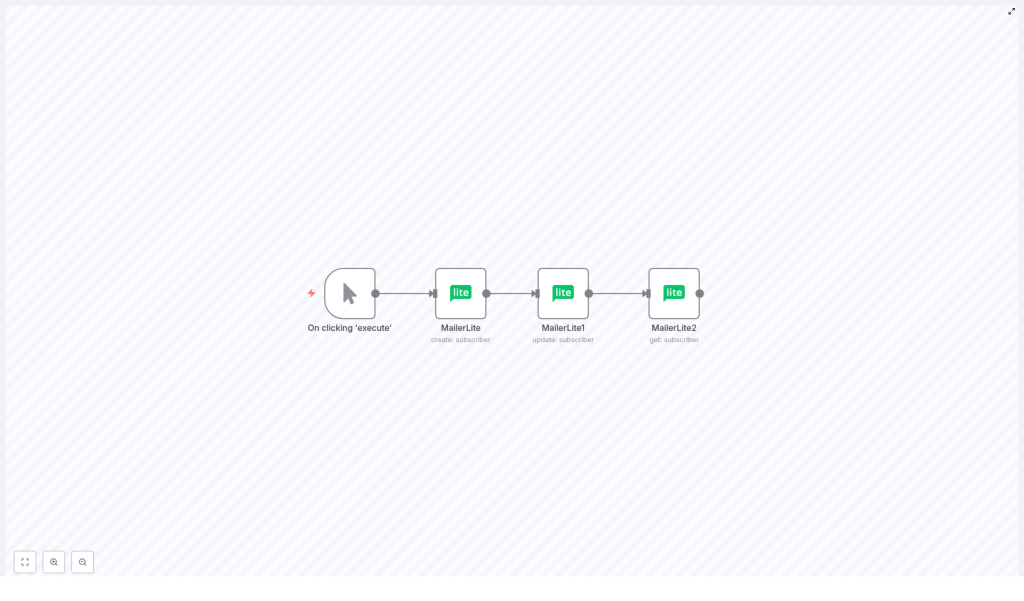
What this n8n + MailerLite workflow actually does
This template is a small, focused workflow that shows the full lifecycle of a subscriber inside MailerLite using the dedicated MailerLite node in n8n.
Here is the flow in human terms:
- You manually start the workflow while testing.
- n8n creates a new MailerLite subscriber with an email and a name.
- n8n updates that same subscriber’s custom field, for example their
city. - n8n fetches the subscriber again so you can confirm the field was updated correctly.
Under the hood, this happens through three MailerLite nodes connected in sequence:
- Node 1 (MailerLite) – operation:
create, setsemailandname - Node 2 (MailerLite1) – operation:
update, usessubscriberIdfrom Node 1 to update a custom field likecity - Node 3 (MailerLite2) – operation:
get, uses the samesubscriberIdto retrieve the updated record
It is a small workflow, but it covers the three most common subscriber operations you will likely use over and over.
Grab the n8n MailerLite template JSON
If you would rather not build everything from scratch (fair), you can import the ready-made template into your n8n instance and be up and running in a minute or two.
Here is the exact workflow JSON used in the template:
{  "id": "96",  "name": "Create, update and get a subscriber using the MailerLite node",  "nodes": [  { "name": "On clicking 'execute'", "type": "n8n-nodes-base.manualTrigger", "position": [310,300], "parameters": {} },  { "name": "MailerLite", "type": "n8n-nodes-base.mailerLite", "position": [510,300], "parameters": { "email": "harshil@n8n.io", "additionalFields": { "name": "Harshil" } }, "credentials": { "mailerLiteApi": "mailerlite" } },  { "name": "MailerLite1", "type": "n8n-nodes-base.mailerLite", "position": [710,300], "parameters": { "operation": "update", "subscriberId": "={{$node[\"MailerLite\"].json[\"email\"]}}", "updateFields": { "customFieldsUi": { "customFieldsValues": [ { "value": "Berlin", "fieldId": "city" } ] } } }, "credentials": { "mailerLiteApi": "mailerlite" } },  { "name": "MailerLite2", "type": "n8n-nodes-base.mailerLite", "position": [910,300], "parameters": { "operation": "get", "subscriberId": "={{$node[\"MailerLite\"].json[\"email\"]}}" }, "credentials": { "mailerLiteApi": "mailerlite" } }  ],  "connections": {  "MailerLite": { "main": [ [ { "node": "MailerLite1", "type": "main", "index": 0 } ] ] },  "MailerLite1": { "main": [ [ { "node": "MailerLite2", "type": "main", "index": 0 } ] ] },  "On clicking 'execute'": { "main": [ [ { "node": "MailerLite", "type": "main", "index": 0 } ] ] }  }
}
You can import this JSON directly into n8n, plug in your MailerLite API credentials, and you are ready to test.
Quick setup guide: from zero to automated subscriber
Let us walk through the setup in a clean, simple sequence. No fluff, just the steps you actually need.
Step 1 – Add a Manual Trigger
Start with a Manual Trigger node in n8n. This lets you click a button in the editor to run the workflow while you are still building and testing it.
Later, you can replace this trigger with something more useful in real life, such as:
- A webhook that fires when someone submits a form
- A scheduled trigger that runs periodically
- Another app event, like a CRM update
Step 2 – Create the MailerLite subscriber
Next, add your first MailerLite node and configure it to create a subscriber.
In the node settings:
- Set the operation to create subscriber
- Fill in the email field
- Set additionalFields.name or any other fields you want to store
The example template uses:
email:harshil@n8n.ioname:Harshil
Once this node runs, MailerLite creates a new contact and returns the subscriber data, including the email that we will reuse as the identifier in the next steps.
Step 3 – Update the subscriber’s custom field
Now add a second MailerLite node, which will handle the update operation.
In the settings for this node:
- Set operation to update
- In subscriberId, reference the email returned from the first MailerLite node using an expression:
{{$node["MailerLite"].json["email"]}}
Then configure the custom field update:
- Open updateFields.customFieldsUi.customFieldsValues
- Add a new custom field object with:
value: "Berlin"
fieldId: "city"
In other words, you are telling MailerLite: “For the subscriber whose ID is this email, set the custom field city to Berlin.” No more manual profile editing.
Step 4 – Get the subscriber to confirm the update
Finally, add a third MailerLite node and set its operation to get.
Again, use the same email expression in the subscriberId field:
{{$node["MailerLite"].json["email"]}}
When you run the workflow, this node fetches the latest version of the subscriber record. Open the node output and you should see the updated city custom field, now proudly set to Berlin.
Testing your MailerLite automation workflow
Before you unleash this on your actual audience, do a quick test run.
- Import the template JSON into your n8n instance or recreate the nodes manually using the steps above.
- Set up MailerLite credentials in n8n by adding your API key in the node credential section.
- Execute the workflow using the Manual Trigger. Watch each node run in sequence.
- Inspect the final MailerLite node output and confirm that:
- The subscriber was created
- The custom field (for example
city) was updated - The
getoperation returns the updated data
If everything looks right, you have a working create-update-get flow for MailerLite.
Best practices for MailerLite automation in n8n
Once the basic flow works, a few small tweaks can make it more robust and less likely to break at 2 a.m.
- Use email as subscriberId when it makes sense
MailerLite lets you use the email as an identifier for many operations. This keeps things simple, especially in smaller workflows where you do not want to track multiple IDs. - Handle existing subscribers gracefully
If your create operation might run for an email that already exists, decide how you want to handle it:- Use MailerLite’s upsert behavior if available
- Or add a preliminary search/get step to check if the subscriber already exists, then branch to update instead of create
- Double check custom field IDs
Custom fields in MailerLite use specific IDs or keys. The example usescity, but in your account it might be different. Open your MailerLite settings to confirm the correctfieldIdbefore wondering why nothing updates. - Add error handling for production
For real-world workflows, add a Catch node or use the “Execute Workflow on Error” pattern. This lets you log failures, retry operations, or send yourself a warning when MailerLite is not in the mood. - Respect rate limits and plan retries
If you are working with large lists, keep MailerLite’s rate limits in mind. Use n8n’s HTTP Request node options or node settings to add delays or exponential backoff so your workflow plays nicely with the API.
Common issues and how to fix them
Problem 1 – “Subscriber not found” on update or get
If the update or get step says the subscriber does not exist, the usual suspect is the subscriberId value.
Check that:
- You are using the exact email returned by the create node
- There is no extra whitespace around the email
If needed, you can trim whitespace directly in the expression:
={{$node["MailerLite"].json["email"].trim()}}
Problem 2 – Custom field not updating
If the custom field stubbornly refuses to change, verify the fieldId or key is correct.
In MailerLite:
- Go to your custom fields settings
- Find the field you want to use
- Confirm the exact identifier that MailerLite expects
Make sure that ID matches what you put in the customFieldsValues configuration in n8n.
Problem 3 – Authentication or API errors
If n8n cannot talk to MailerLite at all, it is usually a credentials issue.
- Re-check that your MailerLite API key is valid and active
- Confirm it has the required permissions
- Re-add the credentials in n8n and test a simple GET request to confirm everything works
Where to go next with this workflow
This simple create-update-get pattern is like the “Hello world” of integrations. Once you are comfortable with it, you can start making it more powerful and more tailored to your real processes.
Ideas for next steps:
- Add conditional logic, for example only update certain fields if the user meets specific criteria
- Sync subscribers from sources like Google Sheets, CRMs, or signup forms directly into MailerLite
- Track subscriber activity or events and push that data into analytics tools
- Extend the workflow with error handling, logging, and notifications when something fails
Before you know it, you will have a fully automated email list system that quietly keeps everything in sync while you focus on more interesting work than updating cities one by one.
Try the MailerLite n8n template now
Ready to retire manual subscriber updates?
- Import the workflow template into your n8n instance
- Connect your MailerLite credentials
- Run the workflow and watch it create, update, and fetch a subscriber for you
If you want help tailoring this flow to your specific stack or use case, reach out or leave a comment. And if this guide helped you escape repetitive email list chores, consider subscribing for more n8n automation tutorials.
Call-to-action: Ready to automate your email list? Import the workflow, connect MailerLite, and run it. If you liked this guide, subscribe for more n8n automation tutorials.
