
NDA Risk Detector: Build an Automated Contract Risk Pipeline with n8n
Reviewing nondisclosure agreements (NDAs) for risky clauses is important, but it is also repetitive and slow if done manually. This guide explains, in a teaching-first way, how to use an n8n workflow template called the NDA Risk Detector to automate much of that work.
You will learn how to:
- Ingest NDAs into n8n through a secure webhook
- Split long documents into chunks and generate embeddings
- Store and query those embeddings in a Redis vector index
- Use an AI agent (LLM) to analyze risk and recommend changes
- Log every analysis to Google Sheets for traceability
- Evaluate and improve the accuracy of your NDA risk workflow
Why automate NDA risk detection with n8n?
Legal teams, founders, and operations teams often need to triage NDAs quickly. When every agreement is read line by line, you run into several problems:
- Slow turnaround – Reviews can bottleneck deal flow.
- Inconsistent decisions – Different reviewers may apply different standards.
- Poor visibility – It is hard to track how many NDAs are high risk and why.
An automated NDA risk detector built in n8n helps you:
- Surface the most risky clauses first so humans can focus where it matters.
- Apply consistent criteria using the same prompt and risk rubric every time.
- Integrate with existing tools like Slack, email, and Google Sheets for alerts and audit trails.
Conceptual overview of the NDA Risk Detector workflow
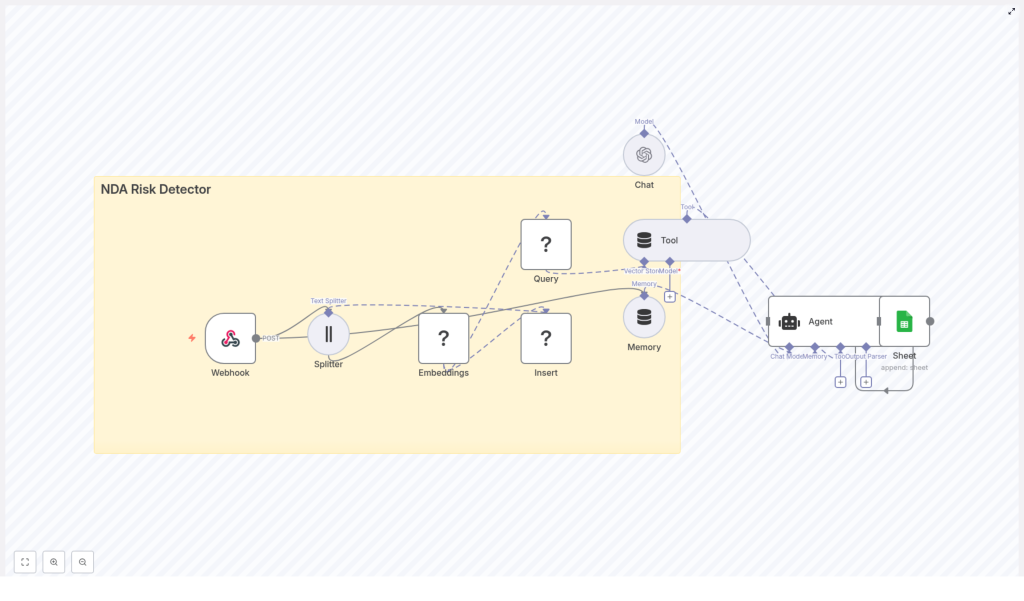
At a high level, this n8n template creates an automated pipeline that:
- Receives NDA content via a Webhook.
- Splits the NDA into smaller overlapping chunks using a Splitter.
- Generates embeddings for each chunk through an embeddings provider.
- Stores these vectors in a Redis vector store.
- Lets an AI Agent query Redis as a tool to retrieve relevant clauses.
- Uses an LLM to classify risk and generate recommendations.
- Logs results to Google Sheets for tracking and analysis.
Here are the main building blocks you will work with in n8n:
- Webhook – Accepts NDA text or file metadata via HTTP POST.
- Splitter – Breaks the NDA into chunks using
chunkSizeandchunkOverlap. - Embeddings node – Calls an embeddings model (Hugging Face by default) to generate vectors.
- Insert (Redis) – Stores vectors in a Redis index (for example
nda_risk_detector). - Query (Redis) + Tool – Performs similarity search for relevant clauses and exposes it as a tool to the agent.
- Memory – Keeps conversational or session context for the agent.
- Chat / Agent – Uses an LLM (such as OpenAI) to reason about clauses, classify risk, and propose edits.
- Google Sheets – Saves analysis results for reporting and compliance.
Step-by-step: how the n8n NDA Risk Detector works
Step 1 – Ingest NDA content via Webhook
The workflow starts with an n8n Webhook node. This acts as an HTTP endpoint where other systems (or a simple script) can send NDA data.
You can send:
- Raw NDA text
- Metadata about an uploaded file (for example a PDF stored elsewhere)
- Sender or source information
Example JSON payload:
{  "filename": "nda_acme_2025.pdf",  "text": "Confidential information includes...",  "source": "email@example.com",  "received_at": "2025-10-01T12:00:00Z"
}
Security tip: never leave this webhook open to the public. Protect it with authentication tokens, IP allowlists, or a gateway so only trusted systems can send NDAs.
Step 2 – Split long NDAs into chunks
Most NDAs are longer than what you want to embed or send to an LLM in one go. The workflow uses a Splitter node to break the text into overlapping segments.
By default, the template uses:
chunkSize = 400chunkOverlap = 40
This means each chunk is about 400 tokens or characters (depending on configuration), and each new chunk overlaps the previous one by about 10 percent. Overlap is important because:
- It keeps key phrases or sentences from being split in a way that loses context.
- It helps the embedding model understand how clauses relate to each other.
You can adjust these values based on:
- The embedding model’s token limits
- The typical length and structure of your NDAs
Step 3 – Generate embeddings for each chunk
After splitting, each chunk is passed into an Embeddings node. The template uses Hugging Face embeddings by default, but the node can be configured to use:
- OpenAI embeddings
- Cohere
- Other compatible providers
When choosing an embedding model for NDA analysis, consider:
- Semantic accuracy for legal or long-form text.
- Cost per 1,000 tokens or per request.
- Latency if you plan to run many analyses in parallel.
Each chunk becomes a vector representation that captures its meaning, which is what you will store and search later in Redis.
Step 4 – Store vectors in a Redis vector index
Next, the workflow uses an Insert node connected to Redis to store each embedding. These vectors are written into an index, typically named something like:
nda_risk_detector
Redis is a good fit for this because it:
- Is fast enough for production search and retrieval.
- Is relatively easy to host and scale.
- Supports vector similarity search directly.
At this point, your NDA has been fully chunked and indexed as vectors. Future queries will search this index to find relevant clauses for risk analysis.
Step 5 – Query Redis and expose it as a Tool
To let the AI agent find relevant NDA sections, the workflow includes a Query node that performs similarity search against the Redis index. Given a query embedding, it returns the most similar chunks.
In the template, this query capability is exposed to the agent as a Tool. That means the agent can decide when to call the tool to:
- Search for clauses about confidentiality duration.
- Look up definitions of “Confidential Information”.
- Find indemnity or IP assignment language.
Instead of sending the entire NDA to the LLM every time, the agent retrieves only the most relevant chunks from Redis, which keeps costs and token usage lower while improving focus.
Step 6 – Use an Agent with Memory to analyze risk
The core of the workflow is the Agent node, which orchestrates the analysis. It works together with:
- The Vector Store Tool (the Redis query).
- A Memory component that stores session context.
- A Chat / LLM node such as OpenAI’s GPT models.
Here is what typically happens in this stage:
- The agent receives a task such as “Analyze this NDA for risk.”
- It calls the Redis Tool to retrieve relevant chunks for each risk category.
- Using the retrieved context and its memory, it evaluates the clauses.
- It outputs structured results, for example:
- An overall risk score (Low, Medium, High).
- A list of flagged clauses with excerpts.
- Short rationales explaining the risk.
- Suggested negotiation or remediation language.
To guide the agent, you will typically give it a clear prompt and rubric. For instance, you might instruct it to pay special attention to:
- Perpetual or indefinite confidentiality obligations.
- Very broad definitions of “Confidential Information”.
- Unilateral injunctive remedies that favor only one party.
- IP assignment language hidden in an NDA.
- One-sided indemnity provisions.
Step 7 – Log results to Google Sheets
Finally, the workflow sends the agent’s results into a Google Sheets node. Each NDA analysis becomes a new row, which may include:
- Filename (for example
nda_acme_2025.pdf) - Summary of the NDA and key findings
- Risk level (Low, Medium, High)
- Flagged clauses or short excerpts
- Suggested changes or negotiation notes
- Timestamp of the analysis
This creates a simple but effective audit trail. Over time, you can filter by risk level, track trends, and measure how the automated system compares to human reviewers.
Example agent prompt for NDA risk analysis
Below is an example of a structured prompt you can give to the Agent node. It tells the LLM exactly what to output and what policy to follow:
Analyze the following NDA excerpts. For each excerpt, provide:
1) Risk level (Low/Medium/High)
2) Short rationale (1-2 sentences)
3) Suggested remediation or negotiation language

Use the company policy: prioritize clauses that impose indefinite obligations, ambiguous definitions, or overly broad restrictions.
You can adapt this prompt to match your organization’s risk policy. For example, you might add rules about jurisdiction, data protection, or IP ownership.
Practical tuning tips for better accuracy
Chunk size and overlap
- Larger chunks (higher
chunkSize) mean fewer vectors and lower cost, but you may lose fine-grained detail. - Smaller chunks increase precision for search but create more vectors and more queries.
- An overlap of about 10 percent (for example 40 on 400) helps maintain continuity between chunks.
Embedding model choice
- Prefer models that handle legal or long-form text well.
- Test multiple providers (Hugging Face, OpenAI, Cohere) and compare:
- How well they retrieve truly relevant clauses.
- Cost per analysis.
Vector store considerations
- Redis is a strong default for production-grade vector search.
- For very large-scale indexing or advanced filtering, you can look at Pinecone or Milvus and adjust the workflow accordingly.
Prompt engineering and rubric design
- Be explicit about what counts as High vs Medium risk.
- List concrete NDA patterns to watch for, such as:
- Perpetual confidentiality obligations.
- Extremely broad non-use or non-solicit clauses.
- Unilateral rights to injunctive relief or termination.
- Hidden IP assignment or licensing terms.
- One-sided indemnities or limitation of liability terms.
Security and privacy when processing NDAs
NDAs often contain highly sensitive business information. When you automate their processing, treat security as a first-class requirement:
- Encrypt data in transit and at rest for both the original documents and the embeddings stored in Redis.
- Restrict access to the webhook with strong authentication and network controls.
- Consider redaction of personal data or names before sending text to third-party LLM or embeddings providers.
- Maintain audit logs (for example in Google Sheets or a secured database) and define a clear data retention policy.
Extending the NDA Risk Detector workflow
Once the base workflow is running, you can extend it to fit your legal and operations processes.
- Notifications: Connect Slack or email nodes so that high-risk NDAs automatically trigger alerts to the legal team.
- Contract management integration: Automatically attach the risk summary to your contract lifecycle or document management system.
- Feedback loop: Let human reviewers correct the AI’s assessment, then:
- Feed those corrections back into prompt design.
- Use them to adjust retrieval or re-ranking strategies.
Evaluating performance of your NDA risk detector
To know whether the automation is working well, track a few key metrics:
- Precision and recall for high-risk clauses:
- Compare AI-flagged clauses to a human-labeled set.
- Time saved per review:
- Estimate how many minutes the workflow saves per NDA.
- False positives and false negatives:
- False positives: benign clauses flagged as risky.
- False negatives: risky clauses not flagged.
- User satisfaction:
- Ask legal reviewers whether the summaries and flags are genuinely useful.
Quick implementation checklist
Use this checklist to get from template to working NDA risk detector:
- Deploy the n8n workflow template and secure the Webhook endpoint.
- Configure Hugging Face (or another embeddings provider) with valid credentials.
- Set up a Redis instance and create a vector index, for example
nda_risk_detector. - Connect your LLM provider (for example OpenAI) for the Chat / Agent node.
- Connect Google Sheets and specify the sheet where results will be logged.
- Run tests with sample NDA payloads and adjust:
chunkSizeandchunkOverlap- Prompts and risk rubric
