
Automate XML to Google Sheets with n8n
Imagine this: every morning you open your laptop, grab a coffee, and then spend 20 minutes copy-pasting data from some ancient XML feed into Google Sheets. Again. And again. And again. At this point, the only thing more repetitive than the task is you complaining about it.
Good news – you can retire from manual XML copy-paste duty. With a simple n8n workflow, you can grab XML from a URL, turn it into structured data, and feed it directly into a shiny new Google Sheet. Automatically. On a schedule. While you do literally anything else.
This guide walks you through the exact n8n workflow template: which nodes to use, how to configure them, and how to avoid common XML-to-Google-Sheets headaches.
What this n8n workflow actually does
This workflow takes an XML feed and turns it into a neat, row-based Google Sheet. Under the hood, it:
- Downloads an XML file from a URL
- Parses that XML into JSON inside n8n
- Splits repeating XML elements into individual items (perfect for rows)
- Creates a brand new Google Sheet and writes a header row
- Appends each XML item as a separate row in the sheet
The result: your XML data becomes human-readable, easy to filter, and ready for analysis or reporting, without you touching Ctrl+C or Ctrl+V ever again.
Before you start: what you need
To follow along with this XML to Google Sheets automation, make sure you have:
- An n8n instance (cloud or self-hosted). This example uses n8n version 0.197.1 or later.
- A Google account with Google Sheets API credentials configured in n8n (OAuth2 credential set up).
- A sample XML URL to test with. The example workflow uses:
https://www.w3schools.com/xml/simple.xml
Once those are in place, you are ready to build the workflow.
High-level workflow overview
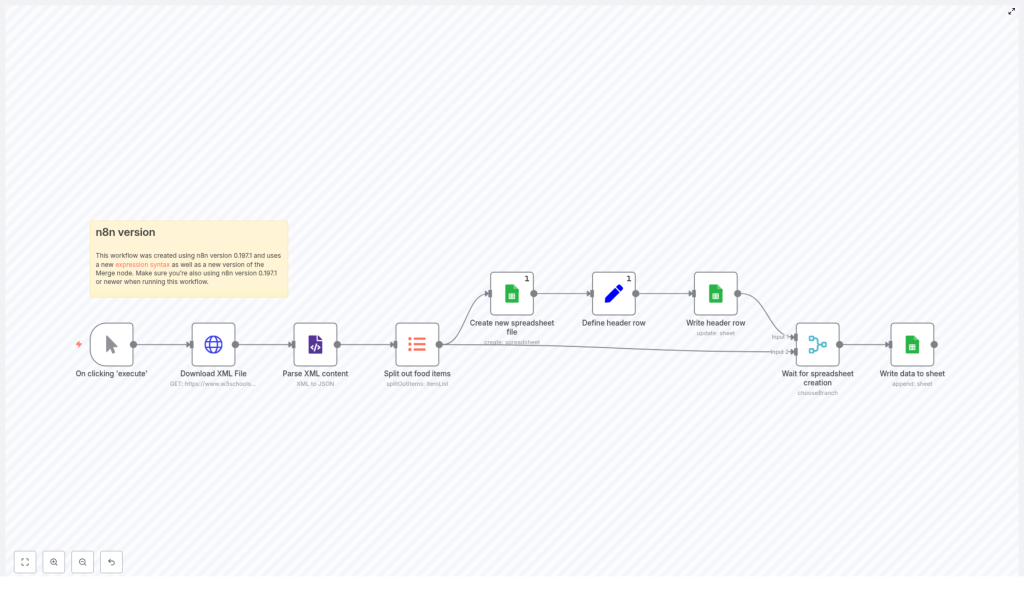
Here is the full sequence of nodes you will use in n8n to automate the XML import into Google Sheets:
- Manual Trigger (or schedule / event trigger)
- HTTP Request – download the XML file
- XML – convert XML to JSON
- ItemLists – split repeating XML elements into separate items
- Google Sheets – create a new spreadsheet file
- Set – generate a dynamic header row
- Google Sheets – write header row
- Merge (chooseBranch) – wait until the sheet and headers are ready
- Google Sheets – append rows for each XML item
Next, let us walk through how to configure each node so everything works together smoothly.
Step-by-step: build the XML to Google Sheets workflow
1. Trigger – how the workflow starts
Start with a trigger node:
- For testing: use a Manual Trigger. You can click Execute to run the workflow instantly.
- For production: swap it later for a Schedule trigger (for regular imports) or a Webhook/event-based trigger (for near real-time updates).
For now, keep it simple with the Manual Trigger so you can iterate quickly.
2. HTTP Request – download the XML
Next, add an HTTP Request node to fetch your XML file. Configure it as follows:
- Method:
GET - URL: your XML feed URL, for example:
https://www.w3schools.com/xml/simple.xml
The response body from this node will contain the raw XML. That is the lovely, unreadable stuff we are about to transform.
3. XML node – parse XML into JSON
Add an XML node and connect it after the HTTP Request node. Configure it to use the response from the previous node as the input.
The XML node converts the XML into JSON while keeping the structure intact. That means you will be able to access parts of the data using paths like:
breakfast_menu.foodThis is the key step that turns your XML into something n8n can work with easily.
4. ItemLists – split repeating elements into items
Most XML feeds contain repeating elements, like a list of products, orders, or in the sample file, food items. To handle each of these as a separate row, add an ItemLists node.
Configure it to:
- Target the repeating XML path, for example:
breakfast_menu.food - Split those elements into separate items
After this node runs, each XML element becomes its own item in n8n, which is exactly what you want before pushing data into Google Sheets as individual rows.
5. Google Sheets – create a new spreadsheet file
Time to give your data a home. Add a Google Sheets node and set it up to create a new spreadsheet:
- Resource: Spreadsheet
- Operation: Create
- Title: something descriptive like My XML Data
When this node runs, it creates a new Google Sheet and returns a spreadsheetId. You will reference that ID in later nodes using expressions, so keep this node handy.
6. Set node – build a dynamic header row
Instead of hard-coding column names, you can generate a header row automatically based on the keys in your data. Add a Set node after the ItemLists node.
Create a field, for example columns, and set its value using this n8n expression:
<!-- In the Set node 'columns' value -->
={{ [ Object.keys($("Split out food items").first().json) ] }}
What this does:
- Looks at the first item produced by the ItemLists node (named something like Split out food items)
- Extracts its keys with
Object.keys() - Wraps them in an array so they can be used as a header row
The result is a JSON array of header names that match the XML fields, which keeps your sheet in sync with your data structure.
7. Google Sheets – write the header row
Now write that header row into your new Google Sheet. Add another Google Sheets node and configure it to update the sheet:
- Operation: Update
- Spreadsheet: use an expression to reference the spreadsheet created earlier:
= {{ $("Create new spreadsheet file").first().json["spreadsheetId"] }}Then:
- Feed in the header data from the Set node
- Enable Raw Data (set
rawData = true) so the array is written directly as the first row
At this point, your sheet exists and has a proper header row that matches your XML structure.
8. Merge (chooseBranch) – wait for everything to be ready
You now have two flows:
- One that creates the spreadsheet and writes the header row
- One that holds your split data items from the XML
To make sure the data rows are not appended before the sheet and headers exist, add a Merge node in chooseBranch mode.
Connect:
- The branch that handles the header writing
- The branch that holds the split XML items
The Merge node waits for both branches, then passes data forward once everything is ready. Think of it as traffic control for your workflow.
9. Google Sheets – append rows for each XML item
Finally, add one more Google Sheets node to append your data rows.
- Operation: Append
- Spreadsheet: again reference the ID from the create node:
= {{ $("Create new spreadsheet file").first().json["spreadsheetId"] }}Then map the fields from each item (produced by the ItemLists node) to the correct columns. n8n will automatically append one row per item, turning each XML element into a row in your Google Sheet.
Key expressions used in this workflow
Here are the two main expressions you will rely on:
- Get the spreadsheetId from the create node:
= {{ $("Create new spreadsheet file").first().json["spreadsheetId"] }}- Generate header columns from the first item keys:
= {{ [ Object.keys($("Split out food items").first().json) ] }}These expressions help keep your workflow dynamic, reusable, and slightly magical.
Tips, best practices, and troubleshooting
1. Check the parsed JSON structure
After the XML node, open the output and inspect the JSON carefully. Find the exact path to your repeating elements, for example:
breakfast_menu.foodUse that path in the ItemLists node. If the path is wrong, your rows will not split correctly and you may end up with empty or weird-looking data.
2. Handle nested XML elements
XML loves nesting things. Google Sheets does not. If your XML has nested objects or attributes, flatten them before writing to the sheet.
Use a Set node or a Function node to:
- Create a flat object
- Convert nested structures into string values
This keeps your columns clean and prevents ugly JSON blobs from showing up in cells.
3. Respect Google Sheets rate limits and quotas
Google Sheets API is friendly, but it does have quotas. If you are appending a large number of rows in a short time:
- Add small delays between batches
- Group rows together and append them in chunks instead of one by one
This reduces API calls and helps you avoid hitting rate limits at the worst possible moment.
4. Add error handling and retries
Stuff happens. XML can be malformed, APIs can fail, and tokens can expire at the exact moment you least expect it.
To make your workflow more robust:
- Use error workflows or the Execute Workflow node to implement retry logic
- Log errors by sending a message to email or Slack when parsing fails or Google Sheets returns an error
This way, you know when things break and can fix them before anyone else notices.
5. Secure your Google credentials
Always store your Google OAuth credentials in the n8n credentials section. Avoid:
- Embedding tokens directly in expressions
- Sharing workflows that contain sensitive keys
For production setups, use environment variables and follow your standard security practices. Automation is great, leaking credentials is not.
6. Control your column order
Using Object.keys() to generate headers is convenient, but the order is based on key insertion order. If you:
- Need a specific column order
- Want to match an existing reporting template
Then define your headers manually in the Set node instead of auto-generating them. That gives you full control over how the sheet looks.
Testing and validating your workflow
Use the Manual Trigger to run the workflow and then open the resulting Google Sheet. Confirm that:
- The header row exists and the column names match your expected fields
- Each XML element (for example each
fooditem) appears as its own row - Values are correctly mapped and look properly formatted in the cells
If something looks off or values are missing or nested unexpectedly, adjust:
- The mappings in the append node
- Or insert a Function or Set node to normalize and flatten values before writing them
Where this XML to Sheets automation really shines
This n8n template is especially useful if you regularly work with XML feeds like:
- Daily inventory feeds exported in XML
- Vendor price lists
- Syndicated content or catalog imports
- Legacy system exports that need to end up in a human-friendly Google Sheet
Any time you are stuck taking structured XML and manually massaging it into a spreadsheet, this workflow can probably take over the job.
Next steps and ways to extend the workflow
The basic workflow is already powerful, but n8n makes it easy to extend it without rewriting everything:
- Swap the HTTP Request node for FTP, SFTP, or a Webhook if your XML comes from a different source
- Add more Set or Function nodes to transform or clean data before writing it
- Schedule the workflow to run automatically at fixed intervals
In other words, you can adapt this template to pretty much any XML-to-Google-Sheets scenario you run into.
Wrap up
Using n8n to automate XML imports into Google Sheets is a practical way to bridge older XML-based systems with modern, collaborative tools. Instead of manually copying and pasting XML into spreadsheets, you let the workflow:
- Download the XML
- Parse it into JSON
- Split it into individual items
- Create a spreadsheet
- Write headers and append all rows
Once it is set up, your main job is to enjoy the fact that this tedious task now runs itself.
Try the template yourself
To get started:
- Set up your Google Sheets OAuth credential in n8n
- Import or recreate the nodes described in this guide
- Use the sample XML URL or plug in your own feed
- Run the workflow and check the generated Google Sheet
If you would like a ready-to-import JSON template or help tweaking the mapping for your specific XML format, reach out or leave a comment. It is often just a small adjustment to adapt this workflow to your data.
Enjoy automating, and may your days of manual XML copy-paste be officially over.
