
Export XML to Google Sheets with n8n: Turn messy data into momentum
Every day, valuable data sits trapped in XML feeds, legacy systems, and old APIs. You know that if you could just get that data into Google Sheets, you could analyze it, share it, and turn it into real decisions. But doing it manually takes time, focus, and energy you would rather invest elsewhere.
This is where automation becomes a catalyst. With a simple n8n workflow, you can move from copy-paste drudgery to a system that quietly runs in the background, feeding your spreadsheets with fresh, structured data. In this guide, you will walk through an n8n template that automatically downloads an XML file, parses it into JSON, turns items into rows, creates a Google Sheet, writes the header row, and appends all your data – without you lifting a finger after setup.
Think of this workflow as a starting point. Once you have it running, you can adapt it, extend it, and build your own automation ecosystem on top of it.
The problem: XML everywhere, time nowhere
XML is still everywhere. Public data feeds, enterprise APIs, and older tools often expose their information as XML. That is fine for machines, but not ideal for people who want quick insights in a spreadsheet.
Without automation, you might be:
- Downloading XML files manually
- Copying and pasting values into Google Sheets
- Writing one-off scripts that you have to maintain
- Fixing errors caused by rushed or repetitive work
Over time, this slows you down and distracts you from higher-value work. The good news is that the problem is predictable, which makes it perfect for automation.
The mindset shift: from manual tasks to automated systems
Automation with n8n is not just about saving a few minutes. It is about shifting how you work. Instead of reacting to data needs, you design systems that keep data flowing for you.
With a single n8n workflow, you can:
- Schedule an automated export from XML to Google Sheets
- Normalize XML fields into consistent spreadsheet columns
- Create or update Google Sheets programmatically
- Reduce manual copy/paste and the risk of human errors
Once this template is in place, you are no longer the bottleneck. Your time is freed up for analysis, strategy, and growth. The workflow you are about to build is a concrete step toward that future.
The solution: an n8n template that does the heavy lifting
This tutorial is built around a ready-to-use n8n workflow template. It takes an XML feed, transforms it into structured data, and writes everything into a new Google Sheet.
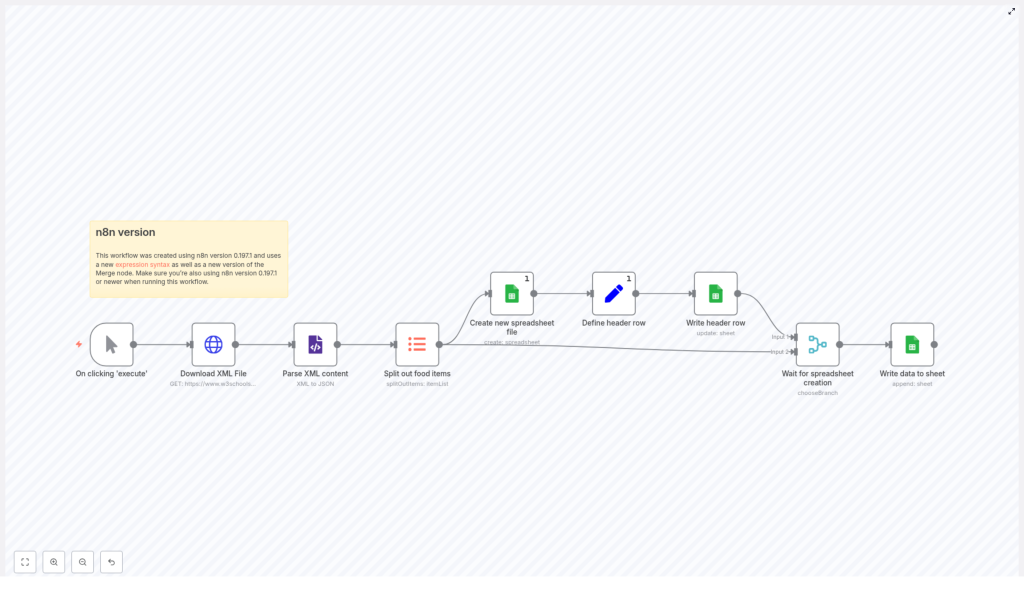
Here is what the template does, end to end:
- Manual Trigger – starts the workflow on demand when you are testing or running it manually.
- Download XML File (HTTP Request) – fetches the XML source, for example
https://www.w3schools.com/xml/simple.xml. - Parse XML content (XML node) – converts the XML payload into JSON objects that n8n can work with easily.
- Split out food items (Item Lists) – takes the parsed list and turns each XML item into its own workflow item.
- Create new spreadsheet file (Google Sheets) – creates a new Google Sheet titled My XML Data.
- Define header row (Set) – uses the first item’s object keys to generate your column headers dynamically.
- Write header row (Google Sheets update) – writes the header row to the new sheet, using
executeOnceso it only runs one time. - Wait for spreadsheet creation (Merge – chooseBranch) – synchronizes the header write with the item stream so data is appended only after the sheet is ready.
- Write data to sheet (Google Sheets append) – appends each item as a new row in your spreadsheet.
Once this is configured, you have a working pipeline from XML to Google Sheets that you can run, schedule, and extend.
Key building blocks of the workflow
1. HTTP Request node – Download your XML feed
The journey starts by pulling in the raw XML.
Configure the HTTP Request node to point to the URL that returns XML. For testing, you can use the W3Schools sample URL:
https://www.w3schools.com/xml/simple.xml
If your actual XML feed requires authentication, add the necessary headers or credentials in this node. This is your bridge from the outside world into your automated workflow.
2. XML node – Turn XML into JSON
Next, you transform that structured but awkward XML into JSON that n8n can handle with ease.
The XML node converts the XML payload into JSON. Pay close attention to:
- Array handling options, so repeating elements are captured correctly
- The path to the repeating elements, for example
breakfast_menu.foodin the sample feed
Getting this right ensures that your data is ready for the next step, where each item becomes its own row.
3. Item Lists node – Split into individual items
Once your XML is in JSON format, you want each XML record to become a single row in Google Sheets.
Use the Item Lists node and set fieldToSplitOut to the array property that contains your items. This transforms one array of objects into multiple workflow items. Each resulting item will map to a single row in your final spreadsheet.
4. Google Sheets nodes – Create, update, and append
The workflow then hands off to Google Sheets, where your data becomes visible, shareable, and actionable.
This template uses three core Google Sheets operations:
- create spreadsheet – creates a new spreadsheet and returns the
spreadsheetId, which is used in later nodes. - update (rawData=true) – writes the header row using a raw array of column names.
- append – appends rows for each split item from your XML data.
Two important expressions help this workflow stay dynamic and reusable:
// Create header row dynamically from the first item
={{ [ Object.keys($("Split out food items").first().json) ] }}

// Use the created spreadsheet for updates and appends
={{ $("Create new spreadsheet file").first().json["spreadsheetId"] }}
These expressions mean you do not have to hard-code column names or spreadsheet IDs. The workflow adapts to your XML structure automatically.
Step-by-step: setting up your XML to Google Sheets automation
You are now ready to turn this template into a working system. Follow these steps to set it up in your own n8n instance:
- Import the workflow template into your n8n instance.
- Open the Download XML File (HTTP Request) node and set the URL to your XML source. If your feed is protected, add headers or authentication details.
- Run the XML node once and confirm that it correctly converts your file. In the Execution Preview, note the path to the repeating array, for example
breakfast_menu.food. - Update the Item Lists node’s fieldToSplitOut value to match that array path so each element becomes its own item.
- Configure Google Sheets credentials (OAuth2) in n8n and assign them to all Google Sheets nodes in the workflow.
- Execute the workflow one time. The Create new spreadsheet file node will create a sheet, and the Set node will derive the column headers from the first item.
- Open the created Google Sheet. You should see your header row at the top and one row per XML item appended below it.
Once you see that first successful run, you have taken an important step. You now have a repeatable process that can keep running while you focus on higher-impact work.
Troubleshooting and improving your workflow
As you adapt this template to real-world feeds, you might encounter a few issues. These are not roadblocks, just opportunities to refine your automation.
- Malformed XML: If the XML node fails to parse the response, validate the XML with an external validator. In n8n, you can configure the HTTP Request node to return raw data, then test the XML node on that output to isolate the issue.
- Authentication errors: For Google Sheets, make sure your OAuth2 credentials have the correct scopes (both Drive and Spreadsheets) and that the authenticated user or service account has access to the created spreadsheet.
- Header mismatch: If different XML items contain different keys, normalize them before writing to Sheets. Use a Function or Set node to enforce consistent properties and ordering so your columns stay aligned.
- Large datasets: Appending one row per item can become slow at scale. Consider batching items into groups of 50 to 100 and calling the Google Sheets append operation once per batch.
- Rate limits: Respect Google Sheets API quotas. If you hit rate limits, add delays or implement exponential backoff for retryable errors in your workflow.
Each improvement you make here increases the reliability of your automation and builds confidence to automate even more processes.
Best practices for a robust XML to Google Sheets pipeline
To turn this template into a sustainable part of your toolkit, consider the following best practices:
- Sanitize headers – Clean up column names by removing special characters and normalizing to lowercase or
snake_case. This keeps your spreadsheets consistent and easier to work with in downstream tools. - Use executeOnce – Apply
executeOnceon header and metadata nodes so the header row is written only once, even when multiple items pass through. - Monitor runs – Enable error notifications or set up logging for workflow failures. This helps you catch issues early instead of discovering them after a reporting deadline.
- Secure credentials – Use environment-scoped credentials in n8n, restrict access, and rotate keys regularly to keep your integrations secure.
- Re-run strategy – Design your workflow so it can safely re-run. For example, implement idempotent appends or track an external cursor to avoid duplicate rows if you need to replay a run.
These habits turn a simple template into a production-ready automation that you can trust.
Extending the template: from one workflow to an automation ecosystem
Once your XML to Google Sheets workflow is running, you have a powerful foundation. From here, you can expand in many directions to support your personal or business growth.
Ideas to extend this workflow include:
- Schedule with Cron – Add a Cron node so the workflow runs daily or hourly, keeping your spreadsheet always up to date.
- Filter or transform data – Insert Function or Set nodes before writing to Sheets to clean, filter, or enrich your data.
- Send notifications – Trigger a Slack message or email once the import finishes or when an error occurs, so you stay informed without constantly checking.
- Archive the XML – Store a copy of the raw XML in S3, Google Drive, or another storage service for auditing or historical analysis.
Each small addition turns your workflow into more than a one-off script. It becomes part of a broader automation strategy that supports your team, your business, and your goals.
Bringing it all together
This n8n workflow template is more than a technical example. It is a practical way to reclaim your time, reduce repetitive work, and build confidence in your ability to automate.
With just a few steps, you can:
- Import XML data directly into Google Sheets
- Eliminate manual copy-paste workflows
- Lay the groundwork for more advanced automation
From here, you can iterate, improve, and adapt the workflow to new XML feeds and new use cases. Each improvement you make is an investment in a more focused, less distracted way of working.
Ready to take the next step? Import the template into n8n, connect your Google Sheets credentials, update the XML URL, and click execute. Watch your first automated import complete, then start imagining what else you can automate.
If you need help tailoring this to your specific XML feed, reach out to a consultant or share your scenario in the comments. Your next automation might be just one workflow away.
Call to action: Clone the template, subscribe for more n8n automation tutorials, and keep experimenting. Each workflow you build moves you closer to a fully automated, high-focus workflow.
