
n8n Tutorial: Create, Update & Get e-goi Subscribers
Imagine this: you are copying the same subscriber info into e-goi for the 14th time today. Your coffee is cold, your patience is gone, and if one more person updates their email address, you might just throw your keyboard out the window.
Or, you could let n8n do it for you.
This tutorial walks you through an n8n workflow template that handles three very repetitive tasks in e-goi for you:
- Create a new subscriber
- Update that subscriber’s details
- Fetch the subscriber to confirm everything looks right
We will configure e-goi nodes, wire them together with expressions, test the workflow, and sprinkle in a few best practices so your automation behaves better than a human on a Monday morning.
What this n8n + e-goi workflow actually does
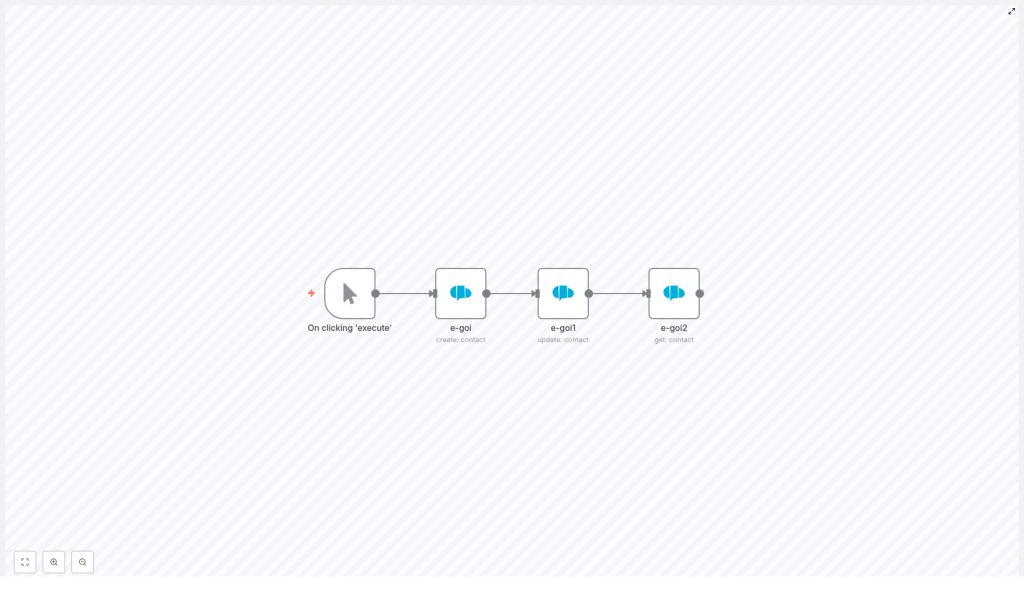
The workflow is a simple 4-node assembly line:
- Manual Trigger – lets you run the workflow on demand while testing
- e-goi (create contact) – creates a brand new contact in a specific list
- e-goi1 (update contact) – updates selected fields for that contact
- e-goi2 (get contact) – retrieves the contact so you can verify the changes
In practice, this pattern becomes the backbone for things like onboarding flows, syncing profile changes from your app, or pulling subscriber data into other tools for personalization.
Why automate e-goi subscriber management with n8n?
Manual data entry is a special kind of punishment. Automation with n8n and e-goi fixes that by:
- Eliminating repetitive typing – no more copy-paste marathons
- Keeping data consistent – the same values flow across systems automatically
- Connecting tools in real time – plug e-goi into CRMs, forms, and e-commerce platforms
Common real-world use cases include:
- Onboarding new users into your email list the moment they sign up
- Syncing profile updates so personalization stays accurate
- Fetching subscriber details on demand for targeted campaigns
What you need before starting
- An n8n instance (cloud or self-hosted)
- An e-goi account with API credentials (API key and any required setup)
- Basic familiarity with n8n nodes and expressions
Once you have those, you are ready to retire a few repetitive tasks from your daily routine.
Quick overview of the workflow structure
Here is the high-level flow so you know where we are going before we dive into the details:
- Start the workflow with a manual trigger while you test.
- Use an e-goi node to create a contact in a specific list.
- Use another e-goi node to update that contact using the contact ID from step 2.
- Use a final e-goi node to get the contact and confirm the updates.
The magic is in how you pass data between nodes with expressions so n8n always knows which contact to update and retrieve.
Step 1: Add a Manual Trigger node
First, give yourself a safe testing environment.
Add a Manual Trigger node and label it something like On clicking ‘execute’. This lets you run the workflow manually while you fine-tune everything.
Later, when you are confident it works, you can swap this trigger for something more automated, for example:
- A Webhook that fires when someone submits a form
- A Schedule that runs at specific times
- Any other trigger node that fits your use case
Step 2: Create a contact in e-goi
Next, we create the actual subscriber in e-goi.
Add an e-goi node and set the operation to create (create contact). Configure the following fields:
- List: choose the numeric list ID where the contact should live, for example
1 - Email: the subscriber’s email address (you can hard-code it for testing or map it from incoming data later)
- Additional Fields: map fields such as
first_name,last_name,phone, and so on - Credentials: select your configured e-goi Credentials in the credentials panel
Example values from the template:
list: 1
email: nathan@testmail.com
additionalFields.first_name: Nathan
When this node runs successfully, e-goi responds with JSON that includes the new contact’s ID. In many setups you will find it under something like:
base.contact_idThat contact_id is important. We will use it in the next nodes to update and retrieve the same subscriber, so no one gets lost in the system.
Step 3: Update the contact using expressions
Now that you have a contact, let us pretend they decided their name should be slightly cooler. Time to update.
Add another e-goi node and set the operation to update. To update the correct contact, you must pass two pieces of information:
- The same list ID used in the create node
- The contact ID returned by the create node
This is where n8n expressions save you from manual copy-paste. In the example workflow, the expressions look like this:
// Use the same list id from the create node's parameters
list: ={{$node["e-goi"].parameter["list"]}}

// Use the contact id from the create node's JSON output
contactId: ={{$node["e-goi"].json["base"]["contact_id"]}}

// Fields to update
updateFields.first_name: Nat
A couple of important notes:
- If your create node returns the contact ID under a slightly different path, open the execution log, inspect the JSON, and adjust the expression accordingly.
- Only include the fields you want to change in updateFields. Fields you do not send are typically left untouched by the API.
With this node in place, your workflow can react to changes in your app or CRM and keep e-goi aligned automatically.
Step 4: Get the contact to verify the changes
Finally, let us make sure everything worked and that the subscriber really is called Nat now.
Add a third e-goi node and set the operation to get. Configure it to use:
- The same list ID from the first e-goi node
- The contact ID returned by the update node
Example expressions:
list: ={{$node["e-goi"].parameter["list"]}}
contactId: ={{$node["e-goi1"].json["base"]["contact_id"]}}
When this node runs, it returns the full contact object as stored in e-goi. In the execution results, check the fields you updated, for example first_name, to confirm the changes are reflected correctly.
How to test the workflow end to end
Before you set this loose in production, run a quick test cycle:
- Save the workflow in n8n.
- Open the credentials panel or execution log and verify your e-goi credentials are valid.
- Click the Manual Trigger node’s execute button to run the whole workflow.
- Inspect each node’s output:
- The create node should return a
contact_id. - The update node should show your changed fields.
- The get node should display the final state of the contact.
- The create node should return a
If everything lines up, congratulations, you have successfully automated a task that used to drain your soul one record at a time.
Troubleshooting: when the robots complain
If something breaks, do not panic. Check these common issues first:
- Invalid credentials or API endpoint
Double-check your e-goi API key and account configuration. If authentication fails, no node in the chain will behave. - Contact not found during update
Make sure thecontactIdexpression is pointing to the correct path in the create node’s output. Inspect the JSON in the execution log and confirm the structure. - Field mapping problems
If fields do not update as expected, open the execution output viewer, look at the full response, and confirm you are using the correct field names and paths in your expressions.
Best practices for a reliable n8n + e-goi setup
To keep your workflow tidy and future proof, consider these habits:
- Use descriptive node names
Rename nodes to something like Create Subscriber, Update Subscriber, and Get Subscriber. Your future self will thank you when writing expressions. - Validate inputs
Check email formats and required fields before calling the e-goi API. Garbage in, garbage out still applies in automation. - Handle errors gracefully
Use the Error Trigger or dedicated error branches to log failures, send alerts, or retry operations instead of silently failing. - Avoid hard-coding in production
While test values likelist: 1andnathan@testmail.comare fine for learning, in real workflows you should pass list IDs and emails dynamically from webhooks, forms, or CRMs.
Ideas for extending this template in real projects
Once you have the basic create-update-get pattern working, you can expand it into more powerful automations:
- Onboard new customers
Capture signups from a form, create an e-goi contact, add tags, and trigger a welcome email sequence. - Sync profile updates
When a user updates their profile in your app, call this workflow to update their e-goi contact so personalization stays accurate. - Segment and tag users
After creating a contact, add tags or custom fields in e-goi so you can build segments and automation flows tailored to user behavior.
Security and data privacy basics
Subscriber data is sensitive, so treat it with care:
- Follow GDPR and any other regional regulations that apply to your audience.
- Store your e-goi API credentials securely in n8n’s credentials manager, not in plain text inside nodes.
- Minimize logging of personal data in public or shared logs. Only log what you truly need for debugging.
Wrapping up: from manual grind to smooth automation
With a small chain of e-goi nodes in n8n, you can create, update, and verify subscriber records in just a few clicks. This simple pattern becomes a building block for:
- Multi-step onboarding journeys
- CRM and email list synchronization
- Campaign triggers and personalized messaging
Ready to try it in your own n8n instance?
Set up the nodes as described, connect your e-goi credentials, and run the workflow using the Manual Trigger. Once it works, export the template from your n8n canvas, adjust the list ID and fields to match your account, and plug it into your real processes.
If you have questions or want a more customized workflow for your stack, reach out or leave a comment. Automation should feel like a helpful assistant, not a mystery.
Call to action: Bookmark this tutorial, test the workflow in your n8n instance, and subscribe for more n8n automation templates and integration guides.
