
Automate Slack: Create Channels, Invite Users & Upload Files with n8n
Slack is a critical collaboration layer for many engineering, product, and operations teams. Yet, the repetitive work of creating channels, inviting users, posting initial messages, and sharing files often remains manual. This guide explains how to implement a robust n8n workflow that automates the full Slack channel setup lifecycle, from channel creation to file upload, using best practices suitable for production-grade automation.
Use case overview: automated Slack channel provisioning
Whenever you onboard new teams, ship a feature, or start a project, you likely repeat the same Slack tasks:
- Create a dedicated channel
- Invite the right stakeholders
- Post a welcome or kickoff message
- Attach relevant documentation or assets
Codifying this flow in n8n ensures that every new channel is created consistently, with the correct participants and resources, and without manual intervention. It improves delivery speed, reduces human error, and provides a repeatable pattern that can be integrated with other systems such as HR platforms, CI/CD pipelines, or project management tools.
What this n8n workflow automates
The workflow template you will configure performs the following steps automatically:
- Create a new Slack channel (for example,
n8n-docs) - Invite one or more users by Slack user ID
- Post a welcome message, optionally with an attachment reference
- Download a file or image via HTTP
- Upload the downloaded file into the newly created Slack channel
These operations are implemented using n8n’s Slack and HTTP Request nodes, orchestrated in a way that passes data between nodes via expressions.
Slack authentication, scopes, and security
Required Slack bot scopes
For this workflow to function correctly, configure a Slack App with a bot token that has, at minimum, the following scopes:
conversations:write– create and manage channelsconversations.invite– invite users to channelschat:write– post messages as the botfiles:write– upload files to channelsusers:read– read user IDs when needed
Store this token in n8n using the credentials system (for example, as Slack Bot Access Token). Do not hard-code tokens in node parameters or workflow fields. Using a bot token is recommended for automation since it is easier to scope and audit than user tokens.
Security best practices
- Keep all secrets in n8n credentials, not in plain-text fields or expressions.
- Limit the bot to the minimal scopes required for the workflow.
- Implement idempotency checks where appropriate to avoid accidental duplication, such as re-creating existing channels.
- Log key operations for auditing, especially in production environments.
Architecture of the n8n workflow
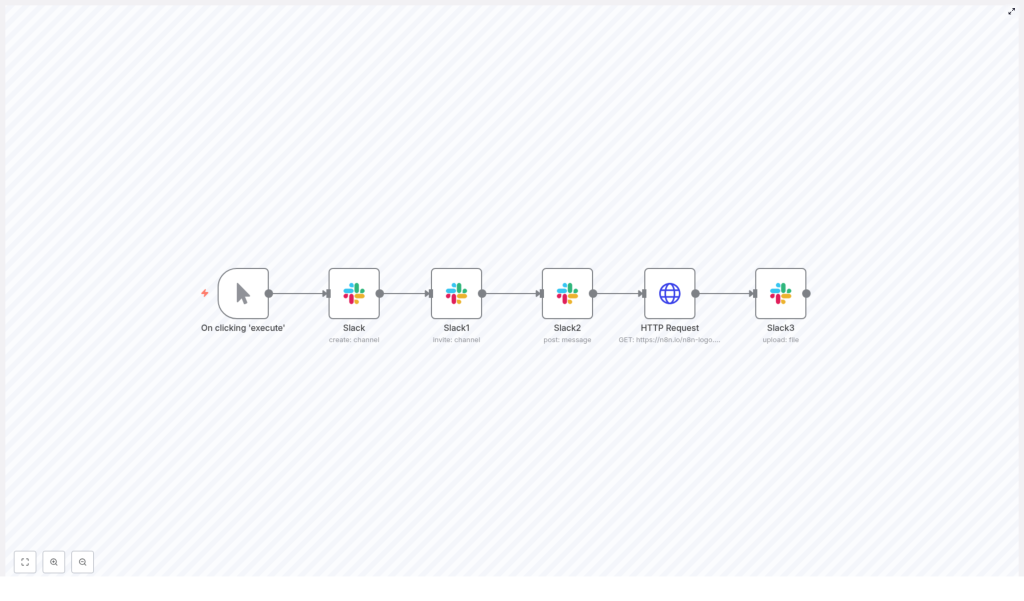
The workflow consists of six primary nodes executed in sequence:
- Manual Trigger – initiates the workflow during testing or on demand.
- Slack (Create Channel) – provisions a new Slack channel.
- Slack (Invite) – invites specified users to that channel.
- Slack (Post Message) – posts the initial welcome message.
- HTTP Request – downloads an external file or image.
- Slack (Upload File) – uploads the binary file to the channel.
Data flows between these nodes primarily through expressions that reference the output of the Slack channel creation step, especially the channel id.
Step-by-step configuration in n8n
1. Manual Trigger for interactive runs
Start with a Manual Trigger node. This trigger is ideal while designing and validating the workflow template because it allows you to run the flow on demand from the n8n UI. Later, you can replace or augment this with other triggers, such as Webhook or Cron, depending on how you want to automate channel creation.
2. Create the Slack channel
Add a Slack node and set the operation to create a channel. In the template example, the channel name is configured as n8n-docs, but you can parameterize this value using expressions or external data sources.
When the node executes successfully, Slack responds with a channel object that includes an id, such as C01FZ3TJR5L. This channel ID is the key reference that subsequent nodes will use to post messages, invite users, and upload files.
3. Invite users to the newly created channel
Next, add another Slack node configured with the Invite operation. Provide an array of Slack user IDs, for example:
["U01797FGD6J"]To ensure that the invite targets the channel created in the previous step, use an expression to reference the channel ID from the create-channel node. Assuming that node is named Slack, you can use:
{{$node["Slack"].json["id"]}}This expression passes the channel ID dynamically, so the workflow continues to work even when the channel name or other parameters change.
Tip: If you only know user email addresses, you can add an additional Slack or HTTP node to look up user IDs from emails using the Slack API, then feed those IDs into this invite step.
4. Post a structured welcome message
Add a third Slack node, this time using the Post Message operation. Again, map the channel field to the channel ID using the same expression:
{{$node["Slack"].json["id"]}}In the message body, define your standard onboarding or project kickoff text. You can also attach images or other media by referencing public URLs (using image_url or similar attachment fields supported by the Slack API). For more advanced implementations, consider templating this message with dynamic variables such as project name, owner, or due dates.
5. Download a file or image using HTTP Request
To include assets directly in the channel, add an HTTP Request node. Configure it to fetch a file from a URL, for example:
https://n8n.io/n8n-logo.pngSet the responseFormat parameter to file. This instructs n8n to store the response as binary data instead of JSON. The resulting binary property can then be passed directly to the Slack file upload node.
6. Upload the downloaded file to Slack
Finally, add a Slack node with the Upload File operation. In this node:
- Enable the option to upload binary data.
- Select the binary property created by the HTTP Request node as the file source.
- Set the target channel using the channel ID expression.
A typical configuration for the channel IDs field might look like:
{"channelIds": [{{$node["Slack"].json["id"]}}]}After this node executes, the file appears in the Slack channel, and the Slack API responds with a file object that includes the file URL and metadata such as size and type.
Key implementation details and best practices
Using expressions to pass data between nodes
Expressions are central to making this workflow dynamic. For the channel ID, use:
{{$node["Slack"].json["id"]}}This pattern ensures that every node operates on the channel created earlier, even if you later rename nodes or parameterize inputs. Ensure that node names are stable or update expressions accordingly when refactoring the workflow.
Handling private channels
If you need to create private channels, configure the Slack create-channel node with the appropriate option (for example, is_private or an equivalent setting in the node UI). Verify that your bot token has the necessary permissions to create private channels and manage membership.
File size and format considerations
- Slack enforces file size limits that vary by plan. Large uploads may fail if they exceed these limits.
- For very large assets, consider sharing links to hosted files instead of direct uploads.
- Ensure the HTTP Request node actually returns binary content and not an HTML error page, particularly when downloading from authenticated or rate-limited endpoints.
Error handling and resilience
For production workflows, add explicit error handling around Slack operations:
- Use a Catch Error node to centralize error handling logic.
- Add IF nodes to branch on known error conditions, such as
channel_already_exists,user_not_found, orinvalid_auth. - Implement retry logic or delays for rate-limited operations, particularly if you create many channels or invite large groups of users.
Common issues and troubleshooting guidance
Authentication failures or missing scopes
Errors such as invalid_auth or permission-related messages usually indicate that the bot token is missing required scopes or that the Slack App has not been re-installed after scope changes. Verify the configured scopes in the Slack App dashboard, update them if needed, and re-install the app into the workspace so the changes take effect.
Channel already exists
If you attempt to create a channel with a name that already exists, Slack returns an error. To handle this gracefully:
- Add a lookup step before channel creation to check whether the channel already exists.
- Or, capture the error and fall back to using the existing channel’s ID instead of failing the entire workflow.
Failed user invitations
When invites fail for specific users:
- Confirm that the user IDs are correct and belong to the target workspace.
- Verify that your bot has permission to invite users to the channel.
- Be aware that external or restricted accounts may have limitations that prevent automatic invites.
File upload problems
If the Slack upload file node fails:
- Check that the HTTP Request node has
responseFormatset tofile, notjson. - Inspect the binary property in n8n’s execution data to confirm that it contains valid file content.
- Validate that the file size and type are supported by Slack and your plan.
Practical automation scenarios
This workflow pattern can be reused and extended for many operational scenarios, including:
- Employee onboarding
Automatically create a project or team channel, invite the new hire and their stakeholders, post onboarding guidelines, and upload key documents. - Deployment and release notifications
For each release, spin up a release-specific channel, invite engineering, QA, and product, post release notes, and attach logs or change summaries. - Event and sprint channels
Create time-bound channels for events, hackathons, or sprints, pre-populate them with agendas, links, and assets, and then schedule cleanup or archiving.
Extending the workflow
Once the core automation is in place, you can enhance it with additional logic and integrations:
- Add a lookup step to check whether a channel already exists before attempting creation.
- Use a database, CRM, or spreadsheet to map user email addresses to Slack user IDs and invite users automatically without manual ID management.
- Implement templated welcome messages that pull dynamic content, such as project identifiers, owners, or links to tickets, from upstream systems.
- Introduce scheduled cleanup for temporary channels, for example, archiving event channels after a defined period.
From manual trigger to full automation
Initially, run this template via the Manual Trigger to validate behavior:
- Execute the workflow from the n8n editor.
- Verify that the channel is created correctly.
- Confirm that users are invited, the welcome message is posted, and the file appears in the channel.
After validation, replace or complement the Manual Trigger with:
- A Webhook trigger to respond to external systems, such as HR tools or CI/CD platforms.
- A Cron trigger to schedule periodic or batch channel provisioning.
Next steps
Use this n8n template as a baseline and adapt it to your organization’s workflows and governance requirements. Integrate it with your existing tooling, introduce additional checks and logging, and evolve it into a standard pattern for Slack automation across your teams.
Call to action: Deploy this workflow in your n8n instance, clone and customize it for your environment, and explore additional n8n templates to standardize more of your operational processes.
