
n8n: Sync Zendesk Tickets to HubSpot – Step-by-Step Teaching Guide
Connecting Zendesk and HubSpot with n8n lets your support and sales teams share a single, consistent view of customer issues. Instead of manually copying ticket information, you can use an automated workflow that keeps both systems in sync.
This guide walks you through how the provided n8n workflow template works, why it is designed this way, and how each node contributes to syncing Zendesk tickets to HubSpot tickets and contacts.
What you will learn
By the end of this guide, you will understand how to:
- Configure a scheduled n8n workflow that polls Zendesk every few minutes
- Use a last-execution timestamp so only updated tickets are processed
- Fetch and merge Zendesk ticket and requester (user) data
- Find or create matching HubSpot contacts
- Create or update HubSpot tickets based on Zendesk tickets
- Use the
external_idfield in Zendesk to store HubSpot IDs for future updates - Handle common issues like duplicates, failures, and permissions
Key concepts before you start
n8n workflow basics
In n8n, a workflow is a series of nodes connected in a logical sequence. Each node performs an action, such as:
- Triggering the workflow on a schedule
- Querying an API like Zendesk or HubSpot
- Transforming or merging data
- Making decisions with conditional logic
Zendesk and HubSpot integration concepts
- Zendesk tickets – Support issues created by customers.
- Zendesk users (requesters) – The people who submit tickets. They have fields like
email,name, andexternal_id. - HubSpot contacts – People in your CRM, usually matched by email.
- HubSpot tickets – Support or service records in HubSpot, often linked to contacts.
external_id– A field in Zendesk used here to store the corresponding HubSpot ID (either contact or ticket). This lets the workflow know whether a record already exists in HubSpot.
Polling and last-execution timestamp
Instead of reacting to events in real time, this workflow uses polling. It checks Zendesk every few minutes and only retrieves tickets that have changed since the last run. To do this, it stores a last execution timestamp in n8n’s static data and uses it in the Zendesk query.
Important keywords for SEO and context
Relevant terms used in this guide: n8n, Zendesk, HubSpot, ticket sync, CRM integration, workflow automation, external_id, polling, last execution timestamp, no-code automation, support ticket integration.
How the overall n8n workflow works
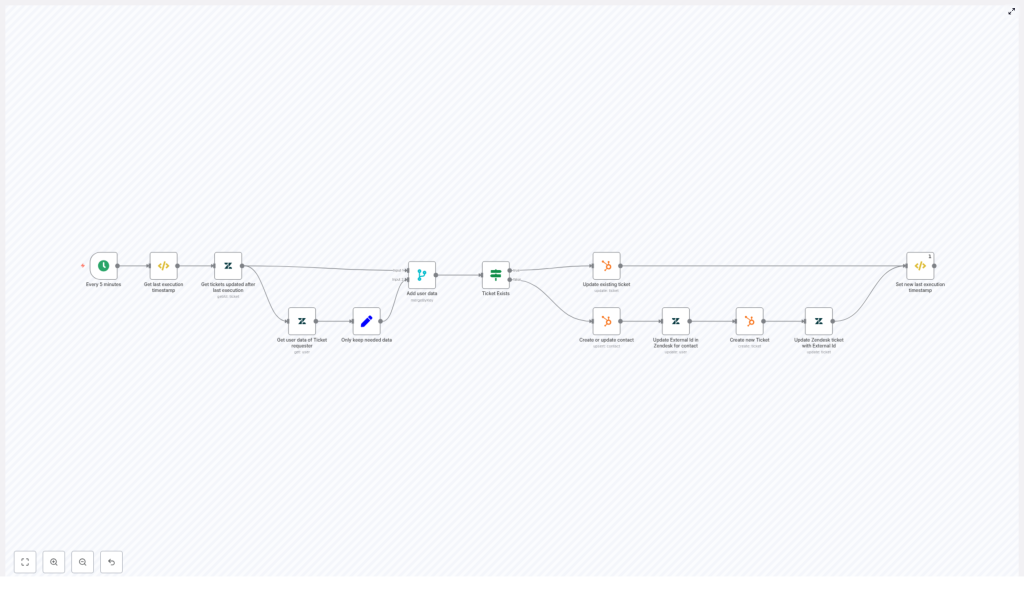
At a high level, the workflow follows this pattern:
- Trigger every 5 minutes using a Cron node.
- Load or initialize the last execution timestamp.
- Query Zendesk for tickets updated since that timestamp.
- Fetch the requester (user) data for each ticket.
- Simplify and merge ticket and user data into a clean payload.
- Decide whether the ticket already exists in HubSpot based on
external_id. - If the ticket exists, update the HubSpot ticket.
- If it does not exist, create or update a HubSpot contact, then create a HubSpot ticket, and finally update Zendesk with the HubSpot IDs.
- Update the stored last execution timestamp so that the next run only processes newer changes.
Next, we will walk through each node and decision in order, like a guided lab.
Step-by-step walkthrough of the workflow
Step 1: Trigger the workflow every 5 minutes (Cron node)
The workflow starts with a Cron node.
- Purpose: Run the sync periodically without relying on webhooks.
- Configuration: Set it to execute every 5 minutes.
This schedule provides near real-time synchronization while keeping things simple. If you need faster or instant synchronization, you can later replace or complement this with Zendesk webhooks.
Step 2: Get or initialize the last execution timestamp (Function Item)
Next, a Function Item node reads and sets a global static value that represents the last time the workflow ran.
The logic looks like this:
// Example logic
const staticData = getWorkflowStaticData('global');
if(!staticData.lastExecution){  staticData.lastExecution = new Date().toISOString();
}
item.executionTimeStamp = new Date().toISOString();
item.lastExecution = staticData.lastExecution;
return item;
What this does:
- If this is the first time the workflow is running, it initializes
staticData.lastExecutionto the current time. - It stores two values on the item:
item.lastExecution– the previous run’s timestamp (used in the Zendesk query).item.executionTimeStamp– the current run’s timestamp (used later to update the static data).
This setup ensures that each run knows exactly from which point in time it should fetch updated tickets.
Step 3: Get tickets updated after the last execution (Zendesk node)
Now the workflow queries Zendesk for tickets that were updated after the stored timestamp.
- Node: Zendesk
- Operation: Search or list tickets
- Example query:
updated>={{ $json["lastExecution"] }} - Order by:
updated_atdescending
This ensures that:
- Only tickets changed since the last run are pulled.
- You minimize API calls and avoid processing the same tickets multiple times.
Step 4: Retrieve requester (user) data for each ticket (Zendesk node)
Each Zendesk ticket has a requester_id that identifies the user who opened the ticket. To properly create or update HubSpot contacts, you need their full user record.
- Node: Zendesk
- Operation: Get user by ID
- Input:
requester_idfrom each ticket
This step enriches each ticket with user data such as:
- Email address (used to match or create HubSpot contacts)
- Name
- User-level
external_idif you use it to store HubSpot contact IDs
Step 5: Keep only the data you need (Set node)
At this point, the ticket and user objects can be quite large. To make mapping and debugging easier, you can trim them down with a Set node.
Common fields to keep:
- Requester data:
requester_idexternal_id(Zendesk user external id, often used to store HubSpot contact ID)emailname
- Ticket data:
id(Zendesk ticket ID)raw_subjectdescriptionexternal_id(Zendesk ticket external id, used to store HubSpot ticket ID)
By only keeping the necessary properties, you reduce complexity in later mapping steps and make it easier to inspect workflow output.
Step 6: Merge ticket and user data (Merge node)
Now you want each item in the workflow to contain both the ticket details and the requester details. A Merge node is used for this.
- Node: Merge
- Mode:
mergeByKey - Key: A shared key that lets you join ticket and user records (for example,
requester_idor another consistent field).
After this step, each item will be a combined object that includes:
- Ticket fields like subject, description, ticket ID, ticket
external_id. - Requester fields like email, name, user
external_id.
This combined data structure makes it much easier to perform conditional checks and to map fields into HubSpot.
Step 7: Decide if the ticket already exists in HubSpot (If node)
The next step is to determine whether the Zendesk ticket has already been synced to HubSpot.
- Node: If
- Condition: Check if the Zendesk ticket’s
external_idfield is set.
Logic:
- If the ticket
external_idexists: This means the Zendesk ticket already has a HubSpot ticket ID stored. The workflow should update the existing HubSpot ticket. - If the ticket
external_idis missing: This is a new ticket from HubSpot’s perspective. The workflow needs to:- Create or update a HubSpot contact for the requester.
- Create a new HubSpot ticket.
- Write the HubSpot ticket ID back to the Zendesk ticket’s
external_id.
Path 1: When ticket external_id exists – Update HubSpot ticket
If the If node follows the “true” branch, the workflow assumes that a corresponding HubSpot ticket already exists.
Update existing HubSpot ticket
- Node: HubSpot (Tickets)
- Operation: Update ticket
- Ticket ID: Use the value from the Zendesk ticket’s
external_id, which stores the HubSpot ticket ID.
Typical field mappings:
- Zendesk
raw_subject→ HubSpot ticket name or subject - Zendesk
description→ HubSpot ticket description
Best practice:
- Enable
continueOnFailso a single failed update does not stop the entire workflow. Instead, you can log the error and move on to the next ticket.
Path 2: When ticket external_id is missing – Create contact and ticket
If the If node follows the “false” branch, the workflow handles a ticket that does not yet exist in HubSpot.
Step 8: Create or update a HubSpot contact
The first task is to make sure the requester exists as a contact in HubSpot.
- Node: HubSpot (Contacts)
- Operation: Create or update contact
- Matching criteria: Usually the email address
The node will either:
- Find an existing contact with that email and return its ID, or
- Create a new contact and return the new HubSpot contact ID (often called
vid).
This HubSpot contact ID is important because the next steps will associate the new ticket with this contact.
Step 9: Update Zendesk requester with HubSpot contact ID
Once you have the HubSpot contact ID, you can store it in Zendesk so future syncs can match users more easily.
- Node: Zendesk
- Operation: Update user (requester)
- Field to update: User
external_id - Value: The HubSpot contact ID returned from the previous node
This step ensures that the Zendesk user and the HubSpot contact are linked via a stable, external identifier.
Step 10: Create a new HubSpot ticket and associate it to the contact
Now you can create the actual HubSpot ticket that corresponds to the Zendesk ticket.
- Node: HubSpot (Tickets)
- Operation: Create ticket
Typical configuration:
- Map Zendesk
raw_subjectto the HubSpot ticket name or subject. - Map Zendesk
descriptionto the HubSpot ticket description. - Associate the ticket with the contact using
associatedContactIdsand the HubSpot contact ID from Step 8.
After creation, HubSpot returns a new ticket ID. You will use that in the next step.
Step 11: Update the Zendesk ticket with the HubSpot ticket ID
To complete the link between systems, update the original Zendesk ticket.
- Node: Zendesk
- Operation: Update ticket
- Field to update: Ticket
external_id - Value: The HubSpot ticket ID from the previous node
This creates a bi-directional reference:
- Zendesk ticket
external_idstores the HubSpot ticket ID. - Zendesk user
external_idcan store the HubSpot contact ID (if you choose to use it that way).
On future runs, the If node can now detect that the ticket already exists in HubSpot and will follow the “update” path instead of creating duplicates.
Step 12: Save the new last execution timestamp (Function Item)
At the end of the workflow, you need to update the stored timestamp so that the next run only processes newer changes.
- Node: Function Item
Expected behavior:
- The node runs once per workflow execution.
- It sets
staticData.lastExecutionto theexecutionTimeStampcaptured at the beginning of the run.
This prevents the workflow from reprocessing the same tickets again on the next cycle.
Best practices for a reliable Zendesk – HubSpot sync in n8n
- Handle rate limits and errors Use
continueOnFailon key nodes like HubSpot update or create nodes. Combine this with logging or notifications so you do not lose visibility into failures. - Use stable identifiers Prefer
external_idor other unique IDs to link Zendesk and HubSpot records, rather than relying only on names or subjects. - Validate email addresses Before creating HubSpot contacts, sanitize and validate email fields to avoid creating duplicates or invalid contacts.
- Monitor and alert on failures Add a Slack, email, or other notification node to alert your team when the workflow encounters errors. This helps you react quickly if the sync stops working.
- <
