
n8n WhatsApp Echo Workflow Guide: Learn, Build, and Test Your Integration
This guide teaches you how to build and understand a complete WhatsApp Echo workflow in n8n. You will learn how to:
- Verify Meta (Facebook) webhook callbacks using a GET request
- Receive incoming WhatsApp messages via POST webhooks
- Check that a user message exists before replying
- Send an echo response back to the sender through the WhatsApp Business API
- Send a Slack notification every time a message is received
- Apply best practices for security, testing, and troubleshooting
By the end, you will not just have a working template, you will also understand how each n8n node fits together and how to extend this workflow later.
1. What Is a WhatsApp Echo Workflow and Why Use It?
A WhatsApp Echo workflow is a simple automation that receives a message from a user, then replies with the same (or a modified) text. It is mainly used as a diagnostic and learning tool.
Why start with an echo flow?
An echo workflow is ideal when you are first connecting n8n to the WhatsApp Business API because it helps you:
- Validate webhook setup Confirm that Meta can reach your n8n webhook and that your GET verification handshake is working.
- Test message parsing Check that you are reading the correct JSON paths from Meta’s payload.
- Prototype responses Try out automated replies before you invest time in message templates or complex logic.
- Notify internal tools Send alerts to Slack or other tools whenever a message arrives.
Once this echo workflow is stable, you can safely build richer automations on top of it.
2. How the n8n WhatsApp Echo Workflow Is Structured
The template is built from several connected nodes in n8n. Each node has a clear role in the flow, from receiving the webhook to sending the reply.
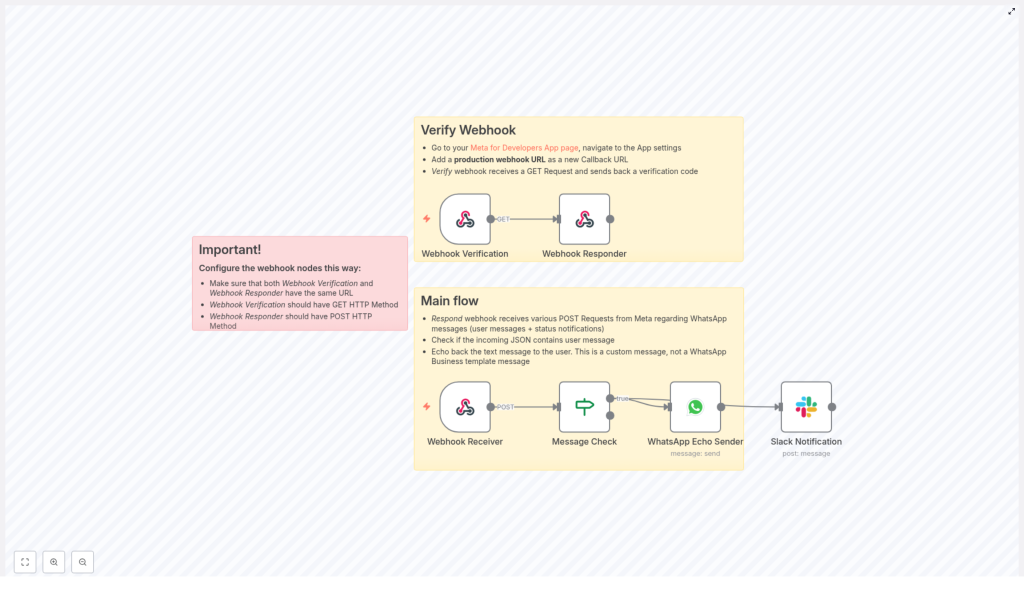
High-level components
- Webhook Verification (GET) – Handles Meta’s initial webhook verification by returning the
hub.challengevalue. - Webhook Receiver (POST) – Accepts incoming WhatsApp webhook events (messages, status updates, etc.).
- Webhook Responder (POST) – Sends responses back to Meta when needed.
- Message Check (If node) – Checks if the incoming JSON contains a user message.
- WhatsApp Echo Sender – Sends an echo reply to the user using your WhatsApp Business API credentials.
- Slack Notification – Posts a summary of the message into a Slack channel for monitoring or debugging.
The key idea is that the GET and POST webhooks share the same path, so Meta can verify and then use that same URL for message delivery.
3. Understanding the Incoming WhatsApp Webhook Payload
Before configuring nodes, it helps to see the structure of the JSON that Meta sends to your webhook.
Example trimmed payload
{  "object": "whatsapp_business_account",  "entry": [  {  "changes": [  {  "value": {  "messages": [  {  "from": "1234567890",  "id": "ABGGH1",  "timestamp": "161975",  "text": {  "body": "Hello"  }  }  ]  }  }  ]  }  ]
}
In this example:
messages[0].fromis the sender’s phone number.messages[0].text.bodyis the message text the user sent.
These paths are exactly what you will reference in n8n expressions for the echo reply and the Slack notification.
4. Step-by-Step: Building the Workflow in n8n
This section walks through each node in the order you would typically configure them. Follow along in your n8n instance while you read.
4.1 Webhook Verification (GET)
Goal: Respond correctly to Meta’s webhook verification request during setup.
When you configure your webhook in the Meta Developer dashboard, Meta sends a GET request to your URL with a hub.challenge parameter. Your endpoint must return this value so that Meta can confirm ownership.
Configuration steps:
- Create a Webhook node in n8n.
- Set the HTTP Method to
GET. - Choose a Path (for example
/whatsapp-webhook). You will reuse this same path for the POST webhook. - Connect this node to a Webhook Responder node (explained below) or configure the response directly in the node if your setup allows.
Returning the challenge:
The Webhook Responder should return the value Meta sends in hub.challenge. In n8n, set the response body to an expression like:
={{ $json.query['hub.challenge'] }}This tells n8n to read the query parameter from the GET request and send it back as the response body.
4.2 Webhook Receiver (POST)
Goal: Receive incoming WhatsApp events from Meta as POST requests.
Once Meta has verified your webhook, it will send message events to the same URL but using the POST method.
Configuration steps:
- Create another Webhook node.
- Set the HTTP Method to
POST. - Set the Path to exactly the same value as the GET node (for example
/whatsapp-webhook). - Ensure the node is configured to pass the raw JSON body into the workflow.
At this point, any WhatsApp message will trigger the POST webhook and the JSON data will be available to downstream nodes.
4.3 Webhook Responder (POST)
Goal: Send HTTP responses for POST webhook calls when needed.
While WhatsApp webhooks often work fine with a simple 200 OK, using a dedicated Webhook Respond node gives you more control over the response body and headers.
Configuration steps:
- Add a Webhook Respond node.
- Connect it after the Webhook nodes or at the end of the flow, depending on your design.
- Set the Response Mode to return a JSON or text response.
- Make sure the URL/path matches the Webhook nodes’ path so the response is tied to the correct request.
For testing, you can respond with a simple JSON such as {"status": "received"} to confirm that the webhook is working.
4.4 Message Check (If node)
Goal: Only send an echo reply when the payload actually contains a user message.
WhatsApp webhooks can include various types of events, such as message status updates. You usually only want to echo back when a message exists. The If node is used to check this.
Example condition:
leftValue: ={{ $json.body.entry[0].changes[0].value.messages[0] }}
operator: object exists
This condition checks whether messages[0] exists in the JSON. If it does, the workflow continues to the nodes that send the WhatsApp reply and Slack notification.
- If true (message exists): Proceed to WhatsApp Echo Sender and Slack Notification.
- If false (no message): End the workflow or handle other event types differently (for example, status updates).
4.5 WhatsApp Echo Sender
Goal: Send an echo response back to the user who sent the original WhatsApp message.
This node uses your WhatsApp Business API credentials to send a standard text message. It reads the sender’s number and text body from the incoming payload and constructs a reply.
Typical configuration fields:
- phoneNumberId Your WhatsApp phone number ID from the Meta Business settings.
- recipientPhoneNumber Use an expression to read the sender’s number:
= {{ $json.body.entry[0].changes[0].value.messages[0].from }} - textBody Use an expression to echo the incoming text:
=Echo back: {{ $json.body.entry[0].changes[0].value.messages[0].text.body }} - Operation Set to
send.
Important note about templates:
This is a free-form text message, not a pre-approved template. The WhatsApp Business API allows this type of non-template reply only within the 24-hour messaging window after the user’s last message.
4.6 Slack Notification
Goal: Notify your team in Slack whenever a WhatsApp message is received.
This node is useful for monitoring, debugging, or letting human operators see incoming messages without logging into n8n or the WhatsApp inbox.
Example message expression:
=Received WhatsApp message from {{$json.body.entry[0].changes[0].value.messages[0].from}}: {{$json.body.entry[0].changes[0].value.messages[0].text.body}}
This expression builds a summary string that includes both the sender’s number and the text body. Configure the Slack node with:
- Correct Slack credentials in n8n
- A valid channel name or ID
- Permissions that include the
chat:writescope for your Slack app
5. Deployment and Testing Tips
Once all nodes are configured, you need a proper environment for Meta to reach your n8n instance and for you to test the full flow.
5.1 Use HTTPS and a Public URL
Meta requires a publicly accessible HTTPS endpoint for webhooks. During development you can:
- Use a tunneling tool like ngrok to expose your local n8n instance over HTTPS.
- Use a dedicated staging server with valid TLS certificates.
5.2 Keep Webhook Paths Consistent
The following nodes must share the same path:
- Webhook Verification (GET)
- Webhook Receiver (POST)
Meta uses this single URL for both verification and incoming events. The Webhook Responder should return the verification challenge for GET requests and handle normal responses for POST events.
5.3 Verify Tokens Correctly
In your Meta App configuration, you set a verification token. Meta sends this token during the verification step and expects your endpoint to confirm it.
In a simple n8n-only setup, you can just return hub.challenge. If you implement custom logic outside n8n, or additional checks, make sure you validate the token before responding to the challenge.
5.4 Respect the 24-Hour Messaging Window
The WhatsApp Business API allows free-form, non-template replies only within a 24-hour period after the user’s last message. Outside that window you must use pre-approved message templates.
Your echo workflow relies on this rule, so for older conversations you may need to switch to templates or avoid sending a reply.
6. Troubleshooting Common Issues
If something is not working, use this checklist to quickly find the problem.
- Webhook verification failed
- Confirm that the GET handler returns the
hub.challengevalue exactly. - Verify that the callback URL in your Meta App settings matches the URL from the n8n Webhook node.
- Confirm that the GET handler returns the
- No messages reaching the workflow
- Inspect the raw JSON body in the Webhook Receiver node.
- Check that your path is correct and the method is set to POST.
- Confirm that you are reading the correct path:
entry → changes → value → messages.
- WhatsApp send errors
- Verify that
phoneNumberIdis correct. - Check that your WhatsApp credentials in n8n are valid.
- Ensure the WhatsApp Business account is approved to send messages.
- Verify that
- Slack notifications not appearing
- Confirm the Slack credentials and channel name or ID.
- Make sure your Slack app has the
chat:writescope. - Check n8n execution logs for any Slack API errors.
7. Security and Best Practices
Even for a simple echo workflow, you should treat your webhook endpoints as production-grade APIs.
- Validate incoming requests Use the app-level verify token or request signature verification provided by Meta, if available.
- Restrict access where possible Limit webhook exposure to Meta IP ranges or add secret headers that only Meta knows.
- Monitor and log failures Use n8n execution history to review errors, and consider external logging for critical production systems.
- Handle edge cases separately Messages with media, status updates, or system notifications should often follow a different branch instead of being echoed back as text.
8. Extending the WhatsApp Echo Workflow
Once your echo flow is working reliably, it becomes a strong foundation for more advanced WhatsApp automation in n8n.
- Automatic media handling Detect media messages, download images or audio, and store them in cloud storage.
- Rich bot logic Route messages to an NLP service or knowledge base to interpret intent and provide smarter replies.
- Fallback routing to humans Escalate to a human operator via Slack or email when the bot cannot understand the user’s request.
- Analytics and reporting Log messages to a database or data warehouse for metrics, dashboards, and long-term analysis.
9. Recap and Next Steps
You have seen how to build a complete n8n WhatsApp Echo workflow that:
- Handles Meta’s webhook verification using a GET request
- Receives WhatsApp messages via a POST webhook
- Checks for the presence of a message before replying
- Sends an echo response using the WhatsApp Business API
- Notifies a Slack channel whenever a new message arrives
- Applies security, testing, and troubleshooting best practices
To put this into practice:
- Deploy the workflow in your n8n instance.
- Configure your WhatsApp Business API credentials and phoneNumberId.
- Expose your webhook with HTTPS (for example using ngrok).
- Register the callback URL in your Meta Developer App settings.
- Send
