
AI Image Processing & Telegram Workflow with n8n
This guide walks you through an n8n workflow template that turns Telegram text prompts into AI-generated images and sends them straight back to the user. You will learn how each node works, how to configure credentials, and how to handle prompts, errors, and costs in a practical way.
What you will learn
By the end of this tutorial-style article, you will be able to:
- Explain how an AI image generation workflow in n8n connects Telegram and OpenAI
- Set up and configure each node in the template step by step
- Use prompt engineering basics to improve image quality
- Add security, moderation, and observability to your automation
- Troubleshoot common issues with chat IDs, binaries, and rate limits
Why build an AI image workflow with Telegram and n8n?
Combining Telegram with AI image generation gives users a fast, conversational way to request and receive visuals. Instead of visiting a web app or dashboard, they simply send a message to a bot, wait a few seconds, and receive a generated image directly in chat.
Typical use cases
- Marketing and creative teams – Quickly mock up social posts, ads, or thumbnails.
- Customer support – Share visual explanations or diagrams on demand.
- Community and hobby bots – Let users create custom artwork for fun.
- Product and UX teams – Rapidly prototype visuals and concepts.
Key benefits of this n8n workflow template
- Instant image delivery through Telegram using a simple chat interface.
- No-code orchestration in n8n, so you can iterate quickly without heavy coding.
- Centralized error handling using merge and aggregation nodes for clean data flow.
- Flexible prompt handling to route, clean, and enrich user input before sending it to OpenAI.
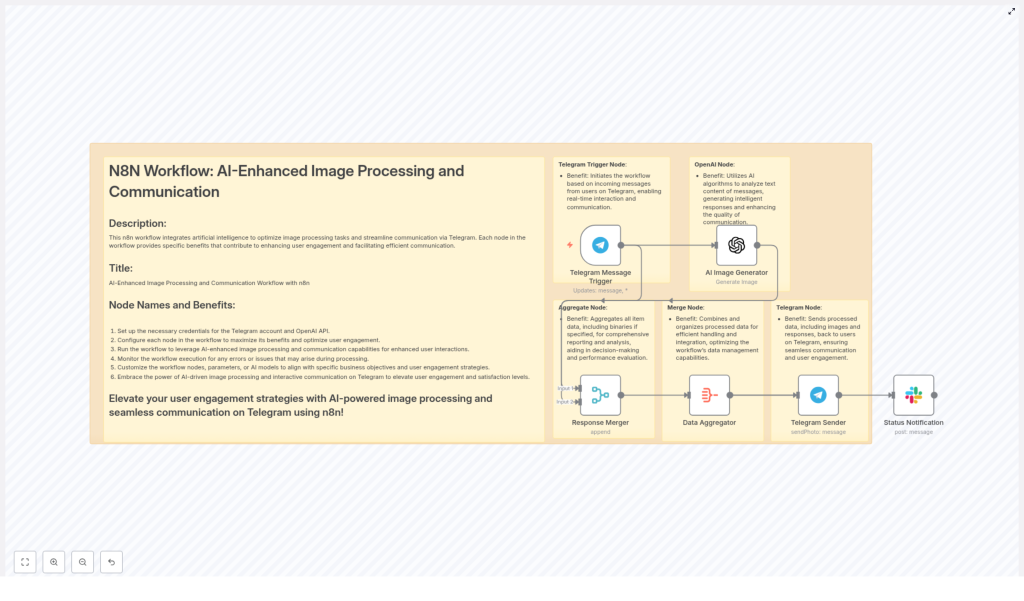
Concept overview: How the workflow fits together
Before configuring anything, it helps to understand the overall flow. At a high level, the template:
- Listens for messages sent to your Telegram bot.
- Uses the message text as a prompt for an AI image generator (OpenAI).
- Merges the generated image with the original message metadata.
- Aggregates all required data and binaries into a single payload.
- Sends the image back to the user in Telegram via
sendPhoto. - (Optional) Notifies another channel like Slack for logging or analytics.
The main n8n nodes involved
In this template, you will work with the following core nodes:
- Telegram Trigger – Starts the workflow when a user sends a message.
- OpenAI Image Generation node – Creates an image from the user prompt.
- Merge node – Joins message metadata and AI output.
- Aggregate node – Assembles JSON and binary data for sending.
- Telegram Sender node – Sends the final image back via
sendPhoto. - Status / Notification node (optional) – Posts status updates to Slack or another channel.
Step-by-step setup in n8n
In this section you will configure the workflow from credentials to final delivery. Follow the steps in order, and test as you go.
Step 1 – Configure your credentials
First, connect n8n to Telegram and OpenAI.
- Telegram Bot API Key
- Open Telegram and start a chat with BotFather.
- Create a new bot and copy the API token that BotFather gives you.
- In n8n, go to Credentials and create a new Telegram credential.
- Paste the bot token and save.
- OpenAI API Key
- Generate an API key in your OpenAI account.
- In n8n, create an OpenAI credential and paste the key.
- Keep this key secret and plan to rotate it periodically for security.
Step 2 – Set up the Telegram Message Trigger
The Telegram Trigger node listens for updates from your bot and starts the workflow whenever a message arrives.
- Choose the Telegram Trigger node in your workflow.
- Attach your Telegram credentials.
- Configure it to listen for message updates.
- If needed, filter by:
- Commands like
/generateto only respond to specific prompts. - User IDs to limit access to certain users or groups.
- Commands like
As an example, the JSON from Telegram often includes a path like message.text for the prompt and message.from.id for the user ID you will reply to.
Step 3 – Configure the AI Image Generator (OpenAI node)
Next, connect the incoming Telegram text to the AI image generator.
- Add an OpenAI node after the Telegram Trigger.
- Select the correct resource type, for example Image.
- Map the prompt field to the incoming message text, for example:
{{ $json.message.text }} - Optionally define a base prompt template or default style to keep outputs consistent.
You can think of this node as the “creative engine” of the workflow. The better and clearer the prompt, the better the resulting image will be.
Step 4 – Merge metadata and AI output
Once OpenAI returns an image, you usually want to keep track of who requested it, when it was requested, and any other context.
- Add a Merge node after the OpenAI node.
- Connect the original Telegram Trigger output and the OpenAI node output into this Merge node.
- Configure the merge mode (for example, merge by index if both streams produce one item each).
This step lets you combine:
- Chat metadata like
chat.id,from.id,username, andtimestamp. - The generated image data and any associated metadata from OpenAI.
Step 5 – Aggregate data and binaries
The Telegram Sender node expects a complete payload that includes both JSON fields and binary image data. The Aggregate node helps you assemble this.
- Add an Aggregate node after the Merge node.
- Configure it to include:
- All necessary JSON fields (for example, the final
chatIdpath). - The binary data property that holds the generated image.
- All necessary JSON fields (for example, the final
This step is important to avoid issues where the image is generated correctly but not attached when sending via Telegram.
Step 6 – Send the image back via Telegram
Now you can reply to the user with the generated image using the Telegram Sender node.
- Add a Telegram node configured as a sender.
- Set the operation to
sendPhoto. - Map the
chatIdfield to the originating user. For example, based on your merged data structure:{{ $json.data[1].message.from.id }}Adjust this expression to match the actual path in your workflow after the Merge and Aggregate nodes.
- Attach the binary image data from the Aggregate node to the
photoor equivalent binary field.
Once configured, test by sending a prompt to your Telegram bot. If everything is correct, you should receive the AI-generated image as a photo message.
Optional Step 7 – Add status notifications
For logging or analytics, you may want a separate notification whenever an image is processed.
- Add a node such as Slack, Webhook, or another messaging node.
- Configure it to run after the Telegram Sender node.
- Send a simple summary, for example:
- User ID, prompt, timestamp
- Generation status (success or error)
Prompt engineering tips for better AI images
The quality of your images depends heavily on the quality of your prompts. Here are some practical guidelines you can share with your users.
- Be specific
Instead of a vague prompt like “a city”, use something like: “a vibrant flat-style illustration of a city skyline at sunset, warm colors, minimalistic design”. - Add style references
Mention artists, art styles, or photography types to guide the look and feel. - Reduce ambiguity
Avoid pronouns like “it” or “they”. Clearly describe the subject, background, and main focus. - Use progressive refinement
Start with a base prompt, then allow follow-up prompts to refine details such as lighting, angle, or mood.
Security, moderation, and access control
When you allow users to send free-form prompts, you need to think about safety, abuse prevention, and cost control.
Content safety and moderation
- Sanitize user input to strip out unsafe words or patterns.
- Integrate a content moderation API, or use OpenAI moderation endpoints, to block disallowed prompts before image generation.
- Log or flag suspicious prompts for manual review if needed.
API key and access security
- Store API keys as environment variables, not directly in workflow code.
- Restrict credential access in n8n so only admin users can view or modify them.
- Rotate keys periodically and revoke them immediately if you suspect leakage.
Usage limits and abuse prevention
- Monitor usage per user to detect unusual spikes or abuse.
- Set rate limits or quotas, such as a maximum number of images per day per user.
- Consider requiring authentication or whitelisting for production bots.
Observability and metrics for your workflow
Treat this workflow like a small production service. Track key metrics so you can detect problems early.
- Requests per day and per user to understand load and adoption.
- Average image generation latency to see how long users wait.
- API error rates and retries to spot reliability issues.
- Telegram delivery success and failures to ensure users actually receive images.
You can use the optional Status Notification node to post summary events to Slack or a monitoring system every time an image is processed and sent.
Cost management and pricing ideas
AI image generation is usually billed per request and sometimes per resolution. A few configuration choices can keep your costs under control.
- Offer a limited number of free generations per user, then require a subscription or manual approval for heavy usage.
- Use smaller default image sizes to reduce cost, and only allow high-resolution images on demand.
- Queue or batch requests during peak periods to avoid cost spikes and API throttling.
Troubleshooting: common issues and fixes
If the workflow does not behave as expected, start with these frequent problem areas.
1. Missing or invalid credentials
If nodes fail to connect to Telegram or OpenAI:
- Open the relevant credential in n8n and re-enter the API key or token.
- Run a connection test in each node if available.
- Make sure you are using the correct bot token and OpenAI key.
2. Chat ID mapping errors
If the bot fails to send photos back to the user, the chatId expression is often the culprit.
- Inspect the output of the Merge or Aggregate node to see the exact JSON structure.
- Update the
chatIdexpression in the Telegram Sender node to match the correct path, for example:{{ $json.data[1].message.from.id }} - Test with a simple text message first to confirm the mapping.
3. Binary data not attached
If Telegram responds with errors about files or the image does not appear:
- Confirm that the Aggregate node is including the binary property from the OpenAI node.
- Check that the binary field name in the Telegram Sender node matches the actual binary key.
- Remember that
sendPhotoexpects the image as a binary file, not just a URL or JSON field.
4. API rate limits and timeouts
Errors like HTTP 429 or timeouts usually mean the API is overloaded or throttling your requests.
- Implement retries with exponential backoff in your workflow.
- Add a queue or delay node to smooth out spikes in traffic.
- Monitor error rates and adjust usage or quotas accordingly.
Scaling the workflow and next steps
Once the basic template is working, you can evolve it into a more robust service.
- Deploy n8n in a production-ready environment such as managed cloud, Docker with autoscaling, or Kubernetes.
- Add a database or storage layer for user preferences and history, so users can revisit previous generations.
- Introduce multi-model support and let users choose between different image engines or styles.
- Build an admin dashboard to review prompts, handle flagged content, and track usage metrics.
Example prompt template you can use
Here is a simple template you can apply inside your workflow or share with users:
Generate a high-resolution, photorealistic image of: "{{ user_prompt }}" - bright daylight, shallow depth of field, warm tones, 16:9 aspect ratio
