
Automate: Replace Images in Google Slides with n8n (So You Never Manually Swap Logos Again)
Picture this: it is 5 minutes before a client meeting, you suddenly realize the logo in your 30-slide deck is the old one, and you start the frantic click-delete-insert dance across every slide. Again.
If that feels painfully familiar, this n8n workflow template is about to be your new favorite coworker. It automatically replaces images in Google Slides based on alt text, so you can swap logos, hero images, or screenshots across entire decks with a single request instead of a full-on copy-paste workout.
In this guide, you will see how to use an n8n workflow that talks to the Google Slides API, finds images by alt text, replaces them in bulk, updates the alt text, and even pings you in Slack to say, “All done, human.”
What this n8n workflow actually does (in plain language)
At its core, this is an image replacement bot for Google Slides. You send it a POST request, it hunts down images that match a specific alt-text key, then swaps them out with a new image URL.
More technically, the n8n workflow:
- Exposes a POST webhook endpoint that accepts a JSON payload
- Validates the incoming parameters so you do not break anything accidentally
- Retrieves the Google Slides presentation via the Google Slides API
- Searches through slides for page elements (images) whose alt text matches your provided
image_key - Uses the Slides API
replaceImagerequest to:- Swap the image URL
- Update the alt text with your key
- Returns a JSON response to the caller so you know what happened
- Optionally sends a Slack notification confirming the change
Result: you update one JSON payload instead of 47 slides. Your future self will be grateful.
Why automate Google Slides image replacement?
Manually updating images in a deck is the digital version of refilling the office printer: boring, repetitive, and surprisingly easy to mess up.
Automating it with n8n and Google Slides API gives you:
- Speed – refresh logos, hero images, or screenshots across many slides or even multiple decks in seconds
- Consistency – keep image positions, cropping, and layout exactly the same while only swapping the content
- Scalability – plug this into your CMS, CRM, or marketing automation so slide updates just happen in the background
Once it is set up, you can treat your slides like a mini design system instead of a manual editing project.
Before you start: what you need in place
To use this n8n workflow template, make sure you have:
- n8n instance – either n8n cloud or self-hosted
- Google Slides API credentials configured in n8n using OAuth2
- A Google Slides presentation where images have unique alt-text identifiers (for example
client_logo,hero_background) - Optional: a Slack workspace and channel if you want notifications when images are replaced
Quick tour of the workflow: n8n nodes involved
Here is the cast of characters in this automation:
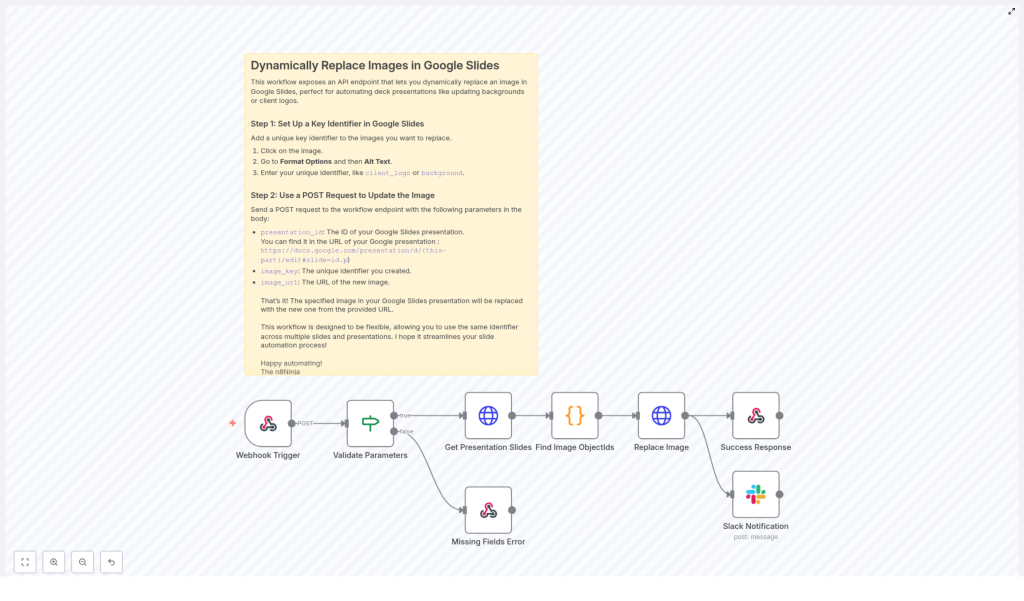
- Webhook Trigger – listens for incoming POST requests with your JSON payload
- IF (Validate Parameters) – checks that
presentation_id,image_key, andimage_urlare present - HTTP Request (Get Presentation Slides) – calls the Google Slides API to fetch the presentation JSON
- Code (Find Image ObjectIds) – scans slides and finds images whose alt text matches your
image_key - HTTP Request (Replace Image) – sends a
batchUpdaterequest to replace the image and update the alt text - Respond to Webhook – returns a success or error JSON response
- Slack (optional) – posts a message to a channel to confirm the update
You do not have to be a Slides API wizard to use this template, but it helps to know what each node is doing behind the scenes.
Step 1 – Tag your images with unique alt text in Google Slides
Automation only works if it knows what to target. In this workflow, that targeting happens via alt text.
In your Google Slides deck:
- Open the presentation
- Click on the image you want to automate
- Go to Format options > Alt text
- In the description, enter a unique key, for example:
client_logohero_backgroundfooter_badge
The workflow will later search for this exact alt-text value and replace all matching images in the presentation. Think of it as giving each image a secret code name.
Step 2 – Create the webhook trigger in n8n
Next, you need a way to tell n8n, “Hey, time to swap that image.” That is what the Webhook Trigger node is for.
In n8n:
- Add a Webhook Trigger node
- Set the HTTP method to POST
- Choose a path, for example:
/replace-image-in-slide - Set the response mode to
responseNodeso that you can return structured JSON from a later node
This gives you a URL that other systems (or you, via tools like Postman) can call to trigger image replacement.
Step 3 – Validate the incoming parameters with an IF node
To avoid mysterious failures and half-updated decks, the workflow checks that the request body contains all the required fields.
Use an IF node to ensure the JSON body includes:
presentation_id– the presentation ID from the Google Slides URLimage_key– the exact alt-text key you set on the image, for exampleclient_logoimage_url– a publicly accessible URL for the new image
If any of these are missing, the workflow can immediately return an error response instead of failing in the middle of the Slides API call.
Step 4 – Retrieve the Google Slides presentation via the API
Now that the request is validated, the workflow needs to read the deck and see what is inside.
Use an HTTP Request node configured for the Google Slides API to GET the presentation JSON:
{  "url": "https://slides.googleapis.com/v1/presentations/{{ $json.body.presentation_id }}",  "method": "GET"
}
This returns the full structure of the presentation, including slides, page elements, and their objectId values. The next step is to find which of those elements are images with your target alt text.
Step 5 – Find image objectIds with a Code node
Now comes the detective work. You need to scan the presentation JSON and pick out only the images that match your image_key.
In a Code node, you will:
- Loop through each slide and its
pageElements - Filter elements where:
- an
imageproperty exists - the element’s
description(alt text) matches the incomingimage_key
- an
- Return an array of objects that contain the matching
objectIdvalues
These objectIds are the handles you will pass to the Slides API so it knows which elements to replace.
Step 6 – Replace the image and update the alt text
With the objectIds in hand, it is time for the actual swap. This happens via a batchUpdate request to the Google Slides API from another HTTP Request node.
For each objectId that matched your image_key, send a payload similar to this:
{  "requests": [  {  "replaceImage": {  "imageObjectId": "OBJECT_ID_HERE",  "url": "https://example.com/new-image.jpg",  "imageReplaceMethod": "CENTER_CROP"  }  },  {  "updatePageElementAltText": {  "objectId": "OBJECT_ID_HERE",  "description": "your_image_key"  }  }  ]
}
A couple of important notes so nothing gets weird visually:
imageReplaceMethodcontrols how the new image fits into the existing frame. Common options include:CENTER_CROP– keeps the aspect ratio and crops from the centerSTRETCH– stretches the image to fit the shape- Other methods are available depending on your layout needs
- Use the same
objectIdfor both thereplaceImageandupdatePageElementAltTextrequests so they target the exact same element
After this step, your slides will look the same structurally, but with shiny new images.
Handling errors and sending responses
Things do not always go perfectly, so the workflow is set up to respond clearly when something is off.
If a required field is missing in the request body, the workflow returns a 500 JSON response similar to:
{ "error": "Missing fields." }
On success, it returns a JSON response like:
{ "message": "Image replaced." }
If you connected Slack, the workflow can also send a message to your chosen channel confirming that the image replacement finished. This is especially useful when other systems call the webhook automatically and you want a visible audit trail.
Security and best practices for this automation
Even though this is “just” replacing images, it still touches live presentations, so a few precautions are smart:
- Make sure the image URL is reachable by Google. It should be publicly accessible or hosted somewhere Google can fetch from.
- Protect your webhook from random callers. Use an API key, IP allowlists, or n8n’s built-in authentication options so only trusted systems can trigger replacements.
- Test on a copy first. Run the workflow on a duplicate of your deck before pointing it at your production presentation.
- Use descriptive alt-text keys. Names like
client_logoorproduct_heroreduce the risk of accidentally replacing the wrong image.
A few minutes of setup here can save you from the “why is the footer logo now a cat meme” kind of surprises.
Example JSON payload for the webhook
When you call the webhook, the request body should look something like this:
{  "presentation_id": "1A2b3C4d5Ef6G7h8I9J0k",  "image_key": "client_logo",  "image_url": "https://assets.example.com/logos/new-logo.png"
}
Swap in your own presentation ID, alt-text key, and image URL, and you are good to go.
Troubleshooting: when things do not go as planned
If the workflow is not behaving, here are some common issues to check before blaming the robots:
- No objectIds found?
Confirm that the image’s Alt text in Google Slides exactly matches theimage_keyyou send in the JSON. Even small typos will prevent a match. - Permission or access errors from Google?
Check the OAuth scopes for the Slides API in your Google Cloud Console and make sure the n8n credentials are configured with the correct permissions. - Image looks distorted after replacement?
Try a differentimageReplaceMethod, for exampleSTRETCHinstead ofCENTER_CROP, or use an image with proportions closer to the original frame.
Once you get the first run working, it is usually smooth sailing from there.
Ideas for next steps and integrations
Replacing a logo on demand is nice. Turning this into a fully automated content pipeline is even better.
You can extend this n8n workflow to:
- Pull fresh images from a CMS when content is updated
- Generate images dynamically via a design API or image generation service
- Trigger replacements from CRM events, for example when a new customer is added or a campaign changes
- Combine with version control or audit logging to track who changed which presentation and when
Once the basics are in place, your slides can quietly keep themselves up to date while you focus on more interesting work than “replace logo v5-final-final.png”.
Try the template and stop doing slide surgery by hand
If you are ready to retire the “click every slide and swap the image” routine, you can import this workflow into n8n, connect your Google Slides credentials, and test it on a sample presentation in just a few minutes.
Next steps:
- Import the template into your n8n instance
- Connect your Google Slides OAuth2 credentials
- Tag a few images with alt text in a test deck
- Send a sample JSON payload to the webhook and watch the magic happen
Want to go further? Subscribe for more n8n automation tutorials and get additional workflow templates straight to your inbox.
If you would like a downloadable n8n workflow JSON tailored to your setup, I can help adapt it to your exact use case. Tell me whether you want Slack notifications enabled and which imageReplaceMethod you prefer, and we can shape the workflow around that.
