
Automate Cold Email Reply Qualification with n8n
Qualifying cold email replies by hand slows down your sales team. With this n8n workflow template, you can automatically read replies from Gmail, check matching contacts in Pipedrive, use OpenAI to assess interest, and create deals for qualified leads. The result is a repeatable system that saves SDRs hours every week and makes sure no valuable reply is missed.
What you will learn in this guide
In this step-by-step tutorial, you will learn how to:
- Understand the full cold email reply qualification workflow in n8n
- Connect Gmail, Pipedrive, OpenAI, and Slack in a single automation
- Configure each node so replies are qualified and turned into deals automatically
- Write and improve an OpenAI prompt that returns clean JSON
- Test, debug, and safely customize the template for your sales process
Why automate cold email reply qualification?
When you run outbound campaigns, your team often spends a lot of time:
- Opening each reply manually
- Deciding whether it is positive, negative, or neutral
- Checking if the sender is in your CRM and in the right campaign
- Creating deals and notifying the right SDR
This manual triage is slow, inconsistent, and expensive. Automation with n8n lets you:
- Qualify replies consistently using clear rules and AI
- Focus human effort on high-value conversations instead of inbox sorting
- Create Pipedrive deals and notify sales in real time
- Reduce errors from missed or misclassified replies
The workflow described below combines Gmail, Pipedrive, and OpenAI so that every relevant reply is checked, scored, and turned into an actionable next step.
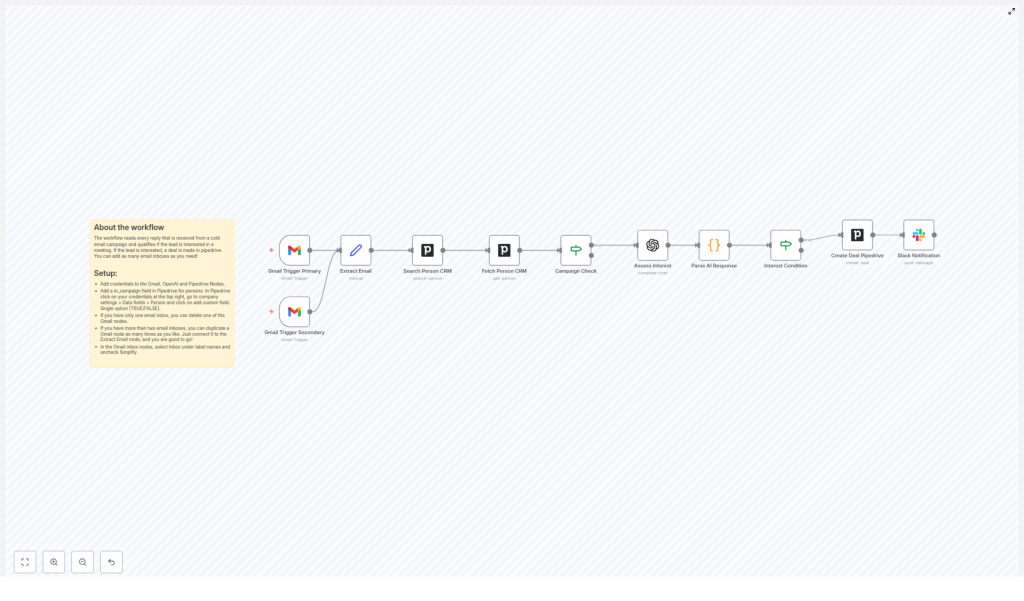
How the n8n cold email reply workflow works
At a high level, the workflow follows this logic:
- Watch one or more Gmail inboxes for new replies.
- Extract and normalize the email content into a consistent field.
- Look up the sender in Pipedrive and fetch their details.
- Check if the person is part of the outbound campaign.
- Send the reply text to OpenAI to assess interest.
- Parse the AI response into structured data.
- If the lead is interested, create a Pipedrive deal.
- Optionally send a Slack notification to your sales channel.
Main components used in the template
- Gmail Trigger (primary and secondary) – watches inboxes for incoming replies
- Set node (Extract Email) – standardizes the email body into a named field
- Pipedrive Search & Fetch – finds the person and retrieves custom fields
- If node (Campaign Check) – filters to people in your outbound campaign
- OpenAI (Assess Interest) – analyzes the reply text
- Code node (Parse AI Response) – converts AI output into clean JSON fields
- If node (Interest Condition) – checks if the lead is interested
- Pipedrive Create Deal – opens a new deal for qualified leads
- Slack node – notifies your sales team when a new deal is created
Before you start: setup checklist
Make sure you have the following ready before configuring the workflow:
- n8n instance with access to:
- Gmail credentials
- Pipedrive credentials
- OpenAI credentials
- (Optional) Slack credentials
- A Pipedrive person custom field, for example in_campaign, that indicates if a contact is in your outbound campaign (TRUE/FALSE or similar)
- At least one Gmail inbox used for outbound campaigns and replies
Later, you will also:
- Adjust Pipedrive deal fields (title, owner, stage) to match your pipeline
- Test and refine the OpenAI prompt so it returns valid JSON consistently
Step-by-step: building the workflow in n8n
Step 1 – Watch replies with Gmail Trigger
The Gmail Trigger node starts the workflow every time a new email that matches your criteria arrives.
Configuration tips:
- Add one or more Gmail Trigger nodes if you monitor multiple inboxes (for example, primary SDR inbox and a shared team inbox).
- Set a reasonable polling interval, such as every minute, while keeping Gmail API quotas in mind.
- In the node settings:
- Uncheck the “Simplify” option so you get the full raw message data.
- Select the Inbox label (or another label you use for campaign replies) so only relevant messages trigger the workflow.
With “Simplify” disabled, you preserve rich context and ensure that later nodes can extract the email body reliably.
Step 2 – Normalize the email content (Set node)
Different Gmail messages may store the body text in slightly different fields. To make the rest of the workflow easier, you standardize this into a single field.
Use a Set node (often named Extract Email) right after the Gmail Trigger and:
- Create a new field, for example
emailortext. - Map this field from the correct part of the Gmail payload that holds the email content.
This step ensures that every downstream node can simply reference something like {{$json.email}} instead of dealing with Gmail-specific structure.
Step 3 – Find the sender in Pipedrive (Search & Fetch)
Next, you connect the reply to the right person in your CRM.
Use two Pipedrive nodes:
- Search Person CRM
- Search for the person by email address from the reply.
- This node returns the matching person if they exist in Pipedrive.
- Fetch Person CRM
- Once a person is found, fetch their full details.
- Include any custom fields, such as in_campaign or qualification flags.
By the end of this step, your workflow knows exactly which Pipedrive contact sent the reply and what campaign or status they belong to.
Step 4 – Filter by campaign (If node)
Not every reply in your inbox belongs to your current outbound campaign. You likely want to qualify only those that are part of a specific sequence.
Use an If node, often named Campaign Check, to:
- Inspect the in_campaign custom field (or your equivalent field) on the Pipedrive person.
- Continue the workflow only if this field is set to TRUE or the value you use for “in campaign”.
Replies from people who are not part of the campaign can be ignored or routed to a different branch for manual review. This avoids clutter and keeps the AI analysis focused on the right audience.
Step 5 – Assess interest with OpenAI
Now you pass the reply text to OpenAI so it can determine whether the lead is interested.
Add an OpenAI node (or a dedicated “Assess Interest” node configured with OpenAI) and:
- Use the standardized email field from the Set node as the input text, for example
{{ $json.email }}or{{ $json.text }}. - Provide a clear prompt that:
- Explains the task: classify whether the reply shows interest.
- Instructs the model to return only JSON.
- Defines the exact JSON structure expected.
Example prompt snippet for the Assess Interest node:
Analyze the following email reply and return only JSON:
{"interested":"yes" or "no","reason":"one-sentence justification"}

Reply:
"{{email_text}}"
Replace {{email_text}} with the field that contains your extracted email body. Keeping the format strict reduces parsing errors later.
Step 6 – Parse the AI response (Code node)
The OpenAI node returns text that should be valid JSON. To safely use it in conditions and deal creation, you convert it into structured fields.
Add a Code node, often named Parse AI Response, and:
- Write a small JavaScript snippet that:
- Reads the raw response from OpenAI.
- Parses it with
JSON.parse()into an object. - Exposes fields like
interestedandreasonon$json.
- The workflow expects something like:
{"interested":"yes"|"no","reason":"..."}
You can also add simple trimming or cleanup here if the AI occasionally includes extra whitespace around the JSON.
Step 7 – Check interest and create a Pipedrive deal
Once the AI output is parsed, you can decide what to do based on the interested value.
Interest Condition (If node)
- Add another If node, usually called Interest Condition.
- Configure it to check if
interestedequals"yes".
Create Deal in Pipedrive
For replies where the lead is interested:
- Add a Create Deal Pipedrive node after the “yes” branch.
- Set a clear deal title, for example:
{{ $json.person_name }} - Reply from outbound campaign
- Configure:
- Pipeline and stage
- Owner (SDR or team member)
- Priority or other custom fields relevant to your process
This step turns qualified replies into actionable deals without any manual data entry.
Step 8 – Notify the team on Slack (optional)
To ensure fast follow up, you can notify your sales team as soon as a new deal is created.
Add a Slack node after the Pipedrive Create Deal node and:
- Send a message to a dedicated sales or SDR channel.
- Include key information, for example:
- Contact name and email
- Deal link in Pipedrive
- Short summary of the AI “reason” field
This keeps everyone aligned and reduces response times to hot leads.
Improving your OpenAI prompt for better results
A strong prompt is critical for reliable automation. To reduce JSON errors and improve accuracy:
- Be explicit about the output format. Clearly state that only JSON should be returned, and show the exact structure.
- Provide examples. Include short examples of positive, neutral, and negative replies and how they should be classified.
- Limit the response length. Ask for a short answer to minimize the chance of extra commentary or hallucinations.
You can start with the example snippet above and gradually refine it using real replies from your campaigns.
Testing and debugging the workflow
Before going live, it is important to test each part of the workflow with realistic data.
- Use a test inbox. Send yourself sample replies (interested, not interested, out of office, etc.) and verify how the workflow behaves.
- Check execution logs in n8n. Inspect the output of each node, especially the OpenAI node and the Parse AI Response node, to confirm the JSON structure is correct.
- Handle malformed JSON. If the AI occasionally returns invalid JSON, enhance the Code node with:
- Trimming of leading or trailing text
- Basic validation before parsing
Security, privacy, and compliance considerations
Because this workflow sends email content to third party services, you should review your data handling practices.
- Review OpenAI data policies. Check how data is stored and processed, and opt out of data logging if your compliance requires it.
- Redact sensitive data when possible. If replies contain personal or confidential information, consider masking or removing it before sending it to OpenAI.
- Minimize stored data in Pipedrive. Only keep fields that are necessary for your sales process and remove test data regularly.
Customization ideas for advanced workflows
Once the basic template is running, you can extend it to match your exact sales motion.
- Interest scoring. Instead of a simple yes/no, ask OpenAI to return a score from 0 to 100 and route high scoring leads differently.
- Automatic meeting scheduling. When the reply suggests times, integrate with a calendar API to propose or book meetings automatically.
- Follow up sequences for “maybe” replies. For ambiguous or “not now” responses, automatically send a personalized follow up email from n8n.
Common issues and how to fix them
AI returns invalid JSON
If the OpenAI node sometimes returns extra text or malformed JSON:
- Tighten the prompt to say “return only JSON, no explanation”.
- Add trimming and validation logic in the Parse AI Response Code node.
- Include concrete examples of correct JSON in the prompt.
Pipedrive person not found
If the workflow cannot match the sender to a Pipedrive contact:
- Confirm that the Search Person CRM node is using the correct email field.
- Check that the inbound reply includes the original outbound email address you used for the campaign.
- Consider adding secondary matching, such as name or company, if email addresses differ.
Recap and next steps
This n8n workflow template transforms cold email reply handling from a manual process into a consistent, automated system. By watching Gmail, checking Pipedrive, using OpenAI to assess interest, and creating deals plus Slack notifications, your SDRs can focus on conversations instead of inbox triage.
To put this into practice:
- Import the workflow into n8n.
- Connect your Gmail, Pipedrive, OpenAI, and optional Slack credentials.
- Verify the in_campaign field or equivalent is set up in Pipedrive.
- Test with a small batch of real replies and refine your OpenAI prompt.
- Roll out gradually and iterate on deal creation rules and routing.
Ready to automate your reply qualification? Set up the template, run a controlled test, and then adapt it to your specific CRM fields and sales cadence. For deeper customization, work with your automation specialist or consult the n8n community for best practices.
