
How to Build a Bitrix24 Chatbot with Webhook Integration in n8n
1. Overview
This guide explains how to implement a Bitrix24 chatbot using an n8n workflow template that relies on Bitrix24 webhook events. The workflow receives incoming POST requests from Bitrix24, validates credentials, routes events based on their type, and sends structured responses back to the Bitrix24 REST API.
The content is organized in a documentation-style format for technical users who want a clear reference to the workflow architecture, node behavior, and configuration details.
2. Workflow Architecture
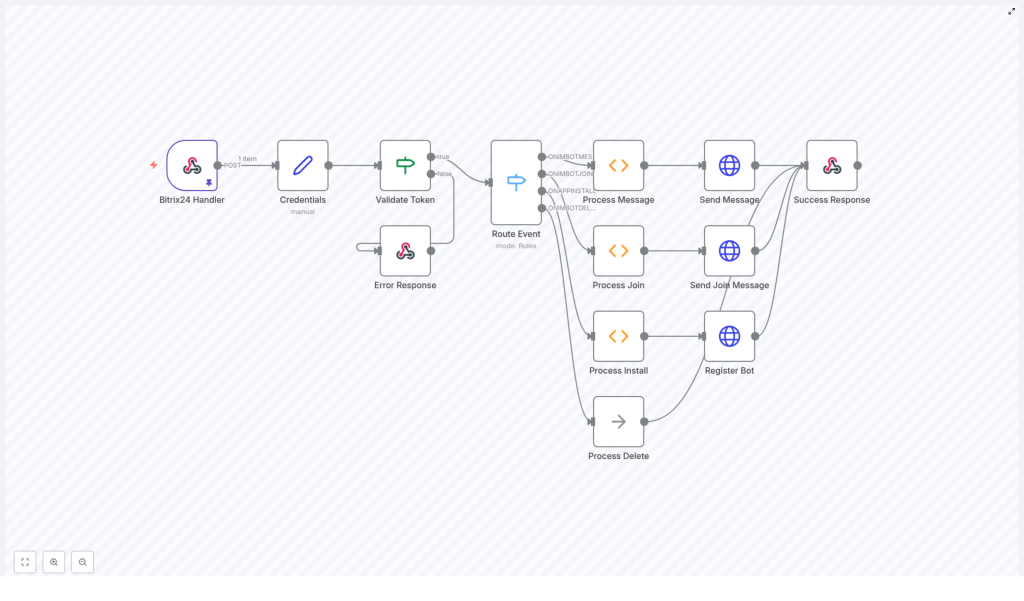
At a high level, the n8n workflow acts as a webhook-based integration between Bitrix24 and your bot logic:
- Bitrix24 Handler (Webhook trigger) receives incoming HTTP POST requests from Bitrix24.
- Credentials Node parses the payload and extracts authentication and routing data.
- Validate Token Node enforces security by verifying the application token.
- Route Event Node inspects the event type and dispatches it to the correct processing branch.
- Process Message / Join / Install / Delete Nodes implement event-specific logic.
- HTTP Request Nodes interact with the Bitrix24 REST API to send messages or register the bot.
- Respond to Webhook Nodes return success or error responses to Bitrix24.
The data flows linearly from the Bitrix24 webhook into the handler node, through validation and routing, then branches into specialized processing nodes before returning a final HTTP response.
3. Node-by-Node Breakdown
3.1 Bitrix24 Handler (Webhook Trigger)
The Bitrix24 Handler node is the entry point of the workflow. It is configured as a Webhook trigger node in n8n and is responsible for:
- Accepting HTTP POST requests sent from Bitrix24.
- Receiving the full webhook payload, including authentication information, event metadata, and message content.
- Passing the raw JSON body to downstream nodes without modification.
All subsequent nodes rely on this payload to determine the event type and to construct appropriate responses.
3.2 Credentials Node
The Credentials node processes the incoming payload and extracts the fields required for authentication and API calls. Typical data extracted includes:
- Application or bot token.
- Client ID or application identifier.
- Domain or Bitrix24 portal URL used to target the REST API.
This node usually runs as a Function or Set node in n8n that:
- Reads specific JSON properties from the webhook body.
- Assigns them to standardized field names used by later nodes.
- Ensures that required authentication values are present before continuing.
3.3 Validate Token Node
The Validate Token node ensures that the incoming request originates from a trusted Bitrix24 application. It:
- Compares the application token from the payload with an expected token or validation rule.
- Determines if the request is authorized to access the workflow.
If the token is invalid, the node triggers an Error Response branch that:
- Returns an HTTP 401 Unauthorized status code to Bitrix24.
- Stops further processing for that request.
If the token is valid, processing continues to the routing logic.
3.4 Route Event Node
The Route Event node examines the event type in the webhook payload and decides which branch of the workflow should handle it. Typical event types include:
- Message add events when a new message is sent to the bot.
- Bot join events when the bot is added to a chat.
- Installation events when the bot application is installed.
- Deletion events when the bot is removed.
This is usually implemented as a Switch or IF node in n8n that:
- Reads an event identifier from the incoming JSON.
- Routes execution to one of the processing nodes:
- Process Message
- Process Join
- Process Install
- Process Delete
3.5 Process Message Node
The Process Message node is responsible for handling new bot messages. It:
- Extracts the chat dialog ID from the event payload.
- Reads the message text sent by the user.
- Constructs a response message that can be static or based on the user input.
In the template, the response behavior is typically:
- Sending a greeting such as
Hi! I am an example-bot. I repeat what you say. - Optionally echoing the user’s message back to them.
The processed data is then passed to an HTTP Request node that calls the Bitrix24 REST API to post the reply back into the chat using the extracted dialog ID.
3.6 Process Join Node
The Process Join node handles events where the bot joins a chat. Its main responsibilities are:
- Identifying the chat or dialog where the bot was added.
- Preparing a welcome or greeting message for that chat.
The node passes this prepared message to a corresponding HTTP Request node that:
- Calls the appropriate Bitrix24 REST endpoint.
- Sends a greeting message to confirm that the bot is active and available.
3.7 Process Install Node
The Process Install node manages bot installation events. It is used to register the bot with Bitrix24 and configure its visible properties. During this step, the workflow:
- Calls the Bitrix24 REST API to register the bot.
- Sets configuration properties such as:
- Bot name and last name.
- Bot color.
- Bot email.
- Other supported registration parameters as required by the Bitrix24 API.
This logic is executed through an HTTP Request node that uses the domain and token extracted earlier to communicate with the Bitrix24 REST interface.
3.8 Process Delete Node
The Process Delete node is triggered when a bot deletion event is received. In the template:
- It is currently a no-operation (no-op) node.
- No additional cleanup logic is performed by default.
You can extend this node later to handle tasks such as:
- Revoking tokens.
- Clearing related data in external systems.
- Logging uninstall events for auditing or analytics.
3.9 HTTP Request Nodes
Multiple HTTP Request nodes are used throughout the workflow to interact with Bitrix24:
- Sending responses to chat messages.
- Posting greeting messages when the bot joins a chat.
- Registering the bot during installation.
These nodes typically:
- Use the domain and token extracted by the Credentials node.
- Call the relevant Bitrix24 REST endpoints with the required parameters.
- Include the dialog ID and message body when sending chat messages.
3.10 Respond to Webhook Nodes
The Respond to Webhook nodes finalize communication with Bitrix24 by returning HTTP responses:
- Success Response node:
- Sends a JSON response back to Bitrix24.
- Indicates that the event was processed successfully.
- Error Response node:
- Returns appropriate HTTP status codes, for example 401 on token validation failure.
- Signals that the event was rejected or could not be processed.
4. Execution Flow
The typical execution sequence for the workflow is:
- Bitrix24 sends a POST webhook request to the Bitrix24 Handler node URL.
- The Credentials node parses the request payload and extracts:
- Authentication token.
- Client ID.
- Domain or portal URL.
- The Validate Token node checks the application token:
- If invalid, the workflow routes to an Error Response node that returns a 401 Unauthorized response.
- If valid, processing continues.
- The Route Event node inspects the event type (for example, message add, bot join, installation, deletion).
- The workflow branches to the corresponding processing node:
- Process Message:
- Reads the dialog ID and message text.
- Builds a reply, such as a greeting or echo of the user message.
- Process Join:
- Creates a greeting message for the chat where the bot joined.
- Process Install:
- Registers the bot via the Bitrix24 REST API and sets its properties.
- Process Delete:
- Currently performs no additional logic but can be extended.
- Process Message:
- Each processing branch uses one or more HTTP Request nodes to:
- Call Bitrix24 REST endpoints.
- Send real-time responses or perform bot registration.
- A Success Response node returns a JSON response to Bitrix24 confirming that the event was handled successfully.
5. Configuration Notes
5.1 Webhook Setup in Bitrix24
To use this workflow, configure Bitrix24 to send webhook events to the URL exposed by the Bitrix24 Handler webhook node. Ensure:
- The HTTP method is set to POST.
- The payload includes the token, domain, client ID, and event details expected by the Credentials node.
5.2 Token Validation
In the Validate Token node:
- Define the logic to compare the incoming token with the expected application token.
- Return a 401 error via the Error Response node if the token does not match.
This step is essential for preventing unauthorized requests from triggering the workflow.
5.3 HTTP Request Node Configuration
For each HTTP Request node that calls the Bitrix24 REST API:
- Use the domain from the Credentials node to build the base URL.
- Include the token as required by the Bitrix24 REST endpoints.
- Pass the dialog ID and message text when sending chat messages.
- Specify bot properties such as name, last name, color, and email during installation.
5.4 Error Handling Considerations
While the template includes a token validation failure path, you may also:
- Extend error branches to capture HTTP errors from Bitrix24 REST calls.
- Log unexpected event types routed through the Route Event node.
- Handle missing or malformed fields in the incoming payload gracefully.
6. Advanced Customization
6.1 Enhancing Message Processing
The Process Message node currently demonstrates a simple pattern, such as:
- Replying with a statement like
Hi! I am an example-bot. I repeat what you say. - Echoing the user’s message back to the chat.
You can extend this logic by:
- Implementing conditional replies based on keywords or patterns.
- Adding message context awareness across multiple messages.
- Integrating with external systems for dynamic data retrieval.
6.2 Integrating AI or External Services
To build a more intelligent Bitrix24 chatbot using this n8n workflow, you can:
- Insert additional nodes between Process Message and the Bitrix24 HTTP Request nodes that:
- Call AI APIs to generate natural language responses.
- Query internal tools or databases for contextual information.
- Use Function nodes to transform or enrich the message text before sending it back.
6.3 Extending Installation and Deletion Logic
The Process Install and Process Delete nodes can be enhanced to:
- Register additional bot settings or permissions at install time.
- Perform cleanup actions, such as removing related records or disabling integrations when the bot is deleted.
7. Start Building Your Bitrix24 Chatbot
This n8n workflow template provides a structured starting point for building a Bitrix24 chatbot with webhook integration. By combining the Bitrix24 Handler, validation, event routing, and HTTP Request nodes, you can automate chat interactions, respond in real time, and integrate your bot with other systems.
Use this template as a foundation, then extend the processing nodes with your own business logic, external integrations, or AI-powered responses to deliver fast, personalized automation inside Bitrix24.
