
Monetize Cross-Chain Token Swaps With 1Shot Gas Station: Turn Complexity Into Passive Revenue
From Manual Swaps To Scalable Systems
If you work with DeFi, cross-chain activity, or dApps, you probably feel it already: the more chains you touch, the more time you spend on repetitive tasks. Managing gas across dozens of networks, handling stablecoin payments, and orchestrating complex swaps can quietly eat your focus and limit how far you can scale.
Instead of spending your energy on manual coordination, you can let an automated system do the heavy lifting. That is where the 1Shot Gas Station n8n workflow template comes in. It turns the complexity of cross-chain token swaps into a streamlined, monetizable service that runs in the background while you focus on building, shipping, and growing.
In this article, you will walk through a journey: from the problem of fragmented gas and cross-chain swaps, to a new mindset around automation, and finally to a practical, ready-to-use n8n workflow that uses Li.Fi and the x402 payment protocol to monetize gasless swaps across up to 100 EVM-compatible blockchains.
Shifting Your Mindset: Automation As A Growth Lever
Automation is not just about saving a few minutes. It is about building systems that work for you, 24/7, with consistent rules and predictable outcomes. When you automate cross-chain swaps and gas payments, you are not only saving time, you are also creating:
- New revenue streams from monetized swaps and fees
- Better user experiences through gasless, low-friction flows
- More mental space to focus on product, strategy, and growth
The 1Shot Gas Station workflow is a powerful example of this mindset. It is a template you can plug into your n8n instance, customize to your own token configurations and chains, then extend over time as your needs evolve. Think of it as a starting point for your own automated, cross-chain gas station and revenue engine.
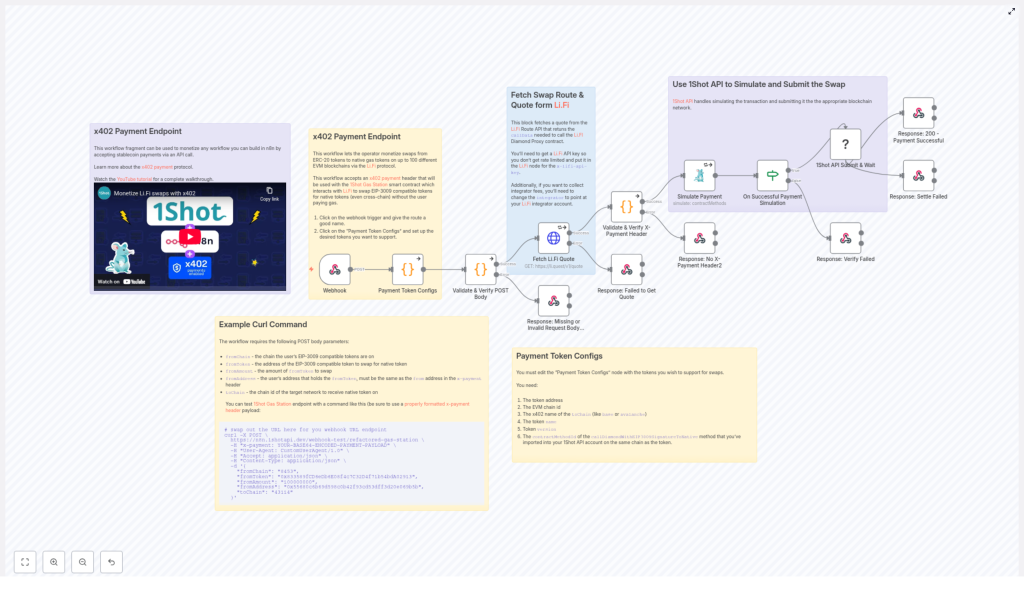
What The 1Shot Gas Station Workflow Actually Does
At its core, the 1Shot Gas Station workflow lets you monetize swaps from ERC-20 tokens to native gas tokens across up to 100 EVM-compatible blockchains, using the Li.Fi protocol and the x402 payment protocol.
Users can swap EIP-3009 compatible tokens for native gas tokens, even across different chains, without paying gas directly themselves. The workflow verifies an off-chain payment authorization, fetches an optimal route via Li.Fi, simulates the transaction with the 1Shot API, and then submits it if everything checks out.
The result is a gasless, monetizable, cross-chain swap experience that you can offer to your users or integrate into your own dApp, all orchestrated by n8n.
How The Workflow Flows: From Request To Revenue
The n8n workflow is built from several components that work together to keep everything secure, fast, and reliable. Here is how the flow unfolds end to end:
- Webhook Trigger – Receives an incoming POST request with swap parameters and a special
x402payment header. - Payment Token Configs – Uses your predefined list of supported tokens, chains, and contract details to validate and process payments.
- Validation & Verification – Checks the POST body and
x-paymentheader for authenticity, correctness, and compliance. - Li.Fi Quote Fetching – Calls the Li.Fi API to obtain a swap route, quote, and call data for the transaction.
- Simulation & Submission – Uses the 1Shot API to simulate the transaction, verify payment, then submit it to the blockchain if valid.
- Structured Responses – Returns clear success or error responses for missing parameters, validation issues, payment failures, and more.
Each of these parts is already wired together in the template. Your role is to configure the details, understand how they interact, and then adapt the workflow to your own business logic.
Step 1: Accepting x402 Payments For Gasless Swaps
To make gasless cross-chain swaps possible, the workflow uses the x402 payment protocol. This protocol enables least-friction stablecoin payments with off-chain authorizations. The user signs an authorization off-chain, and a smart contract later verifies and settles the payment on-chain.
In the workflow, this happens via a required x-payment HTTP header. That header must contain a base64-encoded JSON payload with the authorization details, such as:
- Addresses involved in the payment
- Signature of the off-chain authorization
- Authorized amount
- Validity window
- Nonce and other metadata
The workflow decodes this payload and splits the signature into its r, s, and v components, which are required for Ethereum-compatible processing. This step is crucial for ensuring that the payment is legitimate, properly signed, and ready to be used for settlement.
Step 2: Defining Your Payment Token Configurations
Next comes one of the most empowering parts of the template: you choose which tokens and chains you want to support. This is handled by the Payment Token Configs section of the workflow.
For each supported payment token, you define:
- ERC-20 token address
- EVM chain ID
- Token name and version
- Maximum allowed or required payment amount
- Contract method ID that calls the specific on-chain settlement function
This modular setup lets you start small with a few core chains and tokens, then gradually expand as your users and use cases grow. You are not locked into a fixed configuration. You can treat this as a living list that evolves with your business.
Step 3: Fetching Optimized Swap Routes From Li.Fi
Once the workflow has a valid payment authorization and knows which token and chain are involved, it reaches out to the Li.Fi API to find a suitable swap route.
It calls the endpoint:
https://li.quest/v1/quote
This endpoint returns:
- Swap routes across supported bridges and DEXes
- A quote for the transaction
- The call data needed by the Li.Fi Diamond Proxy contract to execute the swap
To use this reliably in production, you will want a Li.Fi API key so you can avoid strict rate limits and control your traffic. The workflow allows you to pass parameters such as:
- Slippage tolerance
- Allowed or preferred bridges
- Integrator fees and monetization settings
This is where you can tune your monetization strategy and user experience, adjusting how aggressive or conservative you want your routing to be.
Step 4: Simulating & Submitting With The 1Shot API
Before anything touches the blockchain, the workflow takes a safety-first step. It uses the 1Shot API to simulate the swap with the chosen route and payment details.
During this simulation phase, the workflow checks:
- Whether the transaction is structured correctly
- Whether the payment authorization aligns with the expected parameters
- Whether the swap is likely to succeed on-chain
If the simulation passes, the workflow proceeds to submit the transaction to the appropriate blockchain network. If not, it returns a clear error response so you or your users can act accordingly.
This simulation step is what turns the workflow into a trustworthy system you can rely on. It reduces the risk of failed transactions, unexpected behavior, and wasted gas.
Putting It All Together: Example cURL Request
Once your workflow is live, you can test it quickly with a simple cURL command. This is a great way to validate your configuration and see the full flow in action.
Send a POST request to your webhook URL with a correctly formatted x-payment header and a JSON body like this:
curl -X POST \ <your-webhook-url> \ -H "x-payment: YOUR-BASE64-ENCODED-PAYMENT-PAYLOAD" \ -H "User-Agent: CustomUserAgent/1.0" \ -H "Accept: application/json" \ -H "Content-Type: application/json" \ -d '{ "fromChain": "8453", "fromToken": "0x833589fCD6eDb6E08f4c7C32D4f71b54bdA02913", "fromAmount": "100000000", "fromAddress": "0x55680c6b69d598c0b42f93cd53dff3d20e069b5b", "toChain": "43114" }'
This request represents a swap from a specific ERC-20 token on chain ID 8453 to a native token on chain ID 43114. The workflow will handle validation, routing, simulation, and submission automatically.
Configuring Your Payment Tokens In Detail
To unlock the full potential of the template, you need to configure your Payment Token Configs correctly. These configs are essential for both verification and settlement.
For each token, you will specify:
- Token address – The ERC-20 contract address.
- EVM chain ID – The chain where this token lives.
- x402 network name – For example,
base,avalanche,arbitrum, orlinea. - Token name and version – Human-readable identifiers used in the x402 context.
- Contract method ID – Typically for the function
callDiamondWithEIP3009SignatureToNative, which is used to settle payments and perform the swap to native tokens.
Once this is in place, the workflow can match incoming requests to the right token configuration, verify the payment authorization, and then execute the settlement correctly on-chain.
Why This Workflow Is A Powerful Template To Build On
The 1Shot Gas Station workflow is more than a one-off script. It is a reusable, extensible automation template that you can keep improving over time. Here is what makes it so valuable:
- Robust & scalable – Designed to handle cross-chain swaps across up to 100 EVM-compatible blockchains.
- Standards based – Uses the x402 protocol and the Li.Fi aggregator API, which means strong compatibility and a smoother user experience.
- Monetization ready – Built around the idea of turning gas and swaps into a revenue stream instead of a cost center.
- n8n powered – Fully visual and editable, so you can add logging, alerts, custom business rules, or integrations with your existing stack.
As you grow more comfortable with this workflow, you can branch out: add analytics, integrate with your CRM, send notifications to Slack or Telegram, or chain it with other automations in your n8n environment.
Your Next Step: Experiment, Adapt, Grow
You now have a clear picture of what the 1Shot Gas Station workflow does and how it works internally. The next step is to make it your own.
Here is a simple path to get started:
- Import the template into n8n and connect it to your environment.
- Configure your payment tokens with the correct addresses, chain IDs, and method IDs.
- Add your Li.Fi API key and tune your routing and fee parameters.
- Test with the cURL example and inspect responses for validation and simulation details.
- Iterate by adding more tokens, chains, and business logic as your needs expand.
Every iteration turns your workflow into a stronger asset, one that keeps saving you time and generating value long after you set it up.
Conclusion: Turn Your Cross-Chain Flows Into An Automated Gas Station
The 1Shot Gas Station workflow gives you a practical way to transform cross-chain complexity into a smooth, monetized, and largely hands-off system. With x402 for gasless stablecoin payments, Li.Fi for intelligent routing, and n8n as your automation backbone, you can create a gas station that works across many chains and grows with your project.
Ready to start? Configure your tokens, plug in the template, and begin monetizing your decentralized app’s token swaps with far less manual work and far more control.
For deeper technical details and related tutorials, explore the resources linked in the workflow notes and keep iterating on your automation stack.
