
Automate QuickBooks Sales Receipts from Stripe Payments and Free Your Focus
The Hidden Cost of Manual Accounting
Every time a Stripe payment comes in and you open QuickBooks to type out a new sales receipt, you are spending energy that could be going toward strategy, growth, or creativity. Manually copying amounts, customer names, and emails does not just take time, it also introduces small risks: a misplaced digit, a missing customer, a forgotten receipt.
If you are processing more than a handful of payments, this routine can quietly turn into a daily drain. The good news is that this is exactly the kind of repetitive work that automation, and especially n8n, can handle for you with confidence and consistency.
Shifting Your Mindset: From Manual Tasks to Automated Systems
Automation is not about replacing you, it is about creating space for you. When you build workflows in n8n, you are designing systems that keep your business moving while you stay focused on what matters most. Each automated workflow is like a small teammate that never forgets a step, never gets tired, and always follows your rules.
This Stripe to QuickBooks sales receipt workflow is a powerful example of that mindset. It turns a routine accounting chore into a fully automated, reliable process. Once you set it up, every successful payment in Stripe can flow into QuickBooks as a clean, accurate sales receipt, with matching customer data and the correct amounts.
Think of this template as a starting point. You can use it as-is, then gradually customize, refine, and expand it as your business grows and your automation skills evolve.
What This n8n Template Helps You Achieve
This n8n workflow template connects Stripe and QuickBooks so that:
- Each successful Stripe payment automatically triggers a workflow in n8n.
- The workflow checks whether the customer already exists in QuickBooks.
- If needed, a new customer record is created in QuickBooks using Stripe data.
- A sales receipt is then generated in QuickBooks with the correct payment amount.
The result is a smoother, more reliable accounting process, less manual data entry, and more time to focus on higher-value work.
Before You Begin: What You Need in Place
To set up this automated Stripe to QuickBooks workflow in n8n, make sure you have the following ready:
- Stripe Setup: In your Stripe account, configure a webhook for the
payment_intent.succeededevent. This webhook will be the trigger that starts your n8n workflow every time a payment succeeds. - QuickBooks Setup: Connect your QuickBooks account to n8n using OAuth2 credentials. Ensure that your connection has permission to access customer data and create sales receipts.
- n8n Configuration: In your n8n instance, connect:
- Stripe credentials to the webhook and customer-related nodes.
- QuickBooks credentials to the customer and sales receipt nodes.
Once this foundation is in place, you are ready to turn a manual process into a dependable automated system.
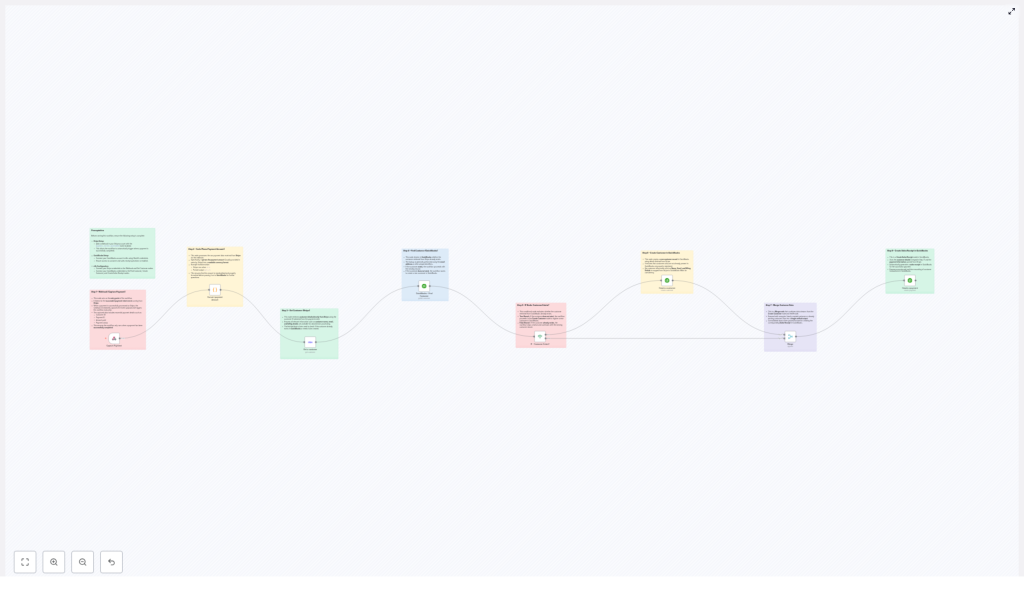
Your Automation Journey: From Stripe Payment to QuickBooks Sales Receipt
Step 1 – Capture the Payment with a Webhook
Everything starts with the moment a customer pays you. In this workflow, the Stripe webhook node listens for the payment_intent.succeeded event. When a payment succeeds, Stripe sends a payload to your webhook, and n8n picks it up instantly.
This webhook node becomes the entry point for the entire workflow. It captures crucial information such as:
- Customer ID
- Payment ID
- Amount
- Status
From here, the workflow can automatically process and transform this data without you needing to log in or copy anything by hand.
Step 2 – Convert the Stripe Amount into a QuickBooks-Ready Value
Stripe typically sends amounts in the smallest currency unit, such as cents. QuickBooks expects a standard currency format. To bridge that gap, the workflow uses a custom JavaScript code node to convert the raw Stripe amount into a human-readable value.
For example, an amount like 7101 from Stripe becomes $71.01 for QuickBooks. This small but essential transformation ensures that your financial records are precise and consistent across both systems.
Step 3 – Pull Accurate Customer Details from Stripe
Next, the workflow uses the customer ID from the Stripe payment event to retrieve detailed customer information. A Stripe customer node fetches data such as:
- Customer name
- Email address
By relying on Stripe as the source of truth for customer details, you make sure that the information that lands in QuickBooks is accurate and up to date, which is especially helpful as your customer base grows.
Step 4 – Search for the Customer in QuickBooks
Now that the customer details are available, the workflow checks whether this customer already exists in QuickBooks. A QuickBooks customer node queries QuickBooks using the customer name retrieved from Stripe.
This step is important for keeping your QuickBooks customer list clean and avoiding duplicates. Instead of manually checking and comparing records, the workflow does it automatically every time a payment comes in.
Step 5 – Decide: Existing Customer or New One?
At this point, an IF node evaluates the result of the QuickBooks customer search. It checks if a QuickBooks customer ID was found:
- If the QuickBooks ID field is empty, the workflow treats the customer as new and moves forward to create a new customer in QuickBooks.
- If the ID exists, the workflow knows the customer is already in QuickBooks and skips the creation step.
This conditional logic keeps your database tidy and ensures that only genuinely new customers are added.
Step 6 – Create a New Customer in QuickBooks When Needed
When the IF node determines that the customer does not exist, a QuickBooks customer creation node steps in. It uses the information pulled from Stripe, such as name and email, to create a new, fully formed customer record in QuickBooks.
Instead of manually copying details or risking incomplete entries, the workflow builds a consistent customer profile for you every single time a new customer pays.
Step 7 – Merge Customer Data into a Single Stream
After handling both existing and newly created customers, the workflow needs a unified path forward. A Merge node combines:
- Customers that already existed in QuickBooks
- Customers that were just created by the workflow
This creates a single, consistent stream of customer data that feeds into the final step. Regardless of the path taken, the workflow now has one clear set of customer details to work with.
Step 8 – Automatically Create the Sales Receipt in QuickBooks
With the customer confirmed and the payment amount converted, the workflow reaches its destination. A QuickBooks sales receipt node uses the merged customer data and the parsed payment amount to create a new sales receipt record in QuickBooks.
The result is a real-time, accurate reflection of your Stripe revenue in QuickBooks. Every successful Stripe payment can now appear as a properly formatted sales receipt, without you lifting a finger.
How This Automation Supports Your Growth
By putting this n8n template to work, you are doing more than just speeding up accounting. You are building a foundation for scalable, resilient operations.
- Less manual entry, fewer errors: Automated sales receipts reduce the risk of typos, missing records, and inconsistent data.
- Aligned customer data: Stripe and QuickBooks stay in sync, so your customer profiles are more reliable across systems.
- Timely revenue tracking: Stripe payments appear in QuickBooks quickly, helping you stay on top of cash flow and financial reporting.
- Ready for higher volume: As your transaction volume grows, the workflow scales with you, handling more payments without adding to your workload.
Each of these benefits adds up to more clarity, more control, and more time to focus on strategy and service instead of repetitive tasks.
Taking the Next Step: Experiment, Customize, and Build
This Stripe to QuickBooks workflow template is a strong starting point, not a rigid solution. Once you have it running, you can:
- Add extra logic for different product types or payment methods.
- Trigger notifications to your team when high-value payments come in.
- Tag or categorize receipts based on metadata from Stripe.
As you experiment and improve the workflow, you will deepen your understanding of n8n and open the door to even more automation opportunities across your business.
Start Automating Your Stripe to QuickBooks Workflow Today
You do not need to rebuild everything from scratch. This n8n template gives you a practical, ready-made path to automate a key part of your financial operations. Connect your Stripe and QuickBooks accounts, plug in your credentials, and let n8n handle the repetitive work.
Use this as your first or next step toward a more automated, focused workflow where tools do the busywork and you stay focused on growth.
