
Synchronize JotForm Orders with Telegram – Complete Teaching Guide
What You Will Learn
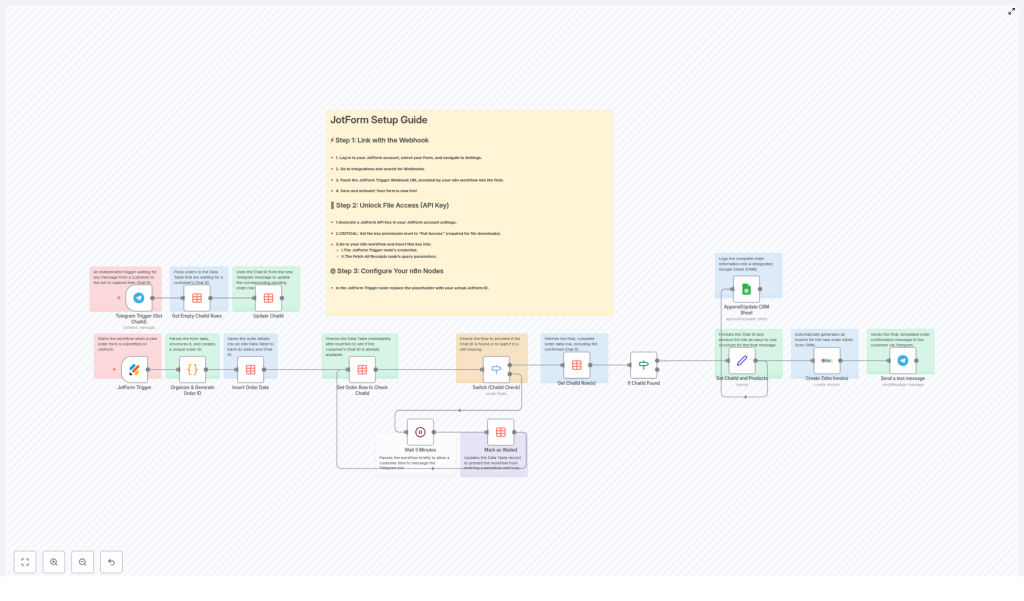
In this guide, you will learn how to build and understand an n8n workflow template that:
- Listens to new JotForm order submissions
- Sends order confirmation messages to customers on Telegram
- Saves orders to an n8n Data Table for tracking
- Logs customer and order data in a Google Sheets CRM
- Creates invoices automatically in Zoho CRM
By the end, you will not only know how to use this template, but also how each node in the workflow contributes to the automation.
Concept Overview: How the Automation Works
This n8n workflow connects four main tools:
- JotForm – where customers place orders via a form
- Telegram – where customers receive order confirmations
- n8n Data Table – where orders and chat IDs are stored
- Google Sheets & Zoho CRM – where CRM data and invoices are managed
The workflow follows this general process:
- A customer submits an order using a JotForm.
- n8n receives the form submission via a webhook and organizes the data.
- The workflow generates a unique order ID and stores the order in an n8n Data Table.
- The system waits for the customer to contact your Telegram bot so it can capture their chat ID.
- Once the chat ID is known, the workflow:
- Sends a confirmation message on Telegram
- Creates an invoice in Zoho CRM
- Logs the order in a Google Sheets CRM
Next, we will walk through the workflow nodes in a teaching-friendly order so you can clearly understand each part.
Step-by-Step Workflow Walkthrough in n8n
1. Capturing Orders from JotForm
JotForm Trigger Node
The workflow begins with the JotForm Trigger node. This node is configured with a webhook URL that JotForm calls every time a form is submitted.
When a customer places an order:
- JotForm sends the submission data to n8n via the webhook.
- The JotForm Trigger node receives customer details, product selections, total amounts, and any other form fields.
- This event starts the rest of the workflow automatically.
2. Cleaning Data and Creating a Unique Order ID
Organize & Generate Order ID Node
After the trigger, the next important step is to structure the raw form data so it is easier to use later.
This node:
- Parses and cleans the JotForm submission payload.
- Extracts key information such as:
- Customer name and contact details
- Product list and quantities
- Total order amount and any other relevant fields
- Generates a unique order ID using:
- A configurable prefix (for example,
{{ $order_id_prefix }}) - A timestamp to ensure uniqueness
- A configurable prefix (for example,
- Builds a pre-formatted order summary that will later be used in Telegram messages, Google Sheets, and Zoho invoices.
This step ensures that all later nodes work with clean, consistent data rather than raw form submissions.
3. Storing Orders in an n8n Data Table
Insert Order Data into n8n Data Table
Next, the workflow saves the organized order data into an n8n Data Table. This table acts as a central storage and tracking system.
The node stores:
- Customer information
- The generated order ID
- Order details such as products and totals
- A column for the Telegram chat ID, which is initially empty
By saving the order here, the workflow can later match the order to the correct Telegram chat when the customer messages your bot.
4. Checking Whether the Telegram Chat ID Exists
Get Order Row to Check Chat ID
After inserting the order into the Data Table, the workflow needs to know if the Telegram chat ID for this customer is already known.
The Get Order Row node:
- Looks up the row corresponding to the current order ID in the Data Table.
- Reads the value of the chat ID field for that order.
Switch (Chat ID Check)
The Switch node then evaluates what to do based on the chat ID value and whether the workflow has already waited once.
It typically checks two conditions:
- No chat ID and not yet waited: The workflow should wait to give the customer time to message the Telegram bot.
- No chat ID but already waited: The workflow should avoid waiting indefinitely and move on or handle the case differently.
5. Giving Customers Time to Contact the Telegram Bot
Wait 5 Minutes and Mark as Waited
If the chat ID is missing and the workflow has not waited yet, it moves to a Wait step.
This node:
- Pauses the workflow for 5 minutes.
- Gives the customer a chance to send a message to your Telegram bot.
- Marks the order as “waited” so the workflow knows not to pause again for the same order.
During this waiting period, a separate part of the workflow is listening for incoming Telegram messages to capture new chat IDs.
6. Capturing Telegram Chat IDs from Customers
Telegram Trigger (Get Chat ID)
The Telegram Trigger node is an independent entry point in the same workflow. It is not started by JotForm, but by Telegram messages.
This node:
- Listens for incoming messages to your Telegram bot.
- Captures the chat ID whenever a customer sends a message.
Get Empty Chat ID Rows & Update Chat ID
Once a chat ID is captured, the workflow needs to link it to the correct order in the Data Table.
This part of the workflow:
- Searches the Data Table for rows (orders) that have an empty chat ID.
- Updates those rows with the new chat ID that was just received from Telegram.
This mechanism allows the system to connect orders with customers’ Telegram accounts even if the chat ID was not known at the time of form submission.
7. Proceeding Once the Chat ID is Known
Get Chat ID Row(s) & If Chat ID Found
After the chat ID has been stored in the Data Table, the workflow retrieves the final order data to continue processing.
The relevant nodes:
- Get Chat ID Row(s) – fetches the order rows that now have a valid chat ID.
- If Chat ID Found – checks again to confirm that the chat ID exists before sending notifications or creating CRM records.
Only when the chat ID is successfully found does the workflow continue to the messaging and CRM steps.
8. Preparing Data for Telegram and CRM Systems
Set Chat ID and Products Nodes
Before sending messages or creating invoices, the workflow formats the data into user friendly structures.
These nodes:
- Format and set the Telegram chat ID in the correct field for the Telegram node.
- Build a readable product list, such as a bullet list or formatted text that can be used in:
- Telegram messages
- Zoho invoices
- Google Sheets descriptions
This ensures that both customers and CRM tools receive clear, organized information about the order.
9. Creating an Invoice in Zoho CRM
Create Zoho Invoice
Once the data is ready, the workflow calls the Zoho CRM integration to generate an invoice.
This node:
- Sends the product details, including names, quantities, and prices.
- Includes the order totals and any relevant customer information.
- Creates a formal invoice record inside Zoho CRM for accounting and follow-up.
This step removes the need to manually create invoices for each order.
10. Logging Orders in a Google Sheets CRM
Append/Update CRM Sheet
The workflow also maintains a simple CRM view using Google Sheets.
This node:
- Appends or updates a row in a configured Google Sheet.
- Logs key information such as:
- Customer details and contact info
- Shipping or billing addresses
- Timestamps for when the order was placed
- Order description and summary
- The generated order ID
By keeping all order data in a spreadsheet, you get a quick overview of your sales pipeline and customer history.
11. Sending the Final Telegram Order Confirmation
Send a Text Message (Telegram Notification)
The last step in the workflow is to send a confirmation message directly to the customer on Telegram.
This node:
- Uses the stored Telegram chat ID to target the correct user.
- Sends a customized, clearly formatted message that may include:
- Order ID
- Customer name
- Product list and totals
- Any additional instructions or thank you text
At this point, the customer receives instant feedback, your CRM is updated, and your invoice is created, all from a single JotForm submission.
Practical Setup Guide
Now that you understand how the workflow works conceptually, let us go through the key setup steps to get it running.
Step 1: Connect JotForm to n8n with a Webhook
- Log in to your JotForm account and open the form you use for orders.
- Go to the form Settings section.
- Navigate to Integrations and search for Webhooks.
- Copy the webhook URL from the JotForm Trigger node in your n8n workflow.
- Paste this URL into the Webhook integration in JotForm.
- Save and activate the webhook so that new submissions are sent to n8n.
Step 2: Enable JotForm API Key Access
- In your JotForm account, go to Account Settings.
- Generate a new API key with Full Access permissions.
- Open the JotForm Trigger node in n8n.
- Enter the generated API key in the node credentials so n8n can securely interact with your JotForm account.
Step 3: Configure All Required IDs and Placeholders in n8n
The template uses placeholders that you must replace with your own IDs and values.
- Open the workflow in n8n and look for placeholders such as:
{{ $form_id_placeholder }}{{ $datatable_id }}{{ $google_sheet_document_id }}{{ $order_id_prefix }}
- Replace each placeholder with:
- Your actual JotForm form ID
- The ID of your n8n Data Table
- The document ID of your Google Sheet
- Your preferred order ID prefix (for example,
ORD-)
- Review and customize:
- Template messages used in Telegram notifications
- Product mappings or field mappings for Zoho and Google Sheets
Once these values are set, run a test JotForm submission and a test message to your Telegram bot to ensure the full flow works end to end.
Quick Recap
- JotForm submissions trigger the workflow through a webhook.
- Data is cleaned, formatted, and assigned a unique order ID.
- Orders are stored in an n8n Data Table, which also holds Telegram chat IDs.
- The workflow waits if needed, while a Telegram Trigger node captures new chat IDs when customers message your bot.
- Once a chat ID is linked to an order, the workflow:
- Formats the order data
- Creates an invoice in Zoho CRM
- Logs the order in a Google Sheets CRM
- Sends a confirmation message to the customer on Telegram
This integration helps you save time, reduce manual data entry, and provide fast, professional communication to your customers.
FAQ
Do I need to know how to code to use this n8n template?
No, you do not need to write code. You only need to configure nodes, credentials, and IDs inside n8n, plus set up the webhook and API key in JotForm.
What happens if a customer never messages the Telegram bot?
If the chat ID is never captured, the workflow will not be able to send the Telegram confirmation. However, the order is still stored in the Data Table and can still be logged in Google Sheets and invoiced in Zoho, depending on how you handle the branch after the wait step.
Can I customize the Telegram message and invoice details?
Yes. You can edit the text templates in the nodes that format products and send Telegram messages, as well as the fields sent to Zoho CRM and Google Sheets.
Get Started with the Template
Automating your order workflow from JotForm to Telegram and your CRM tools helps you:
- Save time on manual tasks
- Reduce errors in data entry
- Improve customer experience with instant confirmations and professional invoicing
Set up this workflow template in n8n, connect your tools, and start delighting your customers with real-time order updates.
