
How to Import XML Data into MySQL Using n8n
Overview
This guide describes a complete n8n workflow template that imports XML data into a MySQL database in a fully automated way. The workflow reads an XML file from the filesystem, converts it to JSON, normalizes the structure into individual items, and inserts each item as a row in a MySQL table.
The article is written for users who are already familiar with n8n concepts such as nodes, binary data, credentials, and basic database operations, and who want a clear, reference-style explanation of how this template is constructed and how to adapt it.
Workflow Architecture
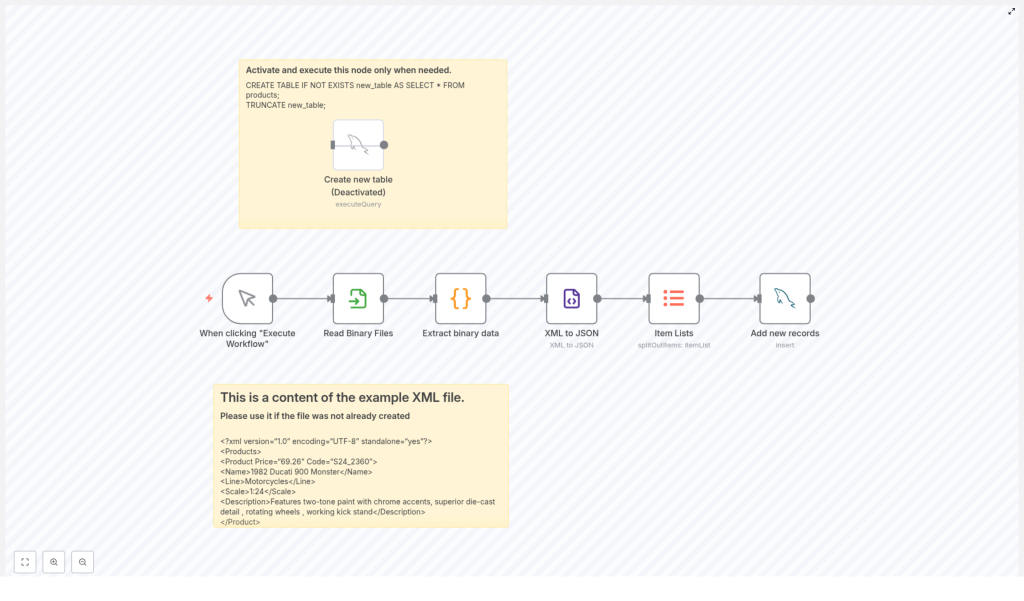
The workflow is composed of the following core nodes, executed in sequence:
- Manual Trigger – Manually starts the workflow execution.
- Read Binary Files – Loads the XML file from disk into n8n as binary data.
- Extract Binary Data (Code node) – Converts the binary XML content to a UTF-8 string.
- XML to JSON – Parses the XML string and outputs a structured JSON object.
- Item Lists – Splits the JSON structure into one item per product for database insertion.
- Add New Records (MySQL node) – Inserts each product as a new row in the target MySQL table.
Additionally, the workflow template contains an optional, disabled node that can prepare the database table:
- Create new table (MySQL node, disabled by default) – Creates and truncates a working table named
new_tablebased on the existingproductsschema.
Data Flow Summary
- The workflow is started manually via the Manual Trigger node.
- Read Binary Files reads the XML file from the configured filesystem path into
binarydata. - Extract Binary Data converts the binary buffer into a UTF-8 string in
jsonformat. - XML to JSON parses that string into a nested JSON structure representing products and their attributes.
- Item Lists extracts the array at
Products.Productand outputs one n8n item per product. - Add New Records maps JSON fields to MySQL columns and performs an insert for each item into
new_table.
Node-by-Node Breakdown
1. Manual Trigger
The Manual Trigger node is used as the workflow entry point. It has no configuration parameters and is intended for ad-hoc or test executions.
- Trigger type: Manual
- Usage: Click Execute Workflow in the n8n editor UI to start the import on demand.
This approach gives you full control over when XML data is imported, which is useful while developing or when you need to run the import only at specific times. It also helps avoid unintended imports that might occur with scheduled or webhook triggers.
2. Read Binary Files
The Read Binary Files node reads the XML file from the local filesystem into n8n as binary data. This node is critical for handling XML as a file rather than as inline text.
- Path:
/home/node/.n8n/intermediate.xml - Output: A single item with a
binaryproperty containing the XML file content.
The XML file at this path is expected to contain a list of products, including attributes such as code, name, line, scale, description, and price. Make sure that:
- The file path is correct for your n8n instance environment.
- The n8n process has read permissions on the file.
- The file contents are valid XML with the expected structure (see the example XML section below).
3. Extract Binary Data (Code Node)
The Extract Binary Data node is typically implemented as a n8n Code node that converts the binary data from the previous node into a UTF-8 encoded string. The output is placed into the json section of the item, which is required by the XML parser node.
Conceptually, this node:
- Reads the binary property that contains the XML file (for example,
item.binary.data). - Converts the buffer to a UTF-8 string.
- Writes that string to a JSON field, such as
item.json.xmlStringor similar, depending on the template.
Key considerations:
- Encoding: The code explicitly uses UTF-8, which matches the XML declaration in the example (
encoding="UTF-8"). - Error handling: If the binary data is not present or is not valid text, this node will throw an error at runtime. Ensure that the previous node successfully reads the file before this node executes.
4. XML to JSON
The XML to JSON conversion is handled by n8n’s built-in XML node. It takes the XML string from the previous step and outputs a JSON representation that is easier to manipulate inside n8n.
- Input: XML string from the Extract Binary Data node.
- Mode: XML to JSON.
- Output: A JSON object with a root property corresponding to the XML root element, for example
Products.
For the example XML, the JSON structure will include a Products object with a Product array containing each product entry. Attributes in the XML (such as Price and Code) and child elements (such as Name, Line, Scale, and Description) are all available as JSON fields.
5. Item Lists (Splitting Products)
The Item Lists node is used to split the JSON structure into separate n8n items so that each product can be processed and inserted individually into MySQL.
- Source path:
Products.Product - Behavior: Takes the array at
Products.Productand outputs one item per product.
This step is essential for database operations, since the MySQL node expects one item per row to insert. If the XML structure changes and the products are located at a different path, you will need to adjust this path accordingly.
Edge cases to consider:
- If
Products.Productis not an array (for example only one product exists), you may need to confirm how the XML node outputs the structure and adjust the Item Lists configuration. - If the path is incorrect or the products array is empty, this node will output zero items and no records will be inserted into MySQL.
6. Add New Records (MySQL Node)
The Add New Records node connects to your MySQL database and inserts each product as a new row in the table new_table. It uses mapped fields from the JSON items produced by the Item Lists node.
- Resource: Typically “Table”.
- Operation: “Insert” or “Insert Many” (depending on the template configuration).
- Table:
new_table.
The node maps the following columns (as described in the template):
- product code – Mapped from the product code in the XML (for example the
Codeattribute). - name – Mapped from the
Nameelement. - line – Mapped from the
Lineelement. - scale – Mapped from the
Scaleelement. - description – Mapped from the
Descriptionelement. - MSRP (Price) – Mapped from the
Priceattribute in the XML. - vendor – Set to a default value in the workflow.
- stock quantity – Set to a default value in the workflow.
- buy price – Set to a default value in the workflow.
Before running the workflow, configure your MySQL credentials in n8n and select them in this node. If the connection fails or the table does not exist, the node will throw an error and the workflow execution will stop at this point.
Database Preparation
The template includes a dedicated MySQL node named “Create new table”, which is disabled by default. This node is used to create and reset the working table new_table. It executes the following SQL statements:
CREATE TABLE IF NOT EXISTS new_table AS SELECT * FROM products;
TRUNCATE new_table;
Behavior and implications:
- CREATE TABLE IF NOT EXISTS – Creates
new_tablewith the same structure asproductsif it does not already exist. - TRUNCATE new_table – Removes all existing rows from
new_table, effectively resetting it before a new import.
This node is disabled by default to avoid accidental data loss. Enable and execute it only when:
- You want to initialize
new_tablefor the first time. - You explicitly intend to clear and repopulate
new_tablewith fresh data from the XML file.
Example XML Input
The workflow is built around an XML structure that contains products within a root Products element. Below is a minimal example of the XML content used:
<?xml version="1.0" encoding="UTF-8" standalone="yes"?>
<Products>  <Product Price="69.26" Code="S24_2360">  <Name>1982 Ducati 900 Monster</Name>  <Line>Motorcycles</Line>  <Scale>1:24</Scale>  <Description>Features two-tone paint with chrome accents, superior die-cast detail , rotating wheels , working kick stand</Description>  </Product>
</Products>
Key characteristics of this structure:
- Root element:
Products. - Product entries: One or more
Productelements insideProducts. - Attributes:
PriceandCodeon eachProduct. - Child elements:
Name,Line,Scale, andDescription.
Your own XML files should follow a similar structure if you want to reuse the same node configuration, especially the Products.Product path in the Item Lists node and the field mappings in the MySQL node.
Configuration Notes
MySQL Credentials and Connection
- Set up MySQL credentials in the n8n Credentials section.
- Assign those credentials to both the Add New Records node and the optional Create new table node.
- Verify that the user has permissions to:
- Connect to the database.
- Perform
INSERToperations onnew_table. - Optionally, run
CREATE TABLEandTRUNCATEif you enable the preparation node.
File System Access
- Confirm that the XML file path
/home/node/.n8n/intermediate.xmlexists in your environment. - Adjust the path if your n8n instance runs in a different container or directory layout.
- Ensure read permissions for the n8n process user.
XML Structure and Parsing
- If your XML uses different element or attribute names, you will need to:
- Update the Item Lists path from
Products.Productto match your root and item elements. - Adjust the field mappings in the Add New Records node to align with your JSON output.
- Update the Item Lists path from
- Invalid XML will cause the XML node to fail. Validate your XML beforehand if you expect inconsistent sources.
Error Handling Considerations
The template focuses on the happy path, but some typical error points include:
- Missing or unreadable XML file in the Read Binary Files node.
- Encoding issues when converting binary data to a string in the Extract Binary Data node.
- Malformed XML that cannot be parsed by the XML to JSON node.
- Empty or unexpected JSON structure that breaks the Item Lists path.
- Database connection failures or missing table in the Add New Records node.
Use n8n’s built-in execution logs and node error messages to diagnose issues. You can also add additional nodes, such as IF or Set nodes, to perform validation or logging before critical steps.
Advanced Customization
Adapting to Different XML Schemas
To reuse this workflow for different XML schemas:
- Update the Item Lists node to point to the correct array path in the JSON output.
- Remap fields in the Add New Records node to match your new XML attributes and elements.
- If the root element changes, verify that the XML node still produces the expected JSON structure.
Scaling for Larger XML Files
For larger XML datasets:
- Consider the memory impact of parsing very large XML files into a single JSON object.
- Monitor workflow execution time and database performance while inserting many rows.
- If needed, split large XML files externally before processing or optimize your MySQL configuration for bulk inserts.
Extending Data Processing
You can extend this template to include additional processing steps, such as:
- Adding validation nodes to check for missing or invalid fields before insertion.
- Transforming or normalizing values (for example, converting price formats or cleaning descriptions) using Code or Function nodes.
- Integrating notifications (email, Slack, etc.) after a successful import or when errors occur.
Benefits of Using n8n for XML to MySQL Automation
- Automation – Replace manual import processes with a repeatable, one-click workflow.
- Scalability – Adapt the same pattern to larger XML files or new XML schemas with minimal changes.
- Flexibility –
