
How One Content Team Stopped Drowning In Tags With n8n, Embeddings & Supabase
By the time the marketing team hit their 500th blog post, Lena had a problem.
She was the head of content at a fast-growing SaaS company. Traffic was climbing, the editorial calendar was full, and the blog looked busy. But under the surface, their content library was a mess. Posts about the same topic had completely different tags. Some had no tags at all. Related posts never showed up together. Search results were weak, and the SEO team kept asking, “Why is it so hard to find our own content?”
Lena knew the answer. Manual tagging.
The pain of manual tags
Every time a new article went live, someone on her team had to skim it, guess the right tags, try to remember what they used last time, and hope they were consistent. On busy weeks, tags were rushed or skipped. On slow weeks, they overdid it and created more variants of the same idea.
The consequences were starting to hurt:
- Taxonomy drifted, with multiple tags for the same topic
- Discoverability suffered, since related posts were not linked together
- Recommendation widgets pulled in random content
- Editors spent precious time doing repetitive tagging instead of strategy
What Lena needed was simple in theory: a way to automatically tag blog posts in a consistent, SEO-friendly way, without adding more work to her already stretched team.
That is when she found an n8n workflow template that promised exactly that: auto-tagging blog posts using embeddings, Supabase vector storage, and a retrieval-augmented generation (RAG) agent.
The discovery: an automation-first approach
Lena had used n8n before for basic automations, but this template looked different. It was a complete, production-ready pipeline built around modern AI tooling. The idea was to plug it into her CMS, let it process every new article, and get consistent, high-quality tags back automatically.
The promise was clear:
- Use semantic embeddings to understand content, not just keywords
- Store vectors in Supabase for fast, reusable search
- Use a RAG agent to generate tags that actually match the article
- Log everything to Google Sheets, and alert on errors via Slack
If it worked, Lena would not just save time. She would finally have a consistent taxonomy, better internal linking, and smarter recommendations, all powered by a workflow she could see and control in n8n.
Setting the stage: connecting the CMS to n8n
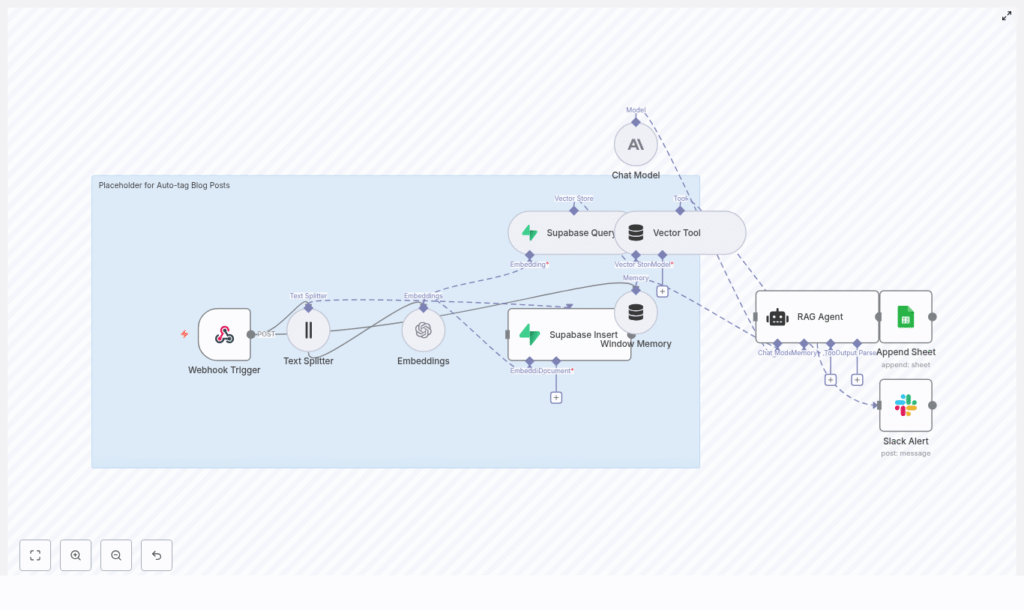
The first step in the template was a Webhook Trigger. This would be the entry point for every new blog post.
Lena asked her developer to add a webhook call from their CMS whenever a post was published. The payload was simple, a JSON object that looked like this:
{  "title": "How to Build an Auto-Tagging Pipeline",  "content": "Full article HTML or plain text...",  "slug": "auto-tagging-pipeline",  "published_at": "2025-08-01T12:00:00Z",  "author": "Editor Name",  "url": "https://example.com/auto-tagging-pipeline"
}
The Webhook Trigger node in n8n listened for this event and expected fields like title, content, author, and url. For security, they configured authentication on the webhook and used a shared secret so only their CMS could call it.
Now, every new article would automatically flow into the workflow the moment it went live.
Rising action: teaching the workflow to “read”
Once Lena could send posts to n8n, the real challenge began. The workflow had to understand the content well enough to generate tags that made sense.
Breaking long posts into meaningful pieces
The template’s next node was the Text Splitter. Lena’s blog posts were often long, detailed guides. Sending the entire article as one block to an embedding model would be inefficient and less accurate, so the Text Splitter broke the content into smaller chunks.
The recommended settings in the template were:
- Chunk size: 400 characters
- Chunk overlap: 40 characters
This struck a balance between preserving context and keeping embedding costs under control. Overlap ensured that ideas crossing paragraph boundaries were not lost. Lena kept these defaults at first, knowing she could adjust chunk size later if latency or costs became an issue.
Turning text into vectors with embeddings
Next came the Embeddings node. This was where the workflow translated each text chunk into a semantic vector using a model like text-embedding-3-small.
For each chunk, the workflow stored important metadata alongside the vector:
- The original text chunk
- The post ID or slug
- The position index, so chunks could be ordered
- The source URL and publish date
To keep costs manageable, the template supported batching embeddings so multiple chunks could be processed in a single API call. Lena enabled batching to reduce the number of calls to the embedding API and keep the operation affordable as their content library grew.
The turning point: Supabase and the RAG agent take over
Once embeddings were generated, Lena needed a place to store and query them. This is where Supabase and the RAG agent came into play, turning raw vectors into useful context for tag generation.
Building a vector memory with Supabase
The template’s Supabase Insert node pushed each embedding into a Supabase vector index. The example index name was auto-tag_blog_posts, which Lena kept for clarity.
Her developer created a table with a schema that matched the template’s expectations:
id(unique)embedding(vector)text(original chunk)post_idorslugmetadata(JSON)
The metadata field turned out to be especially useful. They used it to store language, content type, and site section, which later allowed them to filter vector search results and keep tag generation focused on relevant content.
Retrieving context with the Supabase Query + Vector Tool
When it was time to actually generate tags, the workflow did not just look at the current post in isolation. Instead, it queried the vector store for similar content, using the Supabase Query + Vector Tool node.
This node wrapped Supabase vector queries inside n8n, making it easy to retrieve the most relevant chunks. The template recommended returning the top K documents, typically between 5 and 10, so the RAG agent had enough context without being overwhelmed.
By pulling in related content, the workflow could suggest tags that matched both the article and the overall taxonomy of the blog.
Orchestrating intelligence with Window Memory, Chat Model, and RAG Agent
The heart of the system was the combination of Window Memory, a Chat Model, and the RAG Agent.
- Window Memory preserved short-term context across the RAG run, so the agent could “remember” what it had already seen and decided.
- The Chat Model, such as an Anthropic model, acted as the LLM that transformed retrieved context and article content into tag suggestions. It also validated tags against Lena’s taxonomy rules.
- The RAG Agent orchestrated everything, from retrieval to reasoning to output parsing, ensuring the model had the right information at the right time.
To keep outputs consistent, Lena spent time refining the prompt. She used a structure similar to the template’s example:
System: You are an assistant that generates SEO-friendly tags for blog posts.
Instructions: Given the post title, a short summary, and retrieved context, return 3-7 tags.
Formatting: Return JSON like { "tags": ["tag1","tag2"] }
Avoid: Personal data, brand names unless present in content.
Inside the prompt, she also added guidance like:
“Return 3-7 tags balanced between broad and specific terms. Avoid duplicates and use lowercase, hyphenated two-word tags when appropriate.”
After a few iterations, the tags started to look uncannily like something her own team would have chosen on a good day.
Keeping score: logging, alerts, and control
Lena did not want a black box. She wanted visibility. The template addressed that too.
Logging results with Google Sheets
The workflow included an Append Sheet node that wrote each post and its generated tags to a Google Sheet. This gave Lena an audit trail where she could quickly scan outputs, spot patterns, and compare tags across posts.
It also turned into a training tool. New editors could see how the system tagged posts and learn the taxonomy faster.
Slack alerts for failures
Of course, no system is perfect. If the RAG agent failed, or if something went wrong upstream, the workflow sent a message to a designated Slack channel using a Slack Alert node.
This meant that instead of silently failing, the process raised a flag. Editors could then step in, review the post manually, and investigate what went wrong in the workflow.
Refining the system: best practices Lena adopted
Once the core pipeline was working, Lena started to refine it based on real-world usage. The template’s best practices helped guide those decisions.
Taxonomy and normalization
Lena and her team created a canonical tag list. They used the RAG agent to prefer existing tags when possible, and only introduce new ones when truly needed.
In a post-processing step, they normalized tags by:
- Converting everything to lowercase
- Applying consistent singular or plural rules
- Removing duplicates and near-duplicates
This kept the tag set clean, even as the system processed hundreds of posts.
Managing cost and performance
Embeddings were the main recurring cost, so Lena applied a few strategies to keep spend in check:
- Embed only new or updated content, not every historical post repeatedly
- Use smaller embedding models for bulk operations where ultra-fine nuance was not critical
- Cache frequently requested vectors and reuse them when re-running tags on the same content
These optimizations allowed the team to scale the system without blowing their budget.
Quality control and human-in-the-loop
Even with automation, Lena wanted human oversight. She set up a simple review routine:
- Editors periodically reviewed the Google Sheet log for a sample of posts
- A small set of “ground-truth” posts was used to measure tag precision and recall
- Prompts were adjusted when patterns of weak or irrelevant tags appeared
Over time, the system’s output became more reliable, and the amount of manual correction dropped significantly.
When things go wrong: troubleshooting in the real world
Not every run was perfect. Early on, Lena ran into a few problems that the template’s troubleshooting guide helped her solve.
When no tags are generated
If a post went through the workflow and came back with no tags, Lena checked:
- Whether the webhook payload actually contained the article content and reached the Text Splitter node
- If the embeddings API returned valid vectors and the Supabase Insert succeeded
- Whether the RAG agent’s prompt and memory inputs were correctly configured, sometimes testing with a minimal prompt and context for debugging
In most cases, the issue was a misconfigured field name or a small change in the CMS payload that needed to be reflected in the n8n workflow.
When tags feel off or irrelevant
Sometimes the system produced tags that were technically related but not quite right for the article. To fix this, Lena tried:
- Increasing the number of retrieved documents (top K) from the vector store to give the agent more context
- Refining the prompt with stricter rules and examples of good and bad tags
- Filtering Supabase vector results by metadata such as language or category to reduce noise
Each small adjustment improved tag quality and made the output more aligned with the brand’s content strategy.
Looking ahead: extending the auto-tagging system
Once Lena trusted the tags, the workflow became more than a simple helper. It turned into a foundation for other features.
Using the same pipeline, her team started to:
- Automatically update their CMS taxonomy with approved tags
- Drive related-post widgets on the blog using shared tags
- Feed tags into analytics to detect topic trends and content gaps
- Experiment with an internal UI where editors could see tag suggestions and approve or tweak them before publishing
The original problem of messy, manual tags had transformed into a structured, data-driven content system.
Security and privacy in the workflow
Because the workflow relied on third-party APIs, Lena’s team took privacy seriously. Before sending content for embeddings, they made sure:
- Personal data was removed or anonymized
- Webhook endpoints were secured with shared secrets or JWTs
- API keys and secrets were stored as environment variables and rotated regularly
This kept the system compliant with internal policies and external regulations while still benefiting from advanced AI tooling.
The resolution: from chaos to clarity
A few months after implementing the n8n auto-tagging template, Lena looked at the blog’s analytics dashboard with a sense of relief.
Tags were consistent. Related posts were actually related. Internal search surfaced the right content more often. The SEO team reported better visibility for key topics, and the editorial team had reclaimed hours each week that used to be spent on tedious manual tagging.
The workflow was not magic. It was a carefully designed system built with n8n, embeddings, Supabase vector storage, and a RAG agent, combined with thoughtful prompts, monitoring, and human oversight.
But to Lena and her team, it felt like magic compared to where they started.
Want to follow Lena’s path?
If you are facing the same tagging chaos, you can replicate this journey with your own stack.
To get started:
- Clone the n8n auto-tagging template
- Connect your OpenAI embeddings and Supabase credentials
- Wire up your CMS to the workflow via a secure webhook
- Run a few posts through the pipeline and review the tags in Google Sheets
From there, refine your prompt, tweak chunking sizes, and adjust your Supabase metadata filters until the tags feel right for your content.
