
TTS Voice Calls + Email Verification with n8n and ClickSend
Imagine turning a clunky, manual verification process into a smooth, automated experience that runs in the background while you focus on real work. That is exactly what this n8n workflow template helps you do.
In this guide, you will walk through a complete journey: from the frustration of scattered verification steps to a streamlined system that uses text-to-speech (TTS) voice calls and email verification in one unified flow. Along the way, you will see how this template can become a foundation for deeper automation, better security, and more freedom in your day.
The problem: scattered verification and lost time
Many teams start with simple verification: maybe a one-off email, a manual phone call, or a basic SMS. It works at first, but as you grow, the cracks begin to show:
- Users in different regions cannot rely on SMS or prefer not to share mobile apps.
- Manual checks eat into your time or your support team’s bandwidth.
- Security depends on a single factor, which can be unreliable or easy to miss.
Every extra step you do by hand is energy you could spend on building your product, supporting customers, or scaling your business. Verification should protect your users, not drain your focus.
The mindset shift: let automation do the heavy lifting
When you start thinking in workflows instead of one-off tasks, you unlock a different way of working. Instead of asking “How can I verify this user right now?”, you begin asking “How can I design a system that verifies every user, every time, without me?”
n8n gives you that power. With a single workflow, you can:
- Collect user details once through a form.
- Trigger both TTS voice calls and email verification automatically.
- Handle success or failure without manual intervention.
This is more than a tutorial. It is a template for how you can think about automation: start small, get one process working, then extend and refine it. Each workflow you build is a stepping stone toward a more focused, automated business.
The solution: a combined TTS voice call + email verification flow
The workflow you will use here brings together TTS voice calls and email verification in a single n8n automation. It uses:
- n8n for workflow orchestration and form handling
- ClickSend for TTS voice calls via their voice API
- SMTP for sending email verification codes
The result is a two-step verification flow that is both accessible and secure, ideal for signups, transactions, or two-factor authentication.
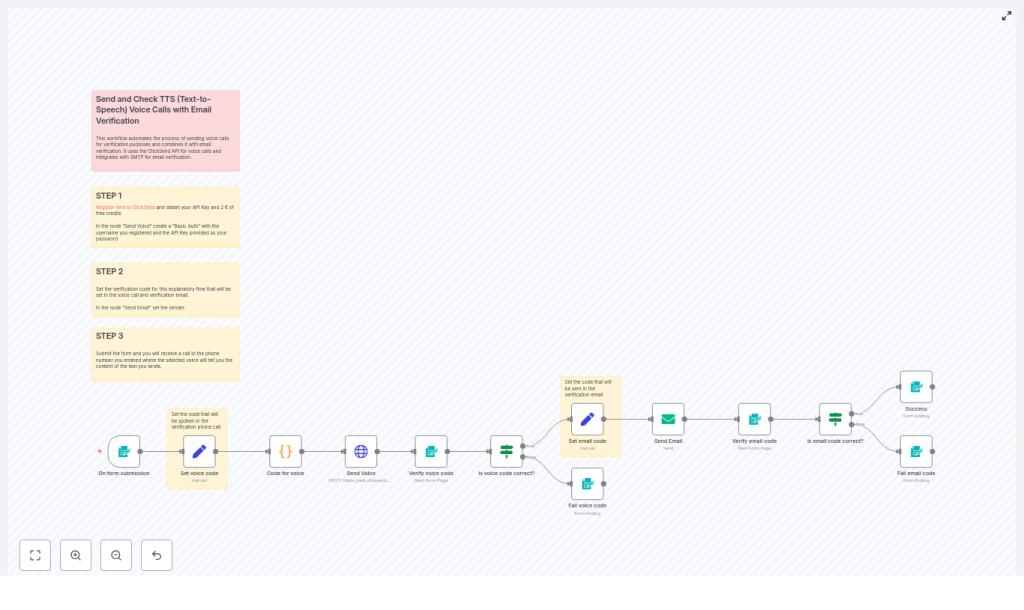
What this n8n workflow actually does
At a high level, the workflow follows this path:
- Collects user data from a form: phone number, language, voice preference, email, and name.
- Generates a numeric code for the TTS voice call and formats it for clear pronunciation.
- Places a TTS voice call using the ClickSend
/v3/voice/sendAPI. - Asks the user to enter the voice code and validates it.
- If the voice code is correct, generates and sends a second verification code via email (SMTP).
- Validates the email code and shows either a success or failure page.
This is a robust, two-step verification process that you can plug into signups, payment flows, or secure account actions. From here, you can iterate, customize, and extend as your needs grow.
Prerequisites: what you need to get started
Before you import and customize the template, make sure you have:
- An n8n instance (cloud or self-hosted) with Form Trigger support.
- A ClickSend account and API key (sign up at ClickSend, get your username and API key, and some test credits).
- SMTP credentials for sending verification emails.
- A basic understanding of HTTP requests and simple JavaScript for n8n Code nodes.
With these in place, you are ready to build a verification system that runs on its own.
Step 1: set up ClickSend credentials in n8n
Your journey starts by connecting n8n to ClickSend so you can place TTS calls automatically.
- Create or log in to your ClickSend account.
- Locate your username and API key in the ClickSend dashboard.
- In the n8n workflow, open the Send Voice HTTP Request node.
- Configure Basic Auth:
- Username: your ClickSend username
- Password: your ClickSend API key
Once this is done, n8n can call the ClickSend voice API on your behalf, without you touching a phone.
Step 2: build the form trigger that starts everything
Next, you create the entry point of your flow: an n8n Form Trigger that collects user details.
Use the Form Trigger node to capture:
- To (phone number, including country code)
- Voice (for example, male or female)
- Lang (supported languages such as
en-us,it-it,en-gb, etc.) - Name
When the user submits this form, the workflow is triggered automatically. You collect everything you need in one step, then let the automation handle the rest.
Step 3: generate and manage verification codes
With the form in place, the workflow needs two codes: one for the voice call and one for email.
In the template, this is handled with Set nodes:
- Set voice code node Generates a numeric code that will be spoken during the TTS voice call.
- Set email code node Creates a separate email verification code, but only after the voice code is successfully validated.
This separation keeps your logic clean: the user must pass voice verification before moving on to email verification.
Refining the message: improving TTS clarity with a Code node
Raw numeric codes like 12345 can be hard to understand over a call. Spacing the digits improves clarity significantly.
The template uses an n8n Code node to transform the code from something like 12345 into 1 2 3 4 5 before sending it to ClickSend.
// Example n8n Code node script
for (const item of $input.all()) {  const code = item.json.Code;  const spacedCode = code.split('').join(' ');  item.json.Code = spacedCode;
}
return $input.all();
This small improvement goes a long way for user experience, and it is a great example of how tiny automation tweaks can create a more professional, reliable flow.
Step 4: send the TTS voice call with ClickSend
Now the workflow is ready to place a voice call using ClickSend’s /v3/voice/send API.
In the Send Voice HTTP Request node:
- Use POST and set the body type to JSON.
- Enable Basic Auth using your ClickSend username and API key.
- Ensure Content-Type is
application/json.
A sample JSON body looks like this:
{  "messages": [  {  "source": "n8n",  "body": "Your verification number is {{ $json.Code }}",  "to": "{{ $('On form submission').item.json.To }}",  "voice": "{{ $('On form submission').item.json.Voice }}",  "lang": "{{ $('On form submission').item.json.Lang }}",  "machine_detection": 1  }  ]
}
Key details:
machine_detection: 1attempts to skip answering machines.bodyuses the spaced code for clearer TTS pronunciation.- The
to,voice, andlangfields are pulled from the Form Trigger node.
Once this node is configured, your workflow can dial users automatically and read out their verification code.
Step 5: verify the voice code
After the call, the user needs a way to confirm they received the correct code. This is done through another form-based step.
- Verify voice code (Form) Presents a simple form where the user enters the code they heard in the call.
- Is voice code correct? (If) Compares the entered code to the original voice code.
If the code matches, the workflow continues to email verification. If not, you can show a failure page, log the attempt, or offer another try. This is where you can start adding your own logic for retries and limits.
Step 6: send and confirm the email verification code
Once the voice step is successful, the workflow moves on to email verification.
- Set email code (Set) Generates a separate code for email verification.
- Send Email (SMTP) Uses your SMTP credentials to send the verification code to the user’s email address.
The user then receives the email and is asked to enter the code in another form:
- Verify email code (Form) Collects the email verification code from the user.
- Is email code correct? (If) Compares it to the stored email code and routes to either a success or failure page.
At this point, your two-factor verification is complete. All of it handled by n8n, ClickSend, and SMTP, without manual intervention.
Node-by-node summary of the n8n workflow
Here is a quick recap of the main nodes and their roles:
- On form submission (Form Trigger) Starts the workflow and collects phone number, language, voice preference, email, and name.
- Set voice code (Set) Creates the numeric code for the TTS call.
- Code for voice (Code) Adds spaces between digits to make the code easier to understand over the call.
- Send Voice (HTTP Request) Calls ClickSend’s
/v3/voice/sendendpoint to start the TTS voice call. - Verify voice code (Form) Collects the code that the user heard and typed in.
- Is voice code correct? (If) Validates the voice code and branches the flow.
- Set email code (Set) Generates the email verification code after voice verification passes.
- Send Email (SMTP) Sends the email with the verification code using your SMTP credentials.
- Verify email code (Form) Lets the user submit the email code.
- Is email code correct? (If) Final decision node that shows success or failure pages.
Once you understand this structure, you can start to edit and expand it to fit your exact use case.
Testing your verification journey end to end
Before rolling this out to users, walk through the full flow yourself:
- Submit the initial form with a valid phone number and email.
- Confirm that you receive a TTS voice call that speaks the spaced verification number.
- Enter the code into the voice verification form. If correct, the workflow should send an email code.
- Open the email, copy the code, and submit it via the email verification form.
- Verify that you see the success page, or the failure page if you intentionally use an incorrect code.
This test run is more than a check. It is a moment to see your new automated system in action and to spot small improvements you might want to make, such as copy changes, timeouts, or styling.
Security and reliability best practices
As you refine this workflow, keep security and reliability in mind:
- Do not hardcode production API keys in workflows. Use n8n credentials or environment variables.
- Set code expiry (for example, 5-10 minutes) and limit verification attempts to reduce fraud.
- Enable rate limiting and logging to detect suspicious activity.
- Ensure your SMTP configuration uses authentication and TLS for secure email delivery.
- Follow local regulations and Do-Not-Call lists when placing voice calls.
These practices help you scale safely as more users rely on your verification system.
Troubleshooting common issues
If something does not work as expected, start with these checks:
- Voice call not received Verify ClickSend credits, API credentials, and phone number format (including country code). Check ClickSend logs for delivery status.
- Poor digit clarity Adjust the Code node to change spacing or add pauses, or try a different TTS voice or language setting.
- Email not delivered Confirm SMTP credentials, review spam or promotions folders, and consider using a more reliable email provider for production traffic.
- Form fields mismatched Double-check that the field names in the Form Trigger match the references in your nodes, such as
$('On form submission').item.json.To.
Each fix you apply makes your automation more stable and future proof.
Extending the workflow: your next automation steps
Once this template is running, you have a powerful base to build on. Here are some ideas to grow from here:
- Store verification attempts and timestamps in a database such as Postgres or MySQL to enforce expiration and retry limits.
- Add SMS as an alternative channel using the ClickSend SMS API for users who prefer text messages.
- Localize messages and voice languages based on user locale for a more personal experience.
- Record calls or log delivery status for auditing and support.
Each extension is another step toward a more automated, resilient system that works for you, not the other way around.
From template to transformation
By combining TTS voice calls and email verification in one n8n workflow, you create a verification strategy that is flexible, accessible, and scalable. With ClickSend handling the voice layer and SMTP delivering email codes, you get a robust two-step flow that is easy to test, adjust, and extend.
This template is not just a technical shortcut. It is a practical way to reclaim time, reduce manual work, and build trust with your users. Start with this workflow, then keep iterating. Add logging, analytics, localization, or new channels as your needs evolve.
Take the next step: import the workflow into n8n, plug in your ClickSend and SMTP credentials, run a few test verifications, and customize the messages and timeouts for your audience. Use it as a starting point to automate more of your user lifecycle.
If you want help tailoring the template to your product or want to explore more automation ideas, you can reach out, subscribe for updates, or request a walkthrough.
Call to action: Download the template, subscribe for more n8
