
How to Run Icypeas Bulk Email Searches in n8n
Imagine opening your laptop in the morning and seeing a ready-to-use list of verified email addresses, already pulled from your contacts, neatly processed, and waiting for your next campaign. No copying, no pasting, no repetitive lookups. That is the kind of shift this n8n workflow can unlock for you.
In this guide, you will learn how to use an n8n workflow template to run Icypeas bulk email searches directly from a Google Sheet. You will read contact data, generate the required API signature, and trigger a bulk email-search request to Icypeas – all inside a single automated flow.
This is more than a technical tutorial. Think of it as a small but powerful step toward a more automated, focused way of working, where tools handle the busywork so you can concentrate on strategy, relationships, and growth.
The problem: Manual email discovery slows you down
Finding and verifying email addresses one by one might feel manageable at first. But as your outreach grows, the manual work starts to steal your time, energy, and focus. Every extra lookup is a tiny distraction that pulls you away from higher-value tasks like crafting better campaigns, refining your offer, or talking to customers.
If you are dealing with dozens or hundreds of contacts, manual email discovery quickly becomes:
- Time consuming and repetitive
- Error prone and inconsistent
- Hard to scale across multiple lists or campaigns
Automation with n8n and Icypeas gives you a different path. Instead of chasing data, you design a workflow once and let it run whenever you need it. Your role shifts from “doer of tasks” to “designer of systems.”
The mindset shift: From tasks to workflows
Before we dive into the n8n template, it helps to adopt a simple mindset: every repetitive task is a candidate for automation. If you can describe the steps, you can often delegate them to a workflow.
This Icypeas bulk email search setup is a perfect example. You already know the steps:
- You collect contact details in a spreadsheet
- You send data to an email discovery tool
- You wait for results and download them
n8n lets you turn those steps into a repeatable system. Once built, you can:
- Trigger searches from any Google Sheet
- Run bulk email lookups on a schedule
- Reuse and adapt the workflow for new campaigns or data sources
Think of this template as a starting point. You can use it as-is, then gradually expand it to fit your unique outreach process.
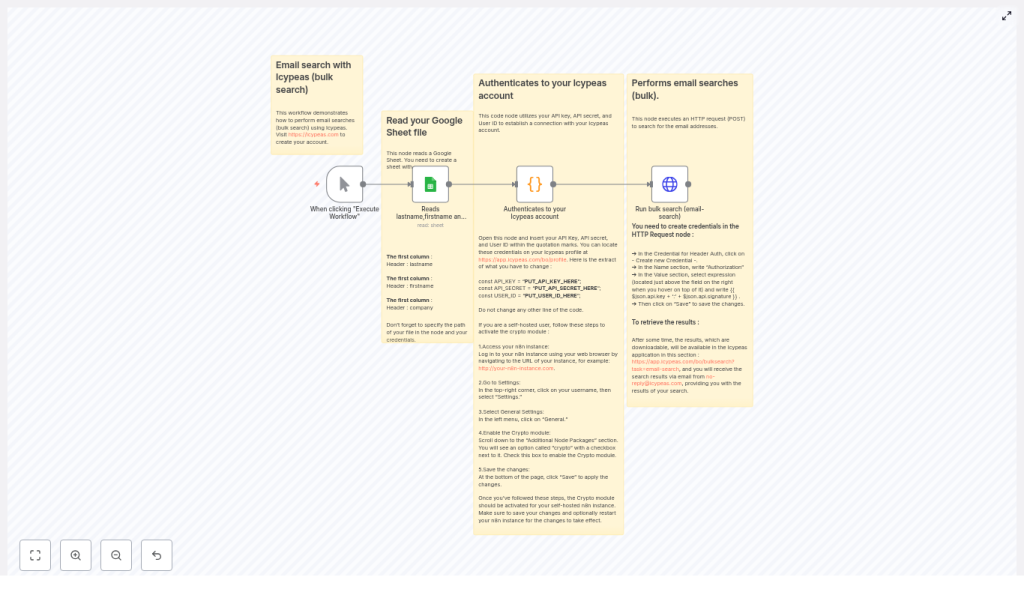
What this n8n + Icypeas workflow does
At a high level, the workflow automates bulk email searches using Icypeas, powered by data from Google Sheets. Here is what happens under the hood:
- Trigger – You start the workflow manually in n8n or run it on a schedule.
- Read contacts – A Google Sheets node pulls rows with
firstname,lastname, andcompany. - Generate signature – A Code node builds the HMAC signature Icypeas requires, using your API secret.
- Send request – An HTTP Request node submits a bulk email-search job to Icypeas.
- Receive results – Icypeas processes the task and makes the results available for download via the dashboard and by email.
Once set up, this flow can save hours of manual work every month, especially if you run regular outreach campaigns or maintain large prospect lists.
What you need before you start
To follow along and use the n8n template effectively, make sure you have:
- An n8n instance (cloud or self-hosted)
- An Icypeas account with:
- API Key
- API Secret
- User ID
You can find these in your Icypeas profile.
- A Google account with a Google Sheet containing your contacts
- HTTP Request credentials configured in n8n
Once this is in place, you are ready to turn a simple spreadsheet into a powerful, automated email search engine.
Step 1: Prepare your Google Sheet for automation
Your Google Sheet is the starting point of the workflow. Clear structure here leads to smooth automation later.
Create a sheet with column headers that match what the n8n Code node expects. For the template and example code below, use these headers:
firstnamelastnamecompany
Example rows:
firstname,lastname,company
Jane,Doe,ExampleCorp
John,Smith,AnotherInc
The included code maps each row as [firstname, lastname, company]. If you ever change the column order or add more fields in the Code node, make sure your sheet headers and mapping stay aligned.
This is a great moment to think ahead: how will you use these results later? Clean, consistent data here will pay off when you integrate this workflow with your CRM, email platform, or reporting system.
Step 2: Read your contacts with the Google Sheets node
Next, bring your contact data into n8n.
Add a Google Sheets node and configure it with your Google credentials and the document ID of your sheet. Set the range to cover all rows you want to process, or leave the range blank to read the entire sheet.
The node will output one item per row, with fields such as:
$json.firstname$json.lastname$json.company
At this point, you have turned your spreadsheet into structured data that can flow through any automation you design. This is a key mindset shift: your sheet is no longer just a static file, it is a live data source for your workflows.
Step 3: Generate the Icypeas API signature with a Code node
Icypeas protects its API with signed requests. That might sound technical, but in practice it is just another repeatable step that you can automate with a single Code node.
Add a Code node after your Google Sheets node. This node will:
- Create a timestamp
- Generate a signature using HMAC-SHA1 of
method + url + timestamp, all lowercased before hashing - Build an api object containing:
keysignaturetimestampuserId
- Create a data array with the records to search
Here is the example JavaScript used in the Code node (trimmed for clarity, but technically complete):
const API_BASE_URL = "https://app.icypeas.com/api";
const API_PATH = "/bulk-search";
const METHOD = "POST";

// Replace with your credentials
const API_KEY = "PUT_API_KEY_HERE";
const API_SECRET = "PUT_API_SECRET_HERE";
const USER_ID = "PUT_USER_ID_HERE";

const genSignature = (url, method, secret, timestamp = new Date().toISOString()) => {  const Crypto = require('crypto');  const payload = `${method}${url}${timestamp}`.toLowerCase();  return Crypto.createHmac("sha1", secret).update(payload).digest("hex");
};

const apiUrl = `${API_BASE_URL}${API_PATH}`;
const data = $input.all().map(x => [x.json.firstname, x.json.lastname, x.json.company]);

$input.first().json.data = data;
$input.first().json.api = {  timestamp: new Date().toISOString(),  secret: API_SECRET,  key: API_KEY,  userId: USER_ID,  url: apiUrl
};

$input.first().json.api.signature = genSignature(  apiUrl,  METHOD,  API_SECRET,  $input.first().json.api.timestamp
);

return $input.first();
Important points:
- Replace
PUT_API_KEY_HERE,PUT_API_SECRET_HERE, andPUT_USER_ID_HEREwith your actual Icypeas credentials. - If you are running self-hosted n8n, enable the
cryptomodule so thatrequire('crypto')works:- Go to Settings > General > Additional Node Packages
- Add
crypto - Restart your n8n instance
Once this step is in place, you have automated the entire signing process. No more manual signature calculations, no risk of typos, and no extra tools needed.
Step 4: Configure the HTTP Request node to trigger the bulk search
Now you are ready to send the bulk email-search job to Icypeas.
Add an HTTP Request node after the Code node and configure it as follows:
Core configuration
- URL: Use the value generated in the Code node, for example:
{{$json.api.url}} - Method:
POST - Body: Send as form parameters
Body parameters (form data)
Add these as key/value pairs in n8n:
task = email-searchname = Test(or any descriptive job name)user = {{$json.api.userId}}data = {{$json.data}}
Authentication and headers
- Authentication: Use a header-based auth credential. Set the Authorization header value as an expression combining your key and signature:
{{ $json.api.key + ':' + $json.api.signature }} - Custom header: Add:
X-ROCK-TIMESTAMPwith value{{ $json.api.timestamp }}
With this node in place, pressing “Execute Workflow” in n8n will send your entire batch of contacts to Icypeas in one automated step.
Step 5: Run the workflow and retrieve your results
Now comes the rewarding part: seeing your automation in action.
- Run the workflow manually in n8n or let your trigger start it.
- The HTTP Request node sends the bulk-search job to Icypeas.
- Icypeas queues and processes your request.
When the processing is complete, you can access the results in two ways:
- In the Icypeas dashboard:
https://app.icypeas.com/bo/bulksearch?task=email-search - By email:
Icypeas typically sends results fromno-reply@icypeas.com.
Keep in mind that the HTTP Request node is responsible for starting the job, not downloading the final files. The processed results are available from the Icypeas back office once the job is done.
At this stage, you have successfully turned a manual lookup process into a repeatable, scalable workflow. From here, you can expand it to push results into your CRM, enrich your records, or trigger follow-up automations.
Troubleshooting and fine tuning your workflow
Every new automation is a learning opportunity. If something does not work right away, use it as a chance to understand your tools better and refine your setup. Here are common issues and how to solve them.
1. Signature mismatch errors
If Icypeas reports a signature mismatch, double check:
- The payload used for the signature is exactly:
method + url + timestamp - You convert the entire payload to lowercase before hashing.
- The timestamp in the payload matches the value of the
X-ROCK-TIMESTAMPheader.
Even small differences in spacing or casing can cause mismatches, so keep the format precise.
2. Wrong column mapping or malformed data
If the data Icypeas receives looks incorrect or incomplete:
- Confirm that your Google Sheet headers are exactly:
firstnamelastnamecompany
- Check that the Code node maps the data as:
[x.json.firstname, x.json.lastname, x.json.company] - Verify the range in the Google Sheets node to ensure all rows are being read.
Once the mapping is correct, you can confidently scale up to larger lists.
3. Self-hosted n8n and the crypto module
If you see errors related to require('crypto') in the Code node:
- Open your n8n settings.
- Go to Settings > General > Additional Node Packages.
- Add
cryptoto the list. - Restart your n8n instance.
After that, the Code node should be able to generate the HMAC signature without issues.
4. Handling rate limits and large tasks
If you work with very large datasets, you might notice longer processing times or hit rate limits. In that case, consider batching your data.
Use the SplitInBatches node after the Google Sheets node to send smaller chunks to Icypeas, for example 50 to 200 records per job. After each batch, you can add a short pause or delay to respect Icypeas processing capacity and rate limits.
This pattern improves reliability, reduces timeout risk, and keeps your automation stable as your lists grow.
Security best practices for your automated workflow
As you automate more of your work, it is important to protect your credentials and data. A few simple habits can go a long way.
- Keep your API_SECRET private and never commit it to public repositories.
- Use n8n credentials to store sensitive values like headers and API keys instead of hard-coding them into nodes.
- If you work in a team, restrict access to your n8n instance and rotate keys periodically.
These practices help you build a trustworthy automation foundation you can rely on as you scale.
Scaling up: Batch processing pattern for large sheets
Once you are comfortable with the basic flow, you can extend it to handle much larger lists while keeping performance steady.
A common pattern is to use a SplitInBatches node after reading from Google Sheets:
- Split your contacts into batches of 50 to 200 records.
- For each batch, run the Code node and HTTP Request node to create a separate Icypeas bulk-search job.
- Optionally add a pause or delay between batches to respect processing and rate limits.
This approach turns your workflow into a robust engine that can process thousands of contacts without overwhelming any single step
