
Build an AI Clothes Swapper with n8n & Fal.ai
Imagine letting your users “try on” clothes online without ever stepping into a fitting room. No backend to build from scratch, no complex infrastructure, just a smart workflow that handles everything for you.
That is exactly what this AI clothes swapper template does. Using n8n for automation and Fal.ai for image-based virtual try-on, you can drop a powerful feature into your app with very little code. The workflow accepts images from your frontend, sends them to Fal.ai, waits for the AI magic to finish, then returns a final image URL ready to display in your UI.
Let’s walk through how it works, when to use it, and how to get the most out of it, step by step.
What this AI clothes swapper actually does
At a high level, this template creates a simple “virtual fitting room” backend. Your frontend or mobile app sends two image URLs to an n8n webhook:
- personImage – the user or model photo
- garmentImage – the clothing item you want to try on
From there, n8n takes over:
- Calls the Fal.ai fashn try-on API with those images and some quality settings
- Waits and polls for the processing status
- Fetches the final generated image once it is ready
- Responds to the original webhook request with the URL of the try-on result
You get a clean JSON response that your frontend can use to instantly show the user how the garment looks on them. No need to manage long-running jobs or queue systems yourself, because n8n and Fal.ai handle that for you.
Why use n8n + Fal.ai for virtual try-on
You might be wondering, why not just call Fal.ai directly from the frontend? A few good reasons:
- Security – Your Fal.ai API key stays hidden on the server side, safely stored in n8n credentials.
- Orchestration – n8n gives you visual control over polling, retries, error handling, and branching logic.
- Scalability – You can adjust wait times, retry strategies, and even add caching or logging, all in a no-code interface.
- Flexibility – Easy to extend later with analytics, user galleries, or e-commerce integrations.
Fal.ai, specifically the fashn/tryon/v1.5 endpoint, does the heavy lifting: realistic garment transfer, background preservation, face refinement, and high-quality output. n8n just makes sure the whole process runs smoothly and predictably.
How the workflow runs from start to finish
Here is the full journey in plain language, from the moment a user taps “Try on” to when they see their new outfit:
- The client app sends a POST request with image URLs to an n8n webhook.
- n8n sends those URLs to the Fal.ai try-on API and gets a
request_id. - The workflow waits a few seconds to avoid hammering the API.
- n8n polls the Fal.ai status endpoint until the job is completed.
- Once completed, n8n calls the Fal.ai result endpoint to get the final image.
- The workflow returns a JSON response to the original webhook call with the generated image URL.
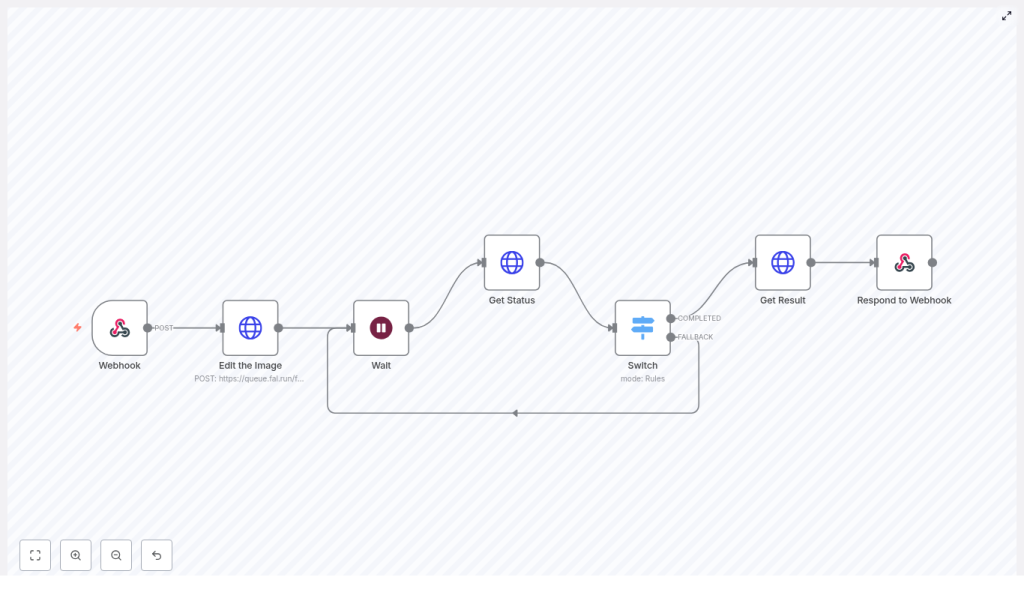
Now let’s break that down node by node inside n8n.
Inside the n8n workflow: node-by-node tour
1. Webhook – your public entry point
Everything starts with the Webhook node. This is the URL your frontend or mobile app calls. It expects a JSON body like this:
{  "personImage": "https://example.com/user.jpg",  "garmentImage": "https://example.com/jacket.png"
}
In the node settings, you will:
- Set the HTTP method to
POST - Choose a webhook path (for example
/webhook/ai-tryon) - Optionally add security checks, such as a secret token in a header or query parameter
This node simply receives the data and passes it to the rest of the workflow.
2. Edit the Image – sending the job to Fal.ai
Next up is an HTTP Request node that talks to Fal.ai’s try-on endpoint:
POST https://queue.fal.run/fal-ai/fashn/tryon/v1.5
Example headers:
Authorization: Key API-KEY
Content-Type: application/json
The request body includes all the important parameters. In this template, you will see fields like:
model_image– thepersonImageURL from the webhookgarment_image– thegarmentImageURLmode– set toquality(orspeedif you prefer faster, cheaper results)background_mode–preserveto keep the original backgroundimage_resolution– for example1024quality–ultrafor high-end outputsblend– e.g.0.85, controls how strongly the garment is blended with the personrefine_faces–trueto improve facial detailsupscaleandenhance_details–truefor post-processing polish
Fal.ai typically responds with a request_id. Store this in the workflow (for example in the default JSON output) so the next nodes can use it to check the job status.
3. Wait – giving Fal.ai a moment to work
After sending the request, the workflow moves into a Wait node. The idea is simple: do not poll the status endpoint constantly, that wastes credits and can slow everything down.
In the template, the flow goes from Edit the Image to Wait, then to Get Status. You can configure a delay like:
- 3 to 8 seconds as a starting point, depending on your latency and cost preferences
You can always tweak this later if your users want faster feedback or if you need to reduce API calls.
4. Get Status – checking if the job is done
Next, another HTTP Request node polls the Fal.ai status endpoint:
GET https://queue.fal.run/fal-ai/fashn/requests/{{ request_id }}/status
Here, {{ request_id }} is the ID returned from the previous step. The response includes a status field. If the status is not COMPLETED, the workflow will loop back to the Wait node and try again later.
5. Switch – routing based on status
To handle different statuses neatly, the template uses a Switch node. It checks the value of $json.status and routes the workflow accordingly.
In this template you will see two main outputs:
- COMPLETED – when
$json.status == "=COMPLETED" - FALLBACK – any other status (pending, failed, etc.)
On the FALLBACK path, the workflow usually goes back to the Wait node to try polling again. You can also add logic here for:
- Maximum retry counts
- Exponential backoff
- Alerts or logging when something looks wrong
This helps you avoid infinite loops or a flood of unnecessary API calls.
6. Get Result – fetching the final try-on image
Once the status is COMPLETED, the workflow moves to another HTTP Request node to grab the finished result:
GET https://queue.fal.run/fal-ai/fashn/requests/{{ request_id }}
The response usually includes an images array. The first image is often the one you want:
images[0].url
This URL points to the final PNG with the garment realistically placed on the person. You can pass this value along to the last step to send it back to your client.
7. Respond to Webhook – sending the image URL back
Finally, the Respond to Webhook node sends a JSON response back to the original client request. In the template, it looks like this:
{  "myField": "{{ $json.images[0].url }}"
}
You can rename myField to something more descriptive, like resultImageUrl, and you can also include extra metadata such as:
request_idprocessing_time- Warnings or error messages if relevant
From the frontend perspective, it is just a simple JSON response that can be used to display the try-on image in your UI.
What a client request looks like
On the client side, calling this workflow is straightforward. Here is a typical request:
POST /webhook/1360d691-fed6-4bab-a7e2-97359125c177
Content-Type: application/json

{  "personImage": "https://cdn.example.com/users/123.jpg",  "garmentImage": "https://cdn.example.com/items/jacket.png"
}
Then, when n8n finishes the whole process, it responds with JSON that includes the generated image URL. Your app can simply parse the response and show the new image to the user.
When to use this virtual try-on workflow
This template is a good fit if you are building things like:
- An e-commerce store that wants to offer “try before you buy” online
- A fashion discovery app that lets users experiment with different outfits
- An internal tool for stylists or marketing teams to generate try-on visuals quickly
- A prototype or MVP to validate a virtual try-on concept without heavy engineering
If you want a managed, visual backend that you can adjust without redeploying code, n8n plus Fal.ai is a very comfortable setup.
Best practices: security, errors, privacy, and performance
Security tips for your webhook and API key
- Protect your webhook by requiring a secret token in a header or query parameter, then validate it in n8n.
- Store your Fal.ai API key in n8n credentials or environment variables. Never expose it on the frontend.
- If this endpoint is public-facing, lock down CORS and whitelist only the domains that should call it.
Error handling and reliability
Things will fail occasionally, so it is worth planning for that:
- Set retry limits on polling and log when requests fail repeatedly.
- Record
request_idvalues and final URLs for easier debugging. - Return clear, human-readable error messages to the client, such as:
"garment image invalid""person image not accessible""processing failed, please try again"
Privacy and consent for user images
If you are working with real people’s photos, treat them carefully:
- Get proper consent and follow relevant privacy regulations like GDPR or CCPA.
- Delete temporary or intermediate images if you do not need to store them long-term.
- Consider masking or limiting any personally identifiable details if they are not essential.
Performance and cost management
High-quality AI images are not free, so it helps to be intentional:
- Higher resolution and upscaling mean better visuals but higher compute costs.
- Offer multiple tiers, for example:
- Fast, lower-res preview
- Slower, high-res final render
- Cache popular garments or common combinations if your use case allows it.
Common pitfalls to avoid
Here are a few issues people often run into with try-on workflows:
- Ignoring non-200 responses from Fal.ai. Always check status codes and any error fields in the response.
- Polling too aggressively or too rarely. Too frequent polls waste credits, too infrequent polls frustrate users with slow results.
- Not validating input image URLs. Make sure:
- The file type is supported
- The URL is accessible from Fal.ai’s servers
- CORS or permissions are not blocking access
Ideas for extending this workflow
Once the core pipeline works, you can have some fun with it. For example, you could add:
- A/B testing for blend values or quality settings to find the most realistic look for your audience.
- A user gallery where people can save, revisit, or share their try-on images, with explicit opt-in.
- E-commerce integration so each garment image is linked to a product ID or product page.
- A UI step that lets users pick color or size before running the final render.
Because everything is in n8n, adding extra nodes for logging, analytics, or notifications is usually just a drag-and-drop away.
Testing checklist before going live
Before you launch this to real users, it is worth running through a quick test plan:
- Try different body types and garment photos:
- Transparent PNGs
- Flat lay images
- Model shots
- Check edge cases:
- Back-facing or side-facing models
- Occlusions, like crossed arms or bags
- Photos with multiple people
- Verify that
refine_facesandupscaledo not introduce strange artifacts in your dataset.
Putting it all together
With this n8n + Fal.ai template, you get a complete, no-code-friendly backend for an AI clothes swapper or virtual try-on feature. The flow is simple:
- Receive images via a webhook
- Send them to
