
Build an n8n Price Watcher: Automated Price Alerts
Imagine never having to refresh a product page again to see if the price finally dropped. Instead of chasing discounts or manually checking your favorite items, you can let automation quietly do the work in the background while you focus on higher value tasks.
This guide shows you how to set up an n8n price watcher that automatically checks product pages, records historical prices, and emails you when a better price appears. It is simple enough for small projects, yet powerful enough to become the foundation of a more advanced price monitoring system for your personal life or your business.
From manual checking to automated clarity
Most of us start the same way: open a tab, check the price, close the tab, repeat later. It is repetitive, easy to forget, and not the best use of your time or attention.
Automation changes that pattern. Instead of constantly reacting, you can create a system that:
- Watches prices for you on a regular schedule
- Remembers what prices used to be
- Notifies you only when something meaningful changes
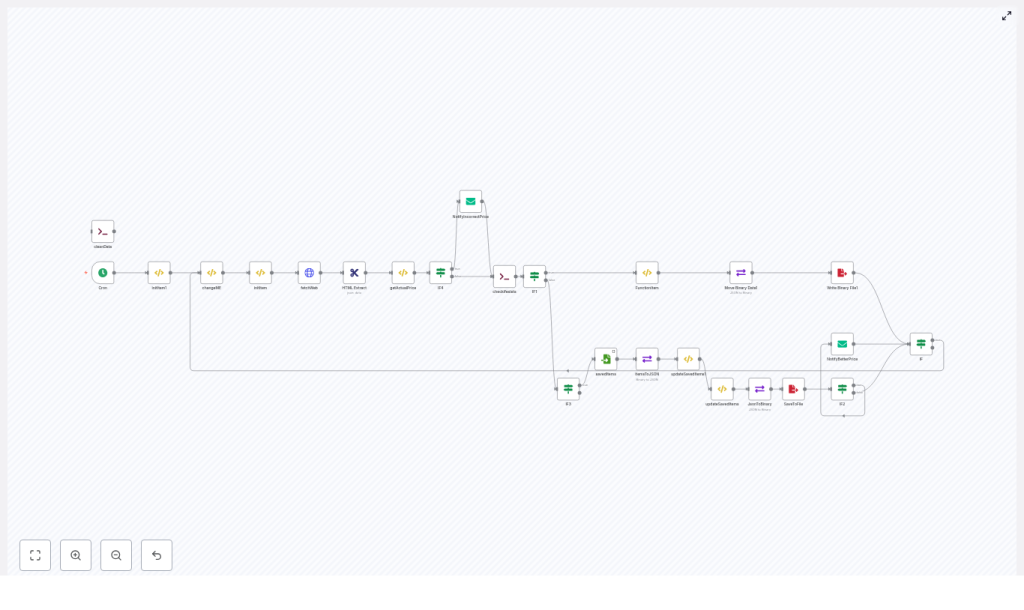
That is exactly what this n8n workflow does. It runs on a schedule, scrapes product pages using HTTP requests and CSS selectors, saves prices to a local JSON file, and sends you email alerts when a lower price is detected or when something looks off and needs manual attention.
Mindset: Start small, automate boldly
This template is not just a price tracker. It is a practical, real-world example of how you can use n8n to reclaim time and mental energy. By setting up one focused automation like this, you begin building the skills and confidence to automate more of your daily work.
Think of it as a stepping stone:
- Today: track a few products and get email alerts
- Next: send notifications to Slack, Discord, or Telegram
- Later: store long-term price history, build dashboards, or integrate with your own tools
You do not need to design a perfect system on day one. Start with this template, get it working, then iterate and grow it as your needs evolve.
What this n8n price watcher actually does
The workflow runs on a schedule (every 15 minutes by default) and follows a simple but powerful loop:
- Loads a list of products you want to watch, including URL, CSS selector, and currency
- Fetches each product page with an HTTP Request node
- Extracts the price from the HTML using the
HTML Extractnode and a CSS selector - Normalizes the price string, converts it to a number, and checks if it is valid
- Reads previously saved prices from a JSON file at
/data/kopacky.json - Compares the new price to the stored one
- If the price dropped, updates the saved file and sends a “better price” email
- If the price cannot be parsed, sends an “incorrect price” email so you can adjust the selector or URL
This pattern is approachable for beginners and reliable for small to medium use cases. It uses only core n8n building blocks like scheduling, HTTP requests, HTML extraction, JavaScript functions, conditional branching, file operations, and email notifications.
Step 1: Schedule your automation with Cron
Cron node
The journey starts with the Cron node, which triggers your workflow automatically.
In the example, the Cron node is configured to run every 15 minutes. You can adjust this interval depending on how frequently prices change and how politely you want to treat the target websites.
- Shorter intervals: faster reaction to price drops, higher load on remote servers
- Longer intervals: lighter load, but slower detection of changes
Choose a schedule that fits your goals and respects the websites you are monitoring.
Step 2: Define what you want to watch
The changeME FunctionItem node
The changeME node is where you define your watchlist. It is a FunctionItem node that returns an array of objects, each object representing a product you want to track. Every item contains:
slug– a short identifier for the productlink– the product URLselector– a CSS selector that points to the price elementcurrency– for exampleEUR,USD, etc.
Example entry:
{ 'slug': 'kopacky', 'link': 'https://www.example.com/product', 'selector': '.prices > strong > span', 'currency': 'EUR' }To add a new product to watch, you simply append another object with the correct selector and link. This makes your automation flexible and easy to extend as you discover more items you want to monitor.
Step 3: Iterate over your watchlist
initItem and the iterator pattern
To process each product one by one, the workflow uses a small iterator pattern based on static workflow data with getWorkflowStaticData('global'). The initItem node picks the current product from the watchlist and passes it along to the next nodes.
This approach lets you:
- Loop through multiple products in a controlled way
- Reuse the same logic (fetch, extract, compare) for every watched item
- Keep the workflow structure clear and maintainable
Step 4: Fetch and extract the price
fetchWeb + HTML Extract
Once a product is selected, the fetchWeb node performs an HTTP request to retrieve the product page HTML as text. Then the HTML Extract node applies the CSS selector defined in your watchlist to find the price element.
Choosing the right selector is crucial for reliable automation. Use your browser DevTools (Elements panel) to:
- Inspect the price element
- Test potential CSS selectors in the console
- Prefer stable attributes like IDs or data attributes over auto-generated class names
If the site renders content with JavaScript (for example, many single page apps), a static HTTP request may return HTML without the price. In those cases, consider using a headless browser solution like Puppeteer or Playwright, or look for an official API endpoint if one is available.
Step 5: Turn text into a clean price
getActualPrice FunctionItem
Raw HTML often includes currency symbols, spaces, and different decimal separators. The getActualPrice node is a FunctionItem that normalizes the extracted string and converts it into a usable number.
Example logic:
var price = String(item.price).replace(",", ".");
price = parseFloat(price);
item.priceExists = (price > 0 ? true : false);
item.price = price;
This function:
- Converts the extracted value to a string
- Replaces comma decimals with dots
- Parses the result as a float
- Sets
priceExiststo indicate if the result looks like a valid price
You can further strengthen this normalization with a slightly more robust pattern:
let raw = String(item.price);
raw = raw.replace(/[^0-9,\.\-]/g, ''); // keep digits, comma, dot, minus
raw = raw.replace(',', '.');
const price = parseFloat(raw);
item.price = price;
This reduces the chance of NaN values and helps keep your workflow resilient across different stores and formats.
Step 6: Decide what happens next with IF nodes
Conditional logic and notifications
Once you have a normalized price, the workflow uses several IF nodes to choose the right path:
- Price cannot be parsed: The workflow sends a
NotifyIncorrectPriceemail. This is your signal to review the selector, check the page, or update the configuration. - Price exists: The workflow proceeds to compare it with saved data.
- Price decreased: If the new price is lower than what is stored, the workflow sends a
NotifyBetterPriceemail and updates the saved file with the new value.
This branching logic keeps your inbox focused. You only receive messages when something meaningful happens: either a new opportunity (better price) or a signal that your automation needs a quick manual tweak.
Step 7: Store and compare prices over time
Reading and writing the JSON file
To remember past prices, the workflow uses file-based storage in a JSON file located at /data/kopacky.json. It relies on:
readBinaryFileto load the existing datamoveBinaryDatato convert file content into JSONwriteBinaryFileto save updated data back to disk
A helper function node, updateSavedItems1, handles the logic of:
- Loading the saved items
- Finding the matching product by slug or identifier
- Updating the record if the new price is lower
- Returning the
oldPriceso it can be included in your email notification
This gives you a lightweight historical record and enables meaningful comparison without needing a full database from day one.
Step 8: Craft meaningful price alerts
Sample HTML email template
When a better price is detected, the workflow sends an HTML email using the NotifyBetterPrice node. Here is an example template used in the workflow:
<h2>New price: {{$node["getActualPrice"].json["price"]}} {{$node["initItem"].json["currency"]}}</h2>
Pôvodná cena bola: {{$node["updateSavedItems1"].json["oldPrice"]}} {{$node["initItem"].json["currency"]}}<br>
URL: {{$node["initItem"].json["link"]}}
You can customize this template to match your brand voice, add styling, or include additional context like timestamps or product names.
Improving reliability: from experiment to trusted system
Error handling and resilience tips
As you rely more on your n8n price tracker, a few reliability practices will help it run smoothly:
- Rate limiting: Space out requests to avoid being blocked. Increase the Cron interval or add a small delay between requests.
- Retries: Enable retries in the HTTP Request node for transient network errors.
- Selector quality: Keep an eye on “incorrect price” emails and refine selectors to keep these alerts rare.
- Proxies: Consider using proxies if you monitor many targets or encounter IP throttling.
- Compliance: Always respect
robots.txtand the terms of service of the sites you track.
Security and operational notes
- Store SMTP credentials securely using n8n credentials, never hardcode them in nodes.
- Protect your n8n instance with authentication if it is accessible from the internet.
- Back up your data file or, for more durability, use an external database so you do not lose history during upgrades or migrations.
Scaling your automation as your needs grow
File storage is perfect for a handful of products or a personal project. As your ambitions grow, you can evolve this template into a more advanced monitoring system.
Enhancement ideas
- Use a database: Move from JSON file storage to Postgres, MySQL, Airtable, Google Sheets, or Firebase for better scalability and querying.
- Track full history: Store each price check with a timestamp so you can build charts and analyze trends over time.
- Expand notification channels: Send alerts to Slack, Discord, Telegram, or SMS in addition to email.
- Persistent storage in production: If running n8n in Docker, mount a volume for
/dataor use a persistent volume in your deployment platform. - Headless browser support: For heavy client-side rendered pages, integrate a headless browser node like Puppeteer to capture fully rendered HTML.
Each improvement builds on the same core workflow you are setting up now. You do not have to redesign from scratch, you just extend what already works.
How to add a new product to your watchlist
Once the workflow is running, expanding it is straightforward. Here is a simple process you can repeat anytime:
- Edit the
changeMEnode and add a new object withslug,link,selector, andcurrency. - Use your browser DevTools to validate the CSS selector and ensure the HTTP Request node returns HTML that contains the price.
- Trigger the workflow manually in n8n to test the new product and confirm that notifications and file updates behave as expected.
With this pattern, you can grow your watchlist in minutes, not hours.
Turn this template into your next automation milestone
This n8n price watcher is a practical, low-cost automation that fits hobby projects, small online stores, and personal shopping lists. More importantly, it is a hands-on demonstration of what n8n can do for you:
- Schedule tasks with Cron
- Fetch data from the web with HTTP Request
- Extract structured information with HTML Extract and CSS selectors
- Transform data using JavaScript in FunctionItem nodes
- Branch logic with IF nodes
- Persist information with file operations
- Stay informed with email notifications
Once you have this workflow running, you will have a working example you can copy, adapt, and extend for countless other automations.
Next steps:
- Add your first few items to the watchlist in the
changeMEnode - Configure your SMTP credentials in n8n
- Run the workflow and watch your first automated price alerts arrive
From here, you can experiment: send alerts to Slack, store data in Airtable, or build a full price history dashboard. Let this template be the first of many workflows that free up your time and help you focus on what matters most.
