
Automate Twitter Banner with n8n Workflow
Imagine this: you hit a new follower milestone, feel that rush of joy, then remember you should update your Twitter banner to show off those shiny new avatars. You open your design tool, drag images around, export, upload, repeat. By the third time, it feels less like “celebrating community” and more like “intern work you forgot to outsource.”
Good news: n8n is that intern. Except it never sleeps, never complains, and actually remembers the right image size.
With this n8n workflow template, you can automatically:
- Grab your newest followers from Twitter
- Download their profile images in high resolution
- Resize and crop those avatars into neat circles
- Place them on a custom banner background
- Upload the final banner straight to your Twitter profile
All of that, without you opening a single design tool. Let’s walk through what this workflow does, how it works, and how to tweak it so your banner updates itself while you focus on more interesting things than cropping images.
Why turn your Twitter banner into an automation playground?
Automating your Twitter banner with n8n is perfect if you:
- Want your profile to look fresh without manually editing images every time
- Love celebrating new followers but hate repetitive design tasks
- Run a brand, community, or creator account that highlights audience growth
This workflow keeps your banner dynamic and engaging, so visitors instantly see that your account is active and community focused, without you spending time doing the same edits over and over.
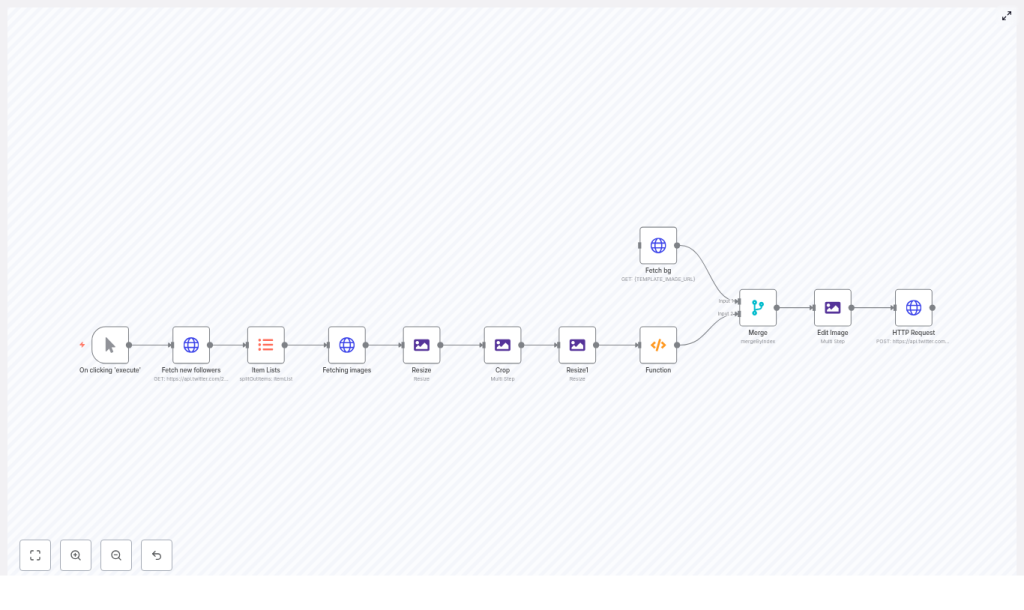
What this n8n Twitter banner workflow actually does
Here is the high level flow of the template:
- Trigger the workflow manually, on a schedule, or via webhook
- Fetch new followers using the Twitter API v2
- Split the follower list into individual items for processing
- Download each avatar and upgrade it to a higher resolution
- Resize and crop avatars into circles
- Fetch a background banner template image
- Merge avatars onto that background at specific coordinates
- Upload the final composite as your Twitter banner using the Twitter API v1.1
Under the hood, this involves a neat mix of HTTP Request, Edit Image, Merge, Function, and trigger nodes. Let’s break it down in a friendly way, so you know exactly what each part is doing.
Step by step setup guide (with minimal pain)
1. Choose how the workflow starts: Manual, Cron, or Webhook
The template uses a Manual Trigger node by default. This is ideal when you are first testing:
- Run the workflow manually inside n8n
Once everything looks good, you can swap this node for:
- Cron node – run daily, weekly, or at any interval you like
- Webhook node – trigger from an external event or another system
That way your banner can quietly update itself on a schedule without you lifting a finger.
2. Fetch your newest followers with Twitter API v2
Next up is an HTTP Request node that talks to the Twitter API v2:
GET /2/users/{YOUR_USER_ID}/followers?user.fields=profile_image_url&max_results=3Key details:
profile_image_urlprovides the avatar URL for each followermax_resultscontrols how many avatars you want to show in your banner- Use header authentication with a Bearer token or another supported method
This node pulls in a list of your latest followers plus their profile image URLs, which is the raw material for your banner magic.
3. Turn the follower list into individual items (Item Lists)
The response from Twitter is a list. The Item Lists node splits that list into separate items so that each follower becomes its own execution path.
Why this matters: each avatar gets processed individually. That means you can download, resize, and crop every image cleanly before merging them back together later.
4. Download and upgrade avatar images
Another HTTP Request node fetches each follower’s avatar. Twitter gives you a default size labeled normal, which is fine for browsing, but not ideal for clean design. The workflow upgrades that URL to a larger square image by swapping out the size:
={{$json["profile_image_url"].replace('normal','400x400')}}This gives you a higher resolution image, which you can then safely downscale in n8n without everything turning into pixel soup.
5. Resize and crop avatars into circles
Next, a set of Edit Image nodes handle the cosmetic surgery:
- Resize each avatar to a consistent size, for example 200×200
- Create a transparent canvas
- Draw a circular mask
- Composite the avatar into that circular mask
The result: clean, circular avatars that are ready to be overlaid on your banner background. No jagged edges, no weird shapes.
6. Final resize and gather avatars with a Function node
Once the avatars are circular, the workflow:
- Resizes them again to their final banner size, for example 75×75 pixels
- Uses a Function node to collect all the avatar binaries into a single item
The Function node code looks like this:
const binary = {};
for (let i=0; i < items.length; i++) {  binary[`data${i}`] = items[i].binary.avatar;
}

return [  {  json: {  numIcons: items.length,  },  binary,  }
];
This consolidates multiple avatar files into one item with binary properties named data0, data1, and so on. That makes it much easier to composite all avatars onto the background in a single Edit Image step later.
7. Fetch your banner background image
Now for the stage where your avatars will perform. Another HTTP Request node downloads the banner background or template image.
Use a hosted URL or CDN location and replace the placeholder {TEMPLATE_IMAGE_URL} in the template with your real image URL. This background is the base canvas on which all avatars will be placed.
8. Merge avatars and background together
The Merge node (set to merge by index) combines:
- The item containing all the avatar binaries (
data0,data1, …) - The item containing the background image
After this step, the Edit Image node receives a single item that includes both the background and all the avatar binaries, which is exactly what it needs to build your final banner.
9. Composite avatars onto the banner
The next Edit Image node performs the compositing. The template uses three example composites with coordinates like:
data0at positionX 1000, positionY 375data1at positionX 1100, positionY 375data2at positionX 1200, positionY 375
You can adjust:
- The coordinates to match your design layout
- The sizes to fit your banner proportions
Keep in mind that a typical Twitter banner safe area is around 1500×500 or larger. Use a canvas that fits Twitter’s upload requirements and test to make sure important content does not get cropped on different devices.
10. Upload the finished banner to Twitter
Once the masterpiece is ready, a final HTTP Request node uploads it using the Twitter API v1.1 endpoint:
POST account/update_profile_banner.jsonConfiguration details:
- The endpoint expects multipart-form-data
- The template sends the banner binary as
banner:bg - Authentication uses OAuth1 with user context
Make sure your OAuth1 credentials are properly set up in n8n and that the app has permission to update the account profile. After this node runs successfully, your Twitter banner updates automatically.
Twitter authentication and permissions in n8n
This workflow talks to two different Twitter API versions, each with its own requirements:
- Twitter API v2 for fetching followers
- Typically uses a Bearer token
- Configured via HTTP Header Auth in n8n
- Twitter API v1.1 for uploading the banner
- Uses OAuth 1.0a with user context
- Configured as an OAuth1 credential in n8n
Best practices:
- Store tokens only in the n8n credentials store
- Never hard code secrets directly in node parameters
- Ensure your Twitter developer app has the right scopes, including permission to write profile data
Customizations, tweaks, and mild overachieving
Once the base workflow is running, you can customize it to match your brand and style.
Adjust how many avatars you show
- Change
max_resultsin the v2 followers request - Update composite steps and coordinates in the Edit Image node to match that count
Design safely for different devices
- Twitter crops banners differently on desktop and mobile
- Keep important avatars and text near the center area
- Test your banner on multiple devices and screen sizes
Keep image quality sharp
- Fetch higher resolution avatars such as 400×400
- Downscale inside n8n rather than upscaling tiny images
- Use consistent sizing so the layout looks clean
Handle errors gracefully
- Add a Set or If node to deal with missing or invalid avatar URLs
- Use a fallback image if a user has no profile picture
- Pick a Merge node mode that matches the number of avatars you expect
Respect API rate limits
- Monitor rate limits for both v2 and v1.1 endpoints
- Add scheduling or simple rate limiting logic if needed
- Avoid hammering the API every few seconds just because you can
Troubleshooting common issues
If something looks off, here are some quick checks before blaming the robots.
- Blank banner after upload
- Verify the HTTP Request node that uploads the banner points to the correct binary property
- In the template this is
banner:bg
- Authentication failures
- Recreate and test your OAuth1 credentials
- Confirm tokens are valid and the app has profile write access
- Avatars appear in the wrong place or wrong size
- Tweak the composite coordinates and sizes in the Edit Image node
- Preview images locally to fine tune the layout
- Missing avatars
- Some users do not have profile images or have invalid URLs
- Add checks and a default placeholder avatar in your template
Security and best practices
- Keep all Twitter credentials in the n8n credentials store, not in plain text
- Only display public profile images, respect follower privacy, and avoid including any private data
- Do not run the automation so frequently that it looks spammy or violates Twitter policies
From repetitive chore to automated celebration
This n8n workflow turns a tedious, repetitive design task into a hands off way to celebrate your audience. Instead of opening a graphics editor every time you gain followers, you can let n8n quietly:
- Pull in new followers
- Build a clean banner with their avatars
- Upload it to Twitter for you
With a little tuning of positions, sizes, and schedule, your profile banner becomes a living, automated shoutout board for your community.
How to get started:
- Import the workflow into n8n
- Fill in your Twitter credentials and template image URL
- Run a few manual tests to confirm everything looks right
- Swap the Manual Trigger for a Cron or Webhook if you want it fully automated
Call to action: Import the workflow, customize the banner template, and automate your Twitter presence – start celebrating new followers automatically today!
