
Automate Confluence Page Creation with n8n
Imagine never having to copy a Confluence template, tweak fields, and double check formatting again. Instead, every new onboarding doc, release note, or meeting summary appears in the right space, with the right title, already filled with the right details. That is the kind of small but powerful transformation that n8n can unlock for your workday.
In this guide, you will walk through an n8n workflow that automatically creates a new Atlassian Confluence page from a space template. The workflow listens to a webhook, fills in placeholders in the template, then publishes a fully formatted page using the Confluence REST API. Along the way, you will see how this template can be a first step toward a more automated, focused workflow where repetitive tasks run in the background and you stay focused on higher value work.
From repetitive tasks to reliable systems
The problem: manual Confluence pages slow you down
Confluence templates are incredibly useful, but creating pages from them can become a grind. Every time you prepare onboarding docs, release notes, meeting notes, or internal documentation, you repeat the same steps: create a page, select a template, fill in fields, and make sure everything is consistent.
Over time, this manual work leads to:
- Lost time on low value, repetitive tasks
- Inconsistent structure, titles, and metadata
- Human errors in links, versions, or names
It is not that these tasks are hard. They just add up and distract you from the work that really moves your team or business forward.
The mindset shift: treat documentation as a workflow, not a chore
Automation in n8n is not just about saving a few clicks. It is about turning fragile, human dependent steps into reliable systems that run the same way every time. When you automate Confluence page creation, you:
- Build a repeatable process that anyone on your team can rely on
- Free your brain from remembering tiny details like page titles and parent IDs
- Create a foundation you can extend with approvals, notifications, and reporting
Think of this workflow as your starting point. Once you have one automated Confluence process, it becomes much easier to imagine and build the next one.
The n8n Confluence template: your practical starting point
The sample n8n workflow is designed to be both simple and powerful. You can import it, plug in your Confluence details, and start creating pages in minutes. From there, you can customize and grow it to fit your exact use case.
Workflow overview: how the automation flows
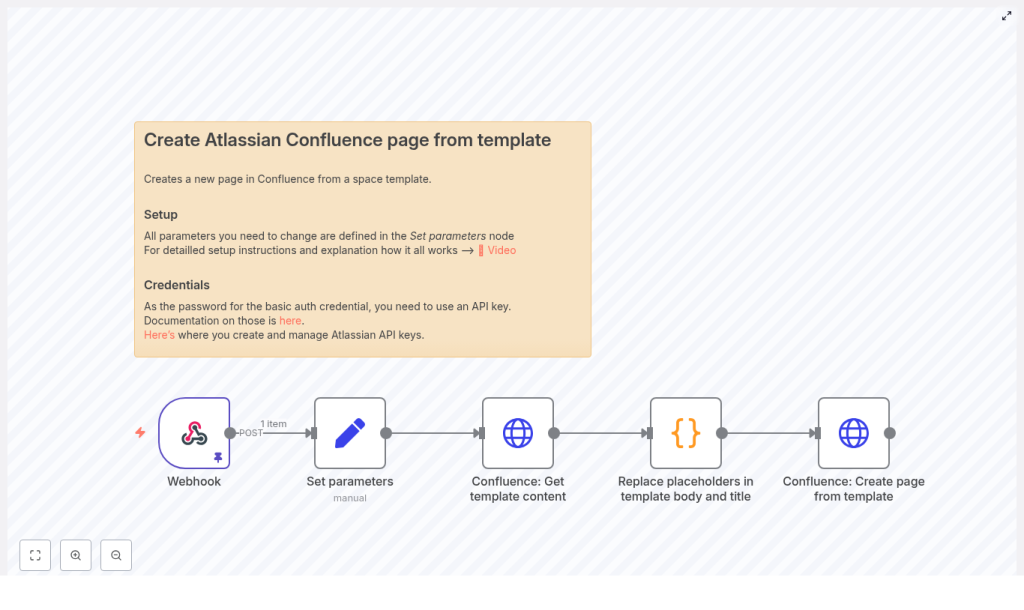
The workflow is built from five core n8n nodes that work together to turn incoming data into a published Confluence page:
- Webhook – receives the incoming payload that will populate your template placeholders
- Set parameters – stores reusable configuration values like your Confluence base URL and template ID
- Confluence: Get template content – fetches the template content (title and body) from Confluence
- Replace placeholders in template body and title – a JavaScript node that swaps placeholders like
$user.name$with real values from the webhook - Confluence: Create page from template – sends the final content to the Confluence REST API to create a page
Once this is in place, your role shifts from “doing the work” to “designing the process.” You decide what data comes in through the webhook, how the template is structured, and how the final page should look, then let n8n handle the rest.
Step 1: Connect n8n securely to Atlassian
Authentication with Atlassian
Before you can let your workflow publish pages on your behalf, you need to connect n8n to Atlassian in a secure way.
In n8n, use Atlassian basic authentication with:
- Your Atlassian account email as the username
- An API token as the password
You can create an API token at id.atlassian.com. Once generated, store this token in n8n credentials so it is never hard coded in individual nodes or shared workflows.
With authentication in place, your workflow can safely call the Confluence REST API and act with the permissions you have granted.
Step 2: Centralize your Confluence settings
The Set parameters node as your control panel
Instead of scattering configuration across multiple nodes, this workflow uses a Set parameters node as a central place for values you might want to change over time. This makes your automation much easier to maintain and scale.
Typical keys you will define include:
confluence_base_url– for examplehttps://your-domain.atlassian.nettemplate_id– the numeric ID of the Confluence template you want to usetarget_space_key– the space key or personal space identifier where pages should be createdtarget_parent_page_id– the ID of the parent page if you want new pages nested under a specific parent
By adjusting these values, you can quickly point the same workflow to a different space, template, or parent page without rewriting any logic.
Step 3: Pull the Confluence template content
Fetching the template via REST API
Next, the workflow needs to know what your Confluence template looks like. The Confluence: Get template content node calls the REST API to fetch it.
The request looks like this:
GET {confluence_base_url}/wiki/rest/api/template/{template_id}
The response includes:
- The template title
- The template body in storage format (Confluence storage representation)
These values become the source content that your JavaScript node will later customize with real data from the webhook.
Step 4: Turn raw data into a polished page
Placeholder replacement with a JavaScript node
This is where your workflow becomes truly dynamic. Instead of static text, your template can contain placeholders like $user.name$ or $project.name$ that are automatically replaced with values from the webhook payload.
The Replace placeholders node uses a small JavaScript function to do this mapping. It supports dot notation for nested JSON values and wraps placeholders with a character such as $.
function replacePlaceholders(template, values) {  const placeholderPattern = /\$(.*?)\$/g;  return template.replace(placeholderPattern, (match, p1) => {  const keys = p1.split('.');  let value = values;  for (const key of keys) {  if (value && key in value) {  value = value[key];  } else {  return match; // keep original if not found  }  }  return value;  });
}

const templateTitle = $('Confluence: Get template content').item.json.name;
const templateBody = $('Confluence: Get template content').item.json.body.storage.value;
const values = $('Webhook').item.json;

const pageTitle = replacePlaceholders(templateTitle, values);
const pageBody = replacePlaceholders(templateBody, values);

return { "page_title": pageTitle, "page_body": pageBody };
Here is what is happening in this step:
- The node reads the template title and body from the previous Confluence node
- It accesses the JSON payload from the Webhook node
- It replaces every placeholder wrapped in
$with the matching value from the JSON - It outputs a final
page_titleandpage_bodythat will be sent to Confluence
This is where your automation becomes uniquely yours. By changing the placeholders in your Confluence template and the structure of your webhook payload, you can adapt this approach to almost any documentation pattern.
Step 5: Create the Confluence page automatically
Publishing via the Confluence content API
With a fully prepared title and body, the workflow is ready to create the page. The Confluence: Create page from template step uses the content API:
POST {confluence_base_url}/wiki/rest/api/content/
An example JSON request body looks like this:
{  "type": "page",  "title": "{{timestamp}}-{{page_title}}",  "space": { "key": "TARGET_SPACE_KEY" },  "ancestors": [{ "id": TARGET_PARENT_PAGE_ID }],  "body": {  "storage": {  "value": "<h1>Final HTML content here</h1>",  "representation": "storage"  }  }
}
In the actual workflow, you will:
- Use n8n expressions to inject
{{ $json["page_title"] }}and{{ $json["page_body"] }}from the JavaScript node - Keep the
storagerepresentation for the body, since the template is already in Confluence storage format - Escape any special characters if you build JSON manually
Once this node runs successfully, your new Confluence page appears exactly where you want it, already filled with the right information.
Example: what the incoming data can look like
To make this concrete, here is a sample webhook payload that could trigger the workflow:
{  "user": { "name": "Alice", "email": "alice@example.com" },  "project": { "key": "PROJ", "name": "Example Project" },  "release": { "version": "1.2.3", "date": "2025-09-12" }
}
If your Confluence template includes placeholders like:
$user.name$$project.name$$release.version$
then the workflow will automatically fill in those values, giving you a complete, customized page for each new release, project, or onboarding flow.
Growing your automation: tips, fixes, and safeguards
Troubleshooting common issues
As you experiment and refine the workflow, you may run into a few common issues. Use these checks to keep things running smoothly:
- 401 or 403 errors – Verify your Atlassian credentials and API token, and confirm that the user has permission to create pages in the target space.
- Invalid space or ancestors – Double check the space key and parent page ID. You can look up IDs in the Confluence UI or via the API.
- Pages not rendering correctly – Make sure you are using the
storagerepresentation and that the template body has not been HTML escaped twice. - Placeholders not replaced – Confirm that the webhook JSON structure matches the dot notation in your placeholders exactly.
- Rate limits – Atlassian applies rate limits to API calls. For large scale automation, add retries or throttling in n8n.
Security best practices as you scale
As your automation becomes more powerful, security becomes more important. Keep these guidelines in mind:
- Store Atlassian API tokens in n8n credentials, never in plain text inside nodes or shared workflows
- Validate incoming webhook payloads for public endpoints, for example using HMAC or a shared secret
- Apply the principle of least privilege so the Confluence user only has the access that the automation really needs
Take it further: extend and personalize the workflow
Once your first automated Confluence page is working, you have a powerful base to build on. Here are a few ways to grow this into a richer system:
- Notifications – Send a Slack message or email with the link to the newly created page so your team knows it is ready
- Dynamic templates – Support multiple template IDs and select one based on fields in the webhook payload, such as project type or environment
- Tracking and audits – Store created page IDs and metadata in a database for reporting, auditing, or rollback workflows
Each improvement brings you closer to a documentation process that runs itself, while you focus on strategy, communication, and product work.
Bringing it all together
Automating Confluence page creation with n8n is a small project with an outsized impact. You define your template once, wire up a webhook, and let the workflow handle the rest. The result is faster documentation, fewer mistakes, and consistent structure across every space.
The sample workflow you have just explored covers everything you need to get started:
- Receiving data through a webhook
- Fetching a Confluence template via the REST API
- Replacing placeholders in the title and body with live data
- Publishing a new Confluence page in the right space and under the right parent
From here, you can extend it with approvals, notifications, scheduling, or integrations with other tools in your stack. Each iteration is another step toward a more automated, intentional way of working.
Ready to build your own automated documentation flow? Import the n8n workflow, update the Set parameters node with your Confluence base URL, space, template ID, and credentials, then send a test webhook. Use the result as your foundation, tweak it, and keep improving until it perfectly matches how your team works.
Download workflow JSON
Get support
Want more step by step automation tutorials like this? Subscribe to get new n8n and Atlassian automation recipes delivered directly to your inbox, and keep building a workflow that works for you, not the other way around.
