
Send Telegram Messages with n8n Webhook
Integrating Telegram with n8n through a webhook is an efficient way to centralize alerts, notifications, and operational messages. This guide presents a compact, production-ready n8n workflow that accepts an HTTP request, forwards the payload to a Telegram chat, and returns a structured confirmation response. It is designed for automation engineers and operations teams who want a reliable, low-maintenance pattern for sending messages to Telegram from any external system.
Use Case and Value Proposition
n8n is an open-source automation platform that enables you to orchestrate APIs and services using visual workflows. Telegram offers a robust bot API that is widely adopted for operational alerts and lightweight chatbots. When combined via an HTTP webhook in n8n, you can:
- Expose a simple HTTP endpoint that any system can call.
- Forward message content directly into a Telegram chat or group.
- Return a clear, human-readable confirmation to the calling system.
This pattern is particularly effective for:
- Cron jobs and scheduled scripts that need to push status updates.
- CI/CD pipelines that should notify teams on build or deploy events.
- Monitoring and alerting tools that integrate via webhooks.
- Internal tools that require fast, no-code notification routing.
What the Workflow Delivers
The template implements a minimal, yet complete, integration between an HTTP endpoint and Telegram. Specifically, it:
- Listens for an HTTP GET request on a defined webhook path.
- Reads a query parameter from the request and uses it as the Telegram message text.
- Sends the message to a preconfigured Telegram chat ID using a bot credential.
- Builds a friendly confirmation string that includes the Telegram recipient name and the message content.
- Returns this confirmation as the HTTP response to the webhook caller.
This structure keeps the workflow small and maintainable while still being suitable for production use.
Prerequisites
Before importing and running the workflow, ensure you have:
- An operational n8n instance, either cloud-hosted or self-hosted.
- A Telegram bot token created via
@BotFather. - The numeric chat ID for the Telegram user or group that should receive messages.
- Basic familiarity with n8n concepts such as nodes, credentials, and expressions.
Architecture Overview
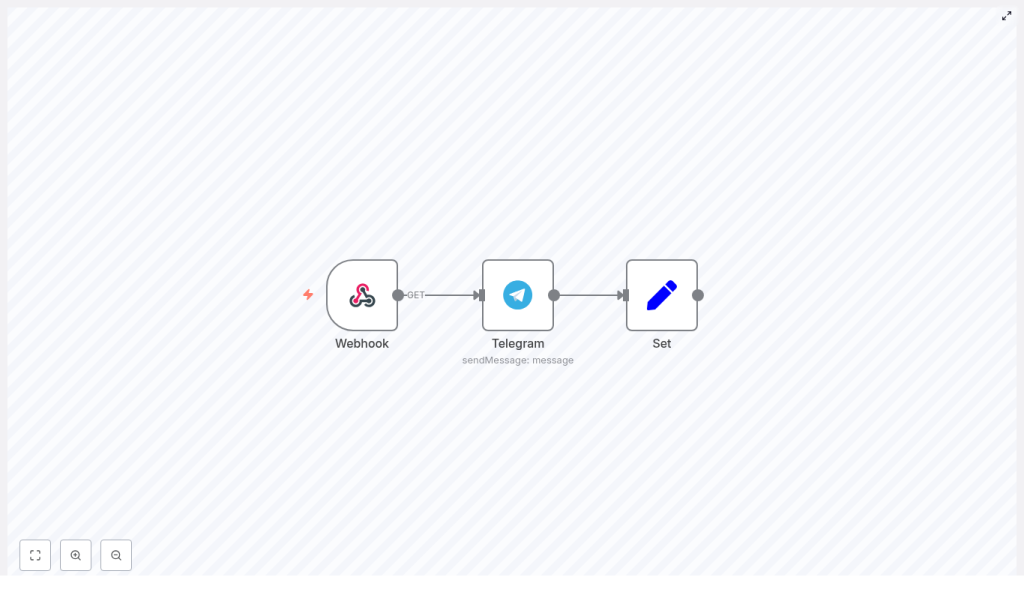
The workflow is intentionally minimal, with three core nodes that handle the complete request lifecycle:
- Webhook node – Exposes an HTTP endpoint and passes incoming parameters into the workflow.
- Telegram node – Uses the Telegram API credential to send the message to a specific chat ID.
- Set node – Constructs a human-readable response string that is returned to the original caller.
The Webhook node triggers the workflow, the Telegram node performs the outbound API call, and the Set node formats the final output. The workflow is configured so that the HTTP response is driven by the last node in the chain.
Workflow Template JSON
You can import the following JSON directly into n8n to create the workflow template:
{ "id":"5","name":"bash-dash telegram","nodes":[{"name":"Webhook","type":"n8n-nodes-base.webhook","position":[450,450],"webhookId":"b43ae7e2-a058-4738-8d49-ac76db6e8166","parameters":{"path":"telegram","options":{"responsePropertyName":"response"},"responseMode":"lastNode"},"typeVersion":1},{"name":"Set","type":"n8n-nodes-base.set","position":[850,450],"parameters":{"values":{"string":[{"name":"response","value":"=Sent message to {{$node[\"Telegram\"].json[\"result\"][\"chat\"][\"first_name\"]}}: \"{{$node[\"Telegram\"].parameter[\"text\"]}}\""}]}},"options":{}},"typeVersion":1},{"name":"Telegram","type":"n8n-nodes-base.telegram","position":[650,450],"parameters":{"text":"={{$node[\"Webhook\"].json[\"query\"][\"parameter\"]}}","chatId":"123456789","additionalFields":{}},"credentials":{"telegramApi":"telegram_bot"},"typeVersion":1}],"active":true,"settings":{},"connections":{"Set":{"main":[[]]},"Webhook":{"main":[[{"node":"Telegram","type":"main","index":0}]]},"Telegram":{"main":[[{"node":"Set","type":"main","index":0}]]}}}
Important: Update the following before using in production:
chatId– Replace123456789with your actual Telegram chat ID.credentials– Point to your own Telegram bot credential in n8n.path– Adjust the webhook path if you want a custom endpoint.- Query parameter name – This example expects a query parameter called
parameterthat contains the message text.
Detailed Node Configuration
1. Telegram Credential Setup
First configure secure access to the Telegram API:
- In n8n, navigate to Credentials and create a new Telegram credential.
- Provide the bot token obtained from
@BotFather. - Assign a clear name, for example
telegram_bot, so it is easy to reference in workflows. - Ensure the credential is stored securely and never commit the token to version control or share it in logs.
2. Webhook Node – HTTP Entry Point
Next, define the inbound interface that external systems will call:
- Method:
GET(you can also usePOSTlater if you prefer JSON bodies). - Path:
telegramor another unique path, for examplealerts-telegram. - Response Mode:
Last Nodeso that the response from the Set node is returned to the caller. - Response Property Name: set to
responsein the node options, which aligns with the Set node configuration.
For the basic template, the incoming message text is read from the query parameter parameter, for example:
?parameter=Hello%20from%20n8n
3. Telegram Node – Message Dispatch
The Telegram node is responsible for sending the actual message to your chat:
- Text: Use an expression that references the query parameter from the Webhook node:
= {{$node["Webhook"].json["query"]["parameter"]}} - ChatId: Set the numeric chat ID of the user or group you want to notify.
- Credentials: Select the Telegram credential you created, for example
telegram_bot. - Additional Fields: Leave empty for this simple use case or extend later for more advanced Telegram features.
When executed, this node uses the Telegram API to send the text content to the specified chat, and the API response becomes available to downstream nodes.
4. Set Node – HTTP Response Formatting
The Set node prepares a concise and informative message for the HTTP response. Configure it as follows:
- Add a new string field named
response. - Use this expression as the value:
=Sent message to {{$node["Telegram"].json["result"]["chat"]["first_name"]}}: "{{$node["Telegram"].parameter["text"]}}"
This expression reads the recipient’s first name from the Telegram API response and the original message text from the Telegram node parameters, then combines them into a human-readable confirmation string. Because the Webhook node is configured with Response Mode: Last Node and responsePropertyName: response, this string is returned to the caller as the HTTP response body.
End-to-End Execution Flow
Once all nodes are configured and the workflow is active, the execution sequence is:
- An external system sends an HTTP request to the n8n webhook URL.
- The Webhook node parses the query parameter and passes it to the Telegram node.
- The Telegram node sends the message to the configured chat ID and exposes the result payload.
- The Set node constructs the final confirmation string using data from the Telegram node.
- The webhook returns this confirmation to the original HTTP caller.
Triggering and Testing the Webhook
After activating the workflow, you can test it with a simple curl command:
curl 'https://your-n8n-instance/webhook/telegram?parameter=Hello%20from%20n8n'
Expected behavior:
- The configured Telegram chat receives the message
Hello from n8n. - The HTTP response contains a confirmation similar to: Sent message to John: “Hello from n8n”, where
Johnis taken from thechat.first_namefield in the Telegram API response.
For local development or non-public environments, you can use a tunneling solution such as ngrok to expose your n8n instance temporarily for testing.
Troubleshooting and Diagnostics
If the integration does not behave as expected, validate the following:
- Telegram credentials: Confirm that the bot token is correct and that the bot is active.
- Chat ID: Ensure you are using the correct ID:
- For direct user chats, use the user’s numeric Telegram ID.
- For groups, invite the bot to the group and obtain the group ID.
- Node execution logs: In n8n, inspect the execution data for the Telegram node to review the raw Telegram API response and identify potential errors.
- Network reachability: Verify that the system sending the webhook can access the n8n instance URL and that there are no firewall or DNS issues.
Security Best Practices for Webhook to Telegram
When exposing webhooks that can trigger outbound messages, security and access control are critical. Consider the following measures:
- Webhook authentication: Protect the endpoint using a secret token or parameter, for example:
?token=abc123. Validate this token within the workflow before sending any Telegram messages. - Transport security: Serve your n8n instance over HTTPS to protect credentials and message content in transit.
- Least privilege for bots: Limit the permissions of the Telegram bot to only what is required for your use case.
- Credential hygiene: Rotate Telegram bot tokens periodically and revoke any token that might be exposed or compromised.
Advanced Enhancements and Extensions
Once the basic pattern is in place, you can extend the workflow to support more complex automation scenarios:
- Use POST and JSON payloads: Switch the Webhook node to
POSTand parse JSON bodies to handle richer message structures, attachments, or metadata. - Rich Telegram messages: Utilize Telegram node additional fields to send images, enable Markdown formatting, or include inline keyboards.
- Structured API responses: Extend the Set node (or replace it with a Function/FunctionItem node) to return structured JSON responses tailored to the calling system.
- Error handling and retries: Add IF nodes, error branches, or dedicated logging workflows to capture failures, retry transient errors, or store error details in a database.
- Multi-tenant support: Parameterize
chatIdby looking it up from a datastore based on an incoming token, username, or system identifier, allowing a single webhook to route messages to multiple destinations.
Summary
This three-node n8n workflow provides a clean, production-ready pattern for sending Telegram messages via a webhook. It is well suited for alerting, operational notifications, and lightweight chatbot interactions. By importing the template, configuring your Telegram credential and chat ID, and applying basic security measures, you can have a robust Telegram notification endpoint running in minutes.
Next step: Import the template into your n8n instance, map it to your own Telegram bot and chat, and trigger the webhook from one of your existing systems. For more automation patterns and advanced n8n workflows, consider exploring additional templates and recipes tailored to your stack.
