
Build a Multi-Report Generator with n8n
Imagine clicking a single button and getting a stack of polished reports – SEO summaries, project updates, even recipe sheets – all generated for you in minutes. No copy-pasting, no manual formatting, no “which version is the latest?” drama.
That is exactly what this n8n workflow template helps you do. In this guide, we will walk through how the multi-report generator works, when you would use it, and how to set it up step by step, using n8n nodes you probably already know.
Think of it as a central report factory. You trigger it once, it fans out, and each report type gets built by its own specialized mini-workflow.
What this n8n multi-report workflow actually does
At its core, this workflow takes one manual trigger and turns it into multiple automated report flows. From that single start point, it can generate different report types such as:
- SEO reports
- Recipe or content sheets
- Project status reports
Each report type uses structured data, runs through its own “child” workflow, and can end up as HTML, PDF, or even a file uploaded to storage or emailed to your team or clients.
The workflow pattern is simple but powerful:
- Start with a Manual Trigger.
- Branch out into multiple
Setnodes that hold mock data for each report type. - Send each of those into an
Execute Workflownode that calls a dedicated child workflow to actually build and deliver the report.
It is perfect for testing your report templates before you plug in real data sources like APIs, Google Sheets, or Airtable.
Why bother with a multi-report workflow?
You could build separate automations for each report type, but that gets messy fast. A unified multi-report workflow in n8n gives you a few big wins:
- One trigger, many outputs – Kick off SEO, project, and recipe reports from the same entry point instead of juggling multiple workflows.
- Clean separation of concerns – Keep your mock data and templates separate from the logic that generates and delivers the actual reports.
- Easy to scale – Need invoices, analytics dashboards, or product catalogs later? Just add another branch and child workflow.
- Smoother testing and debugging – With clear mock data per report type, it is easier to track down issues without touching live data.
If your team runs recurring reports for marketing, product, operations, or clients, this pattern saves you from duplicating the same logic over and over.
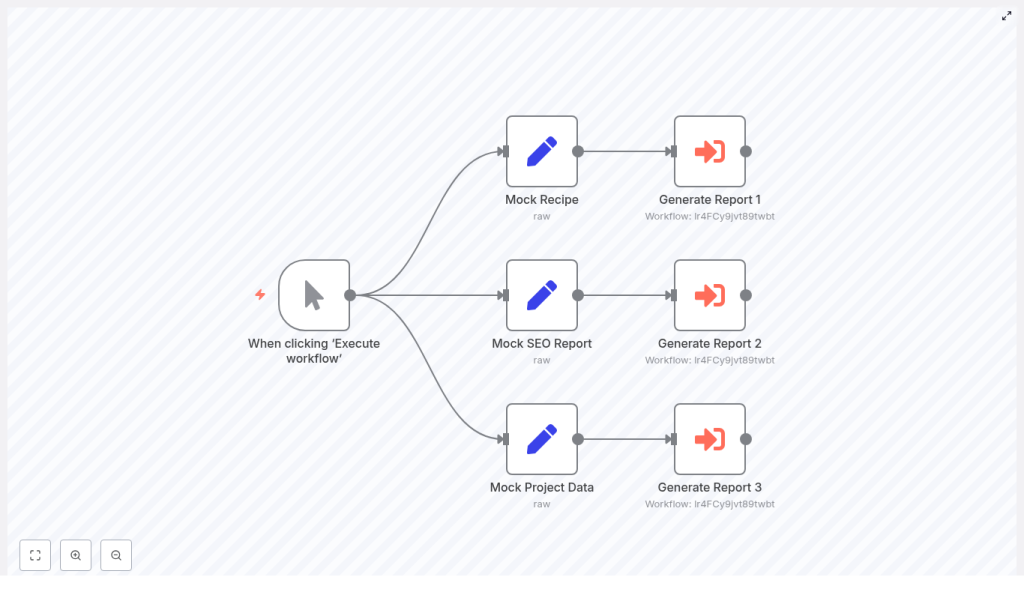
Quick tour of the sample workflow
The sample layout is simple to understand visually. Here is how the pieces fit together:
- Manual Trigger node – The workflow starts “When clicking ‘Execute workflow’”. You run it on demand while building and testing.
- Set (Raw) nodes – Three nodes hold mock data:
- Mock SEO Report
- Mock Recipe
- Mock Project Data
Each one contains a JSON payload that represents what real data will look like later.
- Execute Workflow nodes – Three nodes (Generate Report 1, 2, and 3) each call a separate child workflow. Those child workflows handle formatting, rendering, exporting, and delivering the final report.
This pattern lets you completely design and refine the “report builder” workflows before you connect to live systems.
The JSON payload structure your child workflows expect
All the mock data follows the same basic shape. That way, every child workflow can rely on a consistent input format.
Here is an abbreviated example for an SEO report payload:
{  "title": "SEO Report July",  "filename": "seo_report",  "content": {  "website": "example-store.com",  "analysis_date": "2025-07-31",  "overall_score": 78,  "critical_issues": ["Missing meta descriptions","Slow page load times","Broken internal links"]  }
}
You will notice three key fields:
title– Human readable name for the report.filename– Machine friendly base name for the file you generate.content– The actual report data, which can be nested objects, arrays, and whatever your templates need.
As long as you keep keys like title, filename, and content consistent across report types, your child workflows can easily branch based on filename or something like content.type if you add it.
Step-by-step: building the multi-report generator in n8n
Let us walk through creating this workflow from scratch in n8n. You can follow along in your own instance and adapt it to your needs.
Step 1: Add a Manual Trigger node
Start by adding a Manual Trigger node to your workflow. Set it to run “When clicking ‘Execute workflow’”.
Why Manual Trigger first?
- It is perfect for quick, repeatable testing while you build.
- You can later swap it or complement it with a Cron node if you want scheduled report runs.
Step 2: Create Set nodes for each report template
Next, add a Set node for every report type you want to generate. For example:
- Set – Mock SEO Report
- Set – Mock Recipe
- Set – Mock Project Data
In each Set node, define fields that hold your JSON payload. You can paste in realistic sample data that matches the structure you plan to use in production.
Keeping a separate Set node for each report type helps you:
- Test and tweak one report at a time.
- Avoid mixing fields or accidentally overwriting data between report types.
- Experiment with different payloads, including edge cases and nested structures.
Step 3: Connect Execute Workflow nodes to each Set node
Now for the fun part. For each Set node, add an Execute Workflow node.
Each Execute Workflow node will:
- Receive the mock JSON from its Set node.
- Pass that data into a child workflow dedicated to generating that report.
Inside each child workflow, you will usually want to:
- Validate incoming JSON so you catch missing or malformed fields early.
- Map data into a template engine such as Handlebars, Liquid, or EJS.
- Render HTML and optionally convert it to PDF using an HTML-to-PDF node or external service.
- Upload the report to a storage provider like Amazon S3 or Google Drive.
- Deliver the result via email or webhook to the right people or systems.
This separation keeps your main workflow nice and clean while each child workflow handles the specifics of its report type.
Step 4: Standardize inputs and outputs across child workflows
To keep everything maintainable as you add more reports, treat each child workflow like a small API with a clear contract.
Inputs should at minimum include:
titlefilenamecontent
Outputs should return a consistent structure, for example:
status(such assuccessorerror)url(link to the generated report)file_size(optional but useful for logging and monitoring)
When every child workflow follows the same pattern, it becomes trivial to build follow-up automations, like:
- Centralized logging to a database.
- Notifications to Slack or Microsoft Teams.
- Dashboards that show report status and history.
Scaling your workflow: adding more report types
Once the basic pattern is in place, adding a new report type is straightforward. You do not need to redesign anything, just extend what you already have.
To add another report type:
- Create a new Set node with mock data, or replace it with a live data source node such as:
- HTTP Request (for APIs)
- Google Sheets
- Airtable
- Connect that node to a new Execute Workflow node that calls the corresponding child workflow.
- Make sure the new child workflow respects the same input contract (
title,filename,content) and returns standardized output fields.
This way, your “report factory” grows in a predictable, modular way instead of turning into a giant tangle of special cases.
What a child workflow typically does
Each child workflow is responsible for turning raw data into a finished, shareable report. Here are common steps you might include:
- Use a Function node to validate input and return clear error messages if something is missing or invalid.
- Render HTML with a Template node or an external rendering service.
- Convert HTML to PDF using a headless browser service or a PDF conversion API.
- Upload the generated file to S3, Google Drive, or another storage provider.
- Send a success webhook, email, or message to confirm the report is ready.
You can mix and match these steps depending on how your team prefers to receive and store reports.
Best practices to keep your automation robust
Use environment variables and n8n Credentials
Any time you are working with API keys, S3 credentials, or other secrets, keep them out of your Set nodes and Function nodes.
- Store sensitive values in environment variables or the built-in n8n Credentials system.
- Reference them from your nodes instead of hard-coding them.
This is safer, easier to manage, and much friendlier for teams that share workflows.
Add error handling and retries
Real-world networks are flaky. File uploads fail, email services time out, and APIs occasionally misbehave. Plan for that.
- Wrap critical steps such as uploads or email sends in error handling logic.
- Use retry strategies for transient errors.
- Add fallback paths that send alerts to Slack or Teams when something repeatedly fails.
This keeps your reporting automation reliable instead of silently failing in the background.
Test with realistic mock data
Your Set nodes are not just placeholders. They are your sandbox.
- Fill them with payloads that match real-world length and complexity.
- Include nested arrays, large text blocks, and edge cases.
- Simulate “weird” but possible inputs to see how your templates behave.
When you later swap Set nodes for live data sources like Google Sheets, Airtable, or APIs, you will get far fewer surprises.
Keep report templates modular
Instead of one giant template file for each report type, break things into reusable pieces:
- Header and footer partials.
- Branding components such as logos and colors.
- Content blocks for sections like summaries, tables, or charts.
Using a template engine with partials lets you share branding across all reports while still customizing the content for each type.
Troubleshooting common issues
Even with a solid setup, a few common problems tend to pop up. Here is how to handle them.
1. Child workflow returns an error
If an Execute Workflow node fails, check:
- That the workflow ID or name in the Execute Workflow node is correct.
- That the child workflow is active and accessible.
- Execution logs inside the child workflow to see exactly which node failed.
It also helps to add detailed logging inside Function nodes so you can see the payload and internal state when something goes wrong.
2. File upload fails
When uploads break, it is usually one of these:
- Incorrect or expired credentials.
- Network connectivity issues.
- File size limits or wrong
content-typeheaders.
Double-check your credentials configuration, verify network access, and make sure you are respecting any size limits. Add retry logic for intermittent failures.
3. Unexpected data shape
If your templates or Function nodes are complaining about missing fields, add a validation step at the start of each child workflow:
- Use a Function node to check for required keys like
title,filename, andcontent. - If validation fails, return a clear error message and log the original payload.
This makes it much easier to diagnose issues when you plug in real data sources later.
Security and governance for sensitive reports
If your reports include PII or other sensitive data, you will want a few extra safeguards in place:
- Mask or redact sensitive fields before sending data to any third-party services.
- Use role-based access control for n8n credentials and keep audit logs enabled.
- Encrypt stored outputs and use expiring or restricted URLs instead of public links.
This helps you stay compliant and reduces the risk of accidental data exposure.
Putting it all together
So what you end up with is a clean, modular pattern:
- One trigger that fans out into multiple report branches.
- Dedicated Set or data source nodes for each report type.
- Child workflows that generate, store, and deliver standardized report outputs.
Start by prototyping with Set nodes and mock payloads, then refine your child workflows until they consistently return the same output structure. Once everything feels solid, you can layer on monitoring, retries, and scheduling for production use.
Next steps: from prototype to production
Ready to take this pattern further? Here is how you can evolve it:
- Replace Set nodes with live inputs such as APIs, Airtable, or Google Sheets.
- Add a Cron node to run recurring reports on a schedule.
- Log results to a database or Elastic for better observability and auditing.
Call to action: Try building this multi-report generator in your own n8n instance. Import the sample payload structure above into Set nodes, hook them up to Execute Workflow nodes that call your child report builders, then run the Manual Trigger and watch the reports roll out.
If you prefer to start from something ready-made or want guidance turning this into a fully production-ready automation, feel free to reach out to our team or drop a comment. We are always happy to help you ship better automations faster.
Happy automating, and let your reports take care of themselves.
