
AI Logo Sheet Extractor to Airtable – n8n Workflow Guide
This guide teaches you how to build and use an n8n workflow that turns a single logo-sheet image into structured records in Airtable with the help of an AI parsing agent. You will learn how to accept uploads through a form, send the image to an AI model, interpret the JSON output, and then create or update tools, attributes, and similarity links inside Airtable.
What you will learn
By the end of this tutorial you will be able to:
- Use an n8n Form Trigger to accept logo-sheet uploads from a public form.
- Configure a vision-capable AI agent that extracts tools and attributes from an image.
- Parse and split the AI output so it is safe to process in batches.
- Design a simple Airtable schema with Tools and Attributes tables.
- Upsert tools and attributes in Airtable using deterministic hashes to avoid duplicates.
- Map relationships such as attributes and similar tools using linked records.
- Troubleshoot common issues and extend the workflow for review, analytics, or notifications.
Concept overview
What this n8n workflow does
At a high level, the workflow:
- Receives a logo-sheet image from a public form in n8n.
- Sends the image to an AI language-vision agent that returns structured JSON.
- Splits that JSON into individual tools and attributes so they can be processed safely.
- Creates or updates attributes in Airtable and links them to tools.
- Creates or updates tools in Airtable, including similarity relationships between tools.
The result is an automated pipeline that converts a visual logo sheet into a clean, queryable Airtable database.
Why use this workflow?
- Automate manual data entry from product logo sheets, comparison charts, or vendor overviews.
- Capture context such as categories, features, and similar tools from image layout and labels.
- Maintain a living product database in Airtable with consistent upserts instead of duplicate records.
- Extend and customize the AI prompt, add validations, or send data to downstream analytics tools.
Recommended Airtable structure
Before you build the n8n workflow, set up Airtable so it can store the extracted data in a clean, relational way. The workflow is designed around two tables: Tools and Attributes.
Tools table
Create a table named Tools with at least the following fields:
- Name (single line text) – required. The human-readable tool name.
- Hash (single line text) – a deterministic ID, for example an MD5 hash of the lowercased name. Used to avoid duplicates.
- Attributes (linked records) – links to the Attributes table.
- Similar (linked records) – links to the same Tools table to represent similar or competing tools.
- Description, Website, Category (optional) – extra metadata you may fill in manually or via other automations.
Attributes table
Create a table named Attributes with:
- Name (single line text) – required. The name of the attribute, such as a category or feature.
- Tools (linked records) – a back-link to the Tools table. This will be populated automatically when tools reference attributes.
This schema lets you store each tool once, link it to many attributes, and track similarity relationships between tools.
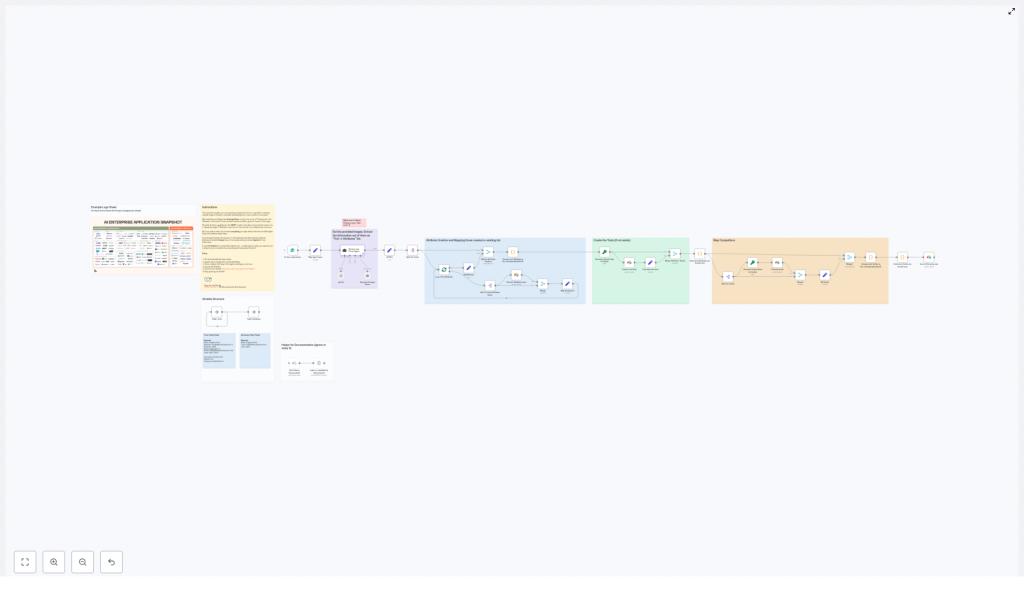
How the workflow works in n8n
The n8n workflow can be understood in five main stages. In the next section we will walk through how to configure each stage step by step.
- Form submission (Trigger) – a public form collects the logo-sheet image and optional context.
- Retrieve and Parser Agent (AI) – a vision-capable LLM inspects the image and returns structured JSON.
- Structured parsing and splitting – the JSON is split into individual tools and attributes.
- Attribute creation and mapping – attributes are upserted in Airtable and mapped back to tools.
- Tool creation and similarity mapping – tools are upserted in Airtable, and similar tools are linked by record ID.
Step-by-step workflow setup
Step 1 – Set up the n8n Form Trigger
Start by creating the entry point for the automation.
- In n8n, create a new workflow or import the provided template.
- Add a Form Trigger node (often called FormTrigger in n8n).
- Configure the webhook path so it is accessible as a public URL.
- Define form fields:
- Image – a file upload field where users submit the logo-sheet image.
- Additional prompt (optional) – a text field where users can add context such as:
- “This is a product comparison chart for enterprise AI tools.”
- “Focus on developer tools and categorize them by primary use case.”
The Form Trigger webhook will fire whenever someone submits an image and optional context, and it will pass that data to the rest of the workflow.
Step 2 – Configure the AI parser agent
Next, you will use a language-vision agent to read the logo sheet and convert it into structured JSON.
- Add an AI node that supports images, such as a LangChain node or an OpenAI multimodal node.
- Connect it to the output of the Form Trigger so it receives:
- The uploaded image.
- The optional user prompt (if provided) as additional context.
- In the AI node, configure:
- Model – choose a vision-capable LLM.
- System prompt – instruct the model to:
- Identify each product or tool in the logo sheet.
- Extract attributes such as category, feature, or UI type.
- Identify similar or competing tools when visible from layout or labels.
- Return JSON only in a strict format.
The JSON returned by the agent should follow a structure similar to:
[{  "name": "ToolName",  "attributes": ["category", "feature", "ui type"],  "similar": ["otherTool1", "otherTool2"]
}]
You should tune the system prompt to match your logo-sheet style. For example, if your sheets always show categories in a specific column, mention that in the prompt so the model can extract more accurate attributes.
Step 3 – Parse and split the AI output
Once the AI node returns the JSON string, you need to prepare it for batch-safe processing.
- Use a node (for example a Function or Item Lists node) to parse the JSON string into an array of tool objects.
- Split the array so that each tool is handled as an individual item in the workflow. This allows you to:
- Upsert each tool separately in Airtable.
- Handle errors or edge cases per item.
- For each tool, split its
attributesarray into individual strings so they can be matched or created as separate attribute records.
By this point, your workflow should be iterating over tools, each with a name, a list of attribute strings, and a list of similar tool names.
Step 4 – Create and map attributes in Airtable
Before writing tools, you need to make sure that all attributes exist in the Attributes table and that you know their record IDs.
- For each attribute string extracted from a tool:
- Check the Attributes table in Airtable to see if an attribute with the same name already exists.
- If it does not exist, create a new record in the Attributes table with that name.
- Collect the Airtable record IDs for all attributes associated with the current tool.
- Map these IDs back into the tool object so that instead of plain text attributes, you now have a list of Airtable record IDs ready to be linked in the Tools table.
This step ensures that attributes are stored as linked records rather than simple text, which makes filtering and analytics in Airtable much easier.
Step 5 – Upsert tools and map similarity relationships
Finally, you will create or update tool records and set up similarity links.
- Generate a deterministic hash for each tool:
- Take the tool name, sanitize it (for example, lowercased and trimmed).
- Generate an MD5 or similar hash.
- Use this hash as a unique key in the Hash field of the Tools table.
- Upsert the tool:
- Search the Tools table for an existing record with the same hash.
- If found, update the record with any new attributes or similar tools.
- If not found, create a new record with:
- Name
- Hash
- Attributes (linked record IDs from Step 4)
- Handle similar tools:
- For each name in the
similararray:- Ensure there is a corresponding record in the Tools table (creating it if necessary, using the same hash strategy).
- Collect the Airtable record IDs of these similar tools.
- Update the current tool record so that the Similar field contains linked record IDs pointing to these related tools.
- For each name in the
After this step, each tool in Airtable will have links to its attributes and to similar tools, giving you a rich, interconnected dataset derived from a single logo sheet.
Initial configuration checklist
- Install and open n8n, then import the workflow template or recreate the nodes as described.
- Configure the Form Trigger webhook URL and add fields for the image and optional prompt.
- Set up a vision-capable AI agent node (such as LangChain or OpenAI multimodal) and tune the system prompt to your logo-sheet layout.
- Connect your Airtable nodes and authenticate using a personal access token.
- Select the Tools and Attributes tables you created earlier.
- Run test submissions with sample logo sheets and inspect:
- The raw AI JSON output.
- The parsed items in n8n.
- The resulting records in Airtable.
- Adjust the AI prompt and parsing logic if tools are missing, misclassified, or attributes are not extracted as expected.
- Once satisfied, activate the workflow and, if needed, secure the form endpoint using API keys, authentication, or IP restrictions.
Prompt tips for better AI extraction
The quality of your AI output depends heavily on the prompt. Consider the following tips:
- Give clear context about the sheet:
- “This image is a grid of SaaS product logos grouped by category.”
- “This is a comparison chart of AI tools; each column is a feature.”
- Specify the exact JSON format you expect:
- Ask for JSON only, no explanations or extra text.
- Include a sample JSON object like the one shown above in the system message.
- Use the additional prompt field in the form when images are ambiguous:
- Allow users to clarify categories, target audience, or special groupings.
- Plan for crowded sheets:
- For very dense logo sheets, consider adding a second validation pass or a human review step before writing to Airtable.
Troubleshooting and common caveats
OCR and image quality issues
- Problem: Small logos or low-resolution images lead to misread names or missing tools.
- Solution: Ask users to upload higher-resolution images and avoid heavy compression. If possible, test your AI prompt with typical examples to see where it fails.
Ambiguous or duplicate names
- Problem: Different tools with similar names or inconsistent capitalization can create duplicates.
- Solution: Use deterministic hashing on a sanitized version of the name (for example, lowercased and trimmed) to generate the Hash field. Review potential hash collisions periodically.
Missing context for classification
- Problem: The AI model does not know how to categorize a logo or cannot infer its function from the image alone.
- Solution: Encourage use of the optional prompt field in the form to add context and classification hints. Update your system prompt to describe your typical sheet layout.
Rate limits and quotas
- Problem: High upload volume can hit API rate limits on your LLM provider or Airtable.
- Solution: Check your API limits and upgrade or throttle as needed. You can also add delays or batch processing nodes in n8n to stay within quotas.
Ideas for extending the workflow
Once the core pipeline is working, you can extend it to match your internal processes.
- Add a human review queue:
- Insert a step that sends extracted tools to a simple UI or a separate Airtable view where a human can approve or edit entries before final write-back.
- Notify your team:
- Integrate Slack or email nodes to alert a channel whenever a new batch of tools is processed.
- Store raw AI responses:
- Save the original JSON and any confidence scores to Airtable or another database for auditing and prompt tuning over time.
- Build analytics:
- Use Airtable views or a BI tool to analyze:
- How many tools share a given attribute.
- Which competitor pairings appear most often.
- Trends across logo sheets over time.
- Use Airtable views or a BI tool to analyze:
