Customer Feedback Collection Workflow for Food & Restaurant

Customer Feedback Collection Workflow for Food & Restaurant (n8n Template)

1. Overview

This n8n workflow template provides an end-to-end automation for collecting, storing, and acting on customer feedback in a food and restaurant context. It combines a web form, Google Sheets, and email notifications so that customer responses are captured in a structured way, persisted in a central spreadsheet, and immediately shared with your team for follow-up.

The workflow is designed for restaurants, cafes, and food service businesses that want a repeatable, low-maintenance pipeline for customer satisfaction data. It uses n8n nodes, triggers, and a small code step to coordinate the flow of information from form submission to internal notification.

2. High-Level Architecture

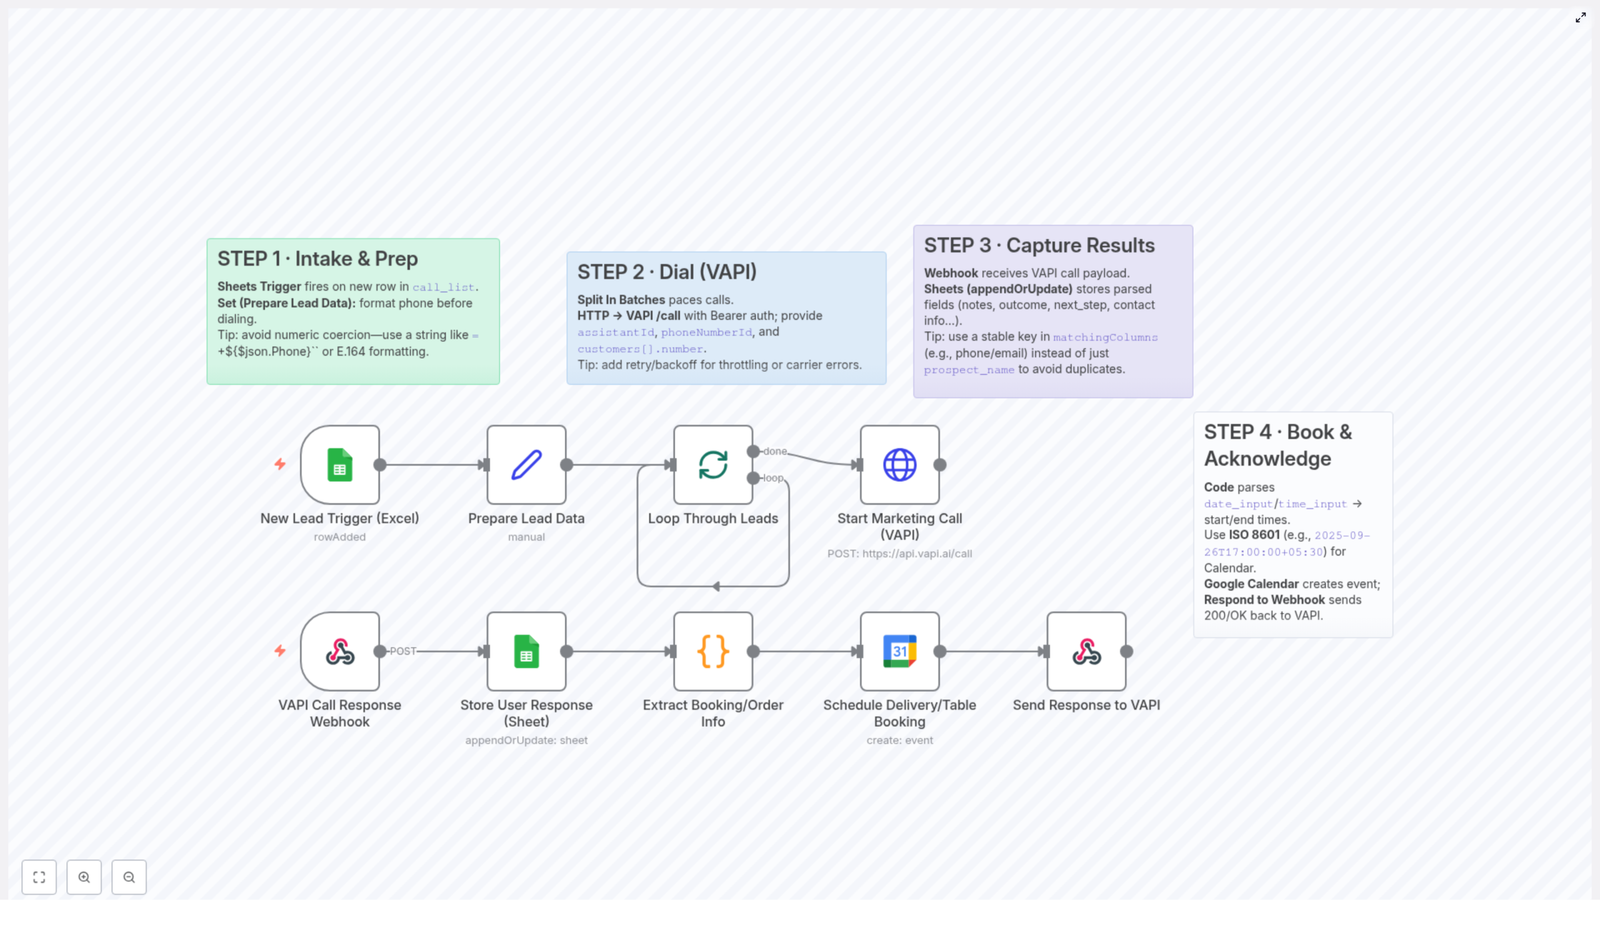
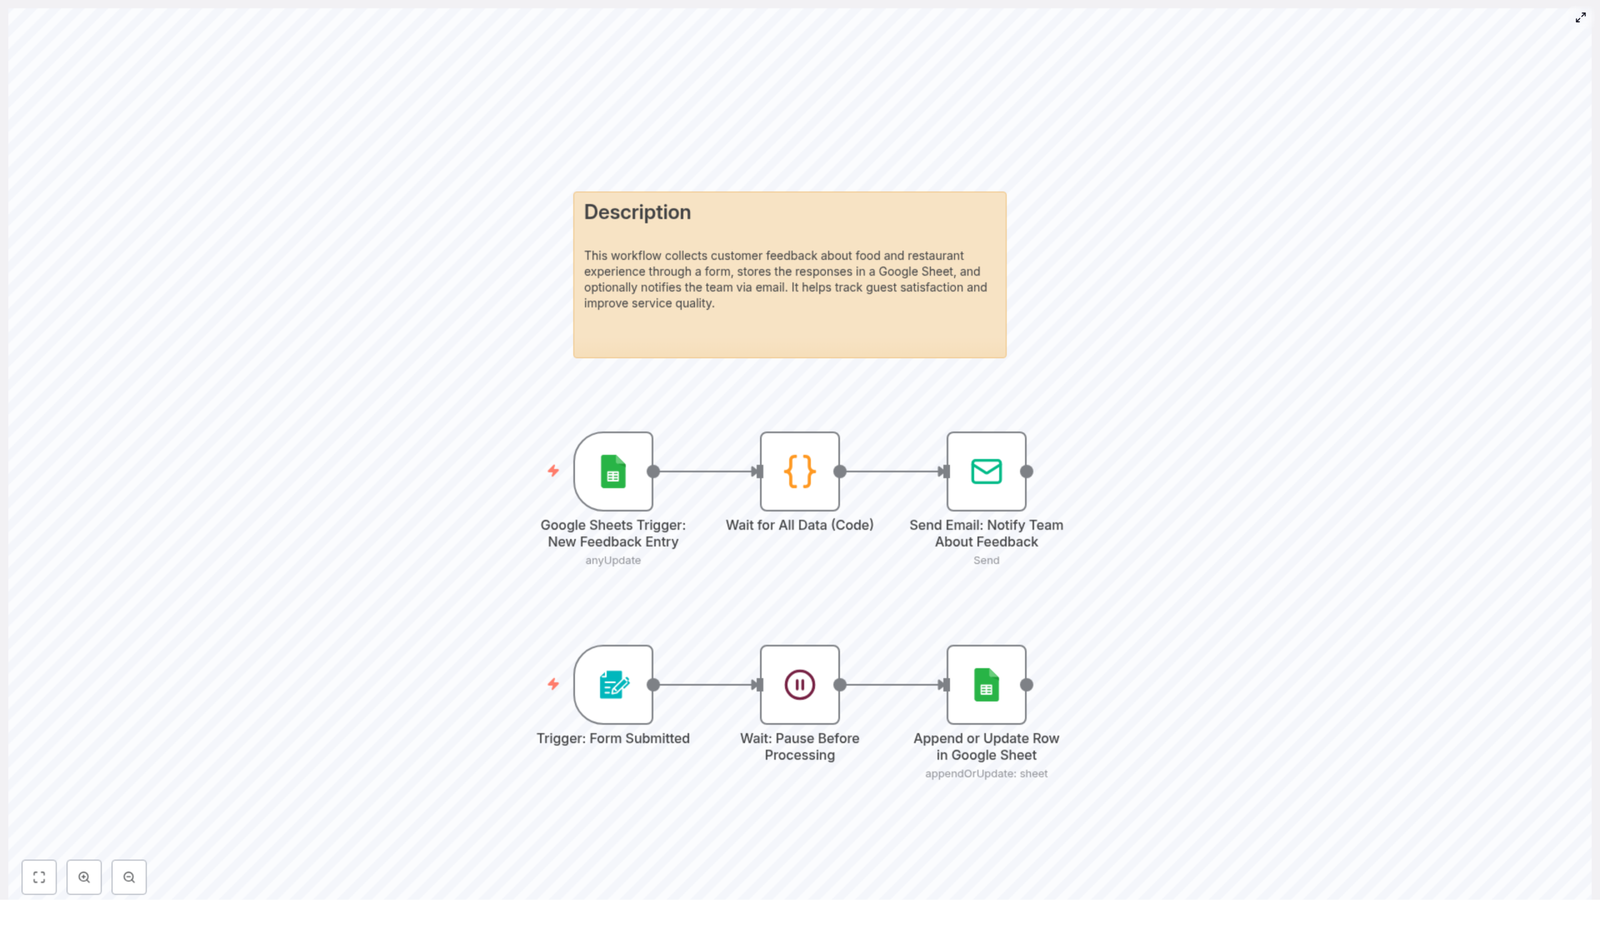
At a high level, the automation has two primary event sources and a sequence of processing steps:

  • Form submission trigger that captures raw feedback from guests.
  • Google Sheets operations that append or update a row with the submitted data.
  • Google Sheets trigger that reacts to new or modified entries in the spreadsheet.
  • Timed waits to ensure data consistency and avoid race conditions.
  • Email notification that sends the feedback details to your team.

The workflow can be embedded into your existing customer journey, such as a QR code on receipts, a link on your website, or a post-meal follow-up message, and then runs autonomously once configured.

3. Data Flow Summary

  1. A customer opens the feedback form and answers questions about cleanliness, taste, staff politeness, order accuracy, food presentation, and overall dining experience.
  2. When the form is submitted, n8n receives the payload through the Form Submitted trigger node.
  3. A Wait node adds a short delay so that the data can be processed in a controlled manner.
  4. The workflow then writes the feedback into a Google Sheet by appending a new row or updating an existing one.
  5. A separate Google Sheets Trigger node detects the new or updated row.
  6. A code step, Wait for All Data, introduces an additional delay or synchronization point if required.
  7. Finally, a Send Email node sends a structured email with all feedback details to your internal team for review and action.

4. Node-by-Node Breakdown

4.1 Form Submitted Trigger

Role: Entry point for customer feedback.
Type: Trigger node (form submission / webhook style).
Input: HTTP request payload generated when a customer submits the feedback form.
Output: A single item that contains all form fields as JSON properties.

The form is typically styled and embedded in your website or shared as a link. It includes fields covering:

  • Cleanliness
  • Taste
  • Staff politeness
  • Order accuracy
  • Food presentation
  • Overall dining experience

Each of these responses is made available to downstream nodes as key-value pairs. The exact field names depend on how the form is configured, so ensure that the Google Sheets and email nodes reference the same keys.

4.2 Wait: Pause Before Processing

Role: Throttle and stabilize processing after a submission.
Type: Wait / Delay node.
Input: Data from the Form Submitted trigger.
Output: The same data, passed along after a configured delay.

This node introduces a short delay immediately after the form is submitted. Common reasons to use this node include:

  • Preventing spikes in API calls if many customers submit feedback at the same time.
  • Ensuring that any external services involved in the form pipeline have finished processing.

Use a fixed delay (for example, a few seconds) to keep the experience responsive while still managing throughput.

4.3 Append or Update Row in Google Sheet

Role: Persist feedback in a structured, queryable format.
Type: Google Sheets node (append or update mode).
Credentials: Google Sheets OAuth or service account credentials configured in n8n.
Input: Feedback data from the Wait node.
Output: Confirmation of the written row, including row index or ID.

This node writes each feedback submission into a Google Sheet. Depending on your configuration it can:

  • Append a new row for every new submission.
  • Update an existing row if you use an identifier to match previous entries.

Typical configuration parameters include:

  • Spreadsheet ID or URL.
  • Worksheet (tab) name.
  • Column mapping from form fields to sheet columns.
  • Update criteria if you choose to update rows instead of always appending.

Ensure that the column headers in the Google Sheet match the field names or that you explicitly map fields to columns in the node settings. This helps maintain consistent data for later analysis and reporting.

4.4 Google Sheets Trigger: New Feedback Entry

Role: Detect new or updated feedback records in the spreadsheet.
Type: Google Sheets Trigger node.
Credentials: Same Google account or service account used for the write node.
Input: Internal to Google Sheets; no direct input from other nodes.
Output: Newly created or updated row data as n8n items.

This trigger monitors the specified Google Sheet for:

  • Newly appended rows that represent new feedback.
  • Updated rows if your workflow is configured to modify existing entries.

You can configure:

  • The specific spreadsheet and sheet tab to watch.
  • Whether to react to new rows, updated rows, or both.
  • The polling interval, which controls how frequently n8n checks for changes.

This separation between the initial form trigger and the Google Sheets trigger makes it easier to extend or modify the workflow later, for example by adding additional processing or reporting steps that activate whenever the sheet changes.

4.5 Wait for All Data (Code)

Role: Provide controlled timing or batch-like behavior before notifications.
Type: Code node (JavaScript) implementing a delay or synchronization step.
Input: Row data from the Google Sheets trigger.
Output: The same row data, passed downstream after processing.

This code node is used to:

  • Introduce an additional wait period before sending notifications.
  • Allow for any final data transformations or checks within a script.

While the template focuses on delay behavior, this node is also a natural place to add more advanced logic, such as filtering certain types of feedback, normalizing rating scales, or aggregating multiple entries before sending a summary email.

4.6 Send Email: Notify Team About Feedback

Role: Deliver feedback details to your internal team for rapid response.
Type: Email node (SMTP or integrated email service).
Credentials: Configured email account or SMTP credentials in n8n.
Input: Processed row data from the Wait for All Data node.
Output: Email sent status and metadata.

This node composes and sends an email that includes:

  • Customer responses for cleanliness, taste, staff politeness, order accuracy, food presentation, and overall dining experience.
  • Any additional metadata you store in the sheet, such as timestamp or location.

Typical configuration parameters:

  • To: One or more team email addresses or a distribution list.
  • Subject: A clear subject line like “New Restaurant Feedback Submitted”.
  • Body: A formatted summary of the feedback fields, using expressions to insert values from the sheet row.

This final step ensures that your team receives real-time notifications and can quickly follow up on complaints, suggestions, or positive comments.

5. Configuration Notes & Best Practices

5.1 Credentials Setup

  • Google Sheets: Configure OAuth or service account credentials in n8n and test access to the target spreadsheet before enabling the workflow.
  • Email: Set up SMTP or a supported email provider, then send a test email from within n8n to verify configuration.

5.2 Form Integration

  • Embed the form on your website, or share it as a link via QR codes on receipts, table tents, or digital menus.
  • Confirm that each form field name aligns with the data mapping in the Google Sheets node and email node.
  • Use clear labels for customers, but maintain consistent internal field keys for automation stability.

5.3 Handling Edge Cases

  • Empty or partial submissions: Decide how to handle missing responses. You can allow blanks to be written to the sheet or add validation logic in the code node.
  • Duplicate entries: If customers submit multiple times, use the “update row” capability with an identifier, or accept duplicates for trend analysis.
  • Email failures: If the email node encounters an error, n8n can be configured to log the failure, retry, or route the item to an error workflow.

5.4 Performance & Scaling

  • Adjust the Wait node duration if you experience rate limits from Google Sheets or your email provider.
  • Use a reasonable polling interval on the Google Sheets trigger to balance responsiveness with API usage.
  • For higher volumes, consider batching notifications in the code node before sending a single summary email to the team.

6. Operational Usage

6.1 Day-to-Day Workflow

  1. Distribute the feedback form link or QR code to customers after their visit.
  2. Allow the workflow to automatically capture submissions and write them to the Google Sheet.
  3. Monitor the Google Sheet periodically to review trends and historical data.
  4. Check your email notifications to respond quickly to issues or to acknowledge positive feedback.

6.2 Customization for Your Restaurant

  • Add or modify form questions to reflect your menu, service model, or specific KPIs.
  • Extend the workflow with additional nodes, such as sending feedback to a CRM, a helpdesk tool, or a dashboarding solution.
  • Adjust email content and recipients based on feedback categories, for example sending complaints to a manager and compliments to a broader team list.

7. Benefits of This n8n Feedback Template

  • Centralized data collection: All customer feedback is stored in a single Google Sheet that is easily accessible to authorized staff, making reporting and analysis straightforward.
  • Real-time notifications: Automatic email alerts for each new entry ensure that your team can react quickly to problems or recognize excellent service.
  • Scalable and customizable: The form, nodes, and data mappings can be adapted as your restaurant grows or your feedback strategy evolves.
  • Improved customer satisfaction: Consistent feedback collection enables you to identify trends and continuously improve food quality, service levels, and overall ambiance.

8. Getting Started

To implement this customer feedback collection workflow in your own environment:

  1. Import the template into your n8n instance.
  2. Configure Google Sheets and email credentials.
  3. Map form fields to sheet columns and email content.
  4. Activate the workflow and share the form with your customers.

Once live, the automation will handle the full cycle of feedback intake, storage, and notification with minimal manual intervention.

9. Next Steps

If you are ready to enhance your restaurant operations with structured, automated feedback collection, you can start using this n8n template immediately. Integrate it into your existing system, monitor the results, and iterate on form questions and workflow logic as you learn more from your guests.

Deploy the workflow, connect it to your preferred feedback channels, and use the insights to continuously improve your guests’ dining experience.

Generate Automated Timesheet Report with n8n Workflow

Generate Automated Timesheet Reports With n8n: A Story Of One Overwhelmed Manager

The Monday That Broke Alex’s Patience

By 8:30 a.m., Alex already knew it was going to be one of those Mondays.

As the operations manager of a growing remote team, Alex had a ritual. Every week, they opened three different tools, exported timesheets, copied them into spreadsheets, searched for missing hours, hunted for typos, and then tried to make the final report look presentable enough for leadership and clients.

It was slow, repetitive, and frustrating. People’s names were duplicated or mistyped, hours were scattered across multiple tasks, and the final report always looked bland and impersonal. No faces, no context, just raw numbers.

That morning, after catching a fourth typo in a client report, Alex finally said out loud, “There has to be a better way.”

That was the moment Alex decided to automate the entire timesheet reporting process, from fetching the data to sending a polished, avatar-rich report by email. The tool that would make it possible was n8n.

Discovering n8n And The Timesheet Report Template

Alex had heard of n8n before. A flexible, open source workflow automation tool that connects APIs, databases, and services with visual nodes. But until now, it had always felt like a “someday” project.

Searching for “automated timesheet report n8n,” Alex stumbled on a workflow template that promised exactly what was needed:

  • Automatically gather and sort timesheet records
  • Attach each user’s avatar to their entries
  • Generate a clean, formatted report in Markdown and HTML
  • Optionally send it by email as an attachment

It sounded almost too good to be true. Still, curiosity won. Alex imported the template into their n8n instance and began exploring how it worked.

Rising Pressure: The Old Way Versus Automation

Before touching anything, Alex thought about the current weekly routine:

  • Export timesheet data from multiple tools
  • Sort entries by user and task by hand
  • Manually calculate totals per task
  • Try to format everything into a decent looking table
  • Attach the report to an email and send it to managers and clients

Every step was fragile. One wrong copy and paste could throw off hours. One forgotten user could mean an awkward email later. And the report never looked “designed.” It looked like what it was: a spreadsheet dumped into an attachment.

So Alex decided to walk through the n8n template node by node, not just to use it, but to understand it.

Step Inside The Workflow: How Alex’s Automation Came Together

The Trigger: When Alex Chooses To Run The Report

The first node Alex saw was a Manual Trigger labeled On clicking ‘execute’. It was simple but powerful. Instead of waiting for a schedule, Alex could run the workflow whenever a report was needed.

“Perfect for testing,” Alex thought, “and later I can always swap this for a cron trigger if I want weekly automation.”

Fetching The Timesheet Records

Next was a Function node that Alex quickly recognized as the heart of the data collection step. This node was responsible for pulling in timesheet records and organizing them by:

  • User name
  • Task title
  • Date
  • Notes
  • Hours spent

It also included user avatar URLs and detailed task information. In Alex’s head, this replaced all the manual exports from different tools. Instead of juggling CSV files, the workflow would gather structured timesheet data in one place.

Imposing Order: Sorting The Data

In the old world, Alex spent too much time dragging spreadsheet columns around just to make the data readable.

The Sort Elements node changed that. It sorted the timesheet items by:

  • UserName
  • TaskTitle
  • date

Alex realized that this was not just about aesthetics. Proper sorting was crucial for building meaningful reports, grouping entries logically, and calculating totals per user and task.

“This alone saves me several minutes every week,” Alex thought, already feeling a bit of relief.

Making Faces Visible: Unique User Avatars

One of the things Alex had always wanted was a more human looking report. Numbers were fine, but faces made it easier for managers to recognize who did what.

The template handled this with a node called GetImg. It used an itemLists operation with removeDuplicates on the UserAvatar field. In practice, this meant:

  • Collect all avatar URLs from the timesheet records
  • Remove duplicate URLs so the same image was not fetched multiple times

Efficient, clean, and exactly what Alex needed to avoid repeated HTTP requests.

Downloading Avatars As Binary Data

The next node, ImgBinary, was an HTTP Request node. Its job was to download the unique avatar images in binary format.

Alex noticed that storing these images as binary made it much easier to embed them directly into the final report. Instead of linking to external URLs, the workflow could encode the images and place them inline.

“So the report will work even if someone opens it offline,” Alex realized. “Nice.”

Merging People With Their Work

At this point, the workflow had two streams of data:

  • Sorted timesheet entries
  • Downloaded avatar binaries

The Merge2 node was responsible for bringing these streams together. It merged items by index so that each user’s data matched the correct avatar.

Alex understood how fragile this could be if done by hand. A single mismatch could put the wrong face next to the wrong name. Here, n8n handled the pairing automatically and reliably.

The Turning Point: Creating The Markdown Report

Everything so far had been setup. The real magic happened in the CreateMDReport Function node.

This node dynamically built a Markdown string that would become the final report. As Alex opened the function code, the structure became clear:

  • Markdown headers for each user and each task section
  • Embedded user avatars as base64 images placed next to usernames
  • Tables listing:
    • Date
    • Hours
    • Task description or notes
  • Totals per task, styled in italics for quick scanning
  • Custom CSS styling for tables, improving readability and visual hierarchy
  • A footer line indicating the report generation date

For Alex, this was the real turning point. Instead of a messy spreadsheet, the workflow would produce a structured, human friendly document where each person’s section started with their avatar and name, followed by clear task breakdowns and totals.

“This is exactly what I used to try to build by hand,” Alex thought, “but cleaner, consistent, and automatic.”

From Markdown To HTML: Ready For Email And Web

Once the Markdown was generated, the workflow passed it into the Markdown node. This node converted the Markdown content into styled HTML with support for:

  • Tables
  • Headings
  • Custom styles

Alex immediately saw the value. HTML reports could be:

  • Sent directly in emails
  • Displayed in a web dashboard
  • Archived for future reference

Preparing The Report As A File Attachment

To make the report easy to share, the template included a node called Move Binary Data1. This node took the HTML content and converted it into a binary file named report.html with the correct MIME type.

In other words, it prepared a clean attachment that could be sent in an email or stored somewhere else as a file.

Optional Finale: Sending The Email

The last piece of the workflow was an optional Send Email node. In the template, it was disabled by default, but clearly ready to use.

Alex realized that by configuring SMTP credentials, this node could automatically send the generated report.html as an attachment to:

  • Team leads
  • Clients
  • Finance or HR

Once enabled, Alex would no longer have to manually attach and send anything. The entire chain, from data to inbox, would be automated.

Seeing The First Automated Report

With the workflow imported and reviewed, Alex clicked the manual trigger and watched the nodes light up one by one.

Within seconds, the run finished. Alex opened the generated HTML report.

There it was:

  • Each user’s name, with their avatar image right next to it
  • Task sections neatly grouped and labeled
  • Tables listing dates, hours, and descriptions, all easy to scan
  • Subtotals per task, clearly highlighted
  • A professional layout that looked like a custom built reporting tool

It felt like a small victory. All the hours spent manually cleaning up timesheets were suddenly optional.

Why This n8n Timesheet Workflow Changed Alex’s Week

After a couple of runs, Alex realized the workflow was not just a convenience. It was a structural improvement to how the team operated.

Key Benefits Alex Experienced

  • Automation – The workflow transformed raw timesheet data into polished reports automatically, eliminating repetitive manual work.
  • Customization – By tweaking the Function nodes, Alex could adjust the report format, add new fields, or change styling without rebuilding everything.
  • Integration – Because it ran on n8n, the workflow could be extended to pull data from databases, HTTP APIs, or other services, and to push reports into email, storage, or internal tools.
  • Visual Workflow – The drag and drop interface made it easier to understand complex logic and explain it to non technical colleagues.

How The Markdown Logic Keeps Reports Flexible

Alex grew especially fond of the CreateMDReport node. Its function code was the “language” of the report and provided several advantages:

  • Use of Markdown headers to structure users and tasks in a clear hierarchy
  • Embedded avatars as base64 images so the report stayed self contained
  • Tables for each group of entries, listing dates, hours, and descriptions
  • Italic styled totals per task that stood out without being distracting
  • Custom CSS for table styling, ensuring readability across devices
  • A footer that always showed when the report was generated, adding transparency

Whenever Alex needed to adjust the layout or wording, it was as simple as editing the function. No more wrestling with spreadsheets to make them look “good enough.”

From One Workflow To A New Habit

Within a couple of weeks, Alex’s Monday mornings looked very different.

Instead of wrangling CSV files, Alex would:

  1. Open n8n
  2. Click “execute workflow” or let the scheduled trigger run
  3. Review the generated HTML report
  4. Let the email node send it automatically to stakeholders

That extra time went into analyzing the data instead of cleaning it. Alex could spot patterns in workload, identify overworked team members, and share insights with leadership, all using the same automated report.

Your Turn: Put This n8n Template To Work

If you recognize yourself in Alex’s story, you can follow a similar path.

Start by importing the timesheet report workflow template into your own n8n instance:

How To Get Started

  1. Import the template into n8n.
  2. Open the GetTimesheetRecords Function node and adapt it to your own data source or timesheet system.
  3. Run the workflow manually using the trigger to see the full process in action.
  4. Inspect the generated HTML report and adjust the Markdown logic in CreateMDReport if you want different headings, fields, or styling.
  5. Configure the Send Email node with your SMTP credentials, then enable it to automate report distribution.

Extend And Customize As Your Needs Grow

As Alex discovered, this workflow is a strong foundation, not a rigid final product. You can:

  • Connect to different databases or APIs for timesheet input
  • Add filters for specific clients, projects, or teams
  • Store the HTML file in cloud storage alongside email delivery
  • Trigger the workflow on a schedule instead of manually

If you run into questions or want to share improvements, the n8n community is a great place to compare approaches and learn new tricks.

Resolution: Professional, Personal, And Effortless Reporting

Alex’s story is not unique. Many managers, founders, and developers face the same tension between needing accurate, professional timesheet reports and not having time to build them by hand.

By using n8n and this automated timesheet report template, you can:

  • Replace manual exports and formatting with a reliable workflow
  • Add a personal touch through user avatars and clean layout
  • Gain back hours each week to focus on analysis, not administration

Automated timesheet reporting with embedded user avatars is more than a cosmetic upgrade. It improves clarity, accountability, and communication across your team and with your clients.

Start building your own version of this workflow today, and let n8n handle the repetitive work while you focus on what matters most.

Automate Delivery Updates: Onfleet to Twilio WhatsApp

Automate Delivery Updates with n8n, Onfleet, and Twilio WhatsApp

Reliable, real-time delivery communication is now a core expectation in logistics and last-mile operations. Customers want immediate visibility into where their order is and when it will arrive. For operations and automation teams, this is an ideal use case for event-driven workflows built on n8n, leveraging Onfleet for delivery task management and Twilio for WhatsApp messaging.

This n8n workflow template connects Onfleet and Twilio WhatsApp so that every time a new delivery task is created in Onfleet, the customer automatically receives a WhatsApp message with a personalized tracking URL. The result is a scalable, low-maintenance notification system that improves transparency and customer satisfaction.

Use Case Overview

The workflow is designed for logistics providers, e-commerce operations, and delivery teams that need to:

  • Send instant delivery notifications when a task is created in Onfleet
  • Provide a direct tracking URL so customers can monitor driver location
  • Use a high-engagement channel, such as WhatsApp, instead of or alongside SMS
  • Standardize communication while keeping messages personalized

In this automation, Onfleet acts as the event source, Twilio handles WhatsApp delivery, and n8n orchestrates the data flow and message composition.

Workflow Architecture in n8n

The template is intentionally simple and production-ready, built around two core components:

  • Onfleet Trigger node – Listens for new delivery tasks
  • Twilio node (WhatsApp) – Sends a WhatsApp message with the tracking URL

n8n manages the data mapping between these systems so that when a taskCreated event occurs in Onfleet, the workflow immediately assembles and dispatches a WhatsApp notification.

1. Onfleet Trigger Node Configuration

The workflow begins with the Onfleet Trigger node. This node continuously listens for events from your Onfleet account and initiates the automation when a relevant event occurs.

Key aspects of the configuration:

  • Event type: Set to taskCreated so the workflow runs whenever a new delivery task is created in the Onfleet dashboard or via API.
  • Payload extraction: The node exposes the full event payload, including metadata about the task and a critical field: the trackingURL.

The trackingURL is the central piece of data used later in the workflow. It provides the real-time link that customers will use to follow their driver’s location and delivery status.

2. Twilio WhatsApp Node Configuration

Once the Onfleet event is received, the workflow passes the payload to the Twilio node configured for WhatsApp messaging. This node uses the Onfleet data to dynamically construct the outbound message.

The message body is templated and includes the tracking link from the trigger payload. A typical configuration for the Twilio node message field looks like this:

{  "message": "Your delivery is on the way, please visit {{$json["body"]["data"]["task"]["trackingURL"]}} to track your driver's location.",  "toWhatsapp": true
}

Important implementation details:

  • Dynamic data mapping: The expression {{$json["body"]["data"]["task"]["trackingURL"]}} references the tracking URL from the Onfleet event JSON. n8n resolves this at runtime for each task.
  • Channel selection: The toWhatsapp flag is set to true to ensure the message is sent via WhatsApp rather than standard SMS.
  • Personalization: You can extend the message template to include customer names, ETAs, or task notes if those fields are available in your Onfleet payload.

Best Practices for Automation and Message Design

To make this workflow robust and user-friendly, consider the following best practices:

  • Validate required fields: Ensure the Onfleet task contains a valid recipient phone number that is compatible with WhatsApp and that the trackingURL is present.
  • Standardize templates: Maintain consistent message templates within n8n for different event types (task created, out for delivery, completed) to provide a predictable customer experience.
  • Observe rate limits: Monitor Twilio and Onfleet API limits and adjust workflow concurrency in n8n if you operate at large scale.
  • Error handling: In production environments, add error branches or additional nodes in n8n to log failed sends or retry transient errors.

Why Use WhatsApp for Delivery Notifications

For many regions, WhatsApp is the primary communication channel for end customers, which makes it an effective medium for operational updates.

  • High engagement – WhatsApp typically outperforms SMS in both open and response rates, which leads to fewer missed deliveries and less support overhead.
  • Rich media capabilities – Beyond text, you can send images, links, and structured content to provide clearer instructions or branded communication.
  • Global coverage – With widespread international adoption, WhatsApp is especially suitable for cross-border or multi-region delivery operations.

Prerequisites and Setup Steps

Before importing and running the n8n template, ensure the following prerequisites are in place:

  1. Onfleet account and API key
    – Create or access your Onfleet account.
    – Generate an API key with appropriate permissions to read tasks and receive webhook events.
  2. Twilio account with WhatsApp enabled
    – Set up a Twilio account.
    – Configure a WhatsApp-enabled number or sandbox and activate the WhatsApp messaging service.
  3. n8n environment
    – Deploy n8n (self-hosted or cloud) and configure credentials for both Onfleet and Twilio.
    – Import the Onfleet-to-Twilio WhatsApp workflow template.
  4. End-to-end testing
    – Create a sample delivery task in Onfleet.
    – Confirm that the Onfleet Trigger node fires and that Twilio successfully delivers the WhatsApp message with the correct tracking URL.
    – Validate message formatting, localization, and phone number formats for your target markets.

Operational Impact

Once implemented, this n8n workflow reduces manual communication effort and ensures every new delivery task triggers a consistent, timely notification. Customers gain immediate access to live tracking, which increases trust and reduces inbound inquiries such as “Where is my order?” or “What time will my package arrive?”

From an operations perspective, this pattern can be extended to additional events, such as task completion or failed delivery attempts, using the same integration pattern between Onfleet, Twilio, and n8n.

Next Steps

By integrating Onfleet triggers with Twilio WhatsApp through n8n, you establish a scalable, automated communication layer for your delivery operations. This template provides a practical starting point that can be customized to match your messaging policies, branding, and workflow complexity.

Ready to elevate your delivery communication strategy? Deploy the Onfleet to Twilio WhatsApp n8n workflow template, adapt the message content to your use case, and start sending automated, real-time tracking updates directly to your customers’ preferred messaging app.

Voice Assistant for Restaurant Bookings & Info

Voice Assistant for Restaurant Bookings & Info (n8n Workflow Tutorial)

What You Will Learn

This guide walks you through an n8n workflow template that turns a voice assistant into a smart restaurant helper. By the end, you will understand how to:

  • Use a voice assistant to take table bookings and food orders
  • Store booking and order data in a PostgreSQL database in real time
  • Automatically confirm bookings and orders through the voice assistant
  • Provide restaurant information on demand using voice commands
  • Connect both workflows to improve customer experience and reduce manual work

Why Use a Voice Assistant in Your Restaurant?

Voice technology is changing how customers interact with restaurants. Instead of calling or browsing a website, customers can simply speak to a voice assistant to:

  • Reserve a table
  • Place a food order
  • Ask for opening hours, address, or menu details

With n8n, you can automate these interactions so that the assistant talks to your database, records the information, and responds instantly. This improves operational efficiency, reduces staff workload, and keeps customers engaged with fast, accurate answers.


Concept 1: Table Booking & Order Handling Workflow

The first workflow focuses on handling bookings and food orders through voice. Think of it as your automated front-of-house assistant that listens, records, and confirms everything for you.

What This Workflow Does

In n8n, this workflow lets your voice assistant:

  • Receive table reservation and food order details via voice input
  • Store all booking and order information in a PostgreSQL database
  • Send an immediate confirmation back to the customer through the voice assistant

How It Works at a High Level

Behind the scenes, the workflow follows this basic logic:

  1. A customer speaks to the voice assistant and makes a request
  2. The workflow waits for the full user response to be captured
  3. The booking and order information is written or updated in the database
  4. The assistant replies with a confirmation message using the stored data

Key Components in n8n

Although the exact node names may vary in your template, the typical building blocks are:

  • Trigger node – Starts the workflow when a voice request arrives
  • Wait or interaction node – Pauses until the user finishes speaking or provides all required details
  • PostgreSQL node – Inserts or updates booking and order records in your database
  • Response node – Sends a confirmation message back through the voice assistant

Step-by-Step: Booking & Order Workflow in n8n

Use these steps as a learning path to understand or customize the template:

  1. Trigger the workflow from a voice request
    The workflow starts whenever the voice assistant receives a booking or order command, for example, “Book a table for four at 7 PM” or “I want to order a pizza.”
  2. Wait for the complete user response
    The system waits for all necessary details, such as date, time, number of guests, and order items. This ensures the database gets full, structured information instead of partial data.
  3. Store booking and order data in PostgreSQL
    The PostgreSQL node writes the collected information into your database. Typical fields might include customer name, contact, reservation time, table size, and ordered items. This step keeps your records accurate and up to date in real time.
  4. Send confirmation through the voice assistant
    Once the data is saved, the workflow prepares a confirmation message, such as “Your table for four at 7 PM has been booked” or “Your order has been placed.” The voice assistant then delivers this message to the customer.

Concept 2: Restaurant Info Provider Workflow

The second workflow turns your voice assistant into an instant information source. Instead of staff answering basic questions, the assistant pulls information directly from your database and replies in seconds.

What This Workflow Does

This workflow enables customers to ask questions like:

  • “What are your opening hours?”
  • “What is your address?”
  • “Do you have vegetarian options?”

The assistant then queries your restaurant info database and responds with the latest details.

Core Features

  • Voice-activated requests for restaurant information
  • Automated database queries to fetch up-to-date restaurant details
  • Fast, spoken replies delivered through the voice assistant

High-Level Workflow Logic

The restaurant info workflow follows a simple pattern:

  1. The customer makes a voice request for information
  2. n8n triggers the information workflow
  3. The workflow queries the PostgreSQL database for the requested data
  4. The system waits briefly for the query to complete and data to process
  5. The assistant speaks the restaurant details back to the customer

Step-by-Step: Info Provider Workflow in n8n

Here is how the information workflow typically runs inside n8n:

  1. Voice request triggers the info workflow
    A question like “What time do you close tonight?” is recognized by your voice system and passed to n8n as a trigger event.
  2. Query PostgreSQL for restaurant data
    The PostgreSQL node runs a query against your restaurant information table. This might include opening hours, contact details, menu descriptions, or special notes.
  3. Wait for the query response
    The workflow pauses briefly while the database returns the requested information. This ensures that the assistant uses the most current data available.
  4. Return the answer via the voice assistant
    The workflow formats the data into a clear spoken response, for example, “We are open today from 11 AM to 10 PM.” The voice assistant then delivers this directly to the customer.

Benefits of Using These n8n Voice Assistant Workflows

Combining both workflows gives your restaurant a powerful automation layer for bookings, orders, and information requests.

  • Increased efficiency
    Routine tasks like reservations, simple orders, and basic information queries are handled automatically, which reduces the pressure on your staff.
  • Improved customer experience
    Customers receive quick, interactive responses without waiting on hold or browsing multiple pages, which leads to higher satisfaction.
  • Better data accuracy
    All information is written to and read from your PostgreSQL database. This direct connection minimizes manual entry errors and keeps records consistent.
  • 24/7 availability
    The voice assistant can respond at any time of day, so customers can book tables, place orders, or ask questions even when staff are busy or the restaurant is closed.

How to Start Using the Template in n8n

To put these concepts into practice, you can import and customize the ready-made n8n template. Once installed, you can:

  • Connect the workflow to your existing voice assistant platform
  • Configure the PostgreSQL node with your database credentials
  • Adjust fields and messages to match your menu, opening hours, and booking rules

This gives you a working foundation that you can expand over time, for example by adding customer notifications, loyalty tracking, or integration with your POS system.


Quick Recap & FAQ

Recap

  • The Table Booking & Order Handling workflow lets your voice assistant take reservations and orders, store them in PostgreSQL, and confirm them instantly.
  • The Restaurant Info Provider workflow listens for information requests, queries your database, and returns up-to-date details via voice.
  • Both workflows run in n8n, so you can customize the logic, messages, and database structure to fit your restaurant.

FAQ

Do I need a PostgreSQL database for this template?

Yes, this template is designed to work with PostgreSQL. The workflows read and write booking, order, and restaurant information directly into a PostgreSQL database.

Can I customize the confirmation messages?

Yes. In n8n you can edit the nodes that generate responses, so you can change the wording, include more details, or localize messages for different languages.

Is this workflow available 24/7?

The workflow itself can run at any time. As long as your voice assistant and n8n instance are active, customers can make requests around the clock.

What are the main advantages for my staff?

Staff spend less time on phone calls and repetitive questions. They can focus on in-person service while the voice assistant handles bookings, orders, and basic information automatically.


Get Started Today

Integrate these voice assistant workflows into your restaurant operations to streamline bookings, automate order handling, and deliver instant information to your customers. With n8n and a PostgreSQL database, you gain a flexible automation layer that grows with your business.

Ready to upgrade your restaurant experience? Install the n8n template, connect your voice assistant, and start automating your customer interactions today.

Automate Jotform Feedback: Triage, Reply & Reporting

Automate Jotform Feedback: Triage, Reply & Reporting

What You Will Learn

In this guide, you will learn how to use an n8n workflow template to:

  • Automatically process new Jotform feedback in real time
  • Classify submissions into comments, questions, and suggestions
  • Run sentiment analysis on comments and alert your team about urgent issues
  • Answer common questions using a Q&A agent and send email replies via Gmail
  • Summarize suggestions, send them to Telegram, and log them in Google Sheets
  • Build a feedback reporting system using Google Sheets for comments

This walkthrough is designed as a step-by-step teaching guide, so you can understand not only what the template does, but also how each part of the n8n workflow works.


Concept Overview: Automated Jotform Feedback System

Customer feedback is one of the most valuable inputs for improving your products and services, but manually reading every submission, deciding who should handle it, and responding quickly can be time consuming.

This n8n workflow template turns Jotform submissions into a fully automated feedback pipeline. It:

  • Catches every new Jotform submission as it arrives
  • Classifies the feedback type using a Switch node
  • Uses AI and external tools to analyze, respond, and log information
  • Routes different feedback types to different branches for tailored handling

The result is a system that triages feedback, replies to customers, and builds structured reports without manual effort.


How the Workflow Works in n8n

Let us walk through the full workflow from the moment a user submits a Jotform to the final logging and reporting steps.

Step 1 – Trigger on New Jotform Submission

The workflow begins with a trigger node that listens for new Jotform entries. Whenever a user submits your form, n8n receives the data and starts the workflow automatically.

Typical fields captured include:

  • Name – used for personalization in alerts and emails
  • Email – used to send replies to questions
  • Feedback text – the main message from the user

This real-time trigger ensures that no feedback is missed and that each submission is immediately routed into the correct processing branch.

Step 2 – Classify Feedback Type with a Switch Node

After the trigger, the workflow uses a Switch node to categorize the feedback. The classification is usually based on a field in the form or on simple logic that you configure.

The Switch node routes submissions into three main types:

  • Comments – general feedback, praise, or complaints
  • Questions – requests for information or clarification
  • Suggestions – ideas for improvements or new features

This branching is essential because each feedback type is handled differently in the next steps.


Branch 1: Handling Comments with Sentiment Analysis & Alerts

Step 3 – Run Sentiment Analysis on Comments

When the Switch node identifies a submission as a comment, the workflow sends the feedback text to a language model for sentiment analysis. The template uses the Google Gemini Chat Model to detect whether the comment is:

  • Positive
  • Neutral
  • Negative

This automated analysis helps you understand the tone of user comments at scale, without manually reading each one.

Step 4 – Alert Support for Negative or Urgent Feedback

For comments that are negative or marked as urgent, the workflow automatically triggers an alert to your support team using Telegram. The alert can include:

  • User name and email
  • Original comment text
  • Detected sentiment
  • Submission date or time

By sending these alerts in real time, your team can respond within your defined SLA and quickly follow up on critical issues.

Step 5 – Log Comments in Google Sheets for Reporting

All comments, regardless of sentiment, are then appended to a dedicated Comments sheet in Google Sheets. Each row typically includes:

  • Name
  • Email
  • Comment text
  • Sentiment result
  • Submission date

This structured log makes it easy to build dashboards, run periodic reports, and track trends in customer sentiment over time.


Branch 2: Answering Questions with a Q&A Agent and Email

Step 6 – Use a LangChain Q&A Agent with a Google Sheets FAQ

When the Switch node flags a submission as a question, the workflow sends it to a Q&A agent built with LangChain. This agent uses a Google Sheets document as a FAQ knowledge base.

Here is how this part works:

  • The question from the Jotform submission is passed to the LangChain agent.
  • The agent searches the FAQ content stored in Google Sheets.
  • It finds the most relevant answer based on the question.
  • The answer is then paraphrased into an easy-to-understand response.

This setup lets you keep your FAQ content in a simple spreadsheet while still delivering intelligent, context aware answers.

Step 7 – Send a Personalized HTML Email via Gmail

After the Q&A agent prepares the answer, the workflow uses a Gmail node to send a reply directly to the user.

The email typically includes:

  • A personalized greeting using the user’s name
  • The paraphrased answer generated by the agent
  • Optional links to documentation, help center, or your website

The email is sent in HTML format, so you can style it with your brand colors, logo, and layout. This makes the automated response feel more professional and consistent with your other communications.


Branch 3: Summarizing and Logging Suggestions

Step 8 – Summarize Suggestions with AI

For submissions categorized as suggestions, the workflow uses an AI model to generate a concise summary. This summary captures the main idea of the suggestion in a short, executive friendly format.

The summarization step is useful when you receive long or detailed suggestions and want a quick overview for product managers or leadership.

Step 9 – Send Suggestions and Summaries to Telegram

Once the summary is created, the workflow sends a message to a designated Telegram channel. This message can include:

  • The summarized suggestion
  • The full original suggestion text
  • User details such as name and email

This gives your team a real time feed of new ideas and improvement requests without needing to open spreadsheets or dashboards.

Step 10 – Log Suggestions in a Google Sheets Backlog

In addition to Telegram alerts, the workflow appends each suggestion to a Suggestions backlog in Google Sheets. The sheet typically stores:

  • Original suggestion text
  • AI generated summary
  • User details
  • Submission date

This backlog becomes a central place for product and UX teams to review, prioritize, and track suggestions over time.


Setup Tips for Reliable Operation in n8n

To keep this Jotform feedback automation stable and easy to maintain, follow these best practices when configuring the n8n template:

  • Use clear node names
    Rename nodes to reflect their purpose, for example, “Jotform Trigger”, “Comment Sentiment Analysis”, “Telegram Alert – Support”, or “Log to Google Sheets – Suggestions”. This makes the workflow easier to understand and debug.
  • Store credentials securely
    Configure all credentials (Jotform, Gmail, Google Sheets, Telegram, AI providers) using n8n’s credentials system. Avoid hard coding API keys or tokens directly in nodes.
  • Centralize configuration variables
    Keep user configurable values, such as sheet IDs, Telegram chat IDs, or email templates, in a dedicated configuration node or section. This simplifies updates and reduces the chance of missing a setting.
  • Remove sensitive data before sharing
    If you plan to share your workflow publicly, make sure to remove or anonymize any personal data, API keys, and internal IDs from the template.

Quick Recap

This n8n workflow template turns raw Jotform feedback into an automated system that:

  • Triggers on every new Jotform submission
  • Classifies feedback into comments, questions, and suggestions
  • Analyzes comment sentiment and alerts your team via Telegram for urgent issues
  • Uses a LangChain Q&A agent with a Google Sheets FAQ to answer questions
  • Sends personalized HTML email replies through Gmail
  • Summarizes suggestions with AI and shares them in Telegram
  • Logs both comments and suggestions in Google Sheets for reporting and backlog management

By combining Jotform, n8n, AI models, Telegram, Gmail, and Google Sheets, you get a complete feedback triage, response, and reporting pipeline with minimal manual work.


FAQ

Do I need coding skills to use this template?

No, the template is designed to work inside n8n’s visual editor. You mainly configure nodes, connect accounts, and adjust text or sheet references. Understanding basic automation concepts is helpful, but coding is not required.

Can I customize the email responses?

Yes. The Gmail node uses HTML content, so you can edit the template text, layout, and styling. You can also adjust how the Q&A agent’s answer is inserted into the email body.

What if I want to add more feedback categories?

You can extend the Switch node with additional cases, then create new branches for each category. For example, you might add “Bug reports” or “Billing issues” and connect them to different handling flows.

How can I improve the sentiment analysis accuracy?

Accuracy mainly depends on the language model configuration and the prompts you use. You can refine prompts, add examples, or adjust how the model is asked to label sentiment to better match your specific use case.


Get Started with the Template

Use this automated Jotform feedback triage system to:

  • Improve customer experience with faster, consistent replies
  • Ensure support teams see urgent issues right away
  • Build a structured, searchable history of feedback for analysis

Set up the workflow in n8n, connect your Jotform, Google Sheets, Gmail, Telegram, and AI credentials, then adapt the branches to your exact process.

If you need help tailoring the workflow to your stack or feedback process, you can always seek personalized setup assistance or customization.

Automated Jotform Feedback Triage & Response Workflow

Automated Jotform Feedback Triage & Response Workflow

Why this workflow is such a game changer

If you are getting a steady stream of customer feedback through Jotform, you probably know the pain: some messages are urgent, some are just nice comments, others are feature requests, and a few are questions that really need a thoughtful reply. Sorting all of that manually can be a serious time sink.

This n8n workflow template turns your Jotform into a smart, always-on assistant that:

  • Sorts feedback into clear types like comments, questions, and suggestions
  • Checks sentiment so angry or urgent messages do not get buried
  • Alerts your support team instantly when something needs fast action
  • Uses an AI Q&A agent with a Google Sheets knowledge base to answer questions
  • Summarizes suggestions and sends them to your product team
  • Logs everything neatly into Google Sheets for reporting and follow-up

In other words, it takes the “triage and respond” part of feedback management off your plate, so you can focus on actually improving your product and helping customers.

When you should use this Jotform – n8n workflow

This template is a great fit if you:

  • Collect feedback, support queries, or ideas via Jotform
  • Want urgent or negative feedback to trigger instant alerts
  • Have a list of FAQs or product info stored in Google Sheets
  • Send replies from a shared or branded Gmail account
  • Need a simple way to track comments and suggestions over time

If you are thinking “we keep missing important feedback” or “we really should be responding faster,” this automation will feel like a breath of fresh air.

How the workflow works at a glance

Here is the big picture of what happens every time someone submits your Jotform:

  1. Jotform triggers the workflow as soon as a new response comes in.
  2. Feedback is classified as a comment, question, or suggestion.
  3. Sentiment analysis runs to detect negative or urgent messages.
  4. Urgent items trigger Telegram alerts for your support team.
  5. Questions are answered by an AI Q&A agent using a Google Sheets knowledge base.
  6. Suggestions are summarized and logged in Google Sheets, plus sent to a Telegram channel.
  7. General comments are stored in a dedicated Google Sheets tab for reporting.

Let us walk through each part in more detail so you know exactly what is going on under the hood.

Step 1 – Jotform trigger & feedback classification

Everything starts with the JotForm Trigger node. This node listens for new submissions from your Jotform and pulls in the key fields you care about, such as:

  • Name
  • Email
  • Feedback description or message

Once the data lands in n8n, a Switch node takes over. This is where the workflow decides what kind of feedback it is dealing with. Based on the user input, the Switch node classifies each submission into one of three main types:

  • Comments – general feedback, praise, or neutral messages
  • Questions – customers asking for help or clarification
  • Suggestions – feature ideas, improvements, or requests

This early classification keeps the rest of the workflow clean and lets you define different paths for each type of feedback.

Step 2 – Sentiment analysis and urgent alerts

Before anything else happens, all feedback items pass through an AI-powered Sentiment Analysis node. This model looks at the tone of the message and evaluates how positive, neutral, or negative it is, along with any sense of urgency.

Why does this matter? Because you probably want to know immediately when someone is upset or having a serious issue. When the sentiment analysis detects a negative or angry message, the workflow:

  • Sends an instant Telegram alert to your support group
  • Flags the feedback so your team can prioritize it

This way, critical or frustrated feedback does not wait around in a spreadsheet or inbox. Your team gets a real-time heads up and can jump in quickly.

Step 3 – Answering questions with an AI Q&A agent

When the Switch node identifies a submission as a question, the workflow routes it to a QnA Agent. This is where things get really handy.

The QnA Agent:

  • Connects to a Google Sheets knowledge base that you maintain
  • Uses AI to understand the user’s question
  • Finds the most relevant information in your FAQ or product data
  • Generates a clear, polite, and easy-to-understand answer

Once the answer is ready, n8n sends it back to the customer using Gmail. The email is formatted as a styled HTML message, so it looks professional and on-brand, not like a plain text system reply.

You get the benefit of quick, AI-assisted responses, while still keeping control of the knowledge base in Google Sheets.

Step 4 – Summarizing and tracking suggestions

Suggestions are gold for your product team, but they can get overwhelming if they are long or repetitive. To help with this, the workflow sends suggestion-type feedback to an AI summarization node.

This node:

  • Reads the full suggestion text
  • Generates a short, actionable summary
  • Keeps the key idea intact while removing extra fluff

From there, the workflow does two things:

  • Sends the summary to a Telegram channel that your product or feature team can monitor
  • Logs the suggestion and its summary in a dedicated Google Sheets “Suggestions” backlog for tracking, prioritization, and analysis

Over time, this gives you a clean, structured view of what your users are asking for, without digging through long-form feedback manually.

Step 5 – Logging comments for reporting and sentiment tracking

Not every message needs an immediate response, but that does not mean it is not useful. For general comments and non-question, non-suggestion feedback, the workflow keeps things organized by:

  • Appending entries to a Google Sheets “Comments” sheet
  • Including sentiment tags from the analysis step
  • Storing user details like name and email for context

This makes it simple to:

  • Run regular reports on customer sentiment
  • Spot trends in feedback over time
  • Review comments before team meetings or planning sessions

All your feedback ends up in one place, structured and ready to use.

Setup tips to get the most out of the template

Once you import this n8n template, a bit of customization will help it fit your setup perfectly. Here are some practical tips:

  • Rename nodes clearly so they match your Jotform fields and internal logic. Future you (and your teammates) will thank you.
  • Use credentials properly by storing API keys and logins in the node credentials section instead of hard-coding them.
  • Centralize user-configurable variables such as sheet IDs, Telegram chat IDs, and email addresses in one place, so they are easy to update later.
  • Remove personal or sensitive IDs before sharing the workflow publicly or with external collaborators.
  • Customize your email templates to match your brand voice, support policy, and signature style.

These small tweaks make the workflow feel like it was built just for your team, not something generic.

Why this n8n + Jotform workflow makes your life easier

So what do you actually gain from putting this in place?

  • Less manual work – triage, classification, and many responses happen automatically.
  • Faster reaction to problems – negative or urgent feedback triggers instant Telegram alerts.
  • Better customer experience – people asking questions get quick, friendly, AI-assisted answers.
  • Organized insights – suggestions and comments are logged in Google Sheets, making reporting and decision-making much easier.

Instead of living in your inbox or scattered tools, your feedback process becomes a smooth, automated system that runs quietly in the background.

Ready to try it?

If you are looking to level up how you handle customer feedback, this template gives you a strong starting point. You can plug it into your existing Jotform, connect your Google Sheets and Gmail accounts, and start automating in just a short setup session.

Automate your Jotform feedback handling, speed up response times, and keep your customers feeling heard and supported.

Connect Google Ecosystem with ChatGPT & OpenAI Agent

Connect Google Ecosystem with ChatGPT & OpenAI Agent: Turn Your Workspace Into an Automated Co‑pilot

The Problem: Powerful Tools, Disconnected Worlds

You already live inside the Google ecosystem. Your days are filled with Gmail threads, calendar invites, Docs, Sheets, and Slides. At the same time, AI tools like ChatGPT and OpenAI Agent Builder are getting smarter and more capable every week.

Yet there is a frustrating gap. The official ChatGPT connector does not let you interact directly with Google Workspace apps from inside the ChatGPT app. Your AI assistant cannot natively send that follow‑up email, adjust your calendar, or update a spreadsheet without you manually copying, pasting, and clicking through multiple tools.

This guide is about closing that gap. It is about turning your AI into a true teammate inside your Google Workspace, so it can act on your behalf instead of just giving you suggestions.

Shifting Your Mindset: From Manual Work To Automated Support

Think of every repeated task you do in Gmail, Calendar, Drive, Docs, Sheets, or Slides. Replying to similar emails, checking availability, creating new documents from templates, or updating rows in a sheet. Each of those actions is a tiny drain on your time and focus.

Now imagine an AI agent that can:

  • Find and respond to specific emails for you
  • Schedule events directly in your Google Calendar
  • Create and update Google Docs and Sheets on command
  • Generate presentations in Google Slides based on your prompts

Instead of thinking, “What can I automate?” start asking, “What can I stop doing manually?” This is the mindset shift that turns AI and automation into real leverage for your work or business.

The good news is that you do not need to build everything from scratch. With n8n and a dedicated MCP server workflow, you can connect ChatGPT and OpenAI Agent Builder directly to your Google Workspace and start delegating tasks to your AI agents today.

Your Bridge Between AI And Google: The n8n MCP Server Workflow

To overcome the native limitations of the ChatGPT connector, you can create a Middleware Control Point (MCP) server using n8n. Think of this MCP server as the bridge between your AI agents and your Google apps.

This n8n workflow acts as a powerful MCP between Google Workspace services – including Gmail, Drive, Docs, Sheets, Calendar, and Slides – and AI agents like OpenAI Agent Builder and the ChatGPT App.

Once set up, it enables AI assistants to directly interact with Google Workspace tools. They can manage emails, calendars, and documents, edit spreadsheets, and work with presentations through secure automation endpoints, all from within your AI environment.

In other words, you are not just connecting tools. You are building an automation layer that lets your AI agents actually do work inside your Google account, safely and programmatically.

Step 1: Prepare ChatGPT To Talk To Your n8n MCP Server

First, you will connect the ChatGPT App to your n8n MCP server so your AI assistant can call your Google automation workflows directly.

ChatGPT App Setup

  • Open your OpenAI profile. A Plus account is usually required.
  • Go to Settings → Apps and Connectors → Advanced Settings.
  • Enable Developer Mode. This unlocks the ability to work with custom MCP servers.
  • Return to Settings → Apps and Connectors and click Create.
  • When prompted, set the MCP server URL using the URL from n8n’s MCP Gmail Trigger node.
  • Click Create to finalize the connection.

ChatGPT App MCP Integration UI

With this in place, your ChatGPT app is no longer just a chat interface. It becomes a control center that can call n8n workflows, which in turn operate on your Google Workspace.

Step 2: Empower OpenAI Agent Builder With Google Workspace Superpowers

Next, you will connect the same MCP server to OpenAI Agent Builder. This lets your custom agents use your Google Workspace as part of their toolset, so they can perform tasks automatically within multi‑step workflows.

OpenAI Agent Builder Setup

  • Go to the OpenAI Agent Builder and enable the API if it is not already active.
  • Click Create a Workflow.
  • Add an Agent node to your workflow.
  • Open the Agent node and under the Tools section, click the + button.
  • Select MCP Server as the tool type.
  • Set the MCP server URL using the URL from n8n’s MCP Gmail Trigger node.
  • Click Create to add the MCP server configuration.
  • Click the + button again, set the same MCP server URL from the MCP Gmail Trigger node, then click Connect and finally Add.

OpenAI Agent Builder MCP Integration UI

Now your agents can call the MCP server as a tool, which means they can trigger Gmail, Calendar, Drive, Docs, Sheets, and Slides operations automatically inside their workflows.

Inside The n8n Template: MCP Triggers That Talk To Google

The heart of this setup is the collection of MCP trigger nodes inside n8n. Each trigger acts as a secure webhook endpoint that your AI agents can call. Behind every endpoint sits a specific Google Workspace operation, from sending emails to updating spreadsheets.

Gmail Operations With MCP Gmail Trigger

Use the MCP Gmail Trigger to let your AI assistant manage your inbox in a structured way. Available operations include:

  • Get a message
  • Send a message
  • Reply to a message
  • Get many messages
  • Create a draft
  • Delete a message or draft
  • Add or remove labels
  • Send message and wait for response

These capabilities turn routine email handling into something you can safely delegate to an AI agent, while still keeping full control through n8n.

Google Calendar Operations With MCP Calendar Trigger

With the MCP Calendar Trigger, your agents can organize your time for you. They can:

  • Create an event
  • Get many events
  • Get a specific event
  • Delete an event
  • Get availability in a calendar

This is ideal for scheduling, availability checks, or building smart booking flows that talk directly to your Google Calendar.

Google Drive Operations With MCP Drive Trigger

The MCP Drive Trigger lets your AI interact with files and folders in Google Drive. It can:

  • Download files
  • Search files and folders
  • Get many shared drives
  • Create files from text
  • Move files

Use this to build agents that can find relevant documents, generate new files from prompts, and keep your Drive organized automatically.

Google Docs Operations With MCP Docs Trigger

With the MCP Docs Trigger, your AI can create and refine written content directly in Google Docs:

  • Create a document
  • Get a document
  • Update a document

This is a powerful way to draft reports, update internal documentation, or generate client‑ready documents without leaving your AI environment.

Google Sheets Operations With MCP Sheet Trigger

The MCP Sheet Trigger gives your agents the ability to work with data in Google Sheets. Available operations include:

  • Get rows
  • Append or update rows
  • Create a sheet
  • Delete rows or columns
  • Clear a sheet

Use this to automate reporting, logging, or data collection workflows where your AI can both read and write structured information.

Google Slides Operations With MCP Slides Trigger

With the MCP Slides Trigger, your AI can help you prepare presentations in Google Slides:

  • Create a presentation
  • Get a presentation
  • Get slides from presentation
  • Replace text in presentation

This makes it possible for your agent to generate slide decks from prompts, update existing presentations, or tailor content for different audiences at scale.

Why MCP In n8n Is A Game Changer For Your Workflow

Using an MCP server inside n8n does more than just connect tools. It gives you a secure, centralized automation layer that you can grow and refine over time.

Key Benefits Of Using MCP With n8n, ChatGPT, And OpenAI Agents

  • Secure automation endpoints Your Google Workspace operations are exposed only through controlled n8n workflows, so you decide exactly what AI agents can and cannot do.
  • Seamless interaction beyond native limits You bypass the limitations of the official ChatGPT connector and unlock deep integration with Gmail, Calendar, Drive, Docs, Sheets, and Slides.
  • Centralized control and visibility All your Google automations and AI integrations live in one place, making them easier to monitor, debug, and improve.
  • Scalable foundation for growth Start with the provided template, then add new branches, conditions, and operations as your needs evolve. Your automation can grow alongside your business.

From Template To Transformation: Make This Workflow Your Starting Point

The n8n workflow template for connecting the Google ecosystem with ChatGPT and OpenAI Agent Builder is more than a ready‑made solution. It is a starting point for a more automated, focused way of working.

Once you have it running, you can:

  • Experiment with new triggers and actions inside Gmail, Calendar, or Sheets
  • Refine which operations your AI agents are allowed to perform
  • Chain multiple Google services together in a single automated flow
  • Build specialized agents for support, sales, content creation, or operations

Each improvement frees a little more of your time and attention. Over weeks and months, those small wins compound into a meaningful shift in how you work.

Next Steps: Put Your AI Co‑pilot To Work

By setting up MCP server triggers in n8n, you empower ChatGPT and OpenAI Agent Builder to perform complex Google Workspace operations programmatically. This opens a new level of automation and smart assistant capabilities that can reshape your daily workflow and productivity.

You do not have to automate everything at once. Start with a single use case, such as letting your agent draft and send specific types of emails or log meeting notes into a Google Doc. As your confidence grows, expand your workflows and let your AI handle more of the repetitive work.

Call To Action: Start Your Automation Journey Today

Ready to supercharge your Google Workspace automation with AI agents? Set up your MCP server workflows in n8n and connect them with the ChatGPT App and OpenAI Agent Builder. Use this template as your launchpad for powerful, extensible, and seamless AI‑driven productivity.

Explore n8n’s community resources for detailed workflow templates, ideas, and support, or reach out to automation experts if you want help designing more advanced flows. The sooner you connect your Google ecosystem with AI, the sooner you reclaim your time for the work that truly matters.

Seamless Google Ecosystem Integration with ChatGPT App & OpenAI Agent Builder

How to Connect Google Ecosystem with ChatGPT App & OpenAI Agent Builder Using MCP

Overview

This guide describes a reference architecture for integrating Google Workspace with the ChatGPT App and OpenAI Agent Builder using an MCP (Middleware Control Point) server implemented in n8n. By exposing Google APIs through a controlled MCP endpoint, you can let AI agents perform operations in Gmail, Google Calendar, Drive, Docs, Sheets, and Slides, even though the official ChatGPT connector does not natively support these Google services.

The workflow template linked at the end of this document provides the MCP server implementation in n8n. This article reorganizes the original explanation into a more technical, documentation-style format suitable for users familiar with automation, webhooks, and API-based integrations.

Architecture and Data Flow

At a high level, the solution introduces n8n as a middleware layer that translates MCP calls from ChatGPT or OpenAI Agent Builder into Google Workspace API requests. The flow is:

  1. ChatGPT App or OpenAI Agent issues a tool call to an MCP server.
  2. MCP Server (hosted in n8n) receives the request via a webhook or HTTP endpoint.
  3. n8n workflow parses the payload, invokes the appropriate Google node (Gmail, Calendar, Drive, Docs, Sheets, or Slides), and processes the response.
  4. n8n returns a structured response back through the MCP interface to the AI agent.

n8n acts as the Middleware Control Point, managing:

  • Authentication with Google via OAuth 2.0 credentials.
  • Mapping of MCP tool calls to specific Google operations.
  • Validation, error handling, and secure exposure of a public endpoint.

What is MCP in this Setup?

The Middleware Control Point (MCP) in this context is a server endpoint that:

  • Accepts tool calls from ChatGPT Apps and OpenAI Agent Builder agents.
  • Executes predefined workflows in n8n that operate on Google Workspace data.
  • Returns normalized, AI-ready responses back to the caller.

Using MCP provides a single, secure automation endpoint that centralizes all Google Workspace interactions. Instead of giving ChatGPT or Agent Builder direct access to Google APIs, you expose a curated set of capabilities through n8n, which can:

  • Manage emails, including reading, sending, replying, labeling, and deleting messages.
  • Handle calendar events, including creation, updates, deletions, and retrieval.
  • Manipulate files and folders in Drive.
  • Create and update Docs, Sheets, and Slides content.

n8n MCP Server Design

The MCP server is implemented as one or more n8n workflows that use HTTP or webhook triggers to expose operations to external clients. Each workflow can focus on a specific Google service or group multiple services, depending on your design preference.

Core Trigger Mechanism

In n8n, you typically configure:

  • A Webhook (or HTTP Request) node that acts as the MCP endpoint URL.
  • Input parsing logic to route incoming MCP calls to the correct Google node.
  • Response mapping to return structured JSON suitable for AI consumption.

The blog content refers to these as MCP triggers for each Google app:

  • MCP Gmail Trigger
  • MCP Calendar Trigger
  • MCP Drive Trigger
  • MCP Docs Trigger
  • MCP Sheet Trigger
  • MCP Slides Trigger

In practice, each of these corresponds to an n8n workflow (or workflow segment) that exposes an endpoint and then calls the respective Google node.

Node-by-Node Capability Breakdown

MCP Gmail Trigger

The Gmail-focused workflow exposes operations such as:

  • Fetching messages (for example, by label, query, or recent messages).
  • Sending new emails.
  • Replying to existing threads.
  • Applying or removing labels.
  • Archiving or deleting messages.

Within n8n, this typically involves:

  • A trigger node that receives the MCP request.
  • A Google Gmail node configured with OAuth 2.0 credentials.
  • Parameters mapped from the MCP payload (recipient, subject, body, threadId, labelIds, etc.).
  • Conditional logic to select the correct Gmail operation based on an action field.

Error handling should validate required fields (for example, recipient email for sending, message ID for replies or deletions) and return clear error messages to the MCP client if inputs are missing or invalid.

MCP Calendar Trigger

The Calendar workflow exposes operations to:

  • Create new events.
  • Update existing events.
  • Delete events.
  • Retrieve events for a given time range or query.

Configuration in n8n uses the Google Calendar node with:

  • OAuth 2.0 credentials with the appropriate calendar scopes.
  • Parameters like calendar ID, event title, start and end time, attendees, and description mapped from the MCP request.

Edge cases you should consider:

  • Time zone handling when creating or updating events.
  • Missing or invalid event IDs on update and delete operations.
  • Empty result sets when querying events, which should still return a valid, empty response object to the agent.

MCP Drive Trigger

The Drive workflow provides:

  • Search capabilities for files and folders.
  • File download operations.
  • Moving files between folders.
  • Creating new files in Google Drive.

In n8n, the Google Drive node is used to:

  • Run searches based on name, MIME type, or custom queries.
  • Fetch file contents when requested by the agent.
  • Update file metadata such as parent folder or title.

For large files or complex folder structures, consider adding pagination or result limits in the workflow logic to avoid excessive payloads being returned to MCP clients.

MCP Docs Trigger

The Docs workflow enables:

  • Creating new Google Docs documents.
  • Updating existing documents.
  • Retrieving documents.

With the Google Docs node, you can:

  • Generate new documents from AI-generated content.
  • Apply updates to document body content.
  • Fetch document metadata or content for further processing.

The MCP request should specify the target document ID for updates and retrieval, and include the text or structured content to insert or modify.

MCP Sheet Trigger

The Sheets workflow focuses on:

  • Adding rows to a sheet.
  • Updating existing rows.
  • Clearing ranges.
  • Deleting rows or ranges.

The Google Sheets node in n8n is configured with:

  • Spreadsheet ID and sheet name or range.
  • Data mappings from MCP input to row values.

You should validate:

  • That the target sheet and range exist.
  • That row indices or keys used for updates and deletions are valid.

MCP Slides Trigger

The Slides workflow supports:

  • Creating new presentations.
  • Updating existing presentations or slides.
  • Retrieving presentations and slide content.

Using the Google Slides node, the MCP server can:

  • Insert or modify text within slides.
  • Reorder slides.
  • Generate new decks from AI-created outlines or content.

The MCP payload should define which presentation and which slide(s) to operate on, along with the intended modifications.

Connecting ChatGPT App to the n8n MCP Server

Once your n8n workflows are deployed and the MCP endpoints are reachable, you can configure the ChatGPT App to use them as tools.

Prerequisites

  • An OpenAI account with Plus (or equivalent) access, as the ChatGPT App configuration typically requires it.
  • A publicly accessible URL for your n8n MCP server workflow (for example, the webhook URL from n8n).

Configuration Steps

  1. Open your OpenAI profile and sign in with the account that will manage ChatGPT Apps.
  2. Navigate to Settings → Apps and Connectors → Advanced Settings.
  3. Enable Developer mode to allow custom tool and connector configuration.
  4. Return to Apps and Connectors and click Create to define a new app.
  5. When prompted for a tool or connector endpoint, enter the MCP server URL exposed by your n8n workflow for Gmail or other Google services.
  6. Save the configuration. The ChatGPT App can now securely communicate with the MCP server and trigger the underlying n8n workflows.

Integrating OpenAI Agent Builder with the MCP Server

You can also use the same n8n MCP server as a tool for agents created via the OpenAI Agent Builder interface.

Agent Builder Setup

  1. Go to the OpenAI Agent Builder and sign in.
  2. Enable API access for your account if it is not already active.
  3. Create a new agent or open an existing one, then add an Agent node to your workflow.
  4. In the Agent configuration, locate the Tools section.
  5. Add a new MCP Server tool and provide the n8n MCP server URL as the endpoint.
  6. Save and finalize your agent workflow. From now on, the agent can call the MCP tool to perform operations across Gmail, Calendar, Drive, Docs, Sheets, and Slides via the n8n middleware.

Example Use Cases

Once the integration is complete, AI-driven workflows can automate a wide range of Google Workspace tasks.

Email Automation with Gmail

  • Automatically read incoming emails and extract key information.
  • Draft and send replies using AI-generated content.
  • Apply labels based on message content or sender.
  • Archive or delete messages on demand via ChatGPT commands.

Calendar Management

  • Query availability for specific dates or time ranges.
  • Schedule new events and send invites.
  • Update event details as plans change.
  • Delete outdated or canceled events.

Document and Spreadsheet Control

  • Create new Google Docs from AI-generated summaries or reports.
  • Update existing documents with new sections or edits.
  • Create new Google Sheets or append rows with structured data.
  • Fetch data from Sheets for analysis or further AI processing.

Presentation Updates with Slides

  • Generate new slide decks from outlines or bullet points.
  • Modify slide text and content based on AI suggestions.
  • Reorder slides to improve narrative flow.

Security and Privacy Considerations

Because this setup grants AI agents indirect access to your Google Workspace, security and privacy must be treated as first-class concerns.

Credentials and OAuth 2.0

  • Use OAuth 2.0 credentials stored securely in n8n for all Google API access.
  • Restrict OAuth scopes to the minimum required for each workflow (for example, read-only scopes where edits are not needed).

Access Control and Auditing

  • Regularly review which workflows and MCP endpoints are exposed to ChatGPT Apps or Agent Builder.
  • Monitor Google account activity and n8n execution logs to detect unusual behavior.
  • Revoke unused OAuth tokens and rotate credentials when team members change or when you suspect compromise.

Platform Maintenance

  • Keep your n8n instance updated to the latest stable version to benefit from security patches.
  • Protect n8n with HTTPS and, where appropriate, additional authentication or IP allowlists around the MCP endpoints.

Next Steps and Template Access

By setting up an MCP server in n8n, you effectively extend ChatGPT and OpenAI Agent Builder beyond their default capabilities, giving them controlled access to your Gmail, Calendar, Drive, Docs, Sheets, and Slides data. This opens up a broad range of automation scenarios that combine AI reasoning with real-world actions in your Google Workspace.

To get started:

  1. Deploy the n8n workflow template that implements the MCP server and associated Google nodes.
  2. Configure OAuth 2.0 credentials and verify access to each Google service (Gmail, Calendar, Drive, Docs, Sheets, Slides).
  3. Expose the workflow endpoint as your MCP server URL.
  4. Connect that MCP URL to your ChatGPT App and to your OpenAI Agent Builder agents.
  5. Iterate on the workflows to refine error handling, logging, and the set of supported actions.

Ready to automate your Google Workspace with AI-driven workflows? Start by configuring your n8n MCP server and linking it to your ChatGPT App and OpenAI Agent Builder today.

Automate Real Estate Calls with Google Sheets & VAPI

Automate Real Estate Calls with Google Sheets & VAPI in n8n

What You Will Learn

In this guide, you will learn how to use an n8n workflow template to:

  • Trigger automated outbound calls from a Google Sheets lead list
  • Send those leads to VAPI.ai to place calls and talk to prospects
  • Capture call results and notes back into Google Sheets
  • Automatically schedule appointments in Google Calendar
  • Handle batching, formatting, and reliability so your automation scales

This walkthrough is designed for real estate teams, but the same approach works for any outbound calling workflow powered by n8n, Google Sheets, and VAPI.


Concept Overview: How the Workflow Fits Together

Before diving into the step-by-step setup, it helps to understand the overall flow of data through n8n.

High-Level Workflow

  1. New lead added to Google Sheets
    A Google Sheets Trigger watches your call_list sheet. When a new row is added, n8n starts the workflow.
  2. Lead data prepared for calling
    A Set node formats the lead details, especially the phone number, so that VAPI can dial it correctly.
  3. Calls sent to VAPI in controlled batches
    A Split In Batches node controls pacing, and an HTTP Request node sends each batch to VAPI’s /call endpoint.
  4. VAPI sends call results back to n8n
    A Webhook node receives call outcomes from VAPI and triggers the follow-up part of the workflow.
  5. Call outcomes stored and appointments scheduled
    Results are written back to Google Sheets, appointment times are parsed, and Google Calendar events are created.
  6. VAPI is acknowledged
    n8n responds to VAPI with a 200 OK using a Respond to Webhook node.

Now let’s walk through each stage in detail, as you would configure it inside n8n.


Step 1 – Capture & Prepare New Leads from Google Sheets

1.1 Use Google Sheets Trigger on your lead list

The workflow starts with a Google Sheets Trigger node connected to your call_list sheet. This sheet is your master list of new leads and should include at least:

  • Prospect name
  • Phone number
  • Any other useful context (source, property type, notes, etc.)

Configure the trigger so that it fires whenever a new row is added. Each new row represents a new lead that should receive an automated call.

1.2 Prepare and clean lead data with a Set node

Next, add a Set node to standardize the data coming from Google Sheets before it is used by VAPI.

The most important field to prepare is the phone number. Spreadsheet tools often treat phone numbers as numeric values, which can cause problems such as:

  • Loss of leading zeros
  • Incorrect formatting when converted to JSON

To prevent this, format the phone number as a string in E.164 format (international format that starts with a plus sign). For example, you might use a formula like:

=+{{ $json.Phone }}

This ensures that when the data reaches the HTTP Request node, the phone number is already a properly formatted string that VAPI can dial reliably.


Step 2 – Send Calls to VAPI in Batches

2.1 Control pacing with Split In Batches

Placing too many calls at once can hit provider rate limits or overload your systems. To avoid this, the workflow uses a Split In Batches node.

This node:

  • Processes your list of leads in smaller groups
  • Helps you comply with VAPI and carrier rate limits
  • Makes it easier to implement retries and error handling

Set the batch size according to your expected call volume and provider limits. For example, you might send 10 or 20 leads per batch, depending on your use case.

2.2 Call the VAPI /call endpoint with HTTP Request

Within each batch, an HTTP Request node sends the actual call instructions to VAPI’s /call endpoint.

Key configuration details:

  • Method: POST
  • URL: VAPI /call endpoint
  • Authentication: Bearer token (include your VAPI API key in the Authorization header)
  • Body format: JSON

The JSON body typically includes:

  • assistantId – your VAPI assistant identifier
  • phoneNumberId – the VAPI phone number used to place calls
  • customers – an array of customer objects, each with a number field

Example structure for the customers array:

{  "assistantId": "YOUR_ASSISTANT_ID",  "phoneNumberId": "YOUR_PHONE_NUMBER_ID",  "customers": [  { "number": "+11234567890" },  { "number": "+19876543210" }  ]
}

Tip: Use expressions in n8n to map the formatted phone number from the Set node into the customers[].number field.

2.3 Handle throttling and errors

Carrier networks and APIs can temporarily throttle or fail requests. To make your outbound calling workflow more resilient:

  • Enable retry logic in the HTTP Request node or wrap it in additional logic to reattempt failed calls
  • Consider using exponential backoff so that repeated failures wait longer between attempts
  • Log failed attempts to a separate sheet or system for review

Step 3 – Receive and Store Call Results from VAPI

3.1 Capture VAPI callbacks with a Webhook node

After VAPI completes a call, it sends the call outcome to a URL you provide. In n8n, this URL is handled by a Webhook node.

Configure the Webhook node to:

  • Use the HTTP method and path VAPI expects
  • Accept JSON payloads containing call results
  • Trigger the next steps of your workflow whenever VAPI posts data

The payload from VAPI typically includes details such as:

  • Call outcome or status
  • Call notes or transcript details
  • Prospect information and any captured objections
  • Suggested follow-up time or appointment details

3.2 Write call outcomes back to Google Sheets

Once the Webhook node receives the call data, the workflow synchronizes it with your lead sheet using a Google Sheets node.

Use the appendOrUpdate operation so that each lead’s row is updated with the latest information instead of creating duplicates.

Fields you might store include:

  • Call outcome (e.g., interested, not interested, no answer)
  • Call notes and objections
  • Follow-up date and time
  • Next steps or assigned agent
  • Any additional prospect details captured during the call

3.3 Choose a reliable matching key

To ensure updates go to the correct row, configure matchingColumns carefully.

Recommended: Use a stable, unique identifier such as:

  • Phone number
  • Email address

Avoid relying only on names, since multiple leads can share the same name. Using a unique key prevents duplicate rows and keeps your data clean and consistent.


Step 4 – Convert Call Outcomes into Calendar Appointments

4.1 Parse appointment date and time with a Code node

When a prospect agrees to a meeting, VAPI includes date and time information in the callback payload. However, this data may not yet be in the exact format your calendar needs.

To handle this, the workflow uses a Code node. This node:

  • Reads date and time fields from the VAPI response
  • Converts them to a consistent timezone
  • Outputs a properly formatted datetime string

In this template, the times are converted to India Standard Time (IST) and formatted as ISO 8601 strings, which are ideal for calendar integrations.

4.2 Create calendar events in Google Calendar

After the Code node prepares the datetime values, a Google Calendar node creates the actual event.

Typical fields to map include:

  • Calendar ID (the calendar where you want the event created)
  • Event summary or title (e.g., “Real estate consultation with [Prospect Name]”)
  • Start and end times in IST ISO 8601 format
  • Description or notes (can include call notes and property details)

This ensures that every qualified prospect who books a time on the call is automatically added to your calendar in the correct timezone, without any manual scheduling.

4.3 Acknowledge the callback with Respond to Webhook

Once the event is created and the sheet is updated, the workflow sends a confirmation back to VAPI.

Use a Respond to Webhook node to return a 200 OK status. This tells VAPI that the callback was received and processed successfully, which helps keep the integration stable and prevents unnecessary retries from VAPI’s side.


Benefits of Automating Real Estate Calls with n8n, Google Sheets & VAPI

  • Reduced manual effort
    Calls are automatically triggered from your Google Sheets lead list and results are written back without manual data entry.
  • Improved scheduling
    Appointment times from calls are parsed and converted to IST, then automatically added to Google Calendar in the right format and timezone.
  • Better data hygiene
    Using unique identifiers and the appendOrUpdate operation keeps your lead sheet as a single source of truth, with up-to-date outcomes and notes.
  • Scalable outbound calling
    Split In Batches, retries, and proper error handling help you scale up your calls while respecting rate limits and avoiding overload.

Frequently Asked Questions

Do I need to change anything in the template before using it?

Yes. You must replace placeholder values like assistantId and phoneNumberId in the HTTP Request node with your actual VAPI credentials. Also connect your own Google Sheets and Google Calendar accounts in the respective nodes.

What format should phone numbers be in?

Use E.164 format, which starts with a plus sign and includes the country code, for example +11234567890. The Set node and Google Sheets formula help ensure the phone number is treated as a string and not accidentally changed by the spreadsheet.

Can I adapt this workflow for non-real-estate use cases?

Yes. Although this template is described for real estate, the pattern is generic. Any business that needs automated outbound calls, result logging, and calendar booking can reuse the same structure with minor adjustments.

How do I prevent duplicate rows in my lead sheet?

Configure the Google Sheets node to use appendOrUpdate and choose a unique identifier, such as phone number or email, in matchingColumns. This ensures updates are applied to existing rows instead of creating new ones.


Next Steps: Try the n8n Template

By combining n8n, Google Sheets, and VAPI, you can turn your lead list into a fully automated outbound calling and appointment booking system. This reduces manual work, improves follow-up consistency, and helps your real estate team focus on closing deals instead of dialing numbers.

Set up the template, connect your credentials, and start running calls directly from your lead sheet.

Automate Lead Calls & Scheduling with VAPI and Google Sheets

Automate Lead Calls & Scheduling with VAPI and Google Sheets

Picture this: your lead list keeps growing, your team is juggling calls, and your calendar looks like a game of Tetris gone wrong. You copy-paste numbers, dial manually, scribble call notes, then try to remember who wanted a callback “next Thursday afternoon, but not too late.”

That is the kind of repetitive chaos this n8n workflow template quietly destroys.

With a simple setup using Google Sheets, VAPI, and Google Calendar, you can automatically:

  • Detect new leads as they land in your sheet
  • Trigger personalized marketing calls with VAPI
  • Capture rich call results and store them neatly
  • Schedule follow-ups or bookings directly in your calendar

No more manual dialing, no more “Did we ever call this person?” and definitely fewer “Oops, I double-booked that slot” moments.

What This n8n Workflow Template Actually Does

This template is built to streamline your lead handling from start to finish. Here is the big picture:

  1. Intake & prep: A Google Sheets Trigger watches your call_list sheet. Whenever a new lead appears, the workflow grabs the data and cleans up the phone number formatting.
  2. Call automation with VAPI: Leads are processed in batches, then VAPI is called via HTTP POST to place automated, personalized calls.
  3. Result tracking: A webhook collects detailed call outcomes from VAPI and logs them in a dedicated Google Sheet.
  4. Scheduling & confirmation: If there is a booking or follow-up, the workflow converts the time into IST, creates a Google Calendar event, and sends a 200 OK back to VAPI.

In short, the template turns your Google Sheet into a mini call center plus scheduling assistant, without needing a human glued to the phone all day.

Why Automate Lead Calls with n8n, VAPI, and Google Sheets?

Manual lead management is like doing dishes by hand when you own a dishwasher. It works, but why?

  • Streamlined lead management: Every call and response is tracked in a single, tidy spreadsheet instead of scattered across notes, inboxes, and memories.
  • Personalized outreach at scale: VAPI handles dynamic, human-like conversations with your leads, one by one, without your team burning out.
  • Accurate scheduling: Follow-ups and bookings are automatically dropped into Google Calendar using the lead’s preferred date and time.
  • Data consistency: Smart use of matching keys and proper phone number formatting keeps your data clean, accurate, and duplicate-free.

Now let us walk through how the template works step by step, so you know exactly what is happening behind the scenes.

Step 1 – Intake & Lead Preparation in Google Sheets

The whole automation starts in your spreadsheet, where your leads already live.

Google Sheets Trigger: Watching Your call_list

The workflow uses a Google Sheets Trigger that fires whenever a new row is added to your call_list sheet. That means every fresh lead is automatically fed into the n8n workflow without you clicking anything.

Preparing Lead Data: Fixing Those Tricky Phone Numbers

Next comes the Prepare Lead Data step. This is where you avoid one of the classic spreadsheet headaches: numeric coercion.

To keep phone numbers from getting mangled by Google Sheets (like dropping leading zeros or turning them into weird scientific notation), the template expects phone numbers to be stored as strings. A couple of safe options:

  • Use a formula like =+${json.Phone} so the value is treated as text
  • Store numbers in E.164 format for a clean, international standard

Once the numbers are nicely formatted, the workflow is ready to start dialing.

Step 2 – Automatically Dial Leads with VAPI

Now we get to the fun part: letting VAPI do the calling while you do literally anything else.

Split In Batches: Pacing Your Calls

Instead of hammering every lead at once, the template uses the Split In Batches node. This lets you process leads in manageable chunks, which helps:

  • Keep your calling pace smooth
  • Reduce the risk of hitting provider limits
  • Make error handling and retries easier

HTTP POST to VAPI: Kicking Off the Call

For each lead in a batch, the workflow sends an HTTP POST request to VAPI’s /call endpoint. That request includes all the important details, such as:

  • assistantId – the VAPI assistant that will handle the conversation
  • phoneNumberId – the number used to place the call
  • The lead’s phone number – pulled from your prepared data
  • Any other required credentials and parameters

This is where the robot takes the phone and politely starts doing your outreach.

Retries & Backoff: Handling Real-World Call Issues

In the real world, calls can fail or get throttled by carriers. The template recommends using retries and backoff strategies so that:

  • Temporary issues do not break your entire workflow
  • Throttling is handled gracefully instead of spamming requests
  • Your calling process stays resilient and reliable

Automation is great, but resilient automation is even better.

Step 3 – Capture Call Results with a Webhook

Once VAPI finishes a call, it does not just hang up and vanish. It sends back detailed information that your workflow can use.

Webhook: Receiving VAPI Call Data

A webhook in n8n is set up to receive the response from VAPI when a call completes. The payload typically includes:

  • Call notes and summaries
  • Call outcomes and next steps
  • Contact details and any updated info

This gives you a rich record of what actually happened on the call, not just “answered” or “missed.”

Updating Google Sheets: Logging Interactions

After the webhook receives the data, the workflow appends or updates a dedicated Google Sheet with the call details. That sheet becomes your single source of truth for:

  • Who was called
  • What was discussed
  • What should happen next

Pro tip: When configuring the sheet update, use a stable key like phone number or email in the matchingColumns field. This avoids duplicate records that can happen if you match only on names. “John Smith” is not as unique as your database might wish.

Step 4 – Book & Confirm with Google Calendar

If the call results in a booking, delivery, or follow-up time, the workflow takes care of the calendar side too.

Processing Date & Time in IST

A JavaScript function in the workflow processes the incoming date and time values and converts them into:

YYYY-MM-DD HH:mm:ss IST

That means your start and end times are correctly built in the IST timezone (Indian Standard Time), so your events land in the right slots.

Creating the Google Calendar Event

Those processed times are then used to create an event in Google Calendar. The workflow automatically:

  • Sets the start and end time in IST
  • Books the slot for the meeting, delivery, or follow-up
  • Aligns with the lead’s preferred schedule

Sending a 200 OK Back to VAPI

Once the calendar event is created successfully, the workflow sends a 200 OK response back to VAPI through the webhook. That acknowledgment confirms the booking worked and keeps the integration in sync.

How to Get Started with This n8n Template

Setting this up is much easier than doing all these steps by hand every day. Here is the simplified path:

  1. Open the n8n workflow template that connects Google Sheets, VAPI, and Google Calendar.
  2. Plug in your credentials and IDs:
    • assistantId for your VAPI assistant
    • phoneNumberId for the number used to call leads
    • Your Google Calendar ID for booking events
  3. Point the Google Sheets Trigger to your call_list sheet.
  4. Confirm that phone numbers are stored as strings or in E.164 format.
  5. Test with a sample lead, watch the call fire, see the sheet update, and check your calendar.

Once you are happy with the flow, you can let it run and stop babysitting your lead list.

Tips, Best Practices & Next Steps

  • Secure your credentials: Always store API keys, assistantId, phoneNumberId, and other sensitive data securely. Use environment variables or n8n credentials instead of hardcoding them.
  • Choose solid matching keys: Use phone numbers or emails in matchingColumns to keep your Google Sheet clean and avoid duplicates.
  • Monitor call performance: Keep an eye on your call logs to fine-tune your VAPI assistant and improve conversion over time.
  • Iterate on your workflow: Once the basics work, you can extend the template with CRM updates, notifications, or additional follow-up logic.

Ready to Let Automation Handle the Boring Stuff?

If you are tired of repetitive dialing, messy notes, and missed follow-ups, this template is your shortcut to a calmer, more organized sales process.

Integrate Google Sheets, VAPI, and Google Calendar into your CRM workflow to:

  • Save time on manual admin work
  • Reduce human errors in scheduling and data entry
  • Speed up your lead response and follow-up cycle

Ready to automate your lead calls and bookings? Fire up this VAPI-powered n8n workflow template, plug in your credentials, and let your outreach practically run itself.

Note: Always ensure your API credentials and sensitive data are securely stored.