Automate Water Bill Calculation with Telegram and Google Sheets

Automate Water Bill Calculation with Telegram and Google Sheets

Imagine Never Typing a Water Meter Reading Again

You know that monthly ritual where someone sends you a blurry photo of a water meter, you squint at it, type the numbers into a sheet, calculate the bill, and then copy everything into a message? Then do it again. And again. And again.

If you are tired of playing “guess that digit” from half-lit meter photos, this n8n workflow template is your new best friend. It uses a Telegram bot, Google Sheets, and Google Gemini AI to handle the entire water bill process for you, from image to invoice, with almost no manual work.

What This n8n Workflow Actually Does

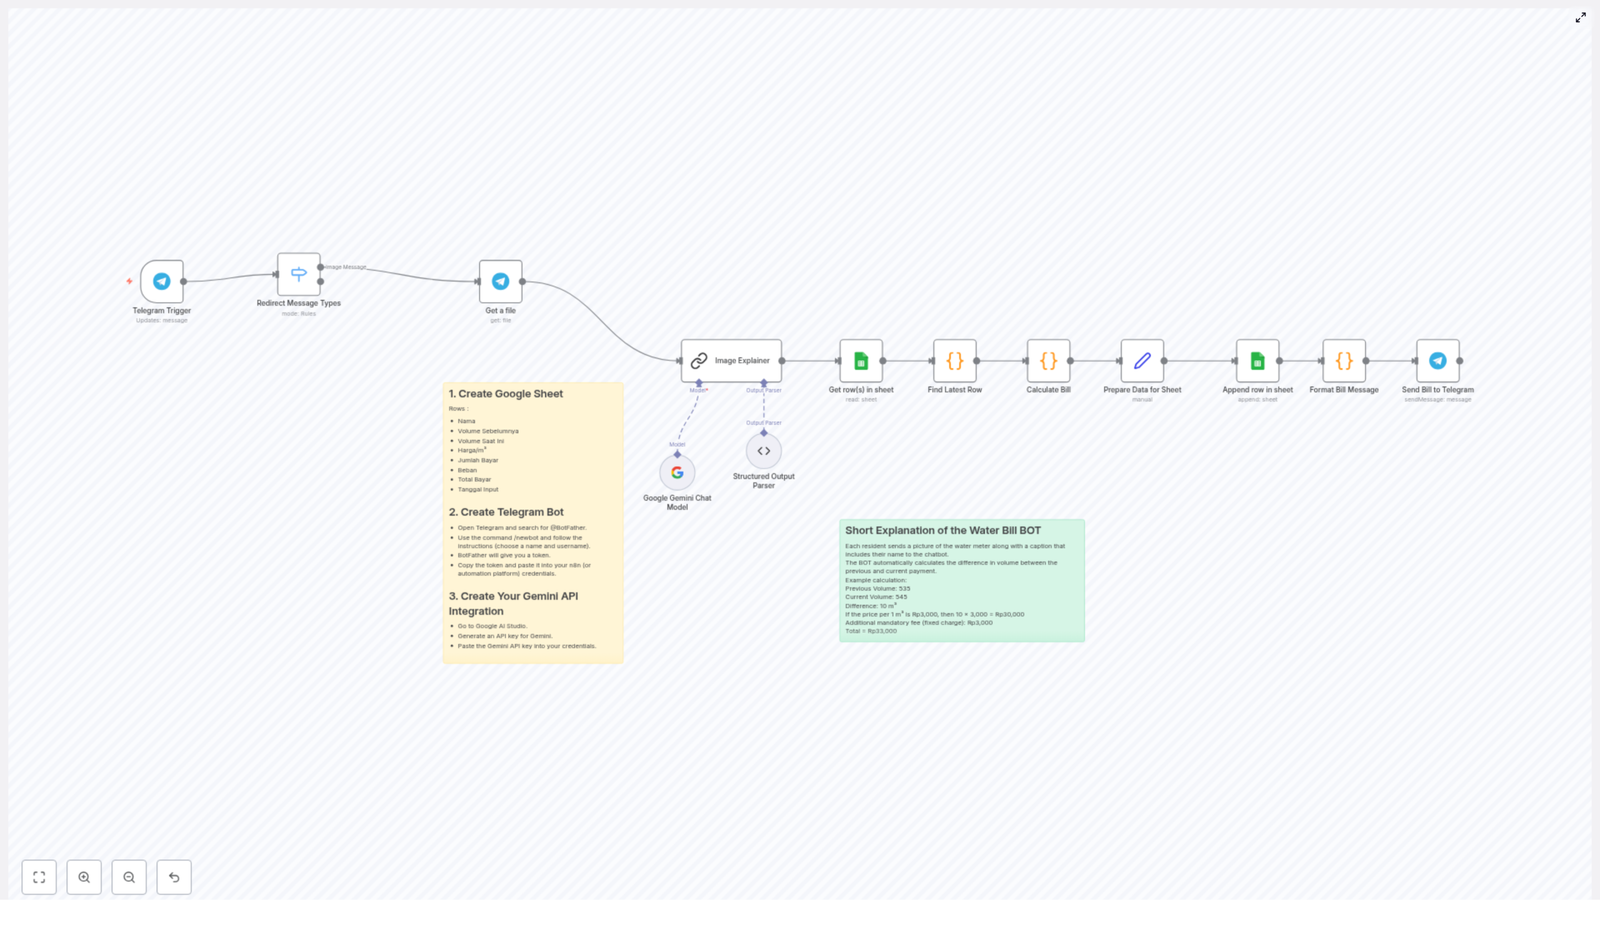
At a high level, this automation turns Telegram into a smart entry point for water bill data, uses AI to read the meter values from images, calculates the bill, logs everything in Google Sheets, and then sends the final bill back to the user in Telegram.

Here is the full journey your data takes:

  • User sends a water meter photo through Telegram.
  • The bot checks what type of message it is and only processes images.
  • n8n downloads the image and sends it to Google Gemini AI.
  • AI reads the numeric meter value and the customer name from the image or caption.
  • The workflow parses that result into clean JSON data.
  • Google Sheets is used to look up previous readings and pricing.
  • The bill is calculated automatically, including consumption and fixed charges.
  • New data is saved back into the sheet for future reference.
  • The final bill, with payment details, is sent back to the user via Telegram.

In short, no more manual transcription, no more calculator, and far fewer “oops, wrong number” moments.

Step-by-Step: How the Template Works Behind the Scenes

1. Telegram Bot – Your Front Desk for Meter Photos

The workflow begins with the Telegram Trigger node. This node listens to your Telegram bot and waits for users to send messages. When someone uploads a water meter image, the bot receives it and passes it into the rest of the n8n workflow.

Think of it as a digital receptionist that only cares about your meter photos, not your memes.

2. Sorting Messages With a Switch Node

Not every Telegram message is useful for billing. Some might be text, stickers, or other random content. The Switch node steps in here to filter and route messages based on their type.

If it is an image, it continues down the workflow. If it is text or something else, it gets filtered out so you do not end up trying to compute a water bill from a thumbs up emoji.

3. Downloading the Image and Letting AI Read the Meter

Once an image passes the filter, the Get a file node retrieves the actual meter photo from Telegram. This file is then forwarded to the Google Gemini Chat Model and Image Explainer nodes.

Here is where the magic happens. Google Gemini AI looks at the image and extracts the numeric meter reading in cubic meters (m³). It can also pick up the customer name from the caption or other context, depending on how you structure your prompts and input.

4. Turning AI Output Into Clean Structured Data

AI often returns text that looks human friendly but is not exactly automation friendly. That is where the Structured Output Parser node comes in.

This node converts the AI result into structured JSON values, so you end up with clearly defined fields such as:

  • Customer name
  • Current volume (m³)

From here, the rest of the workflow can safely use these values for calculations and logging.

5. Looking Up Old Readings and Calculating the Bill

Next, the workflow talks to Google Sheets. Your sheet stores past meter readings, price per cubic meter, and other billing details. The workflow uses this data to:

  • Find the customer’s previous meter reading.
  • Retrieve the price per m³.
  • Apply any fixed charges.

The Calculate Bill node then does the math for you. It:

  • Computes the difference between current and previous readings.
  • Multiplies the consumption by the price per cubic meter.
  • Adds fixed charges to get the total payment.
  • Formats the date for record keeping.

So instead of juggling spreadsheets and formulas, you just let the workflow crunch the numbers.

6. Saving Everything in Google Sheets

Once the bill is calculated, the workflow appends a new row to your Google Sheet. This row usually includes:

  • Name
  • Previous volume
  • Current volume
  • Price per m³
  • Amount to pay
  • Fixed charge
  • Total payment
  • Date of entry

This creates a complete history of usage and payments over time, which is very handy when someone asks, “Why is my bill higher this month?”

7. Sending the Final Bill Back Via Telegram

Finally, the workflow formats all the key billing details into a clear message and sends it back to the user through Telegram’s messaging API.

That message can include:

  • Current and previous meter readings
  • Calculated consumption
  • Total amount to pay
  • Any fixed charges or extra fees
  • Payment instructions

The user gets an instant bill in the same chat where they sent the photo, and you do not have to lift a finger after the initial setup.

What You Need to Set This Up

1. A Google Sheet for All Your Billing Data

Start by creating a Google Sheet that will store your water billing records. At a minimum, include these columns:

  • Name
  • Previous Volume
  • Current Volume
  • Price per m³
  • Amount to Pay
  • Fixed Charge
  • Total Payment
  • Date of Entry

This sheet becomes your single source of truth for all water usage and payment history.

2. A Telegram Bot Set Up With @BotFather

Next, you need a Telegram bot that will receive the meter photos. To create one:

  • Open Telegram and start a chat with @BotFather.
  • Follow the prompts to create a new bot.
  • Copy the bot token that BotFather gives you.

You will use this token in your n8n Telegram Trigger node so the workflow can connect to your bot.

3. Google Gemini AI Integration

To automatically read meter numbers from images, integrate the Google Gemini AI model in n8n. In this workflow template, Gemini is used via the Google Gemini Chat Model and Image Explainer nodes to extract the numeric reading and related details from the photo.

Once configured, Gemini takes care of the image analysis while the rest of the workflow just consumes its structured output.

Why Bother Automating Water Bills?

Besides saving your sanity, this automation brings several practical benefits:

  • Less manual work – No more copying numbers from images into spreadsheets every billing cycle.
  • Fewer errors – AI-based reading extraction reduces mistakes that come from misreading digits or typing too fast.
  • Instant communication – Users get their bills and payment instructions directly in Telegram, often within seconds.
  • Better tracking – Every reading and payment detail is logged in Google Sheets, so you always have a clear history.

Once you experience automated water billing, going back to manual entry feels like using a typewriter to send emails.

Beyond Water: Other Use Cases

This workflow is built for water meters, but the structure is flexible. With a few tweaks, you can adapt the same pattern to other utilities, such as:

  • Electricity meter readings
  • Gas meter readings

The same combo of Telegram, AI-based image recognition, and Google Sheets can support a wide range of meter-based billing setups.

Next Steps: Put the Template to Work

If you are ready to retire your calculator and stop manually decoding meter photos, this n8n template gives you a complete, ready-to-use workflow.

Set it up once, let it run, and never miss a payment again.

Learn more or reach out if you need help fine tuning your automation.

Replace Face in Video with Image Avatar Using Fal.ai

Replace Face in Video with Image Avatar Using Fal.ai

From Manual Editing To Effortless Automation

Manually editing videos to swap faces or animate avatars can feel overwhelming. Traditional tools are complex, time consuming, and often require specialist skills. If you are a creator, marketer, or developer, you probably do not want to spend hours inside video editors when you could be building, launching, and growing.

This is where automation becomes a powerful ally. By combining n8n, Fal.ai, and AWS S3, you can turn a tedious, repetitive task into a smooth, automated workflow that runs in the background while you focus on higher value work.

In this guide, you will walk through a complete n8n workflow template that automatically replaces a face in a video with a custom image avatar using Fal.ai. You will see how a simple form submission can trigger an entire automated process, from file upload to final animated video, with no manual editing required.

Imagine The Possibilities

Before we dive into the steps, take a moment to imagine what this kind of automation could unlock for you:

  • Personalized video messages that feature your brand avatar instead of your face
  • Marketing campaigns with unique character-based ads generated in minutes
  • Social media content that stands out, created without touching a timeline or keyframe
  • Developer friendly automation that plugs into your apps, forms, or internal tools

This workflow is not just a one-off trick. It can be a starting point for a more automated, focused way of working. Once you see how easily you can replace a face in a video with Fal.ai and n8n, you will likely start spotting other processes you can streamline too.

Who This Workflow Empowers

This n8n template is designed for anyone who wants to combine creativity with automation:

  • Content creators who want to produce unique, animated videos without learning complex video tools
  • Marketers who need scalable, personalized content for ads, campaigns, and social media
  • Developers who love building systems and want to integrate AI-powered video into their apps or internal workflows

If you are ready to move from manual editing to automated creation, this workflow gives you a practical, repeatable system to start with.

How The Automated Journey Works

At a high level, here is the transformation that happens behind the scenes every time the workflow runs:

  1. A user opens a simple form and uploads a video and a face image.
  2. n8n stores both files in an AWS S3 bucket and generates public URLs.
  3. Those URLs are sent to the Fal.ai animation API, which performs the face swap on the video.
  4. n8n periodically checks the job status until Fal.ai reports that the animation is COMPLETED.
  5. The final animated video is retrieved and ready to use, share, or feed into the next step of your automation.

Once this is set up, the entire process runs automatically. Your only job is to supply the source video and the image. Everything else is handled by the workflow.

Mindset Shift: Build Once, Reuse Forever

Instead of treating each video as a one-off project, start thinking in terms of systems. With n8n, every workflow you build can be reused, improved, and scaled. This template is a great example:

  • You configure the workflow once.
  • Anyone on your team can use the form to generate new videos.
  • You can plug the output into other automations, such as automatic posting, notifications, or storage.

As you follow the steps below, view them as an investment in a long term automation asset. You are not just creating one cool video. You are building an engine that can power many future projects.

Step-by-Step: Setting Up The n8n + Fal.ai Workflow

The following setup keeps all the technical power of the original process, but organizes it into a clear path you can follow. Each step brings you closer to a fully automated face replacement system.

1. Get Your Requirements In Place

Before configuring the workflow, make sure you have the essentials ready:

  • An active AWS account with an accessible S3 bucket
  • A Fal.ai account and a valid Fal.ai API key
  • A running n8n instance with credentials configured for AWS and Fal.ai

Once these are set, you are ready to connect everything through n8n.

2. Prepare AWS S3 Storage For Media Files

Your workflow needs a reliable place to store the uploaded video and image so Fal.ai can access them. AWS S3 is perfect for this.

In n8n:

  • Set up AWS credentials with permission to upload files to your chosen S3 bucket.
  • Confirm the bucket is configured so that uploaded files can be exposed as publicly accessible URLs (Fal.ai needs to reach them).

This step turns S3 into the central media hub for your automation.

3. Configure Fal.ai API Access In n8n

Next, connect n8n to Fal.ai so it can send animation requests.

  • Obtain your Fal.ai API key from your Fal.ai account.
  • In n8n, configure this key using HTTP header authentication for all Fal.ai API requests.

With this in place, n8n can securely tell Fal.ai which video and image to use for each face replacement job.

4. Create The Upload Form With formTrigger

Now it is time to design the entry point to your workflow: a simple, user friendly form.

  • Add the formTrigger node in n8n.
  • Configure it to allow users to upload:
    • One video file
    • One image file that will act as the avatar or replacement face

This node becomes the front door to your automation. Whenever someone submits the form, the entire workflow starts running automatically.

5. Upload The Video And Image To S3

Once the form is submitted, you want n8n to take over the manual work of handling files.

  • Use the appropriate S3 node(s) in n8n to upload both files from the form to your S3 bucket.
  • After upload, capture the public URLs for both the video and the image.

These URLs are what Fal.ai will use to access and process your media.

6. Send The Face Replacement Request To Fal.ai

With your media hosted on S3, you are ready to trigger the actual animation.

  • Use an HTTP Request node (or similar) in n8n to send a POST request to the Fal.ai animation API.
  • Include the video URL and the image URL in the request body, following Fal.ai’s required format.

This is the moment your static image and source video start their transformation into a new, animated result.

7. Monitor The Animation Status Until Completion

Fal.ai processes the animation job asynchronously, so your workflow needs to wait and check when it is ready.

  • Use a Wait node in n8n configured in a loop.
  • Periodically check the job status with additional Fal.ai API calls.
  • Continue looping until the status is reported as COMPLETED.

This pattern lets your workflow stay responsive without blocking, and it ensures you only move forward once the final video is ready.

8. Retrieve And Use The Final Animated Video

When Fal.ai reports that the job is completed, your workflow can collect the finished asset.

  • Fetch the final animated video from the URL provided by Fal.ai.
  • From here, you can:
    • Store it back into S3
    • Send it via email or chat
    • Trigger another workflow, such as posting to social media or updating a CRM

At this point, the entire face replacement process has been handled by automation. All the user did was submit a form.

Why This Workflow Is A Powerful Starting Point

Automating face replacement in video with Fal.ai and n8n brings several concrete benefits that directly impact your time, energy, and creative output:

  • No complex video editing software required, everything is handled through automation
  • Seamless face replacement using a reliable, repeatable workflow instead of manual steps
  • Engaging, personalized content generated quickly for campaigns, presentations, or social media
  • Full customization so you can align the workflow with your brand, marketing, or product needs

Most importantly, this workflow is modular. You can extend it, combine it with other n8n templates, or adapt it to fit new use cases as your automation skills grow.

Build On This Template And Keep Experimenting

Think of this n8n + Fal.ai template as a foundation. Once it is working, you can start experimenting:

  • Trigger the form from different tools or platforms
  • Automatically notify your team when a new animated video is ready
  • Chain this workflow with others for publishing, archiving, or analytics

Each small improvement compounds. Over time, you will build a library of automations that save you hours every week and let you focus on strategy, creativity, and growth.

Take The Next Step

If you are ready to bring AI powered face replacement into your automated toolkit, this n8n Fal.ai workflow is a practical, inspiring place to start. You can have your first fully automated, personalized animated video running with just a few clicks and some simple configuration.

For more tutorials, inspiration, and support as you expand your automation skills, join our dedicated community on Skool:

n8n & AI Automation Champions Community

Replace Face in Video with Image Avatar using Fal.ai

Replace a Face in Video With an Image Avatar Using Fal.ai & n8n

Why Face-Swapped Video Automation Is So Handy

Ever wished you could quickly swap a face in a video with a custom image avatar, without touching a video editor? That is exactly what this n8n workflow template does for you. It connects Fal.ai’s animation API with AWS S3 and wraps everything inside a simple n8n automation.

So instead of manually editing every clip, you upload a video and an image, let the workflow run, and get back a face-swapped video. It is perfect when you want to scale content creation or just avoid fiddling with complex editing tools.

What This n8n Template Actually Does

Here is the big picture of what the workflow automates for you:

  • Collects a video and an image avatar from a simple n8n form
  • Uploads both files to an AWS S3 bucket and makes them publicly accessible
  • Sends those public URLs to Fal.ai’s animation API to run a face replacement
  • Waits and keeps checking the job status until Fal.ai finishes processing
  • Retrieves the final video URL with the face-swapped animation

All of that happens automatically once the form is submitted. You just grab the final video and use it wherever you like.

Who Will Love This Workflow?

This template is a great fit if you:

  • Create content for social media and want fresh, personalized videos fast
  • Run marketing campaigns and need attention-grabbing, dynamic visuals
  • Build tools or internal apps that generate custom videos on demand
  • Like automation, but do not want to spend hours editing video manually

It is especially useful for content creators, marketers, and developers who want to generate face-swapped videos at scale with minimal friction.

What You Need Before You Start

Before you fire up the template in n8n, make sure you have:

  • An active AWS account with an S3 bucket and permissions to upload files
  • A Fal.ai account and a valid API key
  • An n8n instance (self-hosted or cloud) to run the workflow
  • Basic familiarity with n8n workflows and simple HTTP requests

How the Automation Flows From Start to Finish

Let us walk through the process step by step so you know exactly what is happening behind the scenes.

1. A Simple Form Kicks Everything Off

The workflow starts with an n8n form trigger. This is where you (or your users) upload:

  • The source video that contains the face to be replaced
  • The image avatar that should replace that face

Once the form is submitted, n8n takes those uploaded files and passes them into the next steps automatically.

2. Upload Video and Image to AWS S3

Next, the workflow uploads both files to your AWS S3 bucket. This step is important because Fal.ai needs publicly accessible URLs to process the animation.

In n8n, the S3 node uses your AWS credentials to:

  • Upload the video file
  • Upload the image avatar file
  • Ensure each file is accessible via a public URL or has the right read permissions

Those S3 URLs then become the input for the Fal.ai API request.

3. Call Fal.ai’s Animate Replace Endpoint

Once the files are safely in S3, the workflow sends an HTTP POST request to the appropriate Fal.ai animate replace endpoint.

This request includes:

  • The S3 URL of the original video
  • The S3 URL of the image avatar
  • Your Fal.ai API key, passed via HTTP header authentication in n8n

Fal.ai then starts processing the face replacement job in the background and returns a job identifier or status reference that n8n can track.

4. Wait While the Animation Is Generated

Video processing takes a little time, so the workflow does not just sit idle. Instead, it uses a combination of a Wait node and an HTTP request loop to periodically check the animation status.

The loop keeps calling Fal.ai’s status endpoint until the job is marked as "COMPLETED". This way, you do not have to guess when the video is ready. The automation handles all the polling for you.

5. Retrieve the Final Face-Swapped Video

Once Fal.ai reports that the job is complete, the workflow makes a final API call to grab the output video URL.

From there, you can:

  • Download the finished video
  • Store it back in S3 or another storage location
  • Send it via email, Slack, or any other integration supported by n8n
  • Plug it into your own app or content pipeline

The end result is a fully automated pipeline that takes uploads in, calls Fal.ai, waits for the job, and returns a polished, face-swapped video.

Setting Everything Up in n8n

Now let us break down the actual setup steps you will follow inside n8n to get this template running.

Step 1 – Configure Your AWS S3 Credentials

In n8n, add your AWS credentials so the workflow can talk to your S3 bucket:

  • Provide your AWS access key and secret key
  • Specify the S3 bucket where videos and images will be uploaded
  • Make sure the bucket is publicly accessible or that individual files are given public read permissions

Without proper permissions, Fal.ai will not be able to access the files, so this part is key.

Step 2 – Add Fal.ai API Credentials in n8n

Next, grab your Fal.ai API key from your Fal.ai account dashboard.

In n8n:

  • Create a new credential using HTTP Header Authentication
  • Add your API key in the header field as required by Fal.ai

This lets all your HTTP Request nodes securely authenticate with the Fal.ai animation API without hardcoding keys in every node.

Step 3 – Build the Upload Form With the Form Trigger Node

Use the built-in Form Trigger node in n8n to create a simple upload interface. Configure it so users can:

  • Select a video file
  • Select an image file to use as the avatar

When the form is submitted, the workflow starts and passes those two files into the S3 upload step automatically.

Step 4 – Upload the Files to Your S3 Bucket

After the trigger, add and configure the AWS S3 node to handle uploads:

  • Connect it to your AWS credentials
  • Map the form’s video input to one S3 upload operation
  • Map the image avatar input to another S3 upload operation

Once uploaded, the node will return public URLs for both files, which you will then pass to Fal.ai.

Step 5 – Call the Fal.ai Animate API

Add an HTTP Request node to send a POST request to the Fal.ai animate replace endpoint.

Configure it to:

  • Use your Fal.ai HTTP header credentials
  • Include the S3 video URL and S3 avatar image URL in the request body
  • Follow Fal.ai’s required JSON structure for the face replacement request

Fal.ai responds with details about the animation job, including whatever identifier you need for status checks.

Step 6 – Monitor the Animation Status Until Completion

To keep track of the job, set up a Wait node followed by an HTTP Request loop that:

  • Waits a short period between checks to avoid spamming the API
  • Calls the Fal.ai status endpoint using the job identifier
  • Continues looping until the status is reported as "COMPLETED"

This pattern lets the workflow pause and resume intelligently, instead of blocking or timing out while the video is being processed.

Step 7 – Fetch and Use the Final Video

When the status check returns "COMPLETED", use another HTTP Request (or the same node configured appropriately) to retrieve the final video details from Fal.ai.

From there, you can:

  • Store the final video URL in your database or another S3 bucket
  • Send it to a user via email, chat, or webhook
  • Trigger follow-up automations in n8n, such as posting to social media or notifying your team

Why This Workflow Makes Your Life Easier

So why bother setting all this up instead of doing it manually every time? A few big reasons:

  • Real automation – Once configured, you just upload files and let the workflow handle everything else.
  • Powerful AI without the headache – You get Fal.ai’s advanced animation and face swapping through a simple API call wrapped in n8n.
  • Minimal editing skills needed – No need to learn complex video tools or hire editors for repetitive tasks.
  • Cloud based and scalable – AWS S3 manages your storage, and n8n can run as many workflows as you need.
  • Fully customizable – Since it is in n8n, you can plug in extra steps like notifications, approvals, or further processing.

Ready to Try It?

If you are excited to create unique, personalized videos by swapping faces with custom images, this template gives you a head start. You get a complete n8n workflow that connects Fal.ai, AWS S3, and a friendly upload form.

Want help, inspiration, or ideas from other automation enthusiasts? Join our Skool community here: n8n + AI Automation Champions.


Template Author: Sandeep Patharkar

Category: Content Generation, Content Marketing

Difficulty: Intermediate

Estimated Setup Time: 20 minutes

Automate Outlook Email Classification with n8n & OpenAI

Automate Outlook Email Classification with n8n & OpenAI

Imagine this inbox nightmare…

You open Outlook on a Monday morning and your inbox looks like it lost a fight with a mailing list. Customer questions, invoices, newsletters, promo codes, “quick questions” that are never quick… all shouting for your attention.

Now imagine instead that an AI assistant quietly reads every new email, decides what it is, files it neatly, drafts replies, and pings your team only when it really matters. No more manual sorting, no more “I’ll deal with this later” folders that you never open again.

That is exactly what this n8n Outlook email classification workflow does, using OpenAI to triage your inbox and automation to handle the boring bits.


What this n8n + OpenAI email workflow actually does

This workflow automatically classifies incoming Outlook emails into clear, useful categories so you do not have to:

  • High Priority
  • Customer Support
  • Promotions
  • Finance/Billing

Once an email is classified, the workflow can:

  • Move it into the correct Outlook folder
  • Draft smart AI-powered responses
  • Send Telegram notifications for important updates
  • Summarize promotional and financial emails so you do not have to read walls of text

It is ideal for busy professionals and teams who want to stop babysitting their inbox and let automation do the heavy lifting.

Created by someone who also hates email chaos

  • Workflow created by Sandeep Patharkar
  • Join the Skool community for n8n + AI automation tutorials, live Q&As, and exclusive workflow templates.

How the workflow works behind the scenes

Here is the high level flow so you know what magic is happening where:

  1. New email lands in Outlook.
  2. n8n catches it instantly using the Outlook trigger.
  3. An AI agent (powered by GPT-4.1-mini) reads the content and classifies it.
  4. Based on the category, the email is moved to the right folder.
  5. Smart actions kick in, like drafting replies or notifying your team on Telegram.

Step 1 – Outlook keeps watch for new emails

The workflow starts with the Microsoft Outlook Trigger. It monitors your inbox in real time, so every new email that arrives is:

  • Captured automatically
  • Passed into the workflow for AI classification

No need to click anything or run the workflow manually. Once set up, it just quietly works in the background while you drink your coffee.

Step 2 – AI reads and classifies your emails

The heart of the workflow is the Email_Classifier_Agent, powered by GPT-4.1-mini. It reads the email subject and body, then assigns each email to one of four categories:

  • High_Priority
  • Customer_Support
  • Promotions
  • Finance/Billing

In other words, the AI does the “what kind of email is this?” thinking for you, which is usually the part that makes you stare at your inbox for 5 minutes before doing anything.

Step 3 – Routing emails into the right Outlook folders

Once the category is decided, the Routing node in n8n takes over and moves each email into the correct Outlook folder. The default mapping looks like this:

  • 📂 High Priority01 High Priority
  • 💬 Customer Support02 Customer Support
  • 📢 Promotions03 Promotions
  • 💰 Finance/Billing04 Finance and Billing

You can keep these folder names or adjust them to match your existing Outlook structure, but the idea is simple: important emails stop hiding between promo blasts and newsletters.

Step 4 – Smart responses and actions for each category

Here is where things get fun. Once an email lands in a category, the workflow triggers tailored automations so you are not stuck replying to everything manually.

  • High Priority:
    • AI generates a draft response that you can quickly review and send
    • A Telegram alert is sent so you know something important just landed
  • Customer Support:
    • An automatic reply is sent to acknowledge the request
    • Your support team gets notified so they can jump in
  • Promotions:
    • AI creates a summary of the campaign, so you can see the key offer without scrolling through design-heavy emails
  • Finance/Billing:
    • A financial summary is generated from the email contents
    • The finance team is notified so invoices and billing updates do not slip through the cracks

The result: you spend less time staring at your inbox and more time actually acting on what matters.

Step 5 – Telegram notifications so no one misses a thing

Key actions in the workflow trigger Telegram messages, which is perfect if your team lives in chat apps more than email. You can:

  • Get instant alerts for high priority emails
  • Notify support or finance teams automatically
  • Stay updated without constantly refreshing Outlook

Just remember to update the Telegram node with your own chat ID so the messages go to the right place. Once that is set, your phone becomes a helpful notification center instead of a stress device.


Testing the workflow with Google Sheets (highly recommended)

Before turning this on for your real inbox, you can safely test the entire Outlook classifier using a Google Sheets driven email flow. This is handy for demos, debugging, or just making sure the AI behaves.

Bonus: Auto send test emails from Google Sheets

The idea is simple:

  • Store sample email data (subjects, bodies, etc.) in a Google Sheet
  • Use n8n to fetch rows from the sheet
  • Send those as emails to your Outlook mailbox
  • Watch the workflow classify and route them automatically

This lets you run multiple test cases quickly without typing out the same “fake customer email” twenty times.

Be sure to make a copy of the sample Google Sheet: Demo_Emails Sheet


Quick setup checklist

To get this n8n Outlook email classifier running smoothly, you will typically need to:

  • Configure the Microsoft Outlook Trigger node to watch your inbox
  • Set up the OpenAI / GPT-4.1-mini based Email_Classifier_Agent
  • Confirm or adjust the Routing node so it uses your preferred folder names
  • Update the Telegram node with your own chat ID and channel details
  • Optionally connect Google Sheets if you want to auto send test emails

Once configured, you can let it run and gradually fine tune categories, folder names, and message templates based on how your team works.


Why this workflow is worth implementing

Manually sorting and replying to emails is one of those tasks that feels productive but quietly eats your day. This n8n Outlook email classification template helps you:

  • Cut down inbox overload with automatic categorization
  • Respond faster with AI drafted replies and auto responses
  • Keep teams in the loop through Telegram notifications
  • Test and demo everything safely using Google Sheets driven emails

If you are serious about taming your inbox with automation, this workflow is a great starting point.

Try the template

Ready to let automation handle your email triage so you do not have to? Load up the template in n8n and start customizing it for your own setup.

Connect and learn more

For more automation ideas, workflow templates, and AI powered n8n setups:

  • Connect with the creator on LinkedIn: Sandeep Patharkar
  • Join the Skool community for tutorials, live Q&As, and exclusive n8n + AI automation content

Turn your inbox from a daily chore into an automated system that quietly works for you in the background.

Automated Outlook Email Classifier Workflow with AI

Automated Outlook Email Classifier Workflow with AI

From Overwhelmed Inbox To Focused Workday

Your inbox should support your goals, not steal your attention.

If you are constantly jumping between Outlook emails, trying to decide what matters most, you already know how much energy that decision-making drains. High priority messages get buried under promotions, finance updates mix with customer requests, and important follow-ups slip through the cracks.

Automation gives you another option. Instead of reacting to every email, you can design a system that thinks for you, sorts for you, and even drafts replies for you. That is exactly what this n8n workflow template is built to do.

This automated Outlook email classifier workflow uses AI to intelligently triage your inbox in real time, so you can focus on deep work, serve your customers faster, and give your team the clarity they need to move.

Shifting Your Mindset: Let Automation Do The First Pass

Before we dive into the details, it helps to reframe how you think about email.

Instead of treating every incoming message as a task you must personally manage, imagine a smart assistant that:

  • Reads each new Outlook email as it arrives
  • Understands what type of email it is
  • Sorts it into the right folder automatically
  • Drafts or sends responses on your behalf
  • Alerts the right people instantly on Telegram

With n8n and AI, that assistant is no longer a fantasy. It is a repeatable workflow you can set up once, refine over time, and use as a foundation for even more powerful automations.

This template is not just a tool, it is a starting point for building a more intentional, automated way of working.

What This Intelligent Email Workflow Actually Does

At its core, this n8n workflow automatically classifies incoming Outlook emails into four meaningful categories using AI:

  • High Priority
  • Customer Support
  • Promotions
  • Finance/Billing

Once classified, it takes smart, targeted actions for you:

  • Moves emails into the right Outlook folders
  • Drafts or sends AI-powered responses
  • Sends instant Telegram notifications to you or your team
  • Uses Google Sheets to help you test and validate the workflow

The result is an inbox that organizes itself, so you spend less time sorting and more time acting on what truly matters.

How The Workflow Flows: A Step-by-Step Journey

Step 1 – Capture Emails From Outlook In Real Time

The journey begins with the Microsoft Outlook Trigger node in n8n. This node continuously monitors your Outlook inbox and reacts the moment a new email lands.

Every new message is automatically captured, including its subject and body content, and passed into the workflow. No manual refresh, no extra clicks, just a constant stream of emails ready for intelligent processing.

Step 2 – Classify Each Email With AI

Next, the workflow hands off the email to an AI-powered agent named Email_Classifier_Agent, which uses the GPT-4.1-mini model.

This agent reads the subject line and email body, then decides which of the four categories best fits the content:

  • High Priority
  • Customer Support
  • Promotions
  • Finance/Billing

Instead of you scanning and guessing, the AI takes care of the first layer of decision-making. Over time, this small shift can save hours each week and dramatically reduce mental load.

Step 3 – Route Emails To The Right Outlook Folders

Once the classification is complete, a Routing node takes over. This node uses the AI result to move the email into a specific Outlook folder so your inbox stays clean and structured.

The workflow routes messages as follows:

  • High Priority01 High Priority
  • Customer Support02 Customer Support
  • Promotions03 Promotions
  • Finance/Billing04 Finance and Billing

With this in place, you can open Outlook and instantly see what needs attention first, instead of hunting through a long list of mixed messages.

Step 4 – Trigger Smart, Category-Based Automations

Classification and routing are only the beginning. The real power comes from what happens next. For each category, the workflow triggers tailored actions that move work forward automatically.

  • High Priority
    For mission-critical messages, the workflow:
    • Automatically drafts a response email so you are never starting from a blank page
    • Sends a Telegram alert to you or your team so high impact emails get immediate attention
  • Customer Support
    For support-related emails, the workflow:
    • Generates an AI-powered reply to the customer, helping you respond faster and more consistently
    • Notifies the support team via Telegram so they can follow up or take over when needed
  • Promotions
    For marketing, newsletters, and promotional content, the workflow:
    • Summarizes the key points of incoming promotional emails
    • Sends those summaries and notifications to the relevant team so they can decide what is worth acting on
  • Finance/Billing
    For financial or billing messages, the workflow:
    • Creates a concise financial summary that highlights what matters
    • Notifies the finance team promptly through Telegram so important invoices or billing updates are not missed

Each branch of this workflow is an opportunity to reclaim time, reduce manual effort, and keep your team aligned.

Step 5 – Stay In Sync With Telegram Notifications

Throughout the workflow, key events trigger Telegram messages. You can choose who gets notified and for which categories, but by default the workflow keeps you updated on:

  • New high priority emails
  • Customer support replies
  • Important promotional summaries
  • Finance and billing updates

This means you and your team do not need to live inside Outlook to stay informed. Telegram becomes your real-time alert channel, freeing your inbox from being your main notification system.

Step 6 – Validate And Experiment With Google Sheets

To help you test and refine your setup, the workflow includes a Google Sheets integration that sends test emails through the system.

This is particularly useful when you are:

  • Verifying that classification into the four categories is accurate
  • Checking that routing to Outlook folders works as expected
  • Confirming that Telegram notifications are reaching the correct chat IDs

By running controlled tests from Google Sheets, you can confidently tweak and improve the workflow before fully relying on it for your daily email load.

Why This n8n Workflow Can Transform Your Day

This Outlook email classifier template is more than a neat automation. It is a practical step toward a more focused, less reactive way of working.

  • Saves valuable time by taking over tedious inbox triage so you can invest your energy in higher value work.
  • Increases responsiveness with instant Telegram notifications and AI-generated drafts that speed up replies.
  • Improves organization through automatic sorting into clearly named Outlook folders, which makes priorities obvious at a glance.
  • Supports your team by streamlining communication and distributing workload across support, finance, and other stakeholders.

As you use it, you can extend it with more categories, extra conditions, or integrations with your CRM, project management tools, or internal dashboards. This template is a foundation you can build on, not a fixed endpoint.

Customize It For Your World

To make this workflow truly yours, you will want to adapt a few details to match your environment:

  • Update your Telegram chat IDs so alerts go to the correct users or groups
  • Configure your Outlook credentials and folders if you use different naming conventions
  • Adjust the AI prompts or logic in the Email_Classifier_Agent if your categories or tone need fine tuning

Once these are set, you can gradually iterate. Start simple, observe how the workflow behaves, and keep refining. Every small improvement compounds into more clarity and more saved time.

Your Next Step: Start Automating, Then Keep Evolving

You do not have to overhaul your entire tech stack to feel the benefits of automation. Sometimes a single, well designed workflow can change how you experience your workday.

This Outlook email classifier powered by n8n and OpenAI is one of those workflows. It quietly handles the repetitive parts of email management so you can stay present for the work that really moves your business or career forward.

Set it up, experiment, tweak, and let it grow alongside you. Every improvement you make here is an investment in a more focused, less distracted future.

Note: Remember to update your Telegram chat IDs and email credentials to match your own setup before putting the workflow into full production.

Automate Personalized Email Replies with Google Sheets and AI

Automate Personalized Email Replies with Google Sheets, Gmail, and AI in n8n

Overview

This n8n workflow template automates the generation and delivery of personalized email replies by orchestrating three main services: Google Sheets for lead intake, Gmail for sending messages, and an AI language model for drafting responses. It is designed for users who already understand n8n concepts such as nodes, triggers, credentials, and data mapping, and want a robust, repeatable way to scale 1-to-1 style communication.

At a high level, the workflow:

  • Reads structured lead data from a Google Sheet.
  • Retrieves your Gmail sendAs identity to build a consistent email signature.
  • Uses an LLM node to generate an HTML email body tailored to each lead.
  • Sends the final email via Gmail, with a subject line derived from the lead’s intent.

Workflow Architecture

The template is typically executed on a schedule or via a manual trigger, then processes one or more rows from a Google Sheet, passing each row through a series of nodes. The core data flow looks like this:

  1. Lead Intake (Google Sheets node)
    Reads lead information such as email address, first name, intent, and the reason they reached out.
  2. Sender Identity Retrieval (HTTP Request node to Gmail API)
    Calls Gmail’s sendAs endpoint to obtain your display name, used later in the email signature.
  3. Email Draft Generation (LLM node)
    Combines lead data and sender display name into a structured prompt for the language model, which returns an HTML email body.
  4. Email Delivery (Gmail node)
    Sends the generated HTML to the lead’s email address, with a subject line prefixed by Re: and the lead’s intent.

Data Model and Prerequisites

Google Sheets Structure

The workflow assumes that a specific Google Sheet is used as the source of truth for lead data. At minimum, the following columns must be present:

  • Email ID – The recipient’s email address. This value is mapped to the Gmail node’s to field.
  • First Name – Used by the LLM node to personalize the greeting.
  • Intent – A short description of what the lead is interested in or asking about. This is used both in the AI prompt and as part of the outbound subject line.
  • Why They Sent Email – A more detailed explanation of the lead’s request or context, which the AI uses to craft a specific and relevant reply.

Before running the workflow, replace any placeholder Document ID and Sheet ID values in the Google Sheets node with the actual identifiers for your spreadsheet. Incorrect or missing IDs will prevent the workflow from reading data.

Required Credentials

To successfully run the workflow, you must configure the following credentials in n8n:

  • Google Sheets credentials – For read access to the lead data sheet.
  • Gmail credentials – Used both by the HTTP Request node (for the sendAs identity lookup) and by the Gmail node (for sending messages).
  • OpenAI (or compatible LLM) credentials – For the language model node that generates the email body.

Ensure that the Gmail account used for the HTTP Request node and the Gmail node is the same account whose display name you want to appear in the signature.

Node-by-Node Breakdown

1. Lead Intake from Google Sheets

The workflow begins with a Google Sheets node configured to read rows from the target spreadsheet. This node typically runs in “Read” mode, pulling one or more rows that represent new or unprocessed leads.

  • Key parameters:
    • Document ID – The ID of the Google Sheet document.
    • Sheet ID or Sheet Name – The specific sheet tab that contains the lead data.
    • Column names mapping to:
      • Email ID
      • First Name
      • Intent
      • Why They Sent Email

This node outputs one item per row. Each item carries the lead-specific fields that will be referenced later by the LLM and Gmail nodes.

2. Fetch Sender Identity from Gmail

Next, an HTTP Request node queries the Gmail API to retrieve your sendAs configuration, in particular your display name. This display name is used to construct a human, branded signature at the end of the AI-generated email.

  • Purpose: Obtain the sender’s display name to ensure consistent, professional sign-offs.
  • Data consumed: Gmail account credentials configured in n8n.
  • Data produced: A JSON response that includes the sendAs identity, from which the display name is extracted and passed to the LLM node.

If the HTTP Request node fails or returns no sendAs records, the LLM node may not receive a valid display name. In such cases, the email body can still be generated, but the signature may be incomplete or generic, depending on how the prompt is constructed.

3. Draft Generation via AI Language Model

The central part of the workflow is the language model node (LLM node). It receives a combination of lead data from the Google Sheets node and sender identity from the HTTP Request node, then generates a fully formatted HTML email body.

  • Inputs to the prompt:
    • Recipient’s first name (First Name).
    • Lead intent (Intent), which describes the topic or request.
    • Detailed context (Why They Sent Email), used to make the response specific and relevant.
    • Sender display name from Gmail sendAs, used in the closing signature.

The prompt is crafted so that the LLM:

  • Produces a friendly, helpful, and context-aware reply.
  • Outputs valid HTML suitable for use as an email body.
  • Excludes the subject line from the generated content, since the subject is constructed separately in the Gmail node.

The LLM node should be configured with the appropriate OpenAI (or compatible) model and your API credentials. Any misconfiguration here will result in failed or empty responses, which will in turn cause the Gmail node to send incomplete emails or fail entirely.

4. Sending the Personalized Email via Gmail

The final processing step is a Gmail node that dispatches the AI-generated reply to each lead. This node consumes both the HTML body produced by the LLM and the lead metadata from the Google Sheets node.

  • Key configuration details:
    • to – Mapped from the Email ID column of the Google Sheet.
    • subject – Constructed as Re: <Intent>, where <Intent> is the value from the lead record.
    • body – The HTML string output from the LLM node.
    • emailType – Must be set to html so that the email renders as formatted HTML instead of plain text.

If emailType is not set to html, the recipient will see raw HTML tags instead of a properly formatted message. Ensure this parameter is explicitly configured in the node.

Configuration Notes and Setup Checklist

Google Sheets Configuration

  • Confirm that the Document ID and Sheet ID or Sheet Name in the Google Sheets node match your actual spreadsheet.
  • Verify that the column names exactly match those referenced in the workflow (Email ID, First Name, Intent, Why They Sent Email), or adjust the node mappings accordingly.
  • Optionally, filter rows to avoid reprocessing leads that have already received a reply.

Gmail and Identity Retrieval

  • Set up Gmail credentials in n8n and test them in both the HTTP Request node and the Gmail node.
  • Ensure the Gmail account has a configured sendAs identity with the display name you want to appear in your signature.
  • If multiple sendAs identities exist, ensure the workflow selects the correct one in the HTTP Request node’s response parsing.

LLM Node and OpenAI Configuration

  • Provide a valid OpenAI (or equivalent) API key in the credentials configuration.
  • Select the desired model in the LLM node, consistent with your usage limits and latency requirements.
  • Confirm that the prompt template references all required fields (first name, intent, reason, display name) using correct n8n expression syntax.

Behavior, Edge Cases, and Error Considerations

While the template is straightforward, a few practical considerations help ensure stable operation:

  • Missing or invalid lead data: If any of the key fields (especially Email ID) are empty or malformed, the Gmail node may fail or send to an incorrect address. Consider adding validation or conditional checks before the send step.
  • Unavailable Gmail display name: If the HTTP Request node cannot retrieve a display name, the LLM prompt may need a fallback value. Without it, the email can still be sent but the signature may be less polished.
  • HTML rendering issues: If the LLM output contains malformed HTML, some email clients may not render the message as expected. Keeping the prompt instructions clear and concise helps maintain valid HTML structure.
  • Rate limits and scaling: When processing many rows at once, consider API rate limits for both Gmail and the LLM provider. The template is capable of handling multiple leads because it reads multiple rows from Google Sheets, but external limits still apply.

Benefits of Using This n8n Workflow Template

  • Automation – Automatically responds to incoming leads without manual drafting, reducing repetitive work.
  • Personalization – Each reply is uniquely tailored using the lead’s intent and their detailed reason for contact.
  • Scalability – By reading multiple rows from Google Sheets, the workflow can respond to many leads in a single run.
  • Consistent Branding – The Gmail display name is used in the signature, ensuring that all replies reflect your professional identity.

Getting Started: Implementation Checklist

Before activating the workflow, verify the following:

  • You have a Google Sheet with the required columns and real lead data.
  • Google Sheets, Gmail, and OpenAI (or compatible LLM) credentials are configured and tested in n8n.
  • The Google Sheets node uses your actual Document ID and Sheet ID.
  • The HTTP Request node is correctly pointed to the Gmail sendAs endpoint and uses the appropriate Gmail credentials.
  • The LLM node is configured with the correct model and a prompt that instructs the AI to:
    • Generate a friendly, specific, and helpful reply.
    • Output HTML only, without a subject line.
  • The Gmail node has emailType set to html and constructs the subject as Re: <Intent>.

Advanced Customization Ideas

Once the base template is working, you can extend it in several ways:

  • Introduce filters or conditions so only new or high-priority leads are processed.
  • Log sent emails to another Google Sheet or a database for auditing and analytics.
  • Adjust the LLM prompt to support different tones, languages, or product lines.
  • Add additional nodes to tag leads in a CRM after the email is sent.

Next Steps

If you already use n8n for automation, this template provides a fast way to scale personalized email replies without sacrificing quality. With Google Sheets as a simple interface for lead intake, Gmail for reliable delivery, and an AI model for content generation, you can streamline lead management and improve response times with minimal ongoing effort.

Configure your credentials, connect your sheet, and enable the workflow to start sending tailored replies automatically.

How to Automate Personalized Email Replies with n8n

How to Automate Personalized Email Replies with n8n

Why Bother Automating Email Replies?

If your inbox is constantly filling up with new leads or inquiries, you know how hard it is to keep up and still sound personal in every reply. You want to respond quickly, but you also want each person to feel like you actually read their message, right?

This is where n8n can really shine. With a simple workflow, you can:

  • Pull lead details from a Google Sheet
  • Use OpenAI (or another language model) to write a personalized reply
  • Send that reply automatically through Gmail in a nicely formatted HTML email

So instead of typing out the same kind of responses over and over, you set things up once and let the workflow handle the heavy lifting.

What This n8n Workflow Template Actually Does

Let’s start with the big picture. This n8n workflow template connects three main tools you probably already use:

  • Google Sheets – where your lead data lives
  • Gmail – your email sending engine
  • OpenAI’s language model – the brain that writes the personalized replies

The workflow follows this basic flow:

  1. Read lead data from a Google Sheet
  2. Fetch your Gmail sender identity so your name appears correctly
  3. Generate a tailored HTML email reply using an LLM
  4. Send the personalized email through Gmail

Once it is set up, you just add new leads to the sheet, trigger the workflow, and n8n takes care of everything else.

When Should You Use This Template?

This workflow is ideal if you:

  • Get a lot of similar inbound emails from leads or prospects
  • Want to respond faster without sacrificing personalization
  • Already track leads in a spreadsheet or CRM that can export to Google Sheets
  • Use Gmail as your main email account

Think of use cases like:

  • Replying to demo or trial requests
  • Following up with people who filled out a “contact us” form
  • Responding to common inquiries about pricing, features, or availability

If you are doing any of that manually right now, this n8n template will make your life a lot easier.

Why This Workflow Makes Your Life Easier

  • Time-saving – No more copying, pasting, and rewriting nearly identical replies all day.
  • Consistent personalization – Every email uses the lead’s name, intent, and message context to feel human and relevant.
  • Scalable – Got 10 leads? 100? Just drop them into the Google Sheet. The workflow does not need to change.
  • Professional look – Your Gmail display name is used in the signature so everything stays on-brand and polished.

Step-by-Step: How the n8n Workflow Works

Step 1: Lead Intake with Google Sheets

The whole process starts with a simple Google Sheet. Think of it as your “inbox” for the automation.

Your sheet should have columns like:

  • Email ID
  • First Name
  • Intent (for example, “Requesting a demo” or “Asking about pricing”)
  • Why They Sent Email (the message or context they provided)

In n8n, you use the Google Sheets node to read this data. When you trigger the workflow manually, this node pulls in each row as an item that the rest of the workflow can use.

At this stage, n8n is basically gathering everything the AI will need to write a meaningful reply: who the person is, why they reached out, and what they care about.

Step 2: Fetch Your Sender Identity from Gmail

Next, you probably want your replies to look like they came directly from you, not from some generic system. That is where the Gmail sender identity comes in.

Using an HTTP Request node, the workflow calls Gmail’s API to fetch your sendAs profiles. This gives you details like your Gmail display name.

Why does this matter? Because that display name can be used in the signature of your AI-generated emails. It keeps everything consistent and professional, and it feels more personal to the recipient.

Step 3: Generate a Personalized Draft with a Language Model

Now comes the fun part: letting the AI write the email for you.

With the lead data and your sender identity in hand, the workflow calls a language model such as OpenAI’s GPT using an LLM node.

The prompt passed to the model usually includes things like:

  • The lead’s first name
  • Their intent or reason for contacting you
  • Their original message or context from the sheet
  • Details about how you want the email to sound and how it should be signed

The model then returns a complete email reply in HTML format. Using HTML is important because it lets you use formatting like paragraphs, links, and bold text, which looks much better in email clients.

Step 4: Send the Personalized Email via Gmail

Once the AI has written the draft, the final step is to send it out through Gmail.

In n8n, you configure a Gmail node with settings such as:

  • Recipient – Set dynamically from the Email ID column in your Google Sheet.
  • Subject line – Often something like Re: [Intent], where the intent is pulled directly from the lead data.
  • Email body – The HTML content generated by the language model.
  • emailType – Set to html so the email renders with rich formatting.

Once this node runs, your lead receives a personalized, nicely formatted response that looks like you sat down and typed it yourself.


How to Get Started With This n8n Template

Ready to try this out in your own setup? Here is a simple checklist to follow:

  1. Prepare your Google Sheet
    Create a sheet with columns for Email ID, First Name, Intent, and Why They Sent Email. Add a few test leads so you can see the workflow in action.
  2. Connect your accounts in n8n
    Set up credentials for:
    • Google Sheets – so n8n can read your lead data
    • Gmail – so it can send emails on your behalf
    • OpenAI (or your chosen LLM) – so it can generate the email replies
  3. Import the workflow template
    Bring the template into your n8n instance, then replace any placeholder document IDs and sheet identifiers with your own Google Sheet details.
  4. Run a manual test
    Use the manual trigger in n8n, watch the workflow run, and then check your Gmail “Sent” folder and the test recipient’s inbox to confirm everything looks right.

FAQ

Can I customize the email signature?

Absolutely. You can edit the prompt in the LLM node to change how the signature is written. You might include your full name, role, company, or any standard footer you usually add to emails.

Is this setup secure?

Security depends on how you manage your credentials. Make sure your API keys and account credentials are stored safely within n8n, and limit access to your n8n instance to trusted users only.


Wrapping Up

This n8n workflow is a simple but powerful way to bring together Google Sheets, OpenAI, and Gmail so you can handle email communication more efficiently without losing the personal touch.

Instead of juggling a crowded inbox and typing the same responses over and over, you set up the automation once, keep your sheet updated, and let n8n and the AI handle the rest.

Want to try it yourself? You can start exploring n8n here:

Start building your workflow with n8n today

Automate Feedback Collection and Reporting with n8n Workflow

Automate Feedback Collection and Reporting with n8n (So You Never Copy-Paste Again)

Picture This: You, Drowning in Feedback

Your inbox is full of feedback emails, your Google Sheet has more tabs than your browser, and someone just asked, “Can you send a quick summary of recent feedback?”

Sure, you could copy-paste, sort, filter, summarize, and then write a neat email digest. Again. For the 37th time this month.

Or you could let an n8n workflow quietly handle all of that while you enjoy coffee that is not yet cold.

What This n8n Workflow Actually Does

This workflow is your all-in-one helper for feedback. It:

  • Collects feedback notes or emails into Google Sheets
  • Uses an AI agent (Azure OpenAI Chat Model) to analyze and enrich that feedback
  • Saves the processed insights back into Google Sheets for tracking
  • Summarizes recent feedback
  • Sends a clean, readable email digest with the latest insights

In other words, it turns a messy pile of comments into a structured, AI-enhanced report, then emails it to you or your team automatically. No more manual compiling or late-night spreadsheet archaeology.

Core Building Blocks of the Workflow

Here is a quick overview of the main parts inside the n8n template and what each one does behind the scenes.

1. Manual Trigger

The workflow starts with a Manual Trigger. You can run it on demand from n8n, or later connect it to a schedule if you want regular digests (for example daily or weekly).

2. Google Sheets – Get Rows

Next, the workflow uses the Google Sheets – Get Rows node to pull in your existing feedback entries from a specific sheet. This is where all the raw notes or emails are stored.

3. Extract Notes/Emails

Then an Extract Notes/Emails step parses the relevant text from each row. It grabs the actual feedback content so the AI agent has something meaningful to work with.

4. Loop Over Items

The Loop Over Items logic processes each feedback entry one by one. Instead of dumping everything into the AI at once, it treats each piece of feedback individually, which makes the analysis more accurate and easier to store.

5. AI Agent (Azure OpenAI Chat Model)

Here is where the magic happens. The AI Agent uses the Azure OpenAI Chat Model to:

  • Analyze the feedback content
  • Generate insights or categorization
  • Enrich the data with structured fields that are easier to report on

6. Edit Fields & Parse AI Response

After the AI responds, the Edit Fields & Parse AI Response step cleans things up. It refines the AI output, extracts the important parts, and formats them so they can be stored neatly in your spreadsheet.

7. Save to Google Sheets

The Save to Google Sheets node then writes this processed feedback back into your sheet. This gives you a living, structured database of feedback plus AI-generated insights, all in one place.

8. Fetch Google Sheet Data & AI Agent1

Once your feedback is processed and stored, the workflow uses another Fetch Google Sheet Data step to pull the latest entries. It then calls a second AI Agent interaction (often labeled as AI Agent1) to summarize this recent data into a digestible report.

9. Filter Recent Data

The Filter Recent Data step makes sure the email digest focuses on what is actually new. It filters the summarized results by recency, so you only see feedback from your chosen time window.

10. Send Email Digest

Finally, the Send Email Digest node sends out an email containing the summarized feedback. Your team gets a clear, up-to-date overview without anyone manually compiling it. Instant relief from report-building fatigue.

How the Whole n8n Workflow Flows Together

Here is the big picture of how everything connects inside n8n:

  1. You trigger the workflow manually, or via a schedule if you configure that later.
  2. n8n fetches all feedback entries from your designated Google Sheet.
  3. The workflow extracts the actual notes or email content from each row.
  4. Each feedback item is processed in a loop, one at a time.
  5. The Azure OpenAI Chat Model analyzes each item and generates insights or categorized responses.
  6. The AI output is parsed and cleaned up, then stored back into Google Sheets for tracking.
  7. Once the data is enriched, the workflow fetches the latest processed entries.
  8. A second AI step generates a summary report from this recent data.
  9. The workflow filters that summary to only include the most recent feedback.
  10. An email digest is sent, giving you and your team a concise, AI-enhanced feedback report.

The result is a smooth feedback automation loop that keeps everyone informed without constant manual effort.

Why Automate Feedback Collection and Reporting with n8n?

Aside from saving your sanity, this workflow has some very practical benefits.

  • Time-Saving: Repetitive tasks like collecting, cleaning, and summarizing feedback are handled by n8n, not by you. That is hours back every week.
  • AI-Enhanced Insights: The Azure OpenAI Chat Model helps surface patterns, summaries, and useful context that are hard to spot in raw text.
  • Seamless Integration: It connects Google Sheets and your email service inside one workflow, so everything stays in sync.
  • Customizable and Scalable: You can adapt the workflow to different data sources, additional fields, or new reporting formats as your feedback process grows.

Simple Setup Guide: Getting Started With the Template

Once you load this n8n template, you will mainly:

  • Connect your Google Sheets credentials and select the sheet where feedback is stored
  • Configure your Azure OpenAI credentials for the AI Agent nodes
  • Point the Send Email Digest node to the right recipients and email service
  • Optionally adjust filters or time ranges for what counts as “recent” feedback

After that, you can trigger the workflow manually to test it, review the results in Google Sheets and your inbox, then decide if you want to add a schedule so it runs automatically.

Tips, Tweaks, and Next Steps

  • Fine-tune AI prompts: Inside the AI Agent nodes, you can adjust the prompt to change how feedback is analyzed or summarized.
  • Expand your data sources: If your feedback comes from more than one place, you can add extra nodes before Google Sheets to pull data from other tools.
  • Customize the digest: Edit the email template so the digest matches your brand voice or internal reporting style.
  • Iterate as you go: Start simple, then refine filters, columns, and AI outputs once you see the workflow in action.

Ready to Let Automation Handle the Boring Parts?

If you are done manually wrangling feedback and stitching together reports, this n8n workflow is a straightforward way to upgrade your process. It combines Google Sheets, AI-powered analysis, and automated email digests into one smooth system that keeps your team informed and your time free for more important work.

Set it up once, then let it quietly run in the background while you focus on actually using the feedback instead of just organizing it.

Automate Feedback Management with AI and Google Sheets

Automate Feedback Management with AI and Google Sheets

Why Automating Feedback Feels Like a Superpower

If you have feedback scattered across spreadsheets, emails, and notes, you probably know how painful it can be to actually do something useful with it. Reading through comments, trying to spot trends, writing summaries for your team – it all takes time you probably do not have.

This is where an automated feedback workflow with n8n, Google Sheets, and Azure OpenAI really shines. Instead of manually copying, pasting, and analyzing, you can let automation pull in feedback, run it through AI for insights, and send you a neat email summary. All while keeping everything neatly stored in Google Sheets.

In this article, we will walk through an n8n workflow template that does exactly that, and we will talk about what it does, when to use it, and why it makes your life a lot easier.

What This n8n Workflow Template Actually Does

At a high level, this workflow:

  • Pulls feedback from a Google Sheet
  • Cleans and extracts the relevant text (like notes or email content)
  • Loops through each feedback item and sends it to AI for analysis
  • Formats and parses the AI results into structured data
  • Saves everything back into Google Sheets
  • Filters the most recent feedback and sends an email digest

It uses:

  • n8n for automation and workflow orchestration
  • Google Sheets for storing raw and processed feedback
  • Azure OpenAI chat models for AI-powered analysis and summarization

So instead of spending your time digging through rows, you get a system that quietly does the heavy lifting in the background.

When Should You Use This Feedback Automation?

This workflow is perfect if you:

  • Collect feedback in Google Sheets, whether from forms, support tickets, or manual input
  • Want AI to help analyze and summarize customer comments
  • Need regular email digests of what users are saying
  • Are tired of manually updating spreadsheets and reports

It works especially well for product teams, customer support, marketing, or anyone running surveys and trying to make sense of the results.

How the Workflow Flows: From Raw Feedback to Email Digest

Step 1 – Manually trigger the workflow

You start things off with a manual trigger node called When clicking ‘Execute workflow’. This gives you full control over when the feedback processing runs.

Maybe you want to run it once a day after new responses come in, or only right before your weekly team meeting. In any case, you just hit execute and the workflow gets to work.

Step 2 – Pull feedback data from Google Sheets

Next, the workflow reaches into your spreadsheet using the Get row(s) in sheet node. This node grabs all the raw feedback stored in your Google Sheet.

Typically, this sheet includes things like user notes, comments, or email content. At this point, the data is still messy and unprocessed, but that is exactly what the later steps will fix.

Step 3 – Extract the actual feedback text

Not every column in your sheet is equally useful for analysis. That is where the Extract Notes/Emails code node comes in.

This node goes through the raw sheet data and pulls out the parts you really care about, such as:

  • Free-text feedback fields
  • Notes from support tickets
  • Email body content

By the end of this step, the workflow has a clean list of feedback items that are ready for AI to analyze.

Step 4 – Loop through each feedback item

Instead of sending everything to the AI in one giant chunk, the workflow uses the Loop Over Items node to process each piece of feedback one by one.

This is helpful because it:

  • Ensures each comment gets its own tailored AI analysis
  • Makes it easier to store structured results per feedback item
  • Prevents things from getting mixed up or misaligned in your sheet

Letting AI Do the Heavy Thinking

Step 5 – Analyze and summarize with Azure OpenAI

Here is where the magic happens. The workflow uses two AI agents powered by Azure OpenAI Chat Models:

  • AI Agent
    This agent receives each feedback item, analyzes it, and creates a refined output. The result is then passed into an Edit Fields node so you can format the AI response into clear, structured fields that fit neatly into your sheet.
  • AI Agent1
    After the Google Sheet has been updated with processed feedback, this second AI agent can run additional analysis or filtering on the more recent data. This is useful if you want a higher level summary or extra insights on the latest comments.

In practice, these agents can help you quickly understand sentiment, themes, or key points from each piece of feedback without you having to read everything in detail.

Step 6 – Clean up and parse the AI responses

Once the AI has done its job, the workflow needs to turn those responses into something your spreadsheet can actually use.

Two nodes handle this part:

  • Edit Fields adjusts the structure of the AI output. You can rename fields, map values, and make sure everything lines up with your Google Sheets columns.
  • Parse AI Response is a code node that parses the AI’s text or JSON into a more structured format, preparing it for clean storage.

The result is nicely organized data that is easy to filter, sort, and review later.

Keeping Everything Organized in Google Sheets

Step 7 – Save processed feedback back into Google Sheets

After parsing, the workflow uses the Save to Google Sheets node to write the processed feedback and AI insights into a sheet.

You can store it in:

  • The original Google Sheet that holds your raw feedback, or
  • A dedicated sheet meant just for processed and enriched data

Either way, you end up with a central place where both the original comments and the AI-generated insights live side by side.

Step 8 – Filter recent feedback and send an email digest

Now for the part your stakeholders will love: the digest email.

The workflow:

  1. Fetches all updated data from the Google Sheet again
  2. Uses a code node called Filter Recent Data to pick out only the most recent records
  3. Sends this filtered information into the Send Email Digest node

The email digest can highlight:

  • Recent trends in feedback
  • Notable issues or praises
  • Any patterns the AI has picked up

This means your team gets regular, easy-to-read updates without anyone needing to manually compile reports.

Why This Automated Feedback Workflow Makes Life Easier

  • Huge time savings
    No more copying feedback into documents, manually summarizing, or building reports from scratch. The workflow handles data extraction, processing, and reporting for you.
  • Smarter insights with AI
    Azure OpenAI chat models help you interpret nuanced feedback, spot themes, and pull out key points that are easy to miss when you are skimming quickly.
  • Always up-to-date spreadsheets
    Google Sheets stays in sync with the latest processed feedback and AI results, so your data is always current and accessible to your team.
  • Effortless reporting
    Email digests keep stakeholders informed without extra work. Everyone stays aligned on what customers are saying, even if they never open the spreadsheet.

How to Set This Workflow Up in Your Own n8n Instance

Getting started is easier than it might sound. Here is the basic setup process:

  1. Prepare your Google Sheet
    Make sure your feedback data is in a Google Sheet, with columns for things like notes, comments, or email content. Then configure your Google Sheets credentials in n8n so the workflow can read and write data.
  2. Connect Azure OpenAI
    Set up your Azure OpenAI credentials in n8n and link them to the AI Agent and AI Agent1 nodes. This is what enables the AI analysis and summarization.
  3. Customize the email digest
    Open the Send Email Digest node and add your preferred recipients, subject line, and message template. You can tailor the email content to match your team’s style or reporting needs.

Once everything is connected, you can manually trigger the workflow and watch the entire feedback pipeline run from start to finish.

Ready To Let AI Handle Your Feedback Loop?

Automating feedback management with n8n, Google Sheets, and Azure OpenAI takes a process that is usually tedious and turns it into something almost effortless.

You save time, reduce manual errors, and get richer insights that help you improve your product or service faster. Instead of wrestling with spreadsheets, you can focus on what really matters: acting on what your customers are telling you.

Connect your Google Sheets, plug in your Azure OpenAI setup, and give this AI-powered feedback workflow a try. It might just become your new favorite part of your automation stack.

Automate Receipt Data Extraction with AI and Airtable

Automate Receipt Data Extraction with AI and Airtable

What You Will Learn

In this guide, you will learn how to use an n8n workflow template that automatically extracts data from receipts with AI, then stores it neatly in Airtable. By the end, you will understand:

  • How the workflow connects Google Drive, an AI extraction agent, and Airtable
  • What types of receipt files are supported and how they are processed
  • How AI reads key data like totals, dates, and merchant names from receipts
  • How the workflow formats and saves that data into Airtable records
  • What you need to set up before using this n8n template

Concept Overview: How the Workflow Fits Together

This n8n workflow template is designed to remove manual data entry from your receipt management process. It combines:

  • Google Drive as the input source where receipts are uploaded
  • VLM Run AI agent to extract structured data from receipt images or PDFs
  • Airtable as the database to store and organize the extracted information

Once configured, the workflow watches a specific folder in Google Drive. Whenever you upload a new receipt, the workflow:

  1. Detects and downloads the file
  2. Sends it to the AI agent for data extraction
  3. Formats the extracted fields
  4. Creates or updates a record in Airtable with the cleaned data

The result is an automated pipeline that turns raw receipt files into searchable, structured records without manual typing.

Key Components of the n8n Receipt Workflow

1. Input: Monitoring and Downloading Receipts from Google Drive

The first part of the workflow focuses on capturing new receipts as soon as they appear. In n8n, this is typically handled by a Google Drive trigger or polling node that:

  • Watches a specific folder in Google Drive where you or your team upload receipts
  • Detects when a new file is added
  • Automatically downloads the file for processing

The workflow can handle a wide range of receipt formats, including:

  • Image files like JPG, PNG, and WEBP
  • PDF receipts and scanned documents
  • Photos taken with a mobile phone camera

This flexibility means you can snap a picture of a receipt on the go, upload it to the shared Drive folder, and let the automation handle the rest.

2. AI-Powered Receipt Data Extraction with VLM Run

Once a receipt file has been downloaded, the workflow passes it to the VLM Run AI agent. This is the core of the automation, where the actual receipt data extraction happens.

The AI agent uses OCR and advanced text recognition to scan the content of the receipt. It then identifies and extracts key fields such as:

  • Merchant name – the store, vendor, or service provider
  • Customer information – if present on the receipt
  • Total amount – the final amount charged
  • Currency – for example USD, EUR, etc.
  • Transaction date – the date the purchase was made

The VLM Run AI agent is designed to work with:

  • Different receipt layouts and formats
  • Varying fonts and text placements
  • Lower quality images or slightly skewed photos

This makes the workflow robust in real-world conditions, where receipts are not always perfectly scanned or formatted.

3. Structuring Data and Sending It to Airtable

After the AI agent returns the extracted data, the workflow moves into the data formatting stage. Raw AI output is cleaned and organized into a consistent structure that is ready for database storage.

Typical steps at this stage can include:

  • Normalizing date formats so they match your Airtable schema
  • Ensuring numeric values like totals are correctly parsed
  • Mapping AI output fields to Airtable column names

Once the data is structured, the n8n workflow uses the Airtable node to:

  • Create a new record in your chosen Airtable base and table
  • Store all relevant fields, such as merchant, total, currency, date, and any customer details

This centralizes your receipt information and makes it easy to:

  • Track expenses over time
  • Export data for reporting or accounting
  • Filter, sort, and analyze spending patterns directly in Airtable

Why Automate Receipt Extraction with n8n, AI, and Airtable

Automating this process provides several practical benefits for both individuals and teams.

  • Efficiency – No more manual typing of receipt details into spreadsheets or tools, which speeds up expense reporting.
  • Accuracy – AI-driven OCR reduces common human errors like typos or misreading amounts.
  • Real-time updates – As soon as a receipt is uploaded, your Airtable records can be updated, keeping financial data current.
  • Mobile-friendly workflow – Since receipts can be uploaded from phones to Google Drive, you can capture expenses while traveling or working remotely.
  • Scalability – The same workflow can handle a handful of receipts or hundreds per week without adding more manual work.

Common Use Cases for This n8n Workflow Template

This AI-powered receipt extraction workflow can support many scenarios, including:

  • Business expense management and internal auditing of spending
  • Personal finance tracking and budgeting with categorized receipts
  • Accounting process automation for agencies or firms that manage multiple clients
  • Travel and reimbursement handling for teams that submit receipts for trips, mileage, or client visits

Step-by-Step: Getting Started with the Template

Step 1 – Prepare Your Accounts and Credentials

Before using the n8n template, make sure you have the following:

  • Access to the VLM Run AI API for receipt data extraction
  • A Google Drive account with OAuth2 credentials configured in n8n
  • An Airtable account with OAuth2 credentials set up in n8n

These connections allow n8n to securely communicate with each service and automate the workflow end to end.

Step 2 – Set Up Your Google Drive Receipt Folder

Create or choose a dedicated folder in Google Drive that will act as your receipt inbox. In the workflow configuration, you will point the Google Drive node to this folder so that:

  • Any new file uploaded here triggers the workflow
  • Receipts are automatically downloaded for AI processing

You can share this folder with your team so everyone can drop receipts in the same place.

Step 3 – Configure Your Airtable Base

Next, set up an Airtable base and table that will store the extracted data. Include fields such as:

  • Merchant name
  • Customer information (if needed)
  • Total amount
  • Currency
  • Transaction date
  • Optional notes or tags

In the n8n Airtable node, map each extracted field from the AI agent to the corresponding column in your table.

Step 4 – Connect the AI Agent in n8n

Within the n8n workflow template, locate the node that calls the VLM Run AI agent. Configure it with your API access and verify that:

  • The input file from Google Drive is correctly passed to the AI node
  • The AI output includes the fields you expect, such as merchant, total, and date

This is where you can also test one sample receipt to confirm that the extraction is working as intended.

Step 5 – Test the Full Workflow

Once all nodes are connected and credentials are in place:

  1. Upload a test receipt image or PDF to your Google Drive receipt folder
  2. Watch the workflow in n8n as it runs through each step
  3. Check your Airtable base to confirm that a new record was created with the correct information

If the data looks correct, your automation is ready for regular use.

Quick Recap

This n8n workflow template automates receipt data extraction by:

  • Monitoring a Google Drive folder for new receipt uploads
  • Downloading receipt files in formats like JPG, PNG, WEBP, and PDF
  • Using the VLM Run AI agent to extract key fields via OCR
  • Formatting and inserting the cleaned data into an Airtable base

The result is a streamlined, accurate, and scalable way to manage receipts for personal or business use.

FAQ

What types of receipts can this workflow handle?

The workflow supports images (JPG, PNG, WEBP), PDFs, scans, and photos taken with mobile cameras. The AI agent is designed to handle different layouts and less-than-perfect image quality.

Do I need to manually run the workflow each time?

No. Once configured, the n8n workflow can run automatically whenever a new file appears in the specified Google Drive folder.

Can I customize the fields stored in Airtable?

Yes. You can adjust the Airtable table structure and the field mapping in n8n to match your specific reporting or accounting needs.

Is this setup suitable for teams?

Yes. Teams can share the same Google Drive folder and Airtable base. This allows multiple people to upload receipts while keeping all extracted data centralized.

Start Automating Your Receipt Management

If you are ready to cut down on manual data entry and make your expense tracking more reliable, this n8n template is a practical way to get started. Connect Google Drive, the VLM Run AI agent, and Airtable, then let the workflow handle the repetitive work for you.

Set up your Google Drive receipt folder and Airtable base today, then plug in the template to see how quickly your receipt management process becomes seamless.